background image

Getting Started

14

US

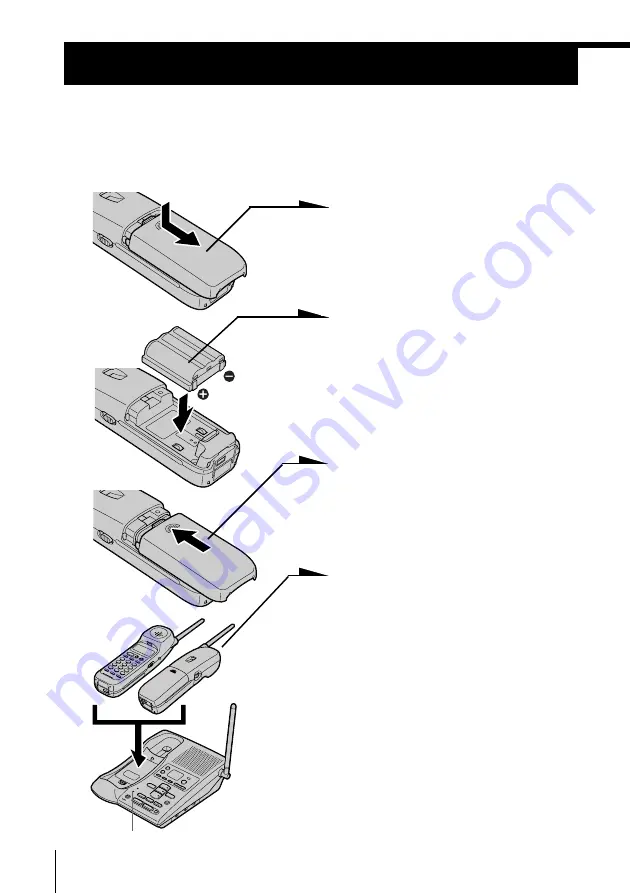
Preparing the battery pack

Charge the battery pack for more than 

12 hours

 before you start using

your phone.

1

Slide open the battery
compartment lid of the handset.

2

Insert the battery pack (with
contacts facing down) into the
battery compartment.

3

Close the battery compartment
lid.

4

Place the handset on the base
unit.

You can place it with either side
facing up.

The CHARGE lamp lights up
when the handset is properly
seated on the charge terminals
of the base unit. Charge the
battery pack for more than 

12

hours

 so that the battery is fully

charged. The CHARGE lamp
remains lit even after charging
is completed.

Step 3

CHARGE lamp

BP-T23

Summary of Contents for SPP-A972 - Cordless Telephone With Answering System

Page 1: ...3 221 211 12 1 2000 Sony Corporation SPP A972 2 Line Cordless Telephone with Answering System Operating Instructions US ...

Page 2: ... serial numbers are located at the bottom of the unit Record the serial number in the space provided below Refer to these numbers whenever you call upon your Sony dealer regarding this product Model No SPP A972 Serial No ________________ ...

Page 3: ...a qualified technician to restore the product to normal operation E If the product has been dropped or the cabinet has been damaged F If the product exhibits a distinct change in performance IMPORTANT SAFETY INSTRUCTIONS When using your telephone equipment basic safety precautions should always be followed to reduce the risk of fire electric shock and injury to persons including the following 1 Re...

Page 4: ...FCC compliant telephone cord and modular plug is provided with this equipment 4 The REN is used to determine the quantity of devices that may be connected to the telephone line Excessive RENs on the telephone line may result in the devices not ringing in response to an incoming call Typically the sum of the RENs should not exceed five 5 0 To be certain of the number of devices that may be connecte...

Page 5: ...d used in accordance with the instructions may cause harmful interference to radio communications However there is no guarantee that interference will not occur in a particular installation If this equipment does cause harmful interference to radio or television reception which can be determined by turning the equipment off and on the user is encouraged to try to correct the interference by one or...

Page 6: ...et 39 To switch from the handset to the base unit 40 Talking between the phones Intercom 40 To talk from the handset to the base unit 40 To talk from the base unit to the handset 41 Receiving a call while using the intercom 42 Transferring a call 42 To transfer from the base unit to the handset 43 To transfer from the handset to the base unit 44 Having a conference call 44 Making another call whil...

Page 7: ...res 61 Understanding the Caller ID service 61 When you receive a call 62 Looking at the Caller ID list 62 Viewing the Caller ID list 63 Erasing data from the Caller ID list 65 Using the Caller ID list 65 Calling back a number from the Caller ID list 66 Storing a number of the Caller ID list into the Phone Directory 67 To change the number of digits of the phone number 69 Using Caller ID with call ...

Page 8: ...0 to 13 Next you need to do three things to set up the base unit including finding the best location for the base unit Step 3 pages 14 to 15 Then insert the battery pack into the handset and charge it for more than 12 hours Step 4 pages 17 to 19 Finally enter the area code to use the Caller ID service First unpack the phone and the supplied accessories Step 1 page 9 That s it Handset ...

Page 9: ...dset AC power adaptor AC T131 Wall bracket for base unit Base unit Rechargeable battery pack BP T23 Step 1 Checking the package contents Make sure you have received the following items in the package If anything is missing contact your local Sony dealer Belt clip ...

Page 10: ...u experience intermittent loss of audio during a conversation try moving closer to the base or move base unit away from other noise sources The cordless telephone operates at a frequency that may cause interference to nearby TVs and VCRs the base unit should not be placed near or on the top of a TV or VCR and if interference is experienced moving the cordless telephone farther away from the TV or ...

Page 11: ...k and to an AC outlet 3 Raise the antenna Make sure it points towards the ceiling Connect the base unit If you want to hang the base unit on the wall see page 70 To connect the base unit to a single outlet having two lines Hook the cord To L1 L1 L2 3 To DC IN 9V To an AC outlet To the telephone outlet Telephone line cord supplied 1 AC power adaptor supplied AC T131 2 DATA jack ...

Page 12: ...C power adaptor to the DC IN 9V jack and to an AC outlet 3 Raise the antenna Make sure it points towards the ceiling Hook the cord To L2 3 To DC IN 9V To an AC outlet To the telephone outlets Telephone line cord supplied 1 AC power adaptor supplied AC T131 2 DATA jack To connect the base unit to two separate outlets To L1 L1 L2 Telephone line cord supplied Line 1 Line 2 ...

Page 13: ...If a call comes in on L2 jack with the call waiting service while a computer or FAX connected to the DATA jack is receiving or sending data that data may be effected If you have data communication frequently we recommend that you and your callers use L2 jack for data communication only If you have only single outlet having one line connect the telephone line cord to the L2 jack Polarity of the plu...

Page 14: ...cing down into the battery compartment 3 Close the battery compartment lid 4 Place the handset on the base unit You can place it with either side facing up The CHARGE lamp lights up when the handset is properly seated on the charge terminals of the base unit Charge the battery pack for more than 12 hours so that the battery is fully charged The CHARGE lamp remains lit even after charging is comple...

Page 15: ...y To obtain the best performance from the battery Do not place the handset on the base unit after each call The battery works best if the handset is returned to the base unit after two or three calls However do not leave the handset off the base unit for a long period of time as this will completely discharge the battery pack When to purchase a new battery pack If the battery lasts only a few minu...

Page 16: ...r use as a handset spare battery pack 1 Open the battery compartment lid of the base unit 2 Insert the battery pack with contacts facing down into the battery compartment 3 Close the battery compartment lid The SPARE BATTERY lamp lights up Charge the battery pack for more than 24 hours so that the battery is fully charged The SPARE BATTERY lamp remains lit even after charging is completed SPARE BA...

Page 17: ... area code below If you live in an area where calls from or to other local areas can also be made by 10 digit dialing area code number you can register up to 5 local area codes with this telephone to take advantage of this system See To enter the local area code For 10 digits phone number users on page 18 Case 2 If 10 digit dialing area code number is required for all local calls in your area at f...

Page 18: ...to 4 on page 17 The current home area code appears on the display 2 Turn Jog Dial down to erase the current home area code 3 Enter a new home area code using the dialing keys 4 Press PGM You will hear a long confirmation beep To enter the local area code For 10 digits phone numbers users If a call matches one of the local area codes you entered the phone number will be registered with 10 digits in...

Page 19: ... elapse between each step of the procedure Tips You may press Jog Dial instead of PGM in step 7 To check the current local area code perform steps 1 to 5 The local area code appears on the display for about 20 seconds To change the local area code 1 Perform steps 1 to 5 on pages 18 to 19 The current local area code appears on the display 2 Turn Jog Dial down to erase the current local area code 3 ...

Page 20: ...W button p 54 Press to repeat the current message or go back to the previous message Keep the button pressed for slow playback of messages 7 Battery compartment p 16 8 SPARE BATTERY lamp p 16 Lights while the spare battery is being charged 9 CHARGE lamp p 14 Lights while the battery is being charged 0 HOLD button p 30 Puts a call on hold qa MIC microphone p 48 58 qs MUTING button p 30 Mutes your v...

Page 21: ...itch p 13 Selects pulse or tone dialing wd SKIP QUICK button p 54 Press to skip to the next message Keep the button pressed for quick playback of messages wf RINGER LEVEL switches L1 L2 p 30 Adjusts the ringer volume wg FLASH button p 30 Switches to a second call if you have call waiting service wh PLAY STOP MAILBOX 1 2 3 buttons p 54 Plays back the messages in each mailbox wj INTERCOM button p 40...

Page 22: ...utton p 25 Allows you to switch temporarily to tone dialing 9 CONF conference button p 44 Lets you talk with two parties at the same time q Display window p 24 61 qa OFF button p 24 Allows you to disconnect the call qs FLASH CALL WAITING button p 29 69 Switches to a second call if you have call waiting service or lets you make a new call qd Dialing keys p 24 qf button p 67 Used to change the numbe...

Page 23: ...n p 26 33 Redials the last number called inserts a pause in the dialing sequence qh PGM program button p 17 32 Used to store numbers in Phone Directory qj Microphone qk I HEADSET jack p 24 28 71 ql VOL volume switch p 25 Adjusts the handset volume qk ql qk qk ...

Page 24: ...EL SEARCHING appears on the display move closer to the base unit 3 Dial the phone number 4 When you re done talking press OFF or replace the handset on the base unit The display and the LINE 1 or LINE 2 button go off Making calls when the headset is connected When the TL HD1 headset not supplied is connected to the I HEADSET jack you can talk through the headset Precaution Avoid listening your hea...

Page 25: ... battery becomes weak during a call The handset will beep every three seconds five times and E and BATTERY LOW appears on the display Finish your call and charge the battery pack For optimum performance charge the battery for a full 12 hours Note that during the first 10 15 minutes of charging the phone will be inactive i e unable to make or receive a call After this initial 10 15 minutes you may ...

Page 26: ...mber dialed Note If the number exceeds 32 digits or if it is erased five short error beeps will alert you that the number cannot be redialed To check the phone number before redialing While the handset is not in use press REDIAL PAUSE The last number dialed is displayed for five seconds To dial the number press LINE 1 or LINE 2 while the number is displayed Note The number will not be displayed if...

Page 27: ...one number for the second party Now you can talk to the second party on line 2 4 To put on hold line 2 and resume the conversation on line 1 press HOLD and then LINE 1 or To disconnect line 2 and resume the conversation on line 1 press LINE 1 Note If you do not press HOLD in step 1 line 1 will be disconnected You can talk with two parties at the same time using both line 1 and line 2 see Having a ...

Page 28: ...e flashes in succession 2 When you re done talking press OFF or replace the handset on the base unit The display and the LINE 1 or LINE 2 button go off Receiving calls when the headset is connected When the TL HD1 headset not supplied is connected to the I HEADSET jack you can talk through the headset Precaution Avoid listening your headset at so loud a volume that extended play might affect your ...

Page 29: ... with an outside caller you will hear two short beeps Tip To inform you of an incoming call the display shows RINGING when ringing If you have subscribed to the Caller ID service the caller s number and or name appears on the display when you receive a call see page 61 or when another call comes in by call waiting service the ringer sound changes to a higher tone if the call matches the number sto...

Page 30: ... OFF the handset will ring when the ringer of the handset is turned on see page 38 Tips To inform you of an incoming call the line button lights on and off according to the ring signal even when you set the L1 or L2 RINGER LEVEL switch on the base unit to OFF If there is an incoming call while on the intercom the base unit will ring at a low level even when the L1 or L2 RINGER LEVEL switch on the ...

Page 31: ...t line 2 and resume the conversation on line 1 press LINE 1 Notes If you do not press HOLD in step 1 line 1 will be disconnected If another call comes in while talking on the base unit a beep will be heard through the base unit and the corresponding line button on the base unit will flash If another call comes in while talking on the handset a ringer tone will be heard once through the handset and...

Page 32: ...16 characters Press a dialing key until the desired character appears See the character table for details Enter successive characters in the same way To enter two characters assigned to the same key or to enter a space turn Jog Dial up to move the cursor to the right Example to enter SONY press 7 four times S press 6 three times O turn Jog Dial up to move the cursor press 6 twice N and press 9 thr...

Page 33: ...dure The total number of phone numbers which can be stored into the Phone Directory varies according to the number of digits of each phone number If all the phone numbers consist of up to 16 digits you can store up to 50 phone numbers However as the Phone Directory uses two phone number memory to store one phone number of 17 digits or more the total number of phone numbers which can be stored in t...

Page 34: ... enter the new name If you want to change only the number skip this step 5 Press Jog Dial The cursor flashes at the last digit of the phone number 6 Turn Jog Dial down to erase the number and enter the new number If you don t want to change the number skip this step 7 Press Jog Dial You will hear a long confirmation beep and the name and or the number is changed Tip When the phone number of 17 dig...

Page 35: ... beep and the memory location is erased SONY 1234567 DIAL EDIT ERASE 1234567 ERASE NO YES 1234567 Making calls from the Phone Directory 1 Press Jog Dial DIRECTORY appears on the display 2 Display the name and phone number you want to call To search in alphabetical order Turn Jog Dial up or down To search by entering the initial character Press the dialing key of the desired character then turn Jog...

Page 36: ...lly connected When neither line is in use line 1 is connected About the search order The names appear in the following order when you turn Jog Dial up or down Alphabetical order ABC XYZ y symbols y y y 0 9 Initial character To search for SONY for example press 7 and then turn Jog Dial to search through the names starting with P Q R S or 7 Phone Directory continued t t ...

Page 37: ...ial up to make RINGER flash 3 Press Jog Dial 4 Turn Jog Dial to choose the line you want to set the ringer type 5 Press Jog Dial The current ringer type appears 6 Press one of the dialing keys 1 to 4 to select a ringer type You will hear the corresponding ringer tone 7 Press OFF DIRECTORY AREA RINGER RINGER 1 SELECTED Turn Press LINE1 LINE2 continued ...

Page 38: ... OFF When RINGER is set to RINGER OFF The handset won t ring You can still make calls and also receive calls if another telephone connected to the same line rings to inform you on incoming calls To turn the ringer on again Follow the instructions described in Setting the ringer type on page 37 Setting the ringer type continued RINGER OFF SELECTED ...

Page 39: ... unit double flashes in succession You can continue talking to the caller through the handset To switch from the handset to the base unit Example While talking on line 1 1 Press HOLD on the handset The call is on hold and HOLD appears on the display of the handset and the LINE 1 button flashes slowly 2 Press LINE 1 on the base unit The LINE 1 button on the base unit lights up and the LINE 1 button...

Page 40: ...e answers the phone Press OFF on the base unit Talking between the phones Intercom You can converse using the base unit and the handset You can start the intercom from either phone To talk from the handset to the base unit Press INTERCOM on the handset After the base unit rings twice you will be connected automatically When a person at the base unit answers you can talk with each other INTERCOM ap...

Page 41: ...when RINGER is set to RINGER OFF You can receive an intercom call on the base unit even when the L1 or L2 RINGER LEVEL switch on the base unit is set to OFF The base unit will ring at a low level Receiving a call while using the intercom When a call comes in RINGING appears on the display of the handset and only the base unit rings at a low level The LINE 1 or LINE 2 button flashes Press LINE 1 or...

Page 42: ... handset and the INTERCOM lamp on the base unit lights up You can talk between the base unit and the handset 3 Press LINE 1 or LINE 2 which is flashing on the handset to talk to the caller with the handset TALK appears on the display of the handset If no one answers the phone Press OFF on the base unit Tips You can receive an intercom call on the handset even when RINGER is set to RINGER OFF If yo...

Page 43: ...INTERCOM appears on the display of the handset and the INTERCOM lamp on the base unit lights up 2 Press LINE 1 or LINE 2 which is flashing on the base unit to talk to the caller with the base unit The corresponding line button of the base unit lights up If no one answers the phone Press OFF on the handset Tip You can receive an intercom call on the base unit even when the L1 or L2 RINGER LEVEL swi...

Page 44: ...lk with two parties at the same time using both line 1 and line 2 Three way conference 1 Press HOLD while talking on one line The line in use is put on hold 2 Press LINE 1 or LINE 2 whichever is not used 3 Dial a phone number for the second party 4 Press CONF conference after the second party is connected CONFERENCE appears on the display Now you can talk to both parties OFF LINE 1 LINE 2 CONF LIN...

Page 45: ...ne will be disconnected To disconnect the lines during a three way conference To disconnect both lines at the same time press OFF To disconnect line 1 and talk on line 2 only Press LINE 2 To disconnect line 2 and talk on line 1 only Press LINE 1 To put the lines on hold during a three way conference Press HOLD Both lines are put on hold To resume the conversations on both lines Press CONF To resum...

Page 46: ...ut both lines on hold The LINE 1 and LINE 2 buttons on the base unit and the handset flash 2 Press CONF on the handset to resume the conversation To join on the base unit while the handset is talking on one line Press the double flashing LINE 1 or LINE 2 on the base unit Now you can talk to the handset and to the line connected To join on the handset while the base unit is talking on one line Pres...

Page 47: ... to select the hour 5 Press TIME SET The hour is set and the minute is announced 6 Press SELECT repeatedly to select the minute 7 Press TIME SET The day and time you just entered is announced and the clock restarts 8 Press PLAY STOP to exit the menu setup mode You will hear a long confirmation beep Notes Press and hold SELECT to increase the minute setting by 10 The time and day are preset to Mond...

Page 48: ...u can record up to 90 seconds 4 To stop recording press PLAY STOP Your greeting replays automatically Notes If you do not record your own greeting the prerecorded greeting will be assigned automatically see page 49 If your greeting is less than two seconds the greeting is not recorded The prerecorded greeting will be assigned automatically If a call comes in during recording recording stops automa...

Page 49: ...aces the old one To erase the greeting 1 Press MENU repeatedly until Set out going message is announced 2 Press ERASE Notes You can also erase the greeting during playback If you have erased your own greeting the prerecorded greeting will be assigned automatically Prerecorded greetings Normal mode Hello I m unable to answer your call right now Please leave your name number and message after the to...

Page 50: ...fter 4 rings select 4 To answer after 6 rings select 6 Select Toll Saver to answer after 2 rings when there are new messages and 4 rings where there are no new messages 3 Press TIME SET The ring duration setting is announced 4 Press PLAY STOP to exit the menu setup mode Notes When the number of rings is set to Toll Saver the phone answers after 2 rings if new messages are recorded If no new messag...

Page 51: ...ssage alert blinks on the display 2 Press SELECT to set the audible message alert on or off 3 Press TIME SET The setting is announced 4 Press PLAY STOP to exit the menu setup mode Notes When the audible message alert is turned on you will hear a beep every 10 seconds if there are any new messages To stop the beep press any button related to the answering machine function or VOLUME The audible mess...

Page 52: ...sing 1 MAILBOX 1 2 MAILBOX 2 or 3 MAILBOX 3 while the caller hears the greeting The greeting stops and a beep will sound then the caller can start recording a message Wait until the greeting finishes then start recording a message When the caller does not select a mailbox the message is automatically recorded to MAILBOX 1 Notes If four minutes have passed while recording the incoming message the l...

Page 53: ...the memory is full The total recording time of this answering machine is approximately 15 minutes including the greeting messages and memo When the remaining recording time becomes less than 30 seconds F flashes on the display and the answering machine goes into the memory full status In this status the answering machine will not answer a call until after 10 rings even if the answering function is...

Page 54: ...revious message Play back slowly Play back quickly Playing back messages If there are new messages the display flashes the number of new messages You will hear beeps if the audible message alert setting is on see page 51 If the MAILBOX lamp flashes press the mailbox button MAILBOX 1 MAILBOX 2 or MAILBOX 3 to play back new messages in the selected mailbox Additional tasks when playing back messages...

Page 55: ...essages 1 Press and hold ERASE for more than two seconds 2 Press a button for the mailbox you want to erase MAILBOX 1 MAILBOX 2 or MAILBOX 3 You will hear a long confirmation beep and all old messages in the selected mailbox are erased To erase individual messages Press ERASE while playing back the message that you want to erase Note The display shows the total number of new i e unreviewed message...

Page 56: ...for a while and you cannot pick up messages 1 Press MENU repeatedly until you hear Set announce only 2 Press SELECT to set the announcement only mode on or off 3 Press TIME SET The setting is announced 4 Press PLAY STOP to exit the menu setup mode The display shows A when the answering machine is set to the announcement only mode Notes To activate announcement only mode you have to turn on the ans...

Page 57: ...or to answer the call Alternatively you may select to mute the message see Turning on off the screening calls function below The message will be recorded but to hear it you will need to play back the message see page 54 To answer the call Press LINE 1 or LINE 2 whichever button lights up on the base unit You can also answer the call by pressing LINE 1 or LINE 2 which is flashing on the handset Not...

Page 58: ...ord your message A memo can be up to four minutes in length 4 Press PLAY STOP to stop recording The message number on the display increases by one Notes If the memory becomes full the answering machine will stop recording Memory full is announced if no recording space is available when you press REC MEMO If your message is shorter than two seconds the recording will be canceled The display flashes...

Page 59: ...t the remote ID code security code 1 Press MENU repeatedly until you hear Set security code 2 Press SELECT to change the remote ID code security code setting 3 Press TIME SET to confirm your choice The new remote ID code security code is announced 4 Press PLAY STOP to exit the menu setup mode Note Press and hold SELECT to increase the remote ID code security code by 10 Tip The remote ID code secur...

Page 60: ...ed Picking up new messages 1 Call your telephone number from a touch tone phone 2 When you hear the greeting press and enter your remote ID code security code You will hear a confirmation beep The number of new messages will be announced 3 Press the keys in the Table of control codes below for the desired operation command 4 When you are finished disconnect the line Notes Do not let two seconds el...

Page 61: ...tional calls PRIVATE when the call is blocked For privacy reasons many states allow callers the option to prevent his or her telephone data from being displayed on the other party s Caller ID display If the call is from an office which uses multiple lines the displayed phone number may not match the number you use to call the extension Tips Even if the ringer of the handset is set to RINGER OFF yo...

Page 62: ... through the Caller ID list to check the phone number and or name of the calls received 1 Turn Jog Dial The display shows the number of NEW calls which you have not viewed and OLD calls which you have viewed calls 2 Turn Jog Dial down to display older data or up to display newer data Note If a 21st call is received the oldest data is automatically erased Tip If there is a NEW data the NEW CALL lam...

Page 63: ... but you can also manually erase unnecessary data one by one or erase the entire list To erase the phone number one by one 1 Display the phone number you want to erase from the Caller ID list see page 62 2 Press Jog Dial 3 Turn Jog Dial up to make ERASE flash and press Jog Dial 4 Turn Jog Dial up to make YES flash then press Jog Dial You will hear a long confirmation beep and the data is erased SM...

Page 64: ... 5 Turn Jog Dial up to make YES flash then press Jog Dial You will hear a long confirmation beep and the entire list is erased Note ALL appears only when all the data has become OLD data If there is any NEW data you cannot erase the entire list Looking at the Caller ID list continued NEW OO OLD OO SMITH JOHN 1 201 123 4567 DIAL PGM ERASE 1 201 123 4567 ERASE NO YES ALL 1 201 123 4567 ALL ERASE NO ...

Page 65: ...cally dials the displayed number Notes If the number displayed in step 1 is not the one you should call back you can change the number of digits of the phone number as described on page 67 If the phone is connected to a Private Branch Exchange PBX you may not be able to call back from the Caller ID list because an outside line access digit is necessary When neither line is in use line 1 is automat...

Page 66: ...ashes at the end of the phone number Enter or change the phone number if necessary see page 34 5 Press Jog Dial again You will hear a long confirmation beep and the name and number are stored Notes Do not allow more than 20 seconds to elapse between each step of the procedure If the number displayed in step 1 is not the one you should store you can change the number of digits of the phone number a...

Page 67: ...ry 1 While the phone number from the Caller ID list is displayed press repeatedly until the phone number with the correct number of digits appears on the display Each time you press the number of digits changes as follows When the home area code and the local area code do not match When the home area code matches SMITH JOHN 1 201 123 4567 SMITH JOHN 201 123 4567 SMITH JOHN 123 4567 SMITH JOHN 1 12...

Page 68: ...ect number of digits pages 65 and 66 Notes You need to adjust the number of digits each time you call back from the Caller ID list as the changes to the Caller ID data is not stored in memory You may not be able to change the number of digits depending on the Caller ID data SMITH JOHN 201 123 4567 SMITH JOHN 1 123 4567 SMITH JOHN 1 201 123 4567 SMITH JOHN 123 4567 ...

Page 69: ... ID with call waiting as a single service This is a new service that combines the two services Even though you now have a Caller ID with call waiting compatible phone unless you subscribe to the combined Caller ID with call waiting service you will not be able to see the name and number of the second caller When a new call comes in while you are talking you hear two short beeps The caller s name a...

Page 70: ...enter of the base unit Align the f marks of the wall bracket with those of the base unit 4 Plug the telephone line cord s to the telephone outlet s and hook the base unit to the wall plate 5 Plug the AC power adaptor to an AC outlet Then raise the antenna so that it points towards the ceiling Tip To remove the wall bracket press the lower tabs 1 2 3 4 5 Telephone line cord Wall bracket Hang up tab...

Page 71: ... the holes on the sides of the handset Note To prevent the handset from dropping make sure that each tab is completely inserted Detaching the belt clip While pressing the back of the belt clip pull the sides one by one until the tabs come off from the holes Note Remove the belt clip carefully to avoid breaking your fingernails Using the headset You can talk on handset without using your hands by c...

Page 72: ... or receive calls and you cannot use the answering machine For the customers in the USA RECYCLING NICKEL CADMIUM BATTERIES Nickel Cadmium batteries are recyclable You can help preserve our environment by returning your unwanted batteries to your nearest point for collection recycling or proper disposal Note In some areas the disposal of nickel cadmium batteries in household or business trash may b...

Page 73: ...tion Do not use any type of abrasive pad scouring powder or solvent such as alcohol or benzine as they may damage the finish of the cabinet If the charge terminals of the base unit and handset are soiled wipe them with a soft cloth If you have any questions or problems concerning your phone please consult your nearest Sony dealer Maintenance ...

Page 74: ...he base unit correctly page 10 Move the handset closer to the base unit Make sure the telephone line cord is securely connected to the telephone outlet Make sure the battery is fully charged page 14 Make sure the dialing mode is set correctly page 13 Make sure the last dialed number is really the one you want to dial The number you last dialed exceeds 32 digits including the tone and pause digits ...

Page 75: ...ne and pause digits does not exceed 32 digits Store the correct number pages 32 The battery may be weak Charge the battery for more than 12 hours page 14 Move the handset closer to the base unit Place the base unit away from noise sources page 10 Either the base unit or handset is being used to converse with an outside caller The remaining recording time is less than 30 seconds or 99 messages were...

Page 76: ...one line Make sure you entered your home area code correctly page 17 You may need to change the number of digits of the phone number page 67 This function may not work when the phone is connected to a Private Branch Exchange PBX If the call is from an office which uses multiple lines the phone number may not match the number you put in the memory If you have stored the phone number with an outside...

Page 77: ...he day and time is cleared or delayed due to a power interruption or when you connect the base unit to the AC outlet for the first time Reset the time correctly page 47 The announcement only mode is selected page 56 The recording area is full Erase unnecesary messages page 55 Message counter The message counter on the base unit shows the following information ...

Page 78: ...prox 87 mm approx 3 1 2 inches Mass Approx 268 g approx 9 5 oz battery included Specifications Base unit Power source DC 9V from AC power adaptor AC T131 Battery charging time Approx 24 hours Dimensions Approx 185 x 70 x 225 mm w h d antenna excluded approx 7 3 8 x 2 7 8 x 8 7 8 inches Antenna Approx 150 mm approx 6 inches Mass Approx 656 g approx 1 lb 7 oz wall bracket excluded Answering machine ...

Page 79: ...turning on off 38 S Screening calls 57 turning on off the screening calls function 57 Setting up answering machine 47 base unit 10 handset 14 Spare battery 16 Speakerphone 29 Stamping messages with day and time 47 54 Storing Caller ID data in Phone Directory 66 Switching phones during a call 39 T U Talking between the phones 40 Three way conference 44 Toll saver 50 Tone dialing dialing mode 13 swi...

Page 80: ...Sony Corporation Printed in China For the customers in the USA Be sure to save the receipt and attach it to your WARRANTY card when having your equipment repaired at an authorized Sony service station ...

Reviews: