background image

13 

GB

Let’

s

 get the pho

to 
fr

am

re

ady

Turning the photo frame on

1

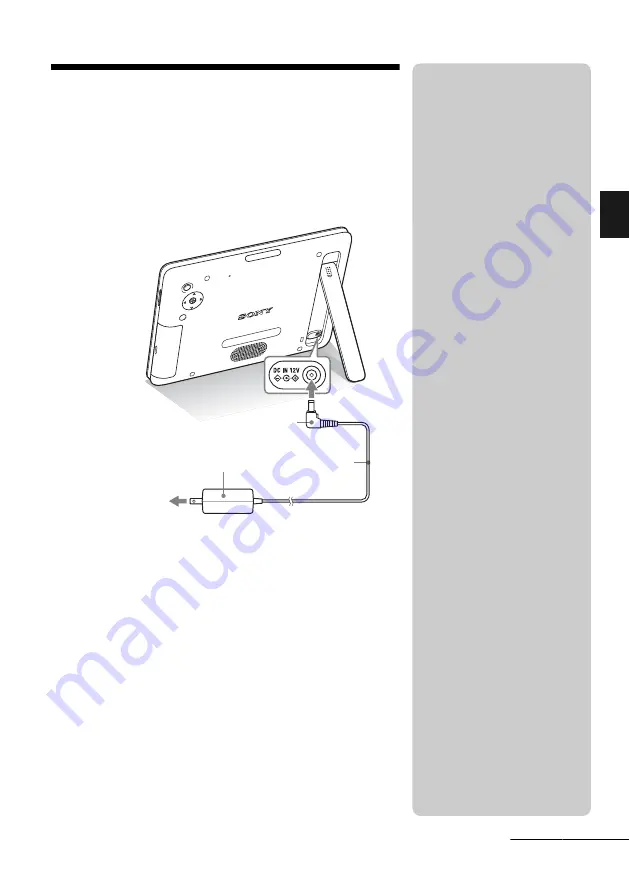
Insert the plug of the AC adaptor into the DC IN 12 V 
jack on the rear of the photo frame.

2

Connect the AC adaptor to the wall outlet.

The photo frame is automatically turned on.

When using the photo frame with the built-in 
battery pack

Turn on the photo frame with the 

1

 (standby) button on the photo 

frame.

If the photo frame is powered only by the built-in battery pack, the 

1

 (standby) button on the remote control does not operate.  

To wall outlet

To the DC IN

12 V jack

AC adaptor

DC cable

Plug

P

Notes

• The socket outlet should be as close 

as possible to the unit, and easily 
accessible.

• Do not place the photo frame on an 

unsteady or tilted surface.

• Connect the AC adaptor to an easily 

accessible wall outlet close by. If 
trouble occurs while using the 
adaptor, immediately shut off the 
power by disconnecting the plug 
from the wall outlet.

• Do not short the plug of the AC 

adaptor with a metal object. Doing 
so may cause a malfunction.

• Do not use the AC adaptor placed in 

a narrow space, such as between a 
wall and furniture.

• After use, remove the AC adaptor 

from the DC IN 12 V jack on the 
photo frame, and remove the AC 
adaptor from the wall outlet.

• Do not turn the photo frame off or 

disconnect the AC adaptor from the 
photo frame while accessing an 
image. Doing so may damage the 
photo frame. 

• The supplied AC adaptor is 

designed to be used with this photo 
frame only. It cannot be used with 
any other devices.

• The AC plug shape may differ 

depending on the region you 
purchase the photo frame.

Continued

Summary of Contents for S-Frame 4-262-215-12 (1)

Page 1: ...nstructions Before operating this unit please read this manual thoroughly and retain it for future reference Owner s Record The model and serial numbers are located at the rear Record the serial number in the space provided below Refer to these numbers whenever you call upon your Sony dealer regarding this product Model No DPF D830 D830L Serial No ________________________ Product lineup differs by...

Page 2: ...ou may call Sony Customer Information Services Center 1 800 222 SONY 7669 The number below is for the FCC related matters only Regulatory Information WARNING If the shape of the plug does not fit the power outlet use an attachment plug adaptor of the proper configuration for the power outlet Declaration of Conformity Trade Name SONY Model No DPF D830 Responsible Party Sony Electronics Inc Address ...

Page 3: ...ve for using connection cables shorter than 3 meters 9 8 feet Attention The electromagnetic fields at the specific frequencies may influence the picture of this digital photo frame Notice If static electricity or electromagnetism causes data transfer to discontinue midway fail restart the application or disconnect and connect the communication cable USB etc again Disposal of Old Electrical Electro...

Page 4: ...orized Representative for EMC and product safety is Sony Deutschland GmbH Hedelfinger Strasse 61 70327 Stuttgart Germany For any service or guarantee matters please refer to the addresses given in separate service or guarantee documents Notice for users Program 2010 Sony Corporation Documentation 2010 Sony Corporation All rights reserved This manual or the software described herein in whole or in ...

Page 5: ...es or exhibits photography may be forbidden Recording contents are not guaranteed Sony shall assume no responsibility for any accidental or consequential damages or loss of the recording contents which may be caused by use or malfunction of the digital photo frame or memory card Backup recommendations To avoid potential risk of data loss caused by accidental operation or malfunction of the digital...

Page 6: ...ime 15 Let s view an image Inserting a memory card 16 Changing the display 17 About the information displayed on the LCD screen 18 Playing a video file 19 Playing a slideshow with background music 20 Importing a music file 20 Selecting a music file to play 20 Playing background music with a slideshow 21 Try using various functions Various functions 22 Sorting images Filtering 23 Specifying the pla...

Page 7: ...e 28 Connecting to a computer 29 Troubleshooting If an error message appears 30 If trouble occurs 31 Additional information Precautions 34 Installation 34 Cleaning 34 Restrictions on duplication 34 Disposing of the photo frame 34 Specifications 35 On trademarks and copyrights 36 ...

Page 8: ...tal Photo Frame Handbook 1 Warranty 1 In some regions the warranty is not supplied The supplied CD ROM contains the Digital Photo Frame Handbook that explains operations and setups of the digital photo frame in detail To view the handbook insert the CD ROM into the computer and double click the Handbook icon To display the handbook you need Adobe Acrobat Reader For details on how to attach the jac...

Page 9: ... sensor Sony logo VIEW MODE button page 17 RESET switch MENU button B b v V Direction Enter buttons BACK button 1 on standby button Standby Indicator Access lamp Memory card slot page 16 EXT INTERFACE USB A connector USB mini B connector page 29 I O cover Speaker DC IN 12 V jack Stand Continued ...

Page 10: ...ton Zoom in button Direction B b v V buttons ENTER button Zoom out button IMPORT button DELETE button ROTATE button About descriptions in this manual The operations described in this manual are based on those with the buttons on the photo frame When an operation is performed differently for example with the remote control and the buttons on the photo frame it will be explained in a tip ...

Page 11: ... When the lithium battery becomes weak the operating distance of the remote control may shorten or the remote control may not function properly In this case replace the battery with a Sony CR2025 lithium battery Use of another battery may present a risk of fire or explosion Replacing procedures CD ROM Handbook page 9 zTip The 1 standby button on the remote control cannot be used when the photo fra...

Page 12: ...or pass the DC cord through the cutout of the stand Detach the stand cap from the stand before folding the stand into the rear of the photo frame Stand cap Cutout zTips x When the photo frame is placed in the portrait orientation The display is automatically rotated on the portrait orientation A video file is not rotated automatically even if you change the orientation of the photo frame x Sony lo...

Page 13: ...e on an unsteady or tilted surface Connect the AC adaptor to an easily accessible wall outlet close by If trouble occurs while using the adaptor immediately shut off the power by disconnecting the plug from the wall outlet Do not short the plug of the AC adaptor with a metal object Doing so may cause a malfunction Do not use the AC adaptor placed in a narrow space such as between a wall and furnit...

Page 14: ...prompt you for charging Power status Color of the standby indicator During battery charging When charging is complete With the AC adaptor connected Power ON Orange Green Power OFF Orange Red On battery operation Power ON Green Power OFF Not lit High Low zTips x On battery charging Charge the battery under ambient temperature within the range of 10 C to 30 C 50 F to 86 F Under temperature outside t...

Page 15: ... second Setting complete ENTER 3 Press MENU In the same window you can use the same procedures as time setting to set the following Setting items Date Date Display Order Y M D M D Y D M Y First day of the week Sunday Monday 12hr 24hr display 12 hours 24 hours zTips x If the photo frame is not operated If the photo frame is not operated for 10 seconds the demo mode is displayed x Releasing the demo...

Page 16: ...multaneously the photo frame will not work properly Access lamp SD memory Card Slot A Memory Stick Slot A Memory Stick Duo Slot B I O cover PNote When using a memory card of the following types make sure to insert it in an appropriate adaptor If you insert it without an adaptor you may be unable to remove it As shown in the right most illustration below make sure to insert the following types of m...

Page 17: ...n is displayed Displays Styles Slideshow Single view Multi image view Clock view Calendar view Time Machine Random view Clock and Calendar Clock1 to Clock11 Calendar1 to Calendar3 Lunar Calendar Arabic Calendar Farsi Calendar Entire image Fit to screen Entire image with Exif Fit to screen with Exif Index Index 1 to Index 3 VIEW MODE buttons PNote If you do not operate the photo frame for a certain...

Page 18: ... if the image is DCF compliant If the image does not comply with DCF its file name is displayed If you named or renamed the file on your computer and the file name includes characters other than alphanumeric characters the file name may not be able to be displayed properly on the photo frame Also for a file created on a computer or other device a maximum of 10 characters from the beginning of the ...

Page 19: ...Fast forward backward playback Press B b during playback of the video file The file is played forward or backward at high speed while you hold down the b or B button When you release the button normal playback starts from that point Depending on the video file fast forward backward playback may not be available with the photo frame To stop playback Press BACK while the video file is being played P...

Page 20: ...lect Select BGM and press ENTER 3 Select a music file you want to play from the imported music file list with v V and press ENTER A check mark is displayed next to the selected file 4 Repeat step 3 if you want to select two or more music files z Tips To clear the selection select the file to be cleared then press ENTER The check mark next to the selected file disappears To delete a music file impo...

Page 21: ...f the screen if you press v V To increase the volume press V To decrease the volume press v PNotes Fast forward backward playback of background music is not available Also you cannot change the playback order of background music files Background music cannot be played during playback of the video The sound of the video file is played with the video The background music for the photo displayed afte...

Page 22: ...displayed with Press MENU and select the destination 4 Press ENTER when the confirmation screen is displayed z Tips x Importing The number of images to be saved in the internal memory Resize approx 4 000 images Original the number of images may vary depending on the original image file size PNotes x Exporting Any memory card or USB external device that is not recognized by this photo frame is list...

Page 23: ... images are displayed select Exit sort show all photos and press ENTER To change the sort style Press BACK while the sorted images are displayed then select another sort style zTip x Using the remote control Press SORT when an image is displayed on the screen P Note During Clock and Calendar display you cannot select the Editing tab PNotes x During sorting Avoid doing the following Doing so may da...

Page 24: ...nlarged image up down left and right Using the remote control To enlarge an image press zoom in on the remote control in Single view mode To reduce an enlarged image press zoom out Saving an enlarged or a reduced image Crop and save When you move the enlarged image with B b v V and press MENU the image is saved in the trimmed size You can select the saving method by pressing v V Saving methods Sav...

Page 25: ...the timer function to turn the photo frame on or off automatically when the photo frame is turned on 1 Press MENU B b to select the Settings tab 2 Press v V to select Auto Power ON OFF and press ENTER zTip When displaying the images in the internal memory the information used to rotate the image is retained even after the power is turned off P Notes An enlarged image cannot be rotated You cannot r...

Page 26: ...elect 12 hours on the time display setting 5 Auto ON day Auto OFF day setting v V Add a check mark to select the day on which you want to activate the timer Move the cursor to OK and press ENTER Advanced 1Press v V to select Time Setting ENTER 2Press B b v V to select the day of the week or a time zone for which you want to set or cancel the auto power on off setting then press ENTER to change the...

Page 27: ... select the Settings tab 2 Press v V to select the item and setting value then press ENTER Setting items Slideshow Settings Slideshow BGM Settings Auto Power ON OFF Date time Settings General Settings Listing Order Sony logo ON OFF etc Language Setting Initialize PNotes Depending on the status on the photo frame some settings of some items cannot be changed They are displayed in gray and cannot be...

Page 28: ...layback of the image in the internal memory Do not disconnect the USB memory or turn off the photo frame while the access lamp on the photo frame is flashing Doing so may damage the data stored in the USB memory Sony assumes no responsibility for any damage or loss of data The photo frame cannot use USB memory data that has been encrypted or compressed using for instance fingerprint authentication...

Page 29: ... type plug for the USB mini B connector of this unit frame side connector type shorter than 3 meters If multiple USB devices are connected to a computer or if a hub is used a problem may occur In such a case simplify the connection You cannot operate the photo frame from another USB device being used simultaneously Do not disconnect the USB cable during data communication Operation with all comput...

Page 30: ...photo frame For an external device The external device may be write protected Cancel the write protection setting for the device you are using For the internal memory Initialize the internal memory PNote When you initialize the internal memory please note that all the image files imported to the internal memory are deleted Write error on the Memory Stick Write error on the SD Memory Card Write err...

Page 31: ...al memory external memory or memory card c The photo frame can play save delete or otherwise handle up to 4 999 image files Did you rename the file with a computer or other device c If you named or renamed the file on your computer and the file name includes characters other than alphanumeric characters the image may not be able to be displayed on the photo frame Is there a folder with more than 8...

Page 32: ...Nothing happens even if you operate the photo frame c Turn off the power then turn it on page 13 c Push the RESET switch with a thin object such as a ballpoint pen page 9 PNote If you push the RESET switch while the photo frame is in operation the data in its internal memory may be erased or the settings may be reset Nothing happens even if you operate the remote control Is the battery inserted in...

Page 33: ...andby indicator lit c If an internal temperature of the photo frame rises owing to direct sunlight etc battery charging becomes disabled In such a case the standby indicator does not light but this is not a malfunction of the photo frame Symptom Check item Cause Solutions ...

Page 34: ...y condense inside the unit In such cases the photo frame will probably not work properly and may even develop a fault if you persist in using it If moisture condensation occurs unplug the AC adaptor of the photo frame and do not use the photo frame for at least one hour On transport When you transport the photo frame remove the memory card external devices AC adaptor and connected cables from the ...

Page 35: ...um bit rate 12 Mbps Maximum frame rate 30 fps 640 480 25 fps 726 576 Music MP3 3 Sampling frequency 32 44 1 48 kHz Bit rate 32 kbps to 320 kbps Maximum number of pixels that can be displayed 8 000 H dots 6 000 V dots 4 File system FAT12 16 32 Image file name DCF format 256 characters within 8th hierarchy Maximum number of files that can be handled 4 999 files for the internal memory or for a memor...

Page 36: ...er of stored images is an approximate guide when resizing and importing images When resizing and importing images they are automatically resized to about 2 000 000 pixels This varies depending on the subject and shooting conditions On trademarks and copyrights Cyber shot Memory Stick Memory Stick Duo MagicGate Memory Stick Memory Stick PRO Memory Stick PRO Duo Memory Stick PRO HG Duo Memory Stick ...

Page 37: ...37 GB memo ...

Page 38: ...38 GB memo ...

Page 39: ...39 GB memo ...

Page 40: ...Printed using VOC Volatile Organic Compound free vegetable oil based ink Sony Corporation Printed in China ...

Reviews: