background image

38

Example: When dubbing a DVD

Example: When playing a VIDEO CD

Example: When playing a CD

Track playing time and the current track/index number

m

Remaining time of the current track

m

Playing time of the disc

m

Remaining time of the disc

m

CD text (when available)

Example: When playing an MP3 audio track

Playing time and number of the current track

m

Current album number

Example: When viewing a JPEG image

Current file number and total number of files in the 
current album

m

Current album number and total number of albums

b

Notes

• The recorder can only display the first level of a CD’s 

text, such as the disc name.

• The letters or symbols that cannot be displayed are 

replaced with “*.”

• Playing time of MP3 audio tracks may not be displayed 

correctly.

5. Changing the Name of a 
Recorded Program

You can label a DVD, title, or program by entering 
characters. You can enter up to 64 characters for a 
title or disc name, but the actual number of 
characters displayed in the menus such as the Title 
List will vary. The steps below explain how to 
change the name of the recorded program.

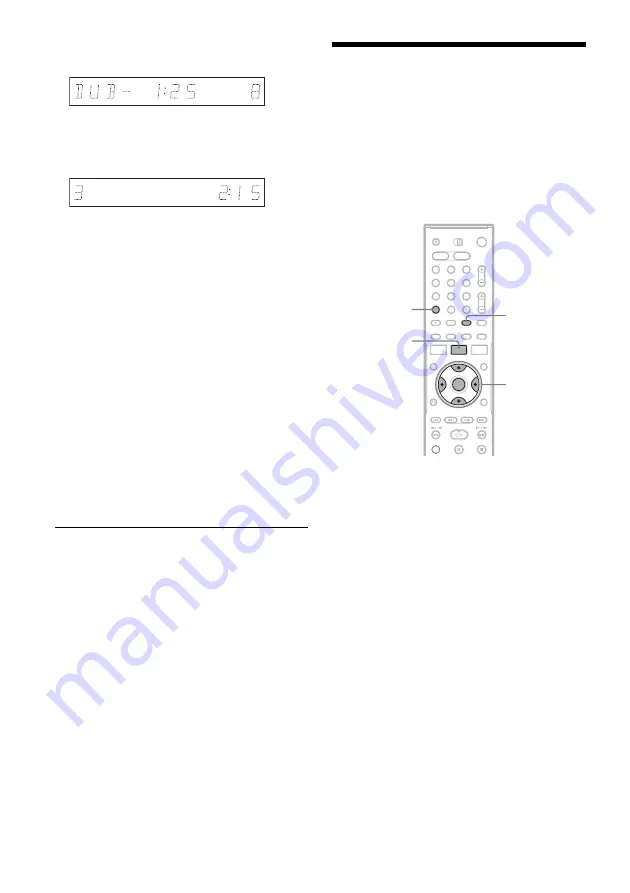
1

Press TITLE LIST.

2

Select a title, and press ENTER.

The sub-menu appears.

3

Select “Title Name,” and press ENTER.

The display for entering characters appears.

4

Press 

<

/

M

/

m

/

,

 to move the cursor to 

the right of the screen and select “A” 
(upper-case), “a” (lower-case), or 
“Symbol,” and press ENTER.

The characters of the selected type are 
displayed.

Remaining time of dubbing in progress

Playing time and number of the current 
scene or track

1

2

3

4

6

7

8

9

0

5

<

/

M

/

m

/

,

,

ENTER

TITLE LIST

CLEAR

INPUT 
SELECT

Summary of Contents for RDR-HX715 - Dvd Recorder & Hard Disk Drive Combo

Page 1: ...2 635 892 11 1 2005 Sony Corporation DVD Recorder Operating Instructions RDR HX715 ...

Page 2: ...s and can radiate radio frequency energy and if not installed and used in accordance with the instructions may cause harmful interference to radio communications However there is no guarantee that interference will not occur in a particular installation If this equipment does cause harmful interference to radio or television reception which can be determined by turning the equipment off and on the...

Page 3: ...ecorder itself has been turned off If you are not going to use the recorder for a long time be sure to disconnect the recorder from the wall outlet To disconnect the AC power cord grasp the plug itself never pull the cord Before disconnecting the AC power cord check that the recorder s hard disk is not operating recording or dubbing on the front panel display On placement Place the recorderin aloc...

Page 4: ...by the manufacturer or sold with the apparatus When a cart is used use caution when moving the cart apparatus combination to avoid injury from tip over 13 Unplug this apparatus during lightning storms or when unused for long periods of time 14 Refer all servicing to qualified service personnel Servicing is required when the apparatus has been damaged in any way such as power supply cord or plug is...

Page 5: ...of your AV amplifier receiver with the remote 24 If you have a Sony DVD player or more than one Sony DVD recorder 24 Step 7 Easy Setup 25 Checking the cable box satellite receiver control setting 26 Connecting a VCR or Similar Device 28 Connecting to the LINE IN 1 or 3 jacks 28 Connecting to the LINE 2 IN jacks on the front panel 29 Connecting to a Satellite or Digital Tuner 30 1 Inserting and For...

Page 6: ...m Connected Equipment 56 Recording from connected equipment with a timer Synchro Rec 56 Recording from connected equipment without a timer 57 Playback 59 Playing 59 Playing titles with the TV Guide On Screen system 59 Playback options 61 Adjusting the picture quality 63 Adjusting the sound quality 64 Pausing a TV Broadcast TV Pause 65 Playing from the beginning of the program you are recording Cha...

Page 7: ... titles Combine Titles 78 Dividing a Playlist title Divide Title 78 Dubbing HDD y DVD 79 Before Dubbing 79 About Dub Mode 79 Dubbing 81 Dubbing a single title Title Dub 81 Dubbing multiple titles Dub Selected Titles 82 DV Digital8 Dubbing 84 Before DV Digital8 Dubbing 84 Preparing for DV Digital8 dubbing 84 Recording an Entire DV Digital8 Format Tape One Touch Dubbing 85 Program Edit 86 Settings a...

Page 8: ...sis Function When letters numbers appear in the display 106 Notes About This Recorder 106 Specifications 107 About i LINK 108 Guide to Parts and Controls 110 Glossary 114 Language Code List 116 Area Code 116 Cable Box Satellite Receiver Brand Code 117 Index 122 ...

Page 9: ...Playback Playing from the beginning of the program you are recording Chasing Playback on page 65 Watching one title while recording another Simultaneous Rec and Play Playing a previous recording while making another Simultaneous Rec and Play on page 66 HDD RW RWVR RWVideo R R HDD RW RWVR RWVideo R R HDD RWVR HDD RW RWVR RWVideo R R VCD CD DATA CD DATADVD Dubbing Editing Compatible media and refere...

Page 10: ... used in this manual Formatting new discs Compatibility with other DVD players finalizing Hard disk drive internal Formatting unnecessary Dub HDD contents to a DVD to play on other DVD players DVD RW Automatically formatted in VR mode Playable on DVD RW compatible players automatically finalized DVD RW VR mode Format in VR mode page 31 Playable only on VR mode compatible players finalization unnec...

Page 11: ...p disc space Recording Features Editing Features Rewrite page 49 Auto Chapter page 96 Manual Chapter page 76 Record 16 9 sizes page 53 Change title name page 73 Delete title page 75 A B Erase page 74 Playlist page 77 Yes Yes Yes Yes Yes Yes Yes Yes Yes Yes No No Yes Yes Yes No Yes Yes Yes Yes Yes Yes Yes Yes Yes Yes No Yes 3 Yes Yes No No No Yes No No Yes Yes 4 No No No Yes No Yes 3 Yes Yes 4 No N...

Page 12: ...n a color system other than NTSC such as PAL Playable discs Type Disc Logo Icon used in this manual Characteristics DVD VIDEO Discs such as movies that can be purchased or rented VIDEO CD VIDEO CDs or CD Rs CD RWs in VIDEO CD Super VIDEO CD format CD Music CDs or CD Rs CD RWs in music CD format that can be purchased DATA DVD DVD RWs DVD Rs DVD RWs DVD Rs DVD ROMs containing JPEG image files DATA C...

Page 13: ... mates DVD recorded material on one side with digital audio material on the other side However since the audio material side does not conform to the Compact Disc CD standard playback on this product is not guaranteed b Notes Some DVD RWs DVD Rs DVD RWs DVD Rs or CD RWs CD Rs cannot be played on this recorder due to the recording quality or physical condition of the disc or the characteristics of t...

Page 14: ...ed on To use the cable box satellite receiver control function you need to connect the set top box controller and set the code number and output channel page 25 After setting up the cable box satellite receiver control check that the recorder can correctly control the cable box or satellite receiver page 26 NOTE TO CATV SYSTEM INSTALLER IN USA This reminder is provided to call the CATV system inst...

Page 15: ... to the LINE IN 1 jack or component video cord to the COMPONENT VIDEO IN jacks set Line1 Input in Video setup to S Video or Component page 93 If you connect an S video cord to the LINE IN 3 jack set Line3 Input in Video setup to S Video page 93 A Cable box or satellite receiver with a video audio output ANT IN R L S VIDEO AUDIO OUT VIDEO OUT TO TV COMPONENT VIDEO IN PB Y PR VHF UHF AC IN COMPONENT...

Page 16: ...IN PB Y PR VHF UHF AC IN COMPONENT VIDEO OUT PB Y PR 1 2 VIDEO S VIDEO R AUDIO L IN OUT COMPONENT VIDEO IN PB Y PR DIGITAL OUT HDMI OUT G LINK COAXIAL OPTICAL PCM DTS DOLBY DIGITAL LINE OUT 1 3 SET TOP BOX CONTROL VIDEO S VIDEO R AUDIO L LINE IN SET TOP BOX CONTROL ANT IN TO TV VHF UHF IN OUT to VHF UHF IN Wall DVD recorder to VHF UHF OUT to antenna input Antenna cable supplied Signal flow TV Cabl...

Page 17: ...on the recorder C Cable without cable box or antenna only no cable TV COMPONENT VIDEO IN PB Y PR VHF UHF AC IN COMPONENT VIDEO OUT PB Y PR 1 2 VIDEO S VIDEO R AUDIO L IN OUT COMPONENT VIDEO IN PB Y PR DIGITAL OUT HDMI OUT G LINK COAXIAL OPTICAL PCM DTS DOLBY DIGITAL LINE OUT 1 3 SET TOP BOX CONTROL VIDEO S VIDEO R AUDIO L LINE IN VHF UHF IN OUT DVD recorder TV to antenna input to VHF UHF IN to VHF...

Page 18: ...ton on page 19 D Connecting to an HDMI input jack Use a certified HDMI cord not supplied to enjoy high quality digital picture and sound through the HDMI OUT jack VIDEO AUDIO INPUT L R INPUT S VIDEO PR PB Y COMPONENT VIDEO IN VHF UHF AC IN COMPONENT VIDEO OUT PB Y PR 1 2 VIDEO S VIDEO R AUDIO L IN OUT COMPONENT VIDEO IN PB Y PR DIGITAL OUT SET TOP BOX CONTROL G LINK COAXIAL OPTICAL PCM DTS DOLBY D...

Page 19: ...ademarks of HDMI Licensing LLC By using the PROGRESSIVE button you can select the signal format in which the recorder outputs video signals interlace or progressive 1 Connect the recorder using the COMPONENT VIDEO OUT jacks pattern C on page 18 2 Press the PROGRESSIVE button repeatedly PROGRESSIVE appears in the front panel display when the recorder outputs progressive signals Progressive Select t...

Page 20: ...S 5 1ch surround effects The yellow plug is used for video signals page 18 VIDEO AUDIO INPUT L R VHF UHF AC IN COMPONENT VIDEO OUT PB Y PR 1 2 VIDEO S VIDEO R AUDIO L IN OUT COMPONENT VIDEO IN PB Y PR DIGITAL OUT SET TOP BOX CONTROL G LINK COAXIAL OPTICAL PCM DTS DOLBY DIGITAL LINE OUT 1 3 VIDEO S VIDEO R AUDIO L LINE IN HDMI OUT B A DIGITAL OUT COAXIAL OPTICAL PCM DTS DOLBY DIGITAL 1 2 VIDEO S VI...

Page 21: ...der to an AV amplifer receiver using an HDMI cord you will need to do one of the following Connect the AV amplifier receiver to the TV with the HDMI cord Connect the recorder to the TV with a video cord other than HDMI cord component video cord S VIDEO cord or audio video cord 1 Manufactured under license from Dolby Laboratories Dolby and the double D symbol are trademarks of Dolby Laboratories 2 ...

Page 22: ...inside the battery compartment and insert new batteries Do not expose the remote sensor marked on the front panel to strong light such as direct sunlight or lighting apparatus The recorder may not respond to the remote You can adjust the remote s signal to control your TV If you connected the recorder to an AV amplifier receiver you can use the supplied remote to control the AV amplifier s receive...

Page 23: ...r buttons and SET Selects the channel on your TV Manufacturer Code number Sony 01 default Akai 04 AOC 04 Centurion 12 Coronado 03 Curtis Mathes 12 14 Daewoo 04 22 Daytron 03 12 Fisher 11 General Electric 04 06 10 Gold Star LG 03 04 17 Hitachi 02 03 04 J C Penney 04 10 12 JVC 09 KMC 03 Magnavox 03 04 08 12 21 Marantz 04 13 MGA Mitsubishi 04 12 13 17 NEC 04 12 Panasonic 06 19 Philco 02 03 04 08 Phil...

Page 24: ...erferes with your other Sony DVD recorder or player set the command mode number for this recorder and the supplied remote to one that differs from the other Sony DVD recorder or player The default command mode setting for this recorder and the supplied remote is DVD3 1 Press SYSTEM MENU The System Menu appears 2 Select SETUP and press ENTER Controlling the volume of your AV amplifier receiver with...

Page 25: ...ill enable you to use the TV Guide On Screen system page 42 Enter your area of residence and zip code even if you do not want to use the TV Guide On Screen system Language Select the language for the on screen displays Clock Set the clock manually using M m and press ENTER If the clock data has already been received go to Set Top Box Control Check that the command mode switch on the remote is set ...

Page 26: ...e cable box satellite receiver 2 Press CH and check that the channel changes on the cable box satellite receiver window 3 Press the number buttons and check that the channel changes on the cable box satellite receiver window Tune your cable box to channel 02 Then using your DVD recorder s remote enter 09 to tune your cable box to channel 09 Did the cable box change to channel 09 If the cable box d...

Page 27: ...er Once you have confirmed that the set top box controller controls your cable box or satellite receiver fix it in place 1 Remove the backing on the double sided tape 2 Attach it so that the set top box controller is directly above the remote control sensor on your cable box satellite receiver ...

Page 28: ...e VCR you may not receive a clear image on your TV screen Be sure to connect your VCR to the DVD recorder and your TV in the order shown below To watch video tapes watch the tapes through a second line input on your TV If you disconnect the recorder s power cord you will not be able to view the signals from the connected VCR Connecting to the LINE IN 1 or 3 jacks LINE OUTPUT S Video AUDIO R L VIDE...

Page 29: ...input jack b Notes Do not connect the yellow LINE IN VIDEO jack when using an S video cord Do not connect the output jack of this recorder to another equipment s input jack with the other equipment s output jack connected to the input jack of this recorder Noise feedback may result Do not connect more than one type of video cord between the recorder and your TV at the same time Connecting to the L...

Page 30: ...not work with some tuners For details see the tuner s operating instructions If you disconnect the recorder s power cord you will not be able to view the signals from the connected tuner VHF UHF AC IN COMPONENT VIDEO OUT PB Y PR 1 2 VIDEO S VIDEO R AUDIO L IN OUT COMPONENT VIDEO IN PB Y PR DIGITAL OUT SET TOP BOX CONTROL HDMI OUT G LINK COAXIAL OPTICAL PCM DTS DOLBY DIGITAL LINE OUT 1 3 VIDEO S VI...

Page 31: ...ct a recording format VR mode or Video mode according to your needs page 10 1 Insert a disc See Inserting a Disc on page 31 2 Press TOOLS The TOOLS menu appears The TOOLS menu displays options applicable to the entire disc e g disc protection recorder e g audio settings during recording or multiple items on a list menu e g erasing multiple titles The displayed options differ depending on the situa...

Page 32: ... page 76 Format Available settings differ depending on the disc type 4 Select Format and press ENTER 5 Select OK and press ENTER For DVD RWs select VR or Video and press ENTER All contents on the disc are erased z Hints By reformatting you can change the recording format on DVD RWs or record again on DVD RWs that have been finalized For DVD RWs and DVD RWs Video mode you can check free space and t...

Page 33: ...recording or when the HDD or DVD is full To stop recording Press x REC STOP located beneath the remote control cover Note that it may take a few seconds for recorder to stop recording To pause recording Press X REC PAUSE located beneath the remote control cover To restart recording press the button again To watch another TV program while recording Set your TV to the TV input using the TV VIDEO but...

Page 34: ...ded Program Title List To play a recorded title select the title from the Title List 1 Press HDD or DVD If you select DVD insert a DVD see Inserting a Disc on page 31 Playback starts automatically depending on the disc 2 Press TITLE LIST To show the extended Title List press TOOLS to select Display List and press ENTER Checking the disc status while recording RW RWVR RWVideo R R HDD 1 2 3 4 6 7 8 ...

Page 35: ...le List changes to the previous next page of titles About the Title List for HDD DVD RWs VR mode You can switch the Title List to show Original or Playlist While the Title List menu is turned on press TOOLS to select either Original or Playlist and press ENTER For details see Edit options for the HDD and DVD RWs VR mode on page 72 To change the title order Sort While the Title List menu is turned ...

Page 36: ...VDs created on other DVD recorders The letters that cannot be displayed are replaced with It may take a few seconds for the thumbnail pictures to be displayed After editing the title thumbnail picture may change to the first scene of the recording title After dubbing the title thumbnail picture set on the source recording is canceled 4 Displaying the Playing Time and Play Information You can check...

Page 37: ...g time 3 1 Displays Super VIDEO CDs as SVCD DATA CDs as CD and DATA DVDs as DVD 2 Does not appear with VIDEO CDs DATA DVDs and DATA CDs 3 Displayed when you press TIME TEXT repeatedly z Hints If DTS is set to Off in Audio setup the DTS track selection option will not appear on the screen even if the disc contains DTS tracks page 95 When Auto Display is set to On default in Options setup page 98 pl...

Page 38: ...ed with Playing time of MP3 audio tracks may not be displayed correctly 5 Changing the Name of a Recorded Program You can label a DVD title or program by entering characters You can enter up to 64 characters for a title or disc name but the actual number of characters displayed in the menus such as the Title List will vary The steps below explain how to change the name of the recorded program 1 Pr...

Page 39: ...cters by pressing and holding CLEAR for 2 seconds or more You can switch between A upper case a lower case or Symbol even if you press INPUT SELECT 6 Labeling and Protecting a Disc You can execute options effective for the entire disc using the Disc Information display 1 Insert a disc See Inserting a Disc on page 31 2 Press TOOLS to select Disc Info and press ENTER Example When the inserted disc i...

Page 40: ...M HSP 0H45M SP 1H00M LSP 1H15M LP 1H30M EP 2H00M SLP 3H00M SEP 4H00M Remainder Date 10 13 2005 10 28 2005 Original 3 GB Discs are automatically finalized when removed from the recorder However you may need to finalize the disc for certain DVD equipment or if the recording time is short You can edit or record on the disc even after finalizing Finalizing is unnecessary when playing a disc on VR form...

Page 41: ...corded on another recorder For DVD RWs Video mode DVD RW Video mode that have been finalized to prohibit additional recording or editing can be unfinalized to allow further recording or editing For DVD RWs VR mode If you cannot record or edit on a DVD RW VR mode that has been finalized with other DVD equipment This disc was finalized Unfinalize it may appear b Note The recorder is not able to unfi...

Page 42: ...turned on the set top box controller must be connected and Set Top Box Control in the Settings setup must be set to On page 90 to download the TV Guide On Screen data Your area of residence and zip code must be set correctly page 89 The time must be set correctly If the time is not set set it manually page 89 The television program list is blank when TV Guide On Screen data is being downloaded or ...

Page 43: ... and News are examples of possible categories SETUP Allows you to change the channel lineup channel display and default options SCHEDULE Displays the list of record or remind timer settings page 55 RECORDINGS Displays the list of recorded titles page 59 D Time Slot Indicates the currently selected time slot Use to select a different time slot E Info Box Shows information about the selected program...

Page 44: ... ENTER When the Panel Menu appears select auto guide and set it to off b Notes The Video Window is locked during recording and the lock indicator appears in the Video Window You cannot unlock the Video Window during recording If you are watching programs through a set top box the Video Window may not change as fast as you move the cursor In this case lock the Video Window page 47 When you turn on ...

Page 45: ...he settings using schedule reminder Press ENTER to set the Remind timer with the displayed settings frequency Sets the timer to turn on the recorder once regularly or weekly Select off to turn off the timer auto tune Changes the channel automatically when the Remind timer is activated when Sets the time at which the recorder will remind you that a program is scheduled to start To change or cancel ...

Page 46: ... no keywords are displayed enter the keyword See To enter a new keyword below 4 Select a program using M m and press ENTER To enter a new keyword 1 Select SEARCH in the Service Bar and press ENTER 2 Select KEYWORD using and press ENTER The Panel Menu appears 3 Select new search from the Panel Menu and press ENTER 4 Select enter keyword from the Panel Menu and press ENTER 5 Select a letter on the k...

Page 47: ... ENTER again to exit the Panel Menu To match the channel number with the broadcast station If the channel number in the program listing does not match the broadcast station there may be more than one channel lineup for your area To change the channel lineup select Change channel lineup from SETUP and press ENTER Then select a different channel lineup if available To change the default settings 1 S...

Page 48: ...ed when sets the recorder to display a notification message at a designated time before or after the selected program is scheduled to start 4 Select one of the available options from the Panel Menu 5 Adjust the default setting using and press ENTER The cursor moves to done Press ENTER again to exit the Panel Menu ...

Page 49: ...hoice Note that recording times in the following table are approximate and the actual times may differ Note also that the maximum continuous recording time for a single title is eight hours Contents beyond this time will not be recorded Press REC MODE repeatedly to switch the recording modes The recording time for DVD R DL Double Layer discs is as follows HQ 1 hour 48 minutes HSP 2 hours 42 minute...

Page 50: ...wo methods to set the timer setting the timer using the TV Guide On Screen system and setting the timer manually b Notes When the recorder is connected to a cable box and you want to record using the TV Guide On Screen system do the following Turn on the cable box connect the set top box controller and set Set Top Box Control in the Settings setup to On Do not operate your cable box or satellite r...

Page 51: ...imer Recording or Reminder Settings on page 55 To stop recording during timer recording Open the remote s cover and press x REC STOP Note that it may take a few seconds for the recorder to stop recording and that the recording cannot be stopped within the first minute of recording To adjust the recording quality See step 3 of Adjusting the recording picture quality and size on page 53 Rec Mode Adj...

Page 52: ...using channel Press the number buttons to enter the channel number input Select the connected input source such as Line1 or Line2 recorder Sets the recording destination to either HDD or DVD quality Sets the recording mode page 49 frequency Sets the timer to record once daily or weekly Select off to turn off the timer 3 Select schedule recording and press ENTER The TIMER REC indicator lights up in...

Page 53: ... advances the time in 30 minute increments The maximum duration is six hours The time counter decreases minute by minute to 0 00 then the recorder stops recording power does not turn off Even if you turn off the recorder during recording the recorder continues to record until the time counter runs out To cancel the Quick Timer Press z REC repeatedly until the counter appears in the front panel dis...

Page 54: ...e setting using M m and press ENTER The default setting is underlined Rec NR weak Off 1 2 3 strong Rec Video Equalizer Contrast weak 3 0 3 strong Brightness dark 3 0 3 bright Color light 3 0 3 deep Hue red 3 0 3 green Repeat steps 2 and 3 to adjust any other items b Notes If one program contains two picture sizes the selected size is recorded However if the 16 9 signal cannot be recorded as 16 9 i...

Page 55: ...U sort by sorts the Record or Remind settings by date title or event record or remind new manual recording sets the recording timer page 52 new manual reminder sets the remind timer See step 5 of Setting the Remind Timer on page 45 RWVR RW R R RWVideo R HDD 1 2 3 4 6 7 8 9 0 5 M m ENTER TV GUIDE MENU SCHEDULE World Soccer SCHEDULE Local News Today s News The Urban Garden Music Show Chemicals and C...

Page 56: ...r the beginning of program B will be cut Recording From Connected Equipment You can set the recorder to automatically record programs from connected equipment that has a timer function such as a satellite tuner Connect the equipment to the LINE IN 1 jacks of the recorder page 30 When the connected equipment turns on the recorder starts recording a program from the LINE IN 1 jacks If you have conne...

Page 57: ...e Synchro Rec function does not work with some tuners For details see the tuner s operating instructions To use the Synchro Rec function you must first set the recorder s clock correctly If the timer settings of a Synchro Recording and another timer recording overlap Regardless of whether or not the program is a Synchro Rec program the program that starts first has priority and the second program ...

Page 58: ...Hint You can adjust the settings for the recording picture before recording See Adjusting the recording picture quality and size on page 53 b Notes When recording a video game image the screen may not be clear Any program that contains a Copy Never copy guard signal cannot be recorded The recorder continues to record but a blank screen will be recorded ...

Page 59: ...ate or by title name R DVD VCD CD DATA CD RWVR RWVideo RW R HDD DATADVD 1 2 3 4 6 7 8 9 0 5 NEXT H PLAY X PAUSE x STOP Z OPEN CLOSE TITLE LIST M m ENTER TOOLS MENU PROGRESSIVE SUBTITLE AUDIO TOP MENU ANGLE PREV INPUT SELECT HDD DVD CH REPLAY ADVANCE SUR TV GUIDE Playing titles with the TV Guide On Screen system 12 11 10 9 2ch TITLE LIST ORIGINAL GB 4 3 4 7 World Sports Mystery Travel 0H30M LSP GB ...

Page 60: ...program using M m and press ENTER The episodes appear 2 Select an episode using M m and press ENTER Playback starts To delete all episodes press MENU while the program is selected and select delete all episodes b Notes The program titles in the Title List and the TV Guide On Screen may not match Information not written on the disc may also appear in the RECORDINGS screen If you press TV GUIDE whil...

Page 61: ... in the front panel display for a few seconds TVS OFF No surround effect TVS DYNAMIC Creates one set of virtual rear speakers TVS WIDE Creates five sets of virtual rear speakers TVS NIGHT Creates five sets of virtual rear speakers Effective at low volume TVS STANDARD Creates three sets of virtual rear speakers Effective when you use two separate front speakers TVS was developed by Sony to produce ...

Page 62: ...AY again after you stop playback the recorder resumes playback from the point where you pressed x STOP To start from the beginning press TOOLS to select Play Beginning and press ENTER Playback starts from the beginning of the title track scene The point where you stopped playing is cleared when you open the disc tray except for HDD you play another title except for HDD you switch the Title List me...

Page 63: ... to start playback Even if you select Factory Setup in Options setup page 99 the Child Lock remains set Notes on playing DTS sound tracks on a CD When playing DTS encoded CDs excessive noise will be heard from the analog stereo jacks To avoid possible damage to the audio system the consumer should take proper precautions when the analog stereo jacks of the recorder are connected to an amplificatio...

Page 64: ...e more apparent In this case it is recommended that you use the BNR function with the DVE function If the condition still does not improve set the DVE level to 1 or Off 1 Press TOOLS during playback to select Audio Settings and press ENTER 2 Select an item and press ENTER Surround TVS Selects one of the surround modes For more information see Playback options on page 61 Audio Filter Selects the di...

Page 65: ...corded program and the current TV broadcast Chasing Playback allows you to view the recorded part of a program while the recording is being made You do not need to wait until the recording finishes Press TOOLS while recording to select Chasing Playback and press ENTER Playback starts from the beginning of the program you are recording When you fast forward to the point that you are recording Chasi...

Page 66: ...SP recording mode The picture freezes for a few seconds when you use fast forward fast reverse or instant replay advance You can also play a DVD VIDEO VIDEO CD Super VIDEO CD CD DATA DVD or DATA CD while recording on the HDD Example Play another title on the HDD while recording to the HDD 1 While recording press TITLE LIST to display the HDD Title List 2 Select the title you want to play and press...

Page 67: ...s Searches for a starting point by entering the time code File Search for DATA DVDs DATA CDs The display for entering the number appears Example Title Search The number in parentheses indicates the total number of titles tracks etc 2 Press the number buttons to select the number of the title chapter track time code etc you want For example Time Search To find a scene at 2 hours 10 minutes and 20 s...

Page 68: ...track list appears To change the page press REPLAY ADVANCE 4 Select a track and press ENTER Play Plays the track Play Beginning Plays the beginning of the track Track Data Shows data about the track such as artist and album name To stop playback Press x STOP To fast review or forward a track Press m M during playback To go to the previous or next MP3 audio track Press PREV or NEXT during playback ...

Page 69: ...nts If you are playing a DATA CD that has both MP3 and JPEG files you can switch between photo and music albums by using the buttons when the album list is displayed You can rotate a JPEG image by using the buttons when the image is displayed Press DISPLAY repeatedly to show information about the JPEG album or image on your TV screen Then press TIME TEXT to toggle between the current selected imag...

Page 70: ...images in Music CD format or Video CD format are recorded in the first session border only the first session border will be played back b Note The recorder may not be able to play some DATA CDs DATA DVDs created in the Packet Write format The recorder can play the following tracks and files MP3 audio tracks with the extension MP3 mp3 or Mp3 JPEG image files with the extension JPEG jpg JPG Jpg jpeg...

Page 71: ... tracks or files in a disc the tracks and files will be played in that order Since a disc with many trees takes longer to start playback it is recommended that you create albums with no more than two trees b Notes Depending on the software you use to create the DATA DVD DATA CD the playback order may differ from the above illustration No more than a total of 199 individual folders can be played Fo...

Page 72: ...age 75 To create and edit Playlist titles A Playlist is a group of Playlist titles created from the original title for editing purposes When you create a Playlist only the control information necessary for playback such as the playback order is stored on the disc Since the original titles are left unaltered Playlist titles can be re edited Example You have recorded the final few matches of a socce...

Page 73: ...increase even when you erase titles for DVD Rs and DVD Rs If a message appears and indicates that the disc s control information is full erase or edit unnecessary titles Erasing and Editing a Title This section explains the basic edit functions Note that editing is irreversible To edit the HDD or DVD RWs VR mode without changing the original recordings create a Playlist title page 77 1 Press TITLE...

Page 74: ...ou can select a section scene in a title and erase it Note that erasing scenes in a title cannot be undone 1 After step 2 of Erasing and Editing a Title select A B Erase and press ENTER The display for setting point A appears To return to the beginning of the title press X PAUSE and then press PREV 2 Select point A by pressing m M and press ENTER The display for setting point B appears 3 Select po...

Page 75: ...uce the picture quality divide the title into two shorter titles Note that dividing a title cannot be undone Only playlist titles can be divided for DVD RW VR mode 1 Press TITLE LIST Press TOOLS and select Original or Playlist from the TOOLS menu to switch the Title Lists if necessary 2 Select a title and press ENTER The sub menu appears 3 Select Divide Title and press ENTER The display for settin...

Page 76: ...d titles are erased freeing up disc space To change the selection select Change You can manually insert a chapter mark at any point you like during playback or recording Press CHAPTER MARK at the point where you want to divide the title into chapters Each time you press the button Marking appears on the screen and the scenes to the left and right of the mark become separate chapters To erase chapt...

Page 77: ...To reset the IN or OUT point select Change IN or Change OUT and repeat step 5 or 6 To view the selected scene select Preview 7 Select OK and press ENTER The Scene List menu appears with all of the selected scenes To add more scenes select Add and go to step 3 To preview all of the captured scenes in the listed order select Preview 8 Select the scene you want to re edit and press ENTER The sub menu...

Page 78: ...the order in which you selected the title appears To cancel the selection press ENTER again 4 Repeat step 3 to select all of the titles you want to combine To cancel all of the selections select Reset All 5 Select OK and press ENTER The list of titles to be combined appears To change the selection select Change and go to step 3 6 Select OK and press ENTER The display for selecting a title name fro...

Page 79: ...D RW Video mode or DVD R the picture size is determined by the setting in DVD Rec Picture Size page 53 When dubbed from HDD to DVD RW or DVD R the picture size is always 4 3 When dubbed from HDD to DVD RW VR mode the originally recorded picture size is retained z Hints When you dub a Playlist title it is recorded as an Original title When dubbed from a DVD to the HDD the picture size and the sound...

Page 80: ...n you dub an HQ title data size is large in SP mode you can reduce the data size saving more titles using less space Select a mode different from the original recording in Dub Mode in the steps of Dubbing a single title Title Dub on page 81 or Dubbing multiple titles Dub Selected Titles on page 82 When a title recorded to HDD in HQ or HQ mode is converted to another mode the recorder automatically...

Page 81: ... that you are going to dub to or from 2 Press HDD or DVD to select the source 3 Press TITLE LIST to turn on the Title List menu 4 Select a title and press ENTER The sub menu appears 5 Select Dubbing and press ENTER The display for selecting the dubbing mode appears If a title with page 81 is selected in the title list a confirmation screen is displayed To Move select Yes A Size of the title approx...

Page 82: ...ted titles can be dubbed at once You can select the dubbing mode for each title 1 Insert the DVD that you are going to dub to or from 2 Press HDD or DVD to select the source 3 Press TITLE LIST to turn on the Title List menu 4 Press TOOLS to select Dub Selected Titles and press ENTER 5 Select titles in the order you want to dub and press ENTER The titles are numbered in the selected order To cancel...

Page 83: ...h making adjustments select Start and press ENTER To automatically adjust the dubbing mode Auto Dub Mode If there is not enough available space on the target disc the recorder automatically selects a dubbing mode with lower picture quality according to the available space The same dubbing mode is set for all of the titles If disc space is insufficient for the selected dubbing mode the following di...

Page 84: ... camera as well before connecting b Notes The DV IN jack is for input only It will not output signals You cannot use the DV IN jack when your digital video camera does not work with this recorder Connect the camera to the LINE IN jack and follow the instructions of Recording from connected equipment without a timer on page 57 the input signal is not in DVC SD format Do not connect a MICRO MV forma...

Page 85: ...urce image changes or if there is nothing recorded on the tape Recording an Entire DV Digital8 Format Tape One Touch Dubbing You can record the entire contents of a DV Digital8 format tape onto a disc with a single press of the ONE TOUCH DUB button on the recorder The recorder controls the digital video camera for the whole process and completes the recording How chapters are created The contents ...

Page 86: ...g on page 84 and press SYSTEM MENU 2 Select DV D8 EDIT and press ENTER The display asks if you want to start selecting scenes If you have previously saved a program the display asks if you want to edit an existing program or to create a new program To resume editing the existing program select Saved Data and go to step 6 3 Select Start and press ENTER The display for setting the IN point start of ...

Page 87: ...ontinue To change the dubbing mode select Reset and repeat from step 9 To have the recorder adjust the dubbing mode select Auto Dub Mode If there is not enough disc space even after changing the dubbing mode the display asks if you want to record halfway To continue select OK To stop during recording Open the remote s cover and press x REC STOP Note that it may take a few seconds for the recorder ...

Page 88: ...et in Settings and press ENTER 2 Select Antenna Cable and press ENTER 3 Select an option and press ENTER 4 Select Auto Preset and press ENTER All receivable channels are preset in numerical sequence Manual Set Presets or disables channels manually If some channels could not be set using the Auto Preset or Easy Setup function you can set them manually 1 Select Tuner Preset in Settings and press ENT...

Page 89: ...ss ENTER 5 Enter your zip code number using M m and press ENTER 6 Select OK and press ENTER Set the clock manually 1 Select Clock in Settings and press ENTER 2 Press M m to set the month and press Set the day year hour and minutes in sequence Press to select the item to be set then press M m to set the numbers The day of the week is set automatically 3 Press ENTER to start the clock z Hint To chan...

Page 90: ...ite receiver OSD On Screen Display Switches the display language on the screen DVD Menu DVD VIDEO only Switches the language for the DVD menu Audio DVD VIDEO only Switches the language of the sound track When you select Original the language given priority in the disc is selected Subtitle DVD VIDEO only Switches the language of the subtitles recorded on the disc When you select Audio Follow the su...

Page 91: ...er also to the instruction manual supplied with the TV projector etc b Note Even when a setting other than Auto is selected and the connected TV cannot accept the resolution the recorder automatically adjusts the video signals that are suitable for the TV Pause Mode HDD DVDs only Selects the picture quality in pause mode 16 9 Select this when connecting to a wide screen TV or TV with a wide mode f...

Page 92: ...erived from film and displays images at 24 frames per second Some DVD software contains both Video and Film In order for these images to appear natural on your screen when output in PROGRESSIVE mode the progressive video signal needs to be converted to match the type of DVD software that you are watching You can fine tune the progressive 480p video signals that are output when you press PROGRESSIV...

Page 93: ...cording to the playback and connection conditions 1 Press SYSTEM MENU while the recorder is in stop mode 2 Select SETUP and press ENTER 3 Select Audio and press ENTER The Audio setup appears with the following options The default settings are underlined Audio ATT attenuation If the playback sound is distorted set this item to On The recorder reduces the audio output level This function affects the...

Page 94: ... come out from the speakers and may affect your ears or cause speaker damage 1 Select Audio Connection in Audio and press ENTER 2 Select Digital Out and press ENTER 3 Select On and press ENTER 4 Set the digital output signal Dolby Digital HDD DVDs only Selects the type of Dolby Digital signal b Note If the HDMI OUT jack is connected to equipment not compatible with DOLBY DIGITAL signals the D PCM ...

Page 95: ...rom the HDMI OUT jack b Notes A loud noise or no sound will be output if you connect the recorder to a TV that is not compatible with DOLBY DIGITAL DTS signals and Auto is selected In this case select PCM Set Digital Out to On when outputting compressed audio signals to an HDMI compatible TV On Select this when the recorder is connected to an audio component with a built in DTS decoder Off Select ...

Page 96: ...lay for registering a new password appears When you have already registered a password the display for entering the password appears 2 Enter your four digit password using the number buttons then select OK and press ENTER 3 Select Standard and press or ENTER The selection items for Standard are displayed 4 Select a geographic area as the playback limitation level and press ENTER The area is select...

Page 97: ... function Finalize Disc for all recordable discs except DVD RW in VR mode Selects whether or not to finalize the disc automatically following One Touch Dubbing page 85 Synchro Rec Selects the recording destination used for Synchro Recording page 56 HQ Setting HDD only Selects the HQ mode used for recording on the HDD page 49 Auto Title Erase HDD only Rec Mode Adjust Screen Saver The screen saver i...

Page 98: ...mmand Mode Be sure to match the Command Mode switch on the remote to the setting made here For details see If you have a Sony DVD player or more than one Sony DVD recorder on page 24 VR Automatically formats the disc in VR mode Video Automatically formats the disc in Video mode Normal Bright lighting Power Save Low lighting Turns off the lighting when the power is off SETUP Format DVD RW VR Settin...

Page 99: ...om Settings Video Audio Features Options Parental Control and All and press or ENTER 3 Select Start and press ENTER The selected settings return to their default settings 4 Press ENTER when Finish appears Easy Setup Resetting the Recorder Select this to run the Easy Setup program 1 Press SYSTEM MENU while the recorder is in stop mode 2 Select SETUP and press ENTER 3 Select Easy Setup and press ENT...

Page 100: ...recorder and then press PROGRESSIVE so that the PROGRESSIVE indicator turns off and the recorder is set to normal interlace format Noise may appear in the pictures recorded on the HDD which is due to the characteristics of HDD and is not a malfunction When playing a double layer DVD the video and audio may be momentarily interrupted at the point where the layers switch There is no picture or the p...

Page 101: ... to some programs could affect picture quality Disconnect the playback equipment in question and connect it directly to your TV The picture does not fill the screen Set TV Type in Video setup in accordance with the screen size of your TV page 91 The picture does not fill the screen even though the picture size is set in TV Type in Video setup The picture size of the title is fixed TV Guide On Scre...

Page 102: ...tup to On page 93 Sound is noisy When playing a CD with DTS sound tracks noise will come from the LINE OUT 1 2 R AUDIO L jacks page 63 The sound volume is low The sound volume is low on some DVDs The sound volume may improve if you set Audio DRC in Audio setup to TV Mode page 94 Set Audio ATT in Audio setup to Off page 93 One of the TVS effects is selected page 61 An alternate audio track cannot b...

Page 103: ...ormat that the recorder can play page 70 Progressive JPEG images cannot be played TV Pause does not work You are recording to the HDD or the HDD is full The channel cannot be changed from the channel you are recording Set the TV s input source to TV Recording does not start immediately after you press z REC Operate the recorder only after LOAD FORMAT or INFOWRITE disappears from the front panel di...

Page 104: ... the satellite receiver and cancel the Synchro Rec function page 56 The clock has stopped Set the clock again page 89 The clock stopped due to a power failure that lasted for more than one hour Reset the clock page 89 The clock is wrong Set the clock again page 89 If you cannot set the clock wait until the clock data is received and the clock is automatically adjusted The TIMER REC indicator is fl...

Page 105: ...er was turned on because the power was turned off or failed during recording Leave the recorder on until RECOVERY disappears from the front panel display HDD ERROR appears in the front panel display The hard disk error occurred Press down 1 on the recorder for ten seconds until WELCOME appears in the front panel display If this does not resolve the problem format the recorder s HDD by pressing dow...

Page 106: ...ls with a soft cloth slightly moistened with a mild detergent solution Do not use any type of abrasive pad scouring powder or solvent such as alcohol or benzine About repairing the hard disk drive It may be necessary to access data stored on the hard disk for testing purposes there is no intention to copy or store the data titles or any other information If replacement or initialization format is ...

Page 107: ...o A 1 A to W W 1 to W 84 Video reception Frequency synthesizer system Audio reception Split carrier system Antenna 75 ohm antenna terminal for VHF UHF Timer Clock Quartz locked Timer indication 12 hour cycle digital Power back up duration 1 hour Video recording format MPEG Video Audio recording format applicable bit rate Dolby Digital 2 ch 256 kbps Inputs and outputs LINE OUT 1 2 AUDIO Phono jack ...

Page 108: ...ions are operations and data transactions with various digital AV equipment When two or more i LINK compatible equipment are connected to this recorder in a daisy chain operations and data transactions are possible with not only the equipment that this recorder is connected to but also with other devices via the directly connected equipment Note however that the method of operation sometimes varie...

Page 109: ...cond or the amount of data that can be sent or received in one second For example a baud rate of 100 Mbps means that 100 megabits of data can be sent in one second For details on how to dub when this recorder is connected to other video equipment having DV jacks see page 84 The DV jack on this recorder can only input DVC SD signals It cannot output signals The DV jack will not accept MICRO MV sign...

Page 110: ... buttons 22 H CLEAR button 67 I AUDIO button 61 SUBTITLE button 61 The AUDIO button has a tactile dot J INPUT SELECT button 56 84 TV VIDEO button 22 K SCHEDULE button 55 DISPLAY button 36 L TIMER button 52 M info button 43 47 N SYSTEM MENU button 86 88 TITLE LIST button 34 59 68 73 TV GUIDE button 42 O TOP MENU button 63 P MENU button 44 63 Q M m ENTER button 25 R O RETURN button 25 EXIT button 44...

Page 111: ... z REC button 33 X REC PAUSE button 33 x REC STOP button 33 Z REC MODE button 33 wj CHAPTER MARK CHAPTER MARK ERASE buttons 76 wk SYNCHRO REC button 56 wl ANGLE button 61 SUR surround button 61 e WIDE MODE button 22 ea COMMAND MODE switch DVD 1 2 3 24 es PROGRESSIVE button 19 ed TIME TEXT button 37 Use the tactile dot as a reference when operating the recorder continued ...

Page 112: ...n 59 I z REC button 33 X REC PAUSE button 33 x REC STOP button 33 J DV IN jack 84 K ONE TOUCH DUB button 85 L SYSTEM MENU button 86 88 M TOOLS button 31 N M m ENTER button 25 O O RETURN button 25 P TV GUIDE button 42 Q previous next buttons 61 R CHANNEL buttons 33 The button has a tactile dot S INPUT SELECT button 56 84 T REC MODE button 33 U LINE 2 IN S VIDEO VIDEO L MONO AUDIO R jacks 29 Use the...

Page 113: ...p page 98 A VHF UHF IN OUT jacks 16 17 B HDMI OUT high definition multimedia interface out jack 18 C G LINK jack for service use only D COMPONENT VIDEO IN Y PB PR jacks 15 E LINE OUT 1 2 R AUDIO L VIDEO jacks 18 20 F LINE OUT 1 2 S VIDEO jack 18 G COMPONENT VIDEO OUT Y PB PR jacks 18 H AC IN terminal 21 I LINE IN 1 3 S VIDEO jack 28 J LINE IN 1 3 R AUDIO L VIDEO jacks 28 K DIGITAL OUT COAXIAL OPTI...

Page 114: ...ents can be recorded only once to a DVD R and will have the same format as a DVD VIDEO DVD RW page 10 A DVD RW read plus RW is a recordable and rewritable disc DVD RWs use a recording format that is comparable to the DVD VIDEO format DVD R page 10 A DVD R is a recordable disc that is the same size as a DVD VIDEO Contents can be recorded only once to a DVD R and will have the same format as a DVD V...

Page 115: ...ision The even number field shows the even numbered lines of an image and the odd numbered field shows the odd numbered lines of an image Original page 72 Titles actually recorded on a HDD DVD RW VR mode Erasing original titles frees up disc space Playlist page 72 Playback information created from the actual recordings on a HDD DVD RW VR mode A Playlist leaves the original titles as they are and c...

Page 116: ...usa 1217 Hindi 1226 Croatian 1229 Hungarian 1233 Armenian 1235 Interlingua 1239 Interlingue 1245 Inupiak 1248 Indonesian 1253 Icelandic 1254 Italian 1257 Hebrew 1261 Japanese 1269 Yiddish 1283 Javanese 1287 Georgian 1297 Kazakh 1298 Greenlandic 1299 Cambodian 1300 Kannada 1301 Korean 1305 Kashmiri 1307 Kurdish 1311 Kirghiz 1313 Latin 1326 Lingala 1327 Laothian 1332 Lithuanian 1334 Latvian Lettish ...

Page 117: ...039 0797 0237 0260 ASE 1080 Auna 1269 BBT 0267 BCC 0276 Belcor 0056 0022 Bell Howell 0014 Bell Atlantic 0641 Bell South 0899 Bestlink 0303 Betavue 0022 British Telecom 0003 BVS 0641 Cable Healthcare 0769 0058 Cable Star 0056 Cabletenna 0022 0039 Cableview 0022 Century 0153 0618 0008 0315 Citation 0017 Citizen 0153 0315 0078 0242 Clearmaster 0883 ClearMax 0883 1247 Colour Voice 0031 0025 Comband 02...

Page 118: ... 0812 Magnavox 0797 0027 0032 0334 0069 Millennium 0618 0153 Cable box brand Code number Memorex 0000 Mitsubishi 0003 Motorola 0476 0276 1476 0810 1376 1254 0400 1106 Movie Time 0156 0078 0063 0203 MS 0069 0015 1018 0303 MultiVision 0012 Myrio 1117 NET 0274 Next Level 0764 1316 1315 1314 Nexus 0770 Northcoast 0671 0314 Nova Vision 0277 0008 Novabeam 0277 Novaplex 0618 0277 0017 0008 NSC 0156 0070 ...

Page 119: ...arx 0040 Sony 1006 1506 1606 Spectradyne 0769 0058 Spectravision 0058 Sprucer 0021 0307 0010 0144 Cable box brand Code number Standard Components 0203 0096 0155 Starcom 0003 0015 0047 0014 0098 0305 Stargate 0015 0040 0770 0865 0797 0305 0014 Starquest 0015 StarSight 0542 0422 Stealth 0274 Stellar One 0807 Storm 1018 0637 Suena Madritel 1230 Supercable 0276 Supermax 0883 Sylvania 0001 Tandy 0258 T...

Page 120: ...d Code number AlphaStar 0772 Atlantic Telephone 1333 Bell ExpressVu 0775 Century 0856 Chaparral 0216 Crossdigital 1109 DirecTV 0749 0566 0392 1749 0099 1109 1076 1442 1856 0247 1142 1639 0724 0639 0819 Dish Network System 0775 1005 1170 Dishpro 0775 1005 Echostar 0775 1170 1005 Expressvu 0775 Galaxis 0863 GE 0566 General Instrument 0361 0869 0627 GOI 0775 Gradiente 0856 Hitachi 0819 0749 Houston T...

Page 121: ...oscan 0392 0566 QNS 1367 RadioShack 0869 RCA 0566 0392 0143 0855 Samsung 1109 1276 Sky 0856 0099 1856 Sony 0639 1639 Star Choice 0869 Star Trak 0869 0772 Thomson 0566 0392 Tivo 1142 1442 Toshiba 0790 0749 1749 1285 UEC 1333 1358 Uniden 0724 0722 Video Cipher II Plus 0361 Zenith 0856 1856 Satellite receiver brand Code number ...

Page 122: ... number 37 Chapter Search 67 Chasing Playback 65 Child Lock 63 Cleaning discs 106 CLEAR 67 Clock 89 Color 54 64 Combine Titles 78 Command Mode 25 98 COMPONENT VIDEO IN 15 28 COMPONENT VIDEO OUT 18 Connecting the antenna cable 14 the audio cords 20 the video cords 18 Connection 90 Contrast 54 64 Controlling TVs with the remote 22 Copy protection 50 114 Copy Free 50 Copy Never 50 Copy Once 50 CPRM 1...

Page 123: ...y 88 Sub menu 35 TOOLS menu 31 Options 98 Original 35 72 115 OSD language 25 90 P Page mode 35 Parental Control 63 96 Parental control settings 96 Parts and controls 110 Pause Mode 91 PB Video Equalizer 64 PBC 63 Play Beginning 62 Play mode 37 Playable discs 12 Playback 59 freeze frame 62 JPEG image files 68 MP3 audio tracks 68 resume play 62 scan audio 62 slow motion play 62 Playback picture qual...

Page 124: ...1 85 Stereo2 85 STOP 59 Sub menu 35 SUBTITLE 61 Subtitle 90 Super VIDEO CD 12 SUR surround 61 SYNCHRO REC 57 System menu 88 T Thumbnail picture 36 Time Search 67 TIME TEXT 37 TIMER 52 Timer recording check change cancel 55 manual setting 52 Rec Mode Adjust 53 Synchro Rec 56 TV GUIDE 50 Title 37 115 TITLE LIST 59 Title List 34 59 Sort 35 Thumbnail 36 Title Name 73 Title number 37 Title Search 67 TO...

Reviews: