


66
4
Select the dividing point by pressing
m
/
M
, and press ENTER.
The display asks for confirmation.
• To change the dividing point, select
“Change.”
5
Select “OK,” and press ENTER.
The display for entering the title name
appears.
• To use the same title name as before, select
“No.”
6
Select “Yes,” and press ENTER to enter a
new name.
Follow the explanations on page 33. After you
enter a new name, the title is divided in two.
1
Press TOOLS to select “Disc Info,” and
press ENTER.
The “Disc Information” display appears.
2
Select “Erase All,” and press ENTER.
3
Select “OK,” and press ENTER.
All titles on the disc are erased (except the
protected titles).
When recording on a DVD+RW or DVD-RW
(Video mode), the recorder searches for the largest
open space and records there. Before you start,
check the disc status by using Disc Map, and erase
titles to create a space large enough for the
recording.
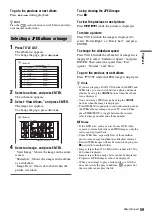
1
Insert a disc and press TITLE LIST.
2
Press TOOLS to select “Disc Map,” and
press ENTER.
The “Disc Map” display appears.
• To check the open space, select the space by
pressing
<
/
,
.
• When
b
or
B
appears on either side of the
screen, you can scroll sideways by pressing
<
/
,
.
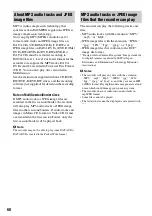
3
Select a title by pressing
<
/
,
, and
press ENTER.
The display for selecting titles to be erased
appears.
• To cancel the selection, press ENTER again.
• To erase more titles, repeat step 3.
Erasing all titles on the disc
+
RW
-RW
VR
-RW
Video
-
R
+
R
HDD
Erasing titles to open up disc
space (Disc Map)
-RW
Video
+
RW
GB
HQ: 0H30M
LP : 1H30M
HSP: 0H45M
EP : 2H00M
SP : 1H00M
SLP: 3H00M
LSP: 1H15M
SEP: 4H00M
Disc Map
Empty Title
Erase
Cancel
2.3
Erase
Cancel
Disc Map
2 Journey
17.9.2004 20:00 (1H00M)
GB
Fri
SP 0.6
Selected title


