background image

39

Ge
tt

in

g

 S

ta

rte

d

• See page 178 for the recording time of memory 

cards.

• Movies recorded on SDXC memory cards 

cannot be imported to or played back on 
computers or A/V devices not supporting the 
exFAT file system used for SDXC memory 
cards, by connecting the camcorder to these 
devices with the USB cable. Confirm in advance 
that the connecting equipment supports the 
exFAT file system. If you connect equipment 
not supporting the exFAT file system and the 
format screen appears, do not perform the 
format. All the data recorded will be lost.

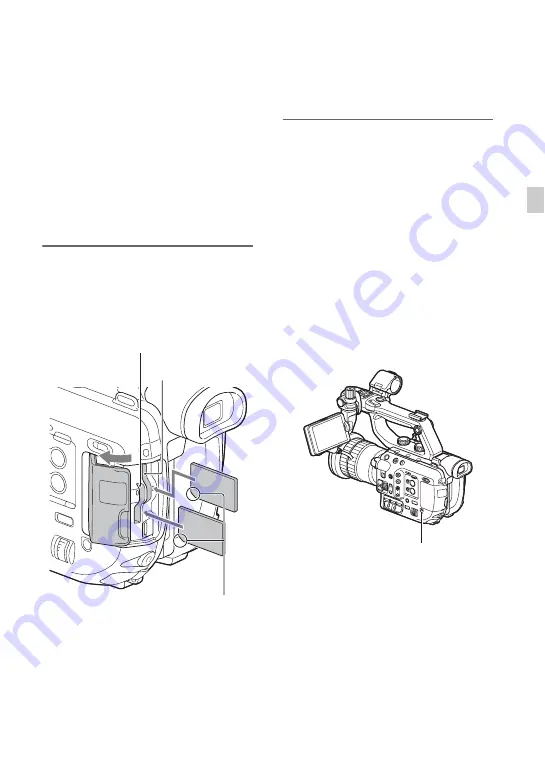
Open the cover, and insert the 
memory card with the notched 
corner in the direction as illustrated 
until it clicks into place.

• If you insert a memory card into the slot in the 

wrong direction, the memory card, the memory 
card slot, or image data may be damaged.

• Memory card slot A accepts either “Memory 

Stick PRO Duo” media, “Memory Stick PRO-

HG Duo” media, or an SD card. Memory card 
slot B accepts an SD card only.

To eject the memory card

Lightly push the memory card once.

b

Notes

• If [The image database file is corrupted. The 

media must be restored to use again.] appears, 
format the memory card (p. 136).

• When inserting or ejecting the memory card, be 

careful of the memory card popping out and 
dropping.

Selecting the memory card slot to be 
used for recording

Press the SLOT SEL button to change 
which slot is selected for recording. You 
can confirm the selected slot on the screen.

b

Notes

• You can only select a slot that already has a 

memory card inserted.

• While movies are being recorded on the 

memory card, you cannot switch the slot even if 
you press the SLOT SEL button.

z

Tip

• When only one slot has a memory card inserted, 

the slot that has the memory card is selected 
automatically.

Memory card 
slot B

Note the direction of the notched corner.

Memory card 
slot A

SLOT SEL button

Summary of Contents for PXW-FS5

Page 1: ...4 581 849 13 1 Solid State Memory Camcorder Operating Guide PXW FS5 FS5M2 FS5M2K Table of Contents Getting Started Recording Playback Editing Using the Menu Troubleshooting Additional Information ...

Page 2: ...r there may be some tiny black points and or bright points white red blue or green in color that appear constantly on the LCD screen These points are normal results of the manufacturing process and do not affect the recording in any way On sunlight Do not record the sun or leave the camcorder under the sun The internal parts of the camcorder may be damaged If sunlight is focused on a nearby object...

Page 3: ...iew your recordings on a TV you need to set 60i 50i SEL in accordance with the country region Television programs films video tapes and other materials may be copyrighted Unauthorized recording of such materials may be contrary to the copyright laws Because of the way that the image device CMOS sensor reads out image signals the following phenomena may occur The subjects passing by the frame rapid...

Page 4: ...you can set in REC FORMAT and other menus depend on the 60i 50i SEL setting In this manual the values for both 60i and 50i settings are described The images of the LCD screen used in this manual for illustration purposes are captured using a digital still camera The on screen displays in each local language are used for illustrating the operating procedures Change the screen language before using ...

Page 5: ...etection support when recording in XAVC QFHD 4K mode 133 Ver 1 1 or later Ver 1 0 or later Auto ND Filter 54 Ver 2 0 or later Recording in RAW format using a RAW recorder sold separately 70 Purchase of CBKZ FS5RIF required Purchase not required pre installed Zebra 1 Zebra 2 54 Setting the headphone output 84 GPS function 115 MPEG HD recording 73 Ver 3 0 or later Purchase of CBKZ SLMP required Purc...

Page 6: ...J Handle record button p 40 The handle record button is disabled when set to the HOLD position K Handle zoom lever p 43 L Multi interface shoe p 83 M Internal microphone p 82 N Microphone holder O INPUT 2 LINE MIC MIC 48V switch p 83 P INPUT 2 jack p 82 Q Cable clamper R Cable clamper S Recording lamp front p 40 The recording lamp flashes if the remaining capacity of the memory card or battery is ...

Page 7: ... p 53 F ASSIGN3 STATUS button p 123 G ND IRIS switch p 50 53 ND IRIS dial p 53 H IRIS PUSH AUTO button p 50 I SHUTTER button p 51 J ISO GAIN button L M H switch p 51 K WHT BAL button B A PRESET switch p 55 L DISPLAY button p 122 M THUMBNAIL button p 119 N MENU button SEL SET dial p 139 O SLOT SEL button p 39 Continued ...

Page 8: ... switch p 84 H AUDIO LEVEL CH 1 dial p 84 I AUDIO LEVEL CH 2 dial p 84 J AUTO MAN CH 2 switch p 84 K FOCUS AUTO MAN switch PUSH AUTO button p 45 L i headphones jack M DC IN jack N Tripod receptacles 1 4 inch 3 8 inch Supports 1 4 20UNC and 3 8 16UNC screws For mounting on a tripod with screw length 5 5 mm or shorter sold separately The tripod may not be able to mount in some orientations depending...

Page 9: ...p 35 B Viewfinder p 35 C Eye sensor D BATT RELEASE button p 21 E Memory card slot B p 39 F Memory card access lamp p 3 G Memory card slot A p 39 H Memory card access lamp p 3 I Multi micro USB jack p 124 J Battery pack p 21 K SDI OUT jack p 124 L HDMI OUT jack p 124 M Wired LAN port p 96 N INPUT 1 jack p 82 z Tip Although a GPS mark is displayed on the handle GPS is a function that is planned for ...

Page 10: ...nstruction manual supplied with the lens The numbers in are reference pages For details about attaching the grip see page 31 A Grip zoom lever p 43 B ASSIGN4 FOCUS MAG button p 46 C ASSIGN dial p 85 D ASSIGN6 button p 85 E Grip rotate lever p 36 F START STOP button p 40 G Multi selector p 61 H ASSIGN5 Fn button p 61 LCD screen Lens PXW FS5M2K only Grip Identifying parts and controls continued ...

Page 11: ...perating with the Wireless Remote Commander supplied with your camcorder your video device may also operate In that case select a commander mode other than DVD2 for your video device or cover the sensor of your video device with black paper To change the battery of the Wireless Remote Commander 1 While pressing on the tab inset your fingernail into the slit to pull out the battery case 2 Place a n...

Page 12: ...pper right Bottom Center Upper right Bottom Indicator Meaning 0min Estimated remaining recording time p 178 Recording playback media p 38 00 00 00 00 Time code hour minute second frame p 162 Indicator Meaning Face detection ON p 47 PEAKING p 158 ZEBRA p 158 NFC active p 88 AIRPLANE MODE p 96 CENTER SCAN p 150 Gamma display assist p 111 Gamma display assist when using HLG p 58 STEADYSHOT p 151 2 0E...

Page 13: ...e recorded automatically They are not displayed while recording However you can check them by selecting the data to display using DISPLAY SET t DATA CODE p 161 or by pressing an ASSIGN button assigned with the DATA CODE function Auto setting p 50 n A B White balance p 55 HISTOGRAM p 158 AUDIO LEVEL DISPLAY p 160 Manual volume adjustment p 84 Indicator Meaning ...

Page 14: ...sting the angle of the grip 36 Step 8 Inserting a memory card 38 Recording 40 Recording 40 Continuous recording on the memory cards Relay Rec 41 Recording movies using both memory card A and B Simul Rec 42 Changing the setting of the START STOP button and handle record button 42 Adjusting the zoom 43 Adjusting the focus 44 Using automatic focus fixed focus temporarily push auto focus focus hold 45...

Page 15: ...ecording 69 Recording in RAW format using a RAW recorder sold separately 70 Preparing to record in RAW mode 70 Selecting RAW output and unit recording format 71 RAW 4K Super Slow Motion 72 RAW 2K Super Slow Motion 72 Setting the S Q button for RAW 72 MPEG HD recording 73 Preparing to record in MPEG HD 73 Recording in MPEG HD 73 Slow Quick Motion Recording 74 Super Slow Motion Recording 75 Playback...

Page 16: ...eful functions 102 Selecting suitable settings automatically full auto mode setting 102 Customizing the picture quality Picture profile 103 Using the gamma display assist function 111 Setting time data 112 Preventing accidental operation HOLD switch 113 Reviewing the most recently recorded scene Last Scene Review 113 Inverting the LCD screen display 114 GPS function 115 GPS function compatible dev...

Page 17: ... 155 Settings for audio recording AVCHD AUDIO FORMAT XLR SET etc DISPLAY SET menu 158 Display settings MARKER DISPLAY OUTPUT etc TC UB SET menu 162 Time code settings TC PRESET UB PRESET TC FORMAT etc NETWORK SET menu 163 Settings for the Wi Fi function CTRL W SMARTPHONE etc SYSTEM menu 164 Settings while recording or other basic settings AREA SET BEEP etc Troubleshooting 168 Warning indicators an...

Page 18: ...le folder structure on the memory card 185 Maintenance and precautions 186 About the XAVC format 186 About the AVCHD format 186 About memory cards 186 About the battery pack 187 About handling of your camcorder 188 Specifications 191 Index 194 Table of Contents continued ...

Page 19: ...tes the number of items supplied Rechargeable battery pack BP U30 AC Adapter Charger BC U1A p 22 Power cord mains lead p 22 Wireless Remote Commander RMT 845 p 11 A button type lithium battery is already installed Large eyecup p 36 Accessory shoe kit Accessory shoe Accessory shoe plate screws 4 p 27 XLR handle p 26 LCD screen p 29 LCD screen protective sheet p 29 USB cable Grip p 31 Body cap attac...

Page 20: ...om the following websites Sony Professional products website U S A http pro sony com Canada http www sonybiz ca Latin America http sonypro latin com Europe Middle East and Africa http www pro sony eu Japan http www sonybsc com Asia Pacific http pro sony asia com Korea http bp sony co kr China http pro sony com cn Although the data regarding recorded materials are stored over multiple files and fol...

Page 21: ...flames Use the supplied AC Adapter to power the camcorder from a power outlet 1 Push the battery in and slide it down into position To remove the battery pack Set the ON STANDBY switch to STANDBY 1 Press and hold the BATT RELEASE button and slide the battery up and out On the battery pack Always set the ON STANDBY switch to STANDBY 1 before changing the battery pack The Battery Info may not be cor...

Page 22: ...o not short circuit the DC plug of the AC Adapter or battery terminal with any metallic objects This may cause a malfunction The attached battery pack cannot be charged while the AC Adapter is connected The battery pack can be charged using the BC U1A battery charger For details about charging refer to the manual for the battery charger b Note Even if the CHG lamp is not lit the battery charger is...

Page 23: ...When attaching a lens do not press the lens release button Attach the lens to the camcorder squarely without excessive force Mounting the lens forcibly may result in a malfunction or damage of the lens mount and ND filter There may be slight lens backlash when the lens is attached depending on the lens used This is not a fault When attaching a heavy lens or a lens attached to a tripod attach indiv...

Page 24: ...mewhere away from dusty locations Do not leave the camcorder body with the lens or body cap removed If dust or debris adheres on the glass surface of the mount Turn off the camcorder and detach the lens Clean the glass surface of the mount and the surrounding area using a blower sold separately and then reattach the lens b Notes Do not use a spray blower because it may scatter water droplets insid...

Page 25: ...ng may cause noise or turn the LCD screen brighter The iris will not adjust automatically in movie mode b Notes Some lenses may not be usable or may have limited functionality Check the dedicated support web site or consult your local authorized Sony service facility on compatible lenses The sound of the lens and the camcorder in operation may be recorded during movie recording You can avoid this ...

Page 26: ...n using LA EA2 LA EA4 Autofocusing Manual focusing b Note AF areas are not displayed during Super Slow Motion recording Step 4 Attaching the handle accessory shoe microphone LCD screen and grip 1 Remove the protective cap from the handle connector terminal 2 Place the handle in position aligning the screws and connector with the camcorder 3 While pressing each screw down turn clockwise to fasten t...

Page 27: ...n using the camcorder with the handle removed attach the protective cap to the connector terminal to protect the connector 1 Lift the edge of the accessory shoe plate and pull it in the direction opposite to that of the arrow on the accessory shoe plate and remove it from the accessory shoe 2 Place the accessory shoe with its protrusions matching the recesses on the accessory shoe mount then fix i...

Page 28: ...nto the microphone holder B 2 Connect the plug of the microphone to the INPUT 1 or INPUT 2 jack C 3 Place the microphone cable into the cable holder D z Tips If the microphone cannot be attached securely use the spacer supplied with the microphone The tip of the microphone may appear in the picture depending on the type of lens that is attached Adjust the position of the microphone Accessory shoe ...

Page 29: ...ed protective sheet to the LCD screen as shown in the diagram b Note Wipe the LCD screen to remove any smudges or dust before attaching the protective sheet z Tips When peeling the protective sheet off the LCD screen it is recommended to use cellophane tape to help peel off the sheet Small air bubbles may disappear naturally if left overnight 4 Attach the LCD screen to the LCD screen mounting clam...

Page 30: ...h the V mark on the LCD screen connection jack and plug in the cable Check the cable orientation to make sure the V faces outwards and then insert the cable To remove the cable Press both sides B and b of the LCD screen connection jack and then remove the connector To change the angle of the LCD screen See Step 6 Adjusting the LCD screen and viewfinder p 34 Step 4 Attaching the handle accessory sh...

Page 31: ...en Remove the LCD screen using the reverse procedure of attaching 1 Remove the grip attachment cover 2 Connect the cable to the REMOTE jack 3 Align the grip mounting index with the attachment point index on the camcorder and turn the grip counterclockwise gently The grip is attached when it clicks into the locked position b Note If the grip does not attach correctly try to attach the grip again wi...

Page 32: ...hes b Note Always place the camcorder on a desk or other horizontal surface when removing the grip z Tip You can attach rosettes to the grip attachment point on the camcorder and to the mounting point on the grip Rosette mount components are available from Sony dealers or service representatives Camcorder side 4 546 932 sold separately Grips side 4 547 089 sold separately Mounting screws 7 627 556...

Page 33: ...or about 2 months the built in rechargeable battery gets discharged and the date and time settings may be cleared from the memory In that case charge the rechargeable battery and then set the date and time again p 189 To set the date and time again press the MENU button and select SYSTEM t CLOCK SET 1 Select your area by turning the SEL SET dial then press the dial 2 Set SUMMERTIME Y year M month ...

Page 34: ...e the LCD screen or the viewfinder using the following settings To use the LCD screen only See page 161 To switch between LCD screen and viewfinder automatically This setting enables switching to viewfinder display automatically whenever your eye is near the eye sensor p 9 on the side of the viewfinder When you move your eye away from the viewfinder the display switches back to the LCD screen b No...

Page 35: ...sed when the camcorder is not in use or when it is being moved to protect the LCD screen To adjust the viewfinder angle You can adjust the angle of the viewfinder to suit your shooting style To adjust the focus of the viewfinder display LCD screen LCD screen LCD ON OFF switch VF LCD PANEL menu setting Connected OFF Not connected Adjusting the LCD screen Adjusting the viewfinder Diopter adjustment ...

Page 36: ...e eyecup attached to the camcorder You can attach the large eyecup facing either the right or left side b Note Do not remove the eyecup pre attached to the camcorder Large eyecup supplied Step 7 Adjusting the angle of the grip You can adjust the angle of the grip to suit your shooting style Normal position Rotated toward the lens maximum rotation Rotated toward the rear maximum rotation Step 6 Adj...

Page 37: ...s locked in position The angle cannot be adjusted beyond the adjustment range Do not use force to try and rotate the grip The recommended way of holding and operating the grip is shown below Using the ASSIGN5 Fn button and multi selector AOperate the ASSIGN dial using your index finger BOperate the multi selector and ASSIGN5 button using your thumb CHold the grip firmly using your middle finger ri...

Page 38: ... used with this camcorder File format Supported memory cards AVCHD SD SDHC SDXC memory card Class 4 or U1 or faster Memory Stick PRO Duo Mark2 Memory Stick PRO HG Duo AVCHD Slow Quick Motion Super Slow Motion SDHC SDXC memory card Class 10 or U1 or faster Memory Stick PRO HG Duo XAVC HD SDXC memory card Class 10 or U1 or faster XAVC HD Slow Quick Motion Super Slow Motion SDXC memory card U3 XAVC Q...

Page 39: ... card slot A accepts either Memory Stick PRO Duo media Memory Stick PRO HG Duo media or an SD card Memory card slot B accepts an SD card only To eject the memory card Lightly push the memory card once b Notes If The image database file is corrupted The media must be restored to use again appears format the memory card p 136 When inserting or ejecting the memory card be careful of the memory card p...

Page 40: ...rding press the record button again b Notes See page 178 about the recording time If a movie file size exceeds 2 GB while recording in AVCHD format the camcorder automatically divides the file and creates a new one The menu settings the picture profile settings and the settings made by the FULL AUTO button are stored in your camcorder when you slide the ON STANDBY switch to STANDBY 1 The memory ca...

Page 41: ...off Even if you press the SLOT SEL button while recording movies you cannot switch the slot currently being used When the remaining recording time of the memory card being used is less than 1 minute and the other slot has a recordable memory card inserted or appears on the camcorder screen The indicator turns off when the memory card is switched If you start recording on a memory card with the rem...

Page 42: ...TOP buttons on camcorder and grip HANDLE REC BUTTON To change the setting Select REC OUT SET t REC SET t REC BUTTON SETTING Recording movies using both memory card A and B Simul Rec Changing the setting of the START STOP button and handle record button REC BUTTON SETTING setting Button and memory card REC BUTTON HANDLE REC BUTTON Recording on both the memory card A and the memory card B starts and...

Page 43: ...m more quickly z Tips Keep your finger on the power zoom lever If you remove your finger the operation sound of the power zoom lever may also be recorded Adjusting the zoom Selecting the zoom type Attached lens ZOOM TYPE setting OPTICAL ZOOM ONLY ON CLEAR IMAGE ZOOM Fixed focal lengthlens zoom lens Zoom using zoom lever not supported Clear image zoom supported Power zoom lens Optical zoom only Opt...

Page 44: ...ing methods depend on the lens attached Refer to the operating manual that comes with your lens Do not grab or apply a strong force to the lens cylinder as it rolls out when zooming The lens may be damaged Keep your finger on the zoom lever If you move your finger off the zoom lever the operation sound of the zoom lever may also be recorded Adjusting the zoom with the zoom ring Adjusting the focus...

Page 45: ...tch the focal length information between meters and feet FOCUS DISPLAY p 160 To measure the precise recording distance The image sensor position mark and tape measure hook are on the same plane as the image sensor To measure the precise distance between the camcorder and the subject use this mark or tape measure hook as a reference You can attach the end of a tape measure to the hook and measure t...

Page 46: ...tions as focus hold The selected area on the LCD screen is magnified and displayed This is useful when adjusting the focus Press the FOCUS MAG button A on the grip The setting changes with each press of the button You can change the position of the enlarged display using the multi selector B on the grip or the SEL SET dial on the camcorder Press the multi selector B or SEL SET dial to set the enla...

Page 47: ...etected depending on the recording environment the condition of the subject or the settings You may not be able to get the proper effect in some recording environments If this happens set FACE DETECTION to OFF When FACE DETECTION is set to ON you cannot adjust shutter speed etc To adjust shutter speed etc set FACE DETECTION to OFF temporarily by setting the FOCUS AUTO MAN switch C to MAN The face ...

Page 48: ...ame rate 60 50 30 25 24 Scanning system p progressive i interlaced Bit rate 50 Mbps 35 Mbps 25 Mbps AVCHD Image size 1080 1920 720 720 1280 720 Frame rate 60 50 30 25 24 Scanning system i interlaced p progressive Bit rate PS max 28 Mbps FX max 24 Mbps FH approx 17 Mbps average HQ approx 9 Mbps average Selecting the file format and recording format 60i 50i 2160 30p 100Mbps 2160 25p 100Mbps 2160 30p...

Page 49: ...ile movie and the proxy file movie For details see Proxy recording supported formats p 182 Proxy recording For details about media that support proxy recording see Supported memory cards p 38 1 Press the MENU button 2 Select REC OUT SET t REC SET t PROXY REC MODE t ON OFF t ON with the SEL SET dial appears on the screen 3 Select REC OUT SET t REC SET t PROXY REC MODE t SIZE t desired image size wi...

Page 50: ...C to adjust the value The volume of the light increases the more that you open the aperture decreasing F value The volume of the light decreases the more that you close the aperture increasing F value To temporarily adjust the iris automatically Press and hold the IRIS PUSH AUTO button D The iris is adjusted automatically for as long as you hold the button down To adjust automatically Press the IR...

Page 51: ... G The ISO value or gain value disappears or appears next to the ISO value or gain value z Tips Can be operated using Direct Menu p 61 You can assign this function to the ASSIGN dial p 85 You can switch the displayed value between ISO sensitivity and gain using ISO GAIN SEL in the menu Note that ISO sensitivity and gain are separately saved with different values p 147 You can adjust and fix the sh...

Page 52: ...ry lamps the picture may flicker or change colors or may have horizontal bands of noise You may be able to improve the situation by adjusting the shutter speed to 1 50 if the power frequency of your area is 50 Hz or 1 60 in a 60 Hz area You can switch the shutter speed display between seconds and degrees SHUTTER DISPLAY page 160 To adjust automatically Press the SHUTTER button H twice The shutter ...

Page 53: ... position 2 Set the PRESET VARIABLE switch B to VARIABLE and switch the ND FILTER dial A to position 1 2 or 3 3 Adjust the filter density in the range 1 4 to 1 128 with the ND IRIS dial C The ND FILTER dial A 1 2 3 positions have no effect on the filter density adjustment z Tips Can be operated using Direct Menu p 61 You can assign this function to the ASSIGN dial p 85 If you switch ND FILTER dial...

Page 54: ...upported Zebra 1 Set a reference level and range for zebra display Zebra 2 Display zebra above a set level Setting zebra Select DISPLAY SET t ZEBRA in the menu and set the following items 1 Zebra 1 level reference level 2 Zebra 1 range 3 Zebra 2 level minimum level When ZEBRA1 or ZEBRA2 is selected the icon or icon appears b Notes Zebra 1 and zebra 2 cannot be displayed at the same time Zebra is n...

Page 55: ...or B When using a commercially available ND filter this adjustment is recommended x To use the PRESET value of white balance Select CAMERA PAINT t WB PRESET and select a desired setting Adjusting the white balance Setting value Example of recording conditions Outdoor OUTDOOR When recording a night scene neon lighting fireworks etc When recording a sunrise sunset etc Under daylight fluorescent lamp...

Page 56: ...ashes slowly Adjust the subject appropriately and set the shutter speed to auto or around 1 60 1 50 then try adjusting the white balance again It may take a long time to adjust the white balance depending on the recording conditions If you want to perform a different operation before completing the adjustment set the B A PRESET switch D to another position to stop the white balance adjustment To r...

Page 57: ... video is displayed automatically with the appropriate settings On devices that do not support the metadata manual configuration is required For AVCHD recording MPEG HD recording AVCHD format recordings and MPEG HD format recordings do not support HDR metadata For appropriate playback and display of HDR manual configuration is required The following items have been added GAMMA items Default settin...

Page 58: ...n of the camcorder do not support HDR and so are not appropriate for displaying HDR However they can display an image to aid shooting using the gamma display assist function The gamma display assist function affects only the monitoring video or playback video displayed in the viewfinder or on the LCD screen The recorded video and output video are not affected 1 Select DISPLAY SET menu t GAMMA DISP...

Page 59: ...ed in HDR The HDMI output and SDI output do not support HDR metadata For appropriate display of HDR manual configuration is required Thumbnail screen Only files recorded in XAVC format Item Description AUTO Shooting screen Automatically corrects the picture according to the picture profile setting Playback screen For AVCHD MPEG HD and XAVC non HLG files automatically corrects the picture according...

Page 60: ...in formats other than XAVC QFHD or XAVC HD The fact that the recording used HLG is not registered in metadata The HLG icon is not displayed on the thumbnail screen and playback screen Limitations on HDR files recorded in non XAVC formats HLG icon Gamma display assist icon High Dynamic Range HDR continued ...

Page 61: ... it can also be assigned to other buttons After entering Direct Menu mode a cursor underline is displayed for items along the bottom of the LCD screen Orange cursor indicates the selected item White cursor indicates selectable items For example the iris value 4 is selected in the following diagram A Focus value B AE shift level value C ND filter value D Iris value E ISO sensitivity gain F Shutter ...

Page 62: ...b Notes Direct Menu is not available when using the following functions including operation using operation buttons ASSIGN buttons During menu display During thumbnail display Slow Quick Motion Super Slow Motion FOCUS MAGNIFIER FACE DETECTION LAST SCENE REVIEW VOLUME Smartphone operation CTRL W SMARTPHONE STREAMING If an item such as iris value or focus value is changed using buttons or switches w...

Page 63: ... to STBY After you press the button to stop recording your camcorder continues recording till it completes writing of the minimum unit of data 0 5 seconds of replay time 1 Press the MENU button C 2 Select CAMERA PAINT t SLOW QUICK t S Q MOTION t REC FORMAT FRAME RATE with the SEL SET dial D REC FORMAT You can select the recording format from the following When 60i is selected XAVC QFHD 2160 30p 10...

Page 64: ...button again To cancel the setting Press the S Q button B or the MENU button C during standby Playback speed based on the setting between FRAME RATE and REC FORMAT during Slow Quick Motion The playback speeds based on the recording format and frame rate setting are as follows XAVC HD AVCHD When 60i is selected When 50i is selected FRAME RATE REC FORMAT 1080 24p 1080 30p 1080 60p 60 40 slow 50 slow...

Page 65: ... camcorder may continue recording for some time approximately 6 minutes at most after you press the record button to stop recording Do not operate your camcorder while the REC indicator is flashing on the LCD screen and wait till it turns to STBY After you press the button to stop recording your camcorder continues recording till it completes writing of the minimum unit of data 0 5 seconds of repl...

Page 66: ...w Motion recording screen appears 4 Press the START STOP button A to start recording To decide the recording time manually If REC TIMING is set to START TRIGGER you can stop recording at any time by pressing the START STOP button To change the frame rate setting During standby press and hold the S Q button B then change the value of the frame rate with the SEL SET dial D To cancel the setting pres...

Page 67: ...setting first stop recording The time code is recorded in REC RUN mode p 162 The Super Slow Motion is canceled automatically when the ON STANDBY switch is set to STANDBY 1 but the FRAME RATE setting is retained Flicker adjustment is not available You cannot record sound You cannot select a shutter speed value slower than the frame rate You cannot use the WB SET button Data code time and camera dat...

Page 68: ...CBKZ FS5HFR Connect a computer to the unit via USB to invoke the automatic detection function and follow the instructions displayed on the computer Ver 4 0 and later Playback speed The playback speeds based on the recording format are as follows When 60i is selected When 50i is selected Recording 1 Select CAMERA PAINT menu t SLOW QUICK t S Q MOTION t HIGH FRAME RATE t ON 2 Select REC FORMAT Shooti...

Page 69: ...Motion is selected the setting of the HIGH FRAME RATE menu item is always applied The following functions cannot be used FACE DETECTION COLOR BAR CENTER SCAN STREAMING DATE REC SIMULTANEOUS REC RELAY REC PROXY REC MODE Wi Fi remote control Full auto mode CLEAR IMAGE ZOOM AUTO BACK LIGHT Audio recording Shutter speed automatic adjustment RAW recording ACTIVE image stabilization STEADYSHOT The follo...

Page 70: ...TART STOP button on the camcorder However the status of the external recorder cannot be checked on the LCD screen Triggering an external recorder is always enabled when recording in RAW The recording trigger status is displayed on the LCD screen of the camcorder For details see the icon description p 71 The recording date time and color bars cannot be recorded when recording in RAW Flicker adjustm...

Page 71: ...he desired format Camera recording formats for RAW output The camera recording format for the format selected using OUTPUT FORMAT is shown below When 60i is selected The bit rate is fixed to 50 Mbps When 50i is selected The bit rate is fixed to 50 Mbps Signal output from output jacks During RAW output the RAW signal is always output on the SDI OUT jack regardless of the SDI OUT output format setti...

Page 72: ...Q button when recording in RAW mode Select SYSTEM t S Q BUTTON SET in the menu and select a function When 4K 2K SUPER SLOW is selected the function switches to 4K SUPER SLOW t 2K SUPER SLOW t OFF in sequence each time you press the S Q button z Tip Available only when full auto mode is off Note that exposure correction is set to manual RAW 4K Super Slow Motion Item Settings default setting in bold...

Page 73: ...information is not supported Data code recording and display is not supported If data code display is set to ON during playback is displayed Color bars can be used only when proxy recording is OFF Date recording can be used only during interlaced recording When recording in MPEG HD recording stops automatically when the recorded file reaches 6 hours duration The maximum recording time in MPEG HD u...

Page 74: ...INT menu t SLOW QUICK t S Q MOTION t FRAME RATE and set the frame rate Default setting in bold 4 Select EXECUTE 5 Press the record button to begin recording Playback speed for FRAME RATE and REC FORMAT settings during Slow Quick Motion When 60i is selected When 50i is selected Slow Quick Motion Recording 60i 50i 1080 30p 50Mbps 1080 25p 50Mbps 1080 24p 50Mbps 60i 50i 1080 30p HQ 1080 25p HQ 1080 2...

Page 75: ...R SLOW MOTION t REC TIMING and select the timing for recording For the recording time settings see Recording time for REC TIMING and FRAME RATE settings p 76 5 Select EXECUTE 6 Press the record button to begin recording 1 2500 quick Super Slow Motion Recording 60i 50i 1080 30p 50Mbps 1080 25p 50Mbps 1080 24p 50Mbps 60i 50i 1080 30p HQ 1080 25p HQ 1080 24p HQ 60i 50i 960fps 800fps 480fps 400fps 240...

Page 76: ...d back in MPEG HD 1 Press the THUMBNAIL button 2 You can switch playback mode to MPEG HD 422 or MPEG HD 420 on the thumbnail screen 3 Select the thumbnail of the movie you want to play to start playback FRAME RATE REC FORMAT 1080 24p 1080 30p 960 2 5 slow 3 125 slow 480 5 slow 6 25 slow 240 10 slow 12 5 slow 120 20 slow 25 slow FRAME RATE REC FORMAT 1080 25p 800 3 125 slow 400 6 25 slow 200 12 5 s...

Page 77: ...77 Recording The output signal formats for MPEG HD are the same as for XAVC HD See page 125 MPEG HD output formats Continued ...

Page 78: ...cards Class 10 or U1 or faster SDXC memory cards U3 are required for MPEG HD 422 proxy 9 Mbps simultaneous recording Estimated recording time of movies MPEG HD 422 1080 720 50Mbps 50Mbps 64GB 110 110 110 110 MPEG HD 422 PROXY 9M 1080 720 50Mbps 50Mbps 64GB 95 95 95 95 MPEG HD 422 PROXY 3M 1080 720 50Mbps 50Mbps 64GB 105 105 100 100 MPEG HD 420 1080 1080 1440 720 HQ max 35 Mbps HQ max 35 Mbps HQ ma...

Page 79: ...educes the overall recording time of the memory card Bit rate movie audio etc and number of pixels of each file format are as follows MPEG HD 422 50Mbps 1920 1080 50Mbps 1280 720 MPEG HD 420 HQ 35Mbps max 1920 1080 HQ 35Mbps max 1440 1080 HQ 35Mbps max 1280 720 MPEG HD 422 MPEG HD 420 PROXY 9M 1080 1080 1440 720 HQ max 35 Mbps HQ max 35 Mbps HQ max 35 Mbps 64GB 140 140 140 140 135 135 MPEG HD 420 ...

Page 80: ...al file MPEG HD 422 Streaming data Image size 1280 720 640 360 Frame rate fps 30 25 p 24p 60 50 p 30 25 p 24p Bit rate Mbps 3 3 2 1 1 1920 1080 60 50 i 50 Yes Yes 30 25 p 50 Yes Yes 24p 50 Yes Yes 1280 720 60 50 p 50 Yes Original file MPEG HD 420 Streaming data Image size 1280 720 640 360 Frame rate fps 30 25 p 24p 60 50 p 30 25 p 24p Bit rate Mbps 3 3 2 1 1 1920 1080 60 50 i HQ Yes Yes 30 25 p HQ...

Page 81: ...920 1080 30p 1920 1080 24p 1280 720 60p When 50i is selected 1920 1080 50i 1920 1080 25p 1280 720 50p Audio LPCM 2ch Recording media Memory card The camcorder is not able to play back data that is recorded in MPEG format using settings other than those described above System About the MPEG format Specifications Video recording format MPEG HD422 MPEG 2 422P HL 4 2 2 Long profile MPEG HD420 MPEG 2 M...

Page 82: ...H INPUT 1 switch Audio level controls C AUTO MAN CH 1 switch D AUTO MAN CH 2 switch E AUDIO LEVEL CH 1 dial F AUDIO LEVEL CH 2 dial You can record sound in stereo using the camcorder s internal microphone 1 Press the MENU button I 2 Select AUDIO SET t CH1 INPUT SELECT t INT MIC with the SEL SET dial J 3 Select AUDIO SET t CH2 INPUT SELECT t INT MIC with the SEL SET dial J Recording sound from the ...

Page 83: ... the input source for each channel 1 Press the MENU button I 2 Select AUDIO SET t CH1 INPUT SELECT t INPUT1 with the SEL SET dial J 3 Select AUDIO SET t CH2 INPUT SELECT t INPUT2 with the SEL SET dial J z Tip When using a stereo microphone that has two XLR plugs connect the left channel L to the INPUT 1 jack and the right channel R to the INPUT 2 jack Set CH 1 to INPUT 1 and CH 2 to INPUT 2 You ca...

Page 84: ...ecording or standby turn the AUDIO LEVEL dial E and F of the channels to adjust To restore automatic adjustment Set the AUTO MAN switch C and D of the manually adjusted channels to AUTO Setting the headphone audio Select AUDIO SET t HEADPHONE OUT in the menu and select the audio for output Adjusting the audio recording level Setting the Headphone Output On the PXW FS5 this function is supported us...

Page 85: ...AST SCENE REVIEW p 113 WB PRESET p 55 AE SHIFT p 149 CENTER SCAN p 150 STEADYSHOT p 151 S Q MOTION p 63 IRIS PUSH AUTO p 50 FACE DETECTION p 47 COLOR BAR p 152 DIRECT p 61 MENU p 139 PICTURE PROFILE p 103 VOLUME p 155 HISTOGRAM p 158 ZEBRA p 54 PEAKING p 158 MARKER p 158 CAMERA DATA DISPLAY p 159 AUDIO LEVEL DISPLAY p 160 DATA CODE p 122 161 GAMMA DISP ASSIST p 111 TC UB DISPLAY p 162 DISPLAY p 12...

Page 86: ...on that you want to assign with the SEL SET dial B then press the dial 5 Select OK with the SEL SET dial B then press the dial 1 Press the MENU button A 2 Select SYSTEM t ASSIGN DIAL with the SEL SET dial B 3 Select the function that you want to assign with the SEL SET dial B then press the dial ASSIGN1 to 3 buttons ASSIGN5 button ASSIGN4 button ASSIGN6 button ASSIGN dial Assigning a function to t...

Page 87: ...r Content Browser Mobile in Google Play then install it You need Android 4 1 or later when you use NFC One touch Google play may not be supported depending on country or region In this case search for Content Browser Mobile on the Internet then install it iOS Search for Content Browser Mobile in the App Store then install it You need iOS 7 0 or later You cannot use NFC One touch when you use iOS b...

Page 88: ...to 2 seconds the smartphone against the camcorder without moving it until Content Browser Mobile starts While CTRL W SMARTPHONE is activated only the START STOP button and handle record button are available on the camcorder The smartphone cannot be connected to the camcorder when AIRPLANE MODE is set to ON Set AIRPLANE MODE to OFF p 163 You can control some of the camcorder s shooting functions re...

Page 89: ...ls about usage restrictions see Function limitations when recording p 180 z Tip You can assign SMARTPHONE CONNECT to an ASSIGN button You can start CTRL W SMARTPHONE by pressing that ASSIGN button when the shooting screen is displayed p 85 Functions that can be controlled using CTRL W SMARTPHONE Recording start stop Touch focus Available when using manual focus Zooming Iris adjustment b Note You c...

Page 90: ...evice list in the Connect menu and select Connect 4 Return to the Home screen then start Content Browser Mobile For details on how to operate Content Browser Mobile after it starts refer to the Help section in Content Browser Mobile 1 Select Settings on the iPhone or iPad then select Wi Fi and the SSID displayed on the camcorder Connecting without using the NFC function iPhone iPad Using the Wi Fi...

Page 91: ...r first time only 3 Confirm connection to the SSID displayed on the camcorder 4 Return to the Home screen then start Content Browser Mobile For details on how to operate Content Browser Mobile after it starts refer to the Help section in Content Browser Mobile ...

Page 92: ...ry is not required for access points that do not display 5 Configure the access point settings IP address Select the IP address configuration method When Manual is selected enter the IP address configuration items displayed on the screen and select OK Priority Connection Select whether to configure connection priority for access points z Tip Selecting DNS server setting on the IP ADDRESS SET scree...

Page 93: ...ss point refer to the manual for the access point or contact the access point administrator The camcorder and access point may not connect or the distance between them for successful communication may be short depending on the surrounding environment such as obstacles and walls and the radio wave conditions Move the camcorder or otherwise reduce the distance between the camcorder and the access po...

Page 94: ...ing an access point manually 1 Press the MENU button 2 Select NETWORK SET t Wi Fi SET t ACCESS POINT SET with the SEL SET dial After a short delay a list of access points that can be connected is displayed 3 Select Manual setting t Manual regist b Note If ten access points have been registered in the camcorder another access point cannot be registered and a message appears Select Delete and delete...

Page 95: ...aracter during entry press Resetting connection information The connection information that you registered in order to use CTRL W SMARTPHONE can be reset 1 Press the MENU button 2 Select NETWORK SET t Wi Fi SET t SSID PW RESET with the SEL SET dial A message appears Screen items Function 1 Switch character type Characters switch between alphabetical letters numerals and symbols 2 Keyboard Characte...

Page 96: ...address appears Wi Fi related settings can be disabled when boarding a plane etc 1 Press the MENU button 2 Select NETWORK SET t AIRPLANE MODE with the SEL SET dial 3 Select ON You can connect the camcorder to a network using a wired LAN 1 Connect the wired LAN jack of the camcorder to a router using a LAN cable sold separately 2 Press the MENU button 3 Select NETWORK SET t WIRED LAN SET t IP ADDRE...

Page 97: ...ing PRESET beforehand to distribute a stream using those settings The following items can be configured SIZE Select the image size for streaming 1280 720 640 360 z Tip Select a size of 640 360 for increased streaming distribution stability DESTINATION SET Configure the streaming distribution destination Host Name IP address or host name of the receiver Port Port number used for streaming on the re...

Page 98: ...eaming function is not available when using the following functions During playback During thumbnail display In the following formats when the file format is AVCHD 1080 60p 1080 50p 720 60p 720 50p In the following formats when the file format is XAVC QFHD 2160 30p 100Mbps 2160 24p 100Mbps 2160 25p 100Mbps The following functions are not available when the streaming function is on Slow Quick Motio...

Page 99: ...each setting and enter the settings for FTP SERVER1 Enter using the keyboard then select OK z Tip For details about the keyboard input method see page 95 DISPLAY NAME Enter the display name of the FTP server to register DESTINATION SET Host Name Host name or IP address of the server Secure Protocol Enable disable secure FTP transfer Port Port number of the FTP server Directory Transfer destination...

Page 100: ...n and PROXY zTip You can assign this function to an ASSIGN button p 85 6 Select the thumbnail of the file you want to transfer and select Up to 100 files can be selected Press the DISPLAY button to preview the image appears on the thumbnail of files that have a proxy file 7 Select whether to turn the camcorder off YES or not NO automatically when the FTP transfer is completed File transfer starts ...

Page 101: ...certificate which can also be updated To update the root certificate save the certificate on a memory card and then import the certificate from the memory card 1 Write the root certificate to a memory card Write the certificate in PEM format with a certification pem file name to the root directory of the memory card 2 Insert the memory card with the root certificate into memory card slot A of the ...

Page 102: ... the MENU button 2 Select NETWORK SET t NETWORK RESET t OK with the SEL SET dial Resetting network settings Useful functions You can optimize settings to suit the scene to record Press the FULL AUTO button A to set full auto mode on The FULL AUTO button lamp turns on The iris ISO sensitivity gain shutter speed and white balance are adjusted automatically You cannot adjust them manually To set full...

Page 103: ...ith the SEL SET dial A then press the dial Customizing the picture quality Picture profile Picture profile number Example setting OFF Do not use a picture profile PP1 Example settings of a color tone with STANDARD gamma PP2 Example settings with color tone like an interchangeable lensstill camera movie with STILL gamma PP3 Example settings of natural color tone with ITU709 gamma PP4 Example settin...

Page 104: ...t picture profile number you want to change with the SEL SET dial A then press the dial 3 Select SETTING with the SEL SET dial A then press the dial 4 Select an item to be adjusted with the SEL SET dial A then press the dial 5 Adjust the picture quality with the SEL SET dial A then press the dial 6 Repeat steps 4 and 5 to adjust other items 7 Select RETURN with the SEL SET dial A then press the di...

Page 105: ...s contrast between bright areas and dark areas more than CINE1 and CINE2 sharpening dark area tone changes CINE4 Increases dark area contrast more than that of CINE3 The dark area contrast is weaker and the bright area contrast is stronger than that of STANDARD ITU709 Gamma curve that corresponds to ITU 709 Gain in low intensity area 4 5 ITU709 800 Gamma curve for checking scenes when shooting usi...

Page 106: ...to MANUAL Item Description and settings MODE Selects automatic or manual mode AUTO Sets the knee point and slope automatically MANUAL Sets the knee point and slope manually AUTO SET Sets the maximum point and sensitivity in AUTO mode MAX POINT Sets the maximum value of the knee point 90 to 100 SENSITIVITY Sets the sensitivity HIGH MIDDLE LOW MANUAL SET Sets the knee point and slope in MANUAL mode ...

Page 107: ...owing three settings and three color temperatures S GAMUT Use when GAMMA is set to S LOG2 a setting that presumes editing in post production after recording S GAMUT3 CINE Use when GAMMA is set to S LOG3 a setting that presumes editing in post production after recording Supports recording in a color gamut for easy adjustment to digital cinema color gamut S GAMUT3 Use when GAMMA is set to S LOG3 a s...

Page 108: ...k and white when COLOR EXTRACT is set will not be corrected COLOR EXTRACT Displays areas in colors that are stored in the memory The other areas are displayed in black and white You can use this function to add effects to your movies or to confirm the colors to be stored in the memory MEMORY SELECTION Selects a memory to make active 1 Sets Memory 1 to be active 2 Sets Memory 2 to be active 1 2 Set...

Page 109: ...ing environment Manual white balance adjustment is recommended when you use COLOR CORRECTION WB SHIFT To set items for the white balance shift Items you can adjust differ depending on the filter type MEMORY1 REVISION Corrects colors in Memory 1 PHASE Corrects the phase of the color in Memory 1 15 to 15 0 for no correction SATURATION Corrects the saturation of the color in Memory 1 15 to 15 0 for n...

Page 110: ...2 off to the vertical V side to 2 off to the horizontal H side B W BALANCE Selects the balance of the lower DETAIL B and the upper DETAIL W TYPE1 off to the lower DETAIL B side to TYPE5 off to the upper DETAIL W side LIMIT Sets the limit level of DETAIL 0 Low limit level likely to be limited to 7 High limit level not likely to be limited CRISPENING Sets the crispening level 0 shallow crispening le...

Page 111: ...get picture profile number with the SEL SET dial A then press the dial 3 Select SETTING t RESET t YES t RETURN t OK with the SEL SET dial A Movies shot using S Log2 or S Log3 require editing in post production These images have low contrast that make live monitoring difficult To preview the video you can use GAMMA DISP ASSIST to convert the video for display in the viewfinder or on the LCD screen ...

Page 112: ...st 2 time digits to 00 02 08 12 16 or 20 When 50i is selected 00 00 00 00 to 23 59 59 24 4 Set other digits by repeating step 3 5 Select OK with the SEL SET dial then press the dial To reset the time code Select RESET in step 2 of Setting the time code above to reset the time code 00 00 00 00 To reset the time code using the Wireless Remote Commander Press the TC RESET button on the Wireless Remot...

Page 113: ...nge the functions to be locked with HOLD SW SET p 166 You can review the most recently recorded scene on the LCD screen This function is available when the function is assigned to an ASSIGN button 1 Assign LAST SCENE REVIEW to an ASSIGN button beforehand p 85 2 After you stop recording press the assigned ASSIGN button The camcorder plays from the start to the end of the most recently recorded scen...

Page 114: ...a is not displayed when the switch is set to B T ROTATE The image is inverted horizontally and vertically The information indicators are inverted horizontally and vertically z Tip The B T and ROTATE switch positions affect the display on the LCD screen only The output image and recorded image are not affected Inverting the LCD screen display MIRROR switch position Display state Example display OFF...

Page 115: ...set to ON by default Position information and time information are recorded with the video when the GPS function is on If you do not want to record position information set GPS SETTING to OFF If a triangulating icon is not displayed after several minutes there may be a problem with signal reception You can start shooting without position information or move to an area with a clear view of the sky ...

Page 116: ...s displayed when shooting if a GPS signal cannot be received Displays position information Set SYSTEM t GPS INFORMATION in the menu to ON Acquired information symbols When position information cannot be received triangulation priority mode is activated All other functions stop and the camcorder searches for satellites making it easier to receive position information To receive position information...

Page 117: ...avel time of the signals etc Determining a location is called triangulation A GPS receiver can determine the location s latitude and longitude by receiving signals from 3 or more satellites As the positions of GPS satellites vary constantly it may take longer to determine the location or the receiver may not be able to determine the location at all depending on the location and time you use the ca...

Page 118: ... information Also the GPS satellites are controlled by the United States Department of Defense and the degree of accuracy may be changed intentionally Error during the triangulation process The camcorder acquires position information periodically during triangulation About restrictions on use of GPS Use GPS in accordance with the regulations of the situation the countries regions of use About the ...

Page 119: ...pears You can turn on off the date and time display on the thumbnails by pressing the DISPLAY button A Icons may also be displayed on thumbnails Playback Memory cards Playback mode Previous Next Thumbnails Current movie data p 120 Proxy recording p 49 icon Protected p 134 icon Continued ...

Page 120: ...cording start 2Resolution 3Frame rate 4Bit rate 5Recording time 6Time code of recording start Time code will not be displayed correctly when you play back a memory card with no time code or a memory card with time code that your camcorder does not support 7DOLBY DIGITAL recording Displayed when audio is recorded in Dolby Digital format in AVCHD i appears on the thumbnail for the movie that has bee...

Page 121: ... about 5 times t about 10 times t about 30 times t about 60 times normal speed To adjust the volume Press the MENU button D and select AUDIO SET t VOLUME to adjust the volume To return to recording mode Press the THUMBNAIL button B On playing back movies Movies recorded using this camcorder may not be played back normally on devices other than this camcorder Also movies recorded on other devices m...

Page 122: ...ically stored during recording on the screen during playback 1 Press the MENU button D 2 Select DISPLAY SET t DATA CODE with the SEL SET dial C or press the ASSIGN button assigned with the DATA CODE function during playback or pause The screen changes in the order date and time display t camera data display t no display with each press of the button A White balance appears during playback of a mov...

Page 123: ...etup p 42 Memory card information You can check the estimated used and free space Battery Info You can check the remaining capacity of the attached battery 1 Press the STATUS button A 2 Turn the SEL SET dial C until the desired item appears on the LCD screen Switches in the order AUDIO t OUTPUT t ASSIGN t CAMERA t REC BUTTON SET t MEDIA INFO t BATTERY INFO Setup items are displayed according to th...

Page 124: ...t be output simultaneously from the jacks in the diagram above A signal cannot be output from the jacks above when recording in 4K mode XAVC QFHD Monitor TV To HDMI input jack HDMI cable sold separately 75 Ω ohms coaxial cable commercially available To SDI jack Signal flow Signal flow AV cable sold separately Monitor TV To audio jack To video jack SDI OUT HDMI OUT ...

Page 125: ...n below SDI OUT output format when 60i is selected Independent of set value Selecting jacks for external output Output signal formats Menu item SDI OUT output signal format Recording mode Recording format SDI HDMI 24p 30p REC OUT SET REC SET FILE FORMAT REC OUT SET REC SET REC FORMAT REC OUT SET VIDEO OUT SDI HDMI REC OUT SET VIDEO OUT 24p 30p XAVC QFHD 2160 24p 2160p 1080p 480i 24p 30p 1080 24p 2...

Page 126: ...80p 480i 24p 30p 1080 24p 24PsF 30PsF 1080 24psf 60p Pull Down 1080 60p 2160p 720p 480i 720 60p 2160p 1080i 480i 1080 60i 1080p 480i 24p 30p 1080 24p 24PsF 30PsF 1080 24psf 60p Pull Down 1080 60p 720p 480i 720 60p 1080i 480i 1080 60i 480p No output 480i 480 60i Menu item SDI OUT output signal format Recording mode Recording format SDI HDMI 24p 30p REC OUT SET REC SET FILE FORMAT REC OUT SET REC SE...

Page 127: ...480i 1080 60i 480p No output 480i 480 60i 1080 60p 720 60p 1080 60i 2160p 1080p 480i 1080 60p 2160p 720p 480i 720 60p 2160p 1080i 480i 1080 60i 1080p 480i 1080 60p 720p 480i 720 60p 1080i 480i 1080 60i 480p No output 480i 480 60i Menu item SDI OUT output signal format Recording mode Recording format SDI HDMI 24p 30p REC OUT SET REC SET FILE FORMAT REC OUT SET REC SET REC FORMAT REC OUT SET VIDEO O...

Page 128: ...T SET VIDEO OUT 24p 30p XAVC QFHD 2160 24p 2160p 1080p 480i 2160 24p 2160p 720p 480i 2160p 1080i 480i 1080p 480i 24p 30p Duringrecording 1080 24p During playback 1080 60p 24PsF 30PsF 60p Pull Down 1080 60p 720p 480i 720 60p 1080i 480i 1080 60i 480p 480 60p 480i 480 60i 2160 30p 2160p 1080p 480i 2160 30p 2160p 720p 480i 2160p 1080i 480i 1080p 480i 1080 60p 720p 480i 720 60p 1080i 480i 1080 60i 480p...

Page 129: ...30p 2160p 1080p 480i 1080 60p 2160p 720p 480i 720 60p 2160p 1080i 480i 1080 60i 1080p 480i 1080 60p 720p 480i 720 60p 1080i 480i 1080 60i 480p 480 60p 480i 480 60i 1080 60p 720 60p 1080 60i 2160p 1080p 480i 1080 60p 2160p 720p 480i 720 60p 2160p 1080i 480i 1080 60i 1080p 480i 1080 60p 720p 480i 720 60p 1080i 480i 1080 60i 480p 480 60p 480i 480 60i Menu item HDMI OUT output signal format Recording ...

Page 130: ...OUT 50p XAVC QFHD 2160 25p 2160p 1080p 576i 25p 1080 25p 25PsF 1080 25psf 50p 1080 50p 2160p 720p 576i 720 50p 2160p 1080i 576i 1080 50i 1080p 576i 25p 1080 25p 25PsF 1080 25psf 50p 1080 50p 720p 576i 720 50p 1080i 480i 1080 50i 576p No output 576i 576 50i XAVC HD AVCHD 1080 25p 2160p 1080p 576i 25p 1080 25p 25PsF 1080 25psf 50p 1080 50p 2160p 720p 576i 720 50p 2160p 1080i 576i 1080 50i 1080p 576i...

Page 131: ... Recording format SDI HDMI 50p REC OUT SET REC SET FILE FORMAT REC OUT SET REC SET REC FORMAT REC OUT SET VIDEO OUT SDI HDMI REC OUT SET VIDEO OUT 50p XAVC QFHD 2160 25p 2160p 1080p 576i 2160 25p 2160p 720p 576i 2160p 1080i 576i 1080p 576i 1080 50p 720p 576i 720 50p 1080i 480i 1080 50i 576p 576 50p 576i 576 50i Menu item SDI OUT output signal format Recording mode Recording format SDI HDMI 50p REC...

Page 132: ... sounds may not be reproduced correctly on some monitors or TVs Do not connect the output jacks of the camcorder with the output jacks of the monitor or TV A malfunction may be caused If you display the edit screen while outputting signals to a monitor or TV the menu may not be displayed correctly XAVC HD AVCHD 1080 25p 2160p 1080p 576i 1080 50p 2160p 720p 576i 720 50p 2160p 1080i 576i 1080 50i 10...

Page 133: ...to XAVC QFHD in the REC OUT SET menu Any one of the following functions can be used when recording in XAVC QFHD External output while recording Face detection function Proxy recording however not supported when all the conditions below are met When REC OUT SET t REC SET t REC FORMAT is set to 100Mbps When REC OUT SET t REC SET t SIMUL RELAY REC is not set to OFF On the PXW FS5 this function is sup...

Page 134: ...the MENU button while playing back movies 2 Select EDIT t DIVIDE with the SEL SET dial 3 Select X at the point where you want to divide 4 Select t b Notes You cannot restore movies once they are divided Do not remove the battery pack the AC Adapter or the memory card that contains the movies from your camcorder during the operation It may damage the memory card A slight difference may occur from t...

Page 135: ... delete protected movies Undo the protection of the movies before you try to delete them p 134 Save important movies beforehand z Tip To delete all data recorded on the memory card and recover all the recordable space of the media format the media p 136 1 Press the MENU button when the thumbnail screen is displayed 2 Select EDIT t DELETE with the SEL SET dial 3 Select the movie to delete is displa...

Page 136: ...tion To avoid the loss of important images you should save them before formatting the media Protected movies are also deleted 1 Press the MENU button 2 Select SYSTEM t MEDIA FORMAT with the SEL SET dial 3 Select the memory card to format 4 Select t b Note While Executing is displayed do not operate the buttons on the camcorder disconnect the AC Adapter or remove the memory card from your camcorder...

Page 137: ...the wall outlet wall socket Disconnect all cables except the AC Adapter Do not disconnect the AC Adapter during the operation Do not apply any vibrations or shocks to your camcorder during this operation 1 Connect the AC Adapter and the power cord mains lead to the DC IN jack of your camcorder and the wall outlet wall socket p 22 2 Press the MENU button 3 Select SYSTEM t MEDIA FORMAT with the SEL ...

Page 138: ...running out of power during the operation 1 Press the MENU button 2 Select SYSTEM t REPAIR IMAGE DB FILE with the SEL SET dial 3 Select the memory card for which you want to check the database file 4 Select The database file check starts Select and quit the database file check if no inconsistency is found 5 Select t b Note If you stop the operation while Repairing the image database file is displa...

Page 139: ...p 163 SYSTEM p 164 EDIT p 146 3 Turn the SEL SET dial until the desired menu item is highlighted then press the dial to select the item 4 Turn the SEL SET dial until the desired setting is highlighted then press the dial to confirm the setting 5 Press the MENU button to hide the menu screen To return to the previous screen select RETURN b Notes The available menu items vary depending on the contex...

Page 140: ...140 Items and setting values not available due to other settings are grayed out Operating the menu continued ...

Page 141: ...dB to 30dB WB PRESET BOUTDOOR INDOOR MANU WB TEMP WB OUTDOOR LEVEL 7 to 7 B0 WB TEMP SET 2300K to 15000K B6500K BLACK BALANCE AE SHIFT ON OFF BOFF ON LEVEL 2 0EV to 2 0EV B0EV LENS COMPENSATION BAUTO OFF ND FILTER PRESET1 B1 4 1 8 1 16 1 32 1 64 1 128 PRESET2 1 4 1 8 B1 16 1 32 1 64 1 128 PRESET3 1 4 1 8 1 16 1 32 B1 64 1 128 ND IRIS DIAL DIRECTION BNORMAL OPPOSITE CENTER SCAN BOFF ON ZOOM SET ZOO...

Page 142: ...PS B1080 25p FX 1080 25p FH FRAME RATE When 60i is selected XAVC QFHD 1fps to 30fps B30fps XAVC HD AVCHD 1fps to 60fps B60fps When 50i is selected XAVC QFHD 1fps to 25fps B25fps XAVC HD AVCHD 1fps to 50fps B50fps SUPER SLOW MOTION REC FORMAT When 60i is selected XAVC HD 1080 60p 50Mbps 1080 60p 35Mbps 1080 30p 50Mbps 1080 30p 35Mbps B1080 24p 50Mbps 1080 24p 35Mbps AVCHD 1080 60p PS 1080 30p FX 10...

Page 143: ...60 24p 60Mbps When 50i is selected 2160 25p 100Mbps B2160 25p 60Mbps XAVC HD When 60i is selected 1080 60p 50Mbps 1080 60p 35Mbps B1080 60i 50Mbps 1080 60i 35Mbps 1080 60i 25Mbps 1080 30p 50Mbps 1080 30p 35Mbps 1080 24p 50Mbps 1080 24p 35Mbps 720 60p 50Mbps When 50i is selected 1080 50p 50Mbps 1080 50p 35Mbps B1080 50i 50Mbps 1080 50i 35Mbps 1080 50i 25Mbps 1080 25p 50Mbps 1080 25p 35Mbps 720 50p ...

Page 144: ...6p 576i 24p 30p OUTPUT 4 B24p 30p 24PsF 30PsF 60p Pull Down 25p OUTPUT 5 B25p 25PsF 50p Pull Down DOWN CONVERT TYPE BSQUEEZE LETTER BOX 16 9 EDGE CROP HDMI TC OUTPUT BOFF ON SDI HDMI REC CONTROL BOFF ON AUDIO SET p 155 VOLUME AVCHD AUDIO FORMAT BLINEAR PCM DOLBY DIGITAL CH1 INPUT SELECT BINT MIC INPUT1 MI SHOE MIC CH2 INPUT SELECT BINT MIC INPUT1 INPUT2 MI SHOE MIC AUDIO LIMIT BOFF ON HEADPHONE OU...

Page 145: ...DISPLAY BON OFF ZOOM DISPLAY BBAR NUMBER FOCUS DISPLAY BMETER FEET SHUTTER DISPLAY BSECOND DEGREE DATA CODE BOFF DATE TIME CAMERA DATA GAMMA DISP ASSIST ON OFF BON OFF TYPE BAUTO S LOG2t 709 800 S LOG3 t709 800 HLG BT 2020 HLG 709 LCD BRIGHT BNORMAL BRIGHT VF COLOR TEMP VF LCD PANEL BLCD PANEL AUTO DISPLAY OUTPUT BLCD PANEL ALL OUTPUT TC UB SET p 162 TC UB DISPLAY BTC U BIT TC PRESET PRESET RESET ...

Page 146: ...SETTING BS Q SUPER SLOW S Q MOTION SUPER SLOW MOTION S Q BUTTON SET B 4K 2K SUPER SLOW 4K SUPER SLOW 2K SUPER SLOW ASSIGN BUTTON ASSIGN1 ASSIGN2 ASSIGN3 ASSIGN4 ASSIGN5 ASSIGN6 ASSIGN DIAL BIRIS ND FILTER ISO GAIN AE SHIFT FOCUS ASSIGN DIAL DIRECTION BNORMAL OPPOSITE CLOCK SET AREA SET SUMMERTIME BOFF ON LANGUAGE GPS SETTING BON OFF GPS INFORMATION AUTO CLOCK ADJ BON OFF AUTO AREA ADJ BON OFF DATE...

Page 147: ... gain dB b Notes Note that ISO sensitivity and gain are separately saved with different values ISO GAIN SEL is available only when the FULL AUTO button is off not lit You can set ISO values for the positions of the ISO GAIN L M H switch Default setting L ISO800 M ISO1600 H ISO3200 1 Select CAMERA PAINT t ISO SET t L M or H with the SEL SET dial 2 Set the ISO sensitivity value with the SEL SET dial...

Page 148: ... value between 0dB and 33dB in 3dB increments The larger the value the higher the gain 3 Select OK with the SEL SET dial z Tips Available when ISO GAIN SEL is set to GAIN The value can be set separately from the one set in ISO SET You can select the upper limit for auto ISO adjustment Default setting BOFF ISO800 to ISO25600 1 3EV increments Setting value The value you can set depends on the GAMMA ...

Page 149: ...temperature is fixed to xxxxK when any of the color modes above is selected You can set the color temperature when you set WB PRESET to MANU WB TEMP 2300K to B6500K to 15000K 100K increments b Note Cannot be selected when COLOR MODE in the picture profile is set to the following S GAMUT xxxxK S GAMUT3 CINE xxxxK or S GAMUT3 xxxxK The white balance color temperature is fixed to xxxxK when any of th...

Page 150: ...2 optical zoom BOFF Disable center scan ON Enable center scan b Note For details about usage restrictions see Function limitations when recording p 180 z Tip You can assign ON OFF to an ASSIGN button p 85 Sets the action when operating the zoom lever x ZOOM TYPE B OPTICAL ZOOM ONLY Uses optical zoom only ON CLEAR IMAGE ZOOM You can use the clear image zoom in addition to the optical zoom b Note Th...

Page 151: ...bilization selector switch the switch setting on the lens takes precedence This menu cannot be selected if a lens fitted with an image stabilization selector switch is attached that does not support ACTIVE image stabilization The image stabilization for such a lens is Lens switch on STANDARD Lens switch off OFF z Tip You can assign this function to an ASSIGN button p 85 See page 63 For details abo...

Page 152: ...lete its registered value then reset its value to 0 Alternatively you can reset the values of all lenses with CLEAR ALL If you perform AF micro adjustment with the lens of another manufacturer the adjustment values of Sony Minolta and Konica Minolta lenses may be affected Do not use this function with lenses of any other manufacturer You cannot perform individual AF micro adjustment for Sony Minol...

Page 153: ...ing menu items x FILE FORMAT See page 48 x REC FORMAT See page 48 For details about RAW format recording see page 71 x SIMUL RELAY REC See page 42 x REC BUTTON SETTING See page 42 x PROXY REC MODE See page 49 x OUTPUT SELECT You can select where to output images SDI B HDMI VIDEO x QFHD REC OUTPUT See page 133 Press the MENU button t select REC OUT SET with the SEL SET dial REC SET VIDEO OUT Contin...

Page 154: ...on is available only when SDI HDMI is 1080p 480i x 25p OUTPUT when 50i is selected Sets the output format when the frame rate in REC FORMAT is set to 25p and progressive scan method is selected B 25p 25PsF 50p Pull Down b Note This function is available only when SDI HDMI is 1080p 576i x DOWN CONVERT TYPE You can set the output format of the video signal Selects the shape of the output 4 3 image a...

Page 155: ...ing in sync with the camcorder B OFF Does not record in sync with the camcorder ON Records to an external recorder in sync with the camcorder AUDIO SET menu Settings for audio recording AVCHD AUDIO FORMAT XLR SET etc The default settings are marked with B See page 139 for details on selecting menu items Turn the SEL SET dial to adjust the volume z Tip You can assign this function to an ASSIGN butt...

Page 156: ... wind noise reduction ON Enables wind noise reduction appears on the status check screen b Note If the internal microphone is selected for both CH 1 and CH 2 CH 1 INT MIC CH 2 INT MIC the sound that is output from the headphones during recording and standby will have weaker stereo effect than the sound that is actually recorded x XLR AGC LINK You can select either linked or separate AGC Auto Gain ...

Page 157: ...PL sound pressure level is input microphone output is 48 dBu set INPUT TRIM to 0dB If using a microphone with 36 dB sensitivity setting INPUT TRIM to 6dB will compensate for the difference in sensitivity from a microphone with 30 dB sensitivity The INPUT TRIM function adjusts the input level from an external microphone For microphones with high sensitivity or to record high level audio adjust in t...

Page 158: ...n mode is set z Tip You can assign this function to an ASSIGN button p 85 Press the MENU button t select DISPLAY SET with the SEL SET dial HISTOGRAM Histogram See page 54 x ON OFF B OFF Does not display the peaking ON You can display an image on the LCD screen with its outlines enhanced This function helps you to adjust the focus x COLOR You can select peaking color BWHITE RED YELLOW x LEVEL You c...

Page 159: ...hen marker display is on even if DISPLAY OUTPUT is set to ALL OUTPUT Markers cannot be displayed during FOCUS MAGNIFIER operation The marker display cannot be output to an external device z Tips You can display all types of markers at the same time You can obtain a balanced composition by positioning the subject at the cross points of the guideframe marker You can assign ON OFF to an ASSIGN button...

Page 160: ...calculated based on this definition and displayed When 60i is selected With a frame rate of 60 selected in REC FORMAT when the shutter speed is 1 60 the shutter angle is 360 degrees With a frame rate of 30 selected in REC FORMAT when the shutter speed is 1 30 the shutter angle is 360 degrees With a frame rate of 24 selected in REC FORMAT when the shutter speed is 1 24 the shutter angle is 360 degr...

Page 161: ...d high color temperature makes it appear bluish Selects whether the camera image is displayed in the viewfinder or on the LCD screen B LCD PANEL The image is always displayed on the LCD screen AUTO Automatically displays image in the viewfinder when you look through the viewfinder The image is displayed on the LCD screen at all other times For details see page 34 You can select where to output the...

Page 162: ...ond however gaps in the actual time occur during extended periods of recording as the actual frame frequency of NTSC image signal is 29 97 frames per second Drop frame corrects this gap to make time code and actual time equal In drop frame the first 2 frame numbers are removed every minute except in every tenth minute Time code without this correction is called non drop frame You can select how th...

Page 163: ...ON Records the time in the user bits b Note The last 2 digits are fixed to 00 when it is set to ON TC MAKE UB TIME REC NETWORK SET menu Settings for the Wi Fi function CTRL W SMARTPHONE etc The default settings are marked with B See page 139 for details on selecting menu items See page 88 See page 97 See page 99 See page 96 See page 92 See page 96 See page 101 See page 102 Press the MENU button t ...

Page 164: ...ect the camera profile to be loaded with the SEL SET dial 2 Select YES on the confirmation screen Press the MENU button t select SYSTEM with the SEL SET dial STATUS CHECK CAMERA PROFILE The camcorder restarts and the loaded camera profile is applied b Note A camera profile saved on a camcorder with different model name or edited on a computer cannot be loaded x SAVE You can save the camera profile...

Page 165: ...o ON to move the time forward 1 hour B OFF Does not set summer time ON Sets summer time You can select the language to be used on the LCD screen See page 115 See page 116 See page 116 See page 117 B OFF Does not superimpose the date and time on images ON Superimposes the date and time on images z Tips You can set this item only when the interlace scanning system is selected When zebra or peaking i...

Page 166: ...FF Disables the supplied Wireless Remote Commander to prevent misoperation by the remote control of another device Select according to the frame rate to record B 60i To record at 24p 30p 60i or 60p 50i To record at 25p 50i or 50p b Note Memory cards formatted and recorded at 60i 50i cannot be recorded or played back at 50i 60i and vice versa If A movie with a different video signal format from thi...

Page 167: ... Displays the total hours of operation in 10 hour increments Displays the installation status of options Displays the current version of your camcorder and lens Be sure to check for firmware updates b Note To perform an update use the AC Adapter You can reset all settings including the clock setting to their default values b Note The picture profile settings are not reset USB LUN SET OPERATION TIM...

Page 168: ...corder does not operate even when the power is set to on Disconnect the power source battery or AC Adapter then reconnect it after about 1 minute Check the HOLD switch Hold state is indicated when an orange portion is visible release hold state as required The camcorder gets warm Camera body may get warm with use this is normal 1 Check your camcorder referring to the items on pages 168 to 174 2 Di...

Page 169: ...arly p 35 The supplied Wireless Remote Commander does not function Set REMOTE CONTROL to ON p 166 Remove any obstructions between the Wireless Remote Commander and the remote sensor of the camcorder Keep strong light sources such as sunlight or overhead lighting away from the remote sensor otherwise the Wireless Remote Commander may not function properly Change the battery Insert a fresh battery w...

Page 170: ...thout repairing The recording does not start when you press the START STOP button The playback screen is displayed Stop playback operation p 121 The START STOP button may be locked by the HOLD switch p 6 There is no empty space on the memory card Replace the memory card with a new one format the memory card p 136 or delete unnecessary images p 135 Total number of movie scenes exceeds the recordabl...

Page 171: ...ton is pressed and the point that the recording movie actually starts or stops On your camcorder there may be a slight time difference between the point where you press the record button and the actual point that recording movie starts stops This is not a malfunction Automatic focus does not function Set the FOCUS switch to AUTO to enable automatic adjustment p 45 Adjust the focus manually if the ...

Page 172: ...be reduced by using a slower shutter speed You may try downloading the Catalyst Browse software to repair the image Black bands appear when you record a TV screen or computer screen Adjust the shutter speed p 51 Fine patterns flicker diagonal lines look jagged Adjust DETAIL to the negative side p 110 The time code is not recorded in sequence The time code may not be recorded sequentially if you ch...

Page 173: ...ack on your camcorder Neither image nor sound is played back on the TV connected with the HDMI cable Images are not output from the HDMI OUT jack if copyright protection signals are recorded in the images Signals are not output from the HDMI OUT jack when the USB jack is connected Neither image nor sound is played back on the TV projector or AV amplifier connected with the HDMI cable If you cannot...

Page 174: ...nnect it again You need to download the Catalyst Browse software to copy movies from your camcorder to your computer The ND filter does not move You can move the ND filter to the CLEAR position using the following procedure 1 Turn off the camcorder 2 Remove the round cap 3 Insert a screwdriver into the hole and turn counterclockwise Turning the screwdriver counterclockwise moves the ND filter Turn...

Page 175: ...ed when the ND filter is no longer moving The ND unit may become damaged if the procedure is used during normal operation After performing the procedure above the camcorder should be repaired at a service center An error message may appear after performing the procedure above but the camcorder can still record ...

Page 176: ... battery pack and put it in a cool place Warning indicators pertaining to memory cards Slow flashing Free spaces for recording images are running out For details about memory cards you can use with your camcorder see page 38 No memory card is inserted p 38 Fast flashing There are not enough free spaces for recording images Delete unnecessary images p 135 or format the memory card p 136 after stori...

Page 177: ...uire an IP address Change the IP address setting Could not acquire the IP address If connecting to a network via a wireless LAN select NETWORK SET t ACCESS POINT SET and specify the IP address manually If connecting to a network via a wired LAN select NETWORK SET t WIRED LAN SET and specify the IP address manually Network error occurred A Wi Fi communication error occurred Check the LAN cable conn...

Page 178: ... suit the recording scene This technology causes fluctuations in the recording time of the memory card For example movies containing quickly moving and complex images are recorded at a higher bit rate and this reduces the overall recording time of the memory card Estimated recording time of movies 4K QFHD 2160 60Mbps 100Mbps 64GB 100 100 65 65 4K QFHD PROXY 9M 2160 60Mbps 100Mbps 64GB 85 85 55 55 ...

Page 179: ...ormat are as follows XAVC QFHD 100 Mbps 3840 2160 60 Mbps 3840 2160 XAVC HD 50 Mbps 1920 1080 35 Mbps 1920 1080 25 Mbps 1920 1080 50 Mbps 1280 720 AVCHD PS max 28Mbps 1920 1080 FX max 24Mbps 1920 1080 1280 720 FH approx 17Mbps avg 1920 1080 1280 720 HQ approx 9Mbps avg 1440 1080 1280 720 ...

Page 180: ...ng is OFF Yes when proxy recording is OFF CENTER SCAN No Yes Yes SUPER SLOW MOTION No Yes Yes S Q MOTION Yes Yes Yes STREAMING Yes 60 Mbps only Yes Yes DATE REC No Yes Interlaced recording Yes Interlaced recording SIMULTANEOUS REC Yes Yes Yes RELAY REC Yes Yes Yes PROXY REC MODE Yes Yes No Simultaneous recording Proxy recording Yes 60 Mbps only Yes No Relay recording Proxy recording Yes 60 Mbps on...

Page 181: ...uick Motion Super Slow Motion FACE DETECTION No No COLOR BAR No No CENTER SCAN Yes No STREAMING No No DATE REC No No SIMULTANEOUS REC RELAY REC No No PROXY REC MODE No No Wi Fi remote control No No Full auto mode No No HISTOGRAM Yes No PEAKING Yes Yes ZEBRA Yes Yes WB SET Yes No FOCUS MAGNIFIER Yes Yes CLEAR IMAGE ZOOM Yes No ...

Page 182: ...imultaneous relay recording ON Original file Proxy file Image size 1280 720 640 360 Frame rate fps 60 50 p 30 25 p 24p 60 50 p 30 25 p 24p Bit rate Mbps 9 9 9 3 3 3 3840 2160 30 25 p 100 Yes Yes 60 Yes Yes 24p 100 Yes Yes 60 Yes Yes 1920 1080 60 50 p 50 Yes Yes 35 Yes Yes 60 50 i 50 Yes Yes 35 Yes Yes 25 Yes Yes 30 25 p 50 Yes Yes 35 Yes Yes 24p 50 Yes Yes 35 Yes Yes 1280 720 60 50 p 50 Yes Yes ...

Page 183: ...es Yes 1920 1080 60 50 p 50 Yes 35 Yes 60 50 i 50 Yes Yes 35 Yes Yes 25 Yes Yes 30 25 p 50 Yes Yes 35 Yes Yes 24p 50 Yes Yes 35 Yes Yes 1280 720 60 50 p 50 Yes Original file AVCHD Streaming data Image size 1280 720 640 360 Frame rate fps 30 25 p 24p 60 50 p 30 25 p 24p Bit rate Mbps 3 3 2 1 1 1920 1080 60 50 p PS 60 50 i FX Yes Yes FH Yes Yes 30 25 p FX Yes Yes FH Yes Yes 24p FX Yes Yes FH Yes Yes...

Page 184: ...Guyana Haiti Honduras Japan Korea Mexico Micronesia Myanmar Nicaragua Panama Peru the Philippines Puerto Rico Saint Lucia Samoa Surinam Taiwan Trinidad and Tobago the U S A Venezuela etc Countries regions that require 60i 50i SEL set to 50i Argentina Australia Austria Belgium Brazil Bulgaria China Croatia Czech Republic Denmark Finland France French Guiana Germany Greece Hong Kong Hungary Indonesi...

Page 185: ...ata of AVCHD movie files Do not modify the files or folders on the camcorder from the computer Doing so might damage image files or prevent image files from being played back C XAVC HD 4K QFHD movie management information folder This folder contains recording data of XAVC HD 4K QFHD movie files Do not modify the files or folders on the camcorder from the computer Doing so might damage image files ...

Page 186: ...ay vary depending on the combination of the memory card and memory card compliant product you use Damaged or lost image data will not be compensated for and may occur in the following cases If you eject the memory card turn the power off on your camcorder or remove the battery pack for replacement while your camcorder is reading or writing image files on the memory card while the memory card acces...

Page 187: ...e battery pack to water The battery pack is not water resistant About storage of the battery pack If the battery pack is not used for a long time fully charge the battery pack and use it up on your camcorder once a year to maintain proper function To store the battery pack remove it from your camcorder and put it in a dry cool place To discharge the battery pack on your camcorder completely leave ...

Page 188: ...tion use the accessories recommended in these operating instructions Do not let your camcorder get wet for example from rain or sea water If your camcorder gets wet it may malfunction Sometimes this malfunction cannot be repaired If any solid object or liquid gets inside the casing unplug your camcorder and have it checked by a Sony dealer before operating it any further Avoid rough handling disas...

Page 189: ...f the organic EL panel Because of the physical characteristics of the organic EL panel image persistence or low brightness may occur These problems are not a malfunction and the organic EL panel can be used without problems Casing If the casing is soiled clean the camcorder body with a soft cloth lightly moistened with water and then wipe the casing with a dry soft cloth Avoid the following to pre...

Page 190: ...te on disposal transfer of memory cards Even if you use MEDIA FORMAT or DELETE data from the memory card may not be deleted completely When you give the memory card to somebody it is recommended that you delete data completely using data deletion software on a computer Also when you dispose of the memory card it is recommended that you destroy the actual body of the memory card Maintenance and pre...

Page 191: ...luding projecting parts Approx 185 2 mm 218 3 mm 369 5 mm 7 3 8 in 8 5 8 in 14 5 8 in including SELP18105G lens hood large eyecup LCD screen handle grip w o grip belt including projecting parts width height depth Mass Approx 830 g 1 lb 13 oz body only Approx 2 2 kg 4 lb 14 oz including SELP18105G lens hood eyecup BP U30 battery pack LCD screen handle grip w o grip belt System Signal format When 60...

Page 192: ...59M 292M 424M 425M standards HDMI output Type A 1 USB Multi micro USB jack 1 i headphones output Stereo minijack φ3 5 mm 1 Audio input XLR type 3 pin female 2 line mic mic 48 V switchable DC input DC jack REMOTE jack Stereo minimini jack φ2 5 mm 1 Wired LAN LAN terminal 100BASE TX 10BASE T Display LCD screen 8 8 cm 3 5 type Approx 1 56M dots Viewfinder 1 0 cm 0 39 type Approx 1 44M dots Internal m...

Page 193: ...d 2 4 GHz band Security WEP WPA PSK WPA2 PSK NFC NFC Forum Type 3 Tag compliant Rechargeable battery pack BP U30 Maximum voltage 16 4 V DC Nominal voltage 14 4 V DC Capacity 28 Wh Design and specifications are subject to change without notice ...

Page 194: ...156 CLEAR ALL 152 CLOCK SET 33 COLOR BAR 152 171 COLOR CORRECTION 108 COLOR DEPTH 108 COLOR MODE 107 COLOR PHASE 107 Connect TV 124 Content Browser Mobile 87 CTRL W SMARTPHONE 163 D DATA CODE 161 Data code 122 Date and time 13 33 34 DATE REC 165 DELETE 135 DETAIL 110 DF 162 Direct Menu 61 DISPLAY 122 DISPLAY OUTPUT 161 DISPLAY SET menu 158 DIVIDE 134 DOWN CONVERT TYPE 154 Drop frame 162 F FACE DET...

Page 195: ...ET 162 Menu using 139 MIC 48V 83 Microphone external 28 internal 82 Multi interface shoe 83 MIRROR 10 114 Moisture condensation 188 Mount adapter 25 MPEG HD recording 73 Multi interface shoe 6 Multi micro USB jack 9 Multi selector 10 N ND filter 53 ND IRIS 53 ND IRIS DIAL DIRECTION 150 NDF 162 Network functions 92 NETWORK RESET 163 NETWORK SET menu 163 NFC 88 O OPERATION TIME 167 Option 5 OUTDOOR ...

Page 196: ...pplied items 19 SYSTEM menu 164 T TC FORMAT 162 TC MAKE 163 TC PRESET 112 171 TC RUN 162 TC UB DISPLAY 162 TC UB SET menu 162 Telephoto 43 THUMBNAIL 7 119 TONE 152 Trademark 197 Troubleshooting 168 TV 124 U UB PRESET 112 UB TIME REC 163 USB CONNECT 166 USB LUN SET 167 Using your camcorder abroad 184 V Variable mode 53 VERSION DISPLAY 167 VF COLOR TEMP 161 VF LCD PANEL 161 VIDEO OUT 153 Viewfinder ...

Page 197: ...d trademark of NFC Forum Inc in the United States and in other countries Adobe the Adobe logo and Adobe Acrobat are either registered trademarks or trademarks of Adobe Systems Incorporated in the United States and or other countries The SDXC logo is a trademark of SD 3C LLC All other product names mentioned herein may be the trademarks or registered trademarks of their respective companies Tradema...

Page 198: ...e access to modify and redistribute source code for these software programs under the conditions of the supplied GPL LGPL Source code is provided on the web Use the following URL to download it http oss sony net Products Linux We would prefer you do not contact us about the contents of source code Licenses in English are recorded in the internal memory of your product Establish a Mass Storage conn...

Page 199: ...199 ...

Page 200: ...Printed in China 2015 Sony Corporation http www sony net ...

Reviews: