background image

72

Playing a game

Check that the connections to the TV and audio equipment are correct and 
that the precautions have been met.
• "Precautions" (

page 62)

• "Connecting to a TV" (

page 67)

• "Connecting the controller" (

page 69)

• "Connecting the AC adaptor and AC power cord" (

page 70)

Note

To play online games, you first need to connect to and set up a network. See 
"Connecting to a network" (

page 99) for details.

1

Turn on the console (

page 71).

The main menu is displayed (

page 92).

2

Press the 

A

 (open) button on the console front.

The disc cover opens.

3

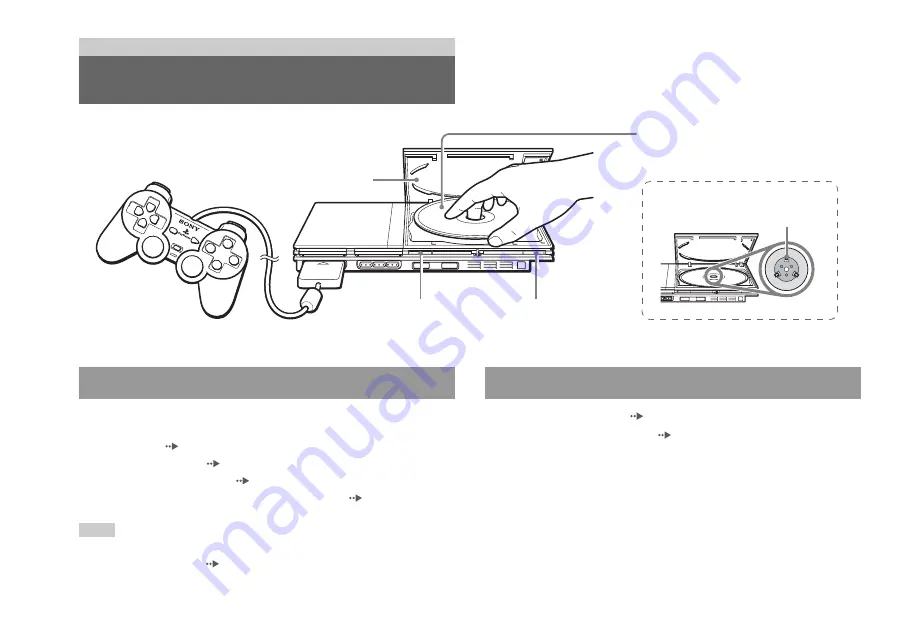
Place the disc in the console.

Set the disc in the disc holder with the label side facing up.

Games

Playing a game

=

/

1

/RESET button

A

 (open) button

Disc cover

Place the disc in the console with the label 
side facing up.

Place the disc so that all three tabs 
are above the disc's surface.

Before playing a game 

Starting a game

Summary of Contents for Play Station 2

Page 1: ...strucciones Instruction manual SCPH 79010 Antes de utilizar este producto lea detenidamente este manual y consérvelo para consultarlo en el futuro Before using this product carefully read this manual and retain it for future reference ...

Page 2: ...iento al exponerse a ciertos patrones luminosos o luces intermitentes Estas personas podrían sufrir un ataque epiléptico o pérdidas pasajeras del conocimiento al exponerse a ciertos patrones o fondos en la pantalla del televisor o al jugar a videojuegos Estas condiciones podrían provocar síntomas de epilepsia no detectada previamente o convulsiones incluso en personas sin un historial de ataques o...

Page 3: ...cio de asistencia técnica llamando al 01 800 759 7669 y 5002 9819 Para su protección por favor lea detenidamente estas instrucciones de seguridad antes de utilizar la consola PlayStation 2 y mantenga este manual disponible para realizar consultas en el futuro 1 Lea las indicaciones 2 Guarde estas indicaciones 3 Obedezca todas las advertencias 4 Siga todas las indicaciones 5 No use este equipo cerc...

Page 4: ...e todo en la parte del enchufe en los receptáculos y en el punto en el que el cable sale del equipo 11 Use solamente los accesorios indicados por el fabricante 12 Use solamente con el carrito soporte trípode ménsula o mesa indicados por el fabricante o que se venden con el equipo Al utilizar el carrito tenga cuidad al desplazar el carrito con el aparato para evitar lesiones y que se vuelque el equ...

Page 5: ...5 Juegos Cómo jugar a un juego 16 Uso de memory cards tarjetas de memoria 19 CD audio Reproducción de un CD audio 22 DVD Reproducción de un DVD 24 Uso de los modos de reproducción 28 Ajuste de la configuración del reproductor de DVD 30 Menú principal Visualización del menú principal 37 Uso de la pantalla Navegador 37 Uso del menú Configuración del Sistema 38 Uso de la pantalla Versión 41 Redes Red...

Page 6: ...ción que no sea la posición vertical u horizontal Cuando coloque la consola en posición vertical utilice el soporte vertical para PlayStation 2 vendido por separado que es compatible con esta consola Asimismo no cambie la posición de la consola mientras esté encendida No coloque ningún tipo de material de goma o vinilo en el exterior de la consola durante un período de tiempo prolongado Mantenga e...

Page 7: ...no sean adecuados para el uso con una red 10Base T 100Base TX Líneas telefónicas residenciales estándar Cualquier línea telefónica o de datos compatible con ISDN digital Líneas telefónicas PBX Otros tipos desconocidos de líneas telefónicas Manejo de los discos de videojuego No toque la superficie del disco cuando maneje un disco sujételo por los bordes No adhiera papel o cinta sobre los discos ni ...

Page 8: ...cable de red de la consola Para limpiar la consola utilice un paño seco y suave No utilice disolventes u otros productos químicos o paño impregnado con agentes químicos para limpiar el producto Cuando se acumule polvo en las rejillas de ventilación de la consola elimínelo con una aspiradora de baja potencia No toque la lente situada en el interior de la cubierta del disco Para proteger la lente de...

Page 9: ...ición vertical utilice el soporte vertical SCPH 70110 U para PlayStation 2 vendido por separado Nota Algunos soportes verticales para PlayStation 2 no se pueden usar con este modelo de la consola PlayStation 2 página 48 Elija el modelo SCPH 70110 U cuando compre un soporte vertical Preparación Introducción Comprobación del contenido de la caja s Consola PlayStation 2 1 pieza s Control analógico DU...

Page 10: ...tavoces Lugares sujetos a vibración El logotipo de la familia de productos se puede girar para que coincida con la posición horizontal o vertical de la consola Nota Puede conectar dispositivos USB que sean compatibles con la consola PlayStation 2 Tenga en cuenta sin embargo que no todos los productos compatibles con USB funcionan con la consola PlayStation 2 Consulte las instrucciones que acompaña...

Page 11: ... apagado Conecte la consola al televisor de la forma que se indica a continuación Parte trasera de la consola PlayStation 2 Rejilla de ventilación trasera Conector cc 8 5V Conector AV MULTI OUT Conector DIGITAL OUT OPTICAL Conector de red NETWORK Conexión a un televisor Antes de realizar la conexión Conexión a un televisor mediante el cable AV suministrado VIDEO L AUDIO R Entradas de audio y vídeo...

Page 12: ...ivo 480 p y debe realizar la conexión con el tipo de cable adecuado También debe comprobar que los ajustes de la consola sean correctos Para obtener información detallada consulte Modo progresivo en Ajuste de las opciones de visualización del televisor página 32 Este producto es compatible con el uso de entradas de vídeo de componentes Y CB PB CR PR pero no se puede usar con entradas en formato HD...

Page 13: ...n cable como el cable AV suministrado y conéctelo al conector AV MULTI OUT de la consola No utilice ningún cable digital óptico Tras conectar el equipo de audio digital ajuste DIGITAL OUT OPTICAL en Activado en el menú Configuración del Sistema Para obtener información detallada consulte DIGITAL OUT OPTICAL página 39 1 Inserte el control analógico DUALSHOCK 2 en un puerto de control de la consola ...

Page 14: ...r del adaptador ca en el conector cc 8 5 de la parte trasera de la consola 3 Enchufe el cable de alimentación ca a la toma de corriente eléctrica El indicador 1 encendido espera de la parte frontal de la consola se iluminará en rojo para indicar que la consola se encuentra en el modo de espera Conexión del adaptador ca y el cable de alimentación ca Adaptador ca Cable de alimentación ca Parte trase...

Page 15: ...odrá ajustar el Idioma la Zona horaria y el Horario de verano Siga las instrucciones en pantalla para completar los ajustes Si conecta la consola a un televisor panorámico ajuste la opción Tamaño de la Pantalla en el menú Configuración del Sistema página 39 1 Pulse y mantenga pulsado el botón 1 RESET reinicio de la parte frontal de la consola durante más de un segundo El indicador 1 se iluminará e...

Page 16: ...ágina 44 para obtener información detallada 1 Encienda la consola página 15 Aparecerá el menú principal página 37 2 Pulse el botón A abrir situado en la parte frontal de la consola Se abrirá la cubierta del disco 3 Coloque el disco en la consola Coloque el disco en el soporte correspondiente con la cara de la etiqueta hacia arriba Juegos Cómo jugar a un juego Botón 1 RESET reinicio Botón A abrir C...

Page 17: ...o toque el disco si éste está girando ya que podría ocasionarle alguna lesión dañar el disco o provocar fallos en la consola 1 Pulse el botón A de la parte frontal de la consola 2 Extraiga el disco Presione la parte negra central del soporte del disco y levante el disco por los bordes 3 Cierre la cubierta del disco 4 Pulse el botón 1 RESET reinicio Aparecerá el menú principal página 37 Cambio de j...

Page 18: ...ysticks analógicos izquierdo y derecho no funcionarán Asimismo se desactivará la función de botón sensible a la presión Dependiendo del software es posible que no pueda cambiar de modo aunque pulse el botón modo ANALOG analógico Al utilizar el modo analógico Al jugar un título de software de formato PlayStation 2 los joysticks analógicos izquierdo y derecho botones L3 y R3 están activos y todos lo...

Page 19: ...r distintas de las del control analógico DUALSHOCK 2 En el modo analógico sólo se pueden utilizar los joysticks analógicos izquierdo y derecho Puede guardar y cargar datos de juego utilizando una memory card tarjeta de memoria También puede borrar datos de juego o copiar datos de juego de una memory card tarjeta de memoria a otra Existen dos tipos de memory card tarjeta de memoria Seleccione una m...

Page 20: ...ección para seleccionar el icono de la memory card tarjeta de memoria que desea utilizar para copiar o borrar datos y a continuación pulse el botón 2 Seleccione el icono de los datos que desea copiar o borrar y pulse el botón 3 Seleccione Copiar o Eliminar y a continuación pulse el botón Cuando copie datos del juego compruebe que hay dos memory cards tarjetas de memoria insertadas en la consola Si...

Page 21: ...en una memory card tarjeta de memoria modelo SCPH 1020 U No se pueden guardar datos de juego de formato PlayStation en una memory card tarjeta de memoria 8MB para PlayStation 2 Sin embargo sí se pueden copiar datos de juego de formato PlayStation de una memory card tarjeta de memoria modelo SCPH 1020 U en una memory card tarjeta de memoria 8MB para PlayStation 2 con fines de almacenamiento Recuerd...

Page 22: ...osible que se emita un ruido extremadamente fuerte si el dispositivo no tiene un decodificador DTS o si está conectado al conector AV MULTI OUT Utilice los botones de dirección para seleccionar el icono de la pista que desea reproducir y a continuación pulse el botón Puede activar las opciones directamente pulsando los botones del control analógico DUALSHOCK 2 Nota También puede utilizar el contro...

Page 23: ...Aparecerá la pantalla Navegador 5 Seleccione el icono del CD audio y a continuación pulse el botón Se muestran los números de pista y la opción de ajuste aparece en la parte inferior izquierda de la pantalla 6 Seleccione la pista deseada y a continuación pulse el botón Se inicia la reproducción Notas También puede acceder a la pantalla Opciones de Reproducción desde la pantalla que muestra las pis...

Page 24: ...ación o a la codificación del software del vídeo DVD Si tiene problemas pruebe a reiniciar el DVD Si los problemas persisten póngase en contacto con el editor del DVD o con el servicio de asistencia técnica en el número de teléfono 01 800 759 7669 y 5002 9819 para obtener más información 1 Inicie la reproducción del DVD página 26 2 Pulse el botón SELECT selección Aparecerá el Panel de control Si v...

Page 25: ...6 Anterior Siguiente Regresa avanza hasta el principio del capítulo actual anterior o siguiente Búsqueda Retrocede avanza rápidamente la reproducción en la pantalla para ayudarle a buscar una escena concreta página 27 Icono Función Cámara lenta Cambia a reproducción en cámara lenta hacia atrás y hacia adelante N Reproducir Inicia la reproducción X Pausa Hace una pausa en la reproducción x Parar De...

Page 26: ...disco 1 Durante la reproducción seleccione x en el Panel de control página 24 y a continuación pulse el botón 2 Seleccione N y a continuación pulse el botón Se inicia la reproducción desde el punto en el que detuvo el disco en el paso 1 Para cancelar la Reanudación de la reproducción Tras el paso 1 seleccione x y a continuación pulse el botón Selección de una escena por el número de capítulo 1 Dur...

Page 27: ...sado el botón L2 o R2 para iniciar la búsqueda Utilice los botones de dirección para cambiar la velocidad Suelte el botón L2 o R2 cuando llegue al punto que está buscando Puede visualizar información como el número de título actual o el tiempo transcurrido 1 Durante la reproducción seleccione en el Panel de control página 24 y a continuación pulse el botón La presentación cambia de la forma que se...

Page 28: ...ducción Reproducción Programada página 28 Reproducción Aleatoria página 29 Reproducción Repetida página 29 Repetición A B página 30 En las siguientes instrucciones se asume el uso del Panel de control página 24 para utilizar el reproductor de DVD Notas Puede combinar las opciones de Reproducción Programada Aleatoria y Repetida Sin embargo puede que algunas opciones de Reproducción Aleatoria o Repe...

Page 29: ...el Panel de control página 24 y a continuación pulse el botón La presentación cambia de la forma que se indica a continuación cada vez que se pulsa el botón 2 Seleccione N y a continuación pulse el botón Puede ajustar esta opción para que reproduzca títulos o capítulos repetidamente 1 Seleccione en el Panel de control página 24 y a continuación pulse el botón La presentación cambia de la forma que...

Page 30: ...salida por medio de la pantalla Ajustar También puede seleccionar un idioma para los subtítulos y menús prohibir la reproducción por parte de niños y otras opciones Notas Algunos DVD no admiten todos los ajustes La consola PlayStation 2 reproduce el contenido del disco tal y como fue grabado en el software DVD Si el DVD no admite las funciones enumeradas no podrá cambiar la configuración Las sigui...

Page 31: ...ioma de los subtítulos coincidirá automáticamente con el idioma seleccionado para la pista de audio del DVD En el menú Ajuste de la pantalla puede ajustar el tamaño de la pantalla formato y otras opciones que afectan a la calidad de la imagen Formato TV Puede ajustar el formato para que coincida con la pantalla del televisor conectado Nota Cuando la opción Modo progresivo se ajusta en Activado la ...

Page 32: ...magen en la cual se actualizan todas las líneas de una sola vez En la mayoría de los casos esto resulta en una imagen más nítida y libre de parpadeos Esta característica sólo está disponible si el televisor el cable AV y el software admiten el barrido progresivo 480p El cable AV en componentes vendido por separado es compatible con el barrido progresivo Notas Si la calidad de la imagen se ve reduc...

Page 33: ...oducción Abrir la cubierta del disco Ajuste del Control paterno 1 Seleccione Control Paterno y a continuación pulse el botón Se mostrará la pantalla para registrar una contraseña Si ya se ha registrado una contraseña se mostrará la pantalla de confirmación de la contraseña 2 Seleccione un número y a continuación pulse el botón Repita el paso 2 para introducir una contraseña de cuatro dígitos Si de...

Page 34: ...ntrol Paterno seleccione Otros en el paso 4 de Ajuste del Control paterno página 33 Utilice los botones de dirección para seleccionar la primera letra y a continuación pulse el botón de dirección hacia la derecha Después seleccione la siguiente letra y pulse el botón Cómo cambiar la contraseña En el paso 2 de Ajuste del Control paterno página 33 complete los pasos siguientes Región Código Región C...

Page 35: ...nivel de Control Paterno volverá al ajuste original Notas Si olvida la contraseña consulte Solución de problemas página 54 Si no establece una contraseña no podrá cambiar el ajuste del Control Paterno Algunos DVD con la función de Control Paterno no permiten el uso de modos de reproducción páginas 28 a 30 Salida Audio Digital Puede cambiar el método de emisión de la señal de audio cuando conecte l...

Page 36: ...ioridad del DVD Volumen DVD Si el nivel de salida de audio del DVD es bajo puede ajustar esta opción Sólo se puede ajustar cuando la opción DIGITAL OUT OPTICAL está ajustada en Desactivada en Salida Audio Digital página 35 Precaución Si ajusta esta opción en 1 ó 2 el sonido puede verse distorsionado Si ocurre esto cambie la opción a Normal Asimismo debe tener en cuenta que si sube demasiado el vol...

Page 37: ...l menú principal Para visualizar el menú principal pulse el botón A de la parte frontal de la consola y extraiga el disco A continuación pulse el botón _ 1 RESET reinicio para reiniciar la consola Desde la pantalla Navegador puede hacer lo siguiente Copiar o borrar datos de juego guardados en una memory card tarjeta de memoria Iniciar un juego Iniciar la reproducción de un CD audio Iniciar la repr...

Page 38: ... de un CD audio página 22 Si selecciona el icono de un disco DVD se iniciará la reproducción del DVD Nota Cuando no haya ninguna memory card tarjeta de memoria o disco insertado en la consola aparecerá en la pantalla Navegador el mensaje No hay datos Desde el menú Configuración del Sistema puede cambiar la configuración de numerosas opciones incluyendo el idioma o la visualización de la hora y el ...

Page 39: ... Configuración del Sistema la pantalla Navegador y la pantalla de CD audio Puede determinar si desea emitir la señal de salida a través del conector DIGITAL OUT OPTICAL Ajustar Reloj Notación de la hora Ajusta el reloj del sistema en el modo de 12 ó 24 horas Notación de la fecha Ajusta el orden de visualización del año el mes y el día Zona horaria Ajusta la zona horaria Horario de verano Seleccion...

Page 40: ...le que algunos dispositivos periféricos de terceros sin licencia no funcionen Advierta que el uso de dichos periféricos no se recomienda y anulará la garantía Puede utilizar esta opción para seleccionar el idioma utilizado en el menú principal en la pantalla Navegador en el menú Configuración del Sistema y en la pantalla Versión Salida de Componentes de Imagen Y Cb Pb Cr Pr Seleccione esta opción ...

Page 41: ...s 3 Seleccione el ajuste deseado y a continuación pulse el botón Para obtener información detallada consulte las instrucciones de cada elemento páginas 41 a 43 Nota El ajuste predeterminado de cada menú aparece subrayado en las explicaciones más abajo La consola PlayStation 2 ajusta automáticamente su configuración interna para lograr una reproducción óptima Cuando la opción Diagnóstico está ajust...

Page 42: ...levisor sin el equipo necesario la calidad de la imagen puede verse reducida o puede que no se muestre la imagen Puede desactivar el Modo progresivo mediante el siguiente procedimiento Extraiga el DVD antes de desactivar el modo Desactivar Modo Progresivo 1 Visualice de la pantalla Versión 2 Utilice los botones de dirección para seleccionar Reproductor de DVD y a continuación pulse el botón Aparec...

Page 43: ...a pantalla Versión Menú principal ES 7 Cierre la cubierta del disco Se inicia la reproducción Nota La opción no se desactivará si 1 no inicia un DVD tras el paso 4 o 2 reinicia o apaga la consola antes del paso 6 ...

Page 44: ...n cable recto para conectar una consola PlayStation 2 a una red Según el dispositivo de red que se esté utilizando es posible que se requiera un cable cruzado Consulte las instrucciones suministradas con el dispositivo de red para obtener más detalles Es posible que algunos títulos no requieran una memory card tarjeta de memoria 8MB para PlayStation 2 para acceder al contenido en línea Este modelo...

Page 45: ...ertencia No conecte cables de red de los tipos siguientes al conector de red Si conecta el tipo inadecuado de cable es posible que pase demasiada corriente eléctrica a través del conector lo cual puede provocar fallos calor excesivo o un incendio en el conector Cables de red que no sean adecuados para el uso con una red 10Base T 100Base TX Líneas telefónicas residenciales estándar Cualquier línea ...

Page 46: ... y responsable de Internet Para salir de un juego en línea siga las instrucciones en línea o las instrucciones suministradas con el software Si no encuentra instrucciones puede salir del juego pulsando el botón 1 RESET reinicio El indicador 1 se volverá rojo cuando la consola haya entrado en modo de espera Si no logra salir del juego usando el método descrito arriba puede obligar que el software s...

Page 47: ...Todos Acerca de los discos DVD R DVD RW DVD R y DVD RW Puede que algunos discos no se puedan reproducir porque estén rayados tengan polvo o debido a un problema durante la grabación Sólo se pueden reproducir los discos que han sido finalizados Las secciones de vídeo grabadas en discos DVD RW o DVD R compatibles con CPRM Content Protection for Recordable Media Protección de contenido para soportes ...

Page 48: ...les con este modelo de la consola PlayStation 2 Discos de música codificados con tecnología de protección de los derechos de autor La función de reproducción de CD audio de este producto está diseñada en conformidad con las normas del formato CD Compact Disc o disco compacto Recientemente algunas compañías discográficas han empezado a comercializar discos de música codificados con tecnología de pr...

Page 49: ...tap multiconector con números de modelo distintos a la consola ya que esto podría dañar la consola Este producto se puede usar con títulos de software de formato PlayStation 2 y PlayStation General Acerca del control remoto de DVD para PlayStation 2 Acerca de multitaps multiconectores Especificaciones Requisitos de alimentación Entrada cc 8 5 V Consumo de corriente eléctrica aprox 4 5 A Dimensione...

Page 50: ...en este dispositivo por medio de la tecnología de protección contra copias contenida en el DVD El intento de grabar o copiar DVD para el uso privado por medio de la eliminación o evasión de dicha tecnología podría ser prohibido por las leyes aplicables Control de acceso Este producto incorpora tecnología de control de acceso El control de acceso restringe el uso de software que no esté diseñado es...

Page 51: ...e debe ajustar la opción de salida de vídeo en componentes Compruebe que se han realizado los ajustes correctos página 40 Algunos televisores pueden sufrir un efecto de inestabilidad vertical en la imagen cuando se utiliza la consola PlayStation 2 Si ocurre esto conecte la consola a otro televisor Puede que algunos títulos de software de formato PlayStation no funcionen correctamente en la consola...

Page 52: ... lugar cálido deje que la consola se adapte a la temperatura ambiente antes de usarla Si se produce condensación de humedad extraiga el disco y no utilice la consola durante varias horas hasta que la condensación se evapore página 8 Puede que algunos títulos de software de formato PlayStation no funcionen correctamente en la consola PlayStation 2 Para obtener más información llame al centro de asi...

Page 53: ...os guardados en una memory card tarjeta de memoria están dañados Mientras guarda carga copia o borra datos no intente hacer ninguna de las siguientes acciones Si lo hace podría dañar los datos No extraiga la memory card tarjeta de memoria ni el control No abra la cubierta del disco No reinicie la consola No apague la consola Los datos dañados se pueden borrar en el menú Navegador página 20 La cons...

Page 54: ...e permita el cambio del ángulo de visión Sólo puede seleccionar cuando reproduzca un disco DVD RW modo VR Compruebe si hay un disco DVD RW modo VR insertado en la consola Es posible que algunas opciones del DVD no se puedan modificar Algunas opciones no se pueden modificar durante la reproducción o la Reanudación de la reproducción página 30 Detenga la reproducción por completo o desactive la func...

Page 55: ...cción del disco de acuerdo con la edad del usuario y el nivel de limitación de cada país La limitación varía según el disco cuando está activada la reproducción estará completamente prohibida las escenas violentas se omiten o se sustituyen por otras etc Dolby Digital Tecnología de compresión de audio digital desarrollada por Dolby Laboratories Esta tecnología admite el sonido envolvente de 5 1 can...

Page 56: ...de programación y edición algunas de las cuales no son posibles en el modo de vídeo DVD RW El disco DVD RW léase más RW se puede grabar y regrabar Los discos DVD RW usan un formato de grabación que es comparable al formato DVD VIDEO Material de DVD El material de DVD se puede dividir en dos tipos material basado en vídeo y material basado en película En el material basado en vídeo se graban 30 fot...

Page 57: ... Digital Regrabable Entrada VCR Entrada para vídeo grabadora FORMATO HDTV FormatoparaTelevisión de Alta Definición FORMATO NTSC Formato de televisión aplicable en México ISDN Tecnología de Banda Ancha JOYSTICK Analog Perilla Analógica LCD Pantalla de Cristal Líquido Líneas Telefónicas PBX Líneas internas de telefonía MAC Control de Acceso a Multimedia MAIN POWER Interruptor Principal MEMORY CARD T...

Page 58: ...ileptic seizures or blackouts when exposed to certain light patterns or flashing lights Exposure to certain patterns or backgrounds on a television screen or when playing video games may trigger epileptic seizures or blackouts in these individuals These conditions may trigger previously undetected epileptic symptoms or seizures in persons who have no history of prior seizures or epilepsy If you or...

Page 59: ...For your protection please read these safety instructions completely before operating the PlayStation 2 console and keep this manual for future reference 1 Read these instructions 2 Keep these instructions 3 Heed all warnings 4 Follow all instructions 5 Do not use this apparatus near water 6 Clean only with dry cloth 7 Do not block any ventilation openings Install in accordance with the manufactur...

Page 60: ...e they exit from the apparatus 11 Only use attachments accessories specified by the manufacturer 12 Use only with the cart stand tripod bracket or table specified by the manufacturer or sold with the apparatus When a cart is used use caution when moving the cart apparatus combination to avoid injury from tip over 13 Unplug this apparatus during lightning storms or when unused for long periods of t...

Page 61: ...e console on and off 71 Games Playing a game 72 Using memory cards 75 Audio CDs Playing an audio CD 77 DVDs Watching a DVD 79 Using the playback modes 83 Adjusting DVD player settings 85 Main menu Displaying the main menu 92 Using the Browser screen 92 Using the System Configuration menu 93 Using the Version Information screen 96 Networking Networking 99 Additional information Compatible software ...

Page 62: ... loudspeakers Do not set the console other than in the vertical or horizontal position When placing in the vertical position use the vertical stand for PlayStation 2 sold separately that is compatible with this console Also do not change the position while the console is turned on Do not place any rubber or vinyl materials on the console exterior for an extended period of time Keep the system and ...

Page 63: ...idential telephone lines Any ISDN digital compatible phone or data line PBX phone lines Other unknown types of telephone lines Disc handling Do not touch the disc surface when handling a disc hold it by the edges Do not stick paper or tape onto discs and do not write on discs Fingerprints dust dirt or scratches on the disc can distort the picture or reduce sound quality Always handle carefully and...

Page 64: ...ft dry cloth Do not use solvents or other chemicals or a chemically treated dust cloth to clean the product When dust accumulates in the console vents remove the dust with a low powered vacuum cleaner Do not touch the lens located inside the disc cover To help protect the lens from dust keep the disc cover closed except when inserting or removing discs Exterior protection To help prevent damage to...

Page 65: ...When setting the console in the vertical position use the SCPH 70110 U vertical stand for PlayStation 2 sold separately Note Some vertical stands for PlayStation 2 cannot be used with this model of the PlayStation 2 console page 103 Choose the SCPH 70110 U when purchasing a vertical stand Preparation Getting started Checking the package contents s PlayStation 2 console 1 s Analog controller DUALSH...

Page 66: ...ces close to magnetic fields such as those produced by magnets or loudspeakers Places subject to vibration The product family logo can be rotated to match the horizontal or vertical positioning of the console Note You can connect USB devices that are compatible with the PlayStation 2 console Note however that not all USB compatible products work with the PlayStation 2 console Refer to the instruct...

Page 67: ...ions Check that the TV is turned off Connect the console to the TV as shown below PlayStation 2 console rear Rear vent DC IN 8 5V connector AV MULTI OUT connector DIGITAL OUT OPTICAL connector NETWORK connector Connecting to a TV Before connecting Connecting to a TV using the supplied AV cable VIDEO L AUDIO R Audio and video inputs of the TV Do not use when connecting to a monaural TV To the AV MU...

Page 68: ... support progressive scan 480p and you must connect using the appropriate type of cable You must also check that the console settings are correct For details see Progressive in Setting TV display options page 87 This product is compatible for use with component video inputs Y CB PB CR PR but cannot be used with inputs in HDTV format Y PB PR Refer to the instructions supplied with your TV for detai...

Page 69: ...no sound is produced If this happens use a cable such as the supplied AV cable and connect it to the console s AV MULTI OUT connector Do not use an optical digital cable After connecting digital audio equipment set Digital Out Optical to On in the System Configuration menu For details see Digital Out Optical page 94 1 Insert the analog controller DUALSHOCK 2 into a controller port of the console N...

Page 70: ...r cord to the AC adaptor 2 Plug the connector of the AC adaptor into the DC IN 8 5V connector on the console rear 3 Plug the AC power cord into the electrical outlet The 1 on standby indicator on the console front will light up in red to indicate that the console is in standby mode Connecting the AC adaptor and AC power cord AC adaptor AC power cord Console rear AC adaptor DC IN 8 5V connector Con...

Page 71: ...nguage Time Zone and Daylight Savings Time Summer Time will be displayed Follow the on screen instructions to complete the settings If you connect the console to a wide screen TV set Screen Size in the System Configuration menu page 94 1 Press and hold the 1 RESET button on the console front for more than a second The 1 indicator will turn red to indicate that the console has entered standby mode ...

Page 72: ... set up a network See Connecting to a network page 99 for details 1 Turn on the console page 71 The main menu is displayed page 92 2 Press the A open button on the console front The disc cover opens 3 Place the disc in the console Set the disc in the disc holder with the label side facing up Games Playing a game 1 RESET button A open button Disc cover Place the disc in the console with the label s...

Page 73: ... not touch the disc if it is spinning as doing so may cause injury damage to the disc or console malfunction 1 Press the A button on the console front 2 Remove the disc Hold down the black center part of the disc holder and then lift the disc by the edges 3 Close the disc cover 4 Press the 1 RESET button The main menu is displayed page 92 Changing game discs 1 Open the disc cover and remove the di...

Page 74: ...ontroller in digital mode the left and right analog sticks do not function Also the pressure sensitive button function is turned off Depending on the software you may not be able to switch modes even if you press the ANALOG mode button When using in analog mode When playing a PlayStation 2 format software title the left and right analog sticks L3 and R3 buttons are active and all buttons except SE...

Page 75: ...y the left and right analog sticks can be used in analog mode You can save and load game data using a memory card You can also delete game data or copy game data from one memory card to another There are two types of memory cards Select a memory card suitable for the software in use Note The memory card 8MB for PlayStation 2 uses MagicGate a technology that helps protect copyrighted content throug...

Page 76: ...onsole If you have selected Delete skip to step 5 4 Select the destination and then press the button 5 Select Yes and then press the button While copying or deleting data do not remove the memory cards 6 When copying or deleting is completed press the button Notes To view information about a game data item select the icon for the data and then press the button to check the details Compatibility be...

Page 77: ...r page 69 Note that an extremely loud noise may be emitted if the device does not have a DTS decoder or if it is connected to the AV MULTI OUT connector Using the directional buttons select the icon for the desired track and then press the button You can operate directly by pressing the buttons of the analog controller DUALSHOCK 2 Note You can also use the DVD remote control for PlayStation 2 sold...

Page 78: ...Press the button The Browser screen is displayed 5 Select the audio CD icon and then press the button The track numbers are displayed and the setting option is shown in the lower left of the screen 6 Select the desired track and then press the button Playback begins Notes You can also access the Play Options screen from the screen displaying the tracks by selecting the Audio CD icon in the upper l...

Page 79: ...he manufacturing process or software encoding of the DVD Video software If you experience problems try restarting your DVD If problems persist call the publisher of the DVD or contact our technical support line at 01 800 759 7669 or 5002 9819 for more information 1 Start playback of the DVD page 81 2 Press the SELECT button The Control Panel is displayed If you press the SELECT button again the di...

Page 80: ...ent title or chapter number the elapsed time etc page 82 Help Displays the direct button functions of the analog controller DUALSHOCK 2 0 9 Go to Chapter Used to enter the number of a chapter you want to play page 81 Previous Next Returns skips to the beginning of the current previous or next chapter Search Fast reverses forwards playback on the screen to help you find a particular scene page 82 S...

Page 81: ...s the button Selecting a scene by chapter number 1 During playback select the desired chapter number in the Control Panel page 79 and then press the button Playback of the selected chapter begins If you want to play a chapter with a single digit number i e 1 9 enter a leading zero For example enter as 01 Selecting a scene by title number chapter number or by specifying the time 1 During playback s...

Page 82: ...r R2 button to begin searching Use the directional buttons to change speeds Release the L2 or R2 button when you reach the point you are searching for You can display information such as the current title number or elapsed time 1 During playback select in the Control Panel page 79 and then press the button The display changes as shown below each time you press the button Finding a particular point...

Page 83: ...eat page 84 The following instructions assume use of the Control Panel page 79 to operate the DVD player Notes You can play combinations of Program Play Shuffle Play and Repeat Play Note however that some Shuffle Play or Repeat Play options may not be available depending on the combination The PlayStation 2 console plays disc content as recorded in the DVD software You can create programs to play ...

Page 84: ...ly 1 Select in the Control Panel page 79 and then press the button The display changes as shown below each time you press the button 2 Select N and then press the button You can set a specific scene to be played repeatedly 1 During playback select in the Control Panel page 79 and then press the button at the point you want to start repeated playback The starting point point A is set 2 Press the bu...

Page 85: ...t as recorded in the DVD software If the DVD does not support the features listed you will not be able to change the settings The following options are not available during playback or Resume Play page 81 Clear Resume Play before changing these settings Menu Audio and Subtitles in Language Setup TV Type and Progressive in Screen Setup Parental Control in Custom Setup DTS and Audio Track Auto Selec...

Page 86: ...o match the language selected for the DVD s audio track In the Screen Setup menu you can set the screen size aspect ratio and other options that affect picture quality TV Type You can set the aspect ratio to match the screen of the connected TV Note When you set Progressive to On TV Type is automatically set to 16 9 Setting language options Menu Selects the language for the DVD s menu Audio Select...

Page 87: ...ry equipment If you accidentally set this option to On for such a TV picture quality may be reduced or the picture may not be displayed To clear the setting follow these steps DVDs can contain video based and film based material which use different frame rates When playing video based material using progressive scan some images may appear unnatural If this occurs set Progressive to Off and view in...

Page 88: ...irming the password is displayed 2 Select a number and then press the button Repeat step 2 to enter a four digit password If you want to clear a number press the button When registering a password you are required to enter it again for confirmation 3 Select Region and then press the button The list of region options is displayed 4 Select the region to base the Parental Control level on and then pr...

Page 89: ...o allow playback This usually occurs immediately at disc start up but may also occur at different times depending on the DVD 2 Using the directional buttons select Yes and then press the button The screen for entering the password is displayed 3 Select a number and then press the button Repeat step 3 to enter the four digit password After entering the password playback will begin again When DVD pl...

Page 90: ...f channels when you play a DVD on which multiple audio formats PCM Dolby Digital or DTS are recorded If PCM Dolby Digital and DTS have the same number of channels the console selects PCM Dolby Digital and DTS audio tracks in that order Setting sound options On Select this option when you want sound audio signal to be output through the DIGITAL OUT OPTICAL connector Settings for Dolby Digital and D...

Page 91: ... priority DVD Volume You can set this option if the audio output level of the DVD is low You can set this only when Digital Out Optical is set to Off in Audio Digital Out page 90 Caution If you set this option to 1 or 2 the sound may become distorted If this happens change the setting to Standard Also note that if you set the volume too high it may harm your hearing or damage the speakers 2 Turns ...

Page 92: ...turn on the console with a disc inserted the main menu will not be displayed To display the main menu press the A button on the console front and remove the disc Then press the _ 1 RESET button to reset the console You can do the following from the Browser screen Copy or delete game data saved on a memory card Start a game Start playback of an audio CD Start playback of a DVD 1 Display the main me...

Page 93: ...isc playback of the DVD will begin Note The message There is no data is displayed on the Browser screen when no memory card or disc is inserted in the console From the System Configuration menu you can change settings for numerous options including language or time display and audio or video output method 1 Display the main menu page 92 2 Using the directional buttons select System Configuration a...

Page 94: ...creen You can set whether to output the signal through the DIGITAL OUT OPTICAL connector Clock Adjustment Time Format Sets the system clock to either 12 hour or 24 hour clock display Date Format Sets the display order of year month and day Time Zone Sets the time zone Daylight Savings Time Sets Standard or Daylight Savings Summer Time Normally select Standard Screen Size 4 3 Select this option whe...

Page 95: ...y Function Off Some unlicensed 3rd party peripherals may not work Note that the use of such peripherals is not recommended and will void your warranty You can use this option to select the language displayed on the main menu Browser screen System Configuration menu and Version Information screen Component Video Out Y Cb Pb Cr Pr Select this option when connecting the console to component video inp...

Page 96: ...n The available options are displayed 3 Select the desired setting and then press the button For details see the instructions for each item pages 96 to 98 Note The default setting for each menu item is underlined in the explanations below The PlayStation 2 console automatically adjusts its internal settings for optimal playback When Diagnosis is set to On the console makes additional adjustments t...

Page 97: ...cted to a TV without the necessary equipment the picture quality may be reduced or the picture may not be displayed You can clear the Progressive setting by following the procedure below Remove the DVD before clearing the setting Clear Progressive Setting 1 Display the Version Information screen 2 Using the directional buttons select DVD Player and then press the button The Clear Progressive Setti...

Page 98: ...sing the Version Information screen 7 Close the disc cover Playback begins Note The setting will not be cleared if 1 you do not start a DVD after step 4 or 2 you reset or turn off the console before step 6 ...

Page 99: ...r types In most cases a straight thru type cable can be used to connect a PlayStation 2 console to a network Depending on the network device being used a crossover type cable may be required For details refer to the instructions supplied with the network device Some titles may not require a memory card 8MB for PlayStation 2 to access online content This model of the PlayStation 2 console supports ...

Page 100: ...ork cables or telephone cords of the following types to the network connector If you connect the wrong type of cable too much electrical current may pass through the connector causing a malfunction excessive heat or fire in the connector Network cables not appropriate for use with a 10Base T 100Base TX network Standard residential telephone lines Any ISDN digital compatible phone or data line PBX ...

Page 101: ...safe and responsible Internet usage To quit an online game follow the on screen instructions or the instructions supplied with the software If you cannot find instructions you can quit by pressing the 1 RESET button The 1 indicator will turn red when the console has entered standby mode If you are not able to quit using the method above you can force the software to quit by pressing and holding do...

Page 102: ...sing the copy once capability cannot be played on this console Attention Regarding DualDisc Software The DVD side of a DualDisc should play on this product but the audio side of a DualDisc may not play because these discs do not conform to the specifications required for an Audio Compact Disc For further information please visit www us playstation com dualdisc Additional information Compatible sof...

Page 103: ...When purchasing a DVD remote control for use with this console choose one that does not include a separate IR receiver unit You cannot open or close the disc cover using the DVD remote control Only the multitap for PlayStation 2 SCPH 70120 U sold separately can be used with this console Do not connect multitap products with other model numbers to the console as this may result in damage to the con...

Page 104: ...lby Laboratories Dolby and the double D symbol are trademarks of Dolby Laboratories Confidential unpublished works 1992 1997 Dolby Laboratories All rights reserved DTS and DTS Digital Out are trademarks of DTS Inc Specifications Power requirements DC IN 8 5V Electrical current consumption approx 4 5 A Console dimensions approx 230 28 152 mm 9 1 6 in w h d Console mass approx 600 g 1 3 lbs Signal f...

Page 105: ...ibited by applicable laws SMX or its subsidiaries or affiliates shall not be liable for any damages including special incidental indirect or consequential damages or fees or loss arising out of the use or inability to use this product Go through this section if you experience difficulty in operating the PlayStation 2 console Should any problem persist call our technical support line at 01 800 759 ...

Page 106: ...TV screen and Picture noise appears on the TV screen The aspect ratio does not change even when playing a DVD with the aspect ratio setting adjusted and or playing a DVD with the aspect ratio set to 16 9 Depending on the DVD or TV the aspect ratio cannot be changed Check that the console is connected to the TV directly If there is a selector or receiver AV amplifier connected between the console a...

Page 107: ...ith the analog controller DUALSHOCK 2 it will not work properly with the analog controller DUALSHOCK Use a controller that is appropriate for the software title Refer to the instructions supplied with the software for details Check that the controller is set to the appropriate mode for the software Refer to the instructions supplied with the software for details Try using another controller that i...

Page 108: ...vailable Stop Search Slow Program Play Shuffle Play or Repeat Play may be prohibited The audio language cannot be changed on discs that do not have multiple audio tracks Also some DVDs do not allow the audio language to be changed If multilingual subtitles are not recorded on the DVD you cannot change the language for the subtitles It may not be possible to change the subtitle language or turn the...

Page 109: ...ing a NAT network address translation device or a router hub or switch that is not compatible with the PlayStation 2 console Remove the device connect your console directly to your cable DSL modem and update your network settings for direct connection You are using an Internet service provider that is not compatible with the PlayStation 2 console For details refer to the instructions for the softw...

Page 110: ......

Page 111: ......

Page 112: ...arcas comerciales registradas y es una marca comercial de Sony Corporation PlayStation and DUALSHOCK are registered trademarks of Sony Computer Entertainment Inc SONY and are registered trademarks and is a trademark of Sony Corporation 2007 Sony Computer Entertainment Inc All rights reserved Printed in China ...

Reviews: