


20
Names and Functions of Parts
Ch
apt
er 1 Ov
e
rv
ie
w
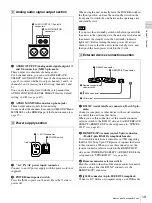
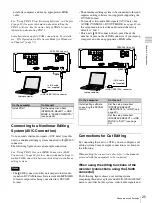
The following connection types are supported. They are
selected by setting INTERFACE SELECT >i.LINK
MODE in the setup menu
AV/C (Audio/Video Control) connection:
Output
DVCAM format digital video and audio signals
(i.LINK MODE set to “AV/C”).
Audio output signals are 2ch or 4ch, as selected by
AUDIO CONTROL >DV OUT MODE in the setup
menu
.
FAM (file access mode) connection:
Input and output
files between this unit and a computer (i.LINK
MODE set to “FAM (PC REMOTE)”).
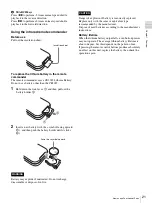
• If video or audio signals from an external device
connected to the S400 connector fail to be output,
disconnect the i.LINK cable and connect it again,
pushing it straight in.
• Before connecting or disconnecting an i.LINK cable
between this unit and a device with a 6-pin i.LINK
connector, power off the device and disconnect its power
cord from the electrical outlet. If the i.LINK cable is
connected or disconnected with the device’s power plug
still connected, high voltage (8 to 40 V) from the
device’s i.LINK connector can flow into this unit,
possibly damaging the unit.
• When connecting this unit to a device with a 6-pin
i.LINK connector, connect to the 6-pin i.LINK
connector of the other device first.
• Except in playback modes (jog and shuttle modes, etc.),
audio signals output from this connector and monitored
on another device may sound different from the audio
signals played back on this unit.
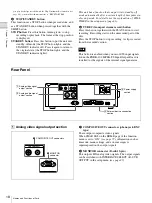
e
U
(signal ground) terminal
Connect to the system ground.
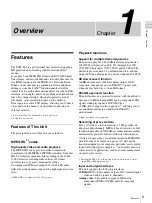
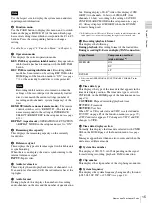
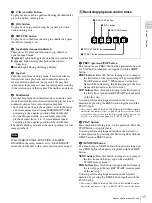
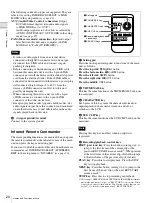
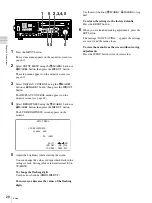
Infrared Remote Commander
The corresponding functions are executed when you point
the remote commander at the infrared sensor of the main
unit and press the keys and setting pad.
If you want to disable control of this unit from the remote
commander, set INTERFACE SELECT >WIRELESS
RMT in the setup menu to “DISABLE”
a
Setting pad
Positions on the pad correspond to functions of the main
unit, as follows.
Press the top side:
M
/MARK1 button
Press the bottom side:
m
/MARK2 button
Press the left side:
<
/IN button
Press the right side:
,
/OUT button
Press the middle:
SET button
b
THUMBNAIL key
This has the same function as the THUMBNAIL button on
the main unit.
c
CHARACTER key
Each press of this key turns the character information
superimposed on the monitor screen on and off, or
switches to the LCD.
d
SUB CLIP key
This has the same function as the SUB CLIP button on the
main unit.
Pressing this key has no effect when no clip list is
registered.
e
Recording/playback control keys
PREV (previous) key:
Press this button, turning it on, to
jump to the first frame of the current clip or the
previous REC START essence mark.
1)
When pressed
at the first frame of the current clip, this button jumps
to the first frame of the previous clip (if it exists).
PLAY key:
Press this to start playback. Press the STOP
key to stop playback.
NEXT key:
Press this button, turning it on, to jump to the
first frame of the next clip or the next REC START
essence mark.
1)
STOP key:
Press this to stop recording or playback.
1) The setting of OPERATIONAL FUNCTION >FIND MODE determines
whether the unit jumps to clips or to REC START essence marks. When
you play back clips recorded with the Clip Continuous Rec function
, you should set this menu item to “REC START EM”.
Notes
Note
THUMBNAIL
PREV
PLAY
SEARCH
NEXT
STOP
CHARACTER
SUB CLIP
PUSH SET
1
Setting pad
2
THUMBNAIL key
3
CHARACTER key
4
SUB CLIP key
5
Recording/playback
control keys
6
SEARCH keys