background image

GB

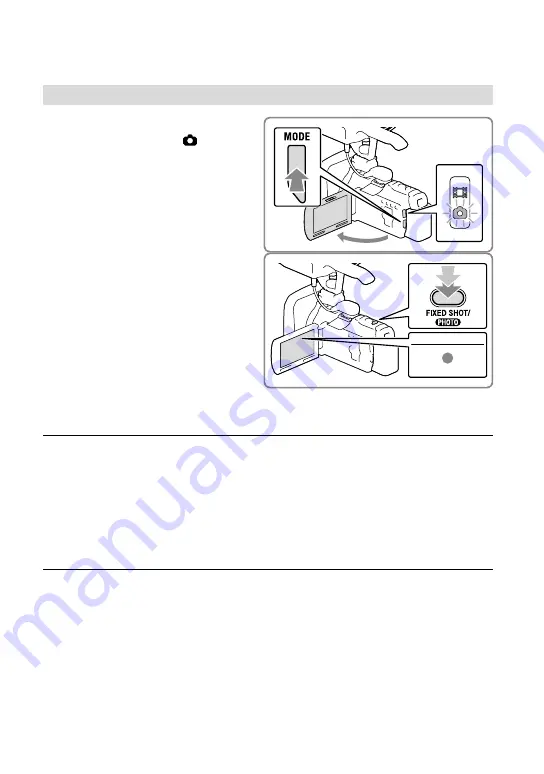
Shooting photos

1

Open the LCD screen and press 
MODE to turn on the   (Photo) 
lamp.

2

Press FIXED SHOT/PHOTO lightly 
to adjust the focus, then press it 
fully.

When the focus is adjusted properly, 

AE/AF lock indicator appears on the LCD 

screen.

The [FIXED SHOT/PHOTO] setting is set 

to [PHOTO] in photo recording mode.

To display items on the LCD screen

Items on the LCD screen disappear if you do not operate the camcorder for a few seconds 

after you turn the camcorder on or switch between the movie recording and photo shooting 

modes.

Touch anywhere except the buttons on the LCD screen to display information on icons with 
functions convenient for recording.

Screen indicators during recording

Described here are icons for both movie recording and photo recording modes. Refer to the 

page in (  ) for details.

Summary of Contents for NXCAM HXR-NX30E

Page 1: ...Getting started Recording Playback Advanced operations Editing Saving images with an external device Customizing your camcorder Others Index Digital HD Video Camera Recorder Operating Guide 4 425 006 11 1 HXR NX30E NX30P ...

Page 2: ...mena can be reduced by adjusting the shutter speed p 68 Images on the screen look horizontally divided when a subject is lighted with a flash The phenomena can be reduced by using a slower shutter speed Notes on use Do not do any of the following Otherwise the recording media may be damaged recorded images may be impossible to play back or may be lost or other malfunctions could occur ejecting the...

Page 3: ...ly appear on your camcorder And the illustrations of your camcorder and its screen indication are exaggerated or simplified for understandability Design and specifications of your camcorder and accessories are subject to change without notice In this manual the internal memory of the camcorder and the memory card are called recording media In this manual the DVD disc recorded with high definition ...

Page 4: ...19 Preparing the recording media 23 Selecting a recording medium 23 Inserting a memory card 23 Recording Playback Recording 25 Recording movies 25 Shooting photos 26 Zooming 29 Playback 30 Operating buttons while playing 31 Advanced operations Recording people clearly 34 Recording the selected subject clearly Face Priority 34 Capturing smiles automatically Smile Shutter 34 Recording movies in vari...

Page 5: ...rding level 42 Reducing wind noise 42 Using an external audio device 43 Recording information on your location GPS 44 Playing images on a TV 45 Using the built in projector 47 Editing Editing on your camcorder 49 Deleting movies and photos 49 Dividing a movie 49 Capturing a photo from a movie 50 Saving images with an external device Dubbing guide 51 The devices on which the created disc can be pla...

Page 6: ...hers Index Troubleshooting 87 Self diagnosis display Warning indicators 94 Recording time of movies number of recordable photos 98 Expected time of recording and playback with each battery pack 98 Expected recording time of movies 99 Expected number of recordable photos 100 Using your camcorder abroad 101 Maintenance and precautions 103 About the AVCHD format 103 About GPS 103 About the memory car...

Page 7: ...p lights up in red during recording The lamp flashes when the remaining recording media capacity or battery power is low MANUAL button 40 MANUAL dial 40 LCD screen Touch panel 19 21 If you rotate the LCD panel 180 degrees you can close the LCD panel with the LCD screen facing out This is convenient during playback operations Speakers Projector lens 47 PROJECTOR FOCUS lever 47 GPS antenna 44 A GPS ...

Page 8: ...g PROJECTOR button 47 HDMI OUT jack 45 USB jack 53 Movie Photo lamp 25 26 MODE button 25 26 Power zoom lever 29 FIXED SHOT PHOTO button 26 Eyecup Viewfinder 20 CHG charge lamp 15 Battery pack 15 START STOP button 26 DC IN jack 15 Viewfinder lens adjustment lever 20 microphone jack PLUG IN POWER headphones jack A V Remote Connector 45 Grip belt Loop for a shoulder belt Built in USB Cable 16 BATT ba...

Page 9: ...witch 42 INPUT1 LINE MIC MIC 48V switch 42 ATT INPUT2 switch 42 INPUT2 LINE MIC MIC 48V switch 42 LOW CUT INPUT1 switch 42 AUTO MAN CH1 switch 42 AUDIO LEVEL CH1 dial 42 AUTO MAN CH2 switch 42 AUDIO LEVEL CH2 dial 42 LOW CUT INPUT2 switch 42 INPUT2 jack 41 INPUT1 jack 41 Cable holder 13 ...

Page 10: ...wn Ring is attached To remove Step Down Ring turn it in the opposite direction from that of the arrow Wireless Remote Commander The wireless remote commander is useful when you use the projector DATA CODE button 82 TC RESET button 79 SCAN SLOW buttons 32 Previous Next buttons 31 PLAY button STOP button DISPLAY button 21 Transmitter START STOP button 25 Power zoom buttons 29 PAUSE button MODE butto...

Page 11: ...tion support cable is designed for use with this camcorder only Use this cable when the Built in USB Cable of the camcorder p 16 is too short for connection USB Adaptor Cable 1 Lens hood 1 Step Down Ring 1 Wind Screen 1 Microphone ECM XM1 1 XLR Adaptor 1 Wireless Remote Commander 1 Rechargeable battery pack NP FV70 1 CD ROM Content Management Utility 1 CD ROM Manuals for Digital HDVideo Camera Rec...

Page 12: ...camcorder and tighten the screw of the XLR Adaptor 2 Connect the plug of the XLR Adaptor to the Active Interface Shoe of the camcorder When detaching the XLR Adaptor Unplug the connector plug of the XLR Adaptor from the Active Interface Shoe beforehand Detach the XLR Adaptor after having loosened the screw of the XLR Adaptor Attaching the microphone 1 Attach the wind screen to the microphone XLR A...

Page 13: ...ophone into the holder Close the cover and lock the stopper securely Be sure to place the microphone with the model name ECM XM1 facing upward 4 Connect the plug of the microphone to the INPUT1 connector of the XLR Adaptor 5 Put the microphone cable into the cable holder See page 41 on the settings for the audio recording INPUT1 jack Release lever Hook the cable in the outer cable holder ...

Page 14: ...he securing ring of the lens hood in the direction of the arrow To remove the lens hood Turn the securing ring of the lens hood in the opposite direction from that of attach Notes Remove the lens hood when you record movies using the NightShot function If you do not do so the shadow of the lens hood will be reflected and recorded in your movies Remove the lens hood when you operate the camcorder w...

Page 15: ...ll outlet wall socket The CHG charge lamp turns on The CHG charge lamp turns off when the battery pack is fully charged Disconnect the AC Adaptor from the DC IN jack of your camcorder Notes You cannot attach any InfoLITHIUM battery pack other than the V series to your camcorder Battery pack CHG charge lamp Align the mark on the DC plug with that on the DC IN jack To the wall outlet wall socket DC ...

Page 16: ... power supply device sold separately to charge the camcorder Charging time Approximate time min required when you fully charge a fully discharged battery pack Battery pack Charging time AC Adaptor Built in USB Cable when using your computer NP FV50 155 280 NP FV70 supplied 195 545 NP FV100 390 1 000 The charging times shown in the table above are measured when charging the camcorder at a temperatu...

Page 17: ...ry pack is low Remove the battery pack from your camcorder and put it in a warm place The temperature of the battery pack is high Remove the battery pack from your camcorder and put it in a cool place When attaching a video light sold separately it is recommended that you use an NP FV70 or NP FV100 battery pack You cannot use the NP FV30 InfoLITHIUM battery pack with your camcorder Notes on the AC...

Page 18: ... 26 Charging the battery pack abroad p 18 Charging the battery pack abroad You can charge the battery pack in any countries regions using the AC Adaptor supplied with your camcorder within the AC 100 V 240 V 50 Hz 60 Hz range Do not use an electronic voltage transformer ...

Page 19: ... select Next 4 Set Summer Time select the date format and the date and time If you set Summer Time to On the clock advances 1 hour When you select the date and time select one of the items and adjust the value with When you select the date and time setting operation is complete Changing the language setting You can change the on screen displays to show messages in a specified language Select Setup...

Page 20: ...CD screen Viewfinder Open Retracted On Pulled out On Closed Retracted Off Pulled out On Notes Even if the LCD screen is closed if the viewfinder is pulled out the camcorder is not turned off When you turn off the power of the camcorder make sure that the viewfinder is retracted to the original position When you make recording with the viewfinder only Pull out the viewfinder and close the LCD panel...

Page 21: ... display after about 3 seconds Display Setting p 84 The display changes to the detailed display when you touch anywhere on the screen except the buttons on the LCD screen so that you can use items To turn on the beep sound Select Setup General Settings Beep On Notes The recording date time and condition and coordinates are recorded automatically on the recording media They are not displayed during...

Page 22: ...Area ADJ set to On The clock may not be adjusted to the correct time automatically depending on the country region selected for your camcorder In this case set Auto Clock ADJ and Auto Area ADJ to Off To set the date and time again Date Time Setting p 85 To calibrate the touch panel Calibration p 110 ...

Page 23: ...dium for movies and for photos Selecting a recording medium Select Rec Media SET Media Select the desired medium Inserting a memory card Open the cover and insert the memory card until it clicks The Preparing image database file Please wait screen appears if you insert a new memory card Wait until the screen disappears To eject the memory card Open the cover and lightly push the memory card in onc...

Page 24: ...acity operation verified Described in this manual Memory Stick PRO Duo media Mark2 Up to 32 GB Memory Stick PRO Duo media Memory Stick PRO HG Duo media SD memory card Class 4 or faster Up to 64 GB SD card SDHC memory card SDXC memory card Operation with all memory cards is not assured Notes A MultiMediaCard cannot be used with this camcorder Movies recorded on SDXC memory cards cannot be imported ...

Page 25: ...ng movies 1 Open the LCD screen and press MODE to turn on the Movie lamp 2 Press START STOP to start recording To stop recording press START STOP again Recording photos while recording a movie Dual Capture Set the FIXED SHOT PHOTO setting to PHOTO and then press the FIXED SHOT PHOTO button If you set the FIXED SHOT PHOTO setting to FIXED SHOT you cannot record photos while recording a movie ...

Page 26: ...cording mode To display items on the LCD screen Items on the LCD screen disappear if you do not operate the camcorder for a few seconds after you turn the camcorder on or switch between the movie recording and photo shooting modes Touch anywhere except the buttons on the LCD screen to display information on icons with functions convenient for recording Screen indicators during recording Described ...

Page 27: ...ng status 44 Tracking focus 34 Zoom Remaining battery Time code Estimated recording remaining time Recording image quality HD STD Rec Format 38 Tracking focus cancel button 34 Audio Format Intelligent Auto button 35 Audio Level Display 76 Capturing a photo Recording playback editing media 23 Approximate number of recordable photos Aspect ratio 16 9 or 4 3 Photo size L M S View Images button 30 My ...

Page 28: ...if data is still being written onto the recording media after recording has finished During this time do not apply shock or vibration to the camcorder or remove the battery or AC Adaptor Access lamp p 23 is lit or flashing The media icon in the upper right of the LCD screen is flashing When Rec Format is set to 1080 25p or 1080 25p you cannot record photos while the camcorder is in movie recording...

Page 29: ...nger on the power zoom lever If you move your finger off the power zoom lever the operation sound of the power zoom lever may also be recorded You cannot change the zoom speed with the button on the LCD screen The minimum possible distance between camcorder and subject while maintaining sharp focus is about 1 cm about 13 32 in for wide angle and about 80 cm about 31 1 2 in for telephoto You can ma...

Page 30: ...d press the button on the LCD screen to enter the playback mode 2 Select to move the desired event to the center and then select it The camcorder displays recorded images as an event automatically based on the date and time 3 Select the image The camcorder plays from the selected image to the last image in the event ...

Page 31: ... playing Items on the LCD screen disappear if you do not attempt to operate the camcorder for a few seconds To display the items again touch the LCD screen To the MENU screen Event name To the previous event Change to the movie photo recording mode Events To the next event Time line bar Change Event Scale button Remaining battery To go back to the Event View screen Previous next Change to the movi...

Page 32: ...epends on the setting of Switch Image Type button p 31 Movie photo default setting photo Volume Delete Context Previous To fast reverse Next To fast forward To pause play To stop Delete Previous Next To play pause movies and photos in the order recorded Next To start stop slide show Delete Context Previous ...

Page 33: ... To repeat Slideshow select Slideshow Set To play back images with other devices You may not be able to play back normally images recorded on your camcorder with other devices Also you may not be able to play back images recorded on other devices with your camcorder Standard definition image quality STD movies recorded on SD memory cards cannot be played on AV equipment of other manufacturers ...

Page 34: ...f the subject Make sure to set the Face Detection setting to other than Off Auto is the default setting To record subjects other than people Tracking focus Touch the subject you want to record Your camcorder adjusts the focus automatically Capturing smiles automatically Smile Shutter A photo is recorded automatically when the camcorder detects the smile of a person during movie recording p 73 Dual...

Page 35: ...ecords movies after selecting the most suitable setting for the subjects or the situation automatically Off is the default setting When the camcorder detects a subject the icons that correspond to the detected conditions are displayed Select On at the right bottom of the recording screen of movies or photos Face detection The camcorder detects faces and adjusts the focus color and exposure Portrai...

Page 36: ...ra shake in the vertical and horizontal directions Standard The camcorder reduces camera shake using the balanced SteadyShot function in wide angle shooting Off The camcorder does not use the balanced SteadyShot function To further reduce camera shake FIXED SHOT By fixing the composition you can steady the shot when recording movies 1 Select Camera Audio Camera Settings FIXED SHOT PHOTO FIXED SHOT...

Page 37: ...htShot in bright places will cause a malfunction of your camcorder Focus p 67 Low Lux p 69 Recording movies in dim places Video Light Press LIGHT Each time you press the LIGHT button the indicator changes as follows Off no indicator Auto On Notes Keep a distance of about 0 3 m to 1 5 m 1 foot to 5 feet between the camcorder and the subject The video light generates strong light Do not use the vide...

Page 38: ...p 720 50p Setting value If you select 1080 25p for example movies are recorded with following format 1080 Effective scanning lines 25 Frame rate p Scanning system Recording mode Notes Movies recorded with the recording mode set to PS or FX on Rec Format can be saved on an external media device only p 53 55 The recording format of 576 50i is automatically selected for the standard image quality STD...

Page 39: ...u set the zoom lever to the W Wide angle side the IRIS is reset to F3 4 as you move the zoom lever to the T Telephoto side Shooting images with the Shutter Speed priority mode You can express the movement of a moving subject in various way by adjusting the shutter speed When shooting a mountain stream for example a splash of water will be captured clearly with high speed shutter or a trailing imag...

Page 40: ...UAL down for a few seconds Dial Setting screen appears 2 Rotate the MANUAL dial and select the item to be assigned Select RESET to reset the items adjusted manually to the default settings 3 Press MANUAL The camera data that appears on the LCD screen will differ depending on the recording settings of the camcorder The settings will be displayed with the following icons Automatic Exposure is set ma...

Page 41: ...ach the XLR Adaptor when you use the built in microphone You can record stereo sound Notes To reduce wind noise set Int Mic Wind NR to On p 74 Using an external microphone sold separately When an external microphone is connected to the MIC input jack sound is switched to that of the external microphone Sound is not switched during recording Using the supplied microphone Attach the XLR Adaptor when...

Page 42: ...nly Adjusting the recording level You can adjust the recording level input from the INPUT1 INPUT2 jacks You cannot adjust the recording level of the built in microphone and MIC input jack 1 Set the AUTO MAN CH1 CH2 switch of the channel to be adjusted or to MAN 2 Turn the AUDIO LEVEL dial or to adjust the volume to the proper level Confirm that the volume is at the proper level with headphones or ...

Page 43: ...ack or to LINE 2 Set the input level of the microphone When the INPUT1 INPUT2 LINE MIC MIC 48V switch or is set to MIC or MIC 48V you can set the input level with the ATT INPUT1 INPUT2 switch or Adjust according to the microphone sensitivity ATT 10dB is recommended when you use the supplied microphone ECM XM1 The input levels are as follows ATT 0dB 60dBu ATT 10dB 50dBu ATT 20dB 40dBu Notes When th...

Page 44: ...cation cannot be obtained A display that allows you to triangulate the location again appears In this case follow the instructions that appears on the LCD screen Hints for better reception Use the GPS function outdoors and in open areas For details on locations or situations where radio signals cannot be received refer to page 103 Rotate the LCD panel to direct the GPS antenna p 7 towards the sky ...

Page 45: ...ing images on a TV Connection methods and the image quality viewed on the TV screen differ depending on what type of TV is connected and the connectors used If the TV does not have the HDMI input jack use the A V connecting cable for connection 1 Switch the input on the TV to the connected jack 2 Connect the camcorder to a TV 3 Play a movie or a photo on the camcorder p 30 Connecting to a high def...

Page 46: ...er end Copyright protected images are not output from the HDMI OUT jack of your camcorder Some TVs may not function correctly e g no sound or image with this connection Do not connect the camcorder HDMI OUT jack to an external device HDMI OUT jack as malfunction may result HDMI High Definition Multimedia Interface is an interface to send both video audio signals The HDMI OUT jack outputs high qual...

Page 47: ...he built in projector 3 Adjust the focus of the projected image using the PROJECTOR FOCUS lever The projected image is larger when the distance between your camcorder and the reflecting surface increase It is recommended that you place the camcorder about 0 5 m 1 6 feet or further away from the surface that the images are to be projected onto 4 Move the power zoom lever to select the image you wan...

Page 48: ...wing operations or situations while using the projector Make sure not to project images towards the eyes Make sure not to touch the projector lens The LCD screen and the projector lens become hot while in use Using the projector shortens battery life The following operations are unavailable while you are using the projector Operation of the camcorder with the LCD screen closed Several other functi...

Page 49: ...ages from the memory card Deleting movies and photos 1 Select Edit Copy Delete 2 Select Multiple Images and then select the type of image you want to delete 3 Add check marks to the movies or photos to be deleted and select To delete all movies photos in the selected date at one time 1 In step 2 select All In Event 2 Select the date you want to delete using and then select To delete a part of a mo...

Page 50: ...sing and then select If the movie was recorded with one of the following image quality levels the image size will be set as shown below High definition image quality HD 2 1 M 16 9 Wide aspect ratio 16 9 with standard definition image quality STD 0 2 M 16 9 4 3 aspect ratio with standard definition image quality STD 0 3 M 4 3 On recording date and time of captured photos The recording date and time...

Page 51: ...e saved Notes Movies recorded with the recording mode set to PS or FX on Rec Format can be saved on an external media device only The devices on which the created disc can be played back DVD disc with high definition image quality HD AVCHD format playback devices such as a Sony Blu ray disc player or a PlayStation 3 DVD disc with standard definition image quality STD Ordinary DVD playback devices ...

Page 52: ...t selector set it to the input mode 2 Connect your camcorder to the recording device with the A V connecting cable Connect your camcorder to the input jacks of the recording device 3 Start playback on your camcorder and record it on the recording device 4 When dubbing is finished stop the recording device and then your camcorder Notes Connect your camcorder to the wall outlet wall socket using the...

Page 53: ...vies and photos on an external media device USB storage devices such as an external hard disk drive The following functions will be available after you have saved your images on an external media device You can connect your camcorder and the external media device and then play back images stored on the external media device p 54 You can import images saved on the external media device to your comp...

Page 54: ...der before use The format screen appears when an external media device is connected to your camcorder Make sure that important data has not previously been saved on the external media device before you format it using the camcorder Operation is not assured with every device satisfying requirements for operating Make sure not to disconnect the USB cable while Preparing image database file Please wa...

Page 55: ...ollowing operations using Content Management Utility Importing images to a computer Viewing imported images Detecting and correcting flash bands To save movies using a computer install the software from the supplied CD ROM Content Management Utility beforehand Use commercially available software to edit images or create discs Step 1 Checking the computer system OS 1 Microsoft Windows XP SP3 2 Wind...

Page 56: ...y 100 MB Only the NTFS or exFAT file system can be used to import or register videos for viewing to a hard disk Display Minimum 1 024 768 dots Others USB port this must be provided as standard High Speed USB USB 2 0 compatible CD ROM drive is necessary for installation 1 Standard installation is required Operation is not assured if the OS has been upgraded or in a multi boot environment 2 64 bit e...

Page 57: ...cable To play images recorded on the camcorder using a computer See Help of the supplied CD ROM Content Management Utility Notes When importing a long movie or edited image use the supplied software Content Management Utility If you use any other software images may not be imported properly If file size exceeds 2 GB during a long recording a new file is created automatically resulting in the movie...

Page 58: ...ng p 66 Rec Media SET Items for setting up image quality or the recording media p 77 TC UB Items for setting up the time code or user bit p 79 Edit Copy Items for editing images such as copy or protect p 80 Setup Other setup items p 82 1 Select 2 Select a category 3 Select your desired menu item Notes Select to finish setting the menu or to return to the previous menu screen Scrolls the menu items...

Page 59: ... LCD screen displays the list of menus in the sub category selected When you cannot select a menu item Grayed out menu items or settings are not available When you select the grayed out menu item your camcorder displays the reason why you cannot select the menu item or the instruction of under which condition you can set the menu item Sub category icons ...

Page 60: ...Auto Gain Control AGC 68 AE Shift Adjusts the exposure manually 68 White Balance Shift Adjusts the white balance manually 69 Low Lux Records bright color images in the dim 69 Camera Settings Scene Selection Selects an appropriate recording setting according to the type of scene such as night view or beach 69 Cinematone Adjusts the color of the movie to resemble the atmosphere of films when recordi...

Page 61: ...redeye when shooting with flash 74 Audio Audio Format Switches the audio format 74 Blt in Zoom Mic Records movies with vivid sound appropriate to the zoom position 74 Int Mic Wind NR Reduces the wind noise 74 Micref Level Sets the microphone level 74 Audio Output Timing You can set echo control when recording 75 Volume Adjusts the volume of playback sound 75 Shooting Assist My Button Registers MEN...

Page 62: ...y card 78 Repair Img DB F Repairs the image database file on the internal recording media or a memory card 95 File Number Sets how to assign the file number 78 TC UB TC UB Disp Switchs to display the time code and user bit 79 TC Preset Sets the time code 79 UB Preset Sets the user bit 79 TC Run Selects how the time code advances 79 TC Make Selects the recording type on the recording media 79 UB Ti...

Page 63: ...der sounds operation beeps or not 84 LCD Brightness Adjusts the brightness of the LCD screen 84 Display Setting Sets the duration that icons or indicators are displayed on the LCD screen 84 GPS Information Displays location information 84 GPS Setting Sets the GPS 85 REC Lamp Sets the recording lamp to light up or not 85 Remote Ctrl Sets whether the Wireless Remote Commander is to be used or not 85...

Page 64: ...corder records a movie of approximately 3 seconds before the START STOP button is pressed Notes You cannot record sound Image quality is not as good as that of normal recording Rec Format will be set to 1080 50i automatically Golf Shot Divides 2 seconds of fast movement into frames which are then recorded as a movie and photos You can view a series of movement when playing back which is convenient...

Page 65: ...and records a movie in the time period between 1 5 seconds before the impact point to 0 5 second after the impact point The size of photos becomes 1 920 1 080 You cannot record sound Image quality is not as good as that of normal recording Rec Format will be set to 1080 50i automatically Impact sound may be detected by the built in microphone even when an external microphone or XLR Adaptor is atta...

Page 66: ...kly Under video lamps in a studio or under sodium lamps or incandescent like color lamps One Push The white balance will be adjusted according to the ambient light Select Keep framing white object such as a piece of paper to fill the screen under the same lightning conditions as you will shoot the subject Select If the lighting conditions changed by bringing your camcorder outdoors from inside the...

Page 67: ...icture manually Adjust the brightness when the subject is too bright or too dark Auto The exposure is adjusted automatically Manual Select if the subject is white or the backlight is bright or select if the subject is black or the light is dim Focus You can adjust the focus manually You can select this function also when you want to focus on a certain subject intentionally Auto The focus is adjust...

Page 68: ...ed priority mode When you shoot a moving subject at a higher shutter speed it appears as if frozen on the image At a lower shutter speed the subject appears as if it is flowing Auto Adjusts the shutter speed automatically Manual Adjust the shutter speed using to increase the shutter speed and to decrease the shutter speed AGC Limit You can select the upper limit for the AGC Auto Gain Control to re...

Page 69: ... automatically Night Scene 1 Maintains the darkening atmosphere of the distant surroundings in twilight scenes Night Portrait Enables to take photos of people and background using a flash Sunrise Sunset 1 Reproduces the atmosphere of scenes such as sunsets or sunrises Fireworks 1 Takes spectacular shots of fireworks Landscape 1 Shoots distant subjects clearly This setting also prevents your camcor...

Page 70: ... Select the desired effect in STBY to fading in or REC to fading out mode Off Does not use an effect White Fader Fades in out with the white effect Out In Black Fader Fades in out with the black effect The thumbnails of movie recorded using Black Fader may be difficult to see on Event View or other screens Out In Notes When you press START STOP the setting is cleared Self Timer Press FIXED SHOT PH...

Page 71: ... Movie lamp is lit FIXED SHOT This function further reduces camera shake PHOTO This function is used when shooting photos Digital Zoom You can select the maximum zoom level Note that the image quality decreases when you use the digital zoom Off Digital zoom cannot be used 120 Up to 120 zoom is performed digitally Conversion Lens Set this menu item when you want to use a conversion lens sold separa...

Page 72: ...t is about 3 m 10 feet Color Bar You can display or record color bars in the movie recording mode This function helps you to adjust colors when you view movies recorded with your camcorder on a TV or a monitor Off Does not display color bars On Displays color bars Notes This function is automatically set to Off when you switch your camcorder to the photo recording playback mode or turn off the cam...

Page 73: ...y Notes Smiles may not be detected depending on recording conditions subject conditions and the setting of your camcorder Smile Sensitivity Sets the smile detection sensitivity for using the Smile Shutter function Big Smile Detects a big smile Normal Smile Detects a normal smile Slight Smile Detects even a slight smile Flash You can select the flash setting when you record photos using the built i...

Page 74: ...es and other conditions The redeye function does not work with automatic recording by Smile Shutter Audio Format You can set the audio format for high definition image quality HD recording Linear PCM Records in Linear PCM system Dolby Digital Records in Dolby Digital system Notes Audio format is fixed to Dolby Digital with the standard definition image quality STD recording Blt in Zoom Mic You can...

Page 75: ...ecording to one of the My Buttons After selecting My Button select the menu item that you want to assign to a My Button using Select one of the My Buttons to which the menu item will be assigned Select Expanded Focus You can magnify an image that appears at the center of the LCD screen by about 2 0 times to confirm the sharpness of the focus Off Does not magnify images On Magnify images Notes Even...

Page 76: ... maximum level completely white level is set to 100 Notes With a subject that exceeds a brightness level of 100 IRE the image may become overexposed Peaking You can display an image on the screen with its outlines enhanced with colors This function helps you to adjust the focus The enhanced outlines will not be recorded on the image Off Does not display the enhanced outlines White Displays the enh...

Page 77: ...3 Records movies to the full screen on a 4 3 TV screen Notes For details on the holizontal vertical ratio of the TV that will be connected refer to the instruction manuals of the TV TV Type p 83 x v Color You can capture wider range of colors Various colors such as the brilliant color of flowers and turquoise blue of the sea can be more faithfully reproduced Refer to the instruction manuals of the...

Page 78: ...y unless you connect the AC Adaptor to the wall outlet wall socket To avoid the loss of important images they should be saved on a computer or other devices before performing Empty Disconnect all cables except the AC Adaptor Do not disconnect the AC Adaptor during the operation While deleting data do not apply any vibrations or shocks to your camcorder You can check the time that the camcorder wil...

Page 79: ...h Set other digits by repeating step and touch OK To reset the user bit Select Reset on the UB Preset display TC Run You can select how the time code advances Rec Run Advances the time code only during recording Select this setting to record the time code continuous from the last time code of the previous recording Free Run Advances the time code regardless of operation of your camcorder Notes Eve...

Page 80: ...avoid deleting them by mistake will be displayed on the protected images Multiple Images You can select one or more images and protect them Select the type of image you want to protect Add check marks to the desired images You can select multiple images Select the image with so that the mark disappears and you can remove the protection Select Set All In Event You can protect all images in the sele...

Page 81: ... is connected to your camcorder You can perform this operation while the camcorder is displaying the event view of the external device connected See page 53 Remove All In Event You can remove the protection from all images in the selected date at one time select the date you want to remove the protection using You cannot select multiple dates Select Copy You can copy images recorded on the interna...

Page 82: ... time of recording You can check the following information Off Data code is not displayed Date Time Date Time Camera Data Movie SteadyShot off White Balance Shutter Speed IRIS Aperture value Gain Brightness Exposure Flash Coordinates Latitude Longitude Notes The data code is displayed on the TV screen if you connect your camcorder to a TV Depending on the recording media condition bars appear Phot...

Page 83: ... 4 3 mode Notes Horizontal to vertical ratio of high definition image quality HD movies is 16 9 HDMI Resolution Select the output image resolution when connecting your camcorder to a TV with an HDMI cable 1080p 576p Outputs high definition image quality HD movies with a 1080p signal and standard image quality STD movies with a 576p signal Select this setting when you watch movies that have been re...

Page 84: ... way Display Setting You can set the duration of displaying the icons or indicators on the LCD screen Auto Displays for about 3 seconds The rec zoom buttons on the LCD screen are displayed On Always displays The rec zoom buttons on the LCD screen are not displayed GPS Information The camcorder can display location information How to check the triangulating information Color of the satellites trian...

Page 85: ...lly Off Does not receive GPS signals The location information that has previously been recorded will be invalid REC Lamp You can make the camera recording lamp on the front of your camcorder not to turn on Default On Remote Ctrl Remote control On Select this when you use the supplied Wireless Remote Commander p 10 Off Select this when you do not use the supplied Wireless Remote Commander Language ...

Page 86: ...to Clock ADJ is activated This function automatically adjusts the clock when the camcorder receives GPS signals and finishes triangulating successfully while the power is on Once the clock is adjusted it will not be adjusted until the next time you turn the camcorder on again The clock may not be adjusted to the correct time automatically using the GPS system depending on the country region select...

Page 87: ... p 89 Memory card p 89 Recording p 90 Playback p 92 Playing back images stored on memory card on other devices p 92 Editing movies photos on your camcorder p 93 Playback on the TV p 93 Copying Connecting to other devices p 93 Connecting to a computer p 93 Overall operations Wireless Remote Commander The power does not turn on Attach a charged battery pack to the camcorder p 15 The plug of the AC A...

Page 88: ... Shift Low Lux Scene Selection Cinematone Tele Macro SteadyShot SteadyShot Auto Back Light Face Detection The supplied Wireless Remote Commander does not function Set Remote Ctrl to On p 85 Insert a battery into the battery holder with the polarities correctly matching the marks p 109 Remove any obstructions between the Wireless Remote Commander and the remote sensor Point the remote sensor away f...

Page 89: ...the battery again If the problem persists replace the battery pack with a new one p 106 LCD screen viewfinder Menu items are grayed out You cannot select grayed items in the current recording playback situation There are some functions you cannot activate simultaneously The buttons do not appear on the touch panel Touch the LCD screen lightly Press the DISP button p 21 Press DISPLAY on the Wireles...

Page 90: ...ded You cannot record photos together with Smth Slw REC Golf Shot Fader The camcorder cannot shoot photos while it is in the movie recording mode depending on the setting of Rec Format The access lamp remains lit or flashing even if recording was stopped Your camcorder is recording the scene you have just shot on the memory card The imaging field looks different The imaging field may look differen...

Page 91: ...version Lens to Off p 71 Images cannot be recorded or played back correctly If you record and delete images repeatedly for a long time the files on the recording media may become fragmented and images cannot be recorded or played back correctly After backing up the images on other media format the recording media on your camcorder p 78 The subjects passing by the screen very fast appear crooked Th...

Page 92: ...itch Image Type button to Movie you can play movies only is indicated on a thumbnail This may appear on an image recorded on other devices edited on a computer etc You removed the AC Adaptor or the battery pack while the recording media icon at the top right corner of the screen flashes or before the access lamp is turned off after recording This may damage your image data and is displayed is indi...

Page 93: ...er frame of Guide Frame p 75 as a guide The image appears distorted on the 4 3 TV This happens when viewing an image recorded in the 16 9 wide mode on a 4 3 TV Set TV Type correctly p 83 and play back the image Black bands appear at the top and bottom of the screen of the 4 3 TV This happens when viewing an image recorded in the 16 9 wide mode on a 4 3 TV This is not a malfunction Copying Connecti...

Page 94: ...e AC Adaptor to the DC IN jack of your camcorder securely p 15 C 06 The battery pack temperature is high Change the battery pack or place it in a cool place C 13 C 32 Remove the power source Reconnect it and operate your camcorder again E Follow the steps from on page 87 Battery level warning The battery pack is nearly used up Depending on the operating environment or battery conditions may flash ...

Page 95: ...ted Access to the memory card was restricted on another device Warning indicator pertaining to the external media device The image database file may be damaged Check the database file by touching Rec Media SET Repair Img DB F the recording medium The external media device is damaged Warning indicator pertaining to formatting of the external media device The external media device is damaged The ext...

Page 96: ...d If you connect to a computer that has been installed with the supplied software Content Management Utility you can copy the backed up high definition image quality HD movies Description of warning messages If messages appear on the screen follow the instructions Recording media Cannot recognize the internal memory Format and use again The internal recording medium of the camcorder is set differe...

Page 97: ...ers exceeding 999MSDCF You cannot create or delete created folders using your camcorder Format the memory card p 78 or delete folders using your computer This memory card may not be able to record or play movies Use a memory card recommended for your camcorder p 24 This memory card may not be able to record or play images correctly Use a memory card recommended for your camcorder p 24 Contact your...

Page 98: ...reen is opened Bottom When recording with the viewfinder without opening the LCD screen Each recording time is measured in the following conditions When recording high definition image quality HD with Rec Format set to 1080 50i When the XLR Adaptor and supplied microphone are attached Typical recording time shows the time when you repeat recording start stop switching the MODE lamp and zooming Tim...

Page 99: ...min Top When Audio Format is set to Linear PCM Bottom When Audio Format is set to Dolby Digital Standard definition image quality STD in h hour and min minute Recording mode Recording time 23 h 50 min 21 h 50 min You can record movies of a maximum of 3 999 scenes with high definition image quality HD and 9 999 scenes with standard definition image quality STD The maximum continuous recording time ...

Page 100: ... 9 FH Approx 17 Mbps average 1 920 1 080 pixels 16 9 1 280 720 pixels 16 9 HQ Approx 9 Mbps average 1 440 1 080 pixels 16 9 LP Approx 5 Mbps average 1 440 1 080 pixels 16 9 Standard definition image quality STD HQ Approx 9 Mbps average 720 576 pixels 16 9 4 3 unit minute 2 GB 4 GB 8 GB 16 GB 32 GB 10 10 25 25 55 55 110 110 225 225 10 10 25 25 60 60 120 120 245 245 20 15 45 35 90 70 185 145 375 290...

Page 101: ... Adaptor supplied with your camcorder within the AC 100 V to 240 V 50 Hz 60 Hz range Viewing high definition image quality HD movies In countries regions where 1080 50i is supported you can view the movies with the same high definition image quality HD as that of the recorded movies You need a PAL system based and 1080 50i compatible TV or monitor with HDMI input jacks The HDMI cable supplied must...

Page 102: ...r is a PAL system based camcorder System Used in PAL Australia Austria Belgium China Czech Republic Denmark Finland Germany Holland Hong Kong Hungary Italy Kuwait Malaysia New Zealand Norway Poland Portugal Singapore Slovak Republic Spain Sweden Switzerland Thailand United Kingdom etc PAL M Brazil PAL N Argentina Paraguay Uruguay NTSC Bahama Islands Bolivia Canada Central America Chile Colombia Ec...

Page 103: ...our camcorder About GPS The GPS Global Positioning System is a system that calculates geographical location from highly accurate US space satellites This system allows you to pinpoint your exact location on the earth The GPS satellites are located in 6 orbits 20 000 km above the earth The GPS system consists of 24 or more GPS satellites A GPS receiver receives radio signals from the satellites and...

Page 104: ...e GPS information On the restriction of use of GPS Use GPS in accordance with the regulations of the situation the countries regions of use On the geographic coordinate system The WGS 84 geographic coordinate system is used About the memory card A memory card formatted by a computer Windows OS Mac OS does not have guaranteed compatibility with your camcorder Data read write speed may vary dependin...

Page 105: ...dia with MagicGate Memory Stick PRO Duo media Mark2 Memory Stick PRO HG Duo media This product does not support 8 bit parallel data transfer but it supports 4 bit parallel data transfer the same as with Memory Stick PRO Duo media This product cannot record or play data that uses MagicGate technology MagicGate is a copyright protection technology that records and transfers the contents in an encryp...

Page 106: ...r goes off even though the remaining battery time indicator indicates that the battery pack has enough power to operate charge the battery pack fully again Remaining battery time will be indicated correctly Note however that the battery indication will not be restored if it is used in high temperatures for a long time or if left in a fully charged state or when the battery pack is frequently used ...

Page 107: ...ecord properly Near tuner devices such as TVs or radio Noise may occur On a sandy beach or anywhere dusty If sand or dust gets in your camcorder it may malfunction Sometimes this malfunction cannot be repaired Near windows or outdoors where the LCD screen the viewfinder or the lens may be exposed to direct sunlight This damages the inside of the viewfinder or the LCD screen Operate your camcorder ...

Page 108: ...ed If you connect the camcorder to a laptop computer that is not connected to a power source the battery of the laptop computer will continue to use up its charge Do not leave the camcorder connected to a computer in this manner Charging with a personally assembled computer with a converted computer or through a USB hub are not guaranteed The camcorder may not function correctly depending on the U...

Page 109: ...To connect an accessory press down and push it to the end and then tighten the screw To remove an accessory loosen the screw and then press down and pull out the accessory When you are recording movies with an external flash sold separately connected to the accessory shoe turn off the power of the external flash to prevent charging noise being recorded You cannot use an external flash sold separat...

Page 110: ...and cream remains on the screen the coating comes off more easily Wipe it early On adjustment of the touch panel Calibration The buttons on the touch panel may not work correctly If this happens follow the procedure below It is recommended that you connect your camcorder to the wall outlet wall socket using the supplied AC Adaptor during the operation Touch Setup General Settings Calibration Touch...

Page 111: ...jector lens Wipe the lens gently with a soft cloth such as a cleaning cloth or glass cleaning cloth Stubborn stains may be removed with a soft cloth such as a cleaning cloth or glass cleaning cloth lightly dampened with water Never use a solvent such as alcohol benzene or thinner acid alkaline or abrasive detergent or a chemical cleaning cloth as they will damage the lens surface On charging the p...

Page 112: ...format Ver 2 0 compatible STD MPEG2 PS Audio recording system Linear PCM 2ch 48 kHz 16 bit Dolby Digital 2ch 48 kHz 16 bit Dolby Digital Stereo Creator employed Photo file format DCF Ver 2 0 Compatible Exif Ver 2 3 Compatible MPF Baseline Compatible Recording media Movie Photo Internal memory 96 GB Memory Stick PRO Duo media SD card Class 4 or faster The capacity that a user can use Approx 95 6 GB...

Page 113: ...k DC 8 4 V AC Adaptor USB Charging DC 5 V 500 mA 1 5 A Average power consumption During camera recording using the microphone ECM XM1 the viewfinder at normal brightness HD 3 9 W STD 3 7 W During camera recording using the microphone ECM XM1 the LCD screen at normal brightness HD 4 1 W STD 3 8 W Operating temperature 0 C to 40 C 32 F to 104 F Storage temperature 20 C to 60 C 4 F to 140 F Dimension...

Page 114: ... Blu ray are trademarks of the Blu ray Disc Association Dolby and the double D symbol are trademarks of Dolby Laboratories HDMI the HDMI logo and High Definition Multimedia Interface are trademarks or registered trademarks of HDMI Licensing LLC in the United States and other countries Microsoft Windows Windows Vista and DirectX are either registered trademarks or trademarks of Microsoft Corporatio...

Page 115: ... FOR ANY OTHER USE ADDITIONAL INFORMATION MAY BE OBTAINED FROM MPEG LA L L C SEE HTTP WWW MPEGLA COM Software is installed in your camcorder We provide this software based on the license agreements of the copyright owners Based on requests by the owners of copyright of these software applications we have an obligation to inform you of the following Please read the license statements in English in ...

Page 116: ...5 Center Indicator Meaning Slideshow Set NightShot 37 Warning 94 Playback mode 31 Right Indicator Meaning 1080 50i Setting 77 Rec Format 38 60min Remaining battery 00 00 00 00 Time code hour minute second frame user bit 79 Recording playback editing media 23 00Min Estimated recording remaining time 24 1M Photo size 38 9999 9999 Approximate number of recordable photos and photo size Playback folder...

Page 117: ...117 GB Others Index Indicators and their positions are approximate and may differ from what you actually see Some indicators may not appear depending on your camcorder model ...

Page 118: ...cape 69 Language 2 Language Setting 85 LCD Brightness 84 LCD screen 26 Lens hood 14 Light Bright 76 Linear PCM 74 Low Lux 69 M Maintenance 103 MANUAL dial 40 Media Info 77 Media Select 23 Media Settings 23 Memory card 23 Memory Stick media 104 Memory Stick PRO HG Duo media 24 Memory Stick PRO Duo media Mark2 24 Menu lists 60 Menus 58 A Abroad 101 Active Interface Shoe 7 109 AE Shift 68 AGC Limit 6...

Page 119: ...24 Self diagnosis display 94 Self Timer 70 Setting the date and time 19 Setup 82 Shutter Speed 39 68 Smile Sensitivity 73 Smile Shutter 34 73 Smth Slw REC 64 Snow 69 Specifications 112 Spot Focus 67 Spotlight 69 Spot Meter 67 Spot Meter Fcs 66 SteadyShot Movie 36 SteadyShot Photo 71 Summer Time 19 86 Sunrise Sunset 69 Supplied Items 11 T TC UB 79 TC UB Disp 79 TC Make 79 TC Preset 79 TC Run 79 Tel...

Page 120: ... 2012 Sony Corporation Printed in Japan http www sony net Printed on 70 or more recycled paper using VOC Volatile Organic Compound free vegetable oil based ink ...

Reviews: