background image

1

Table of C

on

ten

ts

Sear
ch image

Inde
x

GB

Notes

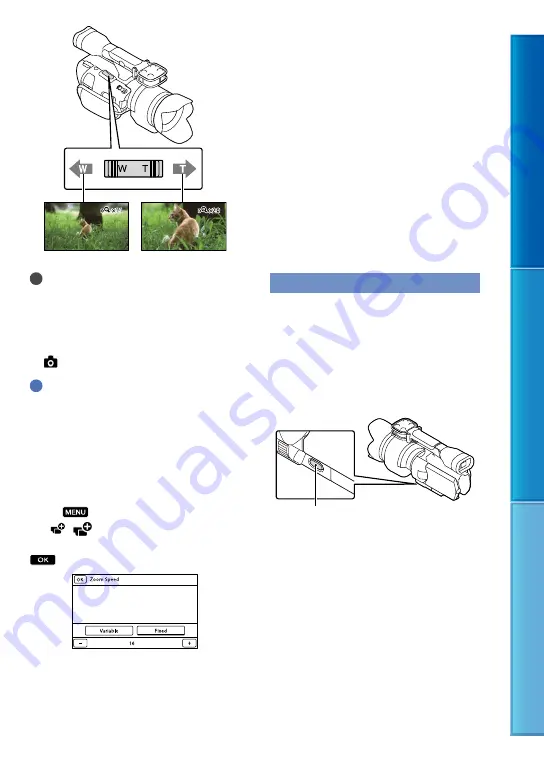
Be sure to keep your finger on the zoom lever. 

If you move your finger off the zoom lever, the 

operation sound of the zoom lever may also be 

recorded.

You cannot use the digital zoom when you set  

[

RAW/JPEG] to [RAW] or [RAW & JPEG].

Tips

The digital zoom and the optical zoom can be 

used together.

When you set [Zoom Lever] (p. 78) t

other than [Digital Zoom], the digital zoom 

magnification will be retained.

To set the zoom speed

You can fine adjust the zoom speed.

Touch 

 (MENU) 

 [Camera/Mic] 

 [  (

Shooting Assist)] 

 [Zoom 

Speed] 

 [Fixed] 

 desired setting 


.

This setting is effective for both digital zoom 

and optical power zoom.

When set to [Fixed], you can zoom at the set 

speed regardless of how far you operate the 

zoom lever.

The zoom speed range differs depending 

on the power zoom lens you use. The speed 

may not change or drive sound may be heard 

loudly depending on the combination of lens 

and [Zoom Speed] setting. Trial shooting is 

suggested before actual shooting.

You can operate the zoom lever of the high-

magnification power zoom lens supplied with 

the NEX-VG30H/VG30EH independently from 

the zoom lever on the camcorder. In this case, 

you can switch between power zoom (SERVO) 

and manual zoom (MANUAL) on the lens. 

When you use the power zoom (SERVO), you 

can select the zoom speed from three levels by 

the zoom speed switch on the lens. The zoom 

setting of the camcorder and that of the lens are 

mutually independent.

Adjusting the focus manually

If the lens has a focusing ring, you can 

adjust the focus manually by turning it to 

the right or left.

If you use a lens that supports autofocus, 

press FOCUS to set focus mode to manual. 

 appears on the LCD screen in manual 

focusing mode.

Use this function in the following cases.

To record a subject behind a window covered 

with raindrops.

To record horizontal stripes.

To record a subject with little contrast 

between the subject and its background.

When you want to focus on a subject in the 

background.

To record a stationary subject using a tripod.


FOCUS button

Summary of Contents for NEX-VG30

Page 1: ...Table of Contents Search image Index GB Click Handycam Handbook NEX VG30 VG30H VG30E VG30EH 2012 Sony Corporation 4 440 802 11 1 ...

Page 2: ...corder connected to a computer will be also found in the Operating Guide and the PlayMemories Home Help Guide that is the Help of the supplied PlayMemories Home software Searching for information quickly Click an item on the right edge of each page and you will jump to the page for that item You can search for an item by keyword using Adobe Reader Refer to the Help of Adobe Reader for tips on how ...

Page 3: ...amcorder under direct sunlight attach the lens cap Exposing the LCD screen the viewfinder or the lens to direct sunlight for long periods of time may cause malfunctions Do not aim at the sun Doing so might cause your camcorder to malfunction Take images of the sun only in low light conditions such as at dusk Do not look at the sun or a strong light through a removed lens This may cause irrecoverab...

Page 4: ...ia or on Blu ray discs p 58 60 Notes on battery pack AC Adaptor Be sure to remove the battery pack or the AC Adaptor after turning off the camcorder Disconnect the AC Adaptor from the camcorder holding both the camcorder and the DC plug Note on the camcorder battery pack temperature When the temperature of the camcorder or battery pack becomes extremely high or extremely low you may not be able to...

Page 5: ...those of NEX VG30 Notes on use Do not do any of the following Otherwise the memory card may be damaged recorded images may be impossible to play back or may be lost or other malfunctions could occur ejecting the memory card when the access lamp p 27 is lit or flashing removing the battery pack or AC Adaptor from the camcorder or applying mechanical shock or vibration to the camcorder when the Movi...

Page 6: ...enables you to use α lenses A mount lenses sold separately as well You can choose the right lens for the recording conditions or subjects A wide variety of characteristic lenses will widen visual expression Manual operability The camcorder allows you to adjust aperture shutter speed gain white balance etc during movie recording The MANUAL dial and dedicated buttons are provided to enable you to us...

Page 7: ...ocusing the background 47 Adjusting the color 45 Focusing manually 41 In better brightness 70 Shooting like film image 79 Achieving more impressive and artistic expression 72 Shooting when holding the camcorder by hand Preventing camera shake 74 Following a moving subject 73 Shooting in low angle 45 ...

Page 8: ...ound clearly Recording the surround sound 44 Recording the loud noise naturally 76 Shooting landscapes The sky in vivid colors 70 Keeping your shot level 76 Shooting clear still images The same scene with different brightness 73 Capturing the best moment 73 ...

Page 9: ...ing the battery cover 14 Step 3 Charging the battery pack 15 Step 4 Attaching the lens 18 Removing the lens 20 Step 5 Turning the power on and setting the date and time 23 Changing the language setting 24 Step 6 Making setting adjustments before recording 25 The LCD panel 25 Changing the display on the LCD screen 25 The viewfinder 26 Step 7 Inserting a memory card 27 Recording Playback Recording 2...

Page 10: ...the image settings manually with the MANUAL dial 47 Adjusting the IRIS 47 Adjusting the Shutter Speed 48 Adjusting Exposure 48 Advanced manual operation 49 Making good use of your camcorder 51 Deleting movies and photos 51 Protecting recorded movies and photos Protect 51 Dividing a movie 52 Capturing a photo from a movie NEX VG30 VG30H only 53 Saving movies and photos with a computer Selecting the...

Page 11: ...tional information Troubleshooting 87 Self diagnosis display Warning indicators 93 Recording time of movies number of recordable photos 96 Expected time of recording and playback with each battery pack 96 Expected recording time of movies 96 Expected number of recordable photos 97 Using your camcorder abroad 98 Maintenance and precautions 100 About the AVCHD format 100 About the memory card 100 Ab...

Page 12: ...mcorder 1 Body cap attached to camcorder NEX VG30H VG30EH supplied but not attached to other models 1 p 18 AC Adaptor 1 p 15 Power cord mains lead 1 p 15 Component A V Cable 1 p 37 A V connecting cable 1 p 37 USB cable 1 p 60 Wireless Remote Commander RMT 835 1 p 112 A button type lithium battery is already installed Rechargeable battery pack NP FV70 1 p 15 Battery Cover 1 p 14 Wind Screen 1 p 14 ...

Page 13: ...luding PlayMemories Home Help Guide Image Data Converter RAW development software Handycam Handbook PDF Operating Guide 1 NEX VG30H VG30EH High magnification power zoom lens E PZ 18 200mm F3 5 6 3 OSS attached to the camcorder 1 p 18 Lens hood 1 p 22 Front lens cap attached to the lens 1 p 18 Rear lens cap 1 p 18 ...

Page 14: ... lenses sold separately For NEX VG30H VG30EH models the lens is attached to the camcorder at the time of purchase Attaching the Wind Screen Use the Wind Screen when you want to reduce the wind noise recorded by the microphone Attach the Wind Screen with the Sony logo facing down Attaching the battery cover Attach the battery cover after attaching the battery pack Attach the battery cover with the ...

Page 15: ...e V series 1 Slide the POWER switch to OFF the default setting 2 Attach the battery pack by sliding it in the direction of the arrow until it clicks 3 Connect the AC Adaptor and the power cord mains lead to your camcorder and the wall outlet wall socket The CHG charge lamp lights up and charging starts The CHG charge lamp turns off when the battery pack is fully charged Battery pack CHG charge lam...

Page 16: ...amcorder is on you can check the approximate amount of remaining battery power with the remaining battery indicator at the upper right on the LCD screen To remove the battery pack Slide the POWER switch to OFF Slide the BATT battery release lever and remove the battery pack To use a wall outlet wall socket as a power source Make the same connections as Step 3 Charging the battery pack p 15 Even if...

Page 17: ...amcorder and put it in a cool place In the default setting the power turns off automatically if you leave your camcorder without any operation for about 5 minutes to save battery power A Shut Off p 85 Notes on the AC Adaptor Use the nearby wall outlet wall socket when using the AC Adaptor Disconnect the AC Adaptor from the wall outlet wall socket immediately if any malfunction occurs while using y...

Page 18: ... is attached to the camcorder at the time of purchase If you use another lens refer to the instruction manual supplied with that lens Do not touch or dirty the lens contacts Remove the body cap from the camcorder body and the packaging lid from the rear of the lens Zoom ring Zoom speed switch Hood index Zoom lever Focus ring Mounting index Lens contacts Zoom switch Front lens cap Rear lens cap ...

Page 19: ...ttaching a lens do not press the lens release button Do not use force when attaching a lens Mounting the lens forcibly may result in a malfunction or damage of the lens mount There may be some slight movement of the lens in the locked position depending on the lens used This is not a malfunction Hold the camcorder body with the front end downward and quickly change the lens somewhere away from dus...

Page 20: ...ndexes and turn the cap clockwise Before you attach caps remove dust from them Notes When changing the lens if dust or debris gets inside the camcorder body and adheres to the surface of the image sensor the part that acts as the film it may appear on the image depending on the shooting conditions The image sensor is applied with the anti dust coating to prevent dust from adhering to the image sen...

Page 21: ...er Do not apply a mechanical shock to the camcorder during cleaning If you cannot clean the image sensor by the above procedure consult your Sony dealer or local authorized Sony service facility Mount Adaptor Using a Mount Adaptor sold separately you can attach an A mount lens sold separately to your camera For details refer to the operating instructions supplied with the Mount Adaptor The availab...

Page 22: ...sult your local authorized Sony service facility on compatible lenses The sound of the lens and the camera in operation may be recorded during movie recording You can avoid this by setting Audio Rec Level to minimum Touch MENU Camera Mic Microphone Audio Rec Level It may take a long time or may be difficult for the camera to focus depending on the lens used or the subject To attach the lens hood A...

Page 23: ...touch Next 3 Select the desired geographical area with then touch Next To set the date and time again touch MENU Setup Clock Settings Date Time Setting Date Time When an item is not on the screen touch until the item appears 4 Set Daylight Savings or Summer Time then touch Next If you set Daylight Savings or Summer Time to On the clock advances 1 hour Touch the button on the LCD screen POWER switc...

Page 24: ...ayed during playback To display the date and time touch MENU Setup Playback Settings Data Code Date Time You can turn off the operation beeps by touching MENU Setup General Settings Beep Off If the button you touch does not react correctly calibrate the touch panel p 103 To turn off the power Slide the POWER switch to OFF The Movie lamp flashes for a few seconds and the camcorder is turned off Cha...

Page 25: ... the viewfinder even though the LCD screen is open p 84 You can adjust the brightness of the LCD screen with LCD Brightness p 84 Changing the display on the LCD screen Press DISPLAY to cycle the screen display in the following order Recording Detailed display simple display minimum display Playing Detailed display minimum display Tips In the default setting the screen display changes to the simple...

Page 26: ...iewfinder even though the LCD screen is open If the eye sensor cannot detect it the display remains on the LCD screen If the image is not clear in the viewfinder If you cannot see the picture in the viewfinder clearly under bright circumstances use the supplied large eyecup To attach the large eyecup stretch it slightly and align it with the eyecup groove in the viewfinder You can attach the large...

Page 27: ...a new Image Database File It may be possible that there is not enough free space is displayed format the memory card p 81 Confirm the direction of the memory card If you forcibly insert the memory card in the wrong direction the memory card memory card slot or image data may be damaged Do not open the cover during recording When inserting or ejecting the memory card be careful so that the memory c...

Page 28: ...rder Do not attach a label or the like on memory card or memory card adaptor Doing so may cause a malfunction Notes A MultiMediaCard cannot be used with this camcorder Movies recorded on Memory Stick XC HG Duo media or SDXC memory cards cannot be imported to or played back on computers or AV devices not supporting the exFAT file system by connecting the camcorder to these devices with the USB cabl...

Page 29: ...rding In the default setting movies are recorded with high definition image quality HD 1 Fasten the grip belt 2 To remove the lens cap push the sliders on both sides of the cap 3 Slide the POWER switch to ON while pressing the green button Your camcorder is turned on ...

Page 30: ...ished During this time do not apply shock or vibration to the camcorder or remove the battery or AC Adaptor Access lamp p 27 is lit or flashing The media icon in the upper right of the LCD screen is flashing Hold the lens with your left hand to support the camera during recording when you do not use a tripod Make sure that your fingers are not touching the microphone Tips See page 96 on the record...

Page 31: ...ition are recorded automatically on the memory card They are not displayed during recording However you can check them as Data Code during playback To display them touch MENU Setup Playback Settings Data Code a desired setting Shooting photos When disappears the photo is recorded Press MODE to turn on the Photo lamp The LCD screen display switches for photo recording mode Press PHOTO lightly to ad...

Page 32: ...Index GB The IRIS Shutter Speed ISO and Exposure are set to automatic adjustment when PROGRAM AE is pressed To change the image size touch MENU Image Quality Size Image Size a desired setting You cannot record photos while is displayed ...

Page 33: ... seconds 3 Touch to select the desired event To the MENU screen Events To the previous next event Event name Change to the movie photo recording mode Time line bar Change Event Scale button The Event Index screen appears when you touch the event that is displayed on the center Touch Change Event Scale on the bottom right of the screen so that you can change the time range of the time line bar from...

Page 34: ...l time of movies in the Event The total number of still images is displayed when there are still images only Switch Image Type button Movie Photo appears with the movie or photo that was most recently played or recorded If you touch the movie or photo with you can continue playback from the previous time Operating the camcorder while playing a movie You can use the functions shown in the figure be...

Page 35: ...ut 10 times about 30 times about 60 times The recording date time and shooting conditions are recorded automatically during recording This information is not displayed during recording but you can display it during playback by touching MENU Setup Playback Settings Data Code a desired setting To adjust the sound volume of movies While playing back movies touch adjust with Viewing photos You can use...

Page 36: ...lideshow touch Slideshow Set To see enlarged images Touch Playback zoom during still image playback You can adjust the zoom by You can also operate this with the zoom lever Tips You cannot use the playback zoom if you have not selected PHOTO on the index screen ...

Page 37: ...hoto on the camcorder p 33 List of connection Connecting to a high definition TV When the recording quality is high definition image quality HD the movies are played back in high definition image quality HD When the recording quality is standard image quality STD the movies are played back in standard definition image quality STD Connecting to a non high definition 16 9 wide or 4 3 TV When movies ...

Page 38: ...82 When you connect with A V connecting cable with S VIDEO When the S VIDEO plug S VIDEO channel is connected audio signals are not output To output audio signals connect the white and red plugs to the audio input jack of your TV This connection produces higher resolution images compared with the A V connecting cable When your TV is monaural When your TV has only one audio input jack Connect the y...

Page 39: ...B the order of priority of the TV input jacks is as follows HDMI component S VIDEO video HDMI High Definition Multimedia Interface is an interface to send both video audio signals The HDMI OUT jack outputs high quality images and digital audio ...

Page 40: ...ANUAL depending on the lens you are using Adjusting the zoom with the zoom lever Adjust the magnification with the zoom lever Move the zoom lever slightly for a slower zoom Move it further for a faster zoom Optical power zoom You can enlarge the image without deterioration A compatible optical power zoom lens is required Digital zoom Due to digital processing the image quality will deteriorate Whi...

Page 41: ...and Zoom Speed setting Trial shooting is suggested before actual shooting You can operate the zoom lever of the high magnification power zoom lens supplied with the NEX VG30H VG30EH independently from the zoom lever on the camcorder In this case you can switch between power zoom SERVO and manual zoom MANUAL on the lens When you use the power zoom SERVO you can select the zoom speed from three leve...

Page 42: ...al Photos only Fine tune manually after auto focus adjustment Direct Manual Focus Using the expanded focus Press EXPANDED FOCUS to magnify approx 4x the center of the screen This is useful for easy and accurate manual focusing Press EXPANDED FOCUS Pressing EXPANDED FOCUS switches between expanded and normal display Notes Even though the image appears expanded on the screen the recorded image is no...

Page 43: ... a medium icon if a movie recorded with the selected recording mode cannot be saved on that medium Touch Recording modes and the media Types of media that images can be saved on will depend on the recording mode selected For details on a save operation using the external devices see page 60 Types of media Recording mode PS FX FH HQ LP On this camcorder Memory card On external devices External medi...

Page 44: ...of the LCD screen Notes The subject you touched may not be detected depending on the surrounding brightness or hairstyle of the subject In this case touch the subject again when you record If you want to track a face set the Face Detection setting to other than Off Auto is the default setting Tips If the face you touched disappears from the LCD screen the subject selected in Face Detection p 74 ha...

Page 45: ... camcorder then rotate it 180 degrees to the lens side Tips A mirror image of the subject appears on the LCD screen but the image will be normal when recorded The camcorder can display an image on either the LCD screen or viewfinder Recording at a different angle Your camcorder can record in the following angles according to the object Low angle START STOP button on the LCD panel Low angles START ...

Page 46: ... the subject Touch Notes Set White Balance to Auto or adjust the color in One Push under white or cool white fluorescent lamps When you select One Push keep framing white objects While the camcorder is recording a movie is grayed out and One Push cannot be set Tips If you have changed the battery pack while Auto was selected or taken your camcorder outdoors after inside use or vice versa aim your ...

Page 47: ... p 49 Setting value When a setting value is highlighted it can be adjusted by the MANUAL dial Rotate the MANUAL dial to adjust the IRIS Tips Press IRIS again to adjust the IRIS automatically appears next to the aperture value The aperture value adjustment range you can set will vary depending on the lens you use With some lenses the aperture value may change when you zoom from wide angle to teleph...

Page 48: ...o focus automatically at a lower Shutter Speed Manual focusing with your camcorder attached to a tripod is recommended When recording under fluorescent lamps sodium lamps mercury lamps or LED lighting the picture may have horizontal bands of noise You may be able to improve the situation by adjusting the Shutter Speed To adjust the Shutter Speed automatically Press SHUTTER SPEED again appears next...

Page 49: ...n The camera data p 82 that appears on the LCD screen will differ depending on the recording settings of the camcorder The settings will be displayed with the following icons Automatic Exposure is set manually Advanced manual operation You can set the brightness of the movies you want to shoot by using IRIS Shutter Speed and Gain ISO The following explanation is an example for when IRIS is set to ...

Page 50: ...osure Spot Meter etc Full manual You can use full manual mode when you set all of IRIS Shutter Speed and Gain ISO to manual The relationship between the three modes Exposure Spot Meter set to manual auto When all of IRIS Shutter Speed Gain ISO is set to manual At least one of is set to Auto Tips IRIS Shutter Speed Gain ISO and Exposure will all be set to automatic adjustment when PROGRAM AE is pre...

Page 51: ... all the recordable space of the media format the media p 81 Reduced size images which enable you to view many images at the same time on an index screen are called thumbnails Press View Images button p 33 Touch MENU Edit Copy Delete To select and delete movies touch Multiple Images MOVIE PHOTO MOVIE PHOTO When Setting is set to STD Quality appears instead of Touch and display the mark on the movi...

Page 52: ...with in step 4 disappears To protect all movies photos in an event at one time In step 3 touch Set All In Event Touch to select the desired event then touch Touch and hold the desired thumbnail so that you can confirm the image Touch to return to the previous screen Touch To undo the protection of an event In step 3 above touch Remove All In Event select the desired movies photos then touch Dividi...

Page 53: ...ture that appears on the playback screen of a movie The Photo Capture screen appears Touch then touch at the point where you want to capture a photo The movie pauses Touch to adjust the capturing point with more precision Touch When capturing is finished the screen returns to pause Notes The image size is fixed based on the image quality of the movie If the movie was recorded with one of the follo...

Page 54: ...player PlayStation 3 etc To save images on a AVCHD recording disc with high definition image quality HD Importing movies and photos to a computer p 56 Creating a AVCHD recording disc with high definition image quality HD p 57 AVCHD format playback devices a Sony Blu ray disc player PlayStation 3 etc To copy images on a disc in standard definition image quality STD to distribute Importing movies an...

Page 55: ...ble of Contents Search image Index GB Notes Always maintain your PlayStation 3 to use the latest version of the PlayStation 3 system software The PlayStation 3 may not be available in some countries regions ...

Page 56: ...e computer screen If you want to change the location where imported media files will be saved click PlayMemories Home Tools Settings Import then select the desired location 3 Click Import Refer to PlayMemories Home Help Guide for details Movies and photos are imported to your computer When the operation is completed the PlayMemories Home screen appears Tips You can move the high definition image q...

Page 57: ...dard definition STD when saving the movie on the disc To add movies to the previously selected ones select the movies in the main window and drag and drop onto the window for selecting movies 4 Click Calendar or Index to select the date or folder and select the movie you want to save on the disc High definition image quality HD movies are marked with To select plural movies hold the Ctrl key down ...

Page 58: ...r to the internet when you install BD Add on Software Place an unused Blu ray disc in the disc drive and click Create Blu ray Disc HD in step 4 of Saving images on a disc p 57 Other procedures are the same as that for creating an AVCHD disc Your computer must support the creation of Blu ray discs BD R unrewritable and BD RE rewritable media are available for creating Blu ray discs You cannot add c...

Page 59: ...media device with high definition image quality HD USB Adaptor Cable VMC UAM1 sold separately 60 Hard disk recorder etc Saving images on a DVD disc with standard definition image quality STD A V connecting cable supplied 63 Movies that are recorded with standard definition image quality STD Use the A V connecting cable to connect the camcorder to an external device in which images are saved The ty...

Page 60: ... a USB hub media devices with built in USB hub card reader Notes You may not be able to use external media devices with a code function The FAT file system is available for your camcorder If the storage medium of the external device was formatted for the NTFS file system etc format the external media device using the camcorder before use The format screen appears when an external media device is c...

Page 61: ... standby mode Event View or Event Index is displayed of the external media device Disconnect the USB Adaptor Cable Notes The number of scenes you can save on the external media device are as follows However even if the external media device has free space you cannot save scenes exceeding the following number High definition image quality HD movies Max 3 999 Standard definition image quality STD mo...

Page 62: ...n a TV connected to your camcorder p 37 You can play back the high definition image quality HD movies on your computer using Player for AVCHD Start Player for AVCHD and select the drive where the external media device is connected with Settings To perform Direct Copy manually You can perform Direct Copy manually while the camcorder is connected to an external media device Touch MENU Edit Copy Dire...

Page 63: ...definition image quality HD movies will be copied with standard definition image quality STD A V connecting cable supplied A V connecting cable with S VIDEO sold separately By using this cable higher quality images can be produced than with an A V connecting cable Connect the white and red plug left right audio and the S VIDEO plug S VIDEO channel of the A V connecting cable with an S VIDEO cable ...

Page 64: ...dubbing is finished stop the recording device and then your camcorder Notes Since copying is performed via analog data transfer the image quality may deteriorate You cannot copy images to recorders connected with an HDMI cable To copy date time information and camera data touch MENU Setup Playback Settings Data Code a desired setting When the screen size of display devices TV etc is 4 3 touch MENU...

Page 65: ...g up image quality or size p 79 Playback Function Items for playback p 33 Edit Copy Items for editing p 80 Setup Other setup items p 81 Operating menus Follow the procedures explained below to set the menu items The Camera Mic and Setup menus have sub categories Touch the sub category icon and the screen changes to other sub category menus Grayed out menu items or settings are not available Notes ...

Page 66: ...the brightness of automatic exposure control 72 Camera Settings Picture Effect Selects the desired effect filter for a more impressive and artistic effect 72 Cinematone Adjusts the color of the movie automatically to resemble the atmosphere of film camera images 73 Self Timer Sets the self timer when your camcorder is in photo recording mode 73 Drive Mode Sets continuous or bracket shooting etc 73...

Page 67: ...st the focus 76 Histogram Displays the histogram 77 Camera Data Display Displays the value of iris gain ISO and shutter speed 77 Audio Level Display Displays the audio level meter on the screen 77 AF Micro Adjustment Adjusts the focus for the attached lens 77 Digital Zoom Sets the digital zoom 78 Zoom Lever Sets the function assigned to the zoom lever 78 Zoom Speed Changes the zoom speed when the ...

Page 68: ...ding 82 Connection TV Type Converts the output signal depending on the aspect ratio of the connected TV 82 Component Output Sets this when connecting your camcorder to a TV with a component input jack 82 HDMI Resolution Selects the type of signal output to a TV via the HDMI jack 83 USB Connect Uses a USB connection with the USB cable 83 USB Connect Setting Sets the USB transfer mode for connecting...

Page 69: ...24p Mode Shoots 24p movies on a PAL based system 85 Calibration Adjusts the touch panel 103 Battery Info Displays the battery information 86 Version Displays the version of your camcorder and lens 86 Clock Settings Date Time Setting Sets the Date Time Daylight Savings Summer Time or Date Time Format 86 Date Time Format Sets the Date Time Format 86 Summer Time Sets the Daylight Savings or Summer Ti...

Page 70: ...he selected subject simultaneously This function enables you to use Spot Meter p 70 and Spot Focus p 71 at the same time Touch the subject of which you want to adjust the brightness and focus To adjust the brightness and focus automatically touch Auto Notes Exposure and Focus are automatically set to Manual Auto is set when the focus is set to DMF in photo shooting mode Spot Meter Flexible spot me...

Page 71: ... brightness when the subject is too bright or too dark Auto Adjusts automatically depending on the image being recorded Manual Adjusts manually Touch to adjust the brightness To adjust the exposure automatically touch Auto Tips You can also adjust manually by using the MANUAL dial p 47 Gain You can adjust the gain manually when you do not want to use the AGC automatic gain control Auto Adjusts aut...

Page 72: ...djusted number Allows for further manual adjustment after optimum exposure has been determined by your camcorder Tips You can adjust the automatic exposure level to brighter or darker when Exposure is set to Auto Touch if the subject is white or the backlight is bright or touch if the subject is black or the light is dim You can also adjust manually by using the MANUAL dial p 47 Picture Effect Sel...

Page 73: ...lso operate by pressing PHOTO on the Wireless Remote Commander p 112 Drive Mode You can set the drive mode such as continuous or bracket shooting This item is available in still image recording mode only Single Shooting Shoots 1 still image Normal shooting mode Cont Shooting Shoots images continuously at high speed while you press and hold down PHOTO Focus and brightness settings of the first shot...

Page 74: ...bjects automatically Off Does not adjust the exposure for backlit subjects MANUAL Button You can select an item for adjustment with the MANUAL button For details see page 47 Face Detection You can set the camcorder to detect a face automatically Furthermore you can select which faces children or adults the camcorder detects with priority It adjusts the focus color exposure automatically for the fa...

Page 75: ...ting to reduce the red eye phenomenon This item is available in still image recording mode only Off Does not use Red Eye Reduction On A flash always strobes to reduce the red eye phenomenon Notes Turn on the power of a flash sold separately attached to use Red Eye Reduction Red Eye Reduction may not produce the desired effects It depends on individual differences and conditions such as distance to...

Page 76: ...ompatible with full pixel display Zebra You can display a zebra pattern as a guide for adjusting brightness The zebra pattern will not be recorded with the image Off Does not display the zebra pattern On and the brightness level appear on the screen Adjust the brightness level with Notes With a subject that exceeds a brightness level of 100 IRE the image may become overexposed Tips IRE Institute o...

Page 77: ...gardless of the settings of this function indicates that the settings are automatically adjusted values p 48 Audio Level Display You can select whether or not to display the audio level meter On Displays the audio level meter Off Does not display the audio level meter Tips When Audio Mode is set to 2ch Stereo the 2 left and right audio level meters on the upper level move AF Micro Adjustment When ...

Page 78: ...lta and Konica Minolta lenses that have the same specifications Digital Zoom You can set digital zoom On Off Note that image quality decreases when you use digital zoom On Up to 2 zoom is performed digitally Off Does not use digital zoom Notes The face detection and tracking focus function will not be effective while using the digital zoom Zoom Lever You can use the zoom lever when you use digital...

Page 79: ...VG30EH the movie will appear as a 60i NEX VG30 VG30H 50i NEX VG30E VG30EH movie 24p NEX VG30 VG30H 25p NEX VG30E VG30EH This setting gives your movies a film like appearance Notes The media that the recorded images can be saved on will depend on the recording mode that has been set during recording For details see page 43 Activate 24p Mode when you shoot 24p movies on a PAL based model NEX VG30E V...

Page 80: ...Tips RAW images The RAW format file is the raw data yet to go through any kind of digital processing A RAW file is different from a more common file format such as JPEG in that it is the raw material to be processed for professional purposes You need the Image Data Converter software included on the CD ROM supplied in order to open a RAW image recorded on this camera With this software a RAW image...

Page 81: ...rotected movies and photos will also be deleted While Executing is displayed do not close the LCD screen operate the buttons on the camcorder disconnect the AC Adaptor or eject the memory card from your camcorder The access lamp is lit or flashing while formatting memory card Repair Img DB F See page 91 94 File Number You can select the way to assign file number of photos Series Assigns file numbe...

Page 82: ...n a 16 9 wide TV The recorded movies and photos are played back as shown below Movies and photos recorded in 16 9 wide mode Movies and photos recorded in 4 3 mode 4 3 Select this to view your movies and photos on a 4 3 standard TV The recorded movies and photos are played back as shown below Movies and photos recorded in 16 9 wide mode Movies and photos recorded in 4 3 mode Notes Horizontal to ver...

Page 83: ...G30E VG30EH signal 720p 480p NEX VG30 VG30H 720p 576p NEX VG30E VG30EH Outputs high definition image quality HD in 720p signal or standard definition image quality STD in 480p NEX VG30 VG30H 576p NEX VG30E VG30EH signal 480p NEX VG30 VG30H 576p NEX VG30E VG30EH Outputs 480p NEX VG30 VG30H 576p NEX VG30E VG30EH signal 480i NEX VG30 VG30H 576i NEX VG30E VG30EH Outputs 480i NEX VG30 VG30H 576i NEX VG...

Page 84: ...lody sounds when you start stop recording or operate the touch panel Off Cancels the melody LCD Brightness You can adjust the brightness of the LCD screen Normal Normal setting normal brightness Bright Select this when the LCD screen is not bright enough Tips This adjustment does not affect the recorded images in any way The brightness is set to Bright automatically when using the AC Adaptor VF Co...

Page 85: ...f Select this if you do not intend to use the supplied Wireless Remote Commander Tips Select Off when you want to prevent your camcorder from responding to a command sent by another remote control unit A Shut Off Auto shut off You can set your camcorder to turn off automatically when you do not operate your camcorder for more than about 5 minutes On The camcorder turns off automatically Off The ca...

Page 86: ... any mode other than shooting mode Date Time Setting Date Time Format You can select one from 4 types of date and time format Daylight Savings Summer Time You can change this setting without stopping the clock Set to On to move the time forward 1 hour Off Does not set the summertime On Sets the summertime Date Time See page 23 Area Setting You can adjust a time difference without stopping the cloc...

Page 87: ...r is set to on It takes a few seconds for your camcorder to be ready to shoot after the power is turned on This is not a malfunction Disconnect the AC Adaptor from the wall outlet wall socket or remove the battery pack then reconnect it after about 1 minute If the functions still do not work press RESET p 110 using a pointed object If you press RESET all settings including the clock setting are re...

Page 88: ...act your Sony dealer The battery pack may be damaged The remaining battery time indicator does not indicate the correct time The ambient temperature is too high or too low This is not a malfunction The battery pack has not been charged enough Fully charge the battery again If the problem persists replace the battery pack with a new one p 102 The indicated time may not be correct depending on the e...

Page 89: ...hen Shooting w o Lens p 85 is set to Disable shooting is not possible in the following cases The lens is not attached correctly The attached lens does not support the E mount lens communication standard Check the dedicated support web site or consult your local authorized Sony service facility on compatible lenses Total number of movie scenes or photos exceeds the recordable capacity of your camco...

Page 90: ...ched correctly Reattach the flash The flash cannot be used for movie shooting Fuzzy white circular spots appear on images shot using a flash Particles dust pollen etc in the air reflected the flash light and appeared on the image This is not a malfunction The image taken with flash is too dark If the subject is beyond the flash range the distance that the flash can reach the pictures will be dark ...

Page 91: ... card icon at the top right corner of the screen flashes or before the access lamp is turned off after recording This may damage your image data and is displayed is indicated on a thumbnail The image data base file may be damaged Check the data base file by touching MENU Setup Media Settings Repair Img DB F If it still appears delete the image with p 51 No sound or only a quiet sound is heard duri...

Page 92: ...yed back on a TV which is not compatible with full pixel display It is recommended you record images using the outer frame of Guide Frame p 76 as a guide The image appears distorted on the 4 3 TV This happens when viewing an image recorded in the 16 9 wide mode on a 4 3 TV Set TV Type correctly p 82 and play back the image Black bands appear at the top and bottom of the screen of the 4 3 TV This h...

Page 93: ...mperature is high Change the battery pack or place it in a cool place Warning indicator pertaining to memory card Slow flashing Free spaces for recording images are running out For the type of memory card you can use with your camcorder see page 28 No memory card is inserted p 28 Fast flashing There are not enough free spaces for recording images After storing the images on other media p 59 delete...

Page 94: ...import using the included PC software Since the database information of high definition image quality HD movies has been damaged there are inconsistencies between the information in the database and the information in the file Touch to back up the high definition image quality HD movies and repair the database file You cannot see the backed up movies on the camcorder By connecting the camcorder to...

Page 95: ... message still appears reconnect the external media device then format it Note that if you format the external media device all the recorded movies and photos are deleted If you cannot format the external media device the external media device may be incompatible with your camcorder or damaged Replace it with a new one Unable to access external media Use the external media device in stable conditi...

Page 96: ... recording and playback time will be shorter when you use your camcorder in low temperatures The recording and playback time will be shorter depending on the conditions under which you use your camcorder Playing time Approximate time available when you use a fully charged battery pack unit minute Battery pack Image quality HD STD NP FV70 supplied 395 325 440 355 NP FV100 785 650 870 710 Top When r...

Page 97: ...ry card with a capacity of under 1 GB for recording photos The following list shows the bit rate pixels and aspect ratio of each recording mode movie audio etc High definition image quality HD PS Max 28 Mbps 1 920 pixels 1 080 pixels 16 9 FX Max 24 Mbps 1 920 pixels 1 080 pixels 16 9 FH Approx 17 Mbps average 1 920 pixels 1 080 pixels 16 9 HQ Approx 9 Mbps average 1 440 pixels 1 080 pixels 16 9 LP...

Page 98: ...dard definition image quality STD movies you need an NTSC NEX VG30 VG30H or PAL NEX VG30E VG30EH TV with AUDIO VIDEO input jacks An A V connecting cable must be connected On TV color systems Your camcorder is an NTSC NEX VG30 VG30H or PAL NEX VG30E VG30EH system based camcorder To view the playback image on a TV the TV must be NTSC system NEX VG30 VG30H or PAL system NEX VG30E VG30EH with an AUDIO...

Page 99: ...ro Istanbul 03 00 Nairobi 03 30 Tehran 04 00 Moscow Abu Dhabi Baku 04 30 Kabul 05 00 Karachi Islamabad 05 30 Calcutta New Delhi 06 00 Almaty Dhaka 06 30 Yangon 07 00 Bangkok Jakarta 08 00 Hong Kong Singapore Beijing 09 00 Seoul Tokyo 09 30 Adelaide Darwin 10 00 Melbourne Sydney 11 00 Solomon Is 12 00 Fiji Wellington Eniwetok Kwajalein Time zone differences Area setting 11 00 Midway Island 10 00 Ha...

Page 100: ...camcorder while your camcorder is reading or writing image files on the memory card while the access lamp is lit or flashing If you use the memory card near magnets or magnetic fields It is recommended that you make a back up of important data on the hard disk of a computer Do not attach a label or the like on memory card or memory card adaptor Do not touch or allow metallic objects to come into c...

Page 101: ...battery pack for a longer time Put the battery pack in a pocket to warm it up and install it on your camcorder right before you start taking shots Use a large capacity battery pack NP FV100 sold separately Be sure to close the LCD screen when not recording or playing back on your camcorder The battery pack is also consumed when your camcorder is in recording standby or playback pause Have spare ba...

Page 102: ...h handling disassembling modifying physical shock or impact such as hammering dropping or stepping on the product Be particularly careful of the lens Keep the LCD screen closed when you are not using your camcorder Do not wrap your camcorder with a towel for example and operate it Doing so might cause heat to build up inside When disconnecting the power cord mains lead pull it by the plug and not ...

Page 103: ...perating the camcorder again On adjustment of the touch panel Calibration The buttons on the touch panel may not work correctly If this happens follow the procedure below It is recommended that you connect your camcorder to the wall outlet wall socket using the supplied AC Adaptor during the operation MENU Setup General Settings Calibration Touch displayed on the screen with the corner of memory c...

Page 104: ...battery However even if the pre installed rechargeable battery is not charged the camcorder operation will not be affected as long as you are not recording the date How to charge the pre installed rechargeable battery Connect your camcorder to a wall outlet wall socket using the supplied AC Adaptor and leave it for more than 24 hours Note on disposal transfer of the memory card Even if you delete ...

Page 105: ...ther product names mentioned herein may be the trademarks or registered trademarks of their respective companies Furthermore and are not mentioned in each case in this Handbook Notes on the License ANY USE OF THIS PRODUCT IN ANY MANNER OTHER THAN PERSONAL THAT COMPLIES WITH THE MPEG 2 STANDARD FOR ENCODING VIDEO INFORMATION FOR PACKAGED MEDIA IS EXPRESSLY PROHIBITED WITHOUT A LICENSE UNDER APPLICA...

Page 106: ... the web Use the following URL to download it When downloading the source code select NEX VG900 as the model for your camcorder http www sony net Products Linux We would prefer you do not contact us about the contents of source code Please read the files in the LICENSE folder on the CD ROM You will find licenses in English for the software ...

Page 107: ...Playback mode 34 Right Indicator Meaning 60i 50i Recording image quality HD STD frame rate 60p 60i 24p 50p 50i 25p and recording mode PS FX FH HQ LP 43 60 Remaining battery 2 0 Digital zoom 40 78 Optical zoom 40 Drive Mode 73 RAW JPEG 80 Recording playback editing media 27 0 00 00 Counter hour minute second 00Min Estimated recording remaining time Photo size 79 9999 Approximate number of recordabl...

Page 108: ...Exposure Auto 49 Exposure Manual 49 IRIS 47 12dB Gain 71 ISO200 ISO 71 4000 Shutter Speed 48 Slide show button 101 0005 Data file name 35 Protected image 51 Flash 75 Flash Level 75 Red Eye Reduction 75 5500K A3 G3 White Balance 45 Indicators and their positions are approximate and may differ from what you actually see Some indicators may not appear depending on your camcorder model ...

Page 109: ...ay collide with each other and be damaged Multi interface shoe For details on compatible accessories of the multi interface shoe visit the Sony web site in your area or consult your Sony dealer or local authorized Sony service facility Operations with other manufacture s accessories are not guaranteed MIC PLUG IN POWER jack When an external microphone sold separately is connected it takes preceden...

Page 110: ...e LCD screen facing out This is convenient during playback operations RESET button Press RESET using a pointed object Press RESET to initialize all the settings including the clock setting Speaker IRIS button View Images button p 33 DISPLAY button p 25 SHUTTER SPEED button PROGRAM AE button WHITE BALANCE button p 45 Memory card access lamp p 27 While the lamp is lit or flashing the camcorder is re...

Page 111: ...eptacle using a tripod screw sold separately the length of the screw must be less than 5 5 mm 7 32 in Mount p 18 Image sensor Do not touch or dirty the image sensor Lens contacts Do not touch or dirty the lens contacts Lens lock pin Lens release button p 20 Lens hood p 13 Lens p 18 Zoom ring p 40 Focus ring p 18 Camera recording lamp The lamp flashes when the remaining recording media capacity or ...

Page 112: ... or an item with then press ENTER to enter Notes Remove the insulation sheet before using the Wireless Remote Commander Point the Wireless Remote Commander towards the remote sensor to operate your camcorder p 111 When no commands have been sent from the Wireless Remote Commander within a certain period the light blue frame disappears When you press any of or ENTER again the frame appears at the p...

Page 113: ...113 Table of Contents Search image Index GB a Sony CR2025 lithium battery Use of another battery may present a risk of fire or explosion ...

Page 114: ... dial 47 Media Info 81 Media Settings 27 Memory Stick media 28 100 Memory Stick PRO HG Duo media 28 Memory Stick PRO Duo media 28 Memory Stick XC HG Duo media 28 Menus 66 Mirror mode 45 Moisture condensation 102 Movies 30 34 MPEG 4 AVC H 264 100 N NTSC 98 O One Push 46 Optical power zoom 40 Outdoor 46 P PAL 98 Peaking 76 Symbols 1080i 480i 83 1080i 576i 83 1080p 480p 83 1080p 576p 83 24p Mode 85 4...

Page 115: ...aving images in external media 60 Screen indicators 107 Self diagnosis display Warning indicators 93 Self Timer 73 Setting the date and time 23 Setup 81 Shooting Mode 70 Shooting w o Lens 85 SHUTTER SPEED 48 Spot Focus 71 Spot Meter 70 Spot Meter Fcs 70 SteadyShot Movie 74 SteadyShot Photo 74 SummerTime 86 T Tripod 111 Troubleshooting 87 Turning the power on 23 TV 37 TV color systems 98 TV Type 82...

Page 116: ...Additional information on this product and answers to frequently asked questions can be found at our Customer Support Website http www sony net ...

Reviews: