background image


Chap

te

r 1
9


Cont

ro

l P
a

n

e

Set

u

p

 (

P

a

nel)

1091

Overall Control Panel Settings (Config Menu)

Assigning a Region to the Region Selection Buttons in 
the Numeric Keypad Control Block or Multifunction 
Flexi Pad Control Block

You can set a maximum of four regions to each of the region selection buttons 
in the numeric keypad control block or Multifunction Flexi Pad control block.
In the Multifunction Flexi Pad control block, pressing the region selection 
button [MORE] displays the regions not assigned to the region selection 
buttons on the memory recall section numeric keypad buttons, so that you can 
select them, and set the assignment of regions to the numeric keypad buttons.
However, in the Multifunction Flexi Pad control block, it is not possible to 
assign a region to the [EXIT] button.

For details of the Multifunction Flexi Pad control block, see “Multifunction 
Flexi Pad Control Block” in Chapter 2 (Volume 1).

1

In the Panel >Config menu, press [10 Key Region Assign].

The 10 Key Region Assign menu appears.

When a CCP-6224 or CCP-6324 control panel including a Multifunction 
Flexi Pad control block is connected, the display in the button area at the 
lower part of the status area changes as follows.

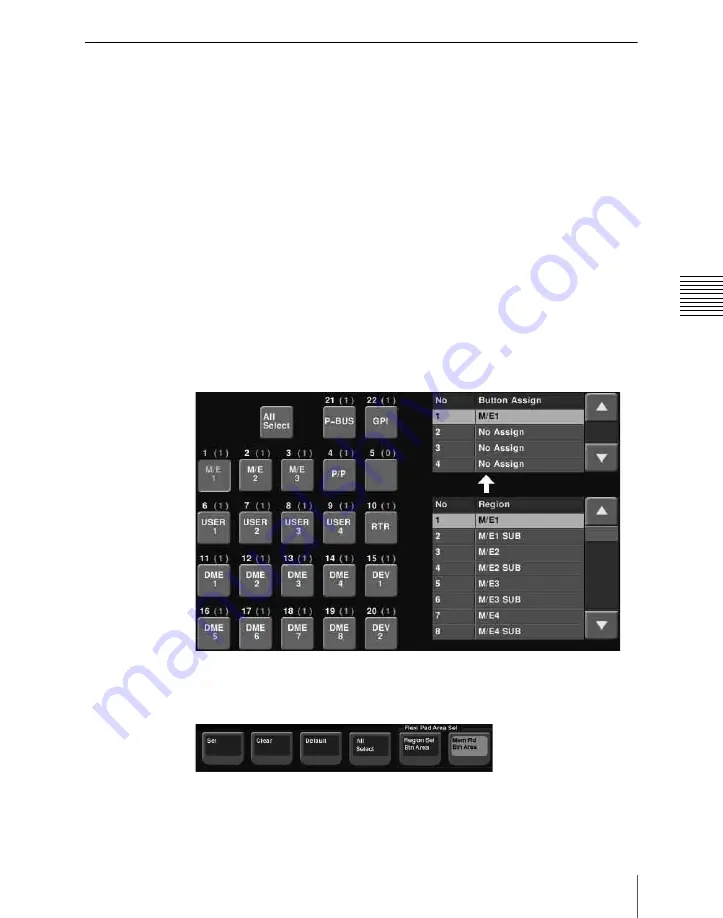
The left side of the status area shows region selection buttons; the upper 
part of the right side shows a list of regions assigned to region selection 
buttons, and the lower part shows a list of assignable regions.

Summary of Contents for MVS-8000X System

Page 1: ...MVS 8000X System With CCP 8000 Series Center Control Panel User s Guide Multi Format Switcher System Volume 1 English 1st Edition Revised 1 Software Version 10 00 and Later ...

Page 2: ...F MERCHANTABILITY OR FITNESS FOR ANY PARTICULAR PURPOSE WITH REGARD TO THIS MANUAL THE SOFTWARE OR SUCH OTHER INFORMATION IN NO EVENT SHALL SONY CORPORATION BE LIABLE FOR ANY INCIDENTAL CONSEQUENTIAL OR SPECIAL DAMAGES WHETHER BASED ON TORT CONTRACT OR OTHERWISE ARISING OUT OF OR IN CONNECTION WITH THIS MANUAL THE SOFTWARE OR OTHER INFORMATION CONTAINED HEREIN OR THE USE THEREOF Sony Corporation r...

Page 3: ...eys 1 to 8 in the independent key transition control block simple type 7321 25 98 1110 Classification Functions supported Menu No See page Vol 1 Vol 2 Vol 3 Signal inputs and outputs Format converter 152 1050 Premium inputs Increased number of primary inputs Wipe Random diamond dust wipes pattern numbers 273 and 274 and dust mix 1151 297 501 Frame Memory Support for 1080P format 380 Extended clips...

Page 4: ... Resume mode 7314 1055 DME input output signal format setting 7316 8 1072 Control panel Assigning functions to transition control block buttons standard type 7321 9 7321 33 7311 34 59 1093 Assigning functions to key control block buttons 7321 29 66 1101 Switcher Setting the re entry button operation mode 7336 4 1200 Tally Additional matrix size 7361 1246 Selecting the serial tally data size 7367 1...

Page 5: ...cess 39 Color Corrector 39 Side Flags 40 Multi Program 2 40 Creation of Special Effects and Management of Data and Operations 42 Digital Multi Effects DME 42 External Devices 43 Keyframes 43 Snapshots 44 Utility 45 Shotbox 45 Macros 45 Files 46 Setup 47 Chapter 2 Menus and Control Panel Names and Functions of Parts of the Control Panel 50 Control Panel Example Configuration 1 With Standard Transit...

Page 6: ...mory Stick USB Connections Block 91 Utility Shotbox Control Block 92 Transition Control Block and Flexi Pad Control Block Simple Type 93 Independent Key Transition Control Block Simple Type 98 Downstream Key Control Block 100 Downstream Key Fade to Black Control Block 102 Transition Control Block Compact Type 104 CCP 6224 2M E Control Panel 107 CCP 6324 3M E Control Panel 107 Cross Point Control B...

Page 7: ...170 Super Mix Settings 171 Color Matte Settings 172 Executing a Transition 175 Transition Indicator Function 175 Setting the Transition Rate 176 Pattern Limit 181 Executing an Auto Transition 184 Executing a Transition With the Fader Lever Manual Transition 185 Combinations of Auto and Manual Transitions 186 Non Sync State 186 Fader Lever Operation in Bus Fixed Mode 187 Transition Preview 189 Inde...

Page 8: ...Specifying the Key Output Destination 246 Key Modify Clear 246 Blink Function 247 Video Processing 247 Key Setting Operations With the Key Control Block 249 Operations in the Key Control Block 250 Key Edge Modifications 253 Masks 257 Applying a DME Effect to a Key 258 Other Key Setting Operations 260 Key Adjustment Operations With the Multifunction Flexi Pad Control Block 263 Resizer 270 Two Dimen...

Page 9: ...d Control Block 330 Recalling a Wipe Snapshot 330 Selecting the Wipe Pattern 331 Editing the Wipe Pattern 331 Saving Canceling and Deleting Edited Wipe Patterns 334 Chapter 6 DME Wipes Overview 338 Types of DME Wipe Pattern 338 DME Wipe Pattern Variation and Modifiers 346 Relation Between DME Wipes and Other Effects 347 Basic Procedure for DME Wipe Settings 349 DME Wipe Settings Menu 349 DME Wipe ...

Page 10: ...84 Selecting an Input Image 388 Selecting Outputs and Target Frame Memory 388 Capturing and Saving an Input Image 389 Recalling Still Images 393 Image Output 395 Continuously Capturing Still Images Record 397 Recalling a Continuous Sequence of Still Images Animation 399 Frame Memory Clip Function 402 Frame Memory Clip Operations 403 Preparations for Operation 403 Recalling Clips 403 Clip Playback ...

Page 11: ...42 Safe Title Settings 443 Displaying a List of Transition Rates and Changing the Settings 444 AUX Menu Operations 446 AUX Bus Settings 446 Status Menu 447 Router Control Menu Operations 448 Checking the List of Inputs for Each Destination 448 Switching the Source for Each Destination 449 Video Process 450 Video Process Adjustments for Each Input Signal 450 Video Process Adjustments on a Particula...

Page 12: ...in the Multi Program 2 Mode When Sharing a Switcher Bank 485 Optional Operations 486 Functions Added in Multi Program 2 Mode 490 Differences Between Multi Program 2 Mode and Standard Mode 491 Restrictions on Using Multi Program 2 Mode 492 Appendix Volume 1 Wipe Pattern List 496 Standard Wipes 496 Enhanced Wipes 497 Rotary Wipes 498 Mosaic Wipes 499 Random Diamond Dust Wipes 501 DME Wipe Pattern Li...

Page 13: ...M E 4 Selection in the Setup Menu 542 Using Keys 5 to 8 544 Assigning Buttons for Selection of Keys 5 to 8 in the Setup Menu 544 Selecting Keys 5 to 8 for Next Transition 545 Selecting Input Signals for Keys 5 to 8 in the Cross Point Control Block 546 Volume 2 Chapter 11 DME Operations DME 554 Three Dimensional Transformations 554 Transformation Operation Modes 560 Graphics Display 564 Three Dimen...

Page 14: ...gs 621 Blur Settings 623 Multi Move Settings 623 Sepia Settings 624 Mono Settings 625 Posterization and Solarization Settings 626 Nega Settings 626 Contrast Settings 627 Mosaic Settings 628 Sketch Settings 628 Metal Settings 631 Dim and Fade Settings 632 Glow Settings 633 Mask Settings 634 Freeze Settings 637 Nonlinear Effect Settings 639 Corner Pinning Settings 668 Lighting Settings 671 Trail Set...

Page 15: ... Creation and Editing 734 Control of VTRs Extended VTRs and Disk Recorders 738 Manual Operation 738 Controlling the Tape Disk Transport 739 Checking VTR Disk Recorder Extended VTR Information 745 Cueup Play 746 VTR Disk Recorder Extended VTR Timeline 754 Disk Recorder Extended VTR File Operations 761 Chapter 13 Keyframe Effects Regions 766 Registers 768 Keyframes 770 Effects 770 Saving and Recalli...

Page 16: ...814 Time Settings 817 Setting the Keyframe Duration 817 Setting the Effect Duration 818 Setting the Delay 819 Path Setting 820 Basic Procedure for Path Settings 820 Executing Effects 823 Executing Effects in the Keyframe Control Block 823 Setting the Run Mode 825 Executing an Effect in the Flexi Pad Control Block 826 Executing an Effect in the Multifunction Flexi Pad Control Block 826 Saving Effec...

Page 17: ...shot Attributes 869 Snapshot Status Display 872 Setting Key Snapshot Attributes 873 Creating and Saving a Master Snapshot 874 Snapshot Register Editing 875 Displaying a List of Snapshot Registers for Editing 875 Operations in the Misc Snapshot Menu 876 Chapter 15 Utility Shotbox Utility Execution 880 Executing a Utility With the User Preference Buttons Menu Control Block 880 Executing a Utility in...

Page 18: ...alling a Macro Register and Executing a Macro 921 Creating and Saving a Macro 924 Macro Operations in the Simple Type Flexi Pad Control Block 928 Recalling a Macro Register and Executing a Macro 929 Creating and Editing a Macro 930 Saving a Macro 933 Macro Operations in the Multifunction Flexi Pad Control Block 934 Recalling a Macro Register and Executing a Macro 934 Creating and Editing a Macro 9...

Page 19: ...of frame memory files to hard disk or memory card 996 File Batch Operations 998 Displaying the Batch Operation Menu 998 Batch Saving Files 998 Batch Loading Files 999 Batch Copying Files 1000 Importing and Exporting Files 1001 Displaying the Import Export Menu 1001 Importing Frame Memory Data 1001 Exporting Frame Memory Data 1002 Directory Operations 1004 Displaying the Directory Menu 1004 Creatin...

Page 20: ...e Network Settings 1043 System Settings System Config Menu 1045 Specifying the Switcher Controlled by the Control Panel 1045 Specifying the DME Connected to the Switcher 1046 Enabling the FM Data Port of the Switcher 1047 Setting the Signal Format Format Menu 1048 Setting the Signal Format 1048 Switching the Input Reference Signal for HD System 1049 Setting Conversion Formats 1050 Setting the Scre...

Page 21: ...l Block 1085 Linking Switcher Bus and Router Destination 1086 Linking Transitions Between Keyers 1089 Linking the Next Transition Selection Buttons 1089 Selecting the Module to be the Reference for Device Control Block 1090 Assigning a Region to the Region Selection Buttons in the Numeric Keypad Control Block or Multifunction Flexi Pad Control Block 1091 Setting Transition Control Block Button Ass...

Page 22: ...isable Side Flags 1123 Auxiliary Bus Control Block Settings Aux Assign Menu 1124 Assigning a Bus to an AUX Delegation Button 1124 Using the Auxiliary Bus Control Block for Router Control 1125 Setting Button Assignments Prefs Utility Menu 1130 Assigning Functions to User Preference Buttons 1130 Assigning a Function to a Memory Recall Button in the Utility Shotbox Control Block 1135 Assigning a Func...

Page 23: ...ting1163 Selecting the Mouse Button Used for Adjusting the Knob Parameters 1163 Chapter 20 Switcher Setup Switcher Settings for Switcher Configuration Config Menu 1166 Adjusting the Reference Phase 1167 Specifying the Video Switching Timing 1167 Setting the Operation Mode 1167 Setting User Regions 1170 Assigning PGM PST Logically to an M E 1171 Setting the Assignments of DME Channels to Use on the...

Page 24: ...Making Switcher Processor GPI Input Settings 1205 Making Switcher Processor GPI Output Settings 1208 Enabling or Disabling AUX Bus Control 1209 Setting DME and Switcher Interfaces 1210 Selecting the Mode for Turning Off Keys Upon Receiving the Editor Command 1211 Chapter 21 DME Setup DME Settings Relating to Signal Inputs Input Menu 1214 Setting the Initial Crop 1214 Setting an Illegal Color Limit...

Page 25: ...g Settings Wiring Menu 1251 Making New Wiring Settings 1251 Changing the Wiring Settings 1252 Deleting Wiring Settings 1252 Sorting Wiring Settings 1252 Tally Generation Settings Tally Enable Menu 1254 Making New Tally Generation Settings 1254 Modifying Tally Generation 1255 Deleting Tally Generation Settings 1255 Tally Copy Settings Tally Copy Menu 1257 Making New Tally Copy Settings 1257 Modifyi...

Page 26: ...tus Display 1268 Appendix Volume 3 Data Saved by Setup Define and Initial Status Define 1272 Data Saved by Setup Define 1272 Data Saved by Initial Status Define 1277 Error Messages 1281 Error Messages Displayed in the Error Status Error Log Menu 1281 Error Messages Appearing in a Message Box 1285 Error Messages Shown in the Error Information Menu 1298 Index 1300 ...

Page 27: ...27 Chapter 1 MVS 8000X Functions ...

Page 28: ...pal components and naming The formal product names of the principal components of the MVS 8000X system and the terms used in this manual are as follows System nomenclature The following terms are used for systems depending on the combination of installed options and the signal format Formal product name Term used in this manual MVS 8000X Multi Format Switcher Processor Switcher or switcher process...

Page 29: ... 8000 Operation Manual CCP 6000 8000 Installation Manual DCU 8000 Device Control Unit Pack DCU 8000 Operation Manual DCU 8000 Installation Manual DCU 2000 Device Control Unit Pack DCU 2000 C Operation Manual DCU 2000 C Installation Manual A system in which the center control panel has five M E banks 5M E system A system in which the center control panel has four M E banks 4M E system A system in w...

Page 30: ...ny number from one to eight channels for a maximum of four channels of DME functionality When the signal format is 1080P you can also connect up to four MVE 8000A units which provides a maximum of eight channels of DME functionality Powerful external device interfaces By connecting to a Sony routing switcher or similar a large system can be built From the control panel it is also possible to opera...

Page 31: ...e to a maximum of eight DME channels When the signal format is 1080P you can also connect up to four MVE 8000A units which enables a maximum of eight channels to be interfaced Designed for use in a live broadcasting environment Flexible control panel layout Because of its modular design the various sections of the control panel can be laid out as required This allows a flexible layout appropriate ...

Page 32: ...m keys 1 to 8 in the PGM PST bank and also vary combinations of these simultaneously The following are examples of transition Notes When the signal format is 1080P four keyers can be used keys 1 to 4 Changing the background A background transition switches from the video currently selected on the background A bus the current video to the video selected on the background B bus the new video In the ...

Page 33: ...ght keys downstream keys on the PGM PST bank If you select a key which is already inserted the transition will delete the key A simultaneous combination of deleting and inserting keys is also possible Inserting or deleting key 1 and key 2 Deleting key 1 and inserting key 2 Delete Insert Key 1 Key 2 Key 1 Key 2 Transition ...

Page 34: ...d at the same time Changing the background and key 2 simultaneously Changing the background and keys 1 to 4 simultaneously Selecting the transition type determines the way in which the transition occurs The following are the transition type Mix NAM non additive mix Super mix Preset color mix color matte Wipe DME wipe Clip transition Cut Key 1 Key 2 Transition Key 1 Key 2 Key 3 Key 4 Transition ...

Page 35: ...ependent key transitions By carrying out an independent key transition in combination with a common transition different transition types can be used for the background and keys The following description compares the independent key transition with a common transition taking a simultaneous change of the background and key as an example Video used in the transition Effect of a common transition In ...

Page 36: ...xt The signal determining how the background is cut out is termed key source and the signal that replaces the cut out part is termed key fill The system component responsible for processing a key is referred to as a keyer Each switcher bank has eight keyers each providing the same functionality On each switcher bank you can use the following key types methods of processing the key source Luminance...

Page 37: ...s page 209 Wipes A wipe is a transition from the current video stream to a new video stream using a wipe pattern Changing the background by means of a wipe is referred to as a background wipe and inserting or deleting a key with a wipe is termed a key wipe There are two types of wipe those that can be selected in a common transition and those that can be selected in an independent key transition T...

Page 38: ... the wipe direction or set the pattern position applying various changes and modifiers to the selected DME wipe pattern Resizer DME wipes Using the resizer you can carry out key DME wipes For details see Chapter 6 DME Wipes page 337 Frame Memory Frame memory is a function for using a still image or video frame memory clip as material for editing You can create a still image by capturing a frame of...

Page 39: ...rmat converter input settings copy only Format converter output settings copy only For details see Copy and Swap page 434 Video Process The term video process is applied to adjustments to the gain hue black level of the input video signal There are two types of adjustment adjustment of an individual input signal and adjustment as image effects on a particular bus For details see Video Process page...

Page 40: ...2 By operating the switcher in Multi Program 2 mode a single switcher mix effects bank can be used to create two separate video outputs referred to as main and sub You can set backgrounds keys and transitions for each of main and sub For example immediately after a score in baseball two versions of the scene can be provided as shown below and switched simultaneously Input source with aspect ratio ...

Page 41: ... 41 Basic Video Processing For details see Multi Program 2 page 479 Background A Key 1 Program output for Main Background B Background A signal from utility 2 bus Key 3 Background B signal from utility 3 bus Program output for Sub ...

Page 42: ...s Border Crop Beveled Edge Key Border Art Edge Flex Shadow Effects for entire image Defocus Blur Multi Move Effects for video image Sepia Mono Posterization Solarization Nega Contrast Mosaic Mask Sketch Metal Dim and Fade Glow Freeze effects Nonlinear effects Wave Mosaic Glass Flag Twist Ripple Rings Broken Glass Flying Bar Blind Split Split Slide Mirror Multi Mirror Kaleidoscope Lens Circle Panor...

Page 43: ... protocol For details on the devices that can be connected consult your Sony representative You can control an external device by previously registering timeline keyframes For details see Chapter 12 External Devices Volume 2 Keyframes A keyframe represents an instantaneous state of an image it can be saved in a register see Registers in Chapter 13 Volume 2 and recalled for reuse By arranging a num...

Page 44: ...pter 13 Keyframe Effects Volume 2 Snapshots The term snapshot refers to a function whereby the various settings required to apply a particular effect to an image are saved in a register as a set of data for recall as required to recover the original state Snapshots are divided as follows Snapshots applying to a particular region functional block of the switcher or DME Master snapshot Key snapshot ...

Page 45: ...hot or keyframe effect can be recalled simultaneously For details see Shotbox in Chapter 15 Volume 2 Macros The term macro refers to the function whereby a sequence of signal selections and other operations on the control panel is saved as data in memory so that it can be recalled as required to automatically execute the same sequence of operations The individual control panel operations constitut...

Page 46: ...y card and recall it as required You can operate on individual files or registers or together in a batch Regarding frame memory it is possible to capture image data stored in an external device into frame memory The following files can be saved and recalled Operation mode setup data for system as a whole and individual devices Device status data for system startup Key memory setting data Video pro...

Page 47: ... menu are grouped under the following headings System setup System For details see Chapter 18 System Setup Volume 3 Panel setup Panel For details see Chapter 19 Control Panel Setup Panel Volume 3 Switcher setup Switcher For details see Chapter 20 Switcher Setup Switcher Volume 3 DME setup DME For details see Chapter 21 DME Setup DME Volume 3 DCU setup DCU For details see Chapter 22 DCU Setup DCU V...

Page 48: ...Chapter 1 MVS 8000X Functions 48 Setup ...

Page 49: ...49 Chapter 2 Menus and Control Panel ...

Page 50: ...he MVS 8000X system control panel comprises a number of modules The following illustration shows a typical 32 button 4 M E configuration with standard transition modules used in the transition control block Control panel configuration 1 left side with standard transition modules Auxiliary bus control block page 84 M E 1 bank M E 2 bank M E 3 bank PGM PST program preset bank Cross point control blo...

Page 51: ...mory Stick USB connections block page 91 Key control block page 66 Keyframe control block page 78 Device control block page 70 page 74 Menu control block page 89 Transition control block standard type page 59 Fade to black control block page 83 Flexi Pad control block standard type page 63 Downstream key control block page 100 Utility Shotbox control block page 92 Numeric keypad control block page...

Page 52: ...on 2 With Simple Transition Modules The following illustration shows a typical configuration with simple transition modules used in the transition control block Except for the simple modules this is the same configuration as in example configuration 1 Control panel configuration 2 left side with simple transition modules ...

Page 53: ...d Functions of Parts of the Control Panel Control panel configuration 2 right side with simple transition modules Transition control block and Flexi Pad control block simple type page 93 Independent key transition control block simple type page 98 ...

Page 54: ...Panel Example Configuration 3 With Compact Transition Modules The following illustration shows a typical configuration with compact transition modules used in the transition control block Control panel configuration 3 with compact transition modules Transition control block compact type page 104 ...

Page 55: ...ys Notes In the M E 4 bank the only signals which can be selected as key signals are the premium inputs inputs to the switcher PREMIUM INPUTS connectors 1 to 20 a Cross point buttons These buttons select the signals used for video creation on this M E bank or PGM PST bank Each row of buttons corresponds to one or more signal buses within the switcher 1 Cross point buttons 5 Source name displays 7 ...

Page 56: ...d down these buttons are assigned to the DME utility 1 or 2 bus as follows When the KEY 4 button is off DME utility 1 bus When the KEY 4 button is on DME utility 2 bus Background A row Press the desired button to select the signal as the current background video on this M E bank or PGM PST bank While the UTIL button on the right hand side is held down in Hold mode these buttons are assigned to the...

Page 57: ...on is lit In a Setup menu you can select either of the following two modes for these buttons The button takes effect while being held down Every time the button is pressed it toggles between the on and off states for key 1 and key 2 rows For background A and background B rows utility buses remain disabled e Source name displays These show the names of the signals which can be selected on the cross...

Page 58: ...uttons in Chapter 19 Volume 3 Notes For the CCP 6224 6324 AUX CTRL is assigned to this button For details see Cross Point Control Block CCP 6224 6324 in the AUX Operating Mode page 108 POST MCRO post macro button Use this button to set a macro attachment in post macro mode For setting in macro only mode use this in combination with a macro only set button assigned to the utility shotbox control bl...

Page 59: ...t key transition operations are possible 9 PRIOR SET button 1 Next transition selection buttons 8 Key status display 2 Transition type selection buttons 7 KF button 6 Pattern limit buttons 5 TRANS PVW button 3 Transition execution section 4 Wipe direction selection buttons q Key delegation buttons qd Key source name display key snapshot buttons qf Key snapshot setting buttons qa Independent key tr...

Page 60: ...guration Config Menu in Chapter 20 Volume 3 two or more of the following buttons may light You can also assign a function to these buttons to select whether or not the fader levers are used as keyframe faders MIX In a background transition the new video fades in as the current video fades out During the transition the overall signal level is maintained at 100 In a key transition the key fades in f...

Page 61: ...he transition type press one of these buttons turning it on to select the wipe direction NORM normal The wipe proceeds in the direction from black to white as shown on the pattern in the lists of patterns see Wipe Pattern List page 496 and DME Wipe Pattern List page 502 or in the direction of the arrow REV reverse The wipe proceeds in the opposite direction to that when the NORM button is pressed ...

Page 62: ...elegate this independent key transition control block to a desired keyer Press one of the KEY1 to KEY8 buttons DSK1 to DSK8 in the PGM PST bank turning it on You can press more than one button to select two or more keyers While these buttons are held down you can select a key source with the cross point buttons for the key bus Pressing one of these buttons twice in rapid succession changes its sta...

Page 63: ...snapshot n Key snapshot setting buttons K SS key snapshot This enables key snapshot mode K SS STORE key snapshot store To save a key snapshot hold down this button and press the key source name display key snapshot button corresponding to the register you want to save K MOD ENBL key modifier enable To recall key adjustment values and key modifier settings when recalling a key snapshot press this b...

Page 64: ...ct use this in combination with the buttons in the memory recall section SHOTBOX To recall or execute a shotbox use this in combination with the buttons of the memory recall section MCRO macro To save recall or edit a macro use this in combination with the buttons of the memory recall section TRANS RATE transition rate To enter the transition rate press this button turning it on To enter the indep...

Page 65: ...ents have been saved to a register hold down the STORE STATS button and press this button to return the register to its state before the save operation STORE STATS store status When a save or delete operation has been carried out on a register this button lights amber After saving to a register hold down this button and press the relevant register button to delete the data in the register Again af...

Page 66: ...k to the corresponding keyer For details of assignment of keys 5 to 8 see Assigning Buttons for Selection of Keys 5 to 8 in the Setup Menu page 544 in Appendix Volume 1 M E delegation Press one of the M E 1 to M E 4 and P P buttons to select the bank an M E bank or the PGM 3 Key fill key source selection buttons 2 Key type selection buttons 1 Delegation buttons 4 Key modifier buttons 9 DME channel...

Page 67: ...on the key fill bus as key fill and a signal separate from the signal assigned in a pair with key fill for key source press this button turning it on To select the signal on the key source bus hold down this button and press a button in the key 1 or key 2 row in the cross point control block To use the signal selected on the key fill bus as key source self keying press the AUTO SEL button and SPLI...

Page 68: ...rce signal is output from the specified output port You can make the output specification independently for each of edit preview and the preview of each M E or PGM PST bank in a Setup menu g Knobs Turn the knobs to adjust the parameter values h Displays Each display shows the initial letters of the parameter name and the parameter value maximum three digits including a minus sign for a negative va...

Page 69: ...gnal subjected to key processing or signal subjected to a DME effect on the currently selected keyer can be selected as a reentry signal PROC V or PROC K for the M E or PGM PST bank on the auxiliary bus or the like If a DME is selected on the currently selected keyer the key fill and key source signals to which a DME effect is applied are assigned otherwise the key fill and key source are assigned...

Page 70: ...M E 3 M E 4 and P P buttons are selected This enables the wipe pattern position setting positioner operation mode in the device control block You can select multiple buttons simultaneously When the USER button is selected This enables pattern position setting used for color backgrounds When the DME1 to DME8 buttons are selected This enables the three dimensional transform operation mode in the dev...

Page 71: ... button to enable wipe pattern position setting for key 1 DSK1 When the USER button is selected pattern position setting for color background 1 is enabled K2 CB2 Press this button to enable wipe pattern position setting for key 2 DSK2 When the USER button is selected pattern position setting for color background 2 is enabled K3 Press this button to enable wipe pattern position setting for key 3 DS...

Page 72: ... moves shrinks or magnifies a key to which the resizer function is applied to When this button is held down the trackball or Z ring operation is switched to a finer control fine mode ROT RSZE resizer Press this button turning it on to enable the resizer CLR WORK BUFR clear work buffer Pressing this button once returns the two dimensional transformation settings to the defaults Pressing twice in ra...

Page 73: ...esizer control mode is enabled By turning the ring you can zoom the key to which the resizer is applied and change the aspect ratio When the LOC SIZE or LOC XYZ button is held down the Z ring operation is switched to a finer control fine mode When the VTR disk recorder frame memory operation mode is enabled Turning the Z ring controls the tape transport disk drive frame memory clip operations at a...

Page 74: ...nabled By moving this you can carry out operations in the x y and z axes When the following buttons are held down the joystick operation is switched to a finer control fine mode The button on the end of the joystick SRC button TRGT button Depending on the settings made in the Setup menu the operation speed multiple can be changed When the effect run control mode is enabled By moving the joystick s...

Page 75: ...e an XDCAM disk recorder VTR other external device frame memory clip or shotbox The device control block trackball and device control block joystick can be used together a Timecode display This shows the current time CURRENT and the start and stop point timecode values for the current reference device START TC STOP TC When you press a device selection button the button lights selecting the assigne...

Page 76: ...egisters 1 to 99 When you press a button the assigned shotbox is selected and executed Carry out the assignment in the Setup menu see Overall Control Panel Settings Config Menu in Chapter 19 Volume 3 SBOX buttons can be set as device selection buttons or DELAY button in the Setup menu d DELAY button When pressed this button lights green the numeric keypad control block display changes to DELAY__ a...

Page 77: ...elected with the device selection button is cued up to the start point of the material When more than one device is selected the amber flashing continues until the reference device is cued up and when the cueing up is finished this button lights green REW When pressed this button lights amber and material of the device selected with the device selection buttons is rewound To stop during the rewind...

Page 78: ... device selected with the device selection buttons stops i Search dial Use this for search and other operations on the material of an external device For details of the method of use see Controlling Tape Disk Transport in Chapter 12 Volume 2 Keyframe Control Block In the keyframe control block you can carry out effect editing and execution 0 EFF LOOP button 1 EDIT ENBL button 2 Edit point specific...

Page 79: ... effect FROM TO Press this button turning it on to enter numeric values from the numeric keypad control block and select a specified range of keyframes during macro editing the specified range of events INS insert When this button is pressed a new keyframe is inserted after the current keyframe Pressing this button while holding down the SHIFT button inserts a new keyframe before the current keyfr...

Page 80: ...f PAUSE button When this button is pressed a pause is applied to the selected keyframe When editing a macro press this button turning it on to include a pause event in the macro The pause length can be set in the numeric keypad control block g Effect execution section RUN When this button is pressed the effect is run from the first keyframe to the last keyframe However if a pause is set on a keyfr...

Page 81: ...ol block is used for region selection for saving and recalling snapshots effects and shotboxes for entering numeric values for trackball operation and keyframe operation and for transition rate entry a Mode selection buttons EFF effect Press to save or recall an effect SNAPSHOT Press to save or recall a snapshot SHOTBOX Press to save or recall a shotbox MCRO macro Press to save recall or edit a ma...

Page 82: ...ter recalling a register press this button to return to the state before recalling the register STORE STATS store status This lights amber when data is stored in a register After saving data to a register hold down this button and press the UNDO button to return the register to the state before the data was saved TC timecode Press this button turning it on to switch transition rate entry to the ti...

Page 83: ...onfig Menu in Chapter 19 Volume 3 PST preset When this button is pressed the signal selected on the background B row of the PGM PST bank is selected on the edit preview bus M E 1 to M E 4 P P M E1 to M E 4 P P preview The preview signal M E 1 PVW M E 2 PVW M E 3 PVW M E 4 PVW P P PVW of the M E or PGM PST bank corresponding to the pressed button is selected on the edit preview bus For details of M...

Page 84: ... key signal DME MON K is selected on the edit preview bus c AUTO button When this button is pressed the M E or PGM PST bank preview signal selected on the edit preview bus is automatically switched to the program signal depending on the on air status Auxiliary Bus Control Block for AUX Buses There are also models without the selected source name displays and source name displays shown in the follo...

Page 85: ...g to the delegation button c DEST destination button Press this button turning it on to display the names of buses allocated to the delegation buttons in the selection source name displays In the case of a module without selected source name displays this button is invalid d Selected bus display This shows the name of the bus selected by the auxiliary bus delegation buttons 1 AUX delegation button...

Page 86: ...signals h 2ND button After selecting a bus with an AUX delegation button hold down this button and select another AUX delegation thus allocating a different bus in the 2nd row from the 1st row i Source name displays These show the names of the source signals which can be selected by the cross point buttons While the SHIFT button is enabled the shifted signal name is displayed If a different bus is...

Page 87: ... If the source names and destination names are set in the Setup menu to SW er Local mode then the description names appear here c DEST destination button Press this button turning it on to display the names of the destinations assigned to the destination selection buttons in the selected source name displays d Selected destination display This shows the name of the destination selected by the dest...

Page 88: ...tton is enabled by a setting in the Setup menu by holding it down during a source selection you can expand the function of the SHIFT button See Cross Point Settings Xpt Assign Menu in Chapter 19 Volume 3 h 2ND button After selecting a destination with the destination selection buttons hold down this button and make another destination selection to assign a different destination from the 1st row to...

Page 89: ...rol block to router control l Level selection buttons To each of the four buttons plural S Bus levels are assigned in the Setup menu Press a button turning it on to make operations apply to those S Bus levels Menu Control Block a Top menu selection buttons These select the menu appearing in the menu display It is also possible to change the assignment of these buttons in setup For details see Over...

Page 90: ... 8 button When this button is on control of an editor from the Remote1 port on the rear panel of the switcher is possible However even when it is off control of the Edit PVW bus is always possible Memory Card USB Adaptor Block a Memory card slot This slot accepts a PCMCIA Type II compliant memory card You can use it in software installation and for saving and reading in data such as snapshot keyfr...

Page 91: ...re information about the usable Memory Sticks and their handling c DEVICE connectors There are three USB connectors You can connect a device such as a mouse keyboard USB storage and so on that is equipped with a USB interface to any of these connectors For details on the devices that can be connected consult your Sony representative About Memory Sticks Usable Memory Sticks This unit has been confi...

Page 92: ...When using Memory Sticks pay attention to the following points Do not touch the connector of the Memory Stick with anything including your finger or metallic objects Do not attach anything other than the supplied label to the Memory Stick labeling position Attach the label so that it does not stick out beyond the labeling position Carry and store the Memory Stick in its case Do not strike bend or ...

Page 93: ...signed register name appears If the register is empty the button goes off In the case of a shotbox function pressing the button executes the assigned shotbox function and the button lights yellow In the case of a macro register pressing the button executes the assigned macro and the button flashes yellow You can also assign enabling and disabling of macro attachment to use as the MCRO ATTCH ENBL b...

Page 94: ...s display 1 Transition type selection buttons 3 Transition execution section 5 Pattern limit buttons 4 Wipe direction selection buttons qa Numeric display 0 XPT HOLD status display 7 Mode selection buttons 9 UNDO button 8 Memory recall section Shown above is the right hand type transition control block with the right hand fader lever ...

Page 95: ...d in the Setup menu see Settings for Switcher Configuration Config Menu in Chapter 20 Volume 3 two or more of the following buttons may light You can also assign a function to these buttons to select whether or not the fader levers are used as key frame faders MIX In a background transition the new video fades in as the current video fades out During the transition the overall signal level is main...

Page 96: ...utton to which the KF button function has been assigned is lit you can use this as a key frame fader When the split fader function is enabled by pressing the projection on the left side of the grip you can release the lock and separate the two halves of the fader lever With the split fader lever in a background mix transition you can control the background A and B buses independently Transition in...

Page 97: ...peration mode Use these in combination with the mode selection buttons to save or recall wipe snapshots DME wipe snapshots or snapshots i UNDO button After recalling a register press this button to return to the state before recalling the register With a setup setting this can be switched to a mode selection button for macro setting and used in combination with the buttons in the memory recall sec...

Page 98: ...ttons in this control block For details see the section Assigning Functions to the Independent Key Transition Control Block Simple Type in Chapter 19 Volume 3 a Independent key transition type selection buttons Press one of the following buttons turning it on to select the independent key transition type MIX Faded in or out WIPE Inserted or deleted with a wipe DME Switches the key with a DME wipe ...

Page 99: ...he switcher this lights red and otherwise lights amber TAKE button This carries out an auto transition on key 3 c K SS key snapshot button This enables key snapshot mode In key snapshot mode it is possible to save and recall key snapshots d Key source name display key snapshot buttons These show the signal name of the key fill selected for key 3 and the transition rate on two buttons In key snapsh...

Page 100: ... make cross point selections on the corresponding key bus b Independent key transition type selection buttons Press one of these buttons turning it on to select the downstream key transition type MIX Carry out a dissolve with the key selected with the key delegation buttons WIPE Carry out a wipe with the key selected with the key delegation buttons DME This switches the key selected with the key d...

Page 101: ...and 4 from left to right press to execute an auto transition The transition starts immediately and the button lights amber When the transition completes the button goes off Fader lever Move this to carry out a manual downstream key transition Transition indicator This comprises multiple LEDs which show the progress of the downstream key transition d Key snapshot setting buttons K SS key snapshot T...

Page 102: ...tons Press these to cut in the corresponding downstream key 1 or 2 When the key is already inserted pressing the button cuts it out Each button lights red when the corresponding key is inserted in the program output final output from the switcher and lights amber at other times AUTO TRANS buttons The left button applies to DSK1 and the right button to DSK2 press these buttons to carry out an auto ...

Page 103: ... select a signal on the edit preview bus Each button can be assigned to any preview output in setup see Overall Control Panel Settings Config Menu in Chapter 19 Volume 3 PST preset When this button is pressed the signal selected on the background B row of the PGM PST bank is selected on the edit preview bus M E 1 to M E 4 P P M E1 to M E 4 P P preview The preview signal M E 1 PVW M E 2 PVW M E 3 P...

Page 104: ...Y1 to KEY8 DSK1 to DSK8 in the PGM PST bank Press this button turning it on to make the next transition insert or remove the corresponding key keys 1 to 8 If a key is currently inserted it will be removed and if it is not currently inserted it will be inserted In the PGM PST bank this inserts or removes downstream keys 1 to 8 For details of assignment and selection of keys 5 to 8 see the following...

Page 105: ...output for the first half of the transition as the new video increases progressively to 100 then the current video is progressively reduced from 100 to zero in the second half while the new video is maintained at 100 SUPER MIX The current video is maintained at 100 output for the first half of the transition as the new video is mixed while increasing progressively to 100 The current video is then ...

Page 106: ...sponding ON indicator lights when the key is inserted It also shows the priority 1 to 4 of each key g PRIOR priority SET button While this button is held down you can set the key priority The setting mode when this button is pressed depends on whether or not the KEY PRIOR button is lit as follows When the KEY PRIOR button is off the current key priority is set When the KEY PRIOR button is lit the ...

Page 107: ...s page 84 and Cross Point Control Block CCP 6224 6324 in the AUX Operating Mode page 108 b Transition control block compact type For details of operations see Transition Control Block Compact Type page 104 c Device control block track ball For details of operations see Device Control Block Trackball page 70 d Multifunction Flexi Pad control block For details of operations see Multifunction Flexi P...

Page 108: ... operations see Device Control Block Trackball page 70 d Multifunction Flexi Pad control block For details of operations see Multifunction Flexi Pad Control Block page 110 Cross Point Control Block CCP 6224 6324 in the AUX Operating Mode On the CCP 6224 6324 when using a 24 column cross point control block if the PRE MCRO button is assigned to switch to AUX operating mode by pressing this button y...

Page 109: ... delegation buttons These select the AUX bus When you press a button turning it on this selects the assigned bus as the AUX bus You can make the rightmost button a SHIFT button in which case each button can be used to select two buses For details of the buses that can be selected see Bus Selection page 147 AUX cross point buttons These select the source signal to be assigned to the AUX bus When yo...

Page 110: ...mes of the buses assigned to the AUX delegation buttons d KEY button When you press this button turning it on the source name displays show the names of the key source signals assigned to the AUX cross point buttons and they are now selectable e AUX DSPLY AUX display button This switches the source name displays to the AUX operating mode by default showing the video source signal names f A B bus c...

Page 111: ... recall deletion and DME wipe adjustments TRANS RATE transition rate Press this to set the transition rate KEY ADJ key adjust Press this to carry out key adjustments and set modifiers KEY SS key snapshot Press this to carry out key snapshot creation recall deletion By default this is not assigned to a mode selection button so before use it is necessary to assign to a mode selection button in the S...

Page 112: ...not assigned to a region selection button so that they can be selected By default the following regions are shown on the memory recall section buttons MSTR master snapshot master timeline registers USER1 to 3 USER5 to 8 MCRO macro DEV2 device 2 PBUS GPI RTR router If there is a region selected in the memory recall section this is indicated by the MORE button lighting green To revert the button dis...

Page 113: ...e are also menus for carrying out general system control managing setting data and initial setup About the Top Menu List When the control panel is powered on the top menu list appears as shown below You can also display this by selecting VF1 Top Menu List after pressing the HOME button at the upper left in the top menu selection button area of the menu control block To display the top menu In the ...

Page 114: ...the VF buttons and HF buttons see Interpreting the Menu Screen page 124 Menus accessed from a top menu selection button Buttons Menus Function See HOME Home Recalling menus using the top menu list or shortcut menu Top menu list page 113 Shortcut menu page 139 M E 1 M E 1 Transition keys and wipe settings for the M E 1 bank page 170 transitions page 211 keys page 293 wipes M E 2 M E 2 Transition ke...

Page 115: ...pter 13 Volume 2 EFF Effect Keyframe effect register settings Chapter 13 Volume 2 SNAP SHOT Snapshot Snapshot register settings Chapter 14 Volume 2 SHOTBOX Shotbox Shotbox register settings Chapter 15 Volume 2 FILE File File settings Chapter 17 Volume 2 ENG SETUP Engineering Setup Setup functions Chapter 18 to Chapter 24 Volume 3 DIAG Diagnosis Status information display Appendix Volume 3 Buttons ...

Page 116: ...ME M E 1 2 3 4 PGM PST DME Wipe XX page 349 SUPER MIX M E 1 2 3 4 PGM PST Misc Transition page 171 PST COLOR MIX M E 1 2 3 4 PGM PST Misc Transition page 172 FM1 2 CLIP FM3 4 CLIP FM5 6 CLIP FM7 8 CLIP M E 1 2 3 4 PGM PST Misc Clip Transition page 413 PRIOR SET M E 1 2 3 4 PGM PST Misc Key Priority page 166 KEY PRIOR M E 1 2 3 4 PGM PST Misc Next Key Priority page 167 WIPE Independent key transiti...

Page 117: ... 2 3 4 5 6 7 8 Transition DME Wipe Adjust 1ch Pattern Select PGM PST DSK1 2 3 4 5 6 7 8 Transition DME Wipe Adjust 1ch Pattern Select page 360 SHIFT M E 1 2 3 4 Key1 2 3 4 5 6 7 8 XX PGM PST DSK1 2 3 4 5 6 7 8 XX page 217 Flexi Pad control block standard type Buttons Menus See WIPE M E 1 2 3 4 PGM PST Wipe Main Pattern page 293 DME M E 1 2 3 4 PGM PST DME Wipe XX page 349 SNAPSHOT Snapshot Snapsho...

Page 118: ...Y7 M E 1 2 3 4 Key7 XX PGM PST DSK7 XX KEY8 M E 1 2 3 4 Key8 XX PGM PST DSK8 XX LUM M E 1 2 3 4 Key1 2 3 4 5 6 7 8 Type PGM PST DSK1 2 3 4 5 6 7 8 Type page 218 LIN CVK PTN CRK M E 1 2 3 4 Key1 2 3 4 5 6 7 8 Type Chroma Adjust PGM PST DSK1 2 3 4 5 6 7 8 Type Chroma Adjust page 224 Numeric keypad control block Buttons Menus See EFF Effect Effect 1 99 XX b Effect Master Timeline Store c Chapter 13 V...

Page 119: ... 2 3 4 Key2 XX PGM PST DSK2 XX DSK3 M E 1 2 3 4 Key3 XX PGM PST DSK3 XX DSK4 M E 1 2 3 4 Key4 XX PGM PST DSK4 XX WIPE M E 1 2 3 4 Key1 2 3 4 5 6 7 8 Transition Wipe Adjust Pattern Select PGM PST DSK1 2 3 4 5 6 7 8 Transition Wipe Adjust Pattern Select page 319 DME M E 1 2 3 4 Key1 2 3 4 5 6 7 8 Transition Wipe Adjust Pattern Select PGM PST DSK1 2 3 4 5 6 7 8 Transition DME Wipe Adjust Pattern Sele...

Page 120: ...mory Clip Recall page 403 K1RSZ to K8RSZ d M E 1 2 3 4 Key1 2 3 4 5 6 7 8 Processed Key PGM PST DSK1 2 3 4 5 6 7 8 Processed Key page 270 Device control block search dial Buttons Menus See DEV1 to DEV12 Device DDR VTR Cueup Play a Device DDR VTR Timeline b Chapter 12 Volume 2 FM1CLIP to FM8CLIP assigned buttons Frame Memory Clip Recall Downstream key fade to black control block Buttons Menus See D...

Page 121: ...e xxx a page 349 SNAPSHOT When the MSTR button is On Snapshot Master Snapshot Store Chapter 14 Volume 2 When the MSTR button is Off Snapshot Snapshot xxx a EFF When the MSTR button is On Effect Master Timeline Store Chapter 13 Volume 2 When the MSTR button is Off Effect Effect 1 99 xxx a SHOTBOX Shotbox Register Store Recall Chapter 15 Volume 2 MCRO Macro Register xxx a Chapter 16 Volume 2 TRANS R...

Page 122: ...y7 xxx a PGM PST DSK7 xxx a KEY8 M E1 2 3 4 Key8 xxx a PGM PST DSK8 xxx a LUM LIN WIPE PTN M E 1 Key1 2 3 4 5 6 7 8 Type page 218 M E 2 Key1 2 3 4 5 6 7 8 Type M E 3 Key1 2 3 4 5 6 7 8 Type M E 4 Key1 2 3 4 5 6 7 8 Type PGM PST DSK1 2 3 4 5 6 7 8 Type M E 1 Key1 2 3 4 5 6 7 8 Type CRK M E 1 Key1 2 3 4 5 6 7 8 Type Chroma Adjust page 221 M E 2 Key1 2 3 4 5 6 7 8 Type Chroma Adjust M E 3 Key1 2 3 4 ...

Page 123: ...nter the page number of the M E 1 Key1 Type menu which is 1111 and press the Enter button For details of the menu page numbers see Menu Tree page 518 The M E 1 Key1 Type menu appears in the menu display as follows KEY SS KEY1 M E1 2 3 4 Key1 xxx a PGM PST DSK1 xxx a page 217 KEY2 M E1 2 3 4 Key2 xxx a PGM PST DSK2 xxx a KEY3 M E1 2 3 4 Key3 xxx a PGM PST DSK3 xxx a KEY4 M E1 2 3 4 Key4 xxx a PGM P...

Page 124: ... corresponding item or function is selected set on a Menu title button This shows the title of the menu screen You can set different colors for the main menu site and subsidiary menu site see page 139 2 Menu page number button 1 Menu title button 6 Function button area 7 Parameter group button 8 Knob parameter buttons 3 VF buttons 4 HF buttons 9 Previous page button 5 Status area 0 Keyframe status...

Page 125: ... Depending on the function if any one is on the status is shown by an orange bar as in the following figure e Status area This shows the status of the settings items controlled by the selected menu An orange frame appears around the parameter area relating to the displayed menu For each of the twelve areas pressing the display jumps to the related menu f Function button area This shows the functio...

Page 126: ...only appears in those menus for which the default recall function is available See Menus allowing a return to default settings page 128 Press this button turning it on then press a VF button or knob parameter button to return the settings to their default values in the following groupings Function grouping the functions within an HF menu under the VF button Knob parameters parameters currently con...

Page 127: ...b 1 to 5 corresponding to the parameter to adjust the value Press the knob parameter buttons 1 to 5 corresponding to the parameter This displays the numeric keypad window allowing you to enter the desired value In the description of specific setting procedures the knob adjustment is described as follows Example When wipe pattern key is selected When the MENU button in the device control block is l...

Page 128: ...eter value to the default state and the Default Recall button goes off Notes In the following table Menus allowing a return to default settings the default recall function does not apply to some knob parameters For details see the table Knob parameters to which default recall does not apply on page 130 The default recall function does not return the horizontal H and vertical V position settings to...

Page 129: ...series DME Wipe b VF7 1370 series Misc b M E4 VF1 a 8110 series 8510 series Key1 Key5 b VF2 a 8120 series 8520 series Key2 Key6 b VF3 a 8130 series 8530 series Key3 Key7 b VF4 a 8140 series 8540 series Key4 Key8 b VF5 8150 series Wipe b VF6 8160 series DME Wipe b VF7 8170 series Misc b P P VF1 a 1410 series 1810 series DSK1 DSK5 b VF2 a 1420 series 1820 series DSK2 DSK6 b VF3 a 1430 series 1830 se...

Page 130: ...us c DME VF1 4110 series Edge c VF2 4120 series Video Modify c VF3 4131 Freeze c VF4 4141 Non Linear c VF5 4150 series Light Trail c VF6 4160 series Input Output c VF7 4170 series Enhanced Video Modify b GLB EFF VF1 4210 series Ch1 Ch4 c VF2 4220 series Ch5 Ch8 c KEY FRAME HF3 6113 Path c Knob parameters to which default recall does not apply Menu number a Menu name Button name Knob Parameter 1111...

Page 131: ...in Transition Type group 1 5 Transition Rate Pattern 1116 1 Transition Wipe Adjust Multi 3 Invert Type H and V in Pairing group 1 Width H V and Fringe in Modulation group 4 Shape 1154 Edge Direction Split in Edge group 1 Split No 1154 1 Edge Direction Matte Adjust Mix Color in Edge Matte group 3 Pattern Multi 3 Invert Type 1155 Main Modify H and V in Pairing group 1 Width H V and Fringe in Modulat...

Page 132: ...ouse Knob parameters subject to restriction on default recall Menu number Menu name Button name Knob Parameter 1111 1 a Type CRK Adjust Sample Mark in the Auto group 1 2 Position H Position V 1112 1 a Edge Matte Adjust Position 1113 a Main Mask Position 1116 1 a Transition Wipe Adjust Position 1116 3 a Transition DME Wipe Adjust Position 1 2 H V 1154 1 a Edge Direction Matte Adjust Position 1 2 Po...

Page 133: ... turn the mouse wheel In the setup menus you can select the direction of mouse wheel rotation that increases the setting value And you can also switch the functions of the right and left mouse buttons For details see Chapter 19 Control Panel Setup Panel Volume 3 Numeric keypad window a Item display This is the name of the parameter being set in the numeric keypad window b Max min maximum minimum v...

Page 134: ...toggles the sign of the entered value When it is pressed the value is negative g Clear button This clears the input It does not change the parameter setting h Trim button After entering the difference from the current value press this button to confirm the numeric input i Enter button This confirms the entered value If correctly set the numeric keypad window closes If not correctly set the input d...

Page 135: ...Close button This closes the keyboard window d BS button This clears the character immediately before the cursor in the input string e Caps Lock button This enables input of capital letters only Notes You can enter items to be displayed on the control panel LCD using lowercase letters but these will be converted to capitals for display 1 Item display 2 Input string 4 BS button 3 Close button 0 Lef...

Page 136: ...in the input string j Left button This moves the cursor one character to the left in the input string k Right button This moves the cursor one character to the right in the input string l Enter button This sets the input string as a parameter value and closes the keyboard window if the value has been entered correctly If the value has not been entered correctly the display color changes m Line fee...

Page 137: ...indow g Shut down button Shuts down the menus Notes Be sure to shut down the menus before powering off the control panel Shutting down the menus 1 In the menu screen press the menu page number button to open the top menu window For details of the top menu window see Function of the top menu window page 136 2 Press Shut down A confirmation message appears 3 Press Yes This shuts down the menu system...

Page 138: ...o copy to that button Swap If you press two color palette buttons in sequence with this button held down the two colors are swapped Default If you press any color palette button with this button held down the color palette button is set to the default color c Color display This shows the setting color and the parameters LUM SAT and HUE By adjusting the parameters with the knobs you can create any ...

Page 139: ...ary menu site press this button turning it on For details of the assignment operation see Assigning Functions to the Menu Control Block Top Menu and User Preference buttons in Chapter 19 Volume 3 Shortcut Menu Recalling a menu using the shortcut menu 1 In the Home menu select VF2 Favorites and HF1 Shortcut The following menu appears 2 In the Group Select box select the group The group buttons appe...

Page 140: ...tings To delete menu group settings 1 In the Home Favorites Group Edit menu select the group to be deleted 2 Press Clear A confirmation message appears 3 Press Yes This deletes the settings To register a menu on a button You can register 15 buttons in one group 1 In the Home Favorites Shortcut menu press Button Edit 2 Move the cursor to the position where you want to display the button To change t...

Page 141: ...3 Press the copy destination button to select it 4 Press Paste This copies the button settings To delete button settings In the Home Favorites Button Edit menu press Clear This deletes the button settings Notes The shortcut menu settings are handled as part of the control panel setup You can recall and save them in the same way as setup data To register a menu macro on a button See Recalling a Men...

Page 142: ...Chapter 2 Menus and Control Panel 142 Basic Menu Operations ...

Page 143: ...143 Chapter 3 Signal Selection and Transitions ...

Page 144: ...Processing Flow The switch from the current video stream appearing on the corresponding program monitor to a new video stream is referred to as a transition The following illustration shows the flow of operations for carrying out a transition on an M E bank or the PGM PST bank ...

Page 145: ... 209 Keys 1 to 8 Select new background video page 146 Select transition type page 157 Select current background video page 146 Background Cut Mix Super mix Preset color mix Wipe DME wipe Make wipe settings page 293 Make DME wipe settings page 349 Preview the effect of transition page 189 Execute the transition page 175 NAM ...

Page 146: ...M PST bank and the buttons in the auxiliary bus control block The number of buttons in each cross point row may be 16 24 or 32 but here the description is of the 32 button case as an example Cross point control block Source name displays Key 2 row Key 1 row Reentry buttons KEY4 button KEY3 button Cross point buttons Background A row Background B row Dedicated SHIFT button Reentry buttons UTIL butt...

Page 147: ...tput from the M E 1 bank as the background B input to M E 2 in the M E 2 cross point control block press the M E1 button in the background B row Notes To select M E 4 it is necessary to assign M E 4 to a button For details of the assignment see Assigning a Region to the Region Selection Buttons in the Numeric Keypad Control Block or Multifunction Flexi Pad Control Block in Chapter 19 Volume 3 For ...

Page 148: ...button then turn off the KEY4 button d Key 3 bus Key 1 row Turn off the dedicated SHIFT button then turn on the KEY3 button d Key 4 bus Key 2 row Turn off the dedicated SHIFT button then turn on the KEY4 button d Key 5 bus e Key 1 row Turn on the dedicated SHIFT button then turn off the KEY3 button Key 6 bus e Key 2 row Turn on the dedicated SHIFT button then turn off the KEY4 button Key 7 bus e K...

Page 149: ... button DSK 7 bus e DSK 1 row Turn on the dedicated SHIFT button then turn on the DSK 3 button DSK 8 bus e DSK 2 row Turn on the dedicated SHIFT button then turn on the DSK 4 button M E 1 M E 2 M E 3 M E 4 a PGM PST Utility 1 bus Background A row When UTIL button mode is Hold hold down the UTIL button Utility 2 bus Background B row DME external video bus Key 1 row Hold down the UTIL button DME uti...

Page 150: ... and M E 4 UTILITY 2 buses P P UTILITY 1 and P P UTILITY 2 buses M E 1 Key 1 fill to M E 1 Key 8 fill buses M E 1 Key 1 source to M E 1 Key 8 source buses M E 2 Key 1 fill to M E 2 Key 8 fill buses M E 2 Key 1 source to M E 2 Key 8 source buses M E 3 Key 1 fill to M E 3 Key 8 fill buses M E 3 Key 1 source to M E 3 Key 8 source buses M E 4 Key 1 fill to M E 4 Key 8 fill buses M E 4 Key 1 source to ...

Page 151: ...the PRE MCRO button in the cross point control block For details of the assignment operation see Overall Control Panel Settings Config Menu in Chapter 19 Volume 3 Notes For the following switcher banks dual background bus mode is not available When set to Dual M E Assign When M E Config is set to DSK AUX Panel less Function When using 24 column cross point control blocks for the CCP 6224 CCP 6324 ...

Page 152: ... corresponding button number to which you assign a signal In addition to the signals input to the PRIMARY INPUTS 1 to 144 connectors the PREMIUM INPUTS 1 to 20 connectors or the FC INPUTS 1 to 16 connectors on the rear panel of the switcher you can also select signals generated within the switcher Each button has assigned to it a video signal and a key signal forming a pair You can set these video...

Page 153: ...oss Point Settings Xpt Assign Menu in Chapter 19 Volume 3 Switching button numbers The rightmost 32nd button functions as a shift button The shift button function can be disabled in a Setup menu When selecting the signals of button numbers 1 to 31 press the cross point button for the desired signal To select button numbers 32 to 62 hold down the shift button and press the cross point button for th...

Page 154: ...abling cross point button operation You can assign the button to be used for the operation to the PRE MCRO button in setup See Overall Control Panel Settings Config Menu in Chapter 19 Volume 3 You can also use the Inhibit Set and Inhibit All Clear functions assigned to user preference buttons See Setting Button Assignments Prefs Utility Menu in Chapter 19 Volume 3 Buses for which operations can be...

Page 155: ...it operation of a cross point button macro attachment settings are still possible see Setting and Canceling a Macro Attachment in Chapter 16 Volume 2 To clear a cross point button operation inhibit setting Hold down the button to which Inhibit Set is assigned and press the button whose operation is inhibited flashing amber This clears the operation inhibit setting for the button you pressed To cle...

Page 156: ...splay the source names of the key signals assigned to buttons hold down the SPLIT button in the key control block or the KEY button in the auxiliary bus control block When using the AUX panel less function see page 151 with the CCP 6224 6324 Control Panel you can use the cross point control block as an AUX bus control block with the AUX CTRL button In this case use the key 1 row as AUX delegation ...

Page 157: ...nsition Operation page 160 The following are the transition types Mix This is a dissolve in which the new video progressively fades in over the current video with the sum of the two video outputs maintained constant At the mid point of the transition when the fader lever is in the center position the output of each is 50 This transition type can also be selected for an independent key transition I...

Page 158: ...irst a dissolve to a color matte and the second from the color matte to the new video In the first transition the current video is replaced by the color matte in a mix dissolve then in the second transition the color matte is replaced by the new video also in a mix dissolve For details on color matte settings see page 172 Notes This transition type is not available for an independent key transitio...

Page 159: ...Clip transitions Linked to a mix dissolve or wipe transition a frame memory clip movie is played back Cut A cut switches instantaneously from the current video to the new video When the next transition is a key transition the key cuts in or out instantaneously ...

Page 160: ...nsert or delete a key Press one of the KEY1 to KEY4 buttons or DSK1 to DSK4 buttons in the PGM PST bank turning it on For details of the operation to select Key5 to Key8 see Assigning Buttons for Selection of Keys 5 to 8 in the Setup Menu page 544 in Appendix Volume 1 To enable the key priority setting which determines the key overlay order after the transition Press the KEY PRIOR button turning i...

Page 161: ...otherwise continue to step 5 5 Select one of the transition type selection buttons in the transition control block To carry out a dissolve to the new video Press one of the MIX NAM SUPER MIX and PST COLOR MIX buttons turning it on To carry out a wipe Press the WIPE or DME button turning it on To carry out a transition while playing back a frame memory clip Press one of the buttons corresponding to...

Page 162: ...stantaneous transition Press the CUT button For details see Executing a Transition page 175 Transition linked to the audio mixer If the video signal selected in the background B row is linked to the audio mixer in setup then the audio mixer sound changes with the transition That is pressing the AUTO TRANS button gives a cross fade and pressing the CUT button gives an instantaneous sound switch For...

Page 163: ...e new video The key priority values go from 1 to 4 with a higher priority key being in front as seen on the screen Priority sequence on the screen There are two ways of setting the priority either using the PRIOR SET button in the transition control block or using the Misc menu to access the Key Priority menu for the M E or PGM PST bank Notes When the operating mode is set to multi program the key...

Page 164: ...or the key to appear on top Notes To select Key5 to Key8 or DSK5 to DSK8 requires an assignment For details see Assigning Buttons for Selection of Keys 5 to 8 in the Setup Menu page 544 The key priority establishes a separate priority order within each of the groups of keys 1 to 4 and keys 5 to 8 You can make any setting within the groups of keys 1 to 4 or keys 5 to 8 but not for combinations of k...

Page 165: ...e of the next transition selection buttons KEY1 to KEY4 DSK1 to DSK4 buttons in the PGM PST bank for the key you want to bring to the front after the transition To set the priority to be the same as before the transition press the BKGD button Notes The BKGD button is only effective when in the mode for changing the key priority for after the transition To select Key5 to Key8 or DSK5 to DSK8 requir...

Page 166: ...Priority by a Menu Operation When using keys 1 to 8 set the priority separately for the two groups For details see Priority Setting for Keys 1 to 8 page 168 Changing the priority of the currently inserted keys 1 In the M E or PGM PST menu select first VF7 Misc then HF3 Key Priority The Key Priority menu appears 2 For each of Priority1 Priority2 Priority3 and Priority4 select a key to determine the...

Page 167: ...Display of the Key Output Status and Key Priority You can check whether keys are currently output and the key priority setting using the key status display in the transition control block of the M E or PGM PST bank The display is above the next transition selection buttons KEY1 to KEY4 DSK1 to DSK4 buttons in the PGM PST bank Notes You can change the assignment of the next transition selection but...

Page 168: ...tion remains on Example key status display given when the KEY PRIOR button is pressed Current key priority 1 2 3 4 Key priority after the transition 3 2 1 4 Indicators 1 3 flashing 2 1 flashing 3 4 Example key status display showing the key priority after the transition Priority Setting for Keys 1 to 8 Set the priority for each of the groups consisting of keys 1 to 4 and keys 5 to 8 1 In the VF7 M...

Page 169: ...and Transitions 169 Key Priority Setting The button you pressed lights green and this becomes the reference group 3 Set the reference group priority 4 In Higher Group select the other group 5 Set the priority for the other group ...

Page 170: ...ppears 2 Select the required transition type in the Transition Type group The parameter settings can now be adjusted with the knobs according to the selected transition type For details see the following Super Mix Settings page 171 Color Matte Settings page 172 Setting the Transition Rate page 176 Notes When multi program mode is selected in the Setup menu see Settings for Switcher Configuration C...

Page 171: ...Notes This transition type is not available for an independent key transition 1 In the M E or PGM PST menu select first VF7 Misc then HF1 Transition The Transition menu appears 2 Select Super Mix in the Transition Type group 3 Turn the knobs to adjust the output levels Knob Parameter Adjustment Setting values 2 A Gain Background A output level 0 00 to 100 00 3 B Gain Background B output level 0 00...

Page 172: ...kground for the next transition One stroke mode and one time mode You can make a setting such that a preset color mix is carried out in a single transition This is called one stroke mode When the bus fixed mode is selected with a Setup menu setting a preset color mix is always carried out in the one stroke mode You can also make a setting such that when a preset color mix is completed the next tra...

Page 173: ...e M E or PGM PST menu select first VF7 Misc then HF1 Transition The Transition menu appears 2 Select Preset Color Mix in the Transition Type group 3 In the Preset Color Mix Fill group select one of the following Flat Color monochrome color matte Utility 2 Bus signal selected on the utility 2 bus 4 When Flat Color is selected turn the knobs to adjust the color matte Key fades out Key When a key is ...

Page 174: ...Chapter 3 Signal Selection and Transitions 174 Color Matte Settings 3 Saturation Saturation 0 00 to 100 00 4 Hue Hue 359 99 to 0 00 Knob Parameter Adjustment Setting values ...

Page 175: ...s can be applied to the background and keys for example allowing a key wipe combined with a background dissolve When the audio mixer is linked in setup you can carry out an auto transition and also switch the sound with the audio mixer See Transition linked to the audio mixer page 162 Transition Indicator Function In each of the M E banks and PGM PST bank to the left of the fader lever is a transi...

Page 176: ...input mode You select one of these modes using either the Flexi Pad control block page 177 Multifunction Flexi Pad control block or the numeric keypad control block page 178 Frame input mode The entered value is a number of frames Example Entering 123 constitutes an entry of 123 frames Timecode input mode The entered value is a timecode value Example Entering 123 constitutes an entry of 1 second 2...

Page 177: ...d control block Notes When using a simple type transition control block you cannot use the Flexi Pad control block to set the transition rate 1 In the M E bank Flexi Pad control block press the TRANS RATE button The memory recall section display is now ready to accept the entered transition rate Flexi Pad control block standard type 2 Enter the desired transition rate with the numeric keypad If re...

Page 178: ...o set the transition rate turning it on The numeric keypad control block display now shows the selected region name and the current transition rate setting for the region 3 With the numeric keypad enter the transition rate If required press the TC button to toggle the input mode frame input or timecode input Enter a value of up to three digits To clear the entry press the CLR button 4 Press the EN...

Page 179: ...on Flexi Pad control block 1 In the Multifunction Flexi Pad control block press the TRANS RATE button The button displays in the memory recall section change as shown in the following illustration and the Multifunction Flexi Pad control block switches to the transition rate setting mode 2 In the region selection buttons select the switcher bank 3 Press the TRANS SEL button in the memory recall sec...

Page 180: ...any of the mode selection buttons 6 Press the ENTR button Setting the transition rate by a menu operation 1 In the switcher bank select first VF7 Misc then HF1 Transition The Transition menu appears 2 Select any transition type in the Transition Type group 3 Turn the knob to set the transition rate Displaying the transition rates in a menu and changing the settings For each of the M E and PGM PST ...

Page 181: ...ith the pattern limit function disabled the wipe pattern does not complete When the limit value is set to 0 the wipe effect is completely disabled and carrying out the transition produces no change in the image When the limit value is set to the maximum 100 the image changes in exactly the same way as when the pattern limit function is off but when the transition is completed the cross point selec...

Page 182: ... to select the transition preview mode see page 189 2 Press the LIMIT SET button This sets the current fader lever position as the pattern limit Setting the pattern limit by a menu operation 1 When a wipe is selected as the transition type in the M E or PGM PST menu select first VF5 Wipe then HF4 Edge Direction When a DME wipe is selected as the transition type in the M E or PGM PST menu select fi...

Page 183: ... pattern limit To cancel the pattern limit after completion of step 3 in the previous procedure press the PTN LIMIT button turning it off If after carrying out step 2 in the previous procedure the pattern limit has been reached carry out the following procedure 1 Press the PTN LIMIT button The button you pressed lights green 2 Carry out the transition The PTN LIMIT button goes off and the pattern ...

Page 184: ...e pattern limit is released 1 In the Pattern Limit Release group of the Edge Direction menu select one of the following Auto Trans Rate Use the transition rate set in the transition rate control block Independ Trans Rate Independent transition rate 2 If you selected Independ Trans Rate in step 1 adjust the following parameter Executing an Auto Transition The following two modes can be used for aut...

Page 185: ...on is executing the AUTO TRANS button lights amber When it completes the button goes off To complete a partially executed transition instantaneously Press the CUT button The AUTO TRANS button goes off Executing a Transition With the Fader Lever Manual Transition Using the fader lever you can manually control the progress of the transition Moving the fader lever from one end of its travel to the ot...

Page 186: ...lete the transition Press the AUTO TRANS button to complete the rest of the transition at the preset transition rate If the transition rate is set to 100 frames and the fader lever has moved through 1 4 of the transition then the remaining 3 4 of the transition is carried out in 100 frames Non Sync State If the fader lever is in an intermediate position when a transition is completed as an auto tr...

Page 187: ...T bank Normally when a background transition is carried out on an M E bank the signals selected on the A and B rows of cross point buttons are interchanged at the end of the transition That is to say except during a transition the background output is always from the background A bus This is called flip flop mode The alternative is known as bus fixed mode in which there is no bus interchange In th...

Page 188: ...ll of these must be in the same direction complying with the above table If as a result of an auto transition for example the fader lever position does not agree with the signal output this is a non sync state see page 186 and LEDs light at both end positions of the fader lever travel Moving the fader lever does not carry out a transition but when the fader lever reaches the end position the non s...

Page 189: ... button was pressed 2 Operate the fader lever or press the AUTO TRANS button or CUT button On the preview monitor you can check the effect of the transition To terminate a transition preview There are three modes for a transition preview To terminate a transition preview carry out the operation which depends on the mode and press the TRANS PVW button turning it off Lock Toggling the TRANS PVW butt...

Page 190: ... to press the TRANS PVW button In bus fixed mode see page 187 transition previews are not available When using the simple type transition control block see page 203 transition previews are not available Hold Normal Hold One Time One Time Transition Preview mode Switcher setup Transition menu Transition Preview group Panel setup Operation Custom Button menu Trans Pvw group ...

Page 191: ...nsitions with independent key transitions When you set a common transition and a key independent transition for the same key you can apply two different effects such as a wipe and mix dissolve see page 157 to the key simultaneously When carrying out such a combination of transitions simultaneously on a key as auto transitions see page 184 the result depends on the timing of pressing the respective...

Page 192: ...with a time offset the following is the result Note that in both cases the common transition is a wipe and the independent key transition is a mix dissolve Time offset execution with the key inserted With the key inserted it is deleted with the two transitions acting with a time offset Whichever button is pressed first when the common transition completes even if the independent key transition is ...

Page 193: ...ter the key is deleted When the key is completely deleted both transitions complete Time offset execution with the key not inserted Common transition wipe start Independent key transition mix start The key is deleted even if the independent key transition has not completed Common transition wipe start Independent key transition mix start The transition completes with the key deleted Example 1 When...

Page 194: ...menu For details see Assigning Buttons for Selection of Keys 5 to 8 in the Setup Menu page 544 2 Select the transition type To fade a key in or out Press the MIX button turning it on To insert or delete a key using a dedicated wipe pattern Press the WIPE button turning it on To insert or delete a key using a dedicated DME wipe pattern Press the DME button turning it on To instantaneously insert or...

Page 195: ... Key Transitions page 360 3 Execute the transition To insert or delete the key gradually with a mix or wipe transition Press the AUTO TRANS button For details of the transition rate see Setting the Independent Key Transition Rate page 197 For details of operation together with a common transition see Combining other transitions with independent key transitions page 191 To cut the key in or out ins...

Page 196: ...en transition in progress Lit amber key inserted Lit red key inserted into final program output Off no key inserted For details of setting the transition rate see Setting the transition rate in the Flexi Pad control block page 177 Notes The buttons for Key5 to Key8 and DSK5 to DSK8 require previous assignment in the Setup menu For details see Assigning Buttons for Selection of Keys 5 to 8 in the S...

Page 197: ... fade to black transition rate for each of the M E and PGM PST banks and change the settings See Displaying a List of Transition Rates and Changing the Settings page 444 When the setup selection is for separate transition rates for inserting or deleting a key you can set both rates independently For example with the system in the state with the key not inserted the transition rate setting applies ...

Page 198: ... numeric keypad control block changes to the mode for inputting the independent key transition rate and its display now shows the corresponding region name and the current transition rate set for the region 2 With the numeric keypad enter the transition rate Enter a value of up to three digits To clear the entry value press the CLR button For details of frame input mode and timecode input mode see...

Page 199: ...utton If required press the TC button to switch the input mode frame count input or timecode input Enter a value of up to three digits To cancel the input press any of the mode selection buttons 6 Press the ENTR button Setting the independent key transition rate by a menu operation 1 In the M E or PGM PST menu select first the desired one from VF1 Key1 to VF4 Key4 then HF6 Transition The Transitio...

Page 200: ...n above the corresponding delegation button when the K SS button is off Displaying the independent key transition rates in a menu and changing the settings For each of the M E and PGM PST banks you can also display the transition rate independent key transition rate and fade to black transition rate and change the settings For more details see Displaying a List of Transition Rates and Changing the...

Page 201: ...multaneously You can also make a Setup menu setting such that a fade to black does not apply to particular programs For details of the setting see Settings Relating to Video Switching Transition Menu in Chapter 20 Volume 3 Fade to Black Operation Fade to black control block Carrying out a fade to black To carry out a fade to black press the FTB button in the fade to black control block The fade to...

Page 202: ... HF1 Transition The Transition menu appears 2 Select FTB 3 Turn the knob to set the fade to black transition rate Displaying the transition rates in a menu and changing the settings You can also display the transition rate independent key transition rate and fade to black transition rate for each of the M E and PGM PST banks and change the settings For more details see Displaying a List of Transit...

Page 203: ...imple transition control block cannot be installed in the CCP 6224 6324 Control Panel Carrying out a transition using a simple type transition control block 1 With the background A row of cross point buttons in the cross point control block select the background video Key status display Key transition selection buttons Transition type selection buttons Transition execution section ...

Page 204: ...s To insert or delete key 1 and key 2 simultaneously Hold down the KEY1 and KEY2 buttons and press one of the MIX NAM WIPE and DME buttons To use a super mix or preset color mix Select Super Mix or Preset Color Mix in the Misc Transition menu for the M E or PGM PST bank To set the key priority use the Misc Key Priority menu for the M E or PGM PST bank For details see Setting the Key Priority by a ...

Page 205: ...n the transition control block The key status display includes two ON indicators corresponding to keys 1 and 2 Display of the key output status When the key is inserted in the output from the M E or PGM PST bank the indication ON lights and when it is not inserted the indication goes off Key priority display The key lying in front on the program monitor has an indication OVER lit To set the key pr...

Page 206: ...sition type is NAM the outputs of the A bus and B bus in the above table are the outputs subjected to NAM The transition indicators always show the progress of the background A bus The operation of the left lever and that of the right lever can be swapped See Operation Settings Operation Menu in Chapter 19 Volume 3 Independent Key Transitions With a Simple Transition Module You carry out independe...

Page 207: ...wipe pattern Press the WIPE button turning it on To insert or delete a key using a dedicated DME wipe pattern Press the DME button turning it on For details of wipe settings see Wipe Settings for Independent Key Transitions page 319 For details of DME wipe settings see DME Wipe Settings for Independent Key Transitions page 360 To cut the key instantaneously in or out Press the CUT button turning i...

Page 208: ...a transition this will be the setting when inserting a key 2 Carry out the transition in the independent key transition execution section To insert or delete the key gradually with a mix or wipe transition Press the TAKE button To set the independent key transition rate using a simple type transition control block use the key 3 and key 4 Transition menus For details see Setting the Independent Key...

Page 209: ...209 Chapter 4 Keys ...

Page 210: ...k you can use the following key types You can select the key type using the key type selection buttons in the key control block or Multi function Flexi Pad control block or by a setting in the Type menu for the keyer See Key Type Setting page 218 Luminance key The background is cut out according to the luminance Y of the key source signal and at the same time the key fill signal is cut out and the...

Page 211: ...owing situations the clean mode goes off and cannot be turned on When the key type is a pattern key When key inversion is on When the key fill is a matte When the key edge is an outline When the key edge is normal with soft edge being on When fine key is on When the key positioner is on Chroma key A key signal based on a particular color is used to cut out the background and the key fill is then i...

Page 212: ... used and the modifiers in common with a wipe However modifiers which relate to the wipe direction and edge are not reflected Key Modifiers Edge modifiers You can apply borders and other effects to the edge of the key See Key Edge Modifications pages 232 and 253 Name Effect Image Normal This is the state with no key edge modifiers applied Border This applies a uniform width border to the edge of t...

Page 213: ...adow width position and density Outline This uses the outline of the original key as the key You can adjust the width and density of the outline You can also enable the separate edge function and adjust the top bottom left and right outline widths separately Emboss This applies an embossing effect to the outline of the key You can adjust the width and position of the embossing and the density You ...

Page 214: ...ge menu switch frame delay mode on see page 236 Regardless of the fine key and edge type settings key fill and key source are fixed in key drop off mode In this mode key image has a one frame delay Notes This function uses the resizer and therefore the normal effect of the setting is not obtained while using DME wipe or other effect that uses the resizer Edge fill When a border drop border or shad...

Page 215: ... You can adjust the positions of the four sides of the box separately When the pattern generator is selected you can select the pattern and apply modifiers Sub mask This uses the wipe generator signal or the signal selected on the utility 1 bus as the mask source When the wipe generator is selected the patterns and the pattern modifiers are the same as in a wipe transition Key Memory The key memor...

Page 216: ...Menu in Chapter 20 Volume 3 Key Default With a simple operation you can return the key adjustment values to their defaults The adjustment values which can be returned to their default values are as follows Adjustment values for the particular key type Clip Gain Density Filter etc In the case of chroma keying all adjustment values return to their default values Key position Key inversion Clean mode...

Page 217: ...ith the Key Control Block page 249 Key Setting Menus The key setting menus for each bank M E 1 to M E 3 and PGM PST are as follows Notes When the signal format is 1080P only keys 1 to 4 can be used Accessing a key setting menu For example to access the M E 1 Key1 menu carry out any of the following procedures In the menu control block select the top menu selection button M E 1 then press VF1 Key1 ...

Page 218: ...n rapid succession Notes To select M E 4 with the top menu selection buttons it is first necessary to assign a button in the Setup menu For details see Assigning a Button for M E 4 Selection in the Setup Menu page 542 To select Key5 to Key8 and DSK5 to DSK8 in the key control block a previous assignment in the Setup menu is required For details see Assigning Buttons for Selection of Keys 5 to 8 in...

Page 219: ... M E 1 Key1 menu When a key wipe pattern key is selected In the M E 1 Key1 Transition Wipe Adjust menu see page 319 carry out pattern selection and modifier setting then return to the M E 1 Key1 Type menu Notes For a wipe pattern selected for a wipe pattern key or key wipe pattern key the Edge and Direction modifier settings are not available 4 Set the parameters When a luminance key or linear key...

Page 220: ... Knob Parameter Adjustment Setting values 1 Y Clip Reference level for creating luminance signal 109 59 to 7 31 2 Y Gain Luminance signal sensitivity 100 00 to 100 00 3 C Clip Reference level for creating chrominance signal 100 00 to 0 00 4 C Gain Chrominance signal sensitivity 100 00 to 100 00 5 Density Key density 0 00 to 100 00 Parameter group 2 2 Knob Parameter Adjustment Setting values 1 Y Fi...

Page 221: ...ound appear in the composite image To prevent this it is possible to set a particular luminance level for the background and any parts below this level are cut forcibly Composing an image by chroma keying There are two types of composition for chroma keying normal mix and additive mix 1 In the M E 1 Key1 menu select HF1 Type 2 Select Chroma in the Key Type group It becomes possible to adjust the k...

Page 222: ...ible Key active When this function is off only the foreground is output and you can make adjustments of color cancel see the next paragraph Color cancel If the foreground image includes shades of the background color turn this function on to remove the color from the foreground image Chroma key window You can adjust the range over which the key signal is determined as matching the specified hue Wh...

Page 223: ...ith the color cancel effect applied This can therefore be used to provide an impression of smoke for example When the Y balance function is applied to the color cancel key the relevant part is output in its original color without canceling and therefore it is possible to combine colors which are the same color as the background i e typically blue in the foreground Chroma key shadow This function p...

Page 224: ...or 4 Adjust the position and size of the sample selector to specify the color to be used as the basis of chroma keying typically a blue background a The setting ranges depend on the signal format screen aspect ratio and size settings 5 Select Auto Start in the Auto group This executes an auto chroma key based on the color specified by the sample selector and displays the composite image on the mon...

Page 225: ...key signal adjustments for color cancel When the color cancel function is set on you can adjust the key signal for color cancel 1 In the Color Cancel group of the Chroma Adjust menu set Color Cancel on 2 In the Color Cancel group set Cancel Key on The cancel key is now on and you can now adjust the key signal for color cancel Knob Parameter Adjustment Setting values 1 Clip Chroma key reference lev...

Page 226: ... For an overview of the window see Chroma key window page 222 After making sure that the values of Clip Gain and Hue are adjusted appropriately use the following procedure to make the window adjustment 1 In the Chroma Adjust menu set Window on Knob Parameter Adjustment Setting values 1 Clip Color cancel key reference level 0 00 to 100 00 2 Gain Color cancel key gain 100 00 to 100 00 Knob Parameter...

Page 227: ...lue background of less than a certain luminance are treated as shadows there is no effect on cutting out of the foreground 1 In the Chroma Adjust menu set Shadow on 2 Adjust the following parameters Notes When chroma key shadow is on key edge is changed to normal and soft edge is switched off Knob Parameter Adjustment Setting values 1 Crop Crop value 100 00 to 0 00 2 Angle Angle value 180 00 to 0 ...

Page 228: ...urce for key 1 on the M E 1 bank use the following procedure 1 In the M E 1 Key1 menu select HF1 Type The Type menu appears 2 In the Key Fill group select either of the following for use as key fill Key Bus signal selected on the key 1 fill bus Matte signal from the dedicated color matte generator 3 If you selected Key Bus in step 2 select the key fill signal on the key 1 row in the cross point co...

Page 229: ...You can select a key source signal independently of the key source automatically selected in Auto Select mode 6 When Split was selected in step 5 hold down the SPLIT button in the key control block or the Multifunction Flexi Pad Control block then in the cross point control block key 1 row select the key source signal Alternatively hold down the key delegation button in the transition control bloc...

Page 230: ...ion Settings Operation Menu in Chapter 19 Volume 3 Selecting key source and key fill in the menu Selecting key source For example to select the key source for M E 1 key 1 use the following procedure 1 In the M E 1 Key1 Type menu press Signal Select The Signal Select menu appears 2 In the Target group press Source 3 In the Key Source group select the key source selection mode Self Auto Select or Sp...

Page 231: ...list on the right 4 Press Set Xpt This selects the key fill signal Carrying out a color mix for key fill When Matte is selected for key fill you can combine color 1 and color 2 For the combination you can use not only a key wipe generator pattern but also the dedicated pattern for key edge color mix 1 In the Key Fill group of the Type menu select Matte and press Matte Adjust The Matte Adjust menu ...

Page 232: ...Select menu and make adjustments by pressing Pattern Adjust to open the menu for pattern adjustment Matte Adjust menu For details see Carrying out a color mix for the key edge fill matte page 236 5 In the Type menu adjust color 1 and color 2 To adjust color 1 select Color1 and to adjust color 2 select Color2 then adjust the following parameters 6 To interchange color 1 and color 2 press the Color ...

Page 233: ...wipe pattern key is selected as the key type Separate edge on The left right top and bottom border or outline widths can be adjusted independently The separate edge function is only valid when a luminance key linear key or chroma key is selected as the key type a In the 4H mode and when Fine Key page 235 is on the setting value range is 0 00 to 4 00 When drop border or shadow is selected The setti...

Page 234: ...s possible to adjust color 1 When the edge type is outline in place of the edge fill signal the selected key fill signal fills the outline and elsewhere remains as the background 5 Carry out the following operation depending on the selection in step 4 Knob Parameter Adjustment Setting values 1 Width Width 0 00 to 8 00 a 2 Position Position 359 99 to 180 00 3 Density Density 0 00 to 100 00 Knob Par...

Page 235: ...nation color matte in the Edge Matte group For the color mix operation see Carrying out a color mix for the key edge fill matte page 236 6 When emboss is selected for the edge type adjust the color in the Emboss Fill group To adjust matte 1 press Matte1 and to adjust matte 2 press Matte2 then adjust the following parameters 7 To make the edge soft press Soft Edge to set it on and adjust the softne...

Page 236: ...if conditions do not allow the resizer to be used Carrying out a color mix for the key edge fill matte When you select Matte for the edge fill of a border drop border or shadow you can create a combination of color 1 and color 2 using a wipe pattern generated by the dedicated pattern generator 1 In the Edge Fill group of the Edge menu select Matte then press Matte Adjust Parameter group 1 2 Knob P...

Page 237: ...press Color 1 and to adjust color 2 press Color 2 turning it on respectively and adjust the following parameters 5 If required set the pattern modifiers When turning Position on and setting the pattern position a See page 306 Knob Parameter Adjustment Setting values 1 Size Pattern size 0 00 to 100 00 2 Soft Softness of pattern edge 0 00 to 100 00 3 Pattern Pattern number 1 to 24 a Knob Parameter A...

Page 238: ...dge menu press Zabton turning it on 2 Adjust the following parameters Knob Parameter Adjustment Setting values 1 H Multi Number of repetitions of pattern horizontally 1 to 63 2 V Multi Number of repetitions of pattern vertically 1 to 63 3 Invert Type Replication layout 1 to 4 a Knob Parameter Adjustment Setting values 1 Aspect Aspect ratio 100 00 to 100 00 a Knob Parameter Adjustment Setting value...

Page 239: ...pattern by pressing Pattern Select to open the menu for edge color mix dedicated wipe pattern selection Mix Pattern Select menu and make adjustments by pressing Pattern Adjust to open the menu for pattern adjustment Matte Adjust menu Mask Pattern Use the main mask Box or Pattern You can also press Pattern Select and in the corresponding pattern adjustment menu change the pattern 5 To adjust the co...

Page 240: ... a pattern is selected a The pattern is the same as a standard wipe See Wipe Pattern List in Appendix Volume 1 page 496 To select the pattern display the Mask Ptn Select menu by pressing the Mask Ptn Select button in the Main Mask menu After selecting one of the patterns standard wipe patterns 1 to 24 displayed in the Mask Ptn Select menu you can adjust the following parameters Knob Parameter Adju...

Page 241: ...on group and setting the angle of the pattern rotation a See page 308 Knob Parameter Adjustment Setting values 1 Size Pattern size 0 00 to 100 00 2 Soft Edge softness 0 00 to 100 00 Knob Parameter Adjustment Setting values 1 Position H Horizontal position 200 00 to 200 00 a 2 Position V Vertical position 200 00 to 200 00 a Knob Parameter Adjustment Setting values 1 H Multi Number of repetitions of...

Page 242: ...E 1 Wipe menu see page 293 then return to this M E 1 Key1 menu In the case of a wipe pattern selected for a mask the modifier Edge and Direction settings are not available Utility 1 Bus signal selected on the utility 1 bus When you selected Utility 1 Bus hold down the UTIL button in the M E 1 bank cross point control block and select the signal with the background A bus buttons While the UTIL butt...

Page 243: ...k mode the following restrictions apply On keys 1 to 4 of one M E a maximum of one DME effect including DME wipes can be used simultaneously When a DME wipe pattern is selected for the background DME cannot be used for keys 1 to 4 On keys 5 to 8 of one M E a maximum of two DME effects including DME wipes can be used simultaneously However for keys 5 to 8 of the M E4 block DME effects cannot be use...

Page 244: ...to combine three or more DME channels 1 Select the DME for the first channel see the previous item Assigning a DME to a key then select the successive channel for the second channel For the third channel select the channel after that 2 To select the video signal for the second channel hold down the UTIL button in the cross point control block and select the signal in the Key1 row DME external vide...

Page 245: ...e KEY4 button in the key 2 row then select the signal in the key 4 row DME utility 2 bus 4 To select the video signal for the fourth channel hold down the UTIL button in the cross point control block and carry out the following operation If the selected DME is channel 4 turn on the KEY4 button in the key 2 row then select the signal in the key 4 row DME utility 2 bus If the selected DME is channel...

Page 246: ...ed To use the key processed keyer key fill and key source signals on the frame memory source buses in the Processed Key menu press FM Feed Ext Proc Key turns on and the key fill and key source signals processed on the currently selected keyer are automatically assigned to frame memory source buses 1 and 2 When a DME is selected on the keyer the key fill and key source signals to which a DME effect...

Page 247: ...ired settings for key 1 on the M E 1 bank use the following procedure 1 In the M E 1 Key1 menu select HF6 Transition The Transition menu appears 2 In the Blink group select Key Blink or Edge Blink to set it on 3 Set the blink parameters When key blink is selected When edge blink is selected Video Processing You can adjust the luminance and hue of the selected key fill signal For example to apply v...

Page 248: ...urning it on 3 Adjust the following parameters To return adjustment values to their defaults Press Unity Knob Parameter Adjustment Setting values 1 Video Gain Video gain 200 00 to 200 00 2 Y Gain Luminance gain 200 00 to 200 00 3 C Gain Chrominance gain 200 00 to 200 00 4 Hue Delay Hue delay 180 00 to 180 00 5 Black Level Luminance black level 7 31 to 109 59 ...

Page 249: ...ontrol block Notes To select M E 4 Key5 to Key8 and DSK5 to DSK8 in the key control block a previous assignment in the Setup menu is required For details see Assigning Buttons for Selection of Keys 5 to 8 in the Setup Menu page 544 M E delegation buttons Key type selection buttons Key fill key source selection buttons Knobs Key delegation buttons Displays Edge type selection buttons MORE button ...

Page 250: ... control block use the following procedure 1 Using the M E delegation buttons in the key control block press the M E1 button setting it on 2 Using the key delegation buttons in the key control block press the KEY1 button setting it on This assigns the key control block to M E 1 key 1 Selecting the key type To select the key type press one of the key type selection buttons in the key control block ...

Page 251: ...ity 0 to 100 4 Filter Filter coefficient 1 to 9 Knob Parameter Adjustment Setting values 1 Clip Chroma key reference level 0 to 100 2 Gain Key sensitivity 100 shown as 00 to 100 3 Hue Hue 0 to 359 4 Density Key density 0 to 100 Parameter group 1 2 Knob Parameter Adjustment Setting values 1 Y Clip Reference level for Y signal 109 to 7 2 Y Gain Y signal sensitivity 100 shown as 00 to 100 3 C Clip Re...

Page 252: ...nal use the key 1 or key 2 bus buttons in the cross point control block For the CCP 6224 6324 Control Panel it is necessary to set the AUX CTRL button to Off in order to exit the AUX panel less function see page 151 Knob Parameter Adjustment Setting values 1 Size Pattern size 0 to 100 2 Soft Edge softness 0 to 100 3 Density Key density 0 to 100 Knob Parameter Adjustment Setting values 1 Luminance ...

Page 253: ... so that both are off When chroma key is selected as the key type select the SELF mode Key Edge Modifications To apply a modification to the key edge press one of the edge type selection buttons in the key control block BDR button border DROP BDR button drop border SHDW button shadow OUTLINE button outline EMBOS button emboss For an overview of the edge modifications see Edge modifiers page 212 Th...

Page 254: ...adjust the edge fill color parameters with the knobs Setting the drop border or shadow parameters When the DROP BDR or SHDW button is lit green the parameter settings differ between the key drop OFF and key drop ON modes see page 213 as shown below Switching between these two modes is made by turning the KEY DROP button on or off Key drop OFF mode a In the 4H mode and when Fine Key page 235 is on ...

Page 255: ...e 4H mode and when Fine Key page 235 is on the setting value range is 0 to 4 b When a wipe pattern key or key wipe pattern key is selected as the key type Separate edge on The outline width settings can be made independently for left right top and bottom sides The separate edge function is only available when luminance key linear key or chroma key is selected as the key type Knob Parameter Adjustm...

Page 256: ...turning it off Softening the edge Press the SOFT EDGE button turning it on The button lights green and you can now adjust the softness with the knob For a normal edge when SOFT EDGE is enabled Key Drop mode turns on When a luminance key or linear key is selected as the key type and clean mode is enabled enabling SOFT EDGE ends the clean mode Applying the zabton effects When the ZABTN button is lit...

Page 257: ...ges from amber to green to make the extra setting When pattern is selected Knob Parameter Adjustment Setting values 1 Size Pattern size 0 to 100 2 Soft Pattern edge softness 0 to 100 Knob Parameter Adjustment Setting values 1 Luminance Luminance 0 to 100 2 Saturation Saturation 0 to 100 3 Hue Hue 359 to 0 4 Density Density 0 to 100 Knob Parameter Adjustment Setting values 1 Top Top position 100 sh...

Page 258: ...ttern is selected for the background a DME can only be used in one place on keys 1 to 4 If two or more channels are selected then no DME can be used on keys 1 to 4 Assigning a DME to a key 1 In the key control block press the delegation buttons M E1 and KEY1 2 Using the DME channel selection buttons select the DME channel DME1 to DME8 for applying the effect The lit colors of the DME1 to DME8 butt...

Page 259: ...the third channel select the channel after that 2 To select the second channel video signal hold down the UTIL button in the cross point control block and select the signal in the Key1 row DME external video bus 3 To select the third channel video signal when the selected DME is Ch3 or Ch4 select the signal on the DME utility 1 bus When the selected DME is Ch7 or Ch8 select the signal on the DME u...

Page 260: ...on specification button MON in the key control block use the DME channel selection buttons to select the DME channel DME1 to DME8 you want to use The selected DME output is assigned to DME MON V and DME MON K 2 To check the DME assignment status hold down just the MON button While it is held down the lit color of the DME1 to DME8 buttons shows the key assignment status Lit green Shows the DME curr...

Page 261: ...s the PROC KEY button to light amber Using the show key function While the SHOW KEY button is held down the key processed key source signal appears on the specified output Show key mode Even when the SHOW KEY button is released for a preset time the show key mode is maintained You can specify the output to which the show key function is applied and set the time for which the show key mode is maint...

Page 262: ...y modify clear When an M E delegation button is held down holding down a key delegation button together returns the key settings to the initial status settings For details of the initial status see Selecting the State After Powering On Start Up Menu in Chapter 18 Volume 3 ...

Page 263: ...M E 4 a previous assignment in the Setup menu is required For details see Assigning a Button for M E 4 Selection in the Setup Menu page 542 Selecting the switcher bank and keyer Before carrying out key adjustment first select the key adjust mode then select the switcher bank and keyer For example to adjust key 1 on M E 1 proceed as follows EDIT ENBL button Mode selection buttons Alphanumeric displ...

Page 264: ... In the memory recall section press the KEY1 button Notes To select keys 5 to 8 in step 3 press KEY SHIFT turning it on then press one of buttons KEY5 to KEY8 in the memory recall section to select the key The button displays in the memory recall section now appear as shown in the following illustration Pressing the PAGE 1 3 PAGE 2 3 buttons further changes the display as follows then pressing PAG...

Page 265: ...Chapter 4 Keys 265 Key Adjustment Operations With the Multifunction Flexi Pad Control Block With these buttons in the memory recall section you can carry out the following key adjustment ...

Page 266: ...he selection hold down this button and press the button assigned to the signal you want as key source in the cross point control block You can also use the same signal as the key fill selected on the key fill bus as key source SELF Press the AUTO SEL button and SPLT button simultaneously so that both are off to select the SELF mode Setting auto chroma key SMPL MARK button Toggles the sample mark d...

Page 267: ...erator is selected and when it is Off the signal selected on the key 1 fill bus is selected For parameters that can be adjusted with the adjustment knobs see Selecting key fill and key source page 228 Selecting the key edge signal EDGE MAT button When this is On the signal generated by the dedicated color matte generator is selected and when it is Off the signal selected on the utility bus is sele...

Page 268: ...ocessing to frame memory FM FEED button Press this to assign the key fill key source signal processed on the currently selected keyer to frame memory source 1 or 2 For details see Using a frame memory feed page 261 Using a DME currently used on another keyer OVER RIDE button When one DME channel is in use holding down this button and pressing a DME channel button DME1 to DME8 allows you to forcibl...

Page 269: ...this to change the DME channel selection buttons displayed Returning the key adjustment values to their defaults Holding down a key type button LUM LIN CRK CVK or PTN recalls the key default values Key modify clear When the KEY ADJ button is held down holding down the region selection button for the selected region together returns all the key settings of the region to the initial status settings ...

Page 270: ...pect of DME effects Restrictions on the use of effects There are restrictions on combined use of resizer effects themselves and that with DME wipes For details see Impossibility of simultaneous use within the same keyer page 283 Relation between resizer and other effects You cannot apply DME effects to a key for which the resizer function is enabled When one of the three functions resizer DME wipe...

Page 271: ...g values 1 Location X Move key horizontally HD 99 9999 to 99 9999 SD 4 3 33 3333 to 33 3333 SD 16 9 24 9999 to 24 9999 2 Location Y Move key vertically HD 99 9999 to 99 9999 SD 4 3 33 3333 to 33 3333 SD 16 9 24 9999 to 24 9999 3 Size Magnify or shrink key 0 0000 to 99 9999 Parameter group 2 2 Knob Parameter Adjustment Setting values 1 Aspect X Change aspect ratio horizontally 0 0000 to 99 9999 2 A...

Page 272: ...ing it on 3 Adjust the following parameters with the knobs To switch between displaying parameter group 1 2 and 2 2 press the MORE button Parameter group 1 2 Knob Parameter Adjustment Setting values 1 X Move key horizontally HD 99 to 99 SD 4 3 33 to 33 SD 16 9 24 to 24 2 Y Move key vertically HD 99 to 99 SD 4 3 33 to 33 SD 16 9 24 to 24 3 S Magnify or shrink key 0 0 to 99 Delegation buttons RESIZE...

Page 273: ...ess the RSZR button turning it on 4 To change the aspect ratio turn on the LOC SIZE ASP Parameter group 2 2 Knob Parameter Adjustment Setting values 1 X Change aspect ratio horizontally 0 0 to 99 2 Y Change aspect ratio vertically 0 0 to 99 3 R Change aspect ratio horizontally and vertically at a time 0 0 to 2 0 Delegation buttons RSZR CTRL button Trackball ASP button LOC button RSZR button Z ring...

Page 274: ...al parameter resetting For details see Entering Three Dimensional Parameter Values in Chapter 11 Volume 2 Clearing resizer effects To clear two dimensional transform parameters only and set the initial state In the device control block press the CLR WORK BUFR button in the operation buttons To clear all resizer parameters and set the initial state In the device control block press the CLR WORK BUF...

Page 275: ...M E 1 Key1 Processed Key menu press Resizer turning it on This enables the resizer function 2 Press Border Crop The Border Crop menu appears 3 Press Crop turning it on This enables the adjustment of crop 4 Set the parameters These settings are the same as those for crop of DME For details see Crop Settings in Chapter 11 Volume 2 Notes If mosaic or defocus is enabled and in the Mosaic Defocus Mode ...

Page 276: ...alues 1 H Simultaneously adjust width of left and right borders 0 00 to 4 00 2 V Simultaneously adjust width of top and bottom borders 0 00 to 3 00 4 3 0 00 to 2 25 16 9 3 All Simultaneously adjust width of all four borders Value of H shown 5 Density Density of the borders 0 00 to 100 00 Knob Parameter Adjustment Setting Values 1 H Simultaneously adjust width of left and right borders 0 00 to 12 0...

Page 277: ... Color Adjust group select the edges for adjustment among the Top Left Right and Bottom edges To select all the four edges press All 3 Hue Hue 359 99 to 0 00 Knob Parameter Adjustment Setting Values Knob Parameter Adjustment Setting Values 1 Inner Soft Border inner softness 0 00 to 100 00 Knob Parameter Adjustment Setting Values 1 Top Top edge 100 00 to 100 00 2 Left Left edge 100 00 to 100 00 3 R...

Page 278: ...E 1 Key1 Processed Key menu press Resizer turning it on This enables the resizer function 2 Press Enhanced Effect The Enhanced Effect menu appears Applying a wide key border 1 In the M E 1 Key1 Processed Key Enhanced Effect menu press Dual Rszr Effect turning it on 2 Press Wide Key Border turning it on 3 Adjust the following parameters Knob Parameter Adjustment Setting values 1 Inner Soft Border i...

Page 279: ...16 9 selected in the system as follows SD format a Shared with the wide key border Soft value Knob Parameter Adjustment Setting values 1 H Simultaneously adjust border width of left and right edges 0 00 to 100 00 2 V Simultaneously adjust border width of upper and lower edges 0 00 to 100 00 3 All Simultaneously adjust border width of all four edges Value of H shown 4 Soft a Softness of border 0 00...

Page 280: ...c Settings in Chapter 11 Volume 2 3 In the Mosaic Defocus Mode group select the signal to which to apply the mosaic effect Video Key Video signal and key signal Video Video signal only Knob Parameter Adjustment Setting values 1 H Horizontal position of shadow 24 00 to 24 00 4 3 32 00 to 32 00 16 9 2 V Vertical position of shadow 18 00 to 18 00 3 Size Shadow size 0 00 to 2 00 4 Soft a Softness of s...

Page 281: ...sing the DME However Mosaic Defocus Mode appears in place of Defocus Mode For more details see Defocus Settings in Chapter 11 Volume 2 Notes If defocus is enabled and in the Mosaic Defocus Mode group you select Video Key then the crop and mask are disabled Applying a mask to mosaic or defocus 1 In the M E 1 Key1 Processed Key Enhanced Effect menu press Dual Rszr Effect turning it on Knob Parameter...

Page 282: ...drop shadow page 279 except that knobs 3 and 5 are as follows The rotation and inversion operations are the same as for a DME mask setting For more details see Chapter 11 Mask Settings Volume 2 Notes When a mask effect is applied to a border the boundary becomes discontinuous giving an unnatural effect Avoid applying a mask to a border If mosaic or defocus is enabled and in the Mosaic Defocus Mode...

Page 283: ...key 2 has resizer set to On the other key cannot be used for a dual resizer effect The same restriction applies when using a resizer DME wipe in place of resizer Impossibility of simultaneous use within the same keyer The following combinations of resizer effects cannot be simultaneously on Mosaic and edge enhance Defocus and wide key border Mask and drop shadow Mask and wide key border ...

Page 284: ...apshot operations are carried out in the independent key transition control block downstream key control block or Multifunction Flexi Pad control block Each keyer is provided with four dedicated key snapshot registers Independent key transition control block standard type Notes To select Key5 to Key8 or DSK5 to DSK8 in the independent key transition control block or downstream key control block a ...

Page 285: ...n which you want to save the snapshot The key source name display key snapshot button which you pressed lights yellow Notes If you save a key snapshot in a register for which the button is lit orange or yellow the existing contents of the register are overwritten Recalling a key snapshot For example the following procedure recalls the state of the M E 1 key 1 settings 1 In the M E 1 independent ke...

Page 286: ...the KEY SS key snapshot mode selection button does not appear in the Multifunction Flexi Pad control block To carry out key snapshot saving and recall in this control block it is first necessary in the Engineering Setup Panel Config Link Program Button Multi Function Mode Sel Assign menu to assign the Key Snapshot mode to a mode selection button To save a key snapshot For example to save a key sna...

Page 287: ... To cancel the recall operation press the UNDO button To delete a key snapshot For example to delete a key snapshot for M E1 key 1 saved in register 1 with the M E1 and key 1 region selected proceed as follows 1 Press the KEY SS button 2 Holding down the DEL button press the button 1 for the register in which is saved the key snapshot you want to delete To carry out an auto transition execution du...

Page 288: ... name display key snapshot button shows the state of registers 1 and 2 for key 3 Pressing the K SS 3 4 button shows the state of registers 3 and 4 for key 3 Off Nothing is saved in the register Lit orange Settings are saved in the register For a register holding a snapshot the register name is shown as up to eight characters 2 In the Flexi Pad control block hold down the SNAPSHOT button and press ...

Page 289: ...ure recalls the state of the M E 1 key 3 settings 1 In the M E 1 independent key transition control block press the K SS button in the key 3 control block turning it on 2 Press the key source name display key snapshot button corresponding to the register you want to recall Press the K SS 3 4 button as required to switch between displaying the key 3 registers 1 and 2 or registers 3 and 4 The button...

Page 290: ...Chapter 4 Keys 290 Key Snapshots ...

Page 291: ...291 Chapter 5 Wipes ...

Page 292: ...Wipe Pattern The patterns that can be used for a wipe are divided into a number of groups as follows Note that only the standard wipe patterns can be used for an independent key transition For wipe patterns see Wipe Pattern List in Appendix Volume 1 page 496 Standard wipe patterns Patterns consisting of straight lines vertically horizontally or diagonally and circular patterns Enhanced wipes More ...

Page 293: ...enu use either of the following operations In the menu control block select the top menu selection button M E 1 and press VF5 Wipe Notes To select M E 4 a previous assignment in the Setup menu is required In the transition control block of the M E 1 bank press the transition type selection button WIPE twice in rapid succession Any of the above operations displays the M E 1 Wipe menu Wipe Pattern S...

Page 294: ... pattern numbers 220 to 223 a At 100 00 tiles appear from the top or left edge of the screen at 100 00 from the bottom or right edge of the screen b At 100 00 all rows appear simultaneously at 100 00 until one row of tiles is completely displayed the next row does not start to appear When a random wipe is selected pattern number 273 Knob Parameter Adjustment Setting values 1 No Number of points 3 ...

Page 295: ... independent key transition Types of pattern mix There are four ways in which patterns can be combined in a pattern mix as follows Mix The effect of the sub pattern is applied to the main pattern modifying the outline or nature of the main pattern Positive NAM Nam Creates a pattern with an outline which contains all points within the outlines of either of the main pattern and the sub pattern Negat...

Page 296: ...ter 5 Wipes 296 Basic Procedure for Wipe Settings Morphing As the transition progresses the pattern morphs from the main pattern through the mix combination to the sub pattern Mix Positive NAM Negative NAM ...

Page 297: ...lso apply the diamond dust wipe effect to the pattern resulting from a pattern mix See Applying the effect of a diamond dust wipe to the selected pattern Dust mix page 300 When the pattern mix function is off turning dust mix on results in the main pattern and the diamond dust pattern being mixed This state is the same as a pattern mix when the diamond dust pattern is selected for the sub pattern ...

Page 298: ...hanges the value of the parameter for the other pattern to maintain the same difference between the two Notes When carrying out a wipe transition using a pattern mix it is recommended that you set the modifier link function to FULL LINK mode If the link function is off or SEMI LINK mode is selected the desired effect may not be obtained at the start or end of the transition Combining two patterns ...

Page 299: ... the Main Sub Link group make the main sub modifier link function settings See Main and sub modifier link function page 298 Full fully linked mode Semi semi linked mode Enhanced Yes Yes No Yes Yes Rotary No No No No No Mosaic Yes Yes No No Yes Random diamond dust Yes Yes No Yes No Main pattern Sub pattern Standard Enhanced Rotary Mosaic Random diamond dust Knob Parameter Adjustment Setting values ...

Page 300: ...s see Possible combinations of wipe patterns and modifiers page 317 Main pattern and sub pattern modifiers You can make independent settings of the modifiers for the main pattern and sub pattern To set the modifiers for the main pattern in the M E 1 Wipe menu select HF5 Main Modify and make the settings in the Main Modify menu To set the modifiers for the sub pattern select HF6 Sub Modify and make...

Page 301: ...ansition is completed normal reverse mode To specify the wipe direction in a menu 1 In the M E 1 Wipe menu select HF4 Edge Direction The Edge Direction menu appears 2 In the Direction group specify the wipe direction Normal regular direction Normal Reverse alternate between regular and reverse for each transition Reverse reverse direction to normal To specify the wipe direction with a button in th...

Page 302: ...ipe menu select HF4 Edge Direction The Edge Direction menu appears 2 Press Split turning it on 3 Set the following parameters Modifying the wipe pattern edge Edge You can apply a border to the pattern soften the edges or soften the applied border Border You can adjust the border width Soft You can adjust the edge softness Split on Split off Knob Parameter Adjustment Setting values 1 Split No Numbe...

Page 303: ...meters according to the selection in step 2 When border is selected When soft edge is selected When soft border is selected 4 When you selected border or soft border select the edge fill signal in the Edge Fill group Utility 2 Bus signal selected on the utility 2 bus Matte signal from the dedicated color matte generator 5 Depending on the operation in step 4 carry out the following operation When ...

Page 304: ... color combination see the next paragraph Carrying out a color mix for the edge fill matte When you selected Matte for the border or soft border edge fill you can combine color 1 and color 2 For the combination you can use not only a normal wipe generator pattern but also the dedicated color mix pattern 1 In the Edge Fill group of the Edge Direction menu select Matte and press Matte Adjust The Mat...

Page 305: ...tion on and setting the pattern position a See page 306 When turning Multi on and using replications of the same pattern a See page 311 Knob Parameter Adjustment Setting values 1 Size Pattern size 0 00 to 100 00 2 Soft Edge softness 0 00 to 100 00 Knob Parameter Adjustment Setting values 1 Size Pattern size 0 00 to 100 00 2 Soft Edge softness 0 00 to 100 00 3 Pattern Pattern number 1 to 24 a Knob ...

Page 306: ...interchange color 1 and color 2 press the Color Invert button turning it on Setting the wipe position Positioner When you turn on this function you can move the wipe pattern to any position Knob Parameter Adjustment Setting values 1 Aspect Aspect ratio 100 00 to 100 00 a Knob Parameter Adjustment Setting values 1 Angle Angle of pattern rotation 100 00 to 100 00 a Knob Parameter Adjustment Setting ...

Page 307: ...osition group press Center To move the pattern from its current position to the center through the course of a transition In the Position group press Auto Center turning it on To set the wipe position using the trackball or joystick You can also set the wipe position using the trackball or joystick in the device control block 1 In the device control block press the M E1 M E2 M E3 M E4 or P P butto...

Page 308: ...he wipe pattern Rotation You can rotate the pattern There are three rotation modes as follows Angle This carries out a wipe with the pattern in a fixed angle The parameter Angle determines the angle of pattern rotation A value of 100 00 of the parameter Angle corresponds to one whole turn counterclockwise a value of 100 00 corresponds to one whole turn clockwise With a value of 0 00 there is no ro...

Page 309: ...Angle determines an angle of pattern inclination at the beginning of the transition A value of 100 00 corresponds to the angle rotated one whole turn counterclockwise A value of 100 00 corresponds to the angle rotated one whole turn clockwise With a value of 0 00 the pattern is stationary The parameter Magnitude determines an angle of pattern rotation through the course of the transition A value o...

Page 310: ...of the pattern A negative value of the parameter Aspect stretches the pattern vertically a positive value stretches the pattern horizontally You can set the aspect ratio independently for the main pattern and sub pattern 1 In the M E 1 Wipe menu select HF5 Main Modify The Main Modify menu appears Knob Parameter Adjustment Setting values 1 Angle Angle of pattern rotation 100 00 to 100 00 Knob Param...

Page 311: ...he manner of replication At a value of 100 00 the pattern of the adjacent odd numbered column on the left lines up with the central coordinate horizontally At a value of 100 00 the pattern of the adjacent odd numbered column on the right lines up with the central coordinate horizontally For an independent key transition wipe you can use the Invert Type parameter to select from the following four t...

Page 312: ...this is on alternate tiles are inverted top to bottom Non Mask When this is on even if the positioner function is used to move the pattern position the pattern is always present on the screen Position By adjusting the following parameters move the pattern position within the divisions determined in step 3 a See page 306 Knob Parameter Adjustment Setting values 1 H Multi Number of repetitions of pa...

Page 313: ...0 represents the maximum movement The parameter V Offset determines the spacing in the vertical direction If a negative value is set the even numbered pairs of strip and slit move upward and the odd numbered pairs move downward The value 100 00 represents the maximum movement If a positive value is set the even numbered pairs of strip and slit move downward and the odd numbered pairs move upward T...

Page 314: ...dulation function is not available Horizontal modulation This modulates the pattern applying waviness in the horizontal direction to edges The parameter Speed determines the speed of waves A value of 100 00 generates the maximum downward speed of waves and a value of 100 00 the maximum upward speed Vertical modulation This modulates the pattern applying waviness in the vertical direction to edges ...

Page 315: ...ify menu appears 2 Depending on the desired effect in the Modulation group select one of the following H Horizontal modulation Modulate the pattern applying waviness in the horizontal direction to edges V Vertical modulation Modulate the pattern applying waviness in the vertical direction to edges Fringe Radial modulation Modulate the pattern applying waviness in the radial direction to edges 3 Se...

Page 316: ...ortion and a positive value produces barrel distortion You can set the spring function independently for the main and sub patterns 1 In the M E 1 Wipe menu select HF5 Main Modify The Main Modify menu appears 2 Press Spring turning it on 3 Set the following parameters Applying a spiral effect to the wipe pattern Spiral This deforms the pattern spirally Spring off Spring on Knob Parameter Adjustment...

Page 317: ...e menu select HF5 Main Modify The Main Modify menu appears 2 Press Spiral turning it on 3 Set the following parameters Possible combinations of wipe patterns and modifiers Yes Can be used No Cannot be used Knob Parameter Adjustment Setting values 1 Magnitude Size and direction of the spiral 100 00 to 100 00 2 Wave Speed Speed of the lateral waves 100 00 to 100 00 Modifiers Type of wipe Standard En...

Page 318: ... and 24 are possible h But patterns 21 and 23 are possible Wipe Modify Clear Press Default Recall at the lower left of the menu display turning it on then press VF5 Wipe to return the wipe settings to their initial status For details of the menu operation to return the wipe state to that set in initial status see Returning to default state in function groupings page 128 Spiral No h Yes No No No Mo...

Page 319: ...erations In the menu control block select the top menu selection button M E 1 and select VF1 Key1 and HF6 Transition to display the Transition menu for key 1 then press Wipe Adjust If VF1 Key5 is shown press the switching button at the top of the menu so that Key1 4 appears and press VF1 Key1 Notes To select M E 4 a previous assignment in the Setup menu is required In the independent key transitio...

Page 320: ...se the following modifiers with an independent key transition wipe Note that the available modifiers may depend on the pattern you are using Direction Edge Positioner Rotation Aspect ratio Pattern replication Setting the wipe direction Direction In the Direction group of the Key1 Wipe Adjust menu make any of the following selections Normal regular direction Normal Reverse alternate between regular...

Page 321: ...e selection is possible Notes By setting the operation mode in setup you can also use K1 CB1 K2 CB2 K3 and K4 to select keys 5 to 8 In this case press SHIFT turning it on then press K1 CB1 K2 CB2 K3 or K4 to select one of keys 5 to 8 However it is not possible to select more than one key For details of assignment for keys 5 to 8 see Assigning Buttons for Selection of Keys 5 to 8 in the Setup Menu ...

Page 322: ...he Position group turning it on Rotating the wipe pattern Rotation 1 In the Rotation group of the Key1 Wipe Adjust menu select the rotation type Angle Incline the pattern through a fixed angle Speed Rotate at a speed rate Magnitude Rotate the pattern through a fixed angle during the course of the transition 2 According to the selection in step 1 set the following parameters When Angle is selected ...

Page 323: ...rning it on 2 Set the following parameters a See page 311 Knob Parameter Adjustment Setting values 1 Angle Angle of pattern rotation at start of transition 100 00 to 100 00 a 2 Magnitude Angle of rotation through course of transition 200 00 to 200 00 a Knob Parameter Adjustment Setting values 1 Aspect Aspect ratio 100 00 to 100 00 a Knob Parameter Adjustment Setting values 1 H Multi Number of repe...

Page 324: ... M E bank and the PGM PST bank Use the Flexi Pad control block the Multifunction Flexi Pad block in each switcher bank or the Menu control block to save and recall wipe snapshots For simple transitions see page 203 there are eight wipe snapshot registers on each M E bank and the PGM PST bank Wipe Snapshot Operations With the Flexi Pad Flexi Pad control block standard type WIPE button STORE STATS b...

Page 325: ... E 1 Flexi Pad control block press the WIPE button This switches the Flexi Pad control block to wipe snapshot mode 2 In the memory recall section press the PTN NO button This switches the Flexi Pad control block to wipe pattern number recall mode 3 Use the buttons in the memory recall section to enter the pattern number consisting of up to three digits and press the ENTR button The entry is confir...

Page 326: ... button you pressed which lights yellow The numeric display shows the number of the corresponding pattern It is also possible to display the register name using a Setup menu see Operation Settings Operation Menu in Chapter 19 Volume 3 Meaning of the state of buttons Off Nothing is saved in the register Lit orange Settings are saved in the register Lit yellow The most recently recalled register Can...

Page 327: ...Deleting a wipe snapshot When the WIPE button is lit in the Flexi Pad control block hold down the STORE STATS button and press the memory recall button for the register in which you want to delete the wipe snapshot The indication of the memory recall button reverts from the wipe pattern or register name to the register number Notes In a simple type Flexi Pad control block it is not possible to del...

Page 328: ...the register in which you want to save Notes If you press a button which is already lit this overwrites the contents of the register When both the main pattern and sub pattern are selected for a pattern mix the button in the memory recall section shows only the main pattern Recalling a wipe snapshot from the menu In the Wipe Snapshot menu press the memory recall button for the wipe snapshot you wa...

Page 329: ...are linked A setting in setup determines whether register names or pattern numbers appear Deleting a wipe snapshot from the menu 1 In the Wipe Snapshot menu press Delete 2 Press the memory recall button for the wipe snapshot you want to delete This deletes the wipe snapshot ...

Page 330: ...stration 1 In the Multifunction Flexi Pad control block press the WIPE button This sets the Multifunction Flexi Pad control block to wipe snapshot mode and the button indications appear as follows You can change the indications for buttons 0 to 9 in the memory recall section to pattern images using the Engineering Setup Panel Operation Flexi Pad Mode menu 2 Select the region for the wipe snapshot ...

Page 331: ...t see Assigning a Button for M E 4 Selection in the Setup Menu page 542 in Appendix Volume 1 2 Press the PTN NO button in the memory recall section The PTN No button lights green 3 With the buttons in the memory recall section enter the pattern number of up to three digits and press the ENTR button This confirms the input and the pattern number appears in the alphanumeric display The PTN NO button...

Page 332: ...y bus By default a color matte is selected You can adjust the parameters selected with these buttons using the control knobs when the button is lit green When border is selected When soft border is selected Parameter group 1 2 Knob Parameter Adjustment Setting values 1 W Border width 0 to 100 Parameter group 2 2 Knob Parameter Adjustment Setting values 1 L Luminance 0 to 100 2 S Saturation 0 to 10...

Page 333: ...e wipe direction NORM normal Sets wipe to normal forward direction NORM REV normal reverse Sets the wipe direction to alternate between normal and reverse for each transition REV reverse Sets wipe to reverse direction to normal 3 O Degree of softening of outside of border 0 to100 Parameter group 1 2 Knob Parameter Adjustment Setting values Parameter group 2 2 Knob Parameter Adjustment Setting valu...

Page 334: ... are on two pages this switches between parameter group 1 2 and parameter group 2 2 Wipe modify clear When the WIPE button is held down holding down the region selection button for the selected region together returns all the wipe settings of the region to the initial status settings For details of the initial status see Selecting the State After Powering On Start Up Menu in Chapter 18 Volume 3 Sa...

Page 335: ...t to cancel is saved Buttons for registers in which wipe snapshots are already saved light orange Canceling recall of a wipe snapshot To cancel the operation of recalling a wipe snapshot press the UNDO button Deleting the date of a saved wipe snapshot Holding down the DEL button press the button for the register in which the wipe snapshot you want to delete is saved The register button you pressed...

Page 336: ...Chapter 5 Wipes 336 Wipe Pattern Operations in the Multifunction Flexi Pad Control Block ...

Page 337: ...337 Chapter 6 DME Wipes ...

Page 338: ...tterns User programmable DME patterns patterns which you can create using keyframe effects DME wipe execution mode and pattern numbers that can be used There are three DME wipe execution modes depending on the number of DME channels available one channel mode two channel mode and three channel mode The pattern numbers that can be used in these modes are as follows Notes When the signal format is 1...

Page 339: ...121 1122 1124 1131 to 1133 1135 one channel mode Mirror The new video appears over the old video as a mirror effect slides in all four directions Pattern numbers 1355 to 1358 one channel mode Sphere The new video appears wrapped around a sphere over the old video then returns to the original video while unwrapping Pattern number 1365 one channel mode Character trail The new video appears with a tr...

Page 340: ... 1058 1061 to 1064 1068 one channel mode 3D trans In one channel mode the new video appears over the old video while undergoing expansion three dimensional rotation and translation Pattern numbers 1071 1072 1074 1076 1077 1088 1091 to 1094 one channel mode In two channel mode the old video changes to the new video while both undergo expansion three dimensional rotation and translation Pattern numb...

Page 341: ... programmable DME pattern the following can be used Single single transition mode Flip tumble Flip Tumble flip tumble transition mode Dual dual transition mode Picture in picture PinP one channel and two channel picture in picture transition mode Compress a type of picture in picture in which the new image is the background and the currently visible image shrinks and then expands to its original s...

Page 342: ...comparison to the case of Picture in picture Example of the image change in the transition mode Picture in picture one channel mode Example of the image change in the transition mode Compress Transition mode frame in out In this mode when the first transition has completed you can move the image with the positioner in both horizontal and vertical directions but the image position at the transition...

Page 343: ...d you can move the image with the positioner in both horizontal and vertical directions The image at the transition start point and end point also moves The description is of an example of creating an effect such as the following Transition start Transition end First transition completion point Image created by interpolation Background B Background A Effect execution State before modification Imag...

Page 344: ...ition you can move the image with the positioner in both horizontal and vertical directions The image at the transition start point and end point also moves The description is of an example of creating an effect such as the following Transition start Transition end First transition completion point Image created by interpolation Background B Background A Effect execution State before modification ...

Page 345: ...ars as in the following figure Transition start Transition end First transition completion point Image created by interpolation Background B Background A Effect execution State before modification Image created by interpolation Background B Background A Transition start Transition end First transition completion point Effect execution ...

Page 346: ...tion can only be specified when the following patterns are selected and when other patterns are selected this is fixed as normal reverse Patterns 1204 1207 1221 to 1224 Edge You can apply a border or soft border see page 353 In the case of those user programmable DME patterns for keys in which an edge has already been applied to the effect the behavior is as follows When the DME wipe edge setting ...

Page 347: ...ransition as desired However this is not available for a DME wipe in the independent key transition control block For more details see Pattern Limit page 181 Size This can only be used when one of the following pattern numbers is selected 1201 to 1208 1221 to 1224 1251 2651 2652 2851 to 2854 2861 to 2864 You can set the size of the image Crop You can crop the image It is also possible in 16 9 mode...

Page 348: ...E channels to use on the individual M E banks in Chapter 20 Volume 3 Relation to resizer When resizer is enabled it is not possible to select a DME wipe For the key 1 and key 2 key 3 and key 4 key 5 and key 6 or key 7 and key 8 combinations if one is used for a dual resizer effect the other key cannot be used for a DME wipe Number of DME wipes that can be used simultaneously on a single M E bank D...

Page 349: ...ME Wipe menu use either of the following operations In the menu control block select the top menu selection button M E 1 and press VF6 DME Wipe Notes To select M E 4 a previous assignment in the Setup menu is required In the transition control block of the M E 1 bank press the transition type selection button DME twice in rapid succession Either of the above operations displays the M E 1 DME Wipe ...

Page 350: ...DME wipe pattern groups in three channel mode User Program and Brick For details of DME wipe patterns see Types of DME Wipe Pattern page 338 and DME Wipe Pattern List page 502 The patterns from the selected pattern group appear on the screen 3 Press the button to select the desired pattern Notes For a key transition the page turn page roll and picture in picture cannot be used Adjusting DME wipe p...

Page 351: ...een c The vertical center position of the video pasted on Side V At 100 00 the center is at the bottom edge of the screen and at 100 00 the center is at the top edge of the screen Knob Parameter Adjustment Setting values 5 Delay Timing for video selected on a utility bus to appear on the screen 100 00 to 100 00 Knob Parameter Adjustment Setting values 1 Rot X Rotation about the Y axis horizontal d...

Page 352: ...ers see DME Wipe Pattern Variation and Modifiers page 346 Specifying the DME wipe direction Direction You can specify the DME wipe direction normal reverse To specify the DME wipe direction in a menu 1 In the M E 1 DME Wipe menu select HF4 Edge Direction The Edge Direction menu appears 2 In the Direction group specify the DME wipe direction Normal regular direction Normal Reverse alternate between...

Page 353: ...l mode press 1st Ch turning it on For a pattern in two channel mode from the Ch Select group select the corresponding channel You can select more than one channel at the same time 3 In the Edge group select the edge type Border border Soft Border soft border 4 Set the parameters according to the selection in step 3 When border is selected When soft border is selected Knob Parameter Adjustment Sett...

Page 354: ... mode from the Ch Select group select the corresponding channel You can select more than one channel at the same time 3 In the Position group press Position turning it on 4 Set the following parameters Display indications when multiple channels are selected at the same time The indications on the knobs show the settings of the lowest numbered channel When you turn the knobs to adjust the settings ...

Page 355: ...s the button where you want to move to turning it on The DME wipe pattern displayed on the screen moves to the position of the specified button Setting relative positions to move the DME wipe pattern In two channel mode use the following procedure 1 In the M E 1 DME Wipe menu select HF5 Modify The Modify menu appears 2 In the Ch Select group select the target channels 3 Press Position in the Posit...

Page 356: ... channel When you turn the knobs to adjust the settings this changes the settings on the other channels by the same amount Adjusting the DME wipe pattern cropping Notes When pattern numbers 1701 and 1702 are selected crop cannot be used 1 In the M E 1 DME Wipe menu select HF5 Modify The Modify menu appears 2 Depending on whether the selected pattern is in one channel mode or two channel mode proce...

Page 357: ...one channel mode in the Ch Select group press 1st Ch turning it on For a pattern in two channel mode from the Ch Select group select the corresponding channels You can select more than one channel at the same time 3 In the Crop Mode group press Crop or 4 3 Crop to crop from 16 9 to 4 3 aspect ratio turning it on 4 In the Crop Mode group press Remove From Begin Parameter group 1 2 Knob Parameter Ad...

Page 358: ...ges Linear The cropping is removed linearly through the whole course of the transition enlarges Setting the timing of transition completion When the execution mode for a DME wipe crop transition is set to Last 5 you can select the timing of transition completion from 70 Last 30 95 Last 5 and 100 Off 1 In the M E 1 DME Wipe menu select HF5 Modify The Modify menu appears 2 In the Crop Mode group sel...

Page 359: ...s at the end of the transition execution time During the last 5 of the transition the transition and cropping removal proceed together DME Wipe Modify Clear Press Default Recall at the lower left of the menu display turning it on then press VF6 DME Wipe to return the DME wipe settings to their initial status For details of the menu operation to return the DME wipe state to that set in initial stat...

Page 360: ...peration In the menu control block select the top menu selection button M E 1 and select VF1 Key1 and HF6 Transition to display the Transition menu for key 1 Next press DME Wipe Adjust If VF1 Key5 is shown press the switching button at the top of the menu so that Key1 4 appears and press VF1 Key1 Notes To select M E 4 a previous assignment in the Setup menu is required Press the key delegation but...

Page 361: ...pple wave and ripple Page Turn Roll page turn and page roll Frame I O frame in out 2D Trans 3D Trans 2D Trans and 3D Trans Sparkle Split Slide sparkle and split slide User Program user programmable DME For details of DME wipe patterns see Types of DME Wipe Pattern page 338 and DME Wipe Pattern List page 502 The patterns from the selected pattern group appear on the screen 3 Press the button to sel...

Page 362: ...ng parameter a The effect size when Size is off is taken as 100 00 Cropping a key DME wipe 1 In the Crop Mode group of the Key1 DME Wipe Adjust menu press Crop turning it on 2 Set the following parameters Knob Parameter Adjustment Setting values 1 H Horizontal position 200 00 to 200 00 2 V Vertical position 200 00 to 200 00 Knob Parameter Adjustment Setting values 1 Size Set size of effect 0 00 to...

Page 363: ...357 To set the timing of transition completion 1 In the Crop Mode group of the Key1 DME Wipe Adjust menu press Crop turning it on 2 In the Crop Mode group press Remove From Begin For subsequent operations see Setting the timing of transition completion page 358 Applying a border to a key DME wipe In the Edge group of the Key1 DME Wipe Adjust menu press Border turning it on For subsequent operation...

Page 364: ...201 to 7208 7221 to 7224 Relation between DME wipes and other effects The following relations hold between a resizer DME wipe and other effects Relation to processed keys It is not possible to select a resizer DME wipe for a key with processed key enabled Relation to resizer It is not possible to use a resizer DME wipe for a key with resizer enabled It is not possible to use a resizer DME wipe for...

Page 365: ...e used for a resizer DME wipe are as follows Slide pattern numbers 7001 to 7008 Squeeze pattern numbers 7021 to 7031 Frame in out pattern numbers 7201 to 7208 7221 to 7224 3 Press the desired pattern to select it For more about resizer DME wipe modifiers see Setting Independent Key Transition DME Wipe Modifiers page 361 ...

Page 366: ...similar to the procedures for wipe snapshot operations In DME wipe snapshot operations use the DME button instead of the WIPE button used in wipe snapshot operations Selecting a DME wipe pattern in the Flexi Pad control block In the standard type Flexi Pad control block enter a four digit pattern number using the DME button For details see Flexi Pad Control Block Standard Type page 63 Notes You ca...

Page 367: ...Wipe Snapshots DME Snapshot Operations With the Menus In the same way as for wipe snapshots you can save recall and delete DME snapshots For details of the operating procedures see Wipe Snapshot Operations With the Menus page 327 ...

Page 368: ...e channel mode cannot be used Keyframe effects in the global channel When the effect with the same number as the reference channel is present on the DME global GLBL channel executing the user programmable DME will also execute the effect on the global channel simultaneously When executing a user programmable DME take note of whether the effect is present on the global channel User Programmable DME...

Page 369: ...the image size to zero so that it cannot be seen within the screen Create the last keyframe to be a full size image In the Transition Mode group of the Key Frame DME User PGM menu select Single Notes on flip tumble one channel mode Create the first keyframe image at full size In the Back group of the DME Input Output Video Key menu depending on the direction of the rotation you want during the tra...

Page 370: ...seen within the screen As the state after completion of the first transition move the image horizontally to make it visible within the screen At this time press the PAUSE button in the keyframe control block turning it on to set a pause for the keyframe For the last keyframe move the image horizontally to place it outside the screen area or set the image size to zero so that the image is not visib...

Page 371: ...Frame DME User PGM menu select Compress Notes on dual transition mode two channel mode Create the first keyframe for each channel as follows Channel 1 create the image full size Channel 2 either create the image outside the screen area or set the image size to zero so that it cannot be seen within the screen Create the last keyframe for each channel as follows Channel 1 either create the image out...

Page 372: ...or the mid point of the whole effect The range of this dead zone corresponds to the central one third of the range of the transition indicator This also applies to an auto transition Create the last keyframe for each channel as follows Channel 1 since the priority is low it will not be visible on the screen so no particular restrictions apply Channel 2 create the image full size In the Transition ...

Page 373: ...ect DME wipe snapshot mode See Recalling a Wipe Snapshot page 330 You can change the indications for buttons 0 to 9 in the memory recall section to pattern images using the Engineering Setup Panel Operation Flexi Pad Mode menu Selecting the DME Wipe Pattern The operation of selecting the DME wipe pattern in the Multifunction Flexi Pad control block is the same as the operation of selecting a wipe ...

Page 374: ...e EDIT ENBL button once more or press the EXIT button Note that the operation of the following buttons is the same as when editing a wipe pattern EXIT button PTN LIMT LIMT SET buttons NORM NORM REV REV buttons KNOB 1 2 button For the method of operation of these buttons see Editing the Wipe Pattern page 331 Channel selection buttons 1ST CH channel 1 Selects channel 1 2ND CH channel 2 Selects chann...

Page 375: ...and then the value of the parameter When the POS button is lit green you can adjust the position of the pattern with the control knobs Knob Parameter Adjustment Setting values 1 W Border width 0 to 100 2 L Luminance 0 to 100 3 S Saturation 0 to 100 4 H Hue 0 to 359 Parameter group 1 2 Knob Parameter Adjustment Setting values 1 W Border width 0 to 100 2 I Degree of softening of inside of border 0 t...

Page 376: ...ion selection button for the selected region returns the DME wipe settings to their initial status For details of the initial status see Selecting the State After Powering On Start Up Menu in Chapter 18 Volume 3 Parameter group 1 2 Knob Parameter Adjustment Setting values 1 H Cropping ratio of the image from left and right sides 100 to 100 2 V Cropping ratio of the image from top and bottom sides ...

Page 377: ...ling and Deleting DME Wipe Snapshots The operations of saving canceling and deleting a DME wipe pattern snapshot you have created are the same as the operations of saving canceling and deleting a wipe snapshot For the operations for wipe snapshots see Saving Canceling and Deleting Edited Wipe Patterns page 334 ...

Page 378: ...Chapter 6 DME Wipes 378 DME Wipe Pattern Operations in the Multifunction Flexi Pad Control Block ...

Page 379: ...379 Chapter 7 Frame Memory ...

Page 380: ...ystem SD system For details of operating procedures see Still Image Operations page 383 Types of image and terminology used The following types of image are handled in frame memory Freeze image An input image that has been frozen but not saved to memory Still image A freeze frame that has been saved to memory as a file Each file still file holds just one still image Video format Memory capacity 10...

Page 381: ...be saved or recalled By allocating FM1 to FM8 to cross point buttons you can use the still image output or clip output from each channel as input material Notes However when the signal format is 1080P only the four options of FM1 to FM4 can be used Correspondence between input and output There are two buses for capturing frame memory material the frame memory source 1 bus and the frame memory sour...

Page 382: ... handling the video and key signals together in frame memory For example when you select a video signal on frame memory source bus 1 the key signal assigned to it is automatically selected on frame memory source bus 2 You can also use the signal automatically selected on frame memory source bus 2 as a key signal when processing keyframe memory 1 To change the pair mode or operation mode use the Fr...

Page 383: ...rry out frame memory operations after stopping clip playback Preparations Allocating the frame memory outputs FM1 to FM8 to cross point buttons To output a frame memory image to a monitor for example the output signal from the frame memory FM1 to FM8 must be allocated to a cross point button Carry out this allocation in the Setup menu Notes When the signal format is 1080P only the four options of ...

Page 384: ... File excluding Pair Recombination menu Folder External Device menus Frame Memory menu a Auto store status display Depending on the setup settings this appears when the auto store function is enabled 2 Display of available image capacity 4 Pair selection button 6 File selection area 3 Target FM selection buttons 5 Pair button 1 Auto store status display Frame memory selection area 7 Frame memory f...

Page 385: ...M selection buttons Press one of these to select which of the selected outputs FM1 and FM2 in the example shown the operation applies to The following information appears on the button Status display File name e g image001 and thumbnail when a file is output Black when a black signal is output Through when the input image is output Freeze when a freeze is output Record when continuously capturing ...

Page 386: ...uttons in the following figure the pair of FM1 and FM2 is selected The following information appears on the button Status display For a pair shows the status for the reference Thumbnail when a file is output Black when a black signal is output Through when the input image is output Freeze when a freeze is output Record when continuously capturing images record e Pair button Press this button turni...

Page 387: ... pair file was selected each press switches the front and the back File information detail display For the selected file this shows the file name P if a pair file E if an extended clip and the duration g Frame memory folder selection area Select the frame memory folder to be displayed h Direct Recall button Toggle on and off the direct recall mode in which pressing a thumbnail immediately recalls ...

Page 388: ...ss point control block for use as an AUX bus control block For details of the switching refer to the Setup menu Auxiliary Bus Control Block Settings Aux Assign Menu in Chapter 19 Volume 3 2 In the auxiliary bus control block cross point buttons select the signal to be used for the input image To select a signal with a key or DME effect applied on the frame memory source bus In the key control bloc...

Page 389: ...1 and FM2 you press the pair is selected When Pair is Off One of the targets must be selected However in the Clip Play menu you can also select both FM1 and FM2 Selecting a frame memory folder Press a button in the frame memory folder selection area see page 387 By pressing More to switch the display you can select from a maximum of 12 folders Thumbnails of the files within the selected folder app...

Page 390: ...eze image For details of the selection method see page 389 Notes The folder selected here is the destination folder for writing the freeze image It is not possible to change the selection of this folder after the following step 5 An orange bar appears on the selection button for the destination folder 5 Press Freeze Enable turning it on The signals of frame memory source buses 1 and 2 are assigned...

Page 391: ...0PsF 24 1080PsF 25 1080PsF 29 97 720P 50 720P 59 94 Saving a freeze image Store You can save an image in temporary memory which has been placed with the freeze function as a file in memory You can save a single image in a single file and apply a name of up to eight characters to the file Notes When the system is powered off all the files saved in memory are lost When the signal format is 1080P the...

Page 392: ... turning it on 2 Use the knobs to adjust the following parameters To return the settings to the default values press Unity in the Video Process group Notes When a pair setting is active it is coupled to the video process on off setting but the above parameter settings are only valid for frame memory source bus 1 The pair setting cannot be used to set the frame memory source bus 2 If you want to se...

Page 393: ...an recall an image file saved in memory and allocate to any of the FM1 to FM8 outputs Recalling a still image To recall a still image file saved in memory using the thumbnails and assign it to an FM output use the following procedure 1 In the Frame Memory menu select VF1 Still and HF1 Recall The Recall menu appears When Pair is on only pair files pairs of main file and sub file are displayed When ...

Page 394: ...or turning the knob scroll the file thumbnail display 6 Press the thumbnail of the clip you want to recall 7 Press Recall This recalls the still image file which is assigned to the FM you selected in step 2 To recall in direct recall mode Direct recall means that pressing a thumbnail immediately recalls the file In this mode only the front thumbnail file is recalled 1 In step 7 above instead of pr...

Page 395: ...ed 4 To move through the selected files press the Prev or Next button 5 Press outside the Find window on the menu screen This closes the Find window Image Output There are two functions related to image output the reposition function for moving the output image and the lock function for fixing the output image Moving the output image reposition function For up to two channels of FM1 to FM8 one fro...

Page 396: ...the movement mode Normal Move in normal mode Black White Move in black white mode 4 With the knobs adjust the parameters to move the image a See page 306 The surroundings of the moved image on the screen are filled with black 5 To return the image moved by the reposition function to the center position in the Reposition group press Center Fixing the output image selection lock function For the out...

Page 397: ...of name assigned to all the still images captured in one record operation This string includes a maximum of four characters which can be specified using a menu before carrying out the capture The first string is automatically used as the clip name when the images are treated as a frame memory clip Second character string A four digit number 0000 or greater which is incremented each time a still im...

Page 398: ...now possible 6 Input the file name if required Pressing File Name displays the keyboard window and you can enter the first character string up to four characters of the file name 7 Set the recording time if required Pressing Duration displays the numeric keypad window in which you can enter the recording time in the form of timecode If you set the recording time to zero this uses all frame memory ...

Page 399: ...ave the same characters except for the last three characters they are treated as an image file group and the effect is created with the last three numeric characters in sequence Notes When creating the effect in pair mode see page 381 the files used must be main files and sub files with the same last three numeric characters in the file name To recall a continuous sequence of still images create a...

Page 400: ... user region use the numeric keypad control block or the Multifunction Flexi Pad control block see step 3 of Recalling a Register in Chapter 13 Volume 2 5 Use the arrow keys or turn the knobs to scroll the thumbnail display of the files 6 Select the thumbnail of the files to be used for the keyframe 7 If necessary turn the knob to check the animation effect in the thumbnail display 8 Using the reg...

Page 401: ... see Error Messages in the Appendix Volume 3 10Press OK This creates the effect in the selected user region register To cancel creating the effect Press Cancel Notes The effect is built with the selected files in increasing order of the last three characters of the file name If you do not want to include some of these files in the effect first delete or rename them A maximum of 99 keyframes can be...

Page 402: ...A frame memory clip can be named using up to four characters For details of frame memory clip names see Continuously Capturing Still Images Record page 397 Frame memory clip settings For frame memory clips you can make the following settings using a menu or device control block trackball search dial joystick Start point Stop point Loop On Off The above settings can be saved in a snapshot register ...

Page 403: ...fter stopping clip playback Preparations for Operation The preparations for using a frame memory clip hereafter a clip are the same as for a still image operation See Preparations page 383 and Selecting Outputs and Target Frame Memory page 388 Recalling Clips Recalling a clip You can recall a clip from each of frame memories 1 to 8 1 In the Frame Memory menu select VF2 Clip and HF1 Recall The Reca...

Page 404: ...ou can select from a maximum of 12 folders Thumbnails of the files within the selected folder appear 5 Using the arrow keys or turning the knob scroll the file thumbnail display 6 Press the thumbnail of the clip you want to recall Knob Parameter Adjustment Setting values 1 Scroll Thumbnail display scrolling 1 and upwards Target selection buttons Pair selection buttons Clip file selection area Fram...

Page 405: ...nt to recall This immediately recalls the file To display the subsidiary file in front With the direct recall mode on press Sub Display turning it on To search the clip file by file name Press the Find button For details see To search by file name page 395 in Chapter 7 Clip Playback You can play a recalled clip by a menu operation or by using the device control block Notes With a pair file recalle...

Page 406: ...playback press Play During playback to stop press Stop To cue up Press Cue To play the image at the beginning of the clip Clip Begin Press Rewind To play the image at the end of the clip Clip End Press FF Playback start point pale blue bar Current position red bar Playback end point yellow bar Status buttons These show the timecode values for the start point current position and end point ...

Page 407: ...t position press the Current status button and enter a timecode value from the numeric keypad window To delete the parts of a clip file other than the playback part trimming 1 Set the playback start point and stop point 2 Press Trim A confirmation message appears 3 Press Yes Using the device control block search dial to play back clips Notes A frame memory clip must first be recalled with a menu o...

Page 408: ...ess the STOP TC button To set to any position press the SET STOP TC button and enter a timecode from the numeric keypad control block To carry out the variable speed playback Use the search dial For details on using the search dial see Controlling the Tape Disk Transport in Chapter 12 Volume 2 To apply a loop to a frame memory clip Press the LOOP button Using the device control block trackball or ...

Page 409: ...the left for the reverse direction When you pressed the JOG button Playback is at a speed corresponding to the turning speed of the Z ring or the movement speed of the joystick When you pressed the SHTL button Playback is at a speed corresponding to the rotation angle of the Z ring or amount of movement of the joystick When you pressed the VAR button Playback is at a speed corresponding to the rot...

Page 410: ...be recorded 4 In the Record Enable group select the clip type To record a normal clip press Clip To record an extended clip press Ext Clip 5 To set the clip name press Name A keyboard window appears 6 Enter the clip name and press Enter 7 To start recording press Record Start 8 To end recording press Record Stop Frame memory selection area Operation target selection buttons Pair selection buttons ...

Page 411: ...ry menu select VF5 Folder The Folder menu appears The status area shows a list of the current folder settings 2 Select New A keyboard window appears 3 Enter the folder name and press Enter This confirms the folder name Changing the folder name 1 In the Frame Memory Folder menu select the folder with the arrow keys or by turning the knobs 2 Press Rename A keyboard window appears 3 Enter the new fol...

Page 412: ... with the arrow keys or by turning the knobs To select all folders select All 2 Press Delete A confirmation message appears 3 To carry out the deletion select Yes and to cancel the deletion select No Notes It is not possible to delete the default folder named Default Clip Output As for still image operation you can use the reposition and lock functions For details of the operation see Image Output...

Page 413: ...uding a clip transition during executing another clip transition the follow on transition does not operate properly Be sure to complete the transition before recalling a snapshot Notes When a clip transition is selected as the transition type if one of the wipe direction selection buttons in the transition control block is lit it indicates the direction of clip playback Setting a clip transition T...

Page 414: ...ransition type Notes For details of the background transition selected here see the various adjustments in the M E 1 Misc Transition menu 6 In the Select group press BKGD Transition 7 Use either of the following methods to set the background transition start point independently of the clip playback timing Move the fader lever to the desired position and in the BKGD Transition Set Timing group pres...

Page 415: ...ion group select the background transition direction 10In the Select group press FM 1 2 Clip 11Using either of the following methods set the start point of the clip Move the fader lever to the desired start point and in the Clip Transition Set Timing group press Start Turn knob 1 to set the number of frames The left end of the reference axis see previous figure is the position of frame 0 Notes It ...

Page 416: ...rse direction you can split a pair file into two single files Couple You can create a pair file from two single still image files or clip files Separate You can also separate a pair file into two single still image files or clip files Creating a pair file from two single files Notes Carrying out the following operation automatically switches Pair to On The following description applies to the case...

Page 417: ...Memory menu select VF4 File and HF1 Pair Recombination The Pair Recombination menu appears 4 Press Separate The FM1 and FM2 pair file is split into separate single files Moving Files 1 In the Frame Memory menu select VF4 File and HF5 Move The Move menu appears The status area shows files to be moved in the upper area and destination files in the lower area 2 Select the folder which contains the fi...

Page 418: ...splay Press directly on the thumbnail in the status area Turn the knobs To delete all files press Select All turning it on When a clip thumbnail is selected the still image files making up the clip are also selected for deletion 4 If necessary turn the knob to check the contents of the frame memory clip through the thumbnail display 5 Press Delete A message for confirming the deletion appears 6 To...

Page 419: ... Turn the knobs 3 If necessary turn the knob check the contents of the frame memory clip through the thumbnail display 4 Press Rename A keyboard window appears 5 Enter the new name then press Enter in the keyboard window Notes The following names cannot be used CON PRN AUX CLOCK NUL COM0 COM1 COM2 COM3 COM4 COM5 COM6 COM7 COM8 COM9 LPT0 LPT1 LPT2 LPT3 LPT4 LPT5 LPT6 LPT7 LPT8 LPT9 This renames the...

Page 420: ...uring playback of a frame memory clip of the pair assigned to either of the target FM selection buttons see page 405 frame memory operations may not be performed properly Carry out frame memory operations after stopping clip playback When the signal format is 1080P this function cannot be used Consult your Sony service representative or sales representative about the hard disk drives that can be c...

Page 421: ...rive Notes Before carrying out this operation for the first time it is necessary to format the hard disk see previous item Hard Disk Formatting 1 In the Frame Memory menu select VF6 External Device and HF2 Ext HDD Backup Restore The Ext HDD Backup Restore menu appears For each partition a list of the directory names and number of files appears To get the hard disk drive information Press Refresh S...

Page 422: ...he operation When the operation is completed a popup window reading Completed appears 5 Press OK To rename a directory Select a directory in the list and in the button area press Rename In the keyboard window that appears enter the new directory name and press Enter The name of a directory is limited to eight characters Notes The following names cannot be used CON PRN AUX CLOCK NUL COM0 COM1 COM2 ...

Page 423: ...A popup window for confirming file recall appears Notes When you execute Replace any existing data in frame memory is lost immediately before the recalling operations 3 Press Yes This starts the file recall operation A progress bar and numerical indication appear to show the progress of the operation When the operation is completed a popup window reading Completed appears 4 Press OK ...

Page 424: ... backup data to DDR or VTR Notes Before starting the backup it is necessary to select the FM output to record on an AUX bus for example and input the AUX output to the DDR VTR 1 In the Frame Memory menu select VF6 External Device and HF4 Backup to DDR VTR The Backup to DDR VTR menu appears 2 In the Backup Enable group select either of the following Clip Still Data from the first board still images...

Page 425: ...m DDR VTR menu appears 2 Press File File Name Data to read the file list from the File Name Data menu For details see the section Overview of File Operations in Chapter 17 Volume 2 3 In the Restore Enable group select either of the following Clip Still Data from the first board still images and clips Ext Clip Data from the second board extended clips 4 In the Restore Type group press either of the...

Page 426: ...le under certain rules you can automatically extract an image from the clip and save as a separate frame memory file Notes When the signal format is 1080P this function cannot be used Relation between recorded state of video tape and files after extraction The extraction is carried out according to the following rules Example 1 When only video signal clips and a still image are recorded single fil...

Page 427: ... a pair file the main file and sub file must have the same number of frames For image extraction as an extended clip Ext Clip must be selected in the Record menu Record Enable group when the video tape content is recorded as a clip For image extraction as still images Clip must be selected in the Record menu Record Enable group when the video tape content is recorded as a clip 1 In the Frame Memor...

Page 428: ...ingle clip and automatically extracts a movie Clip or still image Still When there is key data a pair file is created To check the details of the images still image clip Use the following knob operations Knob Parameter Setting Values 1 No File number 1 to maximum 3 Viewer Timecode for selected image 00 00 00 to maximum ...

Page 429: ...429 Chapter 8 Color Backgrounds Copy and Swap and Other Settings ...

Page 430: ...d to in the menu system as color mix You can also apply modifiers to the selected pattern When the color mix function is not used the result is a flat color and color 1 is always output You carry out color background settings in the Color Bkgd menu This section describes the settings menu for color background 1 as an example Color Background Settings Menu Accessing the Color Bkgd1 menu Use either ...

Page 431: ... display the Mix Ptn Select menu Select any pattern appearing in the Mix Ptn Select menu standard wipe patterns 1 to 24 and you can then adjust the following parameters 3 To adjust color 1 set Color 1 on and to adjust color 2 set Color 2 on then adjust the parameters Knob Parameter Adjustment Setting values 1 Luminance Luminance 0 00 to 100 00 2 Saturation Saturation 0 00 to 100 00 3 Hue Hue 359 9...

Page 432: ...rn a See page 308 3 Hue Hue 359 99 to 0 00 Knob Parameter Adjustment Setting values Knob Parameter Adjustment Setting values 1 Position H Horizontal position 200 00 to 200 00 a 2 Position V Vertical position 200 00 to 200 00 a Knob Parameter Adjustment Setting values 1 H Multi Number of repetitions of pattern horizontally 1 to 63 2 V Multi Number of repetitions of pattern vertically 1 to 63 3 Inve...

Page 433: ...ne wave Notes When using 1080PsF mode in an HD system the modulation function is not available a See Applying modulation to the wipe pattern Modulation page 314 5 To interchange color 1 and color 2 press the Color Invert button turning it on Knob Parameter Adjustment Setting values 1 Speed Rotation rate of pattern 100 00 to 100 00 a Knob Parameter Adjustment Setting values 1 Amplitude Amplitude of...

Page 434: ...ettings copy only Format converter output settings copy only You can carry out copy operations with a simple button operation Swap operations and copy operations on DME data can only be done with a menu operation M E copy and M E swap You can copy and swap the overall bank settings among the M E 1 to M E 4 and PGM PST banks Notes If a DME is being used on the source M E bank then if for example th...

Page 435: ...and swap the wipe settings among the 40 keyers listed in the following table DME wipe copy and DME wipe swap You can copy and swap the DME wipe settings among the banks listed in the following table Target bank Target keyer Target data M E 1 M E 2 M E 3 M E 4 Keys 1 to 8 Key settings excluding the following data items Setup data Key snapshots Key memory PGM PST Downstream keys 1 to 8 Target bank T...

Page 436: ... carry out copy or swap involving independent key transition DME wipe settings Target bank Target keyer Target data M E 1 M E 2 M E 3 M E 4 Keys 1 to 8 But excluding keys 5 to 8 on M E 4 DME wipe settings in the independent key transition control block PGM PST Downstream keys 1 to 8 Target bank Target keyer and data M E 1 M E 2 M E 3 M E 4 PGM PST Keys 1 to 8 Downstream keys 1 to 8 Matte data for ...

Page 437: ... 1080P the combinations for a copy or swap operation are limited to the following Channels 1 and 2 Channels 3 and 4 Channels 5 and 6 Channels 7 and 8 Copying format converter data You can copy data from one format converter input to another or from one output to another Color background Colors 1 and 2 for color background 1 Colors 1 and 2 for color background 2 Frame memory FM1 color FM2 color DME...

Page 438: ...ata Color Copying and swapping color data DME Copying and swapping data by DME channels Format Converter Copying format converter data For details see Settings Relating to Signal Inputs Input Menu in Chapter 21 Volume 3 For an overview of the concepts involved see Copy and Swap page 434 For details of color corrector copy and swap see Copy and Swap Operations page 456 Copying and swapping wipe dat...

Page 439: ... out the copy or swap To undo a copy or swap Press Undo to return to the state before the copy or swap was carried out Copy by Button Operation You can carry out the following copy operations by a simple button operation M E copy Keyer copy Wipe copy DME wipe copy Notes On the CCP 6224 6324 it is not possible to carry out a copy by button operation Basic button operation The basic button operation...

Page 440: ...rol block To copy from M E 1 key 1 to M E 2 key 2 In the key control block M E delegation buttons press M E1 turning it on then hold down the KEY1 button and in the M E 2 independent key transition control block press the KEY2 button Wipe copy button operation Use the WIPE button in the Flexi Pad control block of each M E bank To copy the M E 1 wipe to the M E 2 wipe In the M E 1 Flexi Pad control...

Page 441: ...ontrol from an external device 1 In the menu control block press the top menu selection button MISC then select VF1 Enable and HF1 Port Enable The Misc Enable Port Enable menu appears with the status area showing the settings of the following ports Switcher Remote1 to Remote4 ports RS 422A D sub 9 pin Switcher GPI port parallel 25 pin DME1 DME2 Editor ports RS 422A D sub 9 pin DME1 DME2 GPI ports ...

Page 442: ...elected Notes If effects using the same DME channel are selected simultaneously in two or more regions the DME is selected with the order of precedence P P M E1 M E2 M E3 M E4 Enabling or disabling control from System Manager By installing the BZPS 8000 System Management Software System Manager you can use a computer connected on a network for management of some switcher data and control operation...

Page 443: ...ble to enable control of the preview bus only press PVW Bus Enable in the Control From Plug In Editor group Safe Title Settings Switching the safe title function on or off 1 In the menu control block press the top menu selection button MISC and select VF2 Safe Title The Misc Safe Title menu appears 2 Using any of the following methods select the signal to which the settings apply Directly press th...

Page 444: ...nu selection button MISC then select VF3 Transition The Misc Transition menu appears About the Transition menu display The display of the independent key transition rate in the Misc Transition menu depends on the selection in the Key Transition group of the Engineering Setup Switcher Transition menu for each of the M E and PGM PST banks When Same On direction and Off direction settings the same is...

Page 445: ...n the Transition Rate group press Key K1 K4 To insert on or remove off keys individually press Key On K1 K4 or Key Off K1 K4 3 Turn the knobs to set the number of frames To set the fade to black transition rate in the Transition menu 1 In the Misc Transition menu press FTB 2 Turn the knob to set the number of frames Knob Parameter Adjustment Setting values 1 Transition Rate Transition rate 0 to 99...

Page 446: ...to scroll the reverse video cursor Turn the knob to make the setting 2 Press Video Process turning it on 3 Adjust the following parameters To return adjustment values to their defaults press Unity Knob Parameter Adjustment Setting values 1 AUX Bus AUX bus selection 1 to 48 Knob Parameter Adjustment Setting values 1 Video Gain Video signal gain 200 00 to 200 00 2 Y Gain Luminance signal gain 200 00...

Page 447: ... button STATS in the menu control block This selects VF1 DME Status and the Status menu appears For each DME channel you can see how the DME is being used in the corresponding operation block The display background color also indicates the following differences in the way in which a DME is being used Blue The DME is currently being used in other than the final program output Red The DME is current...

Page 448: ... VF1 Router Control and HF1 Router Control The following menu appears and the left side of the status area shows a list for destination assignments If in the Assign RTR Mode Setting menu Inhibit is set to On for a destination the corresponding line appears in gray Also if PROT protect is set to ON for a source using a BKSR3xxx or R1xxx series Router remote control a padlock icon appears The right ...

Page 449: ...ck for Router Control in Chapter 19 Volume 3 1 Press Change Xpt The Router Router Control Router Control Change Xpt menu appears Destination Select buttons appear in groups of 16 Source Select buttons appear by group maximum 24 buttons 2 Press one of the Destination Select buttons to select the destination for which you want to switch the source To change the group Press one of the 1 16 17 32 33 4...

Page 450: ... Signal For each signal input to the switcher you can set video process on or off and set the parameters Video Gain Y Gain C Gain Hue Delay and Black Level in the Setup menu For details of the settings see Signal Input Settings in Chapter 20 Volume 3 Video Process Adjustments on a Particular Bus Buses to which the adjustments apply For each of the following buses you can switch video process adjus...

Page 451: ...justments for each input signal The parameters saved are as follows VIDEO GAIN Y GAIN BLACK LEVEL C GAIN HUE DELAY Switch the video process memory on or off in the Setup menu For details of setting operations see Settings Relating to Keys Wipes Frame Memory and Color Correction Key Wipe FM CCR Menu in Chapter 20 Volume 3 Applicable bus Menu used for operation See page M E 1 to M E 3 banks Key fill...

Page 452: ... settings for an AUX bus page 446 Overview of video process Video Process page 450 This section describes an example on the background A bus of the M E 1 bank For the background B bus or utility bus 1 or 2 make the adjustment with a similar procedure Making video process settings for each bus 1 In the menu control block press the top menu selection button M E1 and select VF7 Misc and HF2 Video Pro...

Page 453: ...453 Chapter 9 Color Corrector ...

Page 454: ...uses to AUX delegation buttons There are two inputs for capturing material to the color corrector the CCR1 bus and the CCR2 bus For details of the input assignment operation see Auxiliary Bus Control Block Settings Aux Assign Menu in Chapter 19 Volume 3 Signal format When the color corrector output is selected When the color corrector output is not selected 3M E system 4M E system 5M E system 4M E...

Page 455: ...als of the switcher selectable by a setting in the Setup menu For details see Selecting the Bank to Make the Settings in Chapter 20 Volume 3 Selecting the color corrector output signal By assigning the signal output from the color corrector to a cross point button you can make that signal available on that button For details of the assignment process see Cross Point Settings Xpt Assign Menu in Cha...

Page 456: ...ir defaults 1 In the CCR group press Unity A confirmation message appears 2 Press Yes This returns all color corrector settings to their defaults whether CCR is on or off Copy and Swap Operations Copying color corrector data 1 In the CCR menu press VF3 Copy Swap The Copy Swap menu appears The status area shows a copy source list on the left and a copy destination list on the right 2 Using any of t...

Page 457: ...procedure described in the previous item Copying color corrector data In step 3 press Swap instead of Copy To undo copy or swap In the Copy Swap menu press Undo The state before carrying out the copy or swap is restored Knob Parameter Adjustment Setting values 1 Left No Select copy source data 1 or 2 2 Right No Select copy destination data 1 or 2 ...

Page 458: ...ustment of the C signal Hue delay Black level adjustment To apply input video processing effects use the following procedure 1 In the CCR menu press VF1 CCR1 and HF1 Input Process The Input Process menu appears 2 In the Input Process group press Input Process turning it on 3 Adjust the following parameters To return the parameters to their default settings Press Unity in the Input Process group Kn...

Page 459: ...tion of the maximum point of the gamma curve It is also possible to mask part of the region to be corrected Applying primary color correction 1 In the CCR menu press VF1 CCR1 and HF2 Primary CCR The Primary CCR menu appears 2 In the Primary CCR group press Primary CCR turning it on 3 In the Primary CCR Adjust group select the setting item Black black balance adjustment White white balance adjustme...

Page 460: ...n the Secondary CCR menu linked to this setting it automatically changes from Mask 2 to Mask 1 3 Press Mask1 Adjust Knob Parameter Adjustment Setting values 1 Red Red signal adjustment 100 00 to 100 00 2 Green Green signal adjustment 100 00 to 100 00 3 Blue Blue signal adjustment 100 00 to 100 00 4 All Simultaneous RGB adjustment Red value is shown Knob Parameter Adjustment Setting values 1 Red Re...

Page 461: ... pattern as a mask source set the pattern modifiers as required When turning Position on and setting the pattern position Knob Parameter Adjustment Setting values 1 Top Top position 100 00 to 100 00 2 Left Left position 100 00 to 100 00 3 Right Right position 100 00 to 100 00 4 Bottom Bottom position 100 00 to 100 00 5 Soft Degree of softness of box 0 00 to 100 00 Knob Parameter Adjustment Setting...

Page 462: ...te a See Speed page 309 7 To invert the mask source return to the Primary CCR menu and press Pri Sec Mask Invrt turning it on Notes The mask function is common to the primary color correction secondary color correction and spot color adjustment functions Knob Parameter Adjustment Setting values 1 H Multi Number of repetitions of pattern horizontally 1 to 63 2 V Multi Number of repetitions of patte...

Page 463: ...ich you want to make the setting 4 Adjust the following parameters To return the parameter settings to their default values In the Secondary CCR group press Unity Masking a part of the secondary color correction Set Mask to On in the Secondary CCR menu then carry out the same operation as described under Masking a part of the primary color correction page 460 Luminance Processing Operations After ...

Page 464: ...n input luminance signal at the 0 level Y lift correction adjusting the curvature of the curve Y dark correction adjusting the position of the maximum point of the curve It is also possible to mask part of the region to be corrected Applying luminance processing 1 In the CCR menu press VF1 CCR1 and HF5 Luminance Process Under Dark point Middle Dark point Bright Middle point Over Bright point Dark ...

Page 465: ...gree of boundary softness of the three regions Knob Parameter Adjustment Setting values 1 White White balance adjustment 0 00 to 200 00 2 Black Black balance adjustment 100 00 to 100 00 3 Y Lift Curvature of curve 100 00 to 100 00 4 Y Dark Position of maximum point of curve 7 31 to 109 59 Knob Parameter Adjustment Setting values 1 Over B Level Luminance level of the Over Bright point 50 00 to 150 ...

Page 466: ...anged you can make the following corrections Video signal overall gain adjustment Y signal gain adjustment Y signal offset adjustment C signal gain adjustment C signal hue adjustment Adjusting the color of the specified region key 1 In the CCR menu press VF1 CCR1 and HF6 Spot CCR Output The Spot CCR Output menu appears 4 Under D Soft Degree of softness at Under Dark point 15 00 to 70 00 Knob Param...

Page 467: ...ically Notes This automatic adjustment does not carry out key gain adjustment If required adjust the key gain as shown in step 6 6 Press Key Adjust and adjust the following parameters 7 Press Window turning it on to adjust the key detection range for spot color adjustment Knob Parameter Adjustment Setting values 1 Position H Horizontal position 100 00 to 100 00 2 Position V Vertical position 100 0...

Page 468: ...t on 2 Adjust the following parameters To return the parameters to their default settings In the Outer Out Proc group press Unity Output Video Processing Operations Carry out the following corrections are available on the YUV signal Video signal overall gain adjustment Y signal gain adjustment Y signal offset adjustment C signal gain adjustment C signal hue adjustment Knob Parameter Adjustment Set...

Page 469: ...e signal Positive clip setting the maximum amplitude in the positive direction of the color difference signal Negative clip setting the maximum amplitude in the negative direction of the color difference signal Applying YUV clip processing 1 In the CCR menu press VF1 CCR1 and HF7 YUV Clip RGB Clip The YUV Clip RGB Clip menu appears 2 In the YUV Clip group press YUV Clip turning it on 3 In the YUV ...

Page 470: ... menu appears 2 In the RGB Clip group press RGB Clip turning it on 3 In the RGB Clip Adjust group select the item you want to adjust Dark dark clip adjustment White white clip adjustment 4 Adjust the following parameters Knob Parameter Adjustment Setting values 1 White Clip White clip adjustment 6 85 to 109 13 2 Dark Clip Dark clip adjustment 6 85 to 109 13 Knob Parameter Adjustment Setting values...

Page 471: ...efault settings In the RGB Clip group press Unity Knob Parameter Adjustment Setting values 1 Red Red signal adjustment 50 00 to 149 99 a 49 99 to 150 00 b 2 Green Green signal adjustment 50 00 to 149 99 a 49 99 to 150 00 b 3 Blue Blue signal adjustment 50 00 to 149 99 a 49 99 to 150 00 b 4 All Simultaneous RGB adjustment Red value is shown ...

Page 472: ...Chapter 9 Color Corrector 472 Color Corrector Functions ...

Page 473: ...473 Chapter 10 Special Functions ...

Page 474: ... side flags when a 4 3 signal is selected in the cross point control block Auto crop setting When carrying out a DME wipe this function automatically crops the image during transition to 4 3 Adjusting the width of the side flag area You can set the left and right sides separately For the operation for the above setting see Settings for Switcher Configuration Config Menu in Chapter 20 Volume 3 Enab...

Page 475: ...ocedure 1 First in the Setup menu assign the rightmost cross point button to the SIDE FLAG button For details of the assignment operation see Cross Point Settings Xpt Assign Menu in Chapter 19 Volume 3 2 Press the SIDE FLAG button at the right end of the background B row of the M E 1 bank The button you pressed lights amber and this enables the side flags Notes The operations of enabling or disabl...

Page 476: ...de flags to the 4 3 video material See Settings for Switcher Configuration Config Menu in Chapter 20 Volume 3 3 Use either of the following methods to turn the side flags on Use the Misc Enable Side Flags menu See page 474 Use a cross point button operation See previous item This adds side flags to the 4 3 video material Wipe Action on Images With Side Flags When a wipe is carried out on an image ...

Page 477: ...e appearance of the 4 3 image changes Notes For signals with the following DME wipe pattern selected on the DME external video bus gray part shown in the pattern illustration side flags are not applied when auto side flags are set to Off Two channel page turn Two channel page roll Two channel frame in out Two channel brick Three channel brick The following illustration shows the action in a DME wi...

Page 478: ... from a 4 3 image to another 4 3 image when side flags are on for both images Wipe action using squeeze No 1031 Auto crop on 4 3 image Side flags on Auto crop off Side flag area 16 9 image Side flag areas Auto crop on 4 3 image Side flags on Auto crop off Side flag areas 4 3 image Side flags on Side flag areas Side flag areas ...

Page 479: ... are required to enter an install key which validates the software If the software has been factory installed the install key is not required For the method of obtaining an install key contact your Sony representative To obtain a key you may be required to submit the unique device ID of the switcher you are using You can check the unique device ID in the Install menu of the switcher For details of...

Page 480: ...re differences from the operations in standard mode For details see Differences Between Multi Program 2 Mode and Standard Mode page 491 Sequence of Operations in Multi Program 2 Basic operation sequence Enter the BZS 8200X install key first time only Set Multi Program 2 operating mode for each switcher bank Assign output signals and set the background configuration key configuration and key previe...

Page 481: ...he key assignment for each output Assigning sub preview output to preview selection buttons in the fade to black control block Changing the matrix size to Standard Making settings for keyframe timeline operation Basic Operations Required Entering the BZS 8200X install key first time only After installing the BZS 8200X Multi Program 2 software in the switcher carry out the following procedure 1 In ...

Page 482: ...difference from standard mode is that OUT1 is fixed set to PGM1 main program and OUT6 is fixed set to PGM2 sub program and that for the OUT2 to OUT5 signals you can assign any signal selected from the following PGM1 PGM2 PGM3 PGM4 PVW1 PVW2 K PVW1 K PVW2 CLEAN SUB CLEAN Notes Each of main and sub can use a maximum of four of the six outputs OUT1 to OUT6 The outputs can be used within the following...

Page 483: ...nal to a switcher output port number For details see Assigning Output Signals in Chapter 20 Volume 3 Assigning main and or sub to switcher banks For each switcher bank for which Multi Program 2 mode is selected set whether this is main dedicated sub dedicated or main and sub shared To assign main and sub to a single switcher bank 1 In the Engineering Setup Panel Config MP2 Main Sub Assign menu sel...

Page 484: ...ction to buttons in the transition control block This applies to the standard type and compact type transition control block and the CCP 6224 6324 control panel For details of the transition control block see page 59 for the standard type or page 104 for the compact type For details of the CCP 6224 2M E control panel see page 107 and for the details of the CCP 6324 3M E control panel see page 107 ...

Page 485: ...button as SUB To assign macro operations to different buttons If in the above operation you assigned a Multi Program 2 function to the macro buttons you can assign the PRE MCRO and POST MCRO functions to different buttons For details see Assigning Functions to User Preference Buttons or Assigning a Function to a Memory Recall Button in the Utility Shotbox Control Block in Chapter 19 Volume 3 Examp...

Page 486: ...the control panel shows the status of main 6 Carry out the transition Both main and sub video images are switched Optional Operations Making cross point settings Cross point assign tables can be set not only for main output but also for sub output You can set cross point assign tables for the following banks M E 1 SUB to M E 4 SUB P P SUB The table actually used is that for which the control panel...

Page 487: ...ibit M E Operation Inhibit menu you can make settings to inhibit key operations on each of the main and sub keyers independently For details see Inhibiting Utility 2 Bus and Key Operations in Chapter 19 Volume 3 Including Multi Program 2 data in recall operations of keyframes and snapshots In the Engineering Setup Switcher Config menu set Recall M E Config to On When a keyframe or snapshot is stor...

Page 488: ...s the settings for key 1 and key 2 and the state of key 3 and key 4 assigned on sub is not affected Assigning sub preview output to preview selection buttons You can assign the sub preview output to a preview selection button in the fade to black control block or downstream key fade to black control block For details see Overall Control Panel Settings Config Menu in Chapter 19 Volume 3 When the Mu...

Page 489: ...ns assigned to the numeric keypad control block or changing the reference region For details see Specifying the Region and Edit Points in Chapter 13 Volume 2 To assign regions shown in the Timeline menu You can select how regions assigned to region selection buttons appear in the Key Frame Timeline menu For details see Settings in the Timeline Menu in Chapter 13 Volume 2 Enabling re entry between ...

Page 490: ...al other than the re entry signal then recall the snapshots Functions Added in Multi Program 2 Mode You can set video processing for the utility 3 bus signal In the control panel and DCU GPI input settings and switcher GPI link settings the actions that can be selected now also include Sub Cut and Sub Auto Trans A switcher GPI link can now be set also for the utility 3 bus To the macro event confi...

Page 491: ...ingle color only Replication can be selected from four patterns Wipes key Same as wipes background for sub DME wipes Use Can be used Cannot be used Can be used with a setting change Patterns for 1 channel Each of main and sub can be used Patterns for 2 channels Only one of main and sub can be used For each M E the number of DMEs that can be used is the same as in standard mode Patterns for 3 chann...

Page 492: ... re entry between the main and sub sides of the same M E bank page 489 In the following cases a transition using the fader lever may not be performed correctly When the main and sub bus toggle modes are set differently For a pattern mix preset color mix and so on For an Internal bus link GPI link or External bus link the Utility 2 bus cannot be selected Screen aspect show key and MCRO ATTCH ENBL b...

Page 493: ... assigned to both main and sub it is uncertain which data will be reflected When recalling a master snapshot with different register numbers for main and sub the recall timing may differ by one field or more between main and sub The link state is maintained even when M E Config is changed Set the link setting again as required Since keys 2 to 4 are shared between main and sub when the main and sub...

Page 494: ...Chapter 10 Special Functions 494 Multi Program 2 ...

Page 495: ...495 Appendix Volume 1 ...

Page 496: ...Appendix Volume 1 496 Wipe Pattern List Wipe Pattern List Standard Wipes ...

Page 497: ...Appendix Volume 1 497 Wipe Pattern List Enhanced Wipes ...

Page 498: ...Appendix Volume 1 498 Wipe Pattern List Rotary Wipes ...

Page 499: ...Appendix Volume 1 499 Wipe Pattern List Mosaic Wipes ...

Page 500: ...Appendix Volume 1 500 Wipe Pattern List ...

Page 501: ...Appendix Volume 1 501 Wipe Pattern List Random Diamond Dust Wipes ...

Page 502: ...Appendix Volume 1 502 DME Wipe Pattern List DME Wipe Pattern List DME Wipe Patterns Available in One Channel Mode Slide Split ...

Page 503: ...Appendix Volume 1 503 DME Wipe Pattern List Squeeze Door ...

Page 504: ...Appendix Volume 1 504 DME Wipe Pattern List 2D trans 3D trans ...

Page 505: ...Appendix Volume 1 505 DME Wipe Pattern List Flip tumble Frame in out ...

Page 506: ...Appendix Volume 1 506 DME Wipe Pattern List Picture in picture Page turn ...

Page 507: ...Appendix Volume 1 507 DME Wipe Pattern List Page roll Mirror ...

Page 508: ...Appendix Volume 1 508 DME Wipe Pattern List Sphere Character trail Wave Ripple ...

Page 509: ...Appendix Volume 1 509 DME Wipe Pattern List Split slide Sparkle Mosaic Defocus ...

Page 510: ...Volume 1 510 DME Wipe Pattern List User programmable DME The illustrations for patterns 1901 to 1999 show an effect register number or register name DME Wipe Patterns Available in Two Channel Mode Slide Squeeze ...

Page 511: ...Appendix Volume 1 511 DME Wipe Pattern List 3D trans Picture in picture ...

Page 512: ...Appendix Volume 1 512 DME Wipe Pattern List Page turn ...

Page 513: ...Appendix Volume 1 513 DME Wipe Pattern List Page roll ...

Page 514: ...Appendix Volume 1 514 DME Wipe Pattern List Brick Frame in out User programmable DME The illustrations for patterns 2901 to 2999 show an effect register number or register name ...

Page 515: ...ix Volume 1 515 DME Wipe Pattern List DME Wipe Patterns Available in Three Channel Mode Brick User programmable DME The illustrations for patterns 3901 to 3999 show an effect register number or register name ...

Page 516: ...Appendix Volume 1 516 Resizer DME Wipe Pattern List Resizer DME Wipe Pattern List Slide Squeeze ...

Page 517: ...Appendix Volume 1 517 Resizer DME Wipe Pattern List Frame in out ...

Page 518: ...ss the menus Menu control block Some menus can also be accessed by pressing other buttons twice in rapid succession For more details see Menu Organization page 113 Notes Some menus may not appear depending on the model M E 1 to M E 4 Menus The functions in the M E 1 M E 2 M E 3 and M E 4 menus are the same but the menu page numbers are distinguished as follows Top menu selection buttons ...

Page 519: ...s examples M E 1 M E 2 and M E 3 buttons The functions in the Key 2 to Key 8 menus are the same as those in the Key 1 menu with the following menu page numbers Key 2 menu 112x Key 3 menu 113x Key 4 menu 114x Key 5 menu 151x Key 6 menu 152x Key 7 menu 153x Key 8 menu 154x to next page a For VF1 to VF4 either of the groups Key1 to Key4 and Key5 to Key8 appears ...

Page 520: ...Appendix Volume 1 520 Menu Tree M E 1 M E 2 and M E 3 buttons a In Multi Program 2 mode the menus for sub are displayed with 400 higher numbers than the aboves for main to previous page ...

Page 521: ...SK 8 menus are the same as those in the DSK 1 menu with the following menu page numbers DSK 2 menu 142x DSK 3 menu 143x DSK 4 menu 144x DSK 5 menu 181x DSK 6 menu 182x DSK 7 menu 183x DSK 8 menu 184x to next page a For VF1 to VF4 either of the groups Key1 to Key4 and Key5 to Key8 appears ...

Page 522: ...Appendix Volume 1 522 Menu Tree P P button a In Multi Program 2 mode the menus for sub are displayed with 400 higher numbers than the aboves for main to previous page ...

Page 523: ...Appendix Volume 1 523 Menu Tree Frame Memory Menu FRAME MEM button ...

Page 524: ...Appendix Volume 1 524 Menu Tree Color Bkgd Menu AUX Menu COLOR BKGD button AUX button ...

Page 525: ...Appendix Volume 1 525 Menu Tree CCR Menu CCR button ...

Page 526: ...Appendix Volume 1 526 Menu Tree Copy Swap Menu Misc Menu COPY SWAP button MISC button ...

Page 527: ...Appendix Volume 1 527 Menu Tree Status Menu STATS button ...

Page 528: ...Appendix Volume 1 528 Menu Tree DME Menu DME button ...

Page 529: ...Appendix Volume 1 529 Menu Tree Global Effect Menu Device Menu GLB EFF button DEV button ...

Page 530: ...Appendix Volume 1 530 Menu Tree Macro Menu MCRO button ...

Page 531: ...Appendix Volume 1 531 Menu Tree Key Frame Menu KEY FRAME button ...

Page 532: ...Appendix Volume 1 532 Menu Tree Effect Menu EFF button ...

Page 533: ...Appendix Volume 1 533 Menu Tree Snapshot Menu SNAPSHOT button ...

Page 534: ...Appendix Volume 1 534 Menu Tree Shotbox Menu SHOTBOX button ...

Page 535: ...Appendix Volume 1 535 Menu Tree File Menu FILE button ...

Page 536: ...Appendix Volume 1 536 Menu Tree Engineering Setup Menu ENG SETUP button to following pages ...

Page 537: ...Appendix Volume 1 537 Menu Tree to pages after 539 to previous pages to next page ...

Page 538: ...Appendix Volume 1 538 Menu Tree to following pages to previous pages ...

Page 539: ...Appendix Volume 1 539 Menu Tree to previous pages ENG SETUP button to next page ...

Page 540: ...Appendix Volume 1 540 Menu Tree to previous pages ENG SETUP button ...

Page 541: ...Appendix Volume 1 541 Menu Tree Diagnostic Menu DIAG button ...

Page 542: ...elegation buttons 7321 29 Assigning Functions to Key Control Block Buttons Engineering Setup Panel Config Link Program Button Key Control Module Button Assign menu Device control block Region selection buttons 7321 17 Assigning Functions to the Device Control Block Engineering Setup Panel Config Link Program Button Joystick Trackball Module menu Numeric keypad control block Region selection button...

Page 543: ... buttons 7321 7 Assigning Functions to the Buttons in the Multifunction Flexi Pad Control Block Engineering Setup Panel Config 10 Key Region Assign menu Control block Button Menu number Reference in User Guide Control Panel Setup Panel and Cross Point Settings Xpt Assign Menu in Chapter 19 Volume3 ...

Page 544: ...utton 7322 1 Creating Cross Point Assign Tables Setting the action of the SHIFT button in the cross point controlblock Engineering Setup Panel Xpt Assign Table Button Assign menu Key Control Block Delegation button 7321 29 Assigning Functions to Key Control Block Buttons Engineering Setup Panel Config Link Program Button Key Control Module Button Assign menu Transition control block standard type ...

Page 545: ...nel Config DSK Fader Assign menu Downstream key fade to black control block Key delegation buttons 7321 14 Assigning Keys to the DSK1 and DSK2 Buttons in the Downstream Key Fade to Black Control Block Engineering Setup Panel Config Link Program Button DSK FTB Module menu Device control block joystick Operating buttons 7321 31 Selecting the Module to be the Reference for Device Control Block Menu E...

Page 546: ...ss the KEY1 5 button This selects keys 1 and 5 simultaneously Selecting Input Signals for Keys 5 to 8 in the Cross Point Control Block Buttons used for selection of keys 5 to 8 For the positions of the following buttons in the cross point control block see page 55 a Button previously assigned in the Setup menu to selection of keys 5 to 8 To select the key 5 fill signal 1 Turn on the dedicated SHIF...

Page 547: ...Appendix Volume 1 547 Using Keys 5 to 8 3 Select the signal in the key 1 row Notes On an M E 4 bank only premium inputs can be used as key signals ...

Page 548: ...Appendix Volume 1 548 Using Keys 5 to 8 ...

Page 549: ...for use by the purchasers of the equip ment described in this manual Sony Corporation expressly prohibits the duplication of any portion of this manual or the use thereof for any pur pose other than the operation or maintenance of the equipment described in this manual without the express written permission of Sony Corporation ...

Page 550: ...MVS 8000X System SY 4 177 901 02 1 2010 Sony Corporation ...

Page 551: ...MVS 8000X System With CCP 8000 Series Center Control Panel User s Guide Multi Format Switcher System Volume 2 English 1st Edition Revised 1 Software Version 10 00 and Later ...

Page 552: ...F MERCHANTABILITY OR FITNESS FOR ANY PARTICULAR PURPOSE WITH REGARD TO THIS MANUAL THE SOFTWARE OR SUCH OTHER INFORMATION IN NO EVENT SHALL SONY CORPORATION BE LIABLE FOR ANY INCIDENTAL CONSEQUENTIAL OR SPECIAL DAMAGES WHETHER BASED ON TORT CONTRACT OR OTHERWISE ARISING OUT OF OR IN CONNECTION WITH THIS MANUAL THE SOFTWARE OR OTHER INFORMATION CONTAINED HEREIN OR THE USE THEREOF Sony Corporation r...

Page 553: ...553 Chapter 11 DME Operations ...

Page 554: ...VE 9000 is a Digital Multi Effects with multi format support An optional input output board MKE 9021M is available as a dedicated interface for use of the MVE 9000 together with an MVS 8000 series switcher Three Dimensional Transformations Transformation is the process of placing a video image in a three dimensional DME coordinate space and subjecting it to manipulations such as movement rotation ...

Page 555: ...dinate space Movement along the x axes of the source coordinate space and target coordinate space Local coordinate space and global coordinate space The coordinates of an individual DME channel are called its local coordinate space The coordinates common to all channels are called the global coordinate space By switching from local to global coordinate space you can add new movement to the movemen...

Page 556: ... aspect ratio of your monitor 4 3 or 16 9 Values for 4 3 mode Origin at center of image source coordinate space or center of monitor target coordinate space x 0 00 y 0 00 z 0 00 Upper right corner of image or monitor When using SD format signals x 4 00 y 3 00 z 0 00 When using HD format signals x 12 00 y 9 00 z 0 00 Lower left corner of image or monitor When using SD format signals x 4 00 y 3 00 z...

Page 557: ...er of image or monitor When using SD format signals x 4 00 y 2 25 z 0 00 When using HD format signals x 16 00 y 9 00 z 0 00 Lower left corner of image or monitor When using SD format signals x 4 00 y 2 25 z 0 00 When using HD format signals x 16 00 y 9 00 z 0 00 x axis z axis y axis y axis z axis The plus direction on the z axis is depth into the image or monitor screen a The value in parentheses ...

Page 558: ...nal transformation parameters Location XYZ HD format 999 9999 to 999 9999 SD format 4 3 333 3333 to 333 3333 16 9 250 0000 to 250 0000 Rotation Spin 999 9999 to 999 9999 Axis Location HD format 999 9999 to 999 9999 SD format 4 3 333 3333 to 333 3333 16 9 250 0000 to 250 0000 Location Size 0 0000 to 999 9999 Aspect 0 0000 to 2 0000 Perspective x y HD format 999 9999 to 999 9999 SD format 4 3 333 33...

Page 559: ...If required you can return the current value to the defaults by pressing the CTR page 569 button in the device control block twice in rapid succession The following table shows the default parameter values for each transformation operation mode Resetting of parameter values set in the source coordinate space In some transformation operation modes if you switch to the target coordinate space after ...

Page 560: ...ansformation Operation Modes The following operation modes are available for three dimensional DME transformations These operations are carried out in the device control block trackball or joystick For details see Three Dimensional Transformation Operations page 567 Location XYZ Moves the image on the x axis y axis or z axis The direction of movement differs depending on whether you are manipulati...

Page 561: ...chieve the kind of rotation around an axis that you want Combining Rotation mode with Spin mode creates an effect that rotates the image around a specified axis The type of rotation differs depending on whether you are manipulating the image in the source coordinate space or the target coordinate space The way the image rotates around an axis is the same as in Rotation mode Axis Location Moves an ...

Page 562: ...phasizes the sense of perspective Because shrinking and magnification of the image in the target coordinate space is a conversion of the two dimensional image displayed on the monitor shrinking and magnification does not change the shape of the image Magnification and shrinking in the source coordinate space Magnification and shrinking in the target coordinate space Movement on the x axis Movement...

Page 563: ...he image The x axis and y axis values define the position of the view point The z axis value defines its distance from the image Skew In the source coordinate space change the skew of the image on the x axis or y axis Change of aspect ratio in x axis direction Change of aspect ratio in y axis direction Simultaneous change aspect ratio in x axis direction and y axis direction Change of view point o...

Page 564: ... This is a three dimensional display of coordinates in local or global coordinate space You can check the origin of the axes and the directions of the x y and z axes Channel ID This displays the channel number so that you can check which channel you are using a useful feature when you are working with multiple channels Channel IDs are displayed differently in local and global coordinate space In l...

Page 565: ... space The range displayed on a normal monitor screen is indicated by a frame To automatically erase the graphic display Turn Auto Erase on The graphic display is erased automatically whenever a keyframe is executed It is displayed again after the keyframe ends after the time set in Recovery Time Flex Shadow center axis When using the Flex Shadow function see page 608 turn Flex Shadow Axis on to d...

Page 566: ...three dimensional parameter list for the currently controlled image When more than one DME channel is selected the status of the reference channel is displayed For the method of displaying a parameter list and an example display see Viewing the three dimensional parameter details page 573 ...

Page 567: ...ME transformations For details of three dimensional DME coordinate space see Three Dimensional Transformations page 554 Basic Operations This section explains how to use the device control block trackball to carry out three dimensional transformations Device control block trackball Function assignment buttons Operating buttons Z ring Region selection buttons DME1 to 8 Trackball ...

Page 568: ...TRGT button is lit pressing this button enables the trackball to control the perspective of the image in the x axis and y axis directions The Z ring controls the distance to the viewpoint LOC location SIZE When this button is lit the Z ring controls the image size The trackball moves the image in the x axis and y axis directions LOC location XYZ When this button is lit the trackball moves the imag...

Page 569: ...oordinate space TRGT button Selects the target coordinate space SRC and TRGT cannot be selected at the same time 3 Press the button for the operation you want to do turning it on to select the transformation mode The trackball and Z ring are assigned to the selected three dimensional coordinate space transformation mode For details of the three dimensional transformation operation modes see Transf...

Page 570: ...ring To change the perspective on the image With the TRGT button selected in step 2 press the ASP PERS button turning it on You can change the perspective of the image on the x and y axes with the trackball and change the distance to the view point with the Z ring To change the skew of the image With the SRC button selected in step 2 press the ASP PERS button turning it on while holding down the S...

Page 571: ...sformation to a specific axis press the X Y or Z button tuning it on This enables the trackball and Z ring operations on the selected axis only Functions assignable to trackball and Z ring operations Button Usable coordinate space Trackball x direction Trackball y direction Z ring LOC XYZ Source target Move image on x axis Move image on y axis Move image on z axis ROT Source target Rotate image on...

Page 572: ...shows the parameters for the reference channel When both Global and Local are selected the three dimensional parameters are shown for the channel the reference channel for which the button is lit green ASP PERS Source Change aspect ratio on x axis Change aspect ratio on y axis Change aspect ratio on x and y axes simultaneously Target Shift view point on x axis Shift view point on y axis Change dis...

Page 573: ...left part of the screen The Status menu appears This menu shows the three dimensional parameters for the DME reference channel currently selected in the device control block Type of three dimensional space a Operation mode for three dimensional transforms b Value of X Value of Y Value of Z a This shows one of Local Target Local Source Global Target and Global Source b This shows one of Loc XYZ Loc...

Page 574: ...nter them directly from the numeric keypad control block Entering three dimensional parameter values 1 In the device control block press the X Y or Z button turning it on The numeric keypad control block enters a mode in which you can enter parameters for the selected axis 2 Enter a parameter value with the numeric keypad The number of significant digits after a decimal point is 4 3 Press the ENTE...

Page 575: ... the three dimensional transform parameters in the working buffer press the CLR WORK BUFR button in the device control block To clear all of the parameters in the working buffer and initialize the DME system press the CLR WORK BUFR button twice in rapid succession It is necessary to do this for both the local coordinate space and global coordinate space As the initial DME state you can specify whe...

Page 576: ...want to shrink the graphics display to show the range not displayed on a normal monitor turn Scale on and set the following parameters As the value of the setting grows the monitor shrinks further toward the center point 6 To automatically erase the graphic display while the keyframes are executing press Auto Erase turning it on and then set the following parameter Outputting graphics to the monit...

Page 577: ...nd the imaginary view point can wrap around and show on the other side The wrapped around portion is referred to as a virtual image Using the DME menu you can make a setting not to show the virtual images Canceling virtual images 1 In the DME menu select VF6 Input Output and HF2 Video Key The Video Key menu appears 2 Press Wrap Around turning it on The virtual image disappears Wrap Around on Virtu...

Page 578: ...onal Differences With Models of DME page 1014 Special Effects Edge effects Name Effect Image Border See page 593 Adds a border to the image frame You can adjust the width or thickness of the border its color and the softness of the border edges Crop See page 595 Crops away the edges of the image You can crop the top bottom left and right sides individually or all together You can also soften the c...

Page 579: ...dge See page 597 Gives an image a beveled edge You can set the edge width and color The inner edge softness and edge boundary softness can also be set Key Border See page 599 Adds borders to keys or gives a key consisting of an outline only Name Effect Image Color Lights ...

Page 580: ...uter side of the input image The following items can be set Art edge width and position Separate softening of the art edge inner and outer sides Color of art edges Examples of Art Edge source Name Effect Image Gradation Matte Radial Gradation Rainbow Matte Radial Rainbow Examples of Art Edge source Rainbow Matte ...

Page 581: ...xternal Generate shadow using input key signal Internal Generate shadow using an internally generated full size DME key signal Shadow shrinking and magnification Shadow position Shadow color and density Center axis of deformation Shadow slant and perspective Wipe Crop See page 615 Crops the video image to be visible inside or outside a wipe pattern Name Effect Image Rainbow Matte Radial Rainbow Ba...

Page 582: ... See page 623 Shrinks the image and lines up a number of copies vertically and horizontally You can specify the center point of the shrinking the shrinking ratio and the aspect ratio of the image screen Name Effect Image Sepia See page 624 Overlays a specified color onto the image You can adjust the sepia color that is overlaid and specify the degree of mixing between the original image and the se...

Page 583: ...chroma of the image Mosaic See page 628 Divides the image into small tiles so that it looks like a mosaic You can specify the size and aspect ratio of the tiles Mask See page 634 Masks part of the picture so that special effects are applied only inside a selected pattern Name Effect Image MASK NORMAL MASK INVERT Video image Effect video image Mosaic Video image Effect video image Mosaic ...

Page 584: ...a metallic gloss like that from gold silver or a rainbow colored surface A metallic gloss can also be given to a freely selected color Dim and Fade See page 632 The Dim effect makes the image darker as it recedes into the distance The Fade effect makes the image fade into the background as it recedes into the distance Glow See page 633 Softens the edges of highlights giving an effect like being st...

Page 585: ... 637 Nonlinear effects Name Effect Image Wave See page 639 Produces a wave like effect in the image Mosaic Glass See page 644 Makes the image rougher and finer at a specified interval Flag See page 644 Applies an effect like a flag waving in the wind Twist See page 645 Twists the image Ripple See page 646 Applies an effect like ripples moving across the image ...

Page 586: ...ass with shards flying outward Flying Bar See page 652 Divides the image into bars which peel off in two blocks as they move Blind See page 652 Divides the image into bars or wedges with blocks rotating like the slats of venetian blinds Split See page 653 Splits the image upper and lower left and right Split Slide See page 654 Divides the image into bars which slide alternately in reverse directio...

Page 587: ... Divides the image into originals and reflections lining them up vertically and horizontally Kaleidoscope See page 657 Creates an image like a view into a kaleidoscope Lens See page 658 Creates an image like a view through a lens Circle See page 660 Makes a circle with the image Panorama See page 660 Curves the upper and lower edges of the image to emphasize the sense of perspective Name Effect Im...

Page 588: ...a turning page Roll See page 662 Rolls the image up Cylinder See page 662 Winds the whole image onto a cylinder Sphere See page 663 Winds the whole image onto a sphere Explosion See page 663 Divides the image into fragments which expand as they fly out Swirl See page 665 Swirls the image Name Effect Image ...

Page 589: ... 667 Extends the edge of the image like a trail Name Effect Image Corner Pinning See page 668 Provides the effect of inserting the foreground in the background allowing the four corners to be positioned freely so that the image fills the quadrilateral outlined by the corners Name Effect Image Background Corner Pinning when Crop Link is on Foreground in cropped state ...

Page 590: ...tes the effect of a spotlight striking the surface of the image Name Effect Image Trail See page 677 Recursively freezes the input video at regular intervals so that a trail of afterimages is created You can make the afterimages stardust trails Motion Decay See page 681 Blurs the motion of a moving video by creating afterimages of the moving video You can make the afterimages stardust trails Norma...

Page 591: ...see page 706 Front and back sides Signal inversion Invert effect Inverts the input video signal and or key signal horizontally or vertically You can make separate settings for the front and back see page 706 Keyframe Strobe See page 683 Freezes the video each time the effect passes a keyframe You can make the afterimages stardust trails Wind See page 685 Strobes the image at regular intervals and ...

Page 592: ...on of two colors with a pattern generator This color mix signal can be used to fill parts such as a background or border see page 619 Operations Common to All DME Special Effects In this section explanations of the operating procedures for individual special effects begin with selections from the DME menu The following are common operations that you must do prior to selecting from the DME menu 1 I...

Page 593: ... follows 4 3 mode Parameter group 1 2 Knob Parameter Adjustment Setting values 1 H Border width on left and right sides Left value shown 2 V Border width on top and bottom sides Top value shown 3 All Border width on all sides Left value shown 5 Density Border density 0 00 to 100 00 Parameter group 2 2 Knob Parameter Adjustment Setting values 1 Top Border width on top side 6 00 to 6 00 SD 18 00 to ...

Page 594: ...rs Parameter group 1 2 Knob Parameter Adjustment Setting values 1 H Border width on left and right sides Left value shown 2 V Border width on top and bottom sides Top value shown 3 All Border width on all sides Left value shown 5 Density Border density 0 00 to 100 00 Parameter group 2 2 Knob Parameter Adjustment Setting values 1 Top Border width on top side 4 50 to 4 50 SD 18 00 to 18 00 HD 2 Left...

Page 595: ...opping with the knobs 3 Set the parameters The valid ranges of the parameter values depend on the combination of signal format SD HD and aspect ratio 4 3 16 9 selected in the system as follows 4 3 mode Knob Parameter Adjustment Setting values 1 Luminance Luminance 0 00 to 100 00 2 Saturation Saturation 0 00 to 100 00 3 Hue Hue 359 99 to 0 00 Knob Parameter Adjustment Setting values 1 Soft Softness...

Page 596: ...ght Crop position on right side 4 00 to 4 00 SD 12 00 to 12 00 HD 4 Bottom Crop position on bottom side 3 00 to 3 00 SD 9 00 to 9 00 HD Parameter group 1 2 Knob Parameter Adjustment Setting values 1 H Crop positions on left and right sides Left value shown 2 V Crop positions on top and bottom sides Top value shown 3 All Crop positions on all sides Left value shown Parameter group 2 2 Knob Paramete...

Page 597: ...t Crop Set an axis of symmetry at the center of the input video and invert only the desired area of video horizontally and vertically around that axis of symmetry The order of effect application is Invert Crop Beveled Edge Settings Applying a beveled edge 1 In the DME menu select VF1 Edge and HF2 Beveled Edge The Beveled Edge menu appears 2 Press Beveled Edge turning it on This enables the beveled...

Page 598: ...of H shown Knob Parameter Adjustment Setting values 1 H Simultaneously adjust width of left and right edges 0 00 to 4 00 SD 0 00 to 16 00 HD 2 V Simultaneously adjust width of top and bottom edges 0 00 to 2 25 SD 0 00 to 9 00 HD 3 All Simultaneously adjust width of all four edges Value of H shown Knob Parameter Adjustment Setting values 1 Top Adjust luminance of top edge 100 00 to 100 00 2 Left Ad...

Page 599: ... Edge and HF3 Key Border The Key Border menu appears 2 Press Key Border turning it on This enables key borders and you can now use the knobs to adjust the parameters Notes The key border function and Glow function see page 633 cannot be turned on at the same time Only the one most recently turned on is effective 3 Set the following parameters Knob Parameter Adjustment Setting values 1 Inner Soft S...

Page 600: ...es and you can now use the knobs to adjust the parameters Notes The Defocus Blur Key Border and Glow effects cannot be applied to the Art Edge sections Knob Parameter Adjustment Setting values 1 H Simultaneously adjust width of left and right key borders 0 00 to 100 00 2 V Simultaneously adjust width of top and bottom key borders 0 00 to 100 00 3 All Simultaneously adjust width of all four key bor...

Page 601: ...meter group 2 2 Knob Parameter Adjustment Setting values 1 Top Width of top edge 0 00 to 6 00 SD 0 00 to 18 00 HD 2 Left Width of left edge 0 00 to 8 00 SD 0 00 to 24 00 HD 3 Right Width of right edge 0 00 to 8 00 SD 0 00 to 24 00 HD 4 Bottom Width of bottom edge 0 00 to 6 00 SD 0 00 to 18 00 HD 5 Density Density of edges 0 00 to 100 00 Parameter group 1 2 Knob Parameter Adjustment Setting values ...

Page 602: ...100 00 Parameter group 2 2 Knob Parameter Adjustment Setting values Knob Parameter Adjustment Setting values 1 Top Position of top edge 3 00 to 3 00 SD 9 00 to 9 00 HD 2 Left Position of left edge 4 00 to 4 00 SD 12 00 to 12 00 HD 3 Right Position of right edge 4 00 to 4 00 SD 12 00 to 12 00 HD 4 Bottom Position of bottom edge 3 00 to 3 00 SD 9 00 to 9 00 HD 5 All Adjust the position of all four e...

Page 603: ...into Color 2 on the outer side according to the shape of the art edge Radial Rainbow The hue of Color 1 on the inner side changes into Color 2 on the outer side according to the shape of the art edge Example Moving the right edge position in the minus direction Art edge portion Position before moving Position after moving Moving in the minus direction Knob Parameter Adjustment Setting values 1 Inn...

Page 604: ...lows 4 3 mode 16 9 mode Flat Color Gradation Matte Rainbow Matte Radial Gradation Radial Rainbow Rainbow Gradation Knob Parameter Adjustment Setting values 1 H Position of gradation border in horizontal direction 8 00 to 8 00 SD 24 00 to 24 00 HD 2 V Position of gradation border in vertical direction 6 00 to 6 00 SD 18 00 to 18 00 HD 3 Soft Softness of gradation border region 0 00 to 100 00 Knob P...

Page 605: ...ss of gradation border region 0 00 to 100 00 Knob Parameter Adjustment Setting values 1 H Position of gradation border in horizontal direction 8 00 to 8 00 SD 24 00 to 24 00 HD 2 V Position of gradation border in vertical direction 6 00 to 6 00 SD 18 00 to 18 00 HD 3 RBW Soft Softness of rainbow border region 0 00 to 100 00 4 GRD Soft Softness of gradation border region 0 00 to 100 00 Knob Paramet...

Page 606: ...p 2 Adjust the following parameters Color 1 settings Color 2 settings Notes Color 2 cannot be set when Flat Color is selected in the Art Edge Source group Position determined by H and V values When Angle see step 3 is 0 Determined by the value of Angle see step 3 Border Knob Parameter Adjustment Setting values 1 Luminance Luminance 0 00 to 100 00 2 Saturation Saturation 0 00 to 100 00 3 Hue Hue 35...

Page 607: ...or 2 is 540 00 the relationship is as shown below with the hue changing within the Hue Offset range of Color 1 and Color 2 Rounding art edge corners Press Round Corner turning it on The art edge corners on the inner and outer sides are rounded Notes This function is available only when Soft is on Knob Parameter Adjustment Setting values 1 Luminance Luminance 0 00 to 100 00 2 Saturation Saturation ...

Page 608: ...lected Applying a flex shadow 1 In the DME menu select VF1 Edge and HF5 Flex Shadow The Flex Shadow menu appears 2 Press Flex Shadow turning it on This enables flex shadows and you can now use the knobs to adjust the parameters Notes The Flex shadow function cannot be enabled when the following functions are enabled Any nonlinear effect Brick Shadow 3 Adjust the following parameters The valid rang...

Page 609: ...external video signal input to the Ext IN connector 6 Only if Flat Color is selected in step 5 adjust the following parameters Adjusting the size of the flex shadow 1 In the Flex Shadow menu press Size turning it on 4 Soft a Softness of shadow 0 00 to 100 00 5 Density Density of shadow 0 00 to 100 00 Knob Parameter Adjustment Setting values Knob Parameter Adjustment Setting values 1 H Move shadow ...

Page 610: ...Setting values 1 Size H Enlarge or shrink horizontally 0 00 to 2 00 2 Size V Enlarge or shrink vertically 0 00 to 2 00 3 Size All Enlarge or shrink horizontally and vertically Value of Size H shown 4 Soft a Softness of shadow 0 00 to 100 00 5 Density Density of shadow 0 00 to 100 00 Knob Parameter Adjustment Setting values 1 Axis Loc H Move the shadow center axis horizontally 8 00 to 8 00 SD 24 00...

Page 611: ...the following parameters When the default Axis Loc setting is used Picture Flex shadow Axis Loc position Shadow skewed with Axis Loc set at the lower left corner of the picture Shadow size and perspective adjusted with default Axis Loc setting Shadow skewed with Axis Loc set at the midpoint on the left edge of the picture Axis Loc H Axis Loc V Knob Parameter Adjustment Setting values 1 Skew H Skew...

Page 612: ... Loc V set with Axis Loc V Invert the shadow in the vertical direction The inversion is applied around the axis of the knob 1 parameter Axis Loc H set with Axis Loc Setting a combine shadow When there are several images adds a flex shadow in the depth of an image or overlays multiple flex shadows Perspective H 100 Perspective H 100 Perspective V 100 Perspective V 100 Picture When H is enabled When...

Page 613: ...nabled on both of two channels Combine shadow is enabled Density is set to 100 00 Combine shadow is enabled Density is set to 0 00 Shadow Shadow No combine shadow is set Video Video Example 2 Flex Shadow is enabled on one channel only Combine shadow is enabled Density is set to 100 00 Combine shadow is enabled Density is set to 0 00 Shadow No combine shadow is set ...

Page 614: ...tern creation will be explained using the following pattern as an example 1 Press Flex Shadow turning it on 2 In the Flex Shadow group select External 3 Turn Axis Loc on and use knob 2 to set the Axis Loc V parameter so that the center of the flex shadow deformation is at the bottom of the picture For HD format and 16 9 mode Axis Loc V 9 00 The following steps will be easier if you display the fle...

Page 615: ...o turn brick off In the Shaped Video group of the Video Key menu when Output is off unless you set Bkgd in the HF1 Bkgd menu to on the wipe crop effect will not function Applying the wipe crop effect To select the pattern 1 In the DME menu select VF1 Edge and HF6 Wipe Crop The Wipe Crop menu appears 2 Press Wipe Crop turning it on 3 Press Pattern Select The Pattern Select menu appears 4 From the d...

Page 616: ...e group varies with the Size setting To invert the regions of the cropping In the Wipe Crop menu press Invert turning it on Setting the aspect ratio of the wipe crop pattern Aspect 1 In the Wipe Crop menu press Aspect turning it on 2 Set the following parameter Knob Parameter Adjustment Setting values 1 H Horizontal position 8 00 to 8 00 2 V Vertical position 6 00 to 6 00 a 4 50 to 4 50 b 3 Size P...

Page 617: ... 00 represents a speed of four whole turns counterclockwise per second and 100 00 represents a speed of four whole turns clockwise per second 0 00 is the stationary state Applying modulation to the wipe crop pattern Modulation 1 In the Modulation group of the Wipe Crop menu select one of the following H horizontal modulation Modulate the pattern to apply waving in the horizontal direction V vertic...

Page 618: ...of the following Border border Soft soft edge Soft Border soft border 2 Depending on the selection in step 1 set the following parameters When Border is selected 2 Frequency Frequency of modulation 0 00 to 100 00 3 Speed Speed of waves 100 00 to 100 00 Knob Parameter Adjustment Setting values Knob Parameter Adjustment Setting values 1 H Multi Number of repetitions of pattern horizontally 1 to 63 2...

Page 619: ...r 2 see the next section Color Mix Settings Ext Video an external video signal input to the Ext IN connector 2 When Flat Color is selected in step 1 only adjust the following parameters Color Mix Settings Notes The color mix function is not supported on the MVE 8000A Knob Parameter Adjustment Setting values 1 Soft Edge softness 0 00 to 100 00 Knob Parameter Adjustment Setting values 1 Width Border...

Page 620: ...see the next item To set the pattern size and position 1 In the Color Mix menu press Position Size 2 Set the following parameters The setting range for the parameters depends on the system selected signal format SD HD and aspect ratio 4 3 16 9 as follows For SD format a For 4 3 mode b For 16 9 mode For HD format Knob Parameter Adjustment Setting values 1 H Horizontal position 8 00 to 8 00 2 V Vert...

Page 621: ...Replicating the wipe crop pattern Multiplication page 618 Rotating the wipe crop pattern Rotation page 617 Applying modulation to the wipe crop pattern Modulation page 617 Defocus Settings Applying the Defocus effect 1 In the DME menu select VF2 Video Modify and HF1 Defocus Blur The Defocus Blur menu appears 2 Press Defocus turning it on 2 V Vertical position 18 00 to 18 00 3 Size Pattern size 0 0...

Page 622: ...g that can occur at the edge of the screen when the Defocus effect is enabled press Clean Defocus turning it on Masking the Defocus effect with a selected pattern Press Mask to display the Mask menu and set the pattern type and modifiers For details see Mask Settings page 634 Knob Parameter Adjustment Setting values 1 H Horizontal defocusing of video and key signals 0 00 to 100 00 2 V Vertical def...

Page 623: ...most recently is enabled 3 Set the parameters Masking the Blur effect with a selected pattern Press Mask to display the Mask menu and set the pattern type and modifiers For details see Mask Settings page 634 Multi Move Settings Applying the Multi Move effect 1 In the DME menu select VF2 Video Modify and HF2 Multi Move The Multi Move menu appears 2 Press Multi Move turning it on Knob Parameter Adju...

Page 624: ...and plus values to stretch the image in the horizontal direction Sepia Settings Applying the Sepia effect 1 In the DME menu select VF2 Video Modify and HF3 Color Modify The Color Modify menu appears 2 Press Sepia turning it on Knob Parameter Adjustment Setting values 1 Center X x value of shrinking center point 4 00 to 4 00 SD 12 00 to 12 00 HD 2 Center Y y value of shrinking center point 3 00 to ...

Page 625: ...he Mono effect 1 In the DME menu select VF2 Video Modify and HF3 Color Modify The Color Modify menu appears 2 Press Mono turning it on The Mono effect is enabled The color image changes to monochrome Masking the Mono effect with a selected pattern Press Mask to display the Mask menu and set the pattern type and modifiers For details see Mask Settings page 634 Knob Parameter Adjustment Setting valu...

Page 626: ...eness of the gradations with the knobs 3 Set the parameters Masking the Posterization or Solarization effect with a selected pattern Press Mask to display the Mask menu and set the pattern type and modifiers For details see Mask Settings page 634 Nega Settings Applying the Nega effect 1 In the DME menu select VF2 Video Modify and HF3 Color Modify The Color Modify menu appears 2 Press Nega Y or Neg...

Page 627: ... Video Modify and HF3 Color Modify The Color Modify menu appears 2 Press Contrast turning it on The Contrast effect is enabled You can adjust the luminance and chroma contrast with the knobs 3 Set the parameters Clip Gain Offset Knob Parameter Adjustment Setting values 1 Y Clip Luminance clip level 109 59 to 7 31 2 Y Gain Luminance contrast gradient 100 00 to 100 00 3 Y Offset Luminance offset lev...

Page 628: ...aspect ratio of the mosaic tiles with the knobs 3 Set the following parameters a Specify minus values to stretch the tiles in the vertical direction and plus values to stretch the tiles in the horizontal direction Masking the Mosaic effect with a selected pattern Press Mask to display the Mask menu and set the pattern type and modifiers For details see Mask Settings page 634 Sketch Settings Applyi...

Page 629: ...h effect 0 00 is the original input image b The larger the Clip value the narrower the outline width When Draw is selected a 100 00 gives an image completely transformed by the Sketch effect 0 00 is the original input image Knob Parameter Adjustment Setting values 1 Mix Mix amount for Sketch video and input video 0 00 to 100 00 a 2 Clip Reference level for outline extraction 100 00 to 100 00 b 3 G...

Page 630: ...ob Parameter Adjustment Setting values 1 Mix Mix amount for Relief video and input video 0 00 to 100 00 a 2 Offset Relief luminance level 100 00 to 100 00 3 Gain Image gain for outline extraction 100 00 to 100 00 4 Angle Direction of relief image light source 8 00 to 8 00 Knob Parameter Adjustment Setting values 1 H Simultaneously adjust the left and right resolution 0 00 to 100 00 2 V Simultaneou...

Page 631: ...rn and modifiers For details see Mask Settings page 634 Metal Settings Applying the Metal effect 1 In the DME menu select VF7 Enhanced Video Modify and HF2 Metal The Metal menu appears 2 Press Metal turning it on This enables the Metal effect 3 Set the parameters 4 In the Metal Mode group select the type of metallic gloss Knob Parameter Adjustment Setting values 2 Saturation Saturation 0 00 to 100...

Page 632: ...k Settings page 634 Dim and Fade Settings Notes The Dim and Fade functions are not supported on the MVE 8000A Applying the Dim effect 1 In the DME menu select VF7 Enhanced Video Modify and HF3 Dim Fade The Dim Fade menu appears 2 Press Dim turning it on This enables the Dim effect 3 Set the following parameters 4 Press Flat Color and set the parameters for the color of the depths of the picture Kn...

Page 633: ...es the Glow effect Notes On the MVE 9000 the key border function and Glow function cannot be turned on at the same time The function most recently turned on is effective On the MVE 8000A the Defocus and Glow effects or the Blur and Glow effects cannot be turned on at the same time The effect most recently turned on is effective Knob Parameter Adjustment Setting values 1 Luminance Luminance 0 00 to...

Page 634: ... the DME menu select VF2 Video Modify and HF7 Mask The Mask menu appears 2 In the Mask group press the button for the group of the effect to which you want to apply the mask turning it on Effect Gp 1 Posterization Solarization Nega Sepia Mono Contrast Mosaic Sketch Metal Effect Gp 2 Defocus Blur Glow Knob Parameter Adjustment Setting values 1 Clip Reference level for highlight detection 0 00 to 10...

Page 635: ...t on 6 As required set the modifiers for the mask pattern When turning Aspect on and adjusting the pattern aspect ratio Knob Parameter Adjustment Setting values 1 H Horizontal position 8 00 to 8 00 SD 24 00 to 24 00 HD 2 V Vertical position 6 00 to 6 00 SD 18 00 to 18 00 HD 3 Size Size of mask 0 00 to 100 00 4 Soft Softness of mask 0 00 to 100 00 5 Pattern Pattern number 21 24 304 a Knob Parameter...

Page 636: ...rotations per second in counterclockwise direction 100 00 is four rotations per second in clockwise direction 0 00 is no rotation Notes on applying a mask effect with a DME only when using the MVE 9000 In the Mask group of the DME Video Modify Mask menu if Effect Gp1 and Effect Gp2 are simultaneously set to On then the border or beveled edge is also masked The following explains this with the exam...

Page 637: ...ied length Film Slows the apparent frame rate for an effect like film You can specify the ratio of advancement For Hard Freeze and Time Strobe you can select the first field or the frame as the freeze timing Notes When 720P or 1080P signal format is used the Film mode cannot be selected To apply a Freeze effect start by displaying the Freeze menu In the DME menu select VF3 Freeze and HF1 Freeze Im...

Page 638: ...equired when the following signal formats are being used Signal formats 1080P 50 1080P 59 94 1080PsF 23 976 1080PsF 24 1080PsF 25 1080PsF 29 97 720P 50 720P 59 94 2 In the Freeze group press Time Strobe turning it on The Time Strobe freeze is enabled You can adjust the freeze interval and the ratio of live video inserted between freeze images 3 Set the parameters Applying the Film effect Notes Whe...

Page 639: ...ar effect on automatically turns all other nonlinear effects off The Flex Shadow function cannot be enabled when any of the nonlinear effects Page Turn Roll Cylinder and Sphere is enabled However the Flex Shadow function is not supported on the MVE 8000A To turn an effect off In the setting menu press the button for the effect name turning it off or in the Type menu press OFF in the lower right pa...

Page 640: ...t the following parameters according to the selected mode When H V is selected Before modulation Size not modulated 1 and 2 are same size Create waves by reducing 1 and expanding 2 the image Parameter group 1 2 Knob Parameter Adjustment Setting values 1 Amp H Amplitude of waves in horizontal direction 0 00 to 100 00 2 Freq H Frequency of waves in horizontal direction 0 00 to 100 00 3 Offset H a Ho...

Page 641: ... Frequency of waves in vertical direction 0 00 to 100 00 3 Offset V a Vertical direction in which to offset wave phase and amount of movement 16 00 to 16 00 c 64 00 to 64 00 d 4 Speed V b Vertical direction and speed of waves 100 00 to 100 00 5 Slant Slant of waves 8 000 to 8 000 Knob Parameter Adjustment Setting values 1 Amp H Amplitude of waves 0 00 to 100 00 2 Freq H Frequency of waves 0 00 to ...

Page 642: ...Set the following parameters When H V mode is selected When Size mode is selected Knob Parameter Adjustment Setting values 1 Form H Waveform in horizontal direction 1 to 6 a 2 Form V Waveform in vertical direction 1 to 6 a Knob Parameter Adjustment Setting values 1 Form H Waveform 1 to 6 a Knob Parameter Adjustment Setting values 1 Random H Degree of randomness in horizontal waveform modulation 0 ...

Page 643: ...d 1 Press Range Envelope turning it on Knob Parameter Adjustment Setting values 1 Size H Amount of horizontal wave modulation 0 00 to 100 00 2 Offset H Center point of horizontal modulation range 8 000 to 8 000 a 32 000 to 32 000 b 3 Size V Amount of vertical wave modulation 0 00 to 100 00 4 Offset V Center point of vertical modulation range 8 000 to 8 000 a 32 000 to 32 000 b Knob Parameter Adjus...

Page 644: ...menu and the functions of the knobs are the same as for the Wave menu For more information about how to make settings see Wave settings page 639 Flag settings There are two modes H V and Size You can set the size and frequency of waves in the image the wave form the amount of wave movement and the range In H V mode you can also set the wave angle To apply the Flag effect Display the Flag menu The ...

Page 645: ...IANGLE Triangular wave 4 RECTANGLE Rectangular wave Parameter group 1 2 Knob Parameter Adjustment Setting values 1 Amp V Amplitude of twist in vertical direction 0 00 to 100 00 2 Freq V Frequency of twist in vertical direction 0 00 to 100 00 3 Offset V a Amount of movement in twist phase in the vertical direction 16 00 to 16 00 c 64 00 to 64 00 d 4 Speed V b Speed and direction of twist movement i...

Page 646: ...ii of the same length from the center of the ripples behave in the same way Angular Points at the same angle from the center of the ripples behave in the same way Both Both Radial and Angular ripples are applied Shape The ripples can have shapes such as stars or hearts in addition to circles Modulation modes and directions 2 Set the following parameters depending on the selected modulation mode Wh...

Page 647: ...f movement 8 000 to 8 000 4 Speed A b Ripple direction along periphery and speed 100 00 to 100 00 5 Amp R Ripple amplitude along radius 0 00 to 100 00 Parameter group 1 2 Knob Parameter Adjustment Setting values 1 Amp R Ripple amplitude along radius 0 00 to 100 00 2 Freq R Ripple frequency along radius 0 00 to 100 00 3 Offset R a Direction along radius in which to offset ripple phase and amount of...

Page 648: ... only To set the ripple center point 1 Press Position turning it on 2 Set the following parameters depending on the selected modulation mode When Shape is selected Parameter group 1 2 Knob Parameter Adjustment Setting values 1 Amp R Ripple amplitude 0 00 to 100 00 2 Freq R Ripple frequency 0 00 to 100 00 3 Offset R a Direction in which to offset ripple phase and amount of movement 8 000 to 8 000 c...

Page 649: ... Knob Parameter Adjustment Setting values 1 H Ripple center point in horizontal direction 8 000 to 8 000 a 32 000 to 32 000 b 2 V Ripple center point in vertical direction 6 000 to 6 000 a 18 000 to 18 000 b Knob Parameter Adjustment Setting values 1 Size R Amount of ripple modulation along radius 0 00 to 100 00 2 Offset R Center of modulation range along radius 8 000 to 8 000 a 32 000 to 32 000 b...

Page 650: ...ransition the degree of randomness in the distance moved by each block the amount of movement the width of the partitions the degree of randomness in partition width the center point the starting angle and other parameters To apply the Rings effect With the Rings menu displayed use the following procedure 1 To make transition settings press Transition and set the following parameters 3 Size A Amou...

Page 651: ...u can also fix the direction in which shards scatter To apply the Broken Glass effect Display the Broken Glass menu The functions of the knobs in the Broken Glass menu are the same as those of the Rings menu with the exception of Direction For details about operation see Rings settings page 650 Knob Parameter Adjustment Setting values 1 Width Width of partition 0 000 to 100 000 2 Random Degree of ...

Page 652: ...llowing parameters Blind settings There are two modes Bar and Wedge You can set the number of rotations by blocks the perspective the width and position of blocks the direction the center position and other parameters To apply the Blind effect With the Blind menu displayed use the following procedure 1 In the Mode group select Bar or Wedge 2 To make transition settings press Transition and set the...

Page 653: ...split the split positions and other parameters Knob Parameter Adjustment Setting values 1 Rotation Number of rotations of the blocks 8 000 to 8 000 2 Perspective Degree of randomness in distance moved by each block 0 000 to 100 000 Knob Parameter Adjustment Setting values 1 Width Width of partition 0 000 to 100 000 2 Offset Degree of randomness in partition width 5 000 to 5 000 a 20 000 to 20 000 ...

Page 654: ...y each block the degree of sliding block width block angle and other parameters Parameter group 1 2 Knob Parameter Adjustment Setting values 1 Transition H Degree of left and right separation 100 00 to 100 000 2 Transition V Degree of top and bottom separation 100 00 to 100 000 Parameter group 2 2 Knob Parameter Adjustment Setting values 1 Top Amount of movement of top 100 00 to 100 000 2 Left Amo...

Page 655: ... 00 3 Skew H Degree of skew in horizontal direction 0 00 to 100 00 4 Width H Horizontal width of partition 0 00 to 100 00 5 Angle Angle of partition line 8 000 to 8 000 Parameter group 2 2 Knob Parameter Adjustment Setting values 1 Transition V Degree of transition in vertical direction 100 00 to 100 000 2 Random V Degree of randomness in distance moved by blocks in vertical direction 0 00 to 100 ...

Page 656: ...ide on right Right to Left Reflect right side on left Top to Bottom Reflect top side on bottom Bottom to Top Reflect bottom side on top To set the position of the border between original and reflection 1 Press Position 2 Set the following parameters a Setting for SD 4 3 SD 16 9 b Setting for HD 4 3 HD 16 9 Multi Mirror settings You can set the width of the original the center position of the origi...

Page 657: ...ent Setting values 1 Interval H Horizontal distance between mirrors original width 0 000 to 10 000 a 0 000 to 40 000 b 2 Offset H Amount of horizontal offset of image with mirrors fixed 4 000 to 4 000 a 16 000 to 16 000 b 3 Interval V Vertical distance between mirrors original width 0 000 to 10 000 a 0 000 to 40 000 b 4 Offset V Amount of vertical offset of image with mirrors fixed 4 000 to 4 000 ...

Page 658: ...Press Cyclic turning it on Lens settings You can set the shape and aspect ratio of the lens the angle the magnification ratio the curve ratio the size the center position and other parameters You can also choose to display only the portion of the image that is seen through the lens To apply the Lens effect With the Lens menu displayed use the following procedure 1 In the Mode group select the lens...

Page 659: ... 100 00 to 100 00 3 Size H Size 0 00 to 100 00 4 Angle Slant angle 8 000 to 8 000 5 Aspect Aspect ratio 100 00 to 100 00 Knob Parameter Adjustment Setting values 1 Magnify H Magnification ratio 100 00 to 100 00 2 Curve H Curve ratio 100 00 to 100 00 3 Size H Size 0 00 to 100 00 4 Angle Slant angle 8 000 to 8 000 Parameter group 1 2 Knob Parameter Adjustment Setting values 1 Magnify H Horizontal ma...

Page 660: ... the curve center position To apply the Panorama effect With the Panorama menu displayed set the following parameters a Setting for SD 4 3 SD 16 9 b Setting for HD 4 3 HD 16 9 Knob Parameter Adjustment Setting values 1 H Horizontal lens center position 5 000 to 5 000 a 20 000 to 20 000 b 2 V Vertical lens center position 4 000 to 4 000 a 16 000 to 16 000 b Knob Parameter Adjustment Setting values ...

Page 661: ...ing is selected Off There are no splits and the image turns from the edge 2 Press Page Turn then set the following parameters a When split mode is H V b When split mode is H c When split mode is V d When split mode is off To set the input signal of the back page 1 In the Back Video group select the signal input into the back page Self Use the same signal as the front page Flat Use a flat color Hue...

Page 662: ...urn menu For details about operation see Page Turn settings page 661 Notes When using a roll effect with one channel the following restrictions apply In an MVE 8000A HD system when the input is for example a title parts of the back page other than the title appear as black Cylinder settings You can set the degree of winding onto the cylinder the radius the horizontal position of the wound image an...

Page 663: ...orresponds to its axis on the monitor screen To apply the Sphere effect Display the Sphere menu The knobs in the Sphere menu have the same functions as those in the Cylinder menu For details about operation see Cylinder settings page 662 Notes When using a sphere effect with one channel the following restrictions apply In an MVE 8000A HD system when the input is for example a title parts of the in...

Page 664: ...er point 1 Press Position turning it on Knob Parameter Adjustment Setting values 1 Transition Degree of transition 0 00 to 100 00 2 Curve Degree to which image periphery expands 0 00 to 100 00 3 Spiral Degree of curvature of transition path 100 00 to 100 00 Knob Parameter Adjustment Setting values 1 Transition Degree of transition 0 00 to 100 00 2 Curve Degree to which image periphery expands 0 00...

Page 665: ...ition of the swirl 1 Press Position turning it on 2 Set the following parameters Knob Parameter Adjustment Setting values 1 H Center point in horizontal direction 5 000 to 5 000 a 20 000 to 20 000 b 2 V Center point in vertical direction 4 000 to 4 000 a 16 000 to 16 000 b Knob Parameter Adjustment Setting values 1 Transition Swirl amount 0 00 to 100 00 2 Center Amount of rotation in center of swi...

Page 666: ... make transition settings press Transition and set the following parameters 3 To make wave settings for melting part press Border and set the following parameters Knob Parameter Adjustment Setting values 1 H Horizontal center position of swirl 8 000 to 8 000 a 32 000 to 32 000 b 2 V Vertical center position of swirl 6 000 to 6 000 a 18 000 to 18 000 b Knob Parameter Adjustment Setting values 1 Tra...

Page 667: ...rdust 1 Press Pixel turning it on 2 Set the following parameters Character Trail settings You can set the effect starting position the degree of expansion the slant angle of the effect region and trail direction the degree to which the image disappears the trail type and amount of stardust and other parameters To apply the Character Trail effect With the Character Trail menu displayed set the foll...

Page 668: ... VF4 Non Linear Corner Pin HF2 Corner Pinning The Corner Pinning menu appears 2 Set Corner Pinning to On 3 Set Corner Marker to On A marker appears for each corner The marker for the selected corner is distinguished from the other markers 2 Expand Degree of expansion 0 00 to 100 00 3 Trans Angle Angle of slanting in effect region 8 000 to 8 000 4 Trail Angle Direction of trail 100 00 to 100 00 Kno...

Page 669: ...tio 4 3 16 9 combination as follows 4 3 mode a When the selection for operation is All the Top Left value appears and the knobs move all four corners correspondingly 16 9 mode Marker for selected corner Other markers Knob Parameter Adjustment Setting values 1 Pos X Movement in x axis direction 8 00 to 8 00 SD a 24 00 to 24 00 HD a 2 Pos Y Movement in y axis direction 6 00 to 6 00 SD a 18 00 to 18 ...

Page 670: ...age including the part hidden by cropping shaded in the diagram below for positioning Adjusting the density of the foreground You can adjust the density of the foreground image to be translucent so that the background shows through making it easier to position the corners Notes This setting is not saved in a key frame or snapshot 1 In the Corner Pinning menu set Video Through to On 2 Turn the knob...

Page 671: ...ings You can specify the intensity and color of the light and the lighting pattern The following lighting patterns are available Plane Illumination of the entire screen Bar Bar illumination You can specify the width and angle of the bar and its softness Preset Lighting pattern suitable for nonlinear effects When Bar is selected the following modes can be selected Normal Emphasizes the bar highligh...

Page 672: ...hting effect more effective by adjusting Total Ambient to lower the brightness of the entire image This setting is used both by this effect and by the Spotlighting effect Notes The Total Ambient parameter is not supported on the MVE 8000A When Bar is selected a You can make the Lighting effect more effective by adjusting Total Ambient to lower the brightness of the entire image This setting is use...

Page 673: ...s for which the light intensity can be set Setting the bar shape of the highlight area When you select Bar or Preset in step 3 of Applying the Lighting effect page 672 use the following procedure to set the shape of the bar 1 Turn Light Modify on 2 Adjust the following parameters Knob Parameter Adjustment Setting values 1 Light Intensity of light in highlight area 0 00 to 100 00 2 Ambient Intensit...

Page 674: ...of Applying the Lighting effect see page 672 use the following procedure to set the bar shape of the shade area 1 Turn Shade Modify on 2 Adjust the following parameters 2 Y Y value of bar center point 6 00 to 6 00 a 4 50 to 4 50 b 18 00 to 18 00 c d 3 Angle e Angle of bar 8 00 to 8 00 4 Width Width of bar 0 00 to 100 00 5 Soft Softness of edges 0 00 to 100 00 Knob Parameter Adjustment Setting valu...

Page 675: ...n the Bar Light Mode group Normal Emphasizes the bar highlight area Specular An effect like light striking a surface with metallic reflections Mat An effect like light striking paper cloth or another diffusively reflective surface 2 Set the following parameters Knob Parameter Adjustment Setting values 1 X X value of bar center point 8 00 to 8 00a 24 00 to 24 00 b 32 00 to 32 00 c 4 Width Width of ...

Page 676: ...s to set the color of the diffuse light area 2 Offset Offset of center of diffuse light area 4 00 to 4 00 a 12 00 to 12 00 b 16 00 to 16 00 c 3 Width Width of diffuse light area 0 00 to 100 00 4 Soft Softness of diffuse light area 0 00 to 100 00 Knob Parameter Adjustment Setting values Knob Parameter Adjustment Setting values 1 Luminance Luminance 0 00 to 100 00 2 Saturation Saturation 0 00 to 100...

Page 677: ...he one that has been on Turning Trail on when Motion Decay see page 681 Keyframe Strobe see page 683 or Wind see page 685 is on turns it off automatically Applying the Trail effect 1 In the DME menu select VF5 Light Trail and HF2 Trail The Trail menu appears 2 Press Trail turning it on With no selection made in the Bar Light Mode group Width Bar Light With a selection made in the Bar Light Mode gr...

Page 678: ...e page 608 trail and wind see page 685 effects If you select Mix Color or Ext Video in one of these settings a selection of Mix Color or Ext Video in any of the other effects is disabled and Flat Color is selected in its place When executing combining four channels of DME images Mix Color and Ext Video in the flex shadow and background effects cannot be selected Freeze Video Use freeze images of t...

Page 679: ... Hue Rotate item above Erasing the afterimages that remain in memory whenever a keyframe is passed Press Trail Eraser turning it on When the effect passes a keyframe the afterimage is erased before writing a new afterimage Selecting the freeze timing In the Trail Freeze Timing group select the timing for freezing a trail Frame freeze in frame units Field freeze in field units Notes The freeze timi...

Page 680: ...adjustments Setting a combine process Select whether to add the Trail effect before or after the combine Notes The combine process function is not supported on the MVE 8000A When you change the selection in the Combine Process group the afterimages which had been added up to then disappear Knob Parameter Adjustment Setting values 1 Defocus V Defocusing of the video signal 0 00 to 100 00 2 Defocus ...

Page 681: ...e channels being combined is enabled Trail Combine Add the Trail effect before the combine Trails parameters can be set independently for each channel Motion Decay Settings Notes When you turn on motion decay if the Trail Keyframe Strobe or Wind effect is on it automatically goes off Blurring image motion 1 In the DME menu select VF5 Light Trail and HF3 Motion Decay The Motion Decay menu appears 2...

Page 682: ...w afterimage Selecting the freeze timing In the Decay Freeze Timing group select the timing for motion decay freezing Frame freeze in frame units Field freeze in field units Notes The freeze timing setting is not required when the following signal formats are being used Signal formats 1080P 50 1080P 59 94 1080PsF 23 976 1080PsF 24 1080PsF 25 1080PsF 29 97 720P 50 720P 59 94 Applying stardust to th...

Page 683: ...obs to adjust the parameters 3 Set the following parameter a At the setting 0 00 there is no afterimage At a setting of 100 00 the afterimage does not decay 4 To erase the afterimage press KF Strobe Eraser turning it on Selecting the overlay priority for movie and still images video freeze image In the Priority group select the way in which the images are overlaid Over the movie is on top and the ...

Page 684: ...Erasing the afterimages that remain in memory whenever a keyframe is passed Press KF Strobe Eraser turning it on When the effect passes a keyframe the afterimage is erased before writing a new afterimage Applying stardust to the afterimage portion The afterimage portion becomes stardust and gradually disappears 1 Press the DUST button turning it on 2 Set the following parameters Knob Parameter Adj...

Page 685: ... the afterimages which had been added up to then disappear When you do not combine images the Keyframe Strobe effect only is applied regardless of the selection in the Combine Process group Select one of the following in the Combine Process group Combine KF STRB Add the Keyframe Strobe effect after the combine As parameters the data for the channel with the lowest number among the channels being c...

Page 686: ...Mix Color or Ext Video in any of the other effects is disabled and Flat Color is selected in its place When executing combining four channels of DME images Mix Color and Ext Video cannot be selected Freeze Video Freeze the input image to use as the afterimage Flat Color Use a single color matte for the afterimage you can set the following parameters with the knobs Hue Rotate Use a single color mat...

Page 687: ...ers For details of Priority Wind Freeze Timing Wind Eraser Defocus Dust and Combine Process in the Wind menu see Trail Settings page 677 Spotlighting Settings You can set up to three light sources lights 1 to 3 Notes The Spotlighting effect is not supported on the MVE 8000A The BZDM 9050 Texture Lighting Software for MVE 9000 is required to set lights 2 and 3 Knob Parameter Adjustment Setting valu...

Page 688: ...30 patterns See Texture Patterns page 1012 for the texture patterns Non Linear Spotlighting effect is applied to an area to which a DME nonlinear effect is applied Notes The BZDM 9050 is required to enable Texture and Non Linear settings Test sphere function A test sphere is a translucent sphere virtually embedded in the center of the input picture to provide an intuitive way for you to check the ...

Page 689: ... and use the repetition function The following figure shows examples of a texture pattern repeated in the X and Y directions Image before movement Coordinate axis Move Texture moves together with DME image Image before movement Coordinate axis Fix Texture does not move even if DME image moves Original image Repetition in X direction Repetition in Y direction Repetition in X and Y directions ...

Page 690: ...nlinking image and spotlight The spotlight can move together with a DME image or be fixed in place Source Place the light source in source coordinate space The spotlight is linked and moves when the image moves Target Place the light source in target coordinate space The spotlight does not move even when the image moves Selecting the lighted area You can select the area lit by the spotlight Light ...

Page 691: ...ly Light shape Creates the light shape Select the shape pattern For shape patterns see Shape Patterns page 1013 Set the size degree of deformation softness and rotation Ring settings Shines the light with a hole in the middle like a doughnut Adjust the following parameters Offset Distance to move the center of the ring from the initial position the position set when selecting the light source in t...

Page 692: ...el rays The following figure shows an example of the effect of parallel rays on a test sphere The direction of a ray is defined by longitude and latitude Longitude A direction angle expressed as a plus value for clockwise rotation in the plus direction with respect to the X axis of the input picture Latitude Latitude The following figure shows the relationships between the longitude and latitude o...

Page 693: ...es are the same the effect is the same even if the integral parts are different The integral part of a setting value is used when moving a light source with keyframes For example when the longitude of a light source rotates in the clockwise direction from 0 88 315 to 0 12 45 it rotates in the counterclockwise direction the angle grows smaller if the above values are used In this case the value of ...

Page 694: ...rightness of the image makes Spotlighting more effective The Total Ambient setting is shared with the Lighting function 4 In the Surface Select group select the state of the surface struck by the light Flat The image surface is unchanged causing the selected light source to appear as the effect Texture A texture appears on the surface of the image Non Linear The Spotlighting effect is applied to a...

Page 695: ...zes bumps in texture minus emphasizes depressions 0 00 is a flat surface HD format a Minus moves left plus moves right b Minus moves down plus moves up c Plus emphasizes bumps in texture minus emphasizes depressions 0 00 is a flat surface Parameters when you selected Non Linear Knob Parameter Adjustment Setting values 1 X Movement in X axis direction 8 00 to 8 00 a 2 Y Movement in Y axis direction...

Page 696: ...n 1 In the Spot Lighting menu press Texture Ptn Select The Texture Ptn Select menu appears Two lists appear in the status area The list on the left displays the number and name of the currently selected texture The list on the right is for selecting a texture 2 In the Texture Pattern group press User or Factory to select the texture pattern list User List of texture patterns created by the user Se...

Page 697: ... sources Light 1 to Light 3 for Spotlighting can be set by menus Light source menu The following three light source menus are available Notes The BZDM 9050 Texture Lighting Software for MVE 9000 is required to enable Light 2 and Light 3 An install key must be entered to use the software For details see Installation and Device Setup Install Unit Config Menu in Chapter 18 Volume 3 To set light sourc...

Page 698: ...n be set Point Point light source The position can be set Line Line light source The position and angle can be set Whole Non directional light source which illuminates the whole image no settings For more information about light source types see Light source types page 690 5 According to the selected light source type set the following parameters When you selected Parallel a Minus moves counterclo...

Page 699: ...ng values 1 X Movement in X axis direction 6 00 to 6 00 a 2 Y Movement in Y axis direction 6 00 to 6 00 b 3 Z Movement in Z axis direction 6 00 to 6 00 c Knob Parameter Adjustment Setting values 1 X Movement in X axis direction 24 00 to 24 00 a 2 Y Movement in Y axis direction 24 00 to 24 00 b 3 Z Movement in Z axis direction 24 00 to 24 00 c Knob Parameter Adjustment Setting values 1 X Movement i...

Page 700: ...om Z direction At 100 00 the light goes deepest at 100 00 the whole image is lit like a flat effect To select the lighted area In the Area Select group select one of the following FRGD The light strikes the image foreground BKGD The light strikes the image background Both The light strikes both foreground and background For more information about the lighted area see Selecting the lighted area pag...

Page 701: ...e rotation in the clockwise direction HD format a For more information about the shape patterns see Shape Patterns page 1013 in the Appendix b 0 is a round shape and 100 is the shape itself Smaller values make the pattern more rounded c 1 00 is one rotation in the counterclockwise direction 1 00 is one rotation in the clockwise direction To rotate the shape pattern 1 Press Shape Speed turning it o...

Page 702: ... 00 is one rotation in the counterclockwise direction and 1 00 is one rotation in the clockwise direction Notes There is no Radius setting when Line is selected in the Spot Mode group HD format a 1 00 is one rotation in the counterclockwise direction and 1 00 is one rotation in the clockwise direction Knob Parameter Adjustment Setting values 5 Speed Rotation direction and speed 100 00 to 100 00 a ...

Page 703: ... source 1 In the Light 1 menu press Light Color Adjust The Light Color Adjust menu appears 2 In the Fill Blending Mode group select how the light and image should be blended Mix Light as if reflected from a mirror Multiply Light as if reflected from a dull surface diffuse reflection 3 If you selected Mix select the fill color in the Fill Source group Flat Color A monochrome matte Hue Rotation Colo...

Page 704: ... on the right shows the copy or swap destinations 2 Do one of the following to select the target data Press directly on the list in the status area Press the arrow keys to scroll the reverse video cursor Turn the knobs 3 Press Copy to copy or Swap to swap The data is copied or swapped To undo a copy or swap Press Undo Settings are returned to their values before the copy or swap 4 Brilliancy Brill...

Page 705: ...he MVE 9000 you can select the signal to insert in the background With Bkgd set on use the following procedure 1 In the Bkgd Fill group select one of the following Flat Color single color Mix Color mix color signal set in the Color Mix menu see page 619 Ext Video an external video signal input to the Ext IN connector Notes Mix Color or Ext Video can only be applied to one of the background flex sh...

Page 706: ...Sides effect is enabled If the video and key signals currently being output to the monitor are the front side you can select the front signals If they are the back side you can select the back signals Video and key signals are selected with the cross point control blocks of each M E bank or the PGM PST bank Invert Settings Inverts the input video signal and or key signal horizontally or vertically...

Page 707: ...Video Key menu appears 2 Press Key Density turning it on This enables the key density function and you can now use the knobs to adjust the parameters 3 Set the following parameter Key Source Selection You can select either the key signals received from the switcher or the key signals generated in the DME for application to the front and back of the image Selecting the key source signals Notes It i...

Page 708: ...or input video signals you can select from the following four methods Detect changes in the luminance and chrominance signals separately and switch automatically between fields and frames You can select the degree of change detection Detect changes in the luminance signal separately and switch automatically between fields and frames You can select the degree of change detection Do interpolation in...

Page 709: ...es Adaptive Y Detect changes in the luminance component of the video signal separately and switch automatically between fields and frames Field Do interpolation in field units This gives natural movement suitable for moving video Frame Do interpolation in frame units This gives higher image precision suitable for still pictures 3 When you select Adaptive Y C or Adaptive Y in step 2 set the followi...

Page 710: ...n expanding or reducing the picture Mode3 sharp Do not suppress aliasing when expanding or reducing the picture Applying the anti moire filter You can reduce the moire patterns created by interpolation when an image is enlarged compressed or rotated Notes This function is effective only when the HD signal format is used on the MVE 8000A 1 In the DME menu select VF6 Input Output and HF3 Process The...

Page 711: ...ed Global effects Operations common to all global effects In this section explanations of the operating procedures for individual global effects begin with selections from VF1 Ch1 Ch4 in the Global Effect menu The following are common operations that you must do prior to selecting from this menu 1 In the device control block select the target DME channel Name Effect Image Combiner Automatically co...

Page 712: ...e transition the Combiner automatically combines the selected images Up to four channels can be combined You can also control the way in which the combination is carried out as a mix or an overlap with priority set automatically For a mix you can control the relative amounts of each channel Images can also be crossed in three dimensions Notes Three dimensional image crossing is not supported on th...

Page 713: ...Chapter 11 DME Operations 713 Global Effect Operations Combination of Ch1 Ch2 and Ch3 Combination of Ch1 and Ch2 combination of Ch3 and Ch4 Combiner Combiner Combiner ...

Page 714: ...Ch1 Ch2 Ch3 and Ch4 Mixing Ch1 and Ch2 If the Mix1 setting is 70 the proportion of the channels in the mixed portion in the previous illustration is as shown in the following table Mixing Ch1 Ch2 and Ch3 Combination Indication in figure Ch1 Ch2 Ch1 and Ch2 30 70 Combiner ...

Page 715: ...ixing of Ch1 and Ch2 and Ch3 and Ch4 If the Mix1 setting is 70 and the Mix2 setting is 40 the proportions of the channels in the mixed portions in the previous illustration are as shown in the following table Ch1 crossed with Ch2 Combination Indication in figure Ch1 Ch2 Ch3 Ch1 and Ch2 30 70 Ch2 and Ch3 60 40 Ch1 and Ch3 30 70 Ch1 Ch2 and Ch3 30 42 28 Combination Indication in figure Ch1 Ch2 Ch3 C...

Page 716: ...der Priority1 to Priority3 press Ch1 Ch2 and Ch3 respectively to set the overlap priority Priority1 Select the channel with the highest priority Priority2 Select the channel with the second highest priority Priority3 Select the channel with the lowest priority For case Ch1 Ch2 Ch3 Ch4 Under Combiner 1 Priority 1 and Combiner 1 Priority 2 press Ch1 and Ch2 respectively and under Combiner 2 Priority...

Page 717: ...setting value range as with knobs 1 and 2 Mixing pairwise the images of channels 1 and 2 and channels 3 and 4 1 In the Combiner Priority menu press Combiner1 Mix turning it on 2 Adjust the following parameter a See Pairwise mixing of Ch1 and Ch2 and Ch3 and Ch4 page 715 3 Press Combiner2 Mix turning it on 4 Adjust the following parameter Knob Parameter Adjustment Setting values 1 Mix Mix degree 0 ...

Page 718: ...rossing function is not supported on the MVE 8000A 1 In the Combiner Priority menu press Depth turning it on 2 Set the following parameters For case Ch1 Ch2 For case Ch1 Ch2 Ch3 For case Ch1 Ch2 Ch3 Ch4 Knobs 1 and 2 set the same parameters as For case Ch1 Ch2 Ch3 respectively Knob 3 is additionally effective which sets the parameter Soft3 in the same setting value range as with knobs 1 and 2 Knob...

Page 719: ...th turning it on 4 Set the following parameter Brick Settings The Brick effect can combine Ch1 Ch2 and Ch3 or combine Ch2 Ch3 and Ch4 The three images are displayed as shown in the following figure Combinations of Ch1 Ch2 and Ch3 Upper side Ch1 image Side V Ch2 image Side H Ch3 image Knob Parameter Adjustment Setting values 1 Soft1 Softness of edges of channel 1 and channel 2 crossed section 0 00 ...

Page 720: ...sition of the front image in the source coordinate frame is shifted by the amount of half the height Therefore the image is somewhat magnified The flex shadow function cannot be enabled when Brick is enabled However the flex shadow function is not supported on the MVE 8000A 3 Set the parameters a Setting for SD 4 3 SD 16 9 b Setting for HD 4 3 HD 16 9 4 Specify the way to insert the side images wh...

Page 721: ...es 1 H Position of left crop 4 00 to 4 00 SD 12 00 to 12 00 HD 2 V Position of top crop 3 00 to 3 00 SD 9 00 to 9 00 HD 3 Rotation Angle of rotation when rotated around the Z axis of the source space 0 90 180 270 Knob Parameter Adjustment Setting values 1 H Position of left crop 4 00 to 4 00 SD 16 00 to 16 00 HD 2 V Position of top crop 2 25 to 2 25 SD 9 00 to 9 00 HD 3 Rotation Angle of rotation ...

Page 722: ... in the following groups Back image of Side H Side H Back group Front image of Side V Side V Front group Back image of Side V Side V Back group Knob Parameter Adjustment Setting values 1 Top Position of top crop 2 12 to 2 25 SD 8 50 to 9 00 HD 2 Left Position of left crop 4 00 to 3 87 SD 16 00 to 15 50 HD 3 Right Position of right crop 3 87 to 4 00 SD 15 50 to 16 00 HD 4 Bottom Position of bottom ...

Page 723: ...the selected combiner channels the valid buttons differ as follows Taking Ch1 Shadow as an example the following explains the procedure for applying the Drop Shadow effect 1 Press Ch1 Shadow turning it on The Drop Shadow effect is enabled and channel 2 becomes the channel for the shadow to the image You can adjust the position and density of the shadow with the knobs Notes The flex shadow function...

Page 724: ...ect channel 1 channel 2 and channel 3 channel 4 then turn Ch 1 Shadow and Ch 3 Shadow on To apply a shadow after combining the video images Use the Combiner function to select channel 1 channel 2 channel 3 channel 4 then turn Ch 1 Ch 2 Shadow on Knob Parameter Adjustment Setting values 1 Position H Horizontal shadow position 8 00 to 8 00 a 32 00 to 32 00 b 2 Position V Vertical shadow position 8 0...

Page 725: ...725 Chapter 12 External Devices ...

Page 726: ...rations for controlling above external devices To access the Device menu In the menu control block press the top menu selection button DEV For VTRs Extended VTRs and disk recorders you can also carry out operations using the device control block Notes To operate P Bus devices VTRs Extended VTRs and disk recorders in the this system the following settings are required on the DCU 9 pin serial port D...

Page 727: ...set in a keyframe are executed only when the keyframe effect is executed in the normal direction Take care when executing simultaneously with a switcher or DME keyframe effect since the actions are not executed in the reverse direction The following keyframe functions cannot be used KF LOOP EFFECT LOOP REVERSE NORMAL REVERSE PATH Saving to registers Set the data for controlling external devices in...

Page 728: ...Chapter 12 External Devices 728 Control of External Devices File related functions As effect data you can save and recall using the File menu ...

Page 729: ...he P Bus Timeline At a keyframe point on the P Bus timeline you can set an action At any single keyframe point you can set actions for a maximum of 24 devices For details of keyframe creation and editing operations see Creating and Editing Keyframes page 802 For the action setting or P Bus timeline editing use the Device menu You can save the data set in the Device menu in keyframe effect register...

Page 730: ...ethods select the action Press directly on the list on the right of the status area Turn the knob a 1 Off no specification 2 Store 3 Recall 4 Trigger 4 If in step 3 you selected 2 Store 3 Recall or 4 Trigger turn knob 3 to select the register number or trigger number The indication for knob 3 changes to reflect the selection of Store Recall or Trigger The setting is reflected in the list on the ri...

Page 731: ...d the action set for the first keyframe is not executed when the RUN button is pressed then the first keyframe action is executed To execute an action when the REWIND button is pressed it is necessary to set this action Rewind Action To carry out this setting in the Device P Bus Timeline menu press Rewind Action to recall the Rewind Action menu In this setting screen use the same setting method as...

Page 732: ... the numeric keypad control block or keyframe control block outputs an action command to a P Bus device Notes To use the P Bus trigger function the P Bus control mode must be set to Trigger Make this setting in the Engineering Setup Panel Device Interface menu For details see Setting the Control Mode for P Bus Devices in Chapter 19 Volume 3 The relation between the operation in each of the control...

Page 733: ...mple to output a Recall use the following procedure 1 In the numeric keypad control block press the EFF button turning it on The RCALL button in the numeric keypad control block lights 2 Press the P BUS button in the numeric keypad control block turning it on to select the P Bus region 3 Enter the number of the register 1 to 250 to be recalled with the numeric keypad buttons 4 Press the ENTER butt...

Page 734: ... effect register When you recall this register and start execution of the keyframe effect and advance the effect to the keyframe point for which the GPI output is set a trigger pulse is output to the external device from the specified GPI output port GPI Timeline Creation and Editing This section describes how to set GPI output ports to be registered at a keyframe point and how to carry out creati...

Page 735: ...GPI port 4 If in step 3 you selected 2 SCU or 3 DCU then use the knob to select the port number The indication for knob 3 depends on whether SCU or DCU is selected a The number of DCU GPI ports depends on the settings in Engineering Setup The setting is reflected in the list on the right of the status area Notes For the output port you have set here be sure to set the trigger type to Rising Edge F...

Page 736: ...ut ports in a single operation Press All Off Setting the action for a rewind operation On the GPI timeline when the REWIND button in the keyframe control block or Flexi Pad control block or Multifunction Flexi Pad control block is pressed the action set for the first keyframe is not executed when the RUN button is pressed then the first keyframe action is executed To execute an action when the REW...

Page 737: ...Chapter 12 External Devices 737 Control of GPI Devices For details of the setting see Setting the First Keyframe When a Rewind Is Executed in Chapter 19 Volume 3 ...

Page 738: ... and Extended VTR information Device name Register number VTR disk recorder Extended VTR status Current time Start point Stop point Variable speed Start delay time Loop setting Recue setting To control a VTR Extended VTR or disk recorder in this system the following settings are required Button assignment For a VTR Extended VTR or disk recorder connected to the DCU 9 pin serial port assign a devic...

Page 739: ... the stop point timecode value as keyframe data Setting a start delay time For each selected VTR disk recorder Extended VTR you can set the start delay as key frame data Recording to VTR or disk recorder Record video to the selected VTR disk recorder Loop recue setting You can select loop or recue as the playback mode These operate as follows When loop is selected Playback repeats from the start t...

Page 740: ... button cannot be used for frame memory clip operations STOP Press this button to stop the tape disk or frame memory clip START TC start timecode Press this button to set the timecode of the start point at that time The timecode of the start point is updated to the current time each time this button is pressed When the device the operation applies to is a VTR disk recorder the start point updated ...

Page 741: ...ix levels For details of the settings see Setting Trackball Joystick Search Dial and Double Click Sensitivity in Chapter 19 Volume 3 CUE Pressing this button cues the tape disk or frame memory clip automatically to the start point REW rewind Press this button to rewind the tape disk or frame memory clip PLAY Press this button to play the tape disk or frame memory clip FF Press this button to fast ...

Page 742: ...tion and speed of playback depend on the direction and angle of rotation To use this dial press the ENBL button to the upper right of the dial lighting it amber This dial has three operation modes jog shuttle and variable To prevent overheating if the search dial is on continuously for 10 seconds it is automatically turned off However in this state if a movement of the dial is detected it switches...

Page 743: ...ere it stops with a clicking sound 1 1 times normal speed 3 3 times normal speed 1 1 times normal speed To disable the search dial and end variable mode press the STOP button Additionally pressing any of the REW PLAY FF STB OFF and ALL STOP editing buttons ends the variable mode For shuttle mode and variable mode you can set the valid range of the operating angle in the Engineering Setup Panel Ope...

Page 744: ...files page 764 for more information about how to specify file names 1 Using the buttons of the device control block select the VTR or disk recorder to which you want to record You can select more than one button The first button pressed lights green to indicate the reference device and the subsequent buttons light amber 2 While holding down the REC button in the device control block press the PLAY...

Page 745: ...n DEV device name DEV1 to DEV12 represent respectively device 1 to device 12 Reg register Number of the register to which settings apply Status Status of each device The meaning of the indications is as follows Operating status display When VTR Extended VTR or Sony disk 9 pin protocol is used When video disk communications protocol is used XXXX Communications with the device are being carried out ...

Page 746: ...ton Play With this function you can also stop the VTR disk recorder or Extended VTR used for playback at the stop point timecode recalled from the same register Disk recorder video disk communications protocol operation when loop recue is set When loop is set playback repeatedly between the start point and stop point When recue is set when playback reaches the stop point automatically cue up to th...

Page 747: ... Making and saving settings relating to Cueup Play 1 Press the EFF button in the numeric keypad control block turning it on This assigns the numeric keypad control block to keyframe operations and the RCALL button lights 2 Press the region selection button for the region for which you want to make the setting turning it on You can select more than one button 3 Enter the number of the register to b...

Page 748: ... START TC button in the device control block search dial The display in the numeric keypad control block shows START TC Enter the desired timecode from the numeric keypad control block and press ENTER For details of timecode entry see Setting the start point and stop point with the SET XX buttons page 750 Setting with the Cueup Play menu For details of settings in the Cueup Play menu see Setting t...

Page 749: ...g the start point stop point and start delay time in a menu page 752 9 To set a start delay time press the DELAY button in the device control block and enter a value in the numeric keypad control block Alternatively make the setting in the Device DDR VTR Cueup Play menu If no setting is required continue to step 10 For details of settings in the Cueup Play menu see Setting the start point stop poi...

Page 750: ...ng VTR Extended VTR disk recorder is selected as the reference region in the device control block the CUE button also flashes and lights in the same way as the ALL STOP button Also when the start point is reached the STOP button lights amber 5 Press the RUN button in the keyframe control block The VTR Extended VTR disk recorder is now controlled according to the keyframe data Setting the start poi...

Page 751: ...ypad control block press ENTER The STOP TC display and the START TC display automatically calculated in step 2 disappear and the setting of the DUR does not change a If after pressing the SET XX button you press the button in the numeric keypad control block you can enter offsets from the existing setting values Each time you press this button the sign of the offset cycles through the settings abs...

Page 752: ...rn the knob 3 Carry out any of the following operations as required To set the start point press Set in the Start TC group To set the stop point press Set in the Stop TC group To set the start delay time press Set in the Delay group A timecode window appears 4 Set the timecode value for the start point stop point or start delay time Notes You can enter a start delay time in the range that depends ...

Page 753: ...rom the start point of a file to the stop point then indefinitely repeat playback from the start point Recue Carry out playback from the start point of a file to the stop point then return to the start point and stop Notes Loop and recue functions are only available when the EVS XT server is operated with the video disk communications protocol In the Device menu use the following procedure 1 Press...

Page 754: ...imeline editing use the Device menu The data set in the Device menu are saved in a keyframe effect register When you recall this register and start execution of the keyframe effect and advance the effect to the keyframe point for which the action is set an action command is output to the external device through the 9 pin serial port assigned to the VTR disk recorder or Extended VTR Notes When exec...

Page 755: ... and otherwise the setting for the Rewind Action is carried out 2 If the setting when the REWIND button is pressed is for the first keyframe to be executed then the second keyframe is executed and otherwise the first keyframe is executed To execute an effect be sure to carry out a Rewind For example when the start command only is set for a keyframe playback starts from the current position in the ...

Page 756: ...ss the RUN button Some operating limitations apply when the video disk communications protocol is used These are explained with reference to the following figure which illustrates creation of a timeline that plays from the video of file A to the video of file B Operation with no problems Black video or still image appears momentarily when play switches from file A to file B KF1 action setting Oper...

Page 757: ...meline The Device DDR VTR Timeline menu appears The status area shows two lists The upper list shows the device number register number keyframe number and action type start point stop point and variable speed set for the keyframe The lower list is used for setting the action for the device selected above and shows the port name current file current time status information start point stop point va...

Page 758: ...nded VTR skip to step 4 4 In the Action group select the action Cueup Output a command to cue up to the currently displayed start point Start Output a Play command Notes When the stop point and variable speed are both set the variable speed setting takes priority Stop Output a Stop command Notes Before executing the Stop command if the timecode for the set stop point has been reached or on an Exte...

Page 759: ...frame duration to fit the set start point and stop point Press the Set button and adjust the parameter with the knob a The setting range of the variable speed depends on the type of connected device The new variable speed setting is reflected in the status area Repeat steps 2 to 11 as required for other devices To carry out start point and stop point settings and cueing up operations in the device...

Page 760: ...r list in the status area and press Test Fire An action command is output from the DCU 9 pin serial port according to the settings in the list To clear the start point stop point and variable speed settings 1 In the upper list in the status area select the device for which you want to clear the settings 2 Carry out any of the following operations as required To clear the start point setting press ...

Page 761: ...g the file list Before playback and suchlike operations on a disk recorder Extended VTR it is first necessary to display a list of the disk recorder files on the DCU The file list includes the following information File name Date of last update 1 Duration of recorded material 1 To recall the file list use the Device menu 1 Not displayed in the case of an Extended VTR Recalling a file In the recall...

Page 762: ...ended VTR the length of file data and file update information are not shown and the register number is shown in place of the file name 2 Select the device for which you want to recall the file list using the knob 3 Press the File List Update button This starts the process of recalling the file list and a message box appears When the file list recall is completed the message box disappears To cance...

Page 763: ...e following procedure Notes Files cannot be recalled when the disk recorder is set to Recorder 1 In the Device menu press VF3 DDR VTR and HF3 File List The Device DDR VTR File List menu appears 2 Select the device from which you want to recall a file using the knob 3 Using any of the following methods select the file you want to recall Press directly on the lower list in the status area Press the ...

Page 764: ...n using the Sony disk recorder 9 pin protocol Up to 23 characters When using the video disk communications protocol Up to 8 characters in Fixed 8 Character mode or 23 characters in Variable Length mode For details of how to select the file name character count mode in the video disk communications protocol see Making Detailed Settings on the External Device Connected to the Serial Port in Chapter ...

Page 765: ...765 Chapter 13 Keyframe Effects ...

Page 766: ...gion assignment to the region selection buttons see Overall Control Panel Settings Config Menu in Chapter 19 Volume 3 Regions applicable to keyframe operations All the regions less the Router region Regions applicable to snapshot operations Twenty two regions that is the above regions less the external devices regions P Bus Device 1 to Device 12 and GPI and the Macro region User regions You can op...

Page 767: ... only one region appears in the displays for menu and numeric keypad operations This is called the reference region The reference region is determined according to the following precedence M E1 M E2 M E3 M E4 P P User1 User2 User3 User4 User5 User6 User7 User8 DME ch1 DME ch2 DME ch3 DME ch4 DME ch5 DME ch6 DME ch7 DME ch8 Device1 Device2 Device3 Device4 Device5 Device6 Device7 Device8 Device9 Dev...

Page 768: ...elect the appropriate regions depending on the number of channels When recalling registers in the 200 range select two consecutive channels for the regions as for example DME1 and DME2 Similarly for registers in the 300 range select three consecutive registers Registers for P Bus Device regions There are 250 registers for P Bus and Device1 to Device12 in each region numbered 1 to 250 Work register...

Page 769: ...ore keyframe effect regions and the register numbers saved in the regions Snapshot registers These are registers for snapshots and there are 99 numbered 1 to 99 for each region Master snapshot registers There are 99 master snapshot registers numbered 1 to 99 for each control panel They store snapshot regions and the register numbers saved in the regions ...

Page 770: ...ers page 768 Saving and Recalling Effects To create a new effect first recall an empty register then create the keyframes one at a time in this register To run an effect it is also necessary to set the time and the path To edit an existing effect recall the register holding the effect then make the changes When you have finished creating or editing the effect save it in the recalled register or an...

Page 771: ... keyframes Insert Insert the current image as a keyframe Inserting a keyframe in an existing effect may change the duration of the effect see page 773 Modify Modify a keyframe You can modify a single keyframe or a range of keyframes in the effect together Delete Delete a keyframe You can delete a single keyframe or a range of keyframes in the effect together Deleting keyframes from an effect reduc...

Page 772: ...the effect position Difference in the effect of a paste operation Variable duration mode The copied keyframe is inserted at the specified position Constant duration mode The copied keyframe is written over the specified position Transition mode You can use an effect created with keyframes as a DME wipe pattern on the switcher In this case it is necessary to set the transition mode the way in which...

Page 773: ...k See Setting the Effect Duration page 818 When you change the effect duration the keyframe duration for each keyframe in the effect is automatically recalculated proportionally Schematic view of keyframe duration and effect duration The effect duration may also be changed by inserting or deleting keyframes Changes in the effect duration caused by inserting a keyframe When the effect is stopped on...

Page 774: ...effect duration caused by deleting a keyframe When the effect is stopped on a keyframe a delete operation deletes the keyframe and reduces the effect duration by the duration of the deleted keyframe When the effect is stopped between two keyframes a delete operation deletes the preceding keyframe and reduces the effect duration by the duration of the deleted keyframe Insertion position Change in e...

Page 775: ...effect duration Delay setting You can set the delay from the time of executing an operation to run the effect and the effect actually starting that is the delay until the first keyframe You can make this setting in the keyframe control block Note that changing the delay does not alter the duration of the effect Deletion position Change in effect duration Deletion of the first keyframe Deletion of ...

Page 776: ...multaneously Key1 to Key8 Overall path settings for items relating to keys 1 to 8 are made simultaneously Key 1 All to Key 8 All Source Key source path for keys 1 to 8 Fill Key fill path for keys 1 to 8 Proc Proc path for keys 1 to 8 Trans Transition path for keys 1 to 8 Bkgd Util Overall path settings for items relating to the background and utility buses are made simultaneously Bkgd Util All Bkg...

Page 777: ...for frame memory freeze image outputs 1 to 8 Aux Overall path settings for AUX buses are made simultaneously Aux All Aux 1 to 48 Paths for Aux 1 to 48 Color Bkgd Overall path settings for color backgrounds are made simultaneously Color Bkgd All Color Bkgd 1 Paths for color background 1 Color Bkgd 2 Paths for color background 2 CCR Overall path settings for color corrector CCR All CCR 1 Path for co...

Page 778: ...x and y axes Skew Overall path settings for items relating to skew are made simultaneously Skew All Skew X Skew Y Paths for the x and y axes Aspect Path for aspect ratio Pers Overall path settings for items relating to perspective are made simultaneously Pers All Pers X Pers Y Pers Z Paths for the x y and z axes Axis Loc Overall path settings for items relating to image rotation axis are made simu...

Page 779: ...rall path settings for items relating to perspective are made simultaneously Pers All Pers X Pers Y Pers Z Paths for the x y and z axes Axis Loc Overall path settings for items relating to image rotation axis are made simultaneously Axis All Axis X Axis Y Axis Z Paths for the x y and z axes Item Paths that can be set Effect All Overall path settings for DME effect items are made simultaneously Edg...

Page 780: ...a Glow Path for glow Freeze Path for freeze Non Linear Path for nonlinear effects Light Overall path settings for lighting items are made simultaneously Light All Lighting Path for lighting Spot Lighting Path for spotlighting a Trail Path for trails In Out Overall path settings for items relating to input output are made simultaneously In Out All Bkgd Path for background Video Key Path for video k...

Page 781: ...ectorscope CCW The hue changes in a counterclockwise direction as seen on a Vectorscope Short The hue changes in whichever of the clockwise and counterclockwise directions is shorter Long The hue changes in whichever of the clockwise and counterclockwise directions is longer Path types for Xpt There are two types as follows Xpt Hold off When replaying a keyframe change the inputs to the settings s...

Page 782: ...ster so that operation can be applied to two or more regions at a time To save master timeline registers use the numeric keypad control block or menu to recall them you can use the numeric keypad control block menu the Flexi Pad control block or the Multifunction Flexi Pad control block For more details see Creating and Saving a Master Timeline page 830 Sequence of Keyframe Operations The followin...

Page 783: ...dify or delete keyframes Time settings see page 817 Set the overall duration of the effect or the duration of each keyframe Path setting see page 820 Set the type of interpolation used between successive keyframes Executing effects see page 823 This provides a smooth effect based on the time and path settings Saving effects see page 828 Save a completed effect in a register ...

Page 784: ...l block press the top menu selection button KEY FRAME 2 Select HF1 Time Line The Time Line menu appears Interpreting the Timeline Menu The following are the main parts of the menu display Key Frame Timeline menu 1 Keyframe status 2 Region name and register number 3 Delay numerical display 5 Display start time 7 Delay display on timeline 8 Pause point 6 Display end time 0 Effect duration 9 Total ti...

Page 785: ...art of the actual effect d Keyframe number total This shows the number of the keyframe at the cursor position and the total number of keyframes in the register e Display start time This shows the timecode value for the timeline display start point f Display end time This shows the timecode value for the timeline display end point g Delay display on timeline When a delay is set the interval is show...

Page 786: ...on or off On The regions for which the region selection buttons in the numeric keypad control block are lit are shown in the precedence order see next item set in this menu followed by the regions for which the buttons are off in the same order Off The regions appear according to the precedence order see next item and display on off setting see page 787 set in this menu Deciding the precedence ord...

Page 787: ...Active Region is off to select which regions are displayed in the Timeline menu use the following procedure 1 In the Timeline Assign menu use any of the following methods to select the region Press directly on the list on the left of the status area Press the arrow keys to scroll the reverse video cursor Turn the knob 2 For no display press Display turning it off To display press once more turning...

Page 788: ...er which is commonly used for all DME regions channels For a description of the concept of regions and registers see Regions page 766 and Registers page 768 The master timeline can also be recalled from the standard type Flexi Pad control block Recalling a register from the numeric keypad control block Numeric keypad control block 1 Press the EFF button turning it on This allocates the numeric key...

Page 789: ...the master timeline see Creating and Saving a Master Timeline Using the Buttons in the Numeric Keypad Control Block page 830 Notes The regions that can be selected simultaneously are those assigned to the region selection buttons in the numeric keypad control block See Assigning a Region to a Region Selection Button in the Numeric Keypad Control Block or Multifunction Flexi Pad Control Block in Ch...

Page 790: ... indicates the following e The selected register is empty for the regions selected in step 2 E The selected register is empty for all currently selectable regions 4 To apply a temporary attribute effect dissolve press the EFF DISS button Notes It is not possible to apply temporary attributes to the master timeline 5 Press the ENTER button This recalls the specified register When the master timelin...

Page 791: ... number and last recalled register number appear in the numeric display 2 Using any of the following methods select the bank to be recalled To select bank 0 press the BANK 0 button To select bank 1 press the BANK 1 button To select any of banks 0 to 9 press the BANK SEL button the memory recall section display changes as shown in the following figure press one of 0 to 9 EFF button Numeric display ...

Page 792: ... setting in the Setup menu you can select either register names or register numbers to be displayed Lit orange register holding the master timeline Lit yellow last recalled register Off empty register 3 Press the button in the memory recall section which shows the desired register name The button you pressed lights yellow and the master timeline is recalled The numeric display shows the bank numbe...

Page 793: ...corresponding M E 1 M E 2 M E 3 M E 4 and PGM PST regions Notes To select M E 4 it is necessary to assign M E 4 to a button For details of the assignment see Assigning a Region to the Region Selection Buttons in the Numeric Keypad Control Block or Multifunction Flexi Pad Control Block in Chapter 19 Volume 3 USER 1 to USER 8 These select the User regions DME 1 to DME 8 These select the DME channels...

Page 794: ...tons while holding down EFF turns the button green to indicate its corresponding region as the new reference region For details of the precedence order for becoming the reference region see Reference region page 767 The display shows the name of the reference region and the number of the last register recalled for this region 3 Enter the number of the register you want to recall using the numeric ...

Page 795: ...all the master timeline 1 In the Multifunction Flexi Pad control block press the EFF button This switches the Multifunction Flexi Pad control block to the effect operation mode 2 Press the MSTR RCLL button This switches the memory recall section to the master timeline recall mode 3 Press the BANK SEL button This switches the memory recall section to the bank selection mode ...

Page 796: ...the memory recall section show the register states as follows Lit yellow Last recalled register Lit orange Register holding data Off Empty register 5 Press the number of the desired register The button you pressed lights yellow and this recalls the master timeline The alphanumeric display shows the selected bank and register numbers ...

Page 797: ... selection buttons in the numeric keypad control block or Multifunction Flexi Pad control block is linked to the menu If you carry out region selection by pressing a region selection button then all the regions assigned to that button are selected 1 In the Key Frame menu press HF7 Region Select The Key Frame Region Select menu appears On the left of the status area region selection buttons appear ...

Page 798: ... Module group appear at the lower left of the status area and if you press either Region Sel Btn Area or Mem Rcl Btn Area button you can select a region assigned to a region selection button in the Multifunction Flexi Pad control block or a button in the memory recall section Selection screen for regions assigned to region selection buttons ...

Page 799: ... of the status area to select the button you want to assign The regions currently assigned to the button you pressed appear on the right side of the status area 3 In the Region Select group press the button for the region you want to select turning it on 4 In the Ref Region Select group press the button indication you want to make the reference region The button you pressed lights green ...

Page 800: ...tely before the current time press the PREV KF button To move the edit point to a keyframe specified by number press the GO TO KF button then enter the keyframe number with the numeric keypad in the numeric keypad control block or Multifunction Flexi Pad control block and press the ENTER button to confirm To move the edit point to a specified timecode press the GO TO TC button then enter the timec...

Page 801: ...ence from the current keyframe number or timecode value Press the numeric keypad button and enter the difference then press the TRIM button Each time you press the button it toggles between plus and minus Notes You can also specify edit points in the Multifunction Flexi Pad control block For details of the operation see Keyframe Creation and Editing in the Multifunction Flexi Pad Control Block pag...

Page 802: ...lling an empty register use the following procedure to create and insert each new keyframe Use the keyframe control block for carrying out the operation 1 Press the EDIT ENBL button turning it on This enables effect editing in the keyframe control block 2 Create the image you want to be the first keyframe 3 Press the INS button This takes the current image as the first keyframe You can make a sett...

Page 803: ...en the edit point is on a keyframe to insert the new keyframe before the existing keyframe hold down the SHIFT button and press the INS button This inserts the current image as the new keyframe Inserting a keyframe may change the total duration of the effect See Time Settings page 772 Modification Modifying keyframes Use the following procedure in the keyframe control block 1 Press the EDIT ENBL b...

Page 804: ...g it on 2 Stop the effect at the first keyframe of the range to be modified 3 Carry out the necessary modifications 4 Press the FROM TO button turning it on The display in the numeric keypad control block shows the current keyframe number followed by TO 5 Enter the number of the last keyframe to be modified from the numeric keypad control block and press the ENTER button to confirm 6 Press the MOD...

Page 805: ...utton turning it on The display in the numeric keypad control block shows the current keyframe number followed by TO 5 Using the numeric keypad in the numeric keypad control block carry out the following operations To set the first keyframe in the range to be modified press the CLR button then enter the keyframe number and press the ENTER button to confirm To set the last keyframe in the range to ...

Page 806: ...The modified parameter values are taken as absolute values and applied to all of the selected keyframes Background A Background B Keyframe 1 Keyframe 2 Keyframe 3 Effect execution Modify keyframe 2 Changing the position of background B in the horizontal direction Select keyframes 1 to 3 and modify simultaneously Keyframe 1 Keyframe 2 Keyframe 3 Effect execution Result The horizontal position of ba...

Page 807: ...keyframes 1 Press the EDIT ENBL button turning it on 2 Stop the effect at the desired edit point Background A Background B Modify keyframe 2 Changing the position of background B in the horizontal direction Select keyframes 1 to 3 and modify simultaneously Result Background B of keyframes 1 and 3 is moved in the horizontal direction by the same amount as in keyframe 2 Keyframe 1 Keyframe 2 Keyfram...

Page 808: ... the duration does not change For details see Changes in the effect duration caused by deleting a keyframe page 774 Movement Moving keyframes 1 Press the EDIT ENBL button turning it on 2 Stop the effect at the edit point you want to move 3 To move a number of keyframes in a single operation press the FROM TO button turning it on to specify the keyframes For how to specify a range of keyframes see ...

Page 809: ...an one keyframe simultaneously page 804 4 Press the COPY button This copies the specified keyframe and saves it to the paste buffer 5 Move the edit point to the position where you want to insert the copied keyframe 6 Press the PASTE button This inserts the keyframe you have copied after the current keyframe In constant duration mode the copied keyframe overwrites the edit point To insert the copie...

Page 810: ...ing it on 2 Stop the effect on the keyframe you want to make the first of the loop range start point Here by way of example keyframe 2 is taken as the start point 3 Press the KF LOOP button in the keyframe control block turning it on The numeric keypad control block display shows the start point keyframe number as follows The example shown means from keyframe 2 to where the end keyframe is to foll...

Page 811: ... change the loop range or count for the currently recalled effect carry out the following procedure 1 When the KF LOOP button in the keyframe control block is lit amber press it turning it green The numeric keypad control block display shows the current loop range If for example the start point is keyframe 2 and the end point is keyframe 5 this appears as follows 2 To change the loop range press t...

Page 812: ...d the number of loops remaining If the loop count is infinite inf the remaining number is not shown If the REV button is lit the loop is played in the reverse order Canceling keyframe loop execution Press the REWIND button in the keyframe control block Changes to the loop range caused by keyframe insertion deletion When a keyframe is inserted or deleted within the loop range the loop range also ch...

Page 813: ... Edit Operation To undo a keyframe insert modify delete or paste operation immediately after execution press the UNDO button Duration Mode Setting There are two keyframe duration modes variable duration mode and constant duration mode in which the effect duration is fixed see page 772 To select variable duration mode turn the CONST DUR button off To select constant duration mode press the CONST DU...

Page 814: ...ransition mode Frame I O H select frame in out transition mode in the horizontal direction Frame I O V select frame in out transition mode in the vertical direction For details of creating an effect for user programmable DME see Creating User Programmable DME Patterns in Chapter 6 Volume 1 Notes Which DME channel is selected as the reference region lit green in the numeric keypad control block is ...

Page 815: ...ation PAUS button Add a pause setting to a keyframe see page 809 COPY button Copy a keyframe see page 809 PSTE button Paste a keyframe see page 808 ALL button Select all keyframes in an effect see page 803 Buttons in the memory recall section in effect editing mode first page Press the PAGE 1 2 button to switch to the next button display Buttons in the memory recall section in effect editing mode ...

Page 816: ...s keyframe see page 800 NEXT button Move the edit point to the next keyframe see page 800 RUN button Run the effect see page 824 EFF DUR button Set the effect duration see page 818 KF DUR button Set the keyframe duration see page 817 DLY button Set a delay see page 819 KF LOOP button Set a keyframe loop see page 810 CNST DUR button Switch the duration mode see page 813 GOTO TC button Move the edit...

Page 817: ...ils of keyframe duration and effect duration see Keyframe duration and effect duration page 772 Setting the Keyframe Duration Keyframe control block Setting the keyframe duration You can set the value of the keyframe duration independently for each keyframe by the following method 1 Press the EDIT ENBL button turning it on EFF DUR button KF DUR button EDIT ENBL button DELAY button ...

Page 818: ...the entry This changes the keyframe duration to the new setting Notes In addition to the above operation the keyframe duration may also be automatically changed as a result of changing the effect duration See the next section Setting the Effect Duration To set the effect duration use the following procedure 1 Press the EDIT ENBL button turning it on 2 Press the EFF DUR button turning it on The dis...

Page 819: ...1 Press the EDIT ENBL button turning it on 2 Press the DELAY button turning it on The display in the numeric keypad control block shows DELAY followed by the delay time seconds frames 3 Using the numeric keypad in the numeric keypad control block enter the timecode value for the delay as a maximum of four digits You can also use the TRIM button to enter a difference value See To enter a difference...

Page 820: ...irst row path settings for the switcher M E1 to M E4 and PGM PST banks Second and third rows path settings for User1 to User8 Fourth row path settings for DME local channel and global channel 3D transforms and effects Making switcher path settings This section describes settings for M E 1 Key1 as an example The area for the VF buttons shows the names of items A B sign by a button indicates that pr...

Page 821: ...ters are updated each time a keyframe is passed Linear Linear interpolation between keyframes resulting in constant speed movement S Curve The rate of change accelerates and decelerates before and after a keyframe so that the rate of change is maximum midway between two keyframes Spline The effect follows a smooth curved path from each keyframe to the next The status area reflects the selected pat...

Page 822: ...changes in whichever of the clockwise and counterclockwise directions is longer Changing the path type for Xpt 1 Press the Xpt path type indication for the item that you want to change A path selection window appears 2 Press the indication for the desired path type to select it Xpt Hold off When replaying a keyframe change the inputs to the settings saved in memory Xpt Hold on When replaying a key...

Page 823: ...is is referred to as effect execution See also Effect Execution page 781 It is also possible to execute an effect from the device control block the standard type Flexi Pad control block or the Multifunction Flexi Pad control block see Chapter 2 Volume 1 Executing Effects in the Keyframe Control Block Keyframe control block Effect execution section REWIND button FF button RUN button ...

Page 824: ...ader Press the KF button in the transition control block turning it on to execute a keyframe effect with the fader lever in the same control block You can also assign the KF button to a transition type selection button in the transition control block For the operation of assigning the KF button to the transition type selection buttons see Overall Control Panel Settings Config Menu in Chapter 19 Vo...

Page 825: ...ast keyframe When the REV button is lit The effect is executed in the direction from the last keyframe to the first keyframe When the NORM REV button is lit Each time the effect is executed the direction reverses Executing an effect up to the next keyframe 1 Press the STOP NEXT KF button turning it on 2 Press the RUN button This executes the effect as far as the next keyframe When the REV button i...

Page 826: ...ed bank number and last recalled register number appear in the numeric display 2 Press the following buttons to execute the effect REWIND Press this button to move to the first keyframe of the currently recalled effect RUN Press this button to run the currently recalled effect Executing an Effect in the Multifunction Flexi Pad Control Block 1 In the Multifunction Flexi Pad control block press the ...

Page 827: ...utton to switch the memory recall section to the execution mode setting mode and set the execution mode with the following buttons then execute the effect EFF LOOP button Execute the effect repeatedly STOP NEXT button Execute the effect and stop at the next keyframe NORM button Execute the effect from the first keyframe to the last keyframe NORM REV button Execute the effect as far as the first or...

Page 828: ...l block page 788 3 Press the STORE button turning it on 4 With the numeric keypad enter the number of the register in which you want to save the effect To find an empty register instead of entering a number press the period button To search for an empty register common to all currently selectable regions press the button again To search for an empty register in the 100 range press 1 0 0 period in ...

Page 829: ...the memory recall section to effect editing operations 4 Press the STOR button turning it on 5 With the numeric keypad enter the number of the register in which you want to save the effect To find an empty register instead of entering a number press the period button To search for an empty register common to all currently selectable regions press the button again To search for an empty register in...

Page 830: ...ns 2 Recall the register number of the effect you want to save on the master timeline for each region See Recalling a register from the numeric keypad control block page 788 3 Of the region selection buttons press those buttons for the regions you want to save on the master timeline turning them on 4 Press the region selection button MASTR turning it on The display shows the number of the register...

Page 831: ...rmation in master timeline register 1 before change m Information in master timeline register 1 after change 1 Recall the master timeline register you want to change See Recalling a register from the numeric keypad control block page 788 This simultaneously recalls M E 1 register 5 and P P register 5 and the M E 1 and P P region selection buttons light 2 Press the region selection button MASTR tur...

Page 832: ... block lit hold down the STORE button While it is held down the buttons for the saved regions light When the button is released the state before it was held down is restored Creating and Saving a Master Timeline Using the Buttons in the Multifunction Flexi Pad Control Block Creating and saving a master timeline 1 Press the EFF button turning it on This assigns the memory recall section to keyframe...

Page 833: ...f effects Save the effects for each region first then carry out the master timeline save Changing a master timeline You can change information already saved in a master timeline As an example to change the M E 2 register from Effect 11 to Effect 15 use the following procedure 1 Recall the master timeline register you want to change See Recalling a register from the numeric keypad control block pag...

Page 834: ...h the Menu You can save a master timeline using the Effect Master Timeline Store menu Recalling the Store menu 1 Do either of the following In the menu control block press the top menu selection button EFF In the numeric keypad control block press the EFF button twice in rapid succession The Effect menu appears 2 Press VF1 Master Timeline and HF1 Store The Master Timeline Store menu appears The st...

Page 835: ...rse video cursor Turn the knob a For P Bus and Device1 to Device12 register numbers 1 to 250 can be set 2 Press Edit The Edit menu appears and you can now save the master timeline in the specified register In this menu again you can turn the knob to select the master timeline register The status area shows the status of each region in this master timeline 3 Using any of the following methods selec...

Page 836: ... Turn the knob to select the number of the effect register 6 Repeat steps 3 to 5 as required to set all regions and register numbers to be saved on the master timeline 7 In the Store group press Store This saves the settings To return to the state before saving the master timeline content In the Store group press Undo Knob Parameter Adjustment Setting values 3 Effect Reg Effect register number 1 t...

Page 837: ...isters for P Bus and Device1 to Device12 carry out similar operations using VF6 DEV PBUS Effect 1 250 Effect Attribute Settings Applying effect dissolve To apply the effect dissolve attribute to a keyframe effect use the following procedure 1 In the Effect menu press VF2 Effect 1 99 and HF1 Attribute The Attribute menu appears The status area shows the region names register numbers and status and ...

Page 838: ...pper part of the list Register number Register name Write protected status When the register is write protected a letter L appears Empty status When the register is empty a letter E appears Effect Register Editing You can carry out the following editing on effect registers and master timeline registers Lock Write protect the contents of the register Copy Copy the contents of one register to anothe...

Page 839: ...window then select the region in the selection window Selecting multiple regions is also possible To select all regions press ALL 3 Press OK The selected region name appears in the upper part of the list 4 Using any of the following methods select the register Press directly on the list in the status area Press the arrow keys to scroll the reverse video cursor Turn the knobs To select all register...

Page 840: ...same configuration Two of the DME ch1 to 8 including Global regions 3 Press OK The selected region name appears in the upper part of the list 4 Using any of the following methods select the desired registers Press directly on the list in the status area Press the arrow keys to scroll the reverse video cursor Turn the knobs To select all registers press ALL 5 To copy without transferring the name i...

Page 841: ...llowing methods select the register Press directly on the list in the status area Press the arrow keys to scroll the reverse video cursor Turn the knobs 5 Press Merge This carries out the merge Deleting data from effect registers 1 In the Effect menu press VF2 Effect 1 99 and HF6 Delete The Delete menu appears 2 Press the region display in the upper part of the list to display a selection window t...

Page 842: ...ons press ALL 3 Press OK The selected region name appears in the upper part of the list 4 Using any of the following methods select the register you want to name Press directly on the list in status area Press the arrow keys to scroll the reverse video cursor Turn the knob The selected register appears in reverse video 5 Press Rename A keyboard window appears For details of keyboard window operati...

Page 843: ...For the same number the register name for the M E 1 region takes precedence If there is no data for the M E 1 region then the register name appears in the sequence M E 2 M E 3 M E 4 P P User1 to User8 DME ch1 to DME ch8 Device1 to Device12 P Bus GPI Macro Indication colors Each register has a color coded border indicating its status Selected register pale blue border Register containing data shown...

Page 844: ...ister indication in the status area Turn the knob 2 In the Copy group press From __ 3 Select the copy destination register 4 In the Copy group press To __ This executes the copy Deleting the contents of a register This applies to all regions In the Effect Status menu use the following procedure 1 Using any of the following methods select the register you want to delete Press directly on the corres...

Page 845: ...re 1 Using any of the following methods select the register you want to rename Press directly on the corresponding register indication in the status area Turn the knob 2 Press Rename A keyboard window appears 3 Enter a name of up to eight characters and press Enter This changes the name Knob Parameter Adjustment Setting values 1 Register Register selection 1 to 99 ...

Page 846: ...Chapter 13 Keyframe Effects 846 Register Operations in the Menus ...

Page 847: ...847 Chapter 14 Snapshots ...

Page 848: ... or DME The term snapshot alone usually refers to this type of snapshot This only applies to regions assigned to region selection buttons in the numeric keypad control block and Multifunction Flexi Pad control block For details about a region see Regions page 766 Master snapshot This applies to the selected regions and the register numbers saved in the regions A master snapshot can be saved and re...

Page 849: ...ot the key on off state should also remain unchanged For details of the setting operation see Settings Relating to Keys Wipes Frame Memory and Color Correction Key Wipe FM CCR Menu in the Chapter 20 Volume 3 Effect dissolve The transition from the state before the snapshot recall to the snapshot settings is carried out smoothly by a dissolve The dissolve duration can be set in the Snapshot menu Au...

Page 850: ...butes set for each register These are called temporary attributes You can set temporary attributes when recalling a snapshot Bus override If you recall a snapshot while holding down an A or B bus button the selection of the signal on the A or B bus does not change when the snapshot is recalled This function is called bus override This function is effective when cross point hold is off and you want...

Page 851: ...lock Saving a snapshot from the numeric keypad control block 1 Make the settings for the state you want to save as a snapshot 2 In the numeric keypad control block press the SNAPSHOT button turning it on This allocates the numeric keypad control block to snapshot operations and the RCALL button lights SNAPSHOT button Display EFF DISS button CLR AUTO TRANS button TRIM GPI ENBL button Numeric keypad...

Page 852: ...multaneously are those assigned to the region selection buttons in the numeric keypad control block See Assigning a Region to a Region Selection Button in the Numeric Keypad Control Block in Chapter 19 Volume 3 The first button pressed lights green as the reference region and any subsequently pressed buttons light amber Pressing one of the amber lit buttons while holding down SNAPSHOT turns the bu...

Page 853: ...s In the numeric keypad control block it is not possible to apply the cross point hold For details see Applying snapshot attributes page 869 7 Press the ENTER button This saves the snapshot and the STORE button goes off The RCALL and STORE STATS buttons light To cancel a snapshot save operation After saving a snapshot to cancel the save hold down the STORE STATS button and press the UNDO button Re...

Page 854: ...ressed button lights green as the reference region and subsequently pressed buttons light amber Pressing one of the amber lit buttons while holding down SNAPSHOT turns the button green to indicate its corresponding region as the new reference region For details of the precedence order for becoming the reference region see Reference region page 767 The display shows the name of the reference region...

Page 855: ...r number appear in the display If you applied the effect dissolve or auto transition temporary attributes in step 4 the corresponding buttons go off When a master snapshot is recalled the region selection buttons light according to the saved region information To cancel a snapshot recall operation After saving a snapshot to cancel the recall press the UNDO button Notes It is not possible to cancel...

Page 856: ... In a standard type Flexi Pad control block or Multifunction Flexi Pad control block in order to handle the 99 registers they are considered in groups These groups are called banks and there are ten banks numbered from 0 to 9 The correspondence between banks and registers is shown in the following table SNAPSHOT button Numeric display UNDO button STORE STATS button Bank selection buttons Memory re...

Page 857: ...le It is also not possible to apply attributes or to cancel a snapshot save or recall operation once carried out To use registers 9 to 99 or to cancel a snapshot save operation use the numeric keypad control block Saving and Recalling Snapshots Saving a snapshot in the Multifunction Flexi Pad control block As an example to save a snapshot on the M E 1 bank use the following procedure Bank number R...

Page 858: ...lect bank 1 Press the BANK 1 button To select any bank from 0 to 9 Press the BANK SEL button changing the memory recall section display as in the following figure select a number from 0 to 9 The selected bank number appears in the numeric display The buttons in the memory recall section change to show the names of the registers in the selected bank together with the register status Using the Setup...

Page 859: ... M E bank is not assigned to any region selection button in the numeric keypad control block in a setup setting it is not possible to recall a snapshot with the Flexi Pad control block of that M E bank See Assigning a Region to a Region Selection Button in the Numeric Keypad Control Block in Chapter 19 Volume 3 As an example to recall a snapshot on the M E 1 bank use the following procedure 1 In t...

Page 860: ...snapshot The numeric display shows the selected register number after the bank number Deleting a snapshot in the Flexi Pad control block standard type or simple type As an example to delete a snapshot on the M E 1 bank use the following procedure 1 In the M E 1 bank Flexi Pad control block press the SNAPSHOT button This assigns the Flexi Pad control block to snapshot operations The numeric display...

Page 861: ... Pad control block 3 Hold down the STORE STATS button then hold down the button in the memory recall section displaying the number of the corresponding register The button you pressed goes off and this deletes the snapshot The STORE STATS button lights amber Notes On a simple type Flexi Pad control block it is not possible to delete a snapshot ...

Page 862: ...i Pad control block of the CCP 6224 or CCP 6324 Control Panel as follows Saving and Recalling Snapshots Saving a snapshot in the Multifunction Flexi Pad control block As an example to save a snapshot on the M E 1 bank use the following procedure 1 In the M E 1 bank make the settings for the state you want to save as a snapshot SNAPSHOT button Alphanumeric display Region selection buttons Memory re...

Page 863: ... USER 1 to USER 8 These select the User regions DME 1 to DME 8 These select the DME channels RTR This selects the Router region ALL This selects all regions Notes The regions that can be selected simultaneously are those assigned to the region selection buttons in the memory recall section See Assigning a Region to a Region Selection Button in the Numeric Keypad Control Block or Multifunction Flex...

Page 864: ... pressing the STOR button lighting it yellow you can enter the desired register number from the numeric keypad The number you entered appears in the alphanumeric display To find an empty register press the button without entering a number and the number of an empty register appears in the alphanumeric display Confirm the displayed number by pressing the ENTR button This saves the data in the speci...

Page 865: ... Multifunction Flexi Pad Control Block When the reference region is M E x x is a number or P P When the PAGE 1 2 button is pressed to display the second page When the reference region is other than M E x or P P and effect dissolve settings are possible ...

Page 866: ... block press the SNAPSHOT button This assigns the Multifunction Flexi Pad control block to snapshot operations The numeric display shows the last selected bank number and the register number last recalled on the bank 2 Press the region selection button corresponding to the region you want to recall turning it on Multiple selections are also possible M E 1 M E 2 M E 3 M E 4 P P These select the cor...

Page 867: ...ess the TEMP ATTR button you can now select the temporary attribute with the following buttons EFF DISS button Effect dissolve DUR xxx button Effect dissolve duration The current setting is shown by xxx AUTO TRNS button Auto transition XHLD xxx button Bus cross point hold The affected bus is shown by xxx For details of the operation mode of the XPT HOLD button see Selecting the Bank to Make the Se...

Page 868: ...sing the RCLL button lighting it yellow you can enter the desired register number from the numeric keypad Confirm the displayed number by pressing the ENTR button Deleting a snapshot in the Multifunction Flexi Pad control block As an example to delete a snapshot on the M E 1 bank use the following procedure 1 In the Multifunction Flexi Pad control block press the SNAPSHOT button press region selec...

Page 869: ...ing applying attributes and so on using the same menu See page 876 Selecting a Region or Reference Region in a Menu During snapshot operations you can select a region in the menu This is convenient for selecting some of the regions assigned to the numeric keypad control block or changing the reference region For details of the operations see Selecting by menus page 797 Setting Snapshot Attributes ...

Page 870: ...ls see Selecting the Bank to Make the Settings in Chapter 20 Volume 3 1 Press XPT Hold The Snapshot Attribute Xpt Hold menu appears The status area shows a list of the currently selected regions and bus names 2 Using any of the following methods select the register Press directly on the list in the status area To select one or more buses press Plural and then select buses Press the arrow keys to s...

Page 871: ...set the duration for a dissolve set as a temporary attribute effect in the numeric keypad or Flexi Pad control block turn the knob To apply the auto transition attribute Press Auto Transition turning it on To apply the GPI output attribute 1 Press GPI Output turning it on 2 Turn the knob to set the port number To apply the clip event attribute Notes The following operating procedure can be used on...

Page 872: ...or details of attributes and available attributes see Snapshot Attributes page 849 Snapshot Status Display The Snapshot Attribute menu displays the following information For details of how to access the Snapshot Attribute menu see page 869 Region name The selected region name appears in the upper part of the list Register number Register name Write protected status When the register is write prote...

Page 873: ...d is set for all of the DME front video bus DME front key bus DME back video bus and DME back key bus Aux Cross point hold is set for one of the AUX buses Fm1 Fm2 Cross point hold is set for one of the frame memory 1 and 2 buses Ccr1 Ccr2 Cross point hold is set for one of the CCR 1 and 2 buses RTR Cross point hold is set for the Router region Displayed character codes Attributes set Duration valu...

Page 874: ...l selection data is saved or recalled Modifier Only the key modifier settings are saved or recalled Transition Only the independent key transition settings are saved or recalled Creating and Saving a Master Snapshot To save a master snapshot in the Snapshot menu after recalling the Snapshot Master Snapshot Store menu refer to the operations in Creating and Saving a Master Timeline With the Menu pa...

Page 875: ...ock Write protect the contents of the register Copy Copy the contents of one register to another register Move Move the contents of one register to another register Swap Swap the contents of two registers Delete Delete the contents of a register Name Attach a name to a register For details of snapshot register operations see Effect Register Editing page 838 Displaying a List of Snapshot Registers ...

Page 876: ...o DME ch8 RTR Operations in the Misc Snapshot Menu Recalling a snapshot 1 In the Misc menu press Snapshot The Snapshot menu appears 2 As required change the bank see page 877 3 Press the button for the number or name you want to recall This recalls the snapshot and the button you pressed lights green Saving a snapshot 1 Display the Misc Snapshot menu 2 Set the state you want to save as a snapshot ...

Page 877: ...To apply the cross point hold attribute in the Attribute Xpt Hold group select the appropriate bus Notes A setting in the Setup menu determines whether key disable is applied to cross point hold or not For details see Setting the Operation Mode of the Key Bus XPT HOLD Button in Chapter 20 Volume 3 2 Select the following attributes in the Attribute group as required Effect Dissolve Apply effect dis...

Page 878: ...ot register 1 In the Misc Snapshot menu press Rename The button lights amber 2 As required change the bank 3 Press the button for the number you want to rename A keyboard window appears 4 Enter the register name and press Enter The new name appears on the memory recall button ...

Page 879: ...879 Chapter 15 Utility Shotbox ...

Page 880: ...he user preference buttons in the menu control block see page 880 For details of the menu control block utility shotbox control block and cross point control block see Menu Control Block Utility Shotbox Control Block and Cross Point Control Block in Chapter 2 Volume 1 For details of the settings for assigning functions to buttons see Setting Button Assignments Prefs Utility Menu in Chapter 19 Volu...

Page 881: ...ollow the procedure in Shotbox Execution in the Utility Shotbox Control Block page 896 1 Press one of the bank selection buttons BANK1 to BANK4 to select a bank The bank selection button you pressed lights amber For the selected bank the memory recall buttons show the button numbers and corresponding button states If a button has been given a name in the setup menu this name appears Not lighted bu...

Page 882: ...n use the key 2 row of each of the M E 1 to M E 4 and PGM PST banks in the same way as the buttons in the utility shotbox control block Notes To use this function it is first necessary to assign the utility shotbox mode switching function to the control panel PRE MCRO button For details of the assignment operation see Assigning the Utility Shotbox Mode Switching Function in Chapter 19 Volume 3 Cro...

Page 883: ...ion is executing a shotbox register follow the procedure Executing a Shotbox Function With the Key 2 Row Cross Point Buttons page 897 1 Press the PRE MCRO button turning it on 2 Press one of the bank switching buttons see previous figure to select the bank These buttons correspond to banks 1 to 5 in sequence from the left 3 Press the cross point button to which the desired action is assigned This ...

Page 884: ...ion of the regions to which the register applies with the snapshots or effects to be recalled The Auto Run function is an attribute which can be set for each register When this is set to On an effect recalled by a shotbox operation is automatically run When register 1 is executed this recalls M E 1 snapshot 1 User2 effect 5 and DME ch3 effect 1 For register 1 auto run is On and therefore the User2...

Page 885: ...data and the effect setting data and save in the register The procedure described here makes the snapshot settings first followed by the effect settings Creating a shotbox register 1 In the numeric keypad control block press the SNAPSHOT button turning it on This assigns the numeric keypad control block to snapshot operations 2 Specify the register number of the snapshot you want to save in a shot...

Page 886: ...g in a shotbox register and the STORE button goes off At the same time the RCALL button lights 8 In the numeric keypad control block press the EFF button turning it on 9 Specify the register number of the keyframe effect you want to save in a shotbox register and then recall it for each region For details of the procedure for recalling a register see Recalling a Register page 788 10Referring to st...

Page 887: ...tton is lit the mode selection buttons TRANS RATE button and so on in the numeric keypad control block do not operate To change the mode press the RCALL button or SHOTBOX button so that the STORE button goes off Creating a Shotbox Register in the Multifunction Flexi Pad Control Block 1 In the Multifunction Flexi Pad control block press the SNAPSHOT button turning it on This changes the Multifuncti...

Page 888: ...mber of the selected register appears in the alphanumeric display An E after the number indicates an empty register 8 Press ENTR This saves the region you turned on in step 6 and the register number you recalled for that region as a snapshot setting in a shotbox register and the STORE button goes off At the same time the RCALL button lights 9 Press the EFF button turning it on 10Specify the regist...

Page 889: ...k the region saved in the register press and hold the following buttons To check the snapshot region SNAPSHOT button To check the keyframe effect region EFF button The memory recall section buttons change as shown in the following illustration and the region for the saved data lights To recall an assigned effect and simultaneously execute it Press the AUTO RUN button lighting it green then save th...

Page 890: ...er name 2 If necessary switch the region display by pressing one of the following buttons in the status area M E P P Shows the allocations for M E 1 M E1 M E 2 M E2 M E 3 M E3 M E 4 M E4 and P P P P User Shows the allocations for User1 USR1 to User8 USR8 DME Shows the allocations for DME ch1 DME1 ch2 DME2 ch3 DME3 ch4 DME4 ch5 DME5 ch6 DME6 ch7 DME7 and ch8 DME8 DEV1 8 Shows the allocations for De...

Page 891: ... a confirmation message appears asking whether or not to cancel the operation Press OK to return to the previous menu display without carrying out the registration If the operation is carried out the region selected in step 5 is registered on the master timeline and the parameters are now valid 7 Depending on the selection in step 6 set the parameters as follows When a snapshot is selected When an...

Page 892: ...ter 15 Utility Shotbox 892 Shotbox Register Creation To return to the state before saving the setting In the Store group press Undo To execute the settings to check them Press Recall to execute the shotbox ...

Page 893: ...umeric keypad control block see page 893 Flexi Pad control block see page 894 Multifunction Flexi Pad control block see page 894 Cross point control block see page 897 Utility shotbox control block see page 896 Shotbox Execution From the Numeric Keypad Control Block Numeric keypad control block Region selection buttons STORE button STORE STATS button RCALL button SHOTBOX button Display UNDO button...

Page 894: ...x register on recall the effect is immediately executed If you recall an empty register then shotbox execution has no effect When auto run is not set for the recalled register Simply recalling the register does not run the effect To do this in the keyframe control block press the RUN button Shotbox Execution in the Multifunction Flexi Pad Control Block or the Flexi Pad Control Block Notes In the s...

Page 895: ...lected bank number The buttons in the memory recall section show the names and states of the registers corresponding to the selected bank Off register in which nothing is saved Lit orange register holding shotbox settings Lit yellow last executed register 3 Press the button in the memory recall section corresponding to the register you want to run The selected shotbox register is executed The pres...

Page 896: ...recalled register Simply recalling the register does not run the effect To do this press the RUN button Shotbox Execution in the Utility Shotbox Control Block Utility shotbox control block In the utility shotbox control block as the default setting the memory recall buttons have registers 1 to 96 allocated to banks 1 to 4 Bank Register allocation to memory recall buttons 1 1 to 24 2 25 to 48 3 49 ...

Page 897: ...egister has auto run set on recall the effect is immediately executed When auto run is not set for the recalled register Simply recalling the register does not run the effect To do this press the RUN button in the keyframe control block Executing a Shotbox Function With the Key 2 Row Cross Point Buttons You can use the key 2 row of each of the M E 1 to M E 4 and PGM PST banks in the same way as th...

Page 898: ...otbox 898 Shotbox Execution 2 Press one of the bank switching buttons see the figure on page 882 to select the bank 3 Press the cross point button to which the desired shotbox is assigned This executes the shotbox function ...

Page 899: ...one register to another Move Move data from one register to another Swap Swap the contents of two registers Delete Delete the contents of a register Name Attach a name to a register The procedures for shotbox register editing are similar to the procedures described in Effect Register Editing page 838 Unlike in effect register editing however it is not necessary to specify a region in shotbox regis...

Page 900: ...Chapter 15 Utility Shotbox 900 Shotbox Register Editing ...

Page 901: ...901 Chapter 16 Macros ...

Page 902: ...ermed a macro register For each control panel there are 250 macro registers numbered 1 to 250 Events The individual control panel operations constituting a macro are termed events One macro can contain a maximum of 99 events The following table shows the operations for each control block of the control panel that can be saved as events in a macro Control block Event Auxiliary bus control block Cro...

Page 903: ...up b simple type Transition execution section take Transition type selection Pattern limit on off compact type Transition execution section auto transition and cut Independent key transition execution section auto transition a Next transition setting Transition type selection Pattern limit on off VTR disk recorder Extended VTR frame memory clips playback b VTR disk recorder Extended VTR frame memo...

Page 904: ...napshots Master timeline Keyframe control block Effect rewind Effect execution Effect fast forward Selection of effect execution direction Device control block trackball joystick search dial c VTR disk recorder Extended VTR frame memory clips start point setting VTR disk recorder Extended VTR frame memory clips playback VTR disk recorder Extended VTR frame memory clips stop VTR disk recorder Exten...

Page 905: ...ing the sequence of operations on the control panel that you want to save as events in the macro To add an event to an existing macro recall the register holding the macro and create the event you want to add Notes While editing a macro it is not possible to execute another macro Creating a macro To include all information associated with an operation when registering a macro event When registerin...

Page 906: ...lume 3 Events requiring adjustment when creating a macro The following events require time for execution to complete and therefore when executed within a macro sequence a pause event must be inserted to adjust the timing Rewinding effects involving external device control VTR disk recorder Extended VTR cue up For example create a macro to cue up a VTR and then play back as follows Auto insert mode...

Page 907: ... position within a macro Undoing an editing operation You can undo the last event insertion modification deletion or paste operation Macro merging During macro editing you can recall and copy another register to merge it with the macro being edited For example while editing macro register 2 you can recall and copy register 1 to merge it as shown in the following figure Recall macro register 2 and ...

Page 908: ...which the macro is paused the pause length to any value in the range 1 to 999 frames When the set time has elapsed the macro is automatically executed Pause zero event By including a pause event with the time set to zero you can make macro execution pause at the pause event Step execution requires a Setup menu setting By selecting step execution mode in the Setup menu you can make macro execution ...

Page 909: ... block and the keyframe control block Notes For a macro take operation see Macro Execution page 908 the numeric keypad control block and keyframe control block are not used Use the Take button in the Flexi Pad control block For an overview of macros see Macros page 902 For macro operations in the numeric keypad control block use the following buttons See the figure on next page MCRO button UNDO bu...

Page 910: ...ing operations Recalling a register holding a macro executes the macro immediately To recall a macro register use the following procedure 1 In the numeric keypad control block press the MCRO button turning it on This assigns the numeric keypad control block to macro operations and the RCALL button lights 2 Enter the number of the register to be recalled with the numeric keypad buttons 1 to 250 To ...

Page 911: ...pends on a setting in setup For details of the settings see Setting the Macro Execution Mode in Chapter 19 Volume 3 Individual events stored in a macro are executed according to the settings in setup If you change the settings in setup a saved macro may not have the expected effect During macro execution if you switch the control panel to macro editing mode the macro being executed stops During ma...

Page 912: ...ting a new macro 1 Recall an empty register 1 to 250 For details of the method of operation see Recalling a Macro Register and Executing a Macro page 910 This assigns the numeric keypad control block and keyframe control block to macro editing and the MCRO button in the numeric keypad control block and the EDIT ENBL button in the keyframe control block light red The STORE button in the numeric key...

Page 913: ...umeric keypad control block light amber The keyframe control block returns to the state before starting macro editing Notes While carrying out macro editing in the numeric keypad control block and keyframe control block no macro operation other than macro recalling is possible in the Flexi Pad control block Merging a macro for which a macro attachment is set While creating editing a macro if you p...

Page 914: ...s the PREV KF button in the keyframe control block To move to an edit point by specifying an event number the number showing the position of the event in the macro execution sequence press the GO TO KF button in the keyframe control block then in the numeric keypad control block enter the target number and confirm with the ENTER button Inserting an event 1 Specify the edit point See page 913 2 If ...

Page 915: ...he desired event number with the numeric keypad and press the ENTER button This operation is not required when using the current event number 4 Enter the event number for the end of the range and press the ENTER button 5 Press the MOD button in the keyframe control block This modifies the specified range of events simultaneously Modifying all events at the same time 1 Carry out steps 1 to 3 of the...

Page 916: ...lock 3 Press the DEL button This temporarily deletes the specified events from the macro and copies them to the paste buffer 4 Move to the edit point which is the destination within the macro to which you want to move the events 5 To paste the contents of the paste buffer after the edit point press the PASTE button in the keyframe control block To paste before the edit point hold down the SHIFT bu...

Page 917: ...pears in the numeric keypad control block display 2 If required press the AUTO INS button in the keyframe control block to toggle the auto insert mode on or off 3 Enter the pause duration with the numeric keypad control block 0 or 1 to 999 frames 4 Press the ENTER button If auto insert mode is on this sets the pause duration and inserts the pause event When auto insert mode is off continue to step...

Page 918: ... a macro attachment set In this case the data from the assigned macro register is copied into the paste buffer Undoing a macro editing operation with the numeric keypad control block Immediately after inserting modifying deleting or pasting an event you can undo the operation by pressing the UNDO button in the numeric keypad control block Saving a Macro Use the following procedure to save the regi...

Page 919: ...e Control Block This saves the macro data in the specified register and the STORE button goes off The RCALL and STORE STATS buttons light To cancel the saving of a macro To cancel the saving of a macro immediately after performing it hold down the STORE STATS button and press the UNDO button ...

Page 920: ...e Flexi Pad Edit Mode group buttons in the Engineering Setup Panel Operation Macro menu you can set the macro execution mode to Pause Only or Full Editing see Setting the Macro Execution Mode in Chapter 19 Volume 3 The display of the standard type Flexi Pad control block changes as follows depending on the selected mode of macro execution When entering macro editing mode with Pause Only selected N...

Page 921: ...d control block treats the registers in groups These groups are called banks and there are 10 banks numbered from 0 to 9 For details of the correspondence between banks and registers see Banks and Registers page 856 Recalling a Macro Register and Executing a Macro Carrying out a macro operation in the normal mode Use the following procedure to recall a macro register 1 In the Flexi Pad control blo...

Page 922: ... display Each button in the memory recall section shows the corresponding register name and register status for the selected bank Note that in the Setup menu you can select whether to display register names or register numbers Lit orange Register holding macro data Lit yellow Last recalled register Off Empty register 3 Press the button in the memory recall section showing the name of the register ...

Page 923: ...cro attachment set if you recall another macro with the Flexi Pad control block the following operation depends on a setting in setup For details of the settings see Setting the Macro Execution Mode in Chapter 19 Volume 3 Executing a macro in normal execution mode with pause events set When execution of a macro is paused the Take button is assigned to the memory recall section To restart the macro...

Page 924: ...oes off Creating and Saving a Macro 1 In the Flexi Pad control block press the MCRO button turning it on This assigns the Flexi Pad control block to macro operations 2 Select the bank of the register in which you want to save the macro For details of the method of operation see step 2 in the previous item Recalling a Macro Register and Executing a Macro page 921 3 Hold down the MCRO button in the ...

Page 925: ...isplay appears as follows 6 Press the STORE XX button in the memory recall section where XX is the register number The STORE STATS button lights amber This saves the created macro in the register and macro editing ends The Flexi Pad control block returns to the state before macro editing began The MCRO button lights amber Notes During macro editing you can press a mode selection button in the Flex...

Page 926: ...trol block are also not possible To cancel the saving of a macro To cancel the saving of a macro immediately after performing it hold down the STORE STATS button and press the UNDO button Inserting a pause event 1 Press the PAUS button in the memory recall section The buttons in the memory recall section change as follows 2 Enter the length of pause you want to set 0 to 999 frames 3 Press the PAUS...

Page 927: ...etails of the method of operation see step 2 page 922 of Recalling a Macro Register and Executing a Macro 3 Hold down the STORE STATS button and then press the button in the memory recall section showing the corresponding register number The button you pressed in the memory recall section goes off and this deletes the macro The STORE STATS button lights amber ...

Page 928: ...n for use as in the above figure it is necessary in the Setup menu to switch the UNDO button to the MCRO button For more details see Setting the Assignment of Macro Operation Buttons in Chapter 19 Volume 3 Notes In a simple type Flexi Pad control block only registers 1 to 6 can be used for operations There are no bank operations For registers 7 to 250 use the numeric keypad control block Memory re...

Page 929: ...ton pressed remains yellow but flashes and when the macro execution completes it changes to permanently lit The numeric display shows the selected register number Notes Only one macro can be executed at a time If the same register is recalled again during macro execution or when the macro is paused the following operation depends on a setting in setup For details of the settings see Setting the Ma...

Page 930: ... the Flexi Pad control block to macro operation 2 Press the button in the memory recall section showing the register to be recalled 3 Press the Take button This executes one event within the macro then stops The number of events executed as shown in the memory recall section status display is incremented by one 4 Repeat step 3 executing the macro event by event When all events in the macro have be...

Page 931: ...ied out in step 3 as an event within the macro 5 Repeat steps 3 and 4 to register the required events in the macro The numeric display shows the last registered event position and the total number of events 6 Press the STOR 1 button in the memory recall section This saves the created macro in the register and ends the macro editing mode the MCRO button lights amber Notes During macro editing if yo...

Page 932: ...he current macro event the macro event specified as the current edit point press the NEXT button To move the edit point to the event immediately preceding the current macro event press the PREV button Inserting an event To add an event to an already created macro use the following procedure 1 Specify the edit point See page 932 2 Carry out the event to be added on the control panel For details of ...

Page 933: ...point See page 932 2 Press the ALL button lighting it green 3 Press the DEL button This deletes all events within the register Saving a Macro In the memory recall section press the STOR X X register number button to save the edited macro in a register To return to the state before editing without saving the macro editing results Press the EXIT button to recall the same register again This returns ...

Page 934: ...Multifunction Flexi Pad control block Use the following buttons Recalling a Macro Register and Executing a Macro 1 Press the MCRO mode selection button turning it on This switches the Multifunction Flexi Pad control block to macro operation mode 2 Enter the register number with the numeric keypad buttons and press the ENTR button to recall the register MCRO button Numeric keypad buttons DRCT MODE ...

Page 935: ...his selects the bank and the buttons in the memory recall section show the macro register state as follows Lit yellow Last recalled register Lit orange Register holding macro data Off Empty register 5 Press the button for the number of the register to be recalled The button you pressed lights yellow and the macro held in the corresponding register is recalled and executed The button you pressed fl...

Page 936: ...cro in normal execution mode or step execution mode Normal execution mode In this mode the macro events are automatically executed in sequence However if there is a pause event set at some point execution pauses at that point Then pressing the TAKE button in the memory recall section resumes execution Step execution mode The macro events are executed one at a time with pauses in between Execute th...

Page 937: ... page 916 PSTE button Paste a macro event see page 917 ALL button Select all macro events see page 915 STOR button Save the macro see page 918 INS button Insert a macro event see page 914 MOD button Modify a macro event see page 914 DEL button Delete a macro event see page 915 FROM TO button Switch to the mode for entering a value range with the numeric keypad see page 915 SHFT button Move a macro...

Page 938: ...ntents of a register Name Attach a name to a register The operations for macro register editing are the same as those for effect register editing see page 838 except the region selection operation which is not necessary for macro register editing Online Editing of Macro Events Using the On Line Edit menu you carry out online editing of macro events Menu Function Operations Register menu macro regi...

Page 939: ...cro Register and Executing a Macro page 929 2 In any of the following menus select the same register as the register recalled in step 1 and press On Line Edit in the button area Macro Register Lock menu Macro Register Delete menu Macro Register Rename menu File Shotbox Macro Macro File Edit menu The On Line Edit menu appears and you can now carry out online editing of the events held in the recall...

Page 940: ...number Shows the current event number When the FROM TO button in the keyframe control block is pressed to select a range of events this appears as a range From X To Y 1 Register number 2 Register name 3 Event number 5 Macro register listing 4 Remaining Memory 6 ALL button 7 Macro creation event list 8 Insert Before button 9 Insert After button 0 Delete button qa Modify button qs Prev button qd Nex...

Page 941: ...ows the current event in the list in reverse video You can turn knob 1 to scroll the list but this does not change the cursor position Depending on the switcher status the cursor color changes as follows Yellow in macro editing mode Gray when the editing mode is exited by a control panel operation Blue during macro execution f ALL button Selects all events in the macro register listing g Macro cre...

Page 942: ...r To insert an event 1 On the control panel if auto insert mode is on switch it off 2 On the control panel create a macro event The created event appears in the macro creation event list For more details of the display see Macro File Editing Rules page 1016 3 In the macro register listing press Prev or Next to select the position where you want to insert the created event 4 Carry out either of the...

Page 943: ...es the selected event Notes If not in macro editing mode 1 Delete is disabled and it is not possible to delete the selected event 1 While a macro is being executed on the control panel when macro saving has been executed or when the EXIT button in the Flexi Pad control block or Multifunction Flexi Pad control block has been pressed 3 Operate the control panel to save the editing result To modify a...

Page 944: ...u you carry out offline editing of macro events In the Off Line Edit menu you can carry out editing in the menu only unrelated to operation of the control panel To display the Off Line Edit menu In any of the following menus select the register or device holding the macro you want to edit and press Off Line Edit in the button area Macro Register Lock menu Macro Register Delete menu Macro Register ...

Page 945: ...d c Macro listing Lists the macro events that are saved in the register or file The cursor moves to the selected event Each macro event consists of the following components which you can check in the list 1 Register or file number 2 Register or file name 3 Macro listing 4 Editing button group 5 Macro editing candidate list 6 Insert Before button 7 Append button 8 Delete button 9 Set button 0 Store...

Page 946: ...ing candidates for the selection from the editing button group f Insert Before button Inserts immediately before the event selected in the macro listing g Append button Adds an empty row at the end of the macro listing h Delete button Deletes the event selected in the macro listing i Set button Reflects the item selected in the macro editing candidate list in the macro listing and editing buttons ...

Page 947: ...tionally in the leftmost blank position of the editing button group to the right of Contents a button appears corresponding to the item in the macro editing candidate list For example if Event is selected an EVNT button appears 5 In the editing button group press the button that has just appeared The item corresponding to the button appears in the macro editing candidate list If you press the EVNT...

Page 948: ...dit menu without saving the editing results Press Exit to return to the menu that was on the screen immediately before the offline editing 8 Press Store The numeric keypad window appears 9 Enter the register number as required and press Enter The current macro is stored in the register The menu screen switches to the menu that was on the screen immediately before the offline editing To append an e...

Page 949: ...t menu 3 Press Store This saves the results of the macro register or macro file editing and returns to the File Edit menu To create a new macro 1 From the list in any of the following menus select an empty register or file and press Off Line Edit in the button area Macro Register Lock menu Macro Register Delete menu Macro Register Rename menu File Shotbox Macro Macro File Edit menu The Off Line Ed...

Page 950: ...nly is executed The selection of pre or post macro mode is carried out in the cross point control block of the PGM PST bank or the M E banks For the macro only mode assign the selection function to a utility shotbox control block button or user preference button and make the selection by pressing the button Alternatively without pressing the button you can make the selection simply by simultaneous...

Page 951: ...M REV and NORM REV buttons Device control block trackball joystick The buttons to which the same functions as those of VTR disk recorder Extended VTR frame memory clips play cue stop and start tc buttons Device control block search dial PLAY CUE STOP and START TC buttons Downstream key control block DSK1 ON to DSK8 ON buttons e g KEY1 ON to KEY8 ON buttons a e TAKE button e MIX WIPE DME and CUT bu...

Page 952: ...auxiliary bus control block if in the Setup menu you change the assignment of buses to the AUX delegation buttons the macro attachment setting disappears After setting a macro attachment to a button for which you can perform function replacement or function assignment if you change the function assignment to the button the macro attachment setting disappears After setting a macro attachment to a c...

Page 953: ...cro Attachment Setting a macro attachment to a button This section describes the example of setting a macro attachment for the background A row cross points See Setting a macro attachment to a button page 950 for the buttons for which a macro attachment can be set 1 Recall the macro register you want to assign to the button 1 to 250 For details of recall see page 910 2 To set in pre macro mode hol...

Page 954: ...ngineering Setup Panel Operation menu For details see Setting the Macro Execution Mode in Chapter 19 Volume 3 To make a macro attachment setting in macro only mode Notes To carry out this operation it is first necessary to assign the Macro Only Set function to the user preference buttons in the menu control block or the utility shotbox control operation Carry out this assignment in the Eng Setup P...

Page 955: ...e it is held down buttons for which macro attachments are set flash as follows While the PRE MCRO button is held down Buttons set in pre macro mode flash amber Buttons set in macro only mode flash green While the POST MCRO button is held down Buttons set in post macro mode flash amber Buttons set in macro only mode flash green Setting a macro attachment to a fader lever You can set a macro attachm...

Page 956: ... section The indicator lights at the position where the macro attachment is set Transition rate indication in the transition execution section This shows the fader lever position where the macro attachment is set as a percentage value Fader lever start position as 0 end position 100 Removing macro attachment settings To cancel a macro attachment to a button Hold down the PRE MCRO button or POST MC...

Page 957: ...e macro attachment list display see About the Macro Attachment List Display page 1028 in the Appendix Moving quickly within the macro attachment list from one block to another When you are viewing the macro attachment settings for a block in the macro attachment list you can move quickly from the current block to another block to check the settings for that block by pressing the following buttons ...

Page 958: ...ding to the operation mode Pre macro mode The macro is executed first and then the button function is executed Post macro mode The button function is executed first and then the macro is executed Macro only mode The button function is not executed and the macro only is executed During macro execution the button you pressed flashes Notes It is not possible to execute more than one macro at a time T...

Page 959: ...the fader lever passes the position at which the macro attachment is set the macro register is recalled and the macro is executed Notes Unless you move the fader lever to the end position completing the travel it is not possible to execute the macro again When the preset color mix stroke mode is Normal see Settings Relating to Video Switching Transition Menu in Chapter 20 Volume 3 the first lever ...

Page 960: ... a macro attachment setting In the cross point control block for the fader lever on which you want to disable the macro press the MCRO ATTCH ENBL button turning it off In this state operating a fader lever with a macro attachment set does not execute the macro ...

Page 961: ... out in a menu For menu operations which are not recorded in menu macros see Menu Operations Not Recorded in a Menu Macro page 1036 Menu macro creation and editing Carry out menu macro creation and editing in the menu Executing menu macros You execute a menu macro after recalling a menu macro register You can recall and execute simultaneously You can also recall and execute a menu macro from a mac...

Page 962: ...ze these adjustment of the execution timing is required Events saved in a menu macro are executed according to the settings in setup and therefore if you change the setup settings it may not be possible to replay an event When two menu macros are recalled successively the later coming macro is ignored as far as the first macro is being executed Recalling a Menu Macro Register 1 In the Macro menu s...

Page 963: ... macro register list To execute the menu macro at the same time as recalling the register press Recall Run x Register number and name L E indication L indicates the register is locked E indicates an empty register Selected event number total number of events Menu macro configuration list Currently recalled register Number of register selected on the menu macro register list Interval between events...

Page 964: ...the start of a menu macro event Press Rewind Recalling a menu macro register from a macro register Menu macro recall and execution operations can be saved as events in a control panel macro and then recalled If with the control panel in macro editing mode you execute a menu macro then this operation is recorded as an event For details of recalling operations use the following references depending ...

Page 965: ...egister 2 Press Menu Macro Set The Menu Macro Set menu appears The L E indications have the following meanings L The register is locked E The register is empty 3 In the list on the left select the button number to be assigned 4 Press Set Executing a menu macro with a menu button 1 Select the Home Favorites Shortcut menu The following screen appears L E indication ...

Page 966: ...s It is not possible to execute a menu macro during editing To run the macro first press the Store button to end editing Creating a new menu macro 1 In the Macro Menu Macro Register Recall Run menu select an empty register in the menu macro register list For details of the method of operation see Recalling a Menu Macro Register page 962 2 Press Menu Macro Edit The menu macro register is recalled a...

Page 967: ...can be recorded see page 961 When auto insert mode see page 912 is on carrying out a menu operation automatically saves the event in a menu macro When auto insert mode is off skip to step 5 5 When auto insert mode is off press Insert Before or Insert After to save the event 6 Repeat steps 4 and 5 to record the required events in the menu macro 7 Turn the knob to input the event execution interval ...

Page 968: ...ode is off use the same operations as in step 5 of Creating a new menu macro page 966 to save the event Editing a menu macro To edit the content of a menu macro use the following procedure 1 In the Macro Menu Macro Register Recall Run menu select the desired register on the menu macro register list For details of the menu macro register list see Recalling a Menu Macro Register page 962 2 Press Men...

Page 969: ...the Modify button To insert an event before the selected event carry out the new menu operation then press the Insert Before To insert an event after the selected event carry out the new menu operation then press the Insert After 6 With the same operation as step 7 of Creating a new menu macro page 966 change the event execution interval 7 With the same operation as steps 8 and 9 of Creating a new...

Page 970: ...tatus is displayed The keyframe status section appears as follows Menu macro register number Menu macro register name Current event number total number of events Remaining memory The Previous page button shows one of the following When Auto Insert is on Menu Macro Auto Insert appears When Auto Insert is off Menu Macro Insert After appears but operates as Insert After Menu shortcut button to Menu M...

Page 971: ...following editing operations on menu macro registers Lock Write protect the contents of the menu macro register Copy Copy the contents of one menu macro register to another menu macro register Delete Delete the contents of a menu macro register Name Attach a name to a menu macro register The Previous page button shows one of the following When Auto Insert is on Menu Macro Auto Insert appears When ...

Page 972: ... 972 Menu Macros The operations for menu macro register editing are the same as those for effect register editing see page 838 except the region selection operation which is not necessary for menu macro register editing ...

Page 973: ...s The following lists the key frame functions that can be used on the macro timeline RECALL 1 to 99 STORE 1 to 99 RECALL UNDO STORE UNDO search for empty register AUTO SAVE RECALL MODE RECALL RECALL REWIND EDIT ENABLE EDIT UNDO CONST DUR EFF DUR KF DUR DELAY PAUSE INSERT BEFORE INSERT AFTER MODIFY DELETE COPY PASTE BEFORE PASTE AFTER FROM TO ALL PREV KF NEXT KF GOTO TC GOTO KF RUN REWIND FF STOP N...

Page 974: ...luded in the timeline has a pause event with a pause time of zero the remainder of the timeline after the pause is ignored and the macro timeline ends at that point Register editing functions You can use the following editing functions on a register in which a macro timeline is stored Copy Move Swap Merge Lock Name Delete File related functions You can save and recall a created macro timeline as e...

Page 975: ...ttings are not needed on the macro timeline For details of keyframe operations see Creating and Editing Keyframes page 802 Saving a keyframe For the operations use the Macro Timeline menu and the INS button in the keyframe control block 1 Press the EDIT ENBL button turning it on This enables timeline editing in the keyframe control block 2 In the Macro menu select VF4 Timeline and HF1 Timeline The...

Page 976: ...y out this setting in the Macro Timeline Timeline menu press Rewind Action to recall the Rewind Action menu In this setting screen use the same setting method as in the screen for setting an action on the macro timeline Alternatively you can select the reverse arrangement whereby when the REWIND button is pressed this executes the action set for the first keyframe and when the RUN button is presse...

Page 977: ...977 Chapter 17 Files ...

Page 978: ...o process memory setting data Keyframe effect setting data Snapshot setting data Wipe snapshot setting data DME wipe snapshot setting data Key snapshot setting data Shotbox setting data Macro setting data Macro attachment data Menu macro setting data Frame memory image data List of files automatically created in a frame memory file backup to DDR VTR single data set File operations You can carry ou...

Page 979: ...put image To avoid this when loading a file ensure that Freeze Enable is turned off Importing or exporting files to or from frame memory Import Import a file in a different format from hard disk or memory card into frame memory after changing its format Export Export a file in a register to hard disk or memory card after changing its format You can import TIFF BMP and TARGA files as follows into f...

Page 980: ...l screen The following figure shows how an import image is processed when the 480i 59 94 format is used Images are placed with the upper left of the screen as the origin When an image is smaller than the screen the remainder of the screen is filled with black When it is larger parts which extend beyond the screen are discarded No pixel ratio conversion is performed when images are imported for the...

Page 981: ...age sizes which exactly fill the full screen for the various signal formats Importing 720P and 1080P movie material To import movie material in 720P or 1080P format it is necessary to treat each frame as a separate image file For 1080P format the individual files must have numbers which start from an even number E g consecutive numbers from 0000 Directory operations You can create a new directory ...

Page 982: ... setting data Key snapshot setting data Shotbox setting data Macro setting data Macro attachment data Frame memory image data To use the autoload function the data required must first be saved For the on off setting of the autoload function see Selecting the State After Powering On Start Up Menu in Chapter 18 Volume 3 For details of saving operations see Saving Files Recalled by Autoload page 1008...

Page 983: ...milar in the other menus Viewing Detailed File Information As an example to view detailed snapshot file information carry out the following procedure 1 In the File menu select VF3 Snapshot and HF1 Snapshot The Snapshot menu appears The status area shows the device status and a list of files present on the device Button HF1 HF2 HF3 HF4 HF5 VF1 Setup Initial Status Key Memory Video Proc Memory VF2 E...

Page 984: ...ference region file name creation date regions including data in table form Selecting a particular file displays more detailed information about that file in the detail display area at the top right of the file list File Edit buttons Device selection area Detail display area Region selection area ...

Page 985: ...e in a way similar to the region selection To make a region selection 1 Press the region selection area at the top right of the screen see page 984 The region selection window appears 2 Press the region names you do not want to select turning them off 3 Press OK Selecting a Device for Operations To carry out file operations you need to specify the device holding the data or file as one of the foll...

Page 986: ...s Memory Card A list of directories on the memory card appears Maximum 40 per page The maximum number of directories is 120 on a memory card and NFS or 200 on an internal hard disk 3 As required press the b or B button to switch directory pages 4 Press the name of the directory you want to use This selects the specified directory on the memory card to be manipulated Saving Files As an example to s...

Page 987: ... to the first file name and a B is appended to the second file name If either of these files is missing it is not possible to recreate the image and therefore for correct operation the two files must always be handled together Between steps 3 and 4 of the procedure above Saving Files do as follows 1 To select the frame memory folder press Default in the device selection in the list on the left A p...

Page 988: ...o select multiple files turn the knobs to select in the following ranges To select a single file press the arrow keys to scroll the reverse video cursor or press directly on the list in the status area 5 Press T Load This loads the contents of the selected file from the specified location Setup data is first loaded Loading frame memory files Between steps 3 and 4 of the procedure above Loading Fil...

Page 989: ...etween directories on the hard disk or memory card As an example to copy a snapshot file from memory card to hard disk use the following procedure 1 In the File menu select VF3 Snapshot and HF1 Snapshot 2 In the device selection area on the left specify the location of the file to be copied in this case Memory Card and a directory See page 985 3 In the device selection area on the right select the...

Page 990: ...for each frame If either of these two files is missing it is not possible to recreate the image and therefore for correct operation the two files must always be copied together 1 To select the frame memory folder press Default in the device selection in the list on the left A pull down menu appears 2 Press the required folder name 3 Carry out the same operations as in steps 1 and 2 on the list on ...

Page 991: ... Status and Setup data are fixed You can change the file names on the hard disk or memory card but the next time they are reloaded they will revert to the default names The following names cannot be used CON PRN AUX CLOCK NUL COM0 COM1 COM2 COM3 COM4 COM5 COM6 COM7 COM8 COM9 LPT0 LPT1 LPT2 LPT3 LPT4 LPT5 LPT6 LPT7 LPT8 LPT9 Renaming frame memory files Notes In a still image file saved in the 1080P...

Page 992: ...p 3 you cannot select multiple files Press directly on the list in the status area Press the arrow keys to scroll the reverse video cursor Turn the knobs 5 Press Rename The keyboard window appears 6 Depending on the selections of steps 3 and 4 enter a name as follows and press Enter When you selected a single file with Still or All Enter a name of not more than eight characters When you selected m...

Page 993: ...e the following procedure 1 In the File menu select VF3 Snapshot and HF1 Snapshot The Snapshot menu appears The status area shows the device status and a list of files present on the device 2 Press File Edit A detailed list appears Here too you can select a device or specify a directory See page 985 3 Using any of the following methods select the file you want to delete To select all files within ...

Page 994: ... select the frame memory folder press Default in the device selection in the list A pull down menu appears 2 Press the required folder name 3 Select the type of data to be displayed To display still image files press Still To display clip files press Clip To display extended clip files press Ext Clip To display all types of file press All Converting Between Frame Memory Clips and Extended Clips No...

Page 995: ...evice HDD or Memory Card 1 In the File menu press VF5 Frame Mem and HF2 Frame Memory Folder The Frame Memory Folder menu appears The status area shows the device status and a list of files present on the device 2 In the pull down menu of the device selection section select HDD or Memory Card and then specify the directory 3 Press New A keyboard window appears See the section Menu Operations in Cha...

Page 996: ...er The name entered appears in the status area as a frame memory folder To delete a frame memory folder 1 With the same operations as in step 1 of the procedure To rename a frame memory folder select the folder 2 Press Delete A confirmation message appears select Yes to carry out the deletion Saving the list of frame memory files to hard disk or memory card If you save all files currently held in ...

Page 997: ...section on the opposite side the destination for saving automatically appears 3 As the destination for saving select HDD or Memory Card then specify the directory 4 Select the destination file for saving 5 To save to disk press Save To load from disk press Load To view details of files Press File Edit A list of the saved file names appears You can manipulate these files like any other files ...

Page 998: ...separate backup copies of important files on a memory card Format a memory card before using it for the first time For details on formatting a memory card see Using a Memory Card in Chapter 18 Volume 3 1 In the device selection area of the All menu select the destination for saving the files HDD or Memory Card and directory See page 985 2 If there are registers you do not want to save in the Categ...

Page 999: ...irectory See page 985 2 If there are files you do not want to load in the Category group exclude them from the operation To select all files press All Select For details of the data to which operations apply see Files that can be manipulated page 978 Notes The frame memory is not selected when you press All Select To apply the setting to frame memory press Frame Memory turning it on When frame mem...

Page 1000: ...destination storage location HDD or Memory Card and directory see page 985 3 If there are files you do not want to copy remove them from the selection in the Category group To select all files press All Select For details of the data to which the operation applies see Files that can be manipulated page 978 Notes The frame memory is not selected when you press All Select To apply the setting to fra...

Page 1001: ...format is 1080P exporting is not possible Displaying the Import Export Menu In the File menu select VF6 All External File and HF2 Import Export The list on the left shows the frame memory registers and the list on the right shows the content of the external recording media Importing Frame Memory Data As an example to import data in a bitmap format from a memory card to a frame memory register use ...

Page 1002: ...diately below root 6 Using any of the following methods select the file you want to import Press directly on the list in the status area Press the arrow keys to scroll the reverse video cursor Turn the knob 7 Press T Import This transfers the external file to the frame memory register Exporting Frame Memory Data As an example to save image data from frame memory in a bitmap format on a memory card...

Page 1003: ...ins the file you want to export 6 Using any of the following methods select the file you want to export from the list on the left Press directly on the list in the status area Press the arrow keys to scroll the reverse video cursor Turn the knobs 7 Press t Export This adds the image data from the frame memory in a bitmap format on the memory card If the specified destination file name already exis...

Page 1004: ... maximum of 120 directories on a memory card and NFS or 200 on an internal hard disk 1 In the device selection pull down menu select HDD or Memory Card See page 985 2 Press New The keyboard window appears See Menu Operations in Chapter 2 Volume 1 3 Enter a name of not more than eight characters and press Enter A new directory with the name you have entered appears in the status area Notes The foll...

Page 1005: ...re than eight characters and press Enter The new name appears in the status area Deleting a Directory 1 In the device selection pull down menu select HDD or Memory Card See page 985 2 Using any of the following methods select the directory Press directly on the list in the status area Press the arrow keys to scroll the reverse video cursor Turn the knob 3 Press Delete A confirmation message appear...

Page 1006: ...ollowing procedure 1 In the Unit ID Copy menu press the category selection section at the top right of the screen 2 Press the categories you do not want to select turning them off 3 Press OK 4 In the operating device selection section on the left list select the storage location of the source files and in the operating device selection section on the right list specify the destination storage loca...

Page 1007: ...s tCopy A confirmation message appears Select Yes to carry out the copy to the specified destination of the selected file categories Select No to cancel the copy Notes If there is already data present in the copy destination note that this will overwrite all of the data ...

Page 1008: ...following procedure 1 In the File menu select VF3 Snapshot and HF1 Snapshot The Snapshot menu appears 2 In the device selection area on the left select Register 3 In the device selection area on the right select HDD Be sure to select HDD as the saving destination 4 Select the PWON_LD directory The PWON_LD directory is automatically created when Power On File Load is set to On in the System Start U...

Page 1009: ... video cursor or directly press on the list in the status area 6 Press tSave The data from the selected registers is saved in the specified destination If the specified destination already contains data a confirmation message appears Select Yes to overwrite the existing data Select No to cancel the entire saving operation ...

Page 1010: ...Chapter 17 Files 1010 Saving Files Recalled by Autoload ...

Page 1011: ...1011 Appendix Volume 2 ...

Page 1012: ...Appendix Volume 2 1012 SpotLighting SpotLighting Texture Patterns Material provided by Digital Archive Japan INC ...

Page 1013: ...Appendix Volume 2 1013 SpotLighting Shape Patterns ...

Page 1014: ...Spotlighting parameter Total Ambient 4151 4156 No Yes page 672 page 694 Setting the bar mode of the highlight area 4151 No Yes page 675 Adjustment of color of the diffuse light area parameter Bar Diffuse Color 4151 No Yes page 676 Selection of signal to insert in the trail afterimage portion 4152 Freeze Video Flat Color Hue Rotate Without limitation page 678 Combine process for Trail 4152 No Yes p...

Page 1015: ... depth settings three dimensional crossing function parameter Depth 4211 No Yes page 718 Adding user texture patterns for Spotlighting 7316 9 No Yes Adding User Texture Patterns in Chapter 18 Volume 3 Setting AUX bus output reentry input 7337 7 It is not possible to make settings for DME 1 to 8 Ext In It is not possible to make settings for DME 1 to 8 Ext In Setting the AUX Bus Output and Reentry ...

Page 1016: ...ated on the switcher this is a register name automatically set by the switcher When creating a new file it is recommended to set this to be the same as the file name see page 1018 The name is limited to eight characters The following characters may not be used space comma dot Comment Begins with The content of the line following the up to the next newline has no effect on macro execution and can b...

Page 1017: ...er Continue symbol parameter parameter symbol ASCII character string showing the type of event See Correspondence Between Events and Symbols page 1019 parameter Shows details of an event Consists of parameter names and arguments and these must appear in pairs The number and type of parameters depends on the event See Symbols and Parameters page 1020 If the same parameter appears twice or more the ...

Page 1018: ...ited to eight characters The following characters may not be used space comma dot rrrr macro register number 0001 0099 Saving and Recalling a File For a newly created file if you create a directory on the memory card see figure below and move the file to the prescribed location you can then recall it in the File All External File menu Notes When amending a file saved on the switcher be sure to sav...

Page 1019: ...ross point selection in the cross point control block MEXpt Yes Auto transition and take in the transition execution section MEAutoTransition Yes Cut in the transition execution section MECut No Transition type selection TransitionType No Next transition setting NextTransition No Pattern limit on off PatternLimit No Fade to black execution FadeToBlack No Auto transition and take in the independent...

Page 1020: ... Rewind keyframe TimelineRewind Yes Fast forward effect TimelineFF Yes Effect execution direction selection normal TimelineDirectionNormal Yes Effect execution direction selection reverse TimelineDirectionReverse Yes Effect execution direction selection normal reverse on TimelineNormalReverseOn Yes Effect execution direction selection normal reverse off TimelineNormalReverseOff Yes Pause a Pause N...

Page 1021: ...ble bus video signal or key signal AuxXpt AuxBus EditPreview AUX1 to AUX48 FrameMemory1 FrameMemory2 DME1Video to DME8Video DME1Key to DME8Key DME1Video2nd to DME8Video2nd a DME1Key2nd to DME8Key2nd b DMEUtility1 DMEUtility2 CCR1 CCR2 Applicable AUX bus a DMEnVideo2nd Bus for selecting back video signal of DMEn channel n 1 to 8 b DMEnKey2nd Bus for selecting back key signal of DMEn channel n 1 to ...

Page 1022: ...icable bank KeyAutoTransition ME ME1 to ME4 PP Control blocks on the applicable bank Key Key1 to Key8 Key of the applicable independent key transition control block Time Current a 0 to 999 Transition rate number of frames a Mode in which the current value set on the independent key transition control block is used Direction ToOn a ToOff b Any c Transition execution mode a Key is inserted b Key is ...

Page 1023: ... a hh mm ss ff Start point timecode hh hours 00 to 23 As for Frame Memory 1 Clip to Frame Memory 8 Clip hh is fixed to 01 mm minutes 00 to 59 ss seconds 00 to 59 ff frames 00 to 29 a Mode in which the currently set timecode is used Stop Device 1 to 12 FrameMemory1Clip to FrameMemory8Clip Applicable device FF Device 1 to 12 FrameMemory1Clip to FrameMemory8Clip Applicable device Rewind Device 1 to 1...

Page 1024: ...ter 1 to 10 Applicable register number TimelineRecall Region ME1 to ME4 PP User1 to User8 DME1 to DME8 PBus Device1 to Device12 GPI Applicable region Register 1 to 399 Applicable register number TimelineRun Region ME1 to ME4 PP User1 to User8 DME1 to DME8 PBus Device1 to Device12 GPI Current a Applicable region a Mode in which operation takes place in the region currently specified in the numeric ...

Page 1025: ...bank Status ToOn a ToOff b Any c Pattern limit status a Pattern limit applies b Pattern limit does not apply c The pattern limit status always changes TransitionType ME ME1 to ME4 PP Control blocks on the applicable bank TransitionType Mix NAM SuperMix PresetColorMix Wipe DMEWipe FM1 2Clip FM3 4Clip FM5 6Clip FM7 8Clip Transition type KeyTransitionType ME ME1 to ME4 PP Control blocks on the applic...

Page 1026: ...Mode in which operation takes place in the region currently specified in the numeric keypad control block TimelineNormalReverseOn Region ME1 to ME4 PP User1 to User8 DME1 to DME8 PBus Device1 to Device12 GPI Current a Applicable region a Mode in which operation takes place in the region currently specified in the numeric keypad control block TimelineNormalReverseOff Region ME1 to ME4 PP User1 to U...

Page 1027: ...ry1Clip to FrameMemory8Clip Applicable clip ClipType Pair Single File type of clip pair single Clip Clip Name Name of clip up to four characters Device Record Device 1 to 12 Applicable device Line Content Description 1 PNL 0001PNL_0000 PMRMACROREG File header 2 Sample Comment 3 Event Snapshot Region ME1 Register 1 Attribute Off Time Current Simultaneously recall snapshots from register number 1 in...

Page 1028: ...ng tables For example if Block and Button 1 to Button 3 are combined as Block P P XPT Button 1 UTIL1 Bus Button 2 V Button 3 XPT2 The Button column in the macro attachment list in the Macro Attachment menu screen shows UTIL1 Bus V XPT2 which means utility 1 bus video signal cross point number 2 M E and PGM PST Banks The following table shows only the macro attachment assignable buttons in the PGM ...

Page 1029: ...B Bus Main Sub DSK1 Bus Main Sub DSK8 Bus Sub DSK1 Src Bus Sub DSK8 Src Bus Main Sub DSK1 Src Bus Main Sub DSK8 Src Bus nothing Shift XPT 1 XPT 128 M E 1 M E 2 M E 3 P P UTIL1 Bus UTIL2 Bus EXT DME Bus DMEUtility1 DMEUtility2 Sub UTIL1 Bus Sub UTIL2 Bus Sub EXT DME Bus Main Sub UTIL1 Bus Main Sub UTIL2 Bus Main Sub EXT DME Bus V K V Shift K Shift Dual A Bus Dual B Bus Sub Dual A Bus Sub Dual B Bus...

Page 1030: ...Trans blank DSK1 DSK8 Sub Sub DSK1 Sub DSK8 Main Sub Main Sub DSK1 Main Sub DSK8 MIX a NAM a SUPER MIX a PST COLOR MIX a WIPE a DME a TAKE b DSK_ON c AUTO TRANS d CUT d ALL a d KEY PRIOR a d BKGD a d DSK1 a d DSK4 a d NORM a d NORM REV a d REV a d PTN LIMIT a c LIMIT SET a c KF a c PTN LIMIT b Fader PRIOR SET a c TRANS PVW a c K SS c e K SS STORE c e K MOD ENBL c e K TR ENBL c e DSK1 c e DSK4 c e ...

Page 1031: ...SK8 PRIOR ALL wipe direction selection NORM NORM REV REV PLAY CUEUP STOP and PTN LIMIT b For the simple type transition control block c For the standard type transition control block d For the standard type or compact type transition control block e These buttons can be assigned with their functions in the setup menu Thy can be assigned with any of MIX WIPE and DME P P P P Key Trans DSK1 DSK8 Sub ...

Page 1032: ...T 1 XPT 128 M E 1 M E 2 M E 3 P P DME1V DME8V DME1K DME8K nothing Shift 2nd Row 2nd Row Shift DMEUtility1 DMEUtility2 V K V Shift K Shift V 2nd Row K 2nd Row V 2nd Row Shift K 2nd Row Shift DME1V2nd DME8V2nd DME1K2nd DME8K2nd nothing Shift 2nd Row 2nd Row Shift CCR1 CCR2 V K V Shift K Shift V 2nd Row K 2nd Row V 2nd Row Shift K 2nd Row Shift P P UTIL1 P P UTIL2 M E 1 UTIL1 M E 1 UTIL2 M E 2 UTIL1 ...

Page 1033: ...Shift 2nd Row 2nd Row Shift XPT 1 XPT 128 M E 1 M E 2 M E 3 P P DSK1 Src DSK8 Src M E 1 KEY1 Src M E 1 KEY8 Src M E 2 KEY1 Src M E 2 KEY8 Src M E 3 KEY1 Src M E 3 KEY8 Src M E 4 KEY1 Src M E 4 KEY8 Src V K V Shift K Shift V 2nd Row K 2nd Row V 2nd Row Shift K 2nd Row Shift P P EXT DME M E 1 EXT DME M E 2 EXT DME M E 3 EXT DME M E 4 EXT DME Block Select Block Button 1 Button 2 Button 3 ...

Page 1034: ...FF NORM REV NORM REV nothing nothing Multi Function Flexi Pad a DSK1 DSK8 M E 1 KEY1 M E 1 KEY8 M E 2 KEY1 M E 2 KEY8 M E 3 KEY1 M E 3 KEY8 M E 4 KEY1 M E 4 KEY8 AUTO TRANS KEY_ON Sub DSK1 Sub DSK8 M E 1 Sub KEY1 M E 1 Sub KEY8 M E 2 Sub KEY1 M E 2 Sub KEY8 M E 3 Sub KEY1 M E 3 Sub KEY8 M E 4 Sub KEY1 M E 4 Sub KEY8 EFF RUN REWIND NORM REV NORM REV ...

Page 1035: ...LR WORK BUFR CUEUP Y PLAY TRGT STOP AXIS LOC START TC nothing Device Control nothing CUE UP PLAY STOP START TC Utility Box 1 Utility Box 2 Menu Utility 1 Utility 96 nothing DSK FTB Key1 Key2 AUTO TRANS KEY_ON FTB FTB blank FTB DSK Fader 1 DSK Fader 4 P P M E1 M E2 M E3 M E4 KEY1 KEY8 MIX WIPE DME CUT TAKE KEY_ON Block Select Block Button 1 Button 2 Button 3 ...

Page 1036: ...operations using the knobs trackball or joystick value input operations from the numeric keypad are recorded Operations not recorded in menu macros in individual menus Menu number Menu including operations not recorded 0011 to 0023 All menus under Home 2544 FrameMemory File Move 2545 FrameMemory File Delete 2546 FrameMemory File Rename 2551 FrameMemory File Folder 2561 FrameMemory External Device ...

Page 1037: ...for use by the purchasers of the equip ment described in this manual Sony Corporation expressly prohibits the duplication of any portion of this manual or the use thereof for any pur pose other than the operation or maintenance of the equipment described in this manual without the express written permission of Sony Corporation ...

Page 1038: ...MVS 8000X System SY 4 177 901 02 1 2010 Sony Corporation ...

Page 1039: ...MVS 8000X System With CCP 8000 Series Center Control Panel User s Guide Multi Format Switcher System Volume 3 English 1st Edition Revised 1 Software Version 10 00 and Later ...

Page 1040: ...F MERCHANTABILITY OR FITNESS FOR ANY PARTICULAR PURPOSE WITH REGARD TO THIS MANUAL THE SOFTWARE OR SUCH OTHER INFORMATION IN NO EVENT SHALL SONY CORPORATION BE LIABLE FOR ANY INCIDENTAL CONSEQUENTIAL OR SPECIAL DAMAGES WHETHER BASED ON TORT CONTRACT OR OTHERWISE ARISING OUT OF OR IN CONNECTION WITH THIS MANUAL THE SOFTWARE OR OTHER INFORMATION CONTAINED HEREIN OR THE USE THEREOF Sony Corporation r...

Page 1041: ...1041 Chapter 18 System Setup System ...

Page 1042: ...s on the same network it is necessary to set the unit ID on each device as follows When the signal format is 1080P You can connect up to four MVE 8000A units to the first switcher The unit IDs for these DMEs are assigned as follows Notes The signal format for the second switcher cannot be changed to 1080P For more details of how to make the unit ID settings refer to the installation manual for the...

Page 1043: ...hecking IP address automatically 1 In the System Network Config menu press Auto Config This automatically checks all devices excluding the DCU connected to the Data LAN 2 Once switch to another menu then display the Network Config menu again Now the status area of the System Network Config menu shows the results of the automatic check Notes Be sure to carry out this operation after reconfiguring t...

Page 1044: ...8 System Setup System 1044 Network Settings Network Config Menu 1 In the System Network Config menu press NFS Server A keyboard window appears 2 Enter the address of the server you want to use 3 Press NFS Mount ...

Page 1045: ...Assign Specify the DME connected to a switcher Specifying the Switcher Controlled by the Control Panel The number of control panels that can be connected to a single switcher depends on the signal format setting 1080P 2 Other than 1080P 4 1 In the System System Config menu press the Panel Assign button The Panel Assign menu appears 2 Select the switcher to be controlled by the selected control pan...

Page 1046: ...The inhibited buttons do not light even when pressed and the other buttons light after a longer delay time than in Mode 2 Mode 2 The delay time for button lighting is reduced but even the inhibited buttons may light for a moment when pressed Notes Make sure that Tally Master is set to On When simple connection is used between the center control panel and remote panel see page 1263 this setting is ...

Page 1047: ...first DME DME2 second DME DME3 third DME or DME4 fourth DME turning them on For SWR2 the signal format cannot be changed to 1080P Enabling the FM Data Port of the Switcher With the FM data port enabled frame memory data can be transferred in a short time between the switcher and the control panels Notes If multiple control panels are in use FM Data Port Enbl can be turned on for only one control p...

Page 1048: ... the original state press Clear without pressing Execute or FC Format Execute When you press Execute some data is lost such as frame memory images If you press FC Format Execute memory is not initialized and this data is not lost Restrictions on signal formats and re entry Re entry restrictions for an M E on which a selected signal format can be used depend on whether or not the color corrector is...

Page 1049: ...l for HD System This changes the input reference signal Tri Sync tri level sync for an HD system BB Black Burst black burst or sync The following table shows the relation between signal format and the frequency of a signal that can be used as the input reference signal SD system 59 94 480i 50 576i System Field frequency Effective number of scan lines Knob Parameter Adjustment Setting values 1 Devi...

Page 1050: ...ble is 16 or 8 when only one MKS 8450X board is installed and the maximum number of output signals is 4 two outputs when the MKS 8160X is not installed Notes After format conversion input and output signals have one frame delays with respect to the reference signals To synchronize converted input signals and unconverted input signals it is possible to delay the unconverted input signal by one fram...

Page 1051: ... format converter output signal Setting the conversion format 1 Display the System Format menu Switcher signal format setting Format converter signal format setting FC Input 1 8 FC Input 9 16 FC Output 1 2 FC Output 3 4 480i 59 94 720P 59 94 1080i 59 94 720P 59 94 1080i 59 94 720P 59 94 1080i 59 94 720P 59 94 1080i 59 94 576i 50 720P 50 1080i 50 720P 50 1080i 50 720P 50 1080i 50 720P 50 1080i 50 7...

Page 1052: ...inputs 9 to 16 press Input 9 16 Format then press the button for the desired signal format in the FC Input group 6 To set the output format for format converters 1 and 2 in the FC Output group press Output 1 2 Format then press the button for the desired format 7 To set the output format for format converters 3 and 4 in the FC Output group press Output 3 4 Format then press the button for the desi...

Page 1053: ...Chapter 18 System Setup System 1053 Setting the Signal Format Format Menu Notes This setting is only possible when the system format is 1080i ...

Page 1054: ...ted Independ in step 2 select from the following Switcher Aspect Make the setting for the switcher DME Aspect Make the setting for the DME A menu appears according to the selection 4 Carry out either of the following depending on the selection you made in step 3 When you selected Switcher Aspect In each of the M E 1 M E 2 M E 3 M E 4 P P and USER groups select either 16 9 or 4 3 When you selected ...

Page 1055: ...e used after powering on from the following User Start up using the user data previously saved with Setup Define Factory Start up with the factory default settings Initial status mode Select the state of each device after powering on excluding the settings to which setup applies User Start up using the user data previously saved with Initial Status Define For the control panel this applies to the ...

Page 1056: ...he Resume mode cannot be used for DMEs and DCUs In Custom mode see page 1055 the user defined settings user setup data saved in non volatile memory or factory default setup data held in ROM in each device is recalled when a reset is made or the power is turned back on See Selecting the State at Start up page 1057 Hard disk memory card User setup data Load Save File menu Load File menu Save Current...

Page 1057: ...to apply 2 In the Start Up Mode group select one of the following modes Resume When this is on Resume mode is enabled Custom When this is on Custom mode is enabled Notes The Resume mode is only valid when a switcher or control panel is selected for the setting 3 When Custom mode is selected in each of the Setup group and Initial Status group select one of the following User When this is on user de...

Page 1058: ...apply to in the System Start Up menu press Init Status Define A confirmation message appears 2 Press Yes This saves the initial status settings other than the setup settings for the selected devices in non volatile memory within the respective devices For details about the settings which will be saved see Data Saved by Setup Define and Initial Status Define page 1272 Setting Automatic Loading of R...

Page 1059: ... select VF1 System and HF5 Initialize The status area shows the current start up mode settings Resetting the device and initializing memory 1 In the status area of the System Initialize menu select the device to which the settings are to apply 2 In the Initialize group select one of the following modes Reset Reset the device All Clear Initialize memory 3 Press Execute A confirmation message appear...

Page 1060: ...lls the selected software Detail Information Gives details of the software and firmware installed in each device Unit Config Makes switcher processor settings and changes the DME input output signal format License Makes the license valid or invalid Displaying installation details In the System Install Unit Config menu press Detail Information This accesses the Detail Information menu and displays ...

Page 1061: ... the arrow keys to scroll the reverse video cursor Turn the knob The display of the lower list changes according to the selected device To display all related software Press Display All Software turning it on Not just the automatically detected software but the names of all related software for the selected device appear 4 In the lower list select the software you want to install Press directly on...

Page 1062: ...quired to submit the unique device ID of the switcher you are using You can check the unique device ID in the Install Unit Config menu of the switcher using the following procedure a This can be used only on the MVE 8000A To display the unique device ID 1 In the System Install Unit Config menu use either of the following methods to select the device for which you want to register the license Press...

Page 1063: ...of the following methods to select the device for which you want to register the license Press directly on the list in the status area Press the arrow keys to scroll the reverse video cursor 2 Press License The License menu appears 3 Press directly on the name of the software you want to license the Condition box is blank List of software option model names and numbers Device name Unique device ID...

Page 1064: ...lize group and then press Execute Power off and on again After restarting the licensed software is now available for use In case it becomes necessary to cancel the license registration you can use the following procedure To cancel the license registration 1 In the System Install Unit Config menu use either of the following methods to select the device for which you want to cancel the license regis...

Page 1065: ...o longer available Adding User Texture Patterns You can add user created texture patterns to the repertory of texture patterns with which the spotlighting function enables the light falls on the image surface Notes This function is not supported on the MVE 8000A For details of spotlighting and texture patterns see Spotlighting Settings in Chapter 11 Volume 2 The procedure for adding a texture patt...

Page 1066: ... of texture files that can be handled may be reduced depending on the way in which they are stored in memory see Texture Package menu page 1066 For a texture file with an image size outside the specification the minimum enclosing image size is applied see table above and the region below and to the right is filled with black Example a 300 200 pixel texture file is treated as 512 256 pixels Texture...

Page 1067: ...ory space is available b Texture number list This shows the texture numbers 101 to 164 registered in the texture package The list Capacity shows the file size in units of 128 128 pixels a total maximum of 64 units of texture files can be registered 5 Grid display of memory capacity 6 Select button 7 Delete button 8 Make Package button 1 The rest of the capacity 2 Texture number list 3 Directory se...

Page 1068: ...button Pressing this button assigns the texture file selected in the texture file list to the number selected in the texture number list g Delete button Pressing this button deletes the texture file assigned to the number in the texture number list h Make Package button Pressing this button creates the texture package Creating a texture package To use a user provided texture pattern with the spotl...

Page 1069: ...row keys to scroll the reverse video cursor Turn the knob a The range of the setting values depends on the number of saved files on a memory card 7 In the Texture Pattern group press Select This assigns the texture file selected in step 6 to the number selected in step 5 and updates the texture number list The grid display of memory capacity shows the location where the texture files are stored in...

Page 1070: ...on zsp file name generated automatically Notes If you remove the memory card on which the texture file is stored it is not possible to create the texture package If a texture package is already present on the memory card it is overwritten by a new texture package If you carry out steps 9 and 10 without having assigned even one texture file it is not possible to create a texture package If there is...

Page 1071: ...ed list of software that can be installed on the particular device Also software selected as a candidate for installation in the upper list is marked in the lower list with an asterisk 4 Using any of the following methods select in the upper list a DME for which the spotlighting license is valid Press directly on the list in the status area Use the arrow keys to scroll the reverse video cursor Tur...

Page 1072: ...lid when the system signal format is set to 1080P 1 In the System Install Unit Config menu select SWRx and press Unit Config The Unit Config menu appears 2 In the DME I F Type group press one of the following 3G Mode Use 3G mode single 3G SDI signal for DME input output 1 Dual Link Mode Use dual link mode two 1 5G SDI signals for DME input output 2 1 3G SDI Standard defined by SMPTE 424M 2 Dual li...

Page 1073: ...ssword Locking file recall operations Locking file recall operations by category Locking and removing the lock using the password You can change the password To display the Maintenance menu In the Engineering Setup menu select VF1 System and HF7 Maintenance In the status area the current date and time and details of the memory card appear Setting the Date and Time For system date and time settings...

Page 1074: ...the USB Storage Device group of the System Maintenance menu press Refresh Formatting a memory card Notes Format a memory card before using it for the first time 1 Insert the memory card in the memory card slot 2 In the System Maintenance menu using either of the following methods select the USB device Press directly on the list in the status area Press the arrow keys to scroll the reverse video cu...

Page 1075: ...us area Press the arrow keys to scroll the reverse video cursor Turn the knob 2 In the USB Storage Device group press Set Primary Making the primary setting automatic In the USB Storage Device group press Auto Detect Reloading a USB Driver To reload a USB driver in the System Maintenance menu press Reload USB Driver Notes If even after this operation the memory card is not recognized remove the me...

Page 1076: ...ing procedure It is not possible to lock the Setup Operation Lock menu 1 In the System Maintenance menu press Setup Operation Lock The Setup Operation Lock menu appears 2 In the VF Group group select the group including the desired menu The status area shows a list of menu numbers and menu names in the selected group Subsequent lock operations apply within the group selected here 3 Using any of th...

Page 1077: ...dates in the selected VF group Press Lock Item All Clear 5 Repeat steps 2 to 4 to select all of the lock candidates 6 Press Lock A keyboard window appears 7 Enter the password with a maximum of 16 characters and press Enter If the password is correct the menus selected in the list of candidates are all locked The padlock icon changes to the locked state Releasing the lock When a lock is already ap...

Page 1078: ... 4 Enter the new password and press Enter A keyboard window labeled New Password Confirm appears 5 Enter the new password once more for confirmation and press Enter If the password is correct the password change completed message appears 6 Press OK This sets the new password Selecting an opened setup menu for locking With the menu you want to lock open press Lock Item Select button at the lower le...

Page 1079: ... a specified file category 1 In the System Maintenance menu press File Load Lock The File Load Lock menu appears The status area shows a list of file category numbers category names and the lock status Subsequent lock operations apply to the category selected here 2 Using any of the following methods select the category or the set of categories as candidates for the locking operation Press directl...

Page 1080: ...nter the password with a maximum of 16 characters and press Enter If the password is correct the categories selected in the list of candidates are all locked The category name display color and the Lock indication color in the Lock box both change to white To release the lock When a lock is already applied use the following procedure 1 In the System Maintenance File Load Lock menu press Lock A key...

Page 1081: ...1081 Chapter 19 Control Panel Setup Panel ...

Page 1082: ...ft and non shift button rows of a single M E bank Dual M E Xpt Swap When a setting has been made for Dual M E Assign swap the shift and non shift button rows DSK Fader Assign Carry out fader function assignment and key delegation for the key delegation buttons in each of the maximum of four downstream key control blocks External Bus Link Make link settings relating internal switcher buses to routi...

Page 1083: ...llowing methods Press directly on the status area display Press the arrow keys to scroll the reverse video cursor Turn the knob The Bank selection here indicates the physical position on the control panel numbering from the top as the 1st Row 2nd Row 3rd Row and 4th Row This is followed by the system control unit extension interface ports 1 2 and 3 2 Select the bank that you want to assign to the ...

Page 1084: ...For example if the furthest bank from you is assigned to M E 1 and you want no shift button operation for the bank select 1 1st Row for Bank 2 Press Dual M E Assign This assigns the furthest M E bank from you to the unshifted shifted cross points and the M E bank in front of it to the shifted unshifted cross points For fader lever operations only the M E bank closer to you is enabled The shift non...

Page 1085: ...s on the indications in the status area to select the downstream key control block for which you want to make the setting and select the key delegation Here press on the intersection of the 1st Module column and Key1 Assign row 3 In the M E Select group select the bank of the key you want to assign Here select M E 1 as an example 4 In the Key Link Select group select the key you want to assign Her...

Page 1086: ... table setting Link a switcher cross point button and matrix source Link bus setting Link a switcher bus address and router destination Selecting a matrix number 1 In the Panel Config menu press Link Program Button The Link Program Button menu appears 2 In the Link group press External Bus Link The External Bus Link menu appears The status area shows the current link status 3 Turn the knobs to sel...

Page 1087: ...ist in the status area Press the arrow keys to scroll the reverse video cursor Turn the knobs 3 To confirm a source address selected in step 2 press Source Set to confirm a destination address press Destination Set and to confirm a level press Level Set This confirms the selection which is reflected in the status area Setting a link table For the link selected in the External Bus Link menu make th...

Page 1088: ... status area Making link bus settings For the link number selected in the External Bus Link menu use the following procedure 1 In the Panel Config Link Program Button External Bus Link menu press Link Bus Adjust The Link Bus Adjust menu appears The status area lists the current link status and the switcher buses and router destinations that can be selected In this menu too you can use knob 1 to se...

Page 1089: ...the status area Press the arrow keys to scroll the reverse video cursor Turn the knob The selected keyer appears in reverse video 4 In the Key Select group select the keyer to be linked to the transition of the master Notes Linking does not apply to a transition carried out with the downstream key control block Linking the Next Transition Selection Buttons To the transition links between keyers yo...

Page 1090: ...en both trackball and joystick device control blocks are connected select which is to be the reference Also select the range to which key wipe positioning applies To select the reference module 1 In the Panel Config menu press JS TB User Setting The JS TB User Setting menu appears 2 In the Reference Module group select one of the following Trackball Trackball device control block Joystick Joystick...

Page 1091: ... them and set the assignment of regions to the numeric keypad buttons However in the Multifunction Flexi Pad control block it is not possible to assign a region to the EXIT button For details of the Multifunction Flexi Pad control block see Multifunction Flexi Pad Control Block in Chapter 2 Volume 1 1 In the Panel Config menu press 10 Key Region Assign The 10 Key Region Assign menu appears When a ...

Page 1092: ...ow keys to scroll the reverse video cursor in the list in the upper part of the right side Turn the knob 5 Using any of the following methods select the region to be assigned Press directly on the list in the lower part of the right side Press the arrow keys to scroll the reverse video cursor in the list in the lower part of the right side Turn the knob 6 Press Set to confirm the selection This as...

Page 1093: ...s area setting it to On The All Select button indication in the status area changes to orange and the system switches to a mode for assigning region selection buttons to the ALL button In the factory default state all buttons appear in reverse video and are assigned to the ALL button 2 If you do not want to assign any region selection button to the ALL button press the corresponding button indicat...

Page 1094: ... the assignment The button you pressed appears in reverse video 5 Using any of the following methods select the function to be assigned from the list on the right Press directly on the list Press the arrow keys to scroll the reverse video cursor Turn the knob 6 Press Set The texts on the button illustrations change to reflect the selection To cancel the assignment Press Clear To make the assignmen...

Page 1095: ... can be selected with the key 1 row and the background B row shifted signal can be selected with the key 2 row To switch this mode on and off it is necessary to assign this function to the cross point control block PRE MCRO button For details of the dual background bus see Signal Selection in Chapter 3 Volume 1 1 In the Panel Config menu press Link Program Button The Link Program Button menu appea...

Page 1096: ...ton The Link Program Button menu appears 2 Press Xpt Module The Xpt Module menu appears 3 Using any of the following methods select the bank Press directly on the list in the status area Press the arrow keys to scroll the reverse video cursor Turn the knob 4 Select Utility Shotbox in the PRE MCRO POST MCRO group This assigns the utility shotbox mode to the PRE MCRO button and disables the POST MCR...

Page 1097: ...ol AUX Ctrl mode is assigned to the PRE MCRO button And the function for switching the source name displays to the names of the sources or buses for the AUX buses is assigned to the POST MCRO button 1 In the Panel Config menu press Link Program Button The Link Program Button menu appears 2 Press Xpt Module The Xpt Module menu appears 3 Using any of the following methods select the bank Press direc...

Page 1098: ... the button for the assignment The button you pressed changes to reverse video 3 Using any of the following methods select the key to be assigned Press directly on the list Press the arrow keys to scroll the reverse video cursor Turn the knob 4 Press Set to confirm the selection This assigns the selected key to the key delegation button To return the key delegation button assignment to the factory...

Page 1099: ...ned from the following Key1 2 keys 1 and 2 1 Key3 4 keys 3 and 4 1 Key5 6 keys 5 and 6 1 Key7 8 keys 7 and 8 1 1 The M E bank depends on the settings in the M E Assign menu where the independent key transition control block is installed DSK1 2 downstream keys 1 and 2 DSK3 4 downstream keys 3 and 4 DSK5 6 downstream keys 5 and 6 DSK7 8 downstream keys 7 and 8 N A no assignment When the independent ...

Page 1100: ...he main base 1 In the Panel Config menu press Compact Key Module Assign The Compact Key Module Assign menu appears The left side of the status area shows data for the main base physical layout and switcher bank names and key assignment 2 Press directly on the display on the left to select the control block for the assignment Here press on the intersection of the 2nd Row column and Module row 3 Sel...

Page 1101: ...gram Button The Link Program Button menu appears 2 Press Key Control Module The Key Control Module menu appears 3 Press one of 1st 2nd 3rd and 4th to select the key control block 4 Press Button Assign The assignment status of the control block you selected in step 3 above appears 5 Press the button to which you want to assign a function displaying it in reverse video 6 Using any of the following m...

Page 1102: ...ess Fade To Black Module The Fade To Black Module menu appears On the left of the status area preview selection buttons 1 to 11 appear On the right side a list of signals to be assigned appears 3 In the button indications on the left press the button for the assignment 4 Using any of the following methods select the signal to be assigned Press directly on the list on the right In the list on the r...

Page 1103: ...appears 2 Press Device Control Module The Device Control Module menu appears The left of the status area shows the device selection buttons SBOX buttons and DELAY button of the device control block search dial The list on the right shows the devices and functions that can be assigned 3 In the button displays on the left press the button for the assignment 4 Using any of the following methods selec...

Page 1104: ...l Module The Joystick Trackball Module menu appears 3 In the lower right Mode Select group select Device Clip or Wipe RSZR Device Clip Assignment while the device control block DEV button is lit Wipe RSZR Assignment while no button is lit on the device control block or the RSZR button is lit According to the selection the left of the status area shows the region selection buttons of the device con...

Page 1105: ...ock Independent key transition control block 1 1 Only when the Key1 2 Key 3 4 Key5 6 or Key7 8 are assigned by the Compact Key Module Assign menu Notes In the auxiliary bus control block and other control blocks which are excluded from M E and PGM PST banks the operations on the utility 2 bus and keys 1 to 8 are not inhibited 1 In the Panel Config menu press Operation Inhibit Operation Inhibit men...

Page 1106: ...ears 3 In the list in the status area using any of the following methods select the DME channel for which operations are to be inhibited Press directly on the desired DME channel in the list Press the arrow keys to scroll the reverse video cursor Turn the knob 4 Press Inhibit Assigning Functions to the Menu Control Block Top Menu and User Preference Buttons To these 41 buttons you can freely assig...

Page 1107: ...his assigns the menu or action selected in the list to the button To cancel an assignment select the button then press Clear To return all button assignments to the factory default state in the Menu Panel menu press Default Assigning Functions to the Buttons in the Multifunction Flexi Pad Control Block You can assign functions to the buttons in the various parts of the Multifunction Flexi Pad cont...

Page 1108: ...ffect editing when the EFF and EDIT ENBL buttons are pressed Macro Edit Assign button To assign a function to a button in the memory recall section for macro editing when the MCRO and EDIT ENBL buttons are pressed The left side of the status area shows an image of each button and the right side shows a list of menus and actions to be assigned 4 In the button indications on the left press the butto...

Page 1109: ... KEY SS Function Button indication Undo UNDO Pause setting PAUS Copy COPY Paste PSTE Select all ALL Insert INS Modify MOD Delete DEL Keyframe loop count setting KF LOOP Effect duration setting EFF DUR Keyframe duration setting KF DUR Delay setting DLY Constant duration mode on or off CNST DUR Go to specified timecode GOTO TC Go to specified keyframe GOTO KF Set range FROM TO Return the button disp...

Page 1110: ... transition control block simple type The assignment may be to the independent key transition type selection buttons and buttons in the independent key transition execution section 1 In the Panel Config menu press Link Program Button The Link Program Button menu appears 2 Press Compact Key Trans Module The Compact Key Transition Mode menu appears 3 In the Bank Select group select the bank you want...

Page 1111: ...ton Assign list Press directly on the desired list Press the arrow keys to scroll the reverse video cursor Turn the knob 7 Press Set The function selected in step 6 is assigned to the selected button To remove a function assignment In step 5 select the button whose function assignment you want to remove and press Clear The functions currently assigned to the buttons in the selected control block a...

Page 1112: ...Setup Panel 1112 Overall Control Panel Settings Config Menu To return the function assignments to the factory default state Press Default To make the same assignment for all control blocks on all banks Press Copy To All Module ...

Page 1113: ...ton in each row is used as a shift button and the operation mode when it is used as a shift button For the SHIFT button in the cross point control block and for each table select the mode in which this is a shift button dedicated to the source name displays or the mode in which it is a shift button for all buses Disable cross point buttons to work Mixer Xpt Assign Assign audio mixer cross points t...

Page 1114: ... currently assigned in the main table On the right is a list of the source numbers and signals that can be assigned When the shift button is pressed the number column is distinguished by color For details of audio mixer cross point assignment operations see Setting the audio mixer cross points page 1122 2 Using any of the following methods select the button number Press an auxiliary bus control bl...

Page 1115: ...re maintained in their original lines To disable a button In the Panel Xpt Assign Main V K Pair Assign menu select the button you want to disable and press Inhibit To delete any currently assigned signal In the Panel Xpt Assign Main V K Pair Assign menu select the button corresponding to the signal you want to delete and press Delete in the Xpt Assign group Signal deletion is executed in accordanc...

Page 1116: ...umbers and the names of video signals and key signals set in the main table The Table Button Assign menu also allows you to access the Main V K Pair Assign menu and the Src Name LCD Color menu 2 Using the knob select the table number 3 Using any of the following methods select the button number Press an auxiliary bus control block cross point button The auxiliary bus control block is in selection ...

Page 1117: ...want to disable and press Inhibit To delete any currently assigned signal In the Panel Xpt Assign Table Button Assign menu select the button corresponding to the signal you want to delete and press Delete in the Button Assign group The signal assigned to the button number next to the selected button number and following signals move up one line Notes When a button number upper than 121 is selected...

Page 1118: ... SHIFT button in the cross point control block In the Display Shift Mode group of the Panel Xpt Assign Main V K Pair Assign menu or Panel Xpt Assign Table Button Assign menu select either of the following Shift All Bus When this is On it functions as a shift button for all buses Key5 8 Select This functions as a shift button dedicated to the key 1 and key 2 rows When On keys 5 to 8 are selected an...

Page 1119: ...ob 2 to 3 2 Set the name of source signal 2 to CAM2 The name CAM3 is assigned automatically to source signal 3 and the name CAM4 is assigned automatically to source signal 4 Setting the source name display color 1 In the Panel Xpt Assign Table Button Assign Src Name LCD Color menu turn the knobs to select the setting target 2 In the LCD Color group select the color Orange Green Yellow Copying Cros...

Page 1120: ... Copy A confirmation message appears asking whether or not to execute the copy 4 To execute the copy press Yes and to cancel the operation press No Selecting Cross Point Assign Tables You can select the cross point assign table to be used for each of the following banks or buses M E 1 to M E 4 banks and PGM PST bank Buses assignable to AUX delegation buttons Notes It is not possible to assign cros...

Page 1121: ...cedure 1 In the Panel XPT Assign menu press Name Export The Name Export menu appears 2 Turn the knob to set the station ID a If set to 255 the information is sent to all stations with display of All 3 Press Src Name Export This exports the source names to the station selected in step 2 4 Press Dest Name Export This exports the destination names to the station selected in step 2 Knob Parameter Adju...

Page 1122: ...ds select the M E bank or bus Press directly on the list on the left of the status area Press the arrow keys in the list on the left to scroll the reverse video cursor Turn the knob 2 Press Audio Follow Enable appears in the Audio Follow column Setting the audio mixer cross points To assign an audio mixer cross point to a switcher cross point pair video key carry out the following procedure 1 In t...

Page 1123: ...If a macro attachment is set when you assign the button to the side flag function the button numbers are offset and therefore when you press the button this does not execute the macro The settings however are maintained so that when you cancel the side flag assignment the macro can be accessed once more For details of side flag operations see Side Flag Settings in Chapter 10 Volume 1 1 In the Pane...

Page 1124: ...to any bus Shift Mode Specify whether the rightmost button of the AUX delegation buttons is used as a shift button and when it is used as a shift button the operation mode RTR Mode Setting Carry out the following settings for using the auxiliary bus control block for router control Assigning destinations Setting the shift operation in the destination selection button rows Source table settings Set...

Page 1125: ...o set the operation mode of the rightmost button in the row of AUX delegation buttons select one of the following in the Shift Mode group of the Panel Aux Assign menu Hold Acts as a shift button and the shifted version of the AUX delegation buttons is enabled while the button is held down Lock Acts as a shift button and pressing the button toggles between the shifted version and the unshifted vers...

Page 1126: ... the destination to be assigned to the button Press directly on the list in the status area Press the arrow keys to scroll the reverse video cursor Turn the knobs For a button whose operation you want to disable press Inhibit Notes When a destination selection button having a number in the range 65 to 128 is selected source table selection automatically becomes invalid and therefore the Inhibit fu...

Page 1127: ...umber 24 on a 24 button system and button number 32 on a 32 button system Setting the source table 1 In the Panel Aux Assign RTR Mode Setting menu press Source Table Assign The Source Table Assign menu appears 2 In the Source Table Select group select the source table you want to manipulate 3 Press Table Assign The Table Assign menu appears The left of the status area lists the button numbers and ...

Page 1128: ...ource Table Assign menu select the source table then in the Expand Xpt Shift Assign group press Key Button In order not to expand the shift operation press No Assign in the Expand Xpt Shift Assign group Assigning levels to a level selection button To assign levels to the LEVEL1 to LEVEL4 buttons in the auxiliary bus control block use the following procedure 1 In the Panel Aux Assign RTR Mode Setti...

Page 1129: ...pshot applying to the router is recalled the recall also applies to the selected destination selection button Off When a snapshot applying to the router is recalled the recall does not apply to the selected destination selection button Notes When a destination selection button is set to Inhibit then even if SS Enable is on the snapshot for that destination is not recalled Knob Parameter Adjustment...

Page 1130: ... block To display the Prefs Utility menu In the Engineering Setup menu select VF2 Panel and HF4 Prefs Utility The status area shows the settings of the user preference buttons Assigning Functions to User Preference Buttons 1 In the Panel Prefs Utility menu using any of the following methods select the button to be assigned Press directly on the list in the status area Press the arrow keys to scrol...

Page 1131: ...t This assigns the selected action which is reflected in the status area To cancel an assignment After selecting the relevant button press Clear To display register names in the Utility Command column If in step 2 you select Macro Recall or Shotbox Recall press the Reg Name Display button to select whether or not register names appear in the Utility Command column Using the PREFS 9 to PREFS 16 set...

Page 1132: ...led ME1 PGM1 ST ME1 PGM4 ST M E 1 PGM1 output safe title on off M E 1 PGM4 output safe title on off On Off ME1 PVW ST M E 1 preview output safe title on off On Off ME1 Clean ST M E 1 clean output safe title on off On Off ME1 K PVW ST M E 1 key preview output safe title on off On Off ME2 PGM1 ST ME2 PGM4 ST M E 2 PGM1 output safe title on off M E 2 PGM4 output safe title on off On Off ME2 PVW ST M ...

Page 1133: ...y source 1 While freeze being released Either of the other two states FM Src2 Frame Freeze Frame freeze of frame memory source 2 During frame freeze Either of the other two states FM Src2 Field Freeze Field freeze of frame memory source 2 During field freeze Either of the other two states FM Src2 Freeze Off Release freeze of frame memory source 2 While freeze being released Either of the other two...

Page 1134: ...unction is assigned Macro Auto Ins Macro auto insert mode on off On Off Macro AT with Rate When registering an auto transition macro event on off setting of mode to save transition rate On Off Macro AT with A B Bus When registering an auto transition macro event for the transition control block on off setting of mode to save A B Bus cross point settings On Off Macro TL with Region When registering...

Page 1135: ...h you want to assign the shortcut The menu screen goes back to the Prefs Utility menu and the selection is reflected in the status area The user preference buttons PREFS 1 to PREFS 16 flash amber 4 Repeat steps 2 and 3 as required to assign all desired menu shortcuts to the user preference buttons To abandon the process of menu shortcut assignment In the Prefs Utility menu press Menu Shortcut once...

Page 1136: ...ant to assign Press directly on the list Press the arrow keys to scroll the reverse video cursor Turn the knob a When the Command parameter is set to Sw er GPI Test Fire Panel GPI Test Fire DCU GPI or Test Fire When Macro Recall is selected Turn the knob to select the macro register you want to assign When Shotbox Recall is selected Turn the knob to select the shotbox register you want to assign 5...

Page 1137: ...disabled Enabled Disabled DME2 Editor Port Enbl DME2 editor port enabled disabled Enabled Disabled DME3 Editor Port Enbl DME3 editor port enabled disabled Enabled Disabled DME4 Editor Port Enbl DME4 editor port enabled disabled Enabled Disabled ME1 PGM1 ST ME1 PGM4 ST M E 1 PGM1 output safe title on off M E 1 PGM4 output safe title on off On Off ME1 PVW ST M E 1 preview output safe title on off On...

Page 1138: ...X1 output safe title on off AUX48 output safe title on off On Off FM Src1 Frame Freeze Frame freeze of frame memory source 1 During frame freeze Either of the other two states FM Src1 Filed Freeze Field freeze of frame memory source 1 During field freeze Either of the other two states FM Src1 Freeze Off Release freeze of frame memory source 1 While freeze being released Either of the other two sta...

Page 1139: ...mode Can be set only while pressed lit When the function is assigned Macro Take Macro execution During execution When the function is assigned Macro Auto Ins Macro auto insert mode on off On Off Macro AT with Rate When registering an auto transition macro event on off setting of mode to save transition rate On Off Macro AT with A B Bus When registering an auto transition macro event for the transi...

Page 1140: ...en enter a menu number from the numeric keypad window Press a particular control panel button twice in rapid succession 3 In the utility shotbox control block select the bank and press the button to which you want to assign the shortcut The menu screen goes back to the Prefs Utility Utility Module Assign menu and the selection is reflected in the status area The buttons in the utility shotbox cont...

Page 1141: ... as the buttons in the utility shotbox control block 1 In the Prefs Utility menu press Key2 4 Bus Button Assign The Key2 4 Bus Button Assign menu appears The cross point settings for the key 2 row appear 2 Refer to Assigning a Function to a Memory Recall Button in the Utility Shotbox Control Block page 1135 to make the assignment Note however the following differences The bank setting of knob 1 is...

Page 1142: ...r VTR Extended VTR connected to a DCU and accessible from the control panel to the DEV1 to DEV12 buttons which become operative when you press the DEV button on the device control block For a disk recorder or Extended VTR you can also make settings relating to sharing of file lists Further you can make settings for devices disk recorder VTR Extended VTR operable from an editing keyboard Editor Por...

Page 1143: ...ction to be set Press directly on the list in the status area Press the arrow keys to scroll the reverse video cursor Turn the knobs a As for the setting values see Selectable actions for various trigger types page 1144 b When knob 2 selection is Aux O ride Src c When knob 2 selection is Key Snapshot d When knob 2 selection is Snapshot or Shotbox e When knob 2 selection is Macro f When knob 2 sele...

Page 1144: ...ecall Macro Take Prefs Button Macro Recall No Action When the trigger type is only Rising Edge or Falling Edge Aux O ride Src When the trigger type is Level When Target is M E 1 M E 2 M E 3 M E 4 or P P No Action When Target is Common Setup System Format Aspect overall system settings Level Enable No Action Notes Level Enable is a function that determines whether GPI inputs are enabled Enable or d...

Page 1145: ...s Press directly on the list in the status area Press the arrow keys to scroll the reverse video cursor Turn the knob 3 To apply the selection made in step 2 when the input is the GPI high level press H Set To apply the selection made in step 2 when the input is low press L Set This confirms the setting which appears in the status area Making Control Panel GPI Output Settings 1 In the Panel Device...

Page 1146: ... 1 Field 1 2 Field 2 3 Any When is selected as the trigger polarity there is no Pulse Width setting When Status is selected there is no Pulse Width or Timing setting 5 In the Source group select the action block M E 1 to M E 4 and P P Set an action for the M E or PGM PST bank Common Set an action for error status 6 Using any of the following methods select the action to be set Press directly on th...

Page 1147: ... trigger from the selected output port This is not output when the trigger type is Status Setting the Control Mode for P Bus Devices In the P Bus Control group of the Panel Device Interface menu select the mode Trigger When a predetermined button is pressed the action command assigned to that button is output to control an external device Timeline The external device is controlled as a keyframe ef...

Page 1148: ...urn the knob a The range of the setting value depends on the DCU port settings The DCU number slot number and serial port number appear 3 Select the device selection button to be assigned from the Assign group Notes It is not possible to assign more than one device selection button to the same port The later assigned device selection button takes priority and the previous selection is invalidated ...

Page 1149: ...assigned 1 In the Panel Device Interface DCU Serial Port MPE Assign menu select the target disk recorder Extended VTR Press directly on the list in the status area Press the arrow keys to scroll the reverse video cursor Turn the knob a The range of the setting value depends on the DCU port settings 2 Turn the knob to select the device selection button DEV1 to DEV12 for sharing the file list 3 Pres...

Page 1150: ...roup of the Panel Device Interface menu select one of the following modes Momentary On an input pulse rising falling edge the input of the selected AUX bus is used and on a falling rising edge this returns to the original cross point Latch On an input pulse rising falling edge the input of the selected AUX bus is used and this does not return to the original cross point change even on a falling ri...

Page 1151: ... keyframe when an empty register is recalled Effect Auto Save Default KF Duration Setting whether or not to replay the first keyframe after rewinding a GPI P Bus disk recorder VTR Extended VTR Macro effect Source Dest Name For the Source Dest source destination names used by the system select one of the following Source name set by cross point assignment or fixed bus name Description name set on r...

Page 1152: ...he macro execution mode and the mode in which to edit macros using the standard type Flexi Pad control block Setting the On Air Tally To set the high tally state reflected on the control panel use the following procedure 1 In the Panel Operation menu press Button Tally The Button Tally menu appears 2 In the Tally Type group select either of the following R1 to R8 Reflect any of tally groups 1 to 8...

Page 1153: ... editing turn Edit Enable Auto Off on Automatic first keyframe insertion When an empty register is recalled to automatically insert a first keyframe of the state at that point turn 1st KF Auto Insert on Automatic effect saving To automatically save an effected when it is recalled after being edited turn Effect Auto Save on Keyframe duration default value Press Default KF Duration then enter the de...

Page 1154: ...the Name Display Mode group select the method of display in the source name displays Auto Optimize display according to number of characters A name of up to two characters appears as two characters in one line A name of up to four characters appears as four characters in one line Otherwise up to the first eight characters are shown in two lines 2 Character The first two characters appear 4 Charact...

Page 1155: ... Auto Deleg turning it on Button indications in the memory recall section When the Flexi Pad control block mode is WIPE or DME for the button indications in the memory recall section select Pattern or Register Name in the Wipe DME Display group When the mode is Snapshot Effect or MCRO select Register No or Register Name in the Snapshot Effect Display group For details see the following Wipe Snapsh...

Page 1156: ...f on air and amber if not on air Notes This setting is only valid in the independent key transition execution section of the following control block Transition control block standard Downstream key control block DSK Fader Module Independent key transition control block simple type Downstream key fade to black control block Interchanging the AUTO TRANS and CUT buttons To interchange the AUTO TRANS ...

Page 1157: ...u is enabled Protect In this mode pressing a panel button cannot change the cross point settings Notes The button On Off state is preserved in each of the Normal and Protect modes For example if the XPT HOLD buttons are On in the Normal mode and you switch to Protect mode then if the XPT HOLD buttons were Off in this mode the previous time the XPT HOLD buttons go off and if they were On they light...

Page 1158: ...nal sensitivity for trackball joystick and the buttons which recall the relevant menus when pressed twice and the relation of the rotation angle of search dial with the playback speed 1 In the Panel Operation menu press the Sensitivity The Sensitivity menu appears The status area shows a list of the items with their settings 2 Make the following settings as required Trackball and Z ring sensitivit...

Page 1159: ...L VAR Dial Range group select Narrow or Wide to set the sensitivity for the search dial in shuttle mode or variable mode Narrow The search speed varies in a relatively narrow range Wide The search speed varies in a relatively wide range For details of search dial operations see Controlling the Tape Disk Transport in Chapter 12 Volume 2 Specifying Main Split Fader In the Main Split Fader group of t...

Page 1160: ...ro execution or when a macro is stopped if the cross point button with the macro attachment set is pressed again Continue Execution of a macro that has been stopped is resumed and an executing macro continues Cancel A stopped macro or a macro during execution is terminated 6 Using the Macro Recall Override group buttons set the action to occur during macro execution or when a macro is stopped if a...

Page 1161: ...be displayed at menu startup Scrl Down Clockwise Scrl Up Clockwise Set the mouse wheel scrolling direction for parameter setting Mouse Slider Control Select the mouse button used for adjusting the bar positions of the knob parameters To display the Maintenance menu In the Engineering Setup menu select VF2 Panel and HF7 Maintenance The status area shows a list of the items with their settings Scree...

Page 1162: ...justing the Alarms In the Panel Maintenance menu make the following settings To give audible feedback from menu touch screen operations Press Touch Beep turning it on Calibrating the Touch Panel 1 In the Panel Maintenance menu press Touch Panel Calibration The following message appears To Perform Calibration please touch the center of each plus sign 2 Press Yes 3 Press the center of the plus sign ...

Page 1163: ...1055 Setting the Mouse Wheel Scrolling Direction for Parameter Setting In the Mouse Wheel Direction group of the Panel Maintenance menu press one of the following buttons Scrl Down Clockwise Turning the mouse wheel in the direction to scroll down is the same as turning the parameter setting knob clockwise Scrl Up Clockwise Turning the mouse wheel in the direction to scroll up is the same as turnin...

Page 1164: ... Panel Setup Panel 1164 Screen Saver and Other Settings Maintenance Menu Notes When Left Button selected even pressing one of the knob parameter buttons in the menu control block does not display a numeric keypad window ...

Page 1165: ...1165 Chapter 20 Switcher Setup Switcher ...

Page 1166: ... the key preview output you can select either video mode background and key or key mode key only and select the background and key K PVW Config Multi program mode Increase the number of M E or PGM PST programs and assign any of the following to the maximum of six outputs Out1 to 6 M E Output Assign Program outputs 1 to 4 preview output key preview outputs 1 and 2 clean output Further you can selec...

Page 1167: ...In the Switcher Config menu press Switching Timing The Switching Timing menu appears 2 Select any of the following Any Not specified Field 1 Field 1 odd fields Field 2 Field 2 even fields Notes When the signal format is set to 720P 1080PsF or 1080P this selection is not possible Setting the Operation Mode In the M E Config group of the Switcher Config menu select the operation mode for each M E or...

Page 1168: ... Assign group select the output signal to be assigned Setting the output configuration for each bank When you selected Multi Program or DSK as the operation mode use the following procedure 1 In the Switcher Config menu press PGM Config The PGM Config menu appears The status area shows the background and key configuration assigned to the output of each bank 2 Using either of the following methods ...

Page 1169: ... to which the settings apply Press directly on the list in the status area to make the selection Press the arrow keys to scroll the reverse video cursor Turn the knob The selected key preview appears in reverse video 3 In the Mode group select Video mode or Key mode If you select Key mode skip to step 6 4 In the Bkgd group select the background In standard mode or Multi Program mode select Clean o...

Page 1170: ... status area shows the region names and assigned user region numbers 2 Using any of the following methods select the region you want to set Press directly on the list in the status area Press the arrow keys to scroll the reverse video cursor Turn the knob 3 In the User Region Assign group select the user region you want to assign If you do not want to assign a user region select No Assign 4 Repeat...

Page 1171: ... E 3 M E 4 Assign the physical PGM PST as logical M E 4 Setting the Assignments of DME Channels to Use on the Individual M E Banks The Switcher Config DME Config menu allows you to select the DME channels to use on the M E and PGM PST banks for processed keys or DME wipes 1 In the Switcher Config menu press DME Config The DME Config menu appears 2 Using either of the following methods select the M...

Page 1172: ...the reverse video cursor Turn the knobs To select all of the pair numbers press ALL 3 In the Aspect group press 4 3 If you select 16 9 no side flags are applied To set 4 3 video material to have side flags applied automatically You can make a setting so that when a signal with aspect ratio set to 4 3 is selected in the cross point control block side flags are automatically applied To do so in the ...

Page 1173: ...e Switcher Config Side Flags menu press Width 2 Adjust the following parameters Displaying the menu for enabling disabling the side flags In the Switcher Config Side Flags menu press Misc Enbl Setup Flags Displaying the menu for assigning the side flags on off function to a cross point button In the Switcher Config Side Flags menu press Side Flags Button Assign Knob Parameter Adjustment Setting va...

Page 1174: ...itch the illegal limiter on or off for the signal generated by the switcher internal matte generator FC Adjust Select the conversion up conversion cross conversion or down conversion when the format converter is applied to an input Making Through Mode Settings Notes For a format converter dedicated input it is not possible to select through mode 1 In the Switcher Input menu select the input signal...

Page 1175: ...mber For format converter dedicated inputs 165 to 180 FC1 to FC16 indicated after the number 3 Press Video Process turning it on 4 Adjust the following parameters To set the parameter settings to their defaults press Unity Enabling the Illegal Color Limiter To enable the illegal color limiter for the signals generated by the switcher internal matte generator press Matte Illeg Col Limit in the Swit...

Page 1176: ...tion is not possible The following figure illustrates the case when FC Input 1 8 are set to up conversion and FC Input 9 16 are set to cross conversion 2 Press FC Input 1 8 or FC Input 9 16 as required 3 Using any of the following methods select what the setting applies to Press directly on the list in the status area Press the arrow keys to scroll the reverse video cursor Button to switch between...

Page 1177: ...ptive is selected adjust the following parameter a 1 Still priority mode 2 Standard mode 3 Motion priority mode 3 In the Aspect group select one of the following Edge Crop Add black bars on the left and right sides of a 4 3 aspect ratio image to convert it to a 16 9 image Letter Box Crop the top and bottom of a 4 3 aspect ratio image to convert it to a 16 9 image Squeeze Stretch a 4 3 image horizo...

Page 1178: ...ersion the value is from 30 to 30 inclusive To return the edge crop image to the center In the Edge Crop Position group press Center Setting the image position in letter box up conversion mode 1 In the Letter Box Position group of the Switcher Input FC Adjust menu press Position turning it on Original image 4 3 Up converted image 16 9 Edge Crop Letter Box Squeeze Knob Parameter Adjustment Setting ...

Page 1179: ...LB Position Image position 1080i 59 94 31 to 32 1080i 50 36 to 36 720P 59 94 720P 50 30 to 30 Knob Parameter Adjustment Setting values 2 Detail Gain Adjust the edge enhancement sharpness 0 to 127 3 Limiter Adjust the maximum signal level to be added to the original signal 0 to 63 4 Crisp Set the amplitude value for which a low amplitude signal is not emphasized 0 to 15 5 Level Depend Set the lumin...

Page 1180: ... 13 9 Crop the left and right sides of a 16 9 image to make a 13 9 image and add black bars at the top and bottom of the 13 9 image to make a 4 3 image Letter Box 14 9 Crop the left and right sides of a 16 9 image to make a 14 9 image and add black bars on the top and bottom of the 14 9 image to make a 4 3 image Letter Box 16 9 Add black bars on the top and bottom of a 16 9 image to convert it to ...

Page 1181: ...n The value is from 30 to 30 inclusive For more details see Setting the image position in edge crop up conversion mode page 1178 For down conversion the enhancer settings are the same as for up conversion For more details see Making enhancer settings page 1179 Original image 16 9 Down converted image 4 3 Edge Crop Letter Box 13 9 Letter Box 14 9 Letter Box 16 9 Squeeze ...

Page 1182: ...y Swap Copy Format Converter menu appears The status area shows lists of the copy source on the left and the copy destination on the right 2 Select Input in the Data Select group 3 Using any of the following methods select the data Press directly on the list Press the arrow keys to scroll the reverse video cursor Turn the knob 4 Press Copy This copies the data Knob Parameter Adjustment Setting val...

Page 1183: ...ports V Blank Adjust the vertical blanking width for the output signals from each of the Output1 to 48 ports The setting is the number of scan lines from the reference blanking position of field 1 for the particular format which should be masked Through Enable or disable through mode Through mode can be enabled for AUX1 to 48 outputs M E and PGM PST program outputs and clean output Safe Title Enab...

Page 1184: ...ssible to make duplicate assignments Preset Edit Preview AUX 1 to 48 3 Using any of the following methods select the output port number and signal to be assigned Press directly on the list in the status area to make the selection Press the arrow keys to scroll the reverse video cursor Turn the knobs For output ports not to be assigned press Inhibit The selected signal appears in reverse video 4 Pr...

Page 1185: ... press Default Making vertical blanking interval adjustment and through mode settings 1 In the Switcher Output menu press V Blank Through The V Blank Through menu appears The status area shows the output ports and the assigned signals the vertical blanking interval and the through mode Enable Disable status 2 Press V Blank Mask 3 Adjust the parameter a Depending on the signal format the adjustment...

Page 1186: ...ates 2 To enable the safe title on off setting made in the Misc menu press Safe Title turning it on 3 Carry out either of the following operations To display a box Press Box1 or Box2 turning it on In this case carry out the following steps 4 and 5 To display a cross Press Cross turning it on To display a grid Press Grid turning it on In this case carry out the following steps 4 and 5 4 When you se...

Page 1187: ...rts and respective 4 3 Crop mode settings 2 Press 4 3 Crop turning it on This enables the crop setting and this is reflected in the status area Notes When the screen aspect ratio of 16 9 is selected for all M E banks in the System Format Active Line Aspect menu the setting of 4 3 Crop is disabled Setting the format converter outputs To set the format converter Display the Switcher Output FC Adjust...

Page 1188: ...e bus toggle is off the split fader settings are enabled For each of the M E and PGM PST banks select enable or disable Fade To Black Enable or disable fade to black for each final program output Preset Color Mix Set the stroke mode for a preset color mix the key status for a transition including a key and the mode in which the transition type after a transition ends returns to the previous settin...

Page 1189: ...Selecting the background transition flip flop mode In the Transition menu press Bus Toggle to switch between on and off On Flip flop mode Off Bus fixed mode For more details see Fader Lever Operation in Bus Fixed Mode in Chapter 3 Volume 1 Setting the split fader to be enabled or disabled In the Transition menu press Split Fader to switch between Enable and Disable This setting is only valid when ...

Page 1190: ... the Non Drop Key group select the key setting for a transition including a key To carry out the transition with the key state maintained press Key1 to Key8 turning them on See Transitions in Chapter 1 Volume 1 4 If each time a transition ends the transition type is to return to the previous setting press One Time Enable Settings relating to fader lever operations To select the way in which the fa...

Page 1191: ... show key for edit preview M E and Pvw K Pvw of P P Key Auto Drop For each switcher bank M E 1 to M E 4 PGM PST specify a key to be turned off automatically when you press a cross point button for the bus to be output as the background Mask Border Process Set the processing order of masks and borders for each M E or PGM PST bank Key Priority Set the key priority operation mode for each of the M E ...

Page 1192: ...ld Time 4 Adjust the following parameter Settings for Key Auto Drop Function The key auto drop function automatically switches off a particular key when you press a cross point button in a bus that outputs the background on the particular switcher bank PGM PST or M E 1 to M E 4 When the background output bus is in flip flop mode this is always the A bus In bus fixed mode it is either the A bus or ...

Page 1193: ...the Settings In the following procedures select the bank to which the settings apply using any of the following methods then make the settings Press directly on the list in the status area Press the arrow keys to scroll the reverse video cursor Turn the knob The selected bank appears in reverse video Selecting the key memory mode In the Key Memory group of the Switcher Key Wipe FM CCR menu select ...

Page 1194: ...hen the XPT HOLD button is on recalling a snapshot or keyframe effect does not reflect the key settings including the cross point selection information Key Disable with Status Same as Key Disable and further disables the reflection of the key on off status Xpt Hold The XPT HOLD button of the key bus functions as a cross point hold button When the XPT HOLD is on recalling a snapshot or keyframe eff...

Page 1195: ...de in which all signals can be selected for input to the color corrector Press CCR Intrnl Signl Enbl in the Switcher Key Wipe FM CCR menu turning it on You can select signals generated internally to the switcher as material for input to the color corrector Notes When you select an M E reentry signal as material for input to the color corrector 1H delay occurs to the output signal of M E Knob Param...

Page 1196: ...ANS buttons in the cross point control block and GPI output ports M E Link Make settings to link together two M E banks Key Trans Link Make settings to link key transitions Setting a Cross Point Button Link To link together two buses internal to the switcher use the following procedure 1 In the Switcher Link menu press Internal Bus Link The Internal Bus Link menu appears The status area shows the ...

Page 1197: ...Key are available Notes With one of M E 1 to M E 4 Trans PGM and P P Trans PGM selected for Master Bus the link setting become effective as soon as you start moving the fader lever 6 In the Bus Select group select Linked Bus link destination bus 7 Referring to step 5 select the bus to be the link destination and press Bus Set 8 Turn the knob to select the link table and press Link Table Set For mo...

Page 1198: ...sses are reassigned and this is reflected in the status area To change the link number and link table number In this menu too you can change the link number and link table number To do this turn the knobs as follows to make the setting then press Link Table Set Linking Cross Point Buttons and GPI Output Ports To link cross point buttons or the CUT and AUTO TRANS buttons in the cross point control ...

Page 1199: ...he reverse video cursor Turn the knobs a These include main pair numbers 1 to 300 and Cut and Auto Trans on each bank 5 In the Video Button group press Select The selected video or button name is reflected in the status area To clear a video button name link Make the selection to which the setting applies then in the Video Button group press Clear 6 To select for each bus whether the GPI link sett...

Page 1200: ...he system so that when a GPI link is set for the cross point selected on the A a bus of the upstream M E block this triggers the GPI output In the Switcher Link GPI Link menu set Re Entry Enable to On or Off When this is On the GPI is executed upstream a When the bus toggle is set to Off the applicable bus depends on the position of the fader lever Notes For re entry upstream applies to a single s...

Page 1201: ...wing methods select the link number you want to set Press directly on the list in the status area Press the arrow keys to scroll the reverse video cursor Turn the knob 3 In the M E Select group select Master M E link source 4 Using any of the following methods select the M E or PGM PST bank you want to be the link source then press M E Set Press directly on the list in the status area Press the ar...

Page 1202: ...lever operation on the downstream key control block 1 In the Switcher Link menu press Key Trans Link The Key Transition Link menu appears The status area displays a link list showing link sources and link destinations and a key selection list 2 Using any of the following methods select the link number you want to set Press directly on the list in the status area Press the arrow keys to scroll the ...

Page 1203: ...E bank number 1 to 4 in DSKx the x is the DSK number 1 to 8 in Keyx the x is the key number 1 to 8 5 In the Key Select group select Linked Key link destination 6 In the same way as in step 4 select the key you want to be the link destination then press Key Set To release the link setting Use the same operation as in step 2 to select the link number for which you want to release the link setting th...

Page 1204: ...ol Set whether operations on the AUX buses from the four 9 pin ports are inhibited DME SDI Interface Make AUX bus output and re entry input settings Editor I F Set the key off mode for control from an editor Making 9 Pin Port Device Interface Settings The description in this section takes the REMOTE1 port as an example For other REMOTE ports carry out the same process as required 1 In the Switcher...

Page 1205: ...e menu press GPI Input The GPI Input menu appears 2 Using any of the following methods select the settings Press directly on the list in the status area Press the arrow keys to scroll the reverse video cursor Turn the knobs 3 In the Trigger Type group select the trigger type Rising Edge Apply the trigger on a rising edge of an input pulse Falling Edge Apply the trigger on a falling edge of an inpu...

Page 1206: ... Trans SS Recall Keyx SS Recall Effect Recall Effct Recall Run KF Run KF Stop KF Rewind KF Rev Run No Action When Target is P P Cut Auto Trans DSKx Cut DSKx Auto Trans FTB Cut FTB Auto Trans SS Recall DSKx SS Recall Effect Recall Effect Recall Run KF Run KF Stop KF Rewind KF Rev Run No Action When Target is Common Setup FM Src1 Field Freeze FM Src1 Frame Freeze FM Src2 Field Freeze FM Src2 Frame F...

Page 1207: ... FC Input 1 8 FC Input 9 16 FC Output 1 2 and FC Output 3 4 Carrying out level settings To set the low level and high level first set the trigger type to Level then use the following procedure 1 In the Switcher Device Interface menu select the action to be set and press H L Set The H L Set menu appears 2 Using any of the following methods select the settings Press directly on the list in the statu...

Page 1208: ... state for the specified pulse width Any Edge Each time the trigger occurs the relay contacts are alternately closed or opened or the output is switched between high and low Status Depending on the status the relay contacts are closed or opened or the output is switched between high and low No Operation The trigger has no effect on the output 4 Turn the knobs to select the pulse width and timing t...

Page 1209: ...tion list when the trigger type is Status In M E x the x is the M E bank number 1 to 4 in DSKx the x is the DSK number 1 to 8 in Keyx the x is the key number 1 to 8 When Source is M E x Keyx On No Action When Source is P P DSKx On No Action When Source is Common Error Make Error Break No Action b When knob 2 selection is Key Snapshot c When knob 2 selection is Snapshot or Effect 7 Press Action Set...

Page 1210: ...Manual make whether control of the port selected in step 2 is possible or not depend on the setting in the Misc menu 5 Repeat steps 2 to 4 as required to make the settings for other ports Setting DME and Switcher Interfaces Select the signals AUX bus output signals input to the DME as follows Notes When using the MVE 8000A it is not necessary to make this setting 1 Press DME SDI Interface in the S...

Page 1211: ...g Off Keys Upon Receiving the Editor Command Selects the mode for turning off keys when an All Stop command is received from the editor 1 In the Switcher Device Interface menu press Editor I F The Editor I F menu appears 2 Select one of the following modes All When an All Stop command is received all keys for the selected regions are turned off Specified When an All Stop command is received among ...

Page 1212: ...Chapter 20 Switcher Setup Switcher 1212 Interfacing With External Devices Device Interface Menu ...

Page 1213: ...1213 Chapter 21 DME Setup DME ...

Page 1214: ...ff System Phase Adjust the operation timing of the whole system with respect to the reference signal When the signal format is 1080P up to four DMEs can be operated DME1 to DME4 In the following description the settings for DME1 are given by way of example but the settings for DME2 to DME4 are carried out in a similar way Setting the Initial Crop 1 In the DME1 Aspect group of the DME Input menu se...

Page 1215: ...in the DME Input menu turning it on Making DME System Phase Adjustment To adjust the DME reference phase use the following procedure 1 In the DME Input menu press System Phase 2 Set the following parameters Knob Parameter Adjustment Setting values 1 Top Position of top side 9 00 to 9 00 2 Left Position of left side 16 00 to 16 00 3 Right Position of right side 16 00 to 16 00 4 Bottom Position of b...

Page 1216: ... connectors use the following procedure 1 In the DME Output menu press Monitor Output The Monitor Output menu appears 2 In the Select group select the DME to which the setting applies DME1 Select DME1 DME2 Select DME2 When the signal format is 1080P you can also select DME3 or DME4 similarly 3 In the list on the left of the status area press directly on the monitor output for which you want to mak...

Page 1217: ...action settings When the signal format is 1080P up to four DMEs can be operated DME1 to DME4 In the following description the settings for DME1 are given by way of example but the settings for DME2 to DME4 are carried out in a similar way Notes For the GPI Input and GPI Output settings the settings apply to Ch1 Ch2 for DME1 DME3 and Ch3 Ch4 for DME2 DME4 Setting the editor protocol In the DME1 Edi...

Page 1218: ...evel Carry out the specified operation when the input is low or high No Operation Apply no trigger on an input pulse 4 In the Target group select what this applies to channels 1 to 4 or Proc 5 Using any of the following methods select the action to be set Press directly on the list in the status area Press the arrow keys to scroll the reverse video cursor Turn the knobs a As for the setting values...

Page 1219: ... or Format by GPI input If a GPI to switch Aspect or Format occurs when powering the system off the action triggered by the GPI may start immediately before the power goes off and the power may go off before the action is completed This may corrupt the setup settings It is therefore recommended to use Level Enable to avoid such a situation Carrying out level settings To set the low level and high ...

Page 1220: ...ding on the status the relay contacts are closed or opened or the output is switched between high and low No Operation The trigger has no effect on the relay state or output level 3 Using any of the following methods select the action you want to set Press directly on the list in the status area Press the arrow keys to scroll the reverse video cursor Turn the knob a Error Make Error Break No Actio...

Page 1221: ...1221 Chapter 22 DCU Setup DCU ...

Page 1222: ...parallel output ports inserted in an option slot GPI Output Assign Make GPI output settings Serial Port Assign Set the protocol to match the devices connected to a 9 pin serial port You can also select the control panel used to control each device Notes For setup relating to DCU it is necessary to make the same settings on multiple control panels maximum three units that are sharing the DCU After ...

Page 1223: ...t only the input ports which are unused after making the above assignments To display the Input Config menu In the Engineering Setup menu select VF5 DCU and HF1 Input Config The status area shows input port information Assigning a GPI Input Port 1 In the DCU Input Config menu select what the setting applies to DCU1 or DCU2 from the DCU Select group 2 In the Parallel Input Assign group press GPI In...

Page 1224: ...ent of a GPI Input Port 1 In the DCU Input Config menu select what the setting applies to DCU1 or DCU2 from the DCU Select group 2 In the Parallel Input Assign group if GPI Input is on press it to turn it off 3 Turn the knobs to adjust the following parameters 4 In the Parallel Input Assign group press No Assign Knob Parameter Adjustment Setting values 1 From No First port number 1 to To No 2 To N...

Page 1225: ...rectly on the list in the status area Press the arrow keys to scroll the reverse video cursor Turn the knob 2 In the Trigger Type group select the trigger polarity Rising Edge Apply the trigger on a rising edge of an input pulse Falling Edge Apply the trigger on a falling edge of an input pulse Any Edge Apply the trigger on a change in the polarity of the input signal Level Carry out the specified...

Page 1226: ...h appears in the status area Selectable actions for various trigger types When the trigger type is other than Level In M E x the x is the M E bank number 1 to 4 in DSKx the x is the DSK number 1 to 8 in Keyx the x is the key number 1 to 8 M E x Cut M E x Auto Trans P P Cut PP Auto Trans M E x Keyx Cut M E x Keyx Auto Trans P P DSKx Cut P P DSKx Auto Trans FTB Auto Trans FTB Cut Master SS Recall SS...

Page 1227: ...ay corrupt the setup settings It is therefore recommended to use Level Enable to avoid such a situation As for Aux O ride Src when Rising Edge is selected on a rising edge the set AUX bus input is used On a falling edge the original state of the cross point is restored If the GPI trigger is applied repeatedly at short intervals 0 5 second or less the cross point switching may not be carried out co...

Page 1228: ...ade in step 2 when the input is the GPI high level press H Set To apply the selection made in step 2 when the input is low press L Set This confirms the setting which appears in the status area Knob Parameter Adjustment Setting values 1 No Signal format screen aspect ratio selection 1 and upwards ...

Page 1229: ...n the DCU Output Config menu select what the setting applies to DCU1 or DCU2 from the DCU Select group 2 In the Parallel Output Assign group press GPI Output 3 Using any of the following methods select the output port and GPI output number Press directly on the list in the status area Press the arrow keys to scroll the reverse video cursor Turn the knobs a When the MKS 2700 is connected select 2 b...

Page 1230: ...e DCU Select group 2 In the Parallel Output Assign group if GPI Output is on press it to turn it off 3 Turn the knobs to select the slot and port to which the setting applies 4 In the Parallel Output Assign group press No Assign Knob Parameter Adjustment Setting values 1 From Slot First port slot 2 to 6 2 From Port First port number 1 to 54 3 To Slot Last port slot 2 to 6 4 To Port Last port numbe...

Page 1231: ...r Turn the knob 2 In the Trigger Type group select the trigger polarity Rising Edge The trigger causes the relay contacts to be open circuit or drives the output high and holds this state for the specified pulse width Falling Edge The trigger causes the relay contacts to be shorted or drives the output low and holds this state for the specified pulse width Any Edge Each time the trigger occurs the...

Page 1232: ...rsor Turn the knobs a Action list when the trigger type is other than Status In M E x the x is the M E bank number 1 to 4 in Keyx the x is the key number 1 to 8 in DSKx the x is the DSK number 1 to 8 When Source Device is SCU M E x Keyx SS Recall P P DSKx SS Recall Editor GPI only when BZS 8050 license is valid No Action When Source Device is DCU No Action Action list when the trigger type is Stat...

Page 1233: ...I 6 To confirm the selection press Action Set This confirms the selection which appears in the status area Test firing the trigger To test fire the trigger in the DCU GPI Output menu press Test Fire This outputs a trigger from the selected output port This is not output when the trigger type is Status ...

Page 1234: ...t on the left of the status area Press the arrow keys to scroll the reverse video cursor Turn the knob a The setting value range depends on the DCU port setting When the MKS 2700 is connected select 2 for the slot and a value in the range 1 to 6 for the port 3 Using any of the following methods select the protocol for the connected device Press directly on the list on the right of the status area ...

Page 1235: ...played as DCUd_PORTs p d 1 or 2 DCU No s 2 to 6 Slot No p 1 to 6 Port No 6 Press Enter To return the set name to the default name Press Clear in the Name group 7 From the SCU Select group select the control panel SCU1 SCU2 or SCU3 assigned to operations on the external device connected to the serial port Deleting the serial port assignment 1 In the DCU Serial Port Assign menu select the target for...

Page 1236: ...the knob a The range of setting values depends on the DCU port setting When the MKS 2700 is connected select 2 for the slot and a value in the range 1 to 6 for the port 3 Press Port Setting The DCU Serial Port Assign P Bus Setting menu appears At the top of the status area the relevant serial port slot number protocol serial port name and SCU number appear In the lower part of the status area the ...

Page 1237: ... to make the settings for other commands Making detailed settings for a VTR 1 In the DCU Select group of the DCU Serial Port Assign menu select the target for the setting DCU1 or DCU2 2 Using any of the following methods select the serial port connected to the VTR for which you want to make the settings Press directly on the list in the status area Press the arrow keys to scroll the reverse video ...

Page 1238: ... read use VITC When interpolation data is returned from a VTR use that interpolation data VITC Use VITC CTL Control CTL pulses or timer counter pulses are used Use this only for a tape on which no timecode is recorded The displayed tape position is based on the reference signal specified here 5 Using any of the following methods specify the VTR constants Press directly on the list in the status ar...

Page 1239: ... the knob a The range of setting values depends on the DCU port setting When the MKS 2700 is connected select 2 for the slot and a value in the range 1 to 6 for the port 3 Press Port Setting The DCU Serial Port Assign DDR SD9P Setting menu appears At the top of the status area the relevant serial port slot number protocol serial port name SCU number and disk recorder type appear In the lower part ...

Page 1240: ...k communications protocol 1 In the DCU Select group of the DCU Serial Port Assign menu select the target for the setting DCU1 or DCU2 2 Using any of the following methods select the serial port connected to the disk recorder for which you want to make settings Press directly on the list in the status area Press the arrow keys to scroll the reverse video cursor Turn the knob a The range of setting ...

Page 1241: ...selected as the protocol the Simple VDCP Setting menu appears 4 In the DDR Type group select the type of disk recorder Player Functioning as a player Recorder Functioning as a recorder 5 In the Name Mode group select the file name character count mode Fixed 8 Character Use 8 character file names ...

Page 1242: ... to which the video port number or response speed setting applies Press directly on the list in the status area Press the arrow keys to scroll the reverse video cursor Turn the knob a 1 Video Port Number of the video port associated with the serial port to which the setting applies For a player the output port setting For a recorder the input port setting 2 Maximum Open Delay maximum time required...

Page 1243: ...tailed settings for an Extended VTR 1 In the DCU Serial Port Assign menu select the setting target DCU1 or DCU2 from the DCU Select group 2 Using any of the following methods select the serial port connected to the Extended VTR for which you want to make the settings Press directly on the list in the status area Press the arrow keys to scroll the reverse video cursor Turn the knob a The range of s...

Page 1244: ...everse video cursor Turn the knob a 1 Maximum Open Delay maximum time required to open a file 2 Maximum Cueup Delay maximum time required to cue up a file 3 Play After Cueup Delay maximum delay time from the cued up state to begin playback 4 Stop Delay delay time from issuing the stop command until actually stopping 5 Turn the knob to set the response speed of the Extended VTR 6 Press Set This con...

Page 1245: ...1245 Chapter 23 Setup Relating to Router Interface and Tally Router Tally ...

Page 1246: ...rocessor to S Bus space and select the matrix size and positioning level source address settings and so on External Box To obtain the signal selection status of external devices with a parallel input assign a matrix as an external selector in the S Bus space Make the matrix size assignment level source address and other settings Alias Name Gp Set the group number for an S Bus description name to b...

Page 1247: ... maximum value is 897 b When the matrix size is Standard the maximum value is 887 For the Compact size the maximum value is 897 Making an External Box Setting 1 In the Router Tally Router menu press External Box Assign The External Box Assign menu appears The status area shows the external box size address and other settings 2 In the Device group select what the setting applies to one of External ...

Page 1248: ... Device group select External box2 5 In the Matrix Size group select 32 1 6 Turn the knobs to make adjustments At this point make the settings of Destination and Level the same as in step 3 This automatically couples External Box1 and External Box2 forming an external box with 40 8 32 inputs Setting the group number of an S Bus description name 1 In the Alias Name Gp group of the Router Tally Rout...

Page 1249: ...the name is not set the description name for 0 appears If the description name for 0 is not registered either the Type and No values appear 3 In the Alias Name Gp group press Set This confirms the setting which is reflected in the status area Notes Transmit the description name selected here from the router Knob Parameter Adjustment Setting values 1 Gp No Group number of S Bus description name 0 t...

Page 1250: ...he Router Tally Group Tally menu To display the Group Tally menu In the Engineering Setup menu select VF6 Router Tally and HF2 Group Tally The following functions are available here Tally Group Select the group tally Gp1 to 4 or Gp5 to 8 which can be used For the parallel tally all groups can be used regardless of this setting SBus Tally Enable Specify S Bus tally enabled or disabled Setting the t...

Page 1251: ...ings 1 In the Router Tally Wiring menu press New The New menu appears 2 With a knob or menu operation set the destination When switcher inputs and outputs are connected to the router in a group you can specify the start and end destination addresses Destination From Specify the start destination address for the wiring configuration Destination To When the wiring configuration is multiple specify t...

Page 1252: ...le to specify multiple destinations in a single operation and a single Destination Address must be specified 3 Press Execute This updates the wiring settings Deleting Wiring Settings 1 In the Router Tally Wiring menu using either of the following methods select the wiring whose settings you want to delete Press directly on the list in the status area Press the arrow keys to scroll the reverse vide...

Page 1253: ...Chapter 23 Setup Relating to Router Interface and Tally Router Tally 1253 Wiring Settings Wiring Menu Destination level order ascending tDestination address order ascending tSource level order ascending ...

Page 1254: ...e Tally Type Specify the tally type Destination Specify the address and level Tally Enable Specify the timing at which a tally is enabled Enable Always enabled Disable Always disabled Tally Input Follow the tally input status Making New Tally Generation Settings 1 In the Router Tally Tally Enable menu press New The New menu appears 2 Turn the knobs to set the following parameters a 1 R1 2 G1 3 R2 ...

Page 1255: ... port number 6 Press Execute This sets the settings made in steps 2 to 5 as the settings for tally generation Modifying Tally Generation 1 In the Router Tally Tally Enable menu press Modify The Modify menu appears 2 With reference to steps 2 to 5 in the preceding section Making new tally generation settings change the parameters as required 3 Press Execute This modifies the tally generation settin...

Page 1256: ...Chapter 23 Setup Relating to Router Interface and Tally Router Tally 1256 Tally Generation Settings Tally Enable Menu This deletes the selected tally generation entry ...

Page 1257: ...ows the tally copy status Making New Tally Copy Settings 1 In the Router Tally Tally Copy menu select New The New menu appears 2 Turn the knob to select the copy from source When setting more than one tally copy you can specify the copy from source start and end addresses 3 Specify the copy to source address 4 Press Execute This makes the tally copy setting according to the specifications in steps...

Page 1258: ...ally Copy Settings 1 In the Router Tally Tally Copy menu using any of the following methods select the tally copy whose settings you want to delete Press directly on the list in the status area Press the arrow keys to scroll the reverse video cursor Turn the knob 2 Press Delete This deletes the selected tally copy entry Knob Parameter Adjustment Setting values 1 Copy From Copy from source 1 to 102...

Page 1259: ...s the parallel tally settings Making or Modifying Parallel Tally Settings 1 In the Device group of the Router Tally Parallel Tally menu select DCU1 or DCU2 2 Using any of the following methods select the slot number and port number Press directly on the list in the status area Press the arrow keys to scroll the reverse video cursor Turn the knobs a When the MKS 2700 is connected select 2 for the s...

Page 1260: ...te This makes the parallel tally settings in accordance with the settings in steps 1 to 6 Deleting Parallel Tally Settings 1 In the Router Tally Parallel Tally menu using any of the following methods select the parallel tally whose settings you want to delete Press directly on the list in the status area Press the arrow keys to scroll the reverse video cursor Turn the knobs 2 Press Clear This dele...

Page 1261: ...the Serial Tally Port group of the Router Tally Serial Tally menu select the port to which the setting applies 2 In the Tally Group group select the tally group 3 In the Tally Type group press the tally types to select You can select up to four Notes The selectable tally types depend on the settings in step 2 4 In the Tally Data Size group press one of the following to select the data size 128 Bit...

Page 1262: ...rce address setting for a particular bit In the Router Tally Serial Tally Source Assign menu select the serial tally port and bit number see steps 2 and 3 in the previous item then press Clear This clears the source address setting for the selected bit To clear all source address settings In the Router Tally Serial Tally Source Assign menu select the serial tally port then press All Clear A confir...

Page 1263: ...1263 Chapter 24 Simple Connection of the MKS 8080 8082 AUX Bus Remote Panel ...

Page 1264: ...e following procedure For settings on the MKS 8080 8082 see the section Making the Setting With Buttons Setup Function in the Operation Manual for the MKS 8080 8082 1 Carry out initialization of the MKS 8080 8082 settings This can be done on the MKS 8080 8082 separately 2 Set the MKS 8080 8082 station number in the range 2 to 17 This can be done on the MKS 8080 8082 separately 3 Set the S Bus data...

Page 1265: ...nd following H SET PHANTOM TABLE for Router mode This is unset since the unit does not operate in router mode N SET PANEL TABLE for Router mode The source is set to IN001 and following and destination is set to OUT001 and following However since the unit does not operate in router mode these settings are not used R SET ROUTE Since when using the simple connection the switcher and router cannot be ...

Page 1266: ...Chapter 24 Simple Connection of the MKS 8080 8082 AUX Bus Remote Panel 1266 Setting Status of the MKS 8080 8082 in Simple Connection ...

Page 1267: ...1267 Chapter 25 DIAGNOSIS ...

Page 1268: ...d HF1 LAN Status The following communications status screen appears Devices constituting the system only appear if they are connected You can check connection information in the Engineering Setup System System Config menu See System Settings System Config Menu page 1045 Even if a DCU is connected if there is a communications error it does not appear The LAN communications status is shown as follow...

Page 1269: ...ng the Communications Status When not connected Red and blue flashing Peripheral LAN PERIPH LAN When connected Amber When not connected Not shown If the connection between the menu panel and another panel is broken it does not appear ...

Page 1270: ...Chapter 25 DIAGNOSIS 1270 Checking the Communications Status ...

Page 1271: ...1271 Appendix Volume 3 ...

Page 1272: ...s Link All data relating to Key Trans Link menu 7321 3 Engineering Setup Panel Config Link Program Button External Bus Link All data relating to External Bus Link menu 7321 7 Engineering Setup Panel Config 10 Key Region Assign All data relating to 10 Key Region Assign menu 7321 8 Engineering Setup Panel Config Link Program Button All data relating to Link Program Button menu 7321 11 Engineering Se...

Page 1273: ...ock 7324 2 Engineering Setup Panel Prefs Utility Key 2 4 Bus Button Assign All data relating to utility shotbox assignment to cross point buttons in the key 2 row 7325 Engineering Setup Panel Device Interface All data relating to Device Interface menu 7325 1 Engineering Setup Panel Device Interface GPI Input All data relating to GPI Input menu 7325 3 Engineering Setup Panel Device Interface GPI Ou...

Page 1274: ...Config K PVW Config All data relating to Config menu All data relating to M E Output Assign menu All data relating to PGM Config menu All data relating to K PVW Config menu 7331 4 Engineering Setup Switcher Config User1 8 Config All data relating to User1 8 Config menu 7331 5 Engineering Setup Switcher Config Logical M E Assign All data relating to Logical M E Assign menu 7331 6 Engineering Setup ...

Page 1275: ...er Link Internal Bus Link All data relating to Internal Bus Link menu 7336 4 Engineering Setup Switcher Link GPI Link All data relating to GPI Link menu 7336 6 Engineering Setup Switcher Link M E Link All data relating to M E Link menu 7336 7 Engineering Setup Switcher Link Key Transition Link All data relating to Key Transition Link menu 7337 1 Engineering Setup Switcher Device Interface Remote A...

Page 1276: ... Monitor Output All data relating to Monitor Output menu a 7344 Engineering Setup DME Device Interface All data relating to Device Interface menu 7344 1 Engineering Setup DME Device Interface DME1 GPI Input All data relating to DME1 GPI Input menu 7344 3 Engineering Setup DME Device Interface DME1 GPI Output All settings relating to DME1 GPI Output menu 7344 4 Engineering Setup DME Device Interfac...

Page 1277: ...lock Delegation buttons AUTO DELEG Numeric Keypad Control Block Mode selection buttons TC RCALL STORE Menu Control Block User preference buttons assigned for Plug in Editor Enbl and System Manager Enbl functions SUB MENU SITE Utility Shotbox Control Block BANK1 to BANK4 memory recall button Downstream Key Control Block DSK1 to DSK4 K SS key source name display key snapshot buttons ...

Page 1278: ...SHOT BOX MCRO TRANS RATE BANK0 BANK1 memory recall buttons Transition Control Block and Flexi Pad Control Block simple type WIPE DME SNAP SHOT INH memory recall section Independent Key Transition Control Block simple type K SS key source name display key snapshot buttons Downstream Key Fade to Black Control Block DSK1 DSK2 K SS key source name display key snapshot buttons Edit PVW Shift ON OFF Mul...

Page 1279: ...y All data relating to Video Modify menu 4131 DME Freeze Freeze All data relating to Freeze menu 4141 4141 1 to 4141 28 DME Non Linear All data relating to Non Linear menu 4151 DME Light Trail Lighting All data relating to Lighting menu 4152 DME Light Trail Trail All data relating to Trail menu 4153 DME Light Trail Motion Decay All data relating to Motion Decay menu 4154 DME Light Trail KF Strobe ...

Page 1280: ...elating to Flex Shadow menu a 4116 DME Edge Wipe Crop All data relating to Wipe Crop menu a 4117 DME Edge Color Mix All data relating to Color Mix menu a 4127 DME Video Modify Mask All data relating to Mask menu 4155 DME Light Trail Wind All data relating to Wind menu a 4156 DME Light Trail Spot Lighting All data relating to Spot Lighting menu a 4171 DME Enhanced Video Modify Sketch All data relat...

Page 1281: ...or Status menu appears see page 1282 When an error has already been cleared the Error Log menu appears see page 1283 You can select whether or not to indicate the occurrence of an error by the word ERROR shown on the menu title button by setting Error Popup in the Error Status menu or Error Log menu For details see Error Status menu page 1282 or Error Log menu page 1283 To display the error status...

Page 1282: ...or Status menu HF2 Error Log display the Error Log menu Error Status menu The Error Status menu lists currently occurring error information listed with the most recent information at the top When an error has been cleared the error disappears from the list a No This is a sequential number assigned to the error status 1 No 2 Date Time 3 Device 4 Status 6 Error Popup button 5 Refresh Status button ...

Page 1283: ...when an error occurs This button is linked to the Error Popup button in the error log menu On if a device error occurs display ERROR on the menu title button Off if a device error occurs do not display ERROR on the menu title button Error Log menu The Error Log menu lists changes in the error status from the time that the menu display in the menu operating section is started up listed with the mos...

Page 1284: ...red c Device This shows the device on which the status change occurred d Status This shows the details of the status change If you press on the list this switches the display to reverse video and selects the item You can also select items in the error log by turning the knob 1 No 2 Date Time 3 Device 4 Status 5 Clear button 6 Plural button 7 All button 8 Error Popup button ...

Page 1285: ... cancel the selection press once again to return to the normal display h Error Popup button This selects whether or not to display ERROR on the menu title button when an error occurs This button is linked to the Error Popup button in the error status menu On if a device error occurs display ERROR on the menu title button Off if a device error occurs do not display ERROR on the menu title button Er...

Page 1286: ...end Key Frame cannot be executed Key Frame Register is busy UserX 2515 Frame Memory Still Create Key Frame In the above menu an attempt was made to execute Append Key Frame using a register UserX region into which files are being loaded Try again after file loading has finished Append Key Frame cannot be executed Key Frame Register is being edited UserX 2515 Frame Memory Still Create Key Frame In ...

Page 1287: ...Backup is pressed this message appears if there is not enough space to carry out the backup Prepare failed not any file was found on this board 11 2565 Frame Memory External Device Restore from DDR VTR In the above menu when Backup is pressed this message appears if no image is present Backup failed not prepared yet 12 2565 Frame Memory External Device Restore from DDR VTR In the above menu when B...

Page 1288: ...g Setup System Maintenance Setup Operation Lock In the above menu the password was not changed Create Key Frame Create Key Frame cannot be executed FMx is not assigned to a user region 2515 Frame Memory Still Create Key Frame In the above menu an attempt was made to execute Create Key Frame but it failed because the frame memory output FMx is not assigned to a user region 7331 4 Make the assignmen...

Page 1289: ...etup System Maintenance In the above menu removable disk formatting procedure failed Check that the memory card is correctly inserted Error This operation is cancelled because the register is locked Please change the register status to be unlocked first 6211 1 Effect Master Timeline Store Edit 6311 1 Snapshot Master Snapshot Store Edit 6411 1 Shotbox Register Store Recall Edit In the above menu an...

Page 1290: ...ssage appears if a red marker frame file is invalid Blue Symbol file not match 4 2542 Frame Memory File Auto Extraction In the above menu when Extraction Start is pressed this message appears if a blue marker frame file is invalid No data between two symbol files 5 2542 Frame Memory File Auto Extraction In the above menu when Extraction Start is pressed this message appears if there is no data bet...

Page 1291: ...720P format only File Frame Memory Some requests are skipped Following operation is not permitted Loading that will cause duplicate register name 7151 File Frame Memory 7162 File All External File Import Export In the above menu an attempt was made to load a file of a name already existing in the register File Open Status ERROR 01 533X Device DDR VTR When an error is returned from the DDR VTR one ...

Page 1292: ... possible to format the disk correctly in a single attempt In such cases it is necessary to restart the system and then carry out formatting again Press OK to restart the system HDD Format Success System will be restarted 7317 Engineering Setup System Maintenance In the above menu the hard disk formatting procedure completed successfully Press OK to restart the system Success But some partitions c...

Page 1293: ...m Maintenance execute HDD Format Internal Error HDD is incorrect Hard disk is incorrect or not formatted To format the hard disk please execute HDD Format on Page 7317 Internal Error Recovery HDD The recovery data partition of hard disk is damaged and all data is lost The data needs to be recovered Please execute Restore Data on Page 9999 During menu startup an error was found in the recovery data...

Page 1294: ...ture package there was insufficient space on a memory card Password Password Incorrect 7317 1 Engineering Setup System Maintenance Setup Operation Lock In the above menu the wrong password was entered Enter the correct password Record Cannot be executed Maximum number of clips are created 2523 Frame Memory Clip Record In the above menu an attempt was made to execute Rec Start but the number of rec...

Page 1295: ...ore from DDR VTR In the above menu when the Restore Start button is pressed this message appears if the external hard disk is already active in a frame memory file data backup restore operation FM file auto extraction is running 3 2565 Frame Memory External Device Restore from DDR VTR In the above menu when the Restore Start button is pressed this message appears if the function for frame memory f...

Page 1296: ...Prepare failed insufficient Clip id 15 2565 Frame Memory External Device Restore from DDR VTR In the above menu when Restore is pressed this message appears if there are not enough Clip IDs internal processing error Restore failed Cannot find symbol files on this tape 18 2565 Frame Memory External Device Restore from DDR VTR In the above menu when Restore is pressed this message appears if a marke...

Page 1297: ...t 2522 Frame Memory Clip Play In the above menu when Trim is pressed this message appears if neither Start TC not Stop TC is set 2522 Frame Memory Clip Play In the above menu when Trim is pressed this message appears if the interval between Start TC or Clip Begin and Stop TC or Clip End is the entire clip 2522 Frame Memory Clip Play In the above menu when Trim is pressed this message appears if th...

Page 1298: ...m the control panel is not correct one of these messages that corresponds to the situation appears Following the message use Menu 7311 Engineering Setup System Network Config or 7312 Engineering Setup System System Config to retry the operation Illegal Panel Assign Information for Dual Simul Operation Page 7312 No Panel Assign Information Page 7312 No Switcher Assign Information Page 7312 No Syste...

Page 1299: ... Error Local File Access Error FTP Connect Error FTP Busy Error FTP Access Error FTP No Result Error FTP Put Command Error FTP Delete Error FTP Delete Command Error FTP Delete Result Error Control Table No Space Error Control Table Same Name Error No Queue Error Resize BMP Error Make Vector Error Uncompress Error Compress Error Server Not Respond No reactions are returned from the processor Check ...

Page 1300: ...rations 113 Beep 1161 Beveled edge settings 597 Blind settings 652 Blink function 247 Blur settings 623 Border 212 parameters 253 processing order 1194 settings 593 Brick settings 719 Brightness adjustment 1161 Broken glass settings 651 BS button 135 Bus fixed mode fader operation 187 wipe direction 189 Bus selection 147 Button assignment settings 1130 numbers 152 153 operation mode 1155 Button as...

Page 1301: ...agement 1073 Diagnosis 1267 Diagnostic menu 541 Digital multi effects 42 554 Dim and fade settings 632 Direct store 731 Direction 301 320 352 Directory operations 1004 creating a directory 1004 deleting a directory 1005 renaming a directory 1005 Disk recorder control 738 Cueup Play 746 file operations 761 information check 745 recording to 744 settings 1239 1240 timeline 754 timeline editing 757 D...

Page 1302: ...079 File menu 535 File operations 761 autoload function 1008 batch operations 998 copying 989 1006 deleting 993 directory operations 1004 displaying menus 983 import export 1001 individual files 978 loading 988 999 renaming 990 saving 986 998 selecting a device 985 selecting regions 985 viewing detailed information 983 Files 46 978 autoload function 982 deleting 418 operations 978 renaming 419 Fil...

Page 1303: ...transition execution section 62 99 101 106 Independentkeytransitionrate 197 display 200 setting by a menu operation 199 setting in the Flexi Pad control block 197 setting in the numeric keypad control block 198 Initialization hard disk 1075 Input string 135 value 133 Input reference signal 1049 Installation 1060 Interpolation settings 708 Invert settings 706 Item display 133 135 J Joystick 74 Joys...

Page 1304: ...n 396 Locking the setup data 1076 Luminance key 210 M M E bank display 58 copy 434 swap 434 M E 1 to M E 4 menus 518 Macro 45 902 assignment of operation buttons 1094 attachment 46 attachment removal 956 attachment setting 953 auto insert mode 912 creating 905 creation editing 911 creation saving 924 editing 905 906 events 902 execution 908 910 921 execution by attachment 958 execution mode 1159 f...

Page 1305: ...ing 839 Multi 311 323 mirror settings 656 move settings 623 Multi Program 2 40 basic operation 481 restriction 492 Multifunction Flexi Pad Control Block DME Wipe Pattern Operations 373 Key Adjustment Operations 263 Wipe Pattern Operations 330 Multifunction Flexi Pad control block effect 826 keyframe 814 macro operations 934 master timeline 832 shotbox 894 snapshot 862 Multifunction flexipad contro...

Page 1306: ...843 875 menu macro 962 operations in the menus 837 recalling 788 Register editing menu macro 971 Registers 768 Related manuals 29 Replication 323 Reset 1059 Reset initialization 1059 Resizer DME wipe 364 Resizer DME wipe patterns 516 Resume mode 1055 Right button 136 Ripple settings 646 Rotary wipes 498 Rotation 308 322 561 Router destination 1086 Router interface settings 1246 Router interface ta...

Page 1307: ...Spring 316 Squeeze 503 510 516 Standard wipe patterns 292 Standard wipes 496 Start up state 1057 Status area 125 Status menu 447 527 STOP NEXT KF button 80 Sub subsidiary mask 215 using 242 258 Subsidiary menu site 139 SUPER MIX 60 105 Super mix 158 settings 171 Swap 434 438 Swapping 839 Swirl settings 665 Switcher configuration 1166 Switcher setup 1165 System maintenance 1073 settings 1045 T Tall...

Page 1308: ...24 switching settings 1188 switching timing 1167 Video process 450 memory 451 settings 452 Video process memory 1192 Virtual image cancellation 577 VTR control 738 Cueup Play 746 information check 745 Loop 753 recording to 744 Recue 753 timeline 754 timeline editing 757 W Wave settings 639 Wind settings 685 Window adjustment 223 226 WIPE 60 62 105 Wipe 37 158 copy 435 enhanced 292 modify clear 318...

Page 1309: ...for use by the purchasers of the equip ment described in this manual Sony Corporation expressly prohibits the duplication of any portion of this manual or the use thereof for any pur pose other than the operation or maintenance of the equipment described in this manual without the express written permission of Sony Corporation ...

Page 1310: ...MVS 8000X System SY 4 177 901 02 1 2010 Sony Corporation ...

Reviews: