background image

MHC-V5.GB.4-531-350-

11

(1)

20

GB

Transferring music from a disc 
or USB device

You can easily transfer all the 
music on a disc or USB A to USB B 
(Synchronized Transfer). You can 
also transfer a single track or audio 
file during playback (REC1 Transfer).

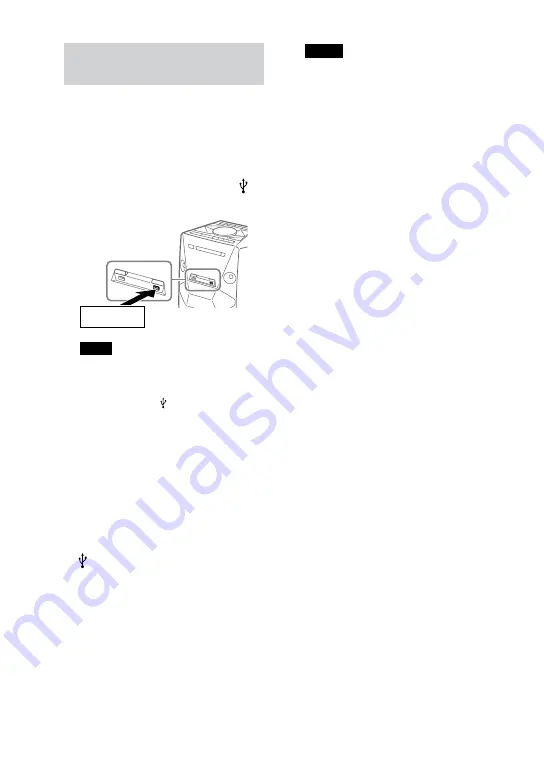
Connect a USB device to the   B 
port.

USB device

Note

You can use a USB adaptor (not 
supplied) to connect the USB device 
to the unit if the USB device cannot be 
plugged into the   port.

Select the function.

Discs:

Press CD, then load the disc.

USB:

Press USB repeatedly until “USB A” 
lights up on the display, then 
connect the USB device containing 
audio files you want to transfer to 

 A port.

Prepare the sound source.

Synchronized Transfer:

When playback is stopped, press 
PLAY MODE repeatedly to select the 
play mode you want.

Notes


ˎ

If you start transferring in Shuffle 
Play (“FLDR SHUF”), the selected 
play mode  changes to “FLDR” 
automatically.


ˎ

If you start transferring in Shuffle 
Play (except “FLDR SHUF”), Repeat 
Play or Program Play with no steps, 
the selected play mode changes to 
Normal Play  automatically.

REC1 Transfer:

Select the track or audio file you 
want to transfer, then start 
playback.

Press REC TO USB B on the unit.

“PUSH ENTER” appears on the 
display.

Press ENTER on the unit.

The transfer starts when 
“DO NOT REMOVE” appears on the 
display.
Do not remove the USB device until 
the transfer is complete.
When the transfer is complete, the 
system performs as follows:

Synchronized Transfer:

When the transfer is complete, the 
disc or USB device stops 
automatically.

REC1 Transfer:

The transfer is completed 
automatically, but the disc or USB 
device continues to play the next 
track or file.

To stop transfer

Press 

.

Summary of Contents for MHC-V5

Page 1: ...MHC V5 4 531 350 11 1 Home Audio System Operating Instructions Getting Started Disc USB Playback USB Transfer Tuner BLUETOOTH Sound Adjustment Other Operations Additional Information ...

Page 2: ...tice an abnormality in the unit disconnect the main plug from the AC outlet immediately Do not install the appliance in a confined space such as a bookcase or built in cabinet Do not expose batteries or appliances with battery installed to excessive heat such as sunshine and fire The unit is not disconnected from the mains as long as it is connected to the AC outlet even if the unit itself has bee...

Page 3: ...ug this apparatus during lightning storms or when unused for long periods of time 14 Refer all servicing to qualified service personnel Servicing is required when the apparatus has been damaged in any way such as power supply cord or plug is damaged liquid has been spilled or objects have fallen into the apparatus the apparatus has been exposed to rain or moisture does not operate normally or has ...

Page 4: ...body excluding extremities hands wrists feet and ankles License and Trademark Notice ˎ ˎ WALKMAN and WALKMAN logo are registered trademarks of Sony Corporation ˎ ˎ MPEG Layer 3 audio coding technology and patents licensed from Fraunhofer IIS and Thomson ˎ ˎ Windows Media is either a registered trademark or trademark of Microsoft Corporation in the United States and or other countries ˎ ˎ This prod...

Page 5: ... developer to meet Apple performance standards Apple is not responsible for the operation of this device or its compliance with safety and regulatory standards Please note that the use of this accessory with iPod or iPhone may affect wireless performance ˎ ˎ All other trademarks and registered trademarks are of their respective holders In this manual and marks are not specified ...

Page 6: ...rching for a track or audio file Track Search 16 Using play mode 17 USB Transfer Transferring music 19 Tuner Listening to the radio 23 BLUETOOTH About the BLUETOOTH wireless technology 24 Listening to music wirelessly on a BLUETOOTH device 24 Setting the BLUETOOTH audio codecs 28 Setting the BLUETOOTH standby mode 29 Using SongPal via BLUETOOTH 29 Sound Adjustment Adjusting the sound 30 Creating y...

Page 7: ...e illumination pattern and color 35 Using the timers 35 Using optional equipment 37 Deactivating the buttons on the unit Child Lock 37 Setting the automatic standby function 38 Additional Information Playable discs 39 Websites for compatible devices and dedicated applications 40 Troubleshooting 40 Messages 45 Precautions 46 Specifications 48 ...

Page 8: ... operations using the remote control but the same operations can also be performed using the buttons on the unit having the same or similar names You can lock the buttons except on standby on the unit to prevent them from being operated by mistake page 37 Unit ...

Page 9: ... USB port can be used only for playback Press to select the menu items Remote control PRESET Press to select a preset station when using the tuner function select folder ˋ ˋ Press to select a folder on an MP3 disc or a USB device ˋ ˋ Unit only Press to select a preset station when using the tuner function rewind fast forward Hold down to find a point in a track or file during playback go back go f...

Page 10: ...o reduce the bass sound BASS CUT effect Unit BASS BAZUCA indicator page 30 OPTIONS Press to enter or exit options menu LED COLOR page 35 Press to change the LED color for the speaker illumination Remote control LED PATTERN page 35 Press to change the LED pattern for the speaker illumination Remote control CD Press to select the CD function Remote control USB Press to select the USB function Repeat...

Page 11: ...D or USB function page 18 ˋ ˋ Press to select the FM reception mode monaural or stereo when using the tuner function page 23 DISPLAY Press to change the information on the display SEARCH MEMORY ˋ ˋ Press to enter or exit search mode ˋ ˋ Press to preset the radio station page 23 CLEAR Press to delete the last step from the program list TIMER MENU page 14 36 Press to set the clock and the timers PLA...

Page 12: ...12GB Getting Started Hooking up the system securely AM loop antenna FM lead antenna Extend it horizontally To wall outlet ...

Page 13: ... audio output jacks of an optional equipment such as a TV or an audio video equipment or another audio system to create a Party Chain page 32 Power Connect the AC power cord supplied to the system and then to the wall outlet When the AC power cord is connected the demonstration page 14 starts automatically If you press to turn on the system the demonstration ends Inserting batteries Insert the two...

Page 14: ...ower Saving Mode Changing the display mode Press DISPLAY repeatedly while the system is turned off Each time you press the button the display mode changes as follows Demonstration The display scrolls messages about the main features of this system using the built in LEDs for illumination No display Power Saving Mode The display is turned off to conserve power The timer and clock continue to operat...

Page 15: ...lders including root and empty folders ˋ ˋ 999 MP3 files ˋ ˋ 250 MP3 files in a folder ˋ ˋ 8 folders levels tree structure of files ˎ ˎ CD TEXT information is not supported Before using the USB device with this system Check the websites for the information about compatible USB devices page 40 To select the playback source or transfer destination USB Memory Select If the USB device has more than on...

Page 16: ...it if the USB device cannot be plugged into the port 3 Press to start playback The audio files are played back in different orders depending on the play mode page 17 Notes on USB device ˎ ˎ This system can recognize up to ˋ ˋ 1 000 folders including root folder and empty folders ˋ ˋ 3 000 audio files ˋ ˋ 250 audio files in a folder Note You can use your iPhone iPod with this system via BLUETOOTH c...

Page 17: ... ˎ ˎ FLDR plays all audio files in the specified folder on the USB device Playing in random order Shuffle Play Press PLAY MODE repeatedly when playback is stopped Disc playback modes and indicators ˎ ˎ SHUF shuffles all audio files on the disc ˎ ˎ FLDR SHUF shuffles all audio files in the specified folder on the disc When FLDR SHUF folder Shuffle Play is selected for AUDIO CD playback playback per...

Page 18: ...he total playing time exceeds 100 minutes for an AUDIO CD or when you program an audio file 6 Repeat steps 3 to 5 to program additional tracks or audio files 7 Press to start Program Play To delete the last step from the program list Press CLEAR when playback is stopped To cancel Program Play Press PLAY MODE repeatedly until PGM disappear from the display when playback is stopped Notes ˎ ˎ CD func...

Page 19: ...d with the same bit rate as the original files ˎ ˎ USB transfer and erase operations are disabled while the disc tray is open Note on copyright protected content The transferred music is limited to private use only Use of the music beyond this limit requires permission of the copyright holders To select the playback source or transfer destination USB Memory Select See page 15 To select the bit rat...

Page 20: ...ect the play mode you want Notes ˎ ˎ If you start transferring in Shuffle Play FLDR SHUF the selected play mode changes to FLDR automatically ˎ ˎ If you start transferring in Shuffle Play except FLDR SHUF Repeat Play or Program Play with no steps the selected play mode changes to Normal Play automatically REC1 Transfer Select the track or audio file you want to transfer then start playback 4 Press...

Page 21: ... To transfer sound as a new MP3 file during transfer Press REC TO USB B during Analog Transfer NEW TRACK appears on the display Notes ˎ ˎ While an MP3 file is being created transfer is disabled ˎ ˎ If you press REC TO USB B again after a few seconds a new MP3 file can be created ˎ ˎ If the transfer is not stopped a new MP3 is created automatically approximately 1 hour after the transfer begins Era...

Page 22: ...r audio files 2 Folder and file numbers are assigned serially thereafter 3 When performing transfer separation see To transfer sound as a new MP3 file during transfer on page 21 newly created MP3 files are saved in the same folder that is created during the first transfer Notes on transferring ˎ ˎ While transferring except analog transfer no sound is output ˎ ˎ CD TEXT information is not transferr...

Page 23: ... will lose the stereo effect but reception will improve To change the AM tuning interval The default setting for AM tuning interval is 9 kHz or 10 kHz for some areas Use the buttons on the unit to perform this operation Note that you cannot change the AM tuning interval in Power Saving Mode 1 Press FUNCTION repeatedly to select TUNER AM 2 Press to turn off the system 3 While holding down press 9K ...

Page 24: ... ˎ ˎ AVRCP 1 3 Audio Video Remote Control Profile ˎ ˎ SPP Serial Port Profile Supported BLUETOOTH codecs ˎ ˎ SBC Sub Band Codec ˎ ˎ AAC Advanced Audio Coding Listening to music wirelessly on a BLUETOOTH device You can listen to music from your BLUETOOTH device over a wireless connection Check the websites for the information about compatible BLUETOOTH devices page 40 About the BLUETOOTH indicator ...

Page 25: ...he unit on the display of the BLUETOOTH device For example select SONY MHC V5 If passkey is required on the BLUETOOTH device enter 0000 6 Perform the BLUETOOTH connection on the BLUETOOTH device When pairing is completed and the BLUETOOTH connection is established BLUETOOTH device name appears on the display Depending on the BLUETOOTH device connection may start automatically after pairing is comp...

Page 26: ...ensional code reader app Notes ˎ ˎ The App may not be available in some countries and or regions ˎ ˎ Depending on your smartphone you can use the NFC function without installing the app In this case the operations and specifications may differ For details refer to the operating instructions of your smartphone Compatible smartphones Smartphones with a built in NFC function OS Android 2 3 3 or later...

Page 27: ...blished the BLUETOOTH device name appears on the display 3 Press Depending on the BLUETOOTH device ˋ ˋyou may need to press twice ˋ ˋyou may need to start playback of an audio source on the BLUETOOTH device Notes ˎ ˎ When the system is not connected to any BLUETOOTH device the system will connect and playback from the last connected BLUETOOTH device automatically when you press ˎ ˎ If you try to c...

Page 28: ...the BLUETOOTH audio codecs when the connected BLUETOOTH device supports Advanced Audio Coding AAC 1 Press OPTIONS on the unit 2 Press repeatedly to select BT AAC then press 3 Press repeatedly to select ON or OFF then press ˎ ˎ ON Select this setting if the BLUETOOTH device supports Advanced Audio Coding AAC ˎ ˎ OFF Select this setting if the BLUETOOTH device only supports Sub Band Codec SBC Notes ...

Page 29: ... for a BLUETOOTH connection even when the system has been turned off When a BLUETOOTH connection is established the system turns on automatically Note The system cannot enter the BLUETOOTH standby mode if the pairing registration information has been erased Using SongPal via BLUETOOTH About App A dedicated app for this model is available on both Google Play and App Store Search for SongPal and dow...

Page 30: ...UCA indicator flashes and BASS CUT appears on the display every 10 seconds ˎ ˎ The BASS CUT effect is turned off automatically when you turn off the system Creating your own sound effect You can raise or lower the levels of specific frequency bands then store the setting in the memory as CUSTOM EQ 1 Press OPTIONS on the unit 2 Press repeatedly to select EQ EDIT then press 3 Press repeatedly to adj...

Page 31: ... left and right channels ˎ ˎ WAH Create a special effect of Wah wah sound by moving the frequency of a filter up and down automatically 2 Press DJ CONTROL to adjust the effect level To turn off the effect Press the selected effect button again Notes ˎ ˎ The DJ EFFECT is automatically turned off when you turn off the system or change the function or tuner band ˎ ˎ The DJ EFFECT does not affect the ...

Page 32: ...n by connecting all the systems using audio cords not supplied Before connecting cords be sure to disconnect the AC power cord If all the systems are equipped with Party Chain function First system Second system Last system Continue the connection until the last system Example When connecting using this system as the first system ˎ ˎ Any system can become a Party Host in this connection ˎ ˎ You ca...

Page 33: ...his system as the first system ˎ ˎ You can connect the system which is not equipped with Party Chain function at the last system Be sure to select the audio in function on this last system ˎ ˎ You must select the first system as Party Host so that all systems are playing the same music when Party Chain function is activated ˎ ˎ In this connection the first system and the last system are not connec...

Page 34: ...e current Party Host becomes Party Guest automatically All systems play the same music as that being played by the new Party Host To deactivate the Party Chain Hold down MUSIC PARTY CHAIN on the Party Host for 2 seconds Notes ˎ ˎ Changing the volume level and sound effect on the Party Host will not affect the output on the Party Guests ˎ ˎ The Party Guests continue playing the music source from th...

Page 35: ... color 1 Press LED PATTERN or LED COLOR to show the current setting 2 Press LED PATTERN or LED COLOR repeatedly to select the illumination pattern or color To turn off the illumination press LED PATTERN repeatedly to select LED OFF Note If the illumination LED brightness is glaring switch on the room lights or turn off the LED Using the timers The system offers three timer functions You cannot act...

Page 36: ...ure as in step 4 to set the time to stop playback or transfer 6 Press repeatedly to select the sound source you want then press For Recording Timer connect a USB device to the B port after selecting the sound source 7 Press to turn off the system Note If the system remains on the timers will not take effect To check the timer setting or activate the timer again 1 Press TIMER MENU TIMER SEL flashes...

Page 37: ... low Adjust the volume level of the equipment If you turn off automatic standby function see Setting the automatic standby function page 38 Deactivating the buttons on the unit Child Lock You can deactivate the buttons on the unit except to prevent misoperation such as child mischief Hold down on the unit for more than 5 seconds CHILD LOCK and ON appear on the display You can only operate the syst...

Page 38: ...IONS on the unit 2 Press repeatedly to select AUTO STBY then press 3 Press repeatedly to select ON or OFF Notes ˎ ˎ The message AUTO STBY flashes on the display about 2 minutes before entering standby mode ˎ ˎ The automatic standby function does not work in the tuner function ˎ ˎ The system may not enter standby mode automatically in the following cases ˋ ˋ when an audio signal is detected ˋ ˋ dur...

Page 39: ...glue extends beyond the seal ˎ ˎ Discs that have labels printed using ink that feels tacky when touched Note on DualDiscs A DualDisc is a two sided disc product which mates DVD recorded material on one side with digital audio material on the other side However since the audio material side does not conform to the Compact Disc CD standard playback on this product is not guaranteed Music discs encod...

Page 40: ...ur nearest Sony dealer Note that if the service personnel changes some parts during repair these parts may be retained If PROTECT XX X is a number appears on the display Immediately unplug the AC power cord and check the following items ˎ ˎ Is anything blocking the ventilation holes of the system ˎ ˎ Is the USB port short circuited After you have checked these above items and found no problems rec...

Page 41: ...Replace the batteries R6 size AA ˎ ˎ Move the unit away from the fluorescent light There is acoustic feedback ˎ ˎ Reduce the volume CHILD LOCK appears when you press any button on the unit ˎ ˎ Set the Child Lock function to off page 37 Disc player The disc tray does not open and LOCKED appears on the display ˎ ˎ Consult your nearest Sony dealer or local authorized Sony service facility The disc tr...

Page 42: ... USB device may be broken Refer to the operating instructions of the USB device on how to deal with this problem Audio files or folders on the USB device cannot be erased ˎ ˎ Check if the USB device is write protected ˎ ˎ The USB device was disconnected or the power was turned off during the erase operation Delete the partially erased file If this does not fix the problem the USB device may be bro...

Page 43: ...Turn off the system and reconnect the USB device then turn on the system ˎ ˎ Check the information on the website about compatible USB devices page 40 Playback does not start from the first file ˎ ˎ Set the play mode to Normal Play page 17 Audio file cannot be played back ˎ ˎ USB devices formatted with file systems other than FAT16 or FAT32 are unsupported ˎ ˎ A WMA audio file that is created in t...

Page 44: ...on from the BLUETOOTH device ˎ ˎ The pairing registration information has been erased Perform the pairing operation again ˎ ˎ Erase the pairing registration information of the BLUETOOTH device page 28 and perform the pairing operation again page 25 The sound skips or fluctuates or the connection is lost ˎ ˎ The system and the BLUETOOTH device are too far apart ˎ ˎ If there are obstacles between th...

Page 45: ...to turn on the system 3 Hold down and BASS BAZUCA at the same time for about 3 seconds RESET appears on the display All user configured settings such as preset radio stations timer and the clock are reset to factory default setting Messages One of the following messages may appear or flash on the display during operation CANNOT PLAY A disc that cannot be played back was inserted DEVICE ERROR The U...

Page 46: ...sc mechanism perform the following procedure before carrying this system Use the buttons on the unit to perform this operation 1 Press to turn on the system 2 Press CD 3 Remove the disc Press to open and close the disc tray Wait until NO DISC appears on the display 4 Unplug the AC power cord Notes on discs ˎ ˎ Before playing wipe the disc with a cleaning cloth from the center outward to the edge ˎ...

Page 47: ... is no improvement move the system far away from the TV Cleaning the cabinet Clean this system with a soft cloth slightly moistened with a mild detergent solution Do not use any type of abrasive pad scouring powder or solvent such as thinner benzine or alcohol On BLUETOOTH Communication ˎ ˎ BLUETOOTH devices should be used within approximately 10 meters 33 feet unobstructed distance of each other ...

Page 48: ...cs or specifications of the BLUETOOTH device make it impossible to connect or may result in different control methods display or operation ˎ ˎ Noise may occur or the audio may cut off depending on the BLUETOOTH device connected with this system the communications environment or surrounding conditions Specifications AUDIO POWER SPECIFICATIONS POWER OUTPUT AND TOTAL HARMONIC DISTORTION USA model onl...

Page 49: ...iode Properties Emission Duration Continuous Laser Output Less than 44 6 μW This output is the value measurement at a distance of 200 mm from the objective lens surface on the Optical Pick up Block with 7 mm aperture Frequency response 20 Hz 20 kHz Signal to noise ratio More than 90 dB Dynamic range More than 88 dB Tuner section FM stereo FM AM superheterodyne tuner Antenna FM lead antenna AM loop...

Page 50: ...Band Codec AAC Advanced Audio Coding 1 The actual range will vary depending on factors such as obstacles between devices magnetic fields around a microwave oven static electricity reception sensitivity antenna s performance operating system software application etc 2 BLUETOOTH standard profiles indicate the purpose of BLUETOOTH communication between devices Supported audio formats Supported bit ra...

Page 51: ...Hz Other models AC 120 V 240 V 50 60 Hz Power consumption 240 W 0 5 W at the Power Saving mode Dimensions w h d Approx 339 mm 908 mm 325 mm 13 3 8 in 35 3 4 in 12 3 4 in Mass Approx 18 kg 39 lb 10 7 8 oz Supplied accessories Remote control 1 R6 Size AA batteries 2 AC power cord 1 FM lead AM loop antenna 1 Design and specifications are subject to change without notice ...

Page 52: ... 2014 Sony Corporation Printed in China ...

Reviews: