background image

25

01GB02CD-EUR.fm

masterpage:Right

MEX-5DI

3-242-048-31 (1)

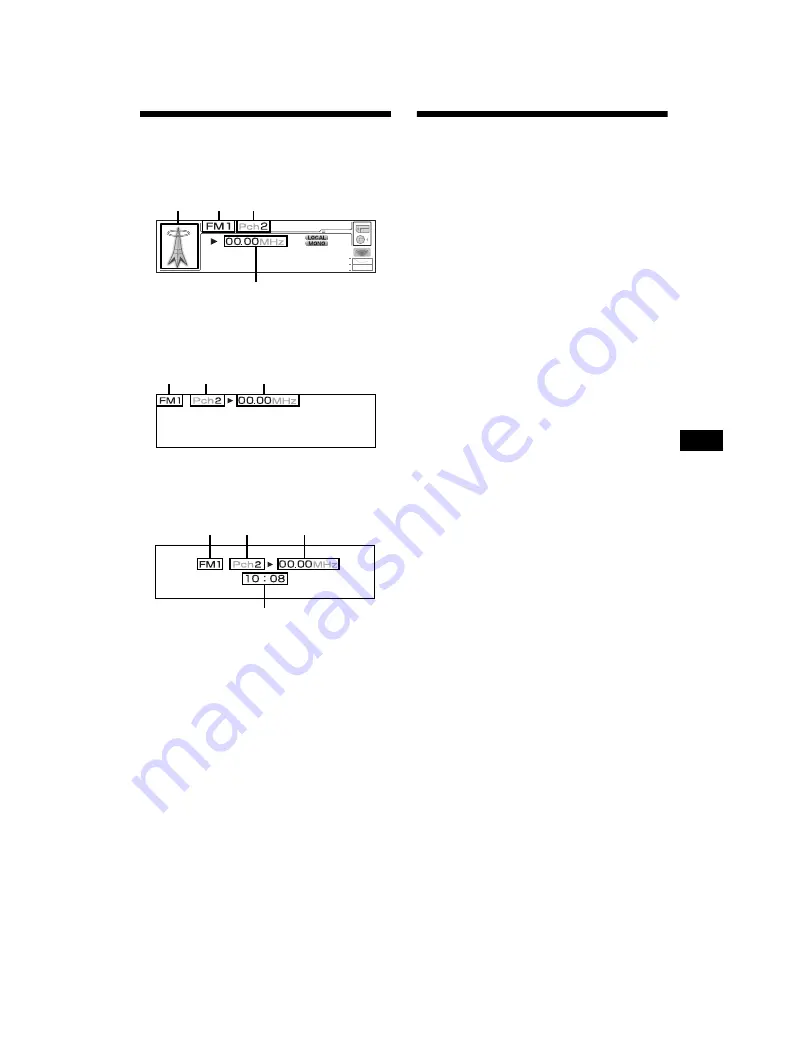
Display items

Standard mode

:

Spectrum analyser mode/Panorama/Wall 
paper mode/Screen saver mode/Slide show 
mode:

Clock mode:

Receiving the stored stations

1

Press 

(SOURCE)

 repeatedly to select 

the radio.

2

Press 

(MODE)

 repeatedly to select the 

band.

3

Press the number button (

(1)

 to 

(6)

on which the desired station is stored.

Tip 
Press 

M

 or 

m

 to receive the stations in the order they 

are stored in the memory (Preset Search function).

If preset tuning does not work

Press 

<

 (SEEK –) or 

(SEEK +) to 

search for the station (automatic 
tuning).

Scanning stops when the unit receives a 
station. Repeat until the desired station is 
received.

Tips
• If automatic tuning stops too frequently, turn on the 

Local Seek to limit seek to stations with stronger 
signals (see “Changing the sound and display 
settings” on page 41)
.

• If you know the frequency of the station you want to 

listen to, press and hold 

<

 or 

,

 to locate the 

approximate frequency, then press the 

<

 or 

,


repeatedly to fine adjust to the desired frequency 
(manual tuning).

If FM stereo reception is poor

Select monaural reception mode

(see “Changing the sound and display 
settings” on page 41
).
The sound improves, but becomes monaural 
(“STEREO” disappears).

Tip
If FM broadcasts are difficult to hear, set “DSO” to 
“OFF” (page 42
).

Radio 
band

Preset 
number

Frequency

Tuner 
icon

Radio 
band

Preset 
number

Frequency

Radio 
band

Preset 
number

Frequency

Clock

Summary of Contents for MEX-5DI

Page 1: ...ren Umschlagseite dieser Bedienungsanleitung MEX 5DI For installation and connections see the supplied installation connections manual Zur Installation und zum Anschluss siehe die mitgelieferte Installations Anschlussanleitung En ce qui concerne l installation et les connexions consulter le manuel d installation connexions fourni 2002 Sony Corporation 3 242 048 31 1 GB DE MEX 5DI 3 242 048 31 1 FR...

Page 2: ... operate the supplied card remote commander Illustrations in this manual may differ from the actual device Car G PROTECTION G PROTECTION is originally developed for Walkman and performs supreme skip free against shocks Car G PROTECTION is designed and tuned for car audio based on the technology of original G PROTECTION Car G PROTECTION creates comfortable audio reproduction with supreme skip free ...

Page 3: ...rough a list List up 26 RDS Overview of RDS 27 Automatic retuning for best reception results AF function 28 Receiving traffic announcements TA TP 29 Presetting RDS stations with AF and TA setting 29 Tuning in stations by programme type PTY 30 Setting the clock automatically CT 31 Image Settings Customising a wall paper Wall Paper 31 Setting a panorama image Panorama 34 Setting a jacket picture Jac...

Page 4: ...4 01GB02CD EUR fm MEX 5DI 3 242 048 31 1 masterpage Left Location of controls SHIFT VOL MODE OFF SOURCE SCREEN OPEN CLOSE MEX 5DI ...

Page 5: ...ote commander and wireless rotary commander j SHIFT switching shift 1 3 button To change the function of the lever qa k lever Selecting radio stations the items to be adjusted the desired image l Z eject OPEN CLOSE button 8 9 19 To eject a disc open close the disc tray m Disc tray n N play button 8 19 o Memory Stick slot p Memory Stick access lamp 1 When an optional CD MD unit is connected AUX is ...

Page 6: ...s k ATT button l AF button m TA button n GRAPHIC button To display the graphic menus o IMAGE button To switch the display patterns p LIST button q M m DISC buttons r ENTER button s BACK button Note If the unit is turned off by pressing OFF for 2 seconds it cannot be operated with the card remote commander unless SOURCE on the unit is pressed to reactivate the unit first Tip See Replacing the lithi...

Page 7: ...eneral menu display Icons and the contents of settings Setup Basic settings Display Display setting PlayMode Settings for playback and radio reception Edit Display character setting SoundTuning Precise settings for sound quality a Selected category menu Example Setup b Selected item and setting Example Beep ON Note To move 1 to 2 press ENTER c Selected item and setting Example Contrast Level 2 d T...

Page 8: ...y and front panel closes Notes Do not place more than 1 disc on the disc tray The disc tray and front panel closes automatically after the caution alarm beeps If you close the disc tray without a CD in the disc tray the unit will make some noise This is not a malfunction Tip If you press and hold OPEN CLOSE of the front panel for more than 1 second the front panel opens first then the disc tray op...

Page 9: ...atic Music Sensor Press up or down the lever once for each track To continuously skip tracks press up or down once and press up or down again within 1 second and hold the lever To locate a specific album available only when an MP3 file is played Press SHIFT then press up or down the lever while Album is displayed in the lower right of the display once for each album To continuously skip albums pre...

Page 10: ...amp lights up then the front panel closes automatically after the caution alarm beeps 3 Press SOURCE repeatedly until MG MS icon or MS appears Playback starts Notes Insert the MG Memory Stick in the correct direction Do not forcefully remove the MG Memory Stick Be careful that the MG Memory Stick does not spring out from the unit and drop Tip When MS Auto is set to ON playback starts automatically...

Page 11: ...momentarily then remove it Note Do not leave an MG Memory Stick protruding out To locate a specific point in a track Manual search Press up or down and hold the lever and release at the desired point To locate a specific track Automatic Music Sensor Press up or down the lever once for each track To continuously skip tracks press up or down once and press up or down again within 1 second and hold t...

Page 12: ... be selected when the desired station is stored page 26 The number button 1 to 6 on the card remote commander can also be selected To adjust the volume level Press up or down the VOL lever To stop radio reception Press OFF To receive a station automatically Automatic tuning Press up or down the lever To receive a desired frequency Manual tuning Press up or down and hold the lever and release at th...

Page 13: ...k number elapsed playing time disc name track name and sound settings You can display items such as an icon of the source on the left side of the display spectrum analyser or wall paper in smaller size in the centre of the display Standard mode 1 Spectrum analyser Standard mode 2 Wall paper Spectrum analyser mode Displays a pre stored spectrum analyser setting on the whole screen Panorama Wall pap...

Page 14: ...s back a pre stored animation Clock Slide show mode The display changes to the Slide show mode only when the slide show is set The display usually changes to the Clock mode without the slide show setting Clock Displays playback or radio reception information and clock Slide show Displays as a slide show the pictures in a Memory Stick ...

Page 15: ...tedly to select the display mode Each time you press SCREEN the display mode changes as follows Standard mode t Spectrum analyser mode t Panorama Wall paper mode t Screen saver mode t Clock Slide show mode t Standard mode 2 Press up or down the lever while Image is displayed in the lower right of the display to select the display pattern You cannot select any display pattern in the Clock Slide sho...

Page 16: ...can be displayed is JPEG 1 600 1 200 dots or less BMP GIF PNG 640 480 dots or less Displayed as a clip motion Standard mode page 37 The image format and size which can be displayed is JPEG 1 600 1 200 dots or less BMP GIF PNG 640 480 dots or less GIF animation file 160 120 dots or less up to 10 frames 84 84 dots or less up to 20 frames Displayed as a wall paper page 31 The image format and size wh...

Page 17: ... on the whole screen Panorama Wall paper mode page 34 The image format and size which can be displayed is JPEG 1 600 1 200 dots or less Displayed as a slide show Clock Slide show mode page 38 JPEG 1 600 1 200 dots or less BMP GIF PNG 640 480 dots or less Note Images you processed on your computer may not be displayed ...

Page 18: ...ld this occur press the reset button again The unit makes some noise during the initial settings this is not a malfunction Setting the clock and the calendar The clock uses a 24 hour digital indication Day Month Year Time The factory setting is 01 01 2002 01 00 1 Press MENU 2 Press or repeatedly to select Setup 3 Press ENTER 4 Press M or m repeatedly to select Clock 5 Press ENTER 1Press M or m rep...

Page 19: ...the recording method used on the disc it may take a minute or more before playing the first track Depending on the condition of the disc it may not play back page 49 50 While the first last track on the disc is playing if m or M is pressed playback skips to the last first track of the disc When the last track on the disc has finished playback restarts from the first track of the disc With the opti...

Page 20: ...yback restrictions Data that has a playback time restriction outside the designated period Playing the tracks in MG Memory Stick automatically Set MS Auto to ON and insert the MG Memory Stick to playback sequentially from the first track automatically 1 Press MENU 2 Press or repeatedly to select Setup 3 Press ENTER 4 Press M or m to select MS Auto 5 Press ENTER 6 Press M or m to select ON 7 Press ...

Page 21: ...isc has been labelled by this unit using the CUSTOM FILE function Disc Memo is displayed accordingly MG Memory Stick Standard mode Spectrum analyser mode Panorama Wall paper mode Screen saver mode Clock mode Disc name 4 Artist name Album folder name 1 Track file name Elapsed playing time Disc Album 1 Track number Unit number 3 CD MD icon MDLP display 2 LP2 LP2 playback LP4 LP4 playback Disc Album ...

Page 22: ...e or more optional CD MD units are connected During playback press 1 REP repeatedly until the desired setting appears in the display Repeat Play starts In a display mode other than the Standard mode the icon will disappear a short time after you adjust the setting To return to normal play mode press 1 REP repeatedly until the icon disappears from the display Playing tracks in random order Shuffle ...

Page 23: ...isplay returns to the normal display Tips Simply overwrite or enter a blank space to correct or erase a name You can label CDs on a unit without the CUSTOM FILE function if that unit is connected along with a CD unit that has the function The Disc Memo will be stored in the memory of the CD unit with the CUSTOM FILE function Note Repeat shuffle play is suspended until the Name Edit is complete Era...

Page 24: ...ting and return to the normal display press LIST Radio The unit can store up to 6 stations per band FM1 FM2 FM3 MW and LW Caution When tuning in stations while driving use Best Tuning Memory to prevent accidents Storing stations automatically Best Tuning Memory BTM The unit selects the stations with the strongest signals within the selected band and stores them in the order of their frequency 1 Pr...

Page 25: ...t receives a station Repeat until the desired station is received Tips If automatic tuning stops too frequently turn on the Local Seek to limit seek to stations with stronger signals see Changing the sound and display settings on page 41 If you know the frequency of the station you want to listen to press and hold or to locate the approximate frequency then press the or repeatedly to fine adjust t...

Page 26: ...ation is assigned to this number and stored Note If you try to store another station on the same stored number the previously stored station will be erased Tuning in a station through a list List up 1 During radio reception press LIST momentarily The frequency or the name assigned to the current station appears in the display 2 Press M or m repeatedly to select the desired station If no name is as...

Page 27: ...ces such as Automatic retuning of a programme helpful during long distance drives AF t page 28 Receiving traffic announcements even when enjoying another programme source TA t page 29 Selecting stations by the type of programme PTY t page 30 Automatic clock time setting CT t page 31 Notes Depending on the country or region not all of the RDS functions are available RDS may not work properly if the...

Page 28: ...mme Identification data PI Seek appears If the unit cannot find the same PI the unit returns to the previously selected frequency Staying with one regional programme When the AF function is on this unit s factory set setting restricts reception to a specific region so you won t be switched to another regional station with a stronger frequency If you leave this regional programme s reception area o...

Page 29: ...g is stored Receiving emergency announcements If either AF or TA is on the unit will switch to emergency announcements if one comes in while listening to an FM station CD MD or AUX Presetting RDS stations with AF and TA setting When you preset RDS stations the unit stores each station s AF TA setting on off as well as its frequency You can select a different setting for AF TA or both for individua...

Page 30: ...he programme type is not specified in the RDS data 3 Press ENTER The unit starts searching for a station broadcasting the selected programme type Programme types Display News News Current Affairs Current Affairs Information Information Sports Sport Education Education Drama Drama Culture Cultures Science Science Varied Varied Speech Popular Music Pop Music Rock Music Rock Music Easy Listening Easy...

Page 31: ...ctual time Image Settings Customising a wall paper Wall Paper Standard Panorama Wall paper mode You can display the static image stored in a Memory Stick as a wall paper The image data you set will be stored in this unit To display the pre stored images in this unit see Selecting the display mode and display pattern on page 13 1 Insert a Memory Stick page 10 2 Press GRAPHIC 3 Press or repeatedly t...

Page 32: ...ntains your desired image An image can be set in up to the 5th layer folder in a Memory Stick 9 Press or repeatedly to select the image you want to set 10Press ENTER If the size of the image you have selected in step 9 is 400 96 dots or less you cannot adjust the image In this case skip to step 12 If you select FlashMemory in step 5 skip to step 12 as well 11Adjust the image 1Press or repeatedly t...

Page 33: ...0 images from a folder within a Memory Stick at one time The following folders in a Memory Stick cannot be displayed CONTROL DCIM MSSONY VOICE HIFI In step 6 or 8 if there is no image data No Picture is shown in the display Depending on the volume of stored data the storing time differs Do not turn off the unit while the message in step 17 is displayed If you turn off the power the data will not b...

Page 34: ... can be set in up to the 5th layer folder in a Memory Stick 8 Press or repeatedly to select the image you want to set 9 Press ENTER Depending on the aspect ratio of the selected image the display type will be set automatically 1 1 to 1 4 tile more than 1 4 scroll horizontally below 1 1 scroll vertically 10Press ENTER again 11Press GRAPHIC The display returns to the normal display Press SCREEN to t...

Page 35: ... Press ENTER 6 Press M or m to select Memory Stick If you want to change the display type of a previously stored image select FlashMemory 7 Press ENTER If you select FlashMemory in step 6 skip to step 10 8 Press M or m repeatedly to select a location or type of image that you want to set Picture Select If an image you want to set is in the first layer of a Memory Stick select this Cyber shot If yo...

Page 36: ...ollows JPEG 1 600 1 200 dots or less BMP GIF PNG 640 480 dots or less You can preview up to 100 images from a folder within a Memory Stick at one time The following folders in a Memory Stick cannot be displayed CONTROL DCIM MSSONY VOICE HIFI In step 7 or 9 if there is no image data No Picture is shown in the display Depending on the volume of stored data the storing time differs Do not turn off th...

Page 37: ...r m repeatedly to select a location or type of image that you want to set Picture Select If an image you want to set is in the first layer of a Memory Stick select this Cyber shot If you want to set a picture taken by an optional Sony digital still camera Cyber shot select this Folder name When a folder is in a Memory Stick the folder name is displayed 9 Press ENTER Select the folder name in step ...

Page 38: ...lide Show Slide show mode Scroll static images in a Memory Stick as a slide show This data will not be stored 1 Insert a Memory Stick page 10 2 Press GRAPHIC 3 Press or repeatedly to select Slide Show Each time you press or the item changes as follows Wall Paper y Panorama y Jacket Pic y ClipMotion y Slide Show y Picture Del y Char Setup 4 Press ENTER 5 Press M or m repeatedly to select a folder f...

Page 39: ...to select your desired image then press M To delete more than one image repeat the procedure in step 6 7 Press ENTER 8 Press M or m to select YES To cancel select NO 9 Press ENTER After deleting is completed the display returns to the graphic top menu display 10Press GRAPHIC The display returns to the normal display Notes You cannot delete the pre stored images in this unit You can delete the imag...

Page 40: ...m to select ON 8 Press ENTER 9 Press GRAPHIC The display returns to the normal display Note In Standard Clock mode you cannot make the display characters disappear automatically Changing the translucence ratio of the characters Blend Level You can set the translucence ratio colour density of the characters in the Spectrum analyser Panorama Wall paper Screen saver Slide show mode By setting this le...

Page 41: ...ll comes in Telephone ATT function Changing the sound and display settings Menu The following items can be set Setup Clock page 18 CT Clock Time page 31 Beep to turn the beeps on or off AUX Skip 1 page 46 to turn the AUX source display on or off MS Auto page 20 Display Dimmer to change the brightness of the display Select AUTO to dim the display only when you turn the lights on Select ON to dim th...

Page 42: ...ple ON or OFF 7 Press ENTER The display returns to the top menu display 8 Press MENU The display returns to the normal display Note The displayed item will differ depending on the source Setting the Dynamic Soundstage Organiser DSO If your speakers are installed into the lower part of the doors the sound will come from below and may not be clear The DSO Dynamic Soundstage Organiser function create...

Page 43: ...qualiser settings for frequency and level 1 Press SOURCE to select a source radio CD MD MS or AUX 2 Press MENU 3 Press or repeatedly to select SoundTuning 4 Press ENTER 5 Press M or m repeatedly to select EQ7 Tune 6 Press ENTER Example EQ7 Tune Xplod 7 Press M or m repeatedly to select the desired equaliser curve 8 Press ENTER 9 Select the desired frequency and level 1Press or repeatedly to select...

Page 44: ... MENU 2 Press or repeatedly to select SoundTuning 3 Press ENTER 4 Press M or m repeatedly to select HPF 5 Press ENTER 6 Press M or m repeatedly to select the cut off frequency Each time you press M or m the frequency changes as follows OFF default setting y 78 Hz y 125 Hz 7 Press MENU After the frequency setting is complete the display returns to the normal display Adjusting the volume of the subw...

Page 45: ...y returns to the normal display Connecting auxiliary audio equipment The unit s AUX IN external audio input terminal on this unit is also used as the BUS AUDIO IN audio input terminal You can listen to the sound from your car speakers by connecting optional Sony portable devices Note If you connect an optional Sony CD MD unit you cannot connect any portable devices and cannot select AUX Selecting ...

Page 46: ...all the unit in another car or after changing the battery 1 Press MENU 2 Press or repeatedly to select Setup 3 Press ENTER 4 Press M or m repeatedly to select Security 5 Press ENTER Code Set display is displayed 1Press M or m repeatedly to enter the first digit 0 9 2Press to move the cursor to the 2nd digit then press M or m repeatedly to enter the 2nd digit Each time you press M a digit goes up a...

Page 47: ...nd press ENTER Code Del display OK returns to a normal display NG the CODE ERROR message appears Input the correct code using the cursor buttons Note You cannot change the security code unless you delete your stored code Tip If the security code is not stored the Code Del display does not appear Additional Information Maintenance Fuse replacement When replacing the fuse be sure to use one matching...

Page 48: ...o not hold the battery with metallic tweezers otherwise a short circuit may occur Removing the unit 1 Remove the front cover 1Press the clip inside the front cover with the release key supplied and pry the front cover free Note To protect the surface of the unit insert thin cloth between the release key and the unit when inserting the release key 2Repeat step 1 on the left side The front cover is ...

Page 49: ... may cause injury or damage the display Bright points of light red blue or green or black dots may appear on the LCD display This is not a malfunction The LCD is made with high precision technology and more than 99 99 of the picture element is intact However tiny elements of the picture may show the above symptoms Notes on discs To keep discs clean do not touch the surface Handle a disc by its edg...

Page 50: ...n Multi Session 2 1 ISO 9660 Format The most common international standard for the logical format of files and folders on a CD ROM There are several specification levels In Level 1 file names must be in the 8 3 format no more than 8 characters in the name no more than 3 characters in the extension MP3 and in capital letters Folder names can be no longer than 8 characters There can be no more than ...

Page 51: ...d When the first track of the first session is not audio CD data If an MP3 file is in the disc only MP3 file s play back and other data is skipped Audio CD data is not recognized If no MP3 file is in the disc NO Music is displayed and nothing is played back Audio CD data is not recognized The playback order of the MP3 files The playback order of the folders and files is as follows Notes A folder t...

Page 52: ... MagicGate Memory Stick which is distinguished by the MG Memory Stick logo number 1 below For recording other data ask for a general Memory Stick which is distinguished by the Memory Stick logo number 2 below Note The Memory capacity of an MG Memory stick and a Memory Stick supported by this product is as follows MG Memory stick maximum 128MB Memory stick maximum 128MB What is MagicGate MagicGate ...

Page 53: ...or with your finger or metallic objects A Do not bend drop or apply strong shock to the Memory Stick Do not disassemble or modify the Memory Stick Do not allow the Memory Stick to get wet Do not use or store the Memory Stick in a location that is subject to Extremely high temperature such as in a car parked in the sun Direct sunlight High humidity or places with corrosive substances To prolong the...

Page 54: ...t mono Power aerial relay control terminal Power amplifier control terminal Inputs Telephone ATT control terminal Illumination control terminal BUS control input terminal BUS audio input AUX IN terminal Aerial input terminal Tone controls Bass 8 dB at 100 Hz Treble 8 dB at 10 kHz Loudness 8 dB at 100 Hz 2 dB at 10 kHz Power requirements 12 V DC car battery negative earth Dimensions Approx 178 50 1...

Page 55: ...r is continuously supplied to the unit The car does not have an ACC position t Press OFF for 2 seconds The power aerial does not extend The power aerial does not have a relay box CD MD playback Playback does not begin Defective MD or dirty CD Some CD Rs CD RWs may not play due to its recording equipment or the disc condition MP3 files cannot be played back Recording was not performed according to ...

Page 56: ...fic announcements Activate TA function The station does not broadcast any traffic announcements despite being TP t Tune in another station PTY displays The current station is not an RDS station RDS data has not been received The station does not specify the programme type A F T A Error displays For this unit and optional CD MD changers The following indications will flash for about 5 seconds and a...

Page 57: ...rong with the unit t Press the reset button on the unit NO Audio Memory Stick without playable audio data is inserted t Check out the audio data using SonicStage or OpenMG Jukebox NO Disc No disc is inserted in the CD MD unit t Insert discs in the CD MD unit NO Magazine The disc magazine is not inserted in the CD MD unit t Insert the magazine in the CD MD unit NO Music 1 A CD which is not a music ...

Page 58: ...Fader 41 44 Fuse 47 H HPF 42 44 I ID3 tag 22 57 Image 15 J Jacket Pic 16 35 L List up 24 26 Lithium battery 48 Local 25 41 Loudness 42 LPF 42 45 M MagicGate 52 MDLP 21 Memory Stick 16 31 34 35 37 38 52 MG Memory Stick 10 20 21 52 Mono 25 41 MP3 50 51 MS Auto 20 N Name Del 23 Name Edit 23 P Panorama 17 34 Panorama Wall paper mode 13 21 25 27 Picture Del 39 PlayMode 7 PTY 30 R Regional 28 41 REP Rep...

Page 59: ......

Page 60: ... können sich von dem eigentlichen Gerät unterscheiden Car G PROTECTION G PROTECTION wurde ursprünglich für den Walkman entwickelt und bietet einen optimalen Stoßschutz zum Vermeiden von Tonsprüngen Car G PROTECTION stellt eine Weiterentwicklung der ursprünglichen G PROTECTION Technologie speziell für Autoaudioanlagen dar Mit Car G PROTECTION steht die G PROTECTION Technologie jetzt nicht mehr nur ...

Page 61: ...ender 27 Einstellen eines Senders anhand einer Liste List up 27 RDS Übersicht über RDS 28 Automatisches Neueinstellen von Sendern für optimale Empfangsqualität AF Funktion 29 Empfangen von Verkehrsdurchsagen TA TP 30 Speichern von RDS Sendern zusammen mit der AF und TA Einstellung 31 Einstellen von Sendern nach Programmtyp PTY 31 Automatisches Einstellen der Uhr CT 32 Bildeinstellungen Anpassen ei...

Page 62: ...4 02DE02CD EUR fm MEX 5DI 3 242 048 31 1 masterpage Left Lage und Funktion der Teile und Bedienelemente SHIFT VOL MODE OFF SOURCE SCREEN OPEN CLOSE MEX 5DI ...

Page 63: ...mschalten 1 3 Dient zum Wechseln der Funktion des Hebel qa k Hebel Dient zum Auswählen von Radiosendern der einzustellenden Option bzw des gewünschten Bildes l Taste Z Auswerfen OPEN CLOSE 8 9 19 Dient zum Auswerfen der CD bzw zum Öffnen Schließen des CD Fachs m CD Fach n Taste N Wiedergabe 8 19 o Memory Stick Einschub p Memory Stick Zugriffsanzeige 1 Wenn ein gesondert erhältliches CD MD Gerät an...

Page 64: ...OL k Taste ATT l Taste AF m Taste TA n Taste GRAPHIC Dient zum Anzeigen der Bildmenüs o Taste IMAGE Dient zum Wechseln des Anzeigemusters p Taste LIST q Tasten M m DISC r Taste ENTER s Taste BACK Hinweis Wenn Sie das Gerät ausschalten indem Sie OFF 2 Sekunden lang drücken können Sie es nicht mit der Kartenfernbedienung bedienen Drücken Sie zunächst SOURCE am Gerät um das Gerät wieder zu aktivieren...

Page 65: ...nstellmöglichkeiten Setup Grundlegende Einstellungen Display Einstellungen für das Display PlayMode Einstellungen für Wiedergabe und Radioempfang Edit Zeicheneingabe SoundTuning Präzise Einstellungen für die Tonqualität a Ausgewählte Menükategorie Beispiel Setup b Ausgewählte Option und Einstellung Beispiel Beep ON Hinweis Wenn Sie von 1 nach 2 wechseln wollen drücken Sie ENTER c Ausgewählte Optio...

Page 66: ...digt 4 Drücken Sie N Die Wiedergabe beginnt sobald sich das CD Fach und die Frontplatte geschlossen haben Hinweise Legen Sie auf keinen Fall mehr als 1 CD in das CD Fach Ein Warnton wird ausgegeben und dann schließen sich das CD Fach und die Frontplatte automatisch Wenn Sie das CD Fach schließen ohne dass eine CD eingelegt ist sind vom Gerät Geräusche zu hören Dies ist keine Fehlfunktion Tipp Wenn...

Page 67: ...tischer Musiksensor Drücken Sie den Hebel nach unten oder oben pro Titel einmal Wenn Sie mehrere Titel hintereinander überspringen wollen drücken Sie den Hebel einmal nach unten oder oben und innerhalb von 1 Sekunde erneut nach unten oder oben und halten ihn gedrückt So steuern Sie ein bestimmtes Album an nur bei Wiedergabe einer MP3 Datei Drücken Sie SHIFT und drücken Sie dann den Hebel nach unte...

Page 68: ...ffsanzeige leuchtet auf ein Warnton wird ausgegeben und die Frontplatte schließt sich automatisch 3 Drücken Sie SOURCE so oft bis MG MS Symbol oder MS erscheint Die Wiedergabe beginnt Hinweise Setzen Sie den MG Memory Stick richtig herum ein Ziehen Sie den MG Memory Stick nicht mit Gewalt heraus Achten Sie darauf dass der MG Memory Stick nicht aus dem Gerät herausspringt und herunterfällt Tipp Wen...

Page 69: ...n ganz heraus Hinweis Lassen Sie den MG Memory Stick nicht vorstehen So steuern Sie eine bestimmte Stelle in einem Titel an manuelle Suche Halten Sie den Hebel nach unten oder oben gedrückt und lassen Sie ihn an der gewünschten Stelle los So steuern Sie einen bestimmten Titel an Automatischer Musiksensor Drücken Sie den Hebel nach unten oder oben pro Titel einmal Wenn Sie mehrere Titel hintereinan...

Page 70: ...speichert wurde Seite 27 Auch mit den Zahlentasten 1 bis 6 auf der Kartenfernbedienung können Sie einen Sender auswählen So stellen Sie die Lautstärke ein Drücken Sie den Hebel VOL nach unten oder oben So beenden Sie den Radioempfang Drücken Sie OFF So stellen Sie einen Sender automatisch ein automatischer Sendersuchlauf Drücken Sie den Hebel nach unten oder oben So stellen Sie eine bestimmte Freq...

Page 71: ...itelname und Toneinstellungen werden angezeigt Sie können ein Symbol der Tonquelle links im Display und den Spektrumanalysator bzw ein Hintergrundbild verkleinert in der Mitte des Displays anzeigen lassen Standardmodus 1 Spektrumanalysator Standardmodus 2 Hintergrundbild Spektrumanalysatormodus Eine werkseitig im Gerät gespeicherte Spektrumanalysatoreinstellung wird im gesamten Display angezeigt P...

Page 72: ...herte Animation wird wiedergegeben Uhrzeit Präsentationsmodus Wenn im Display eine Präsentation angezeigt werden soll müssen Sie diese zunächst einstellen Andernfalls wechselt das Display in den Uhrzeitmodus Uhrzeit Im Display erscheinen Informationen zur Wiedergabe bzw zum Radioempfang sowie die Uhrzeit Präsentation Die Bilder auf einem Memory Stick werden als Präsentation angezeigt ...

Page 73: ...gemodus auszuwählen Mit jedem Tastendruck auf SCREEN wechselt die Anzeige folgendermaßen Standardmodus t Spektrumanalysatormodus t Panorama Hintergrundbildmodus t Bildschirmschonermodus t Uhrzeit Präsentationsmodus t Standardmodus 2 Drücken Sie den Hebel nach unten oder oben während Image unten rechts im Display angezeigt wird um das Anzeigemuster auszuwählen Im Uhrzeit Präsentationsmodus können S...

Page 74: ...1 200 Punkte oder weniger BMP GIF PNG max 640 480 Punkte oder weniger Anzeigen als Clip Sequenz Standardmodus Seite 38 Unterstützt werden folgende Bildformate und Größen JPEG max 1 600 1 200 Punkte oder weniger BMP GIF PNG max 640 480 Punkte oder weniger GIF Animationsdatei max 160 120 Punkte oder weniger bis zu 10 Frames max 84 84 Punkte oder weniger bis zu 20 Frames Anzeigen als Hintergrundbild ...

Page 75: ...ama Hintergrundbildmodus Seite 35 Unterstützt werden folgende Bildformate und Größen JPEG max 1 600 1 200 Punkte oder weniger Anzeigen als Präsentation Uhrzeit Präsentationsmodus Seite 40 JPEG max 1 600 1 200 Punkte oder weniger BMP GIF PNG max 640 480 Punkte oder weniger Hinweis Am Computer bearbeitet Bilder lassen sich möglicherweise nicht anzeigen ...

Page 76: ...die Anfangseinstellungen vorgenommen werden sind vom Gerät Geräusche zu hören Dies ist keine Fehlfunktion Einstellen von Uhrzeit und Datum Die Uhr zeigt die Uhrzeit im 24 Stunden Format digital an Tag Monat Jahr Uhrzeit Werkseitig ist 01 01 2002 01 00 eingestellt 1 Drücken Sie MENU 2 Drücken Sie mehrmals oder und wählen Sie Setup aus 3 Drücken Sie ENTER 4 Drücken Sie mehrmals M oder m und wählen S...

Page 77: ...schließt sich das CD Fach aber die Wiedergabe beginnt nicht Hinweise Legen Sie auf keinen Fall mehr als 1 CD in das CD Fach Ein Warnton wird ausgegeben und dann schließen sich das CD Fach und die Frontplatte automatisch Nur bei Wiedergabe einer MP3 Datei Funktion Drücken Sie Stoppen der Wiedergabe OFF Auswerfen der CD OPEN CLOSE 1 Sekunde lang OPEN CLOSE und dann Z Überspringen von Titeln Automati...

Page 78: ...s Namens auf Seite 25 Wiedergeben von Dateien auf einem MG Memory Stick Sie können auf einem MG Memory Stick aufgezeichnete ATRAC3 Dateien wiedergeben Drücken Sie SOURCE so oft bis MG MS Symbol oder MS erscheint Die Wiedergabe beginnt Tipp Wenn Sie eine ATRAC3 Datei mit SonicStage oder OpenMG Jukebox Version 2 2 oder höher auschecken können Sie ein Bild an die Datei anhängen Wenn Sie eine solche A...

Page 79: ...tivieren wählen Sie in Schritt 6 OFF Informationen im Display Wenn die CD MD das Album 1 bzw der Titel wechselt wird der gespeicherte Name falls vorhanden der neuen CD MD des neuen Albums bzw des neuen Titels automatisch angezeigt Wenn AutoScroll auf ON gesetzt ist laufen die Namen im Display durch Seite 43 CD MD Standardmodus Spektrumanalysatormodus Panorama Hintergrundbildmodus Bildschirmschoner...

Page 80: ...cht korrekt angezeigt Eine MP3 Datei mit variabler Bitrate wird wiedergegeben Im Titel wird vorwärts oder rückwärts gesucht Tipp Wenn die Funktion AutoScroll auf OFF gesetzt ist und der Name der CD MD des Albums bzw des Titels wechselt läuft der Name nicht im Display durch und wird daher nicht ganz angezeigt Wiederholtes Wiedergeben von Titeln Repeat Play Ein Titel das gesamte Album oder alle Tite...

Page 81: ...enn Sie wieder in den normalen Wiedergabemodus schalten wollen drücken Sie 2 SHUF so oft bis das Symbol im Display ausgeblendet wird Hinweise Mit werden nicht Titel von CD Geräten und MD Geräten gemischt wiedergegeben Die Titel auf einem MG Memory Stick können nicht in willkürlicher Reihenfolge wiedergegeben werden Benennen einer CD Disc Memo bei einem gesondert erhältlichen CD Gerät mit CUSTOM FI...

Page 82: ... Shuffle Play wird unterbrochen bis Name Edit abgeschlossen ist Löschen des Disc Memo 1 Drücken Sie mehrmals SOURCE und wählen Sie CD aus 2 Drücken Sie mehrmals MODE um das CD Gerät mit CUSTOM FILE Funktion auszuwählen 3 Drücken Sie MENU 4 Drücken Sie mehrmals oder und wählen Sie Edit aus 5 Drücken Sie ENTER 6 Wählen Sie mit M oder m die Option Name Del 7 Drücken Sie ENTER Die gespeicherten Namen ...

Page 83: ... bei MDs können manche Buchstaben nicht angezeigt werden Tipp Um den Auswahlvorgang zu beenden und zur normalen Anzeige zurückzuschalten drücken Sie LIST Radio Für jeden Frequenzbereich FM1 FM2 FM3 MW und LW können Sie bis zu 6 Sender speichern Achtung Wenn Sie während der Fahrt Sender einstellen sollten Sie die BTM Funktion verwenden Andernfalls besteht Unfallgefahr Automatisches Speichern von Ra...

Page 84: ...K oder SEEK um den Sender zu suchen automatischer Sendersuchlauf Der Suchlauf stoppt wenn ein Sender empfangen wird Wiederholen Sie diesen Vorgang bis das Gerät den gewünschten Sender empfängt Tipps Wenn der automatische Sendersuchlauf zu oft stoppt aktivieren Sie den lokalen Suchmodus so dass die Suche auf Sender mit stärkeren Signalen beschränkt wird siehe Wechseln der Klang und Anzeigeeinstellu...

Page 85: ...e Sender unter dieser Nummer gespeichert Hinweis Wenn Sie unter der gleichen Speichernummer einen anderen Sender speichern wird der zuvor gespeicherte Sender gelöscht Einstellen eines Senders anhand einer Liste List up 1 Drücken Sie während des Radioempfangs kurz LIST Die Frequenz oder der Name des aktuellen Senders erscheint im Display 2 Drücken Sie mehrmals M oder m und wählen Sie den gewünschte...

Page 86: ...s was vor allem bei langen Fahrten über große Entfernungen hinweg hilfreich ist AF t Seite 29 Empfangen von Verkehrsdurchsagen auch wenn Sie einen anderen Sender oder eine andere Tonquelle eingestellt haben TA t Seite 30 Auswählen eines Senders nach Programmtyp PTY t Seite 31 Automatisches Einstellen der Uhrzeit CT t Seite 32 Hinweise Je nach Land oder Region stehen nicht alle RDS Funktionen zur V...

Page 87: ...d angezeigt Wenn das Gerät keine Frequenz mit denselben PI Daten finden kann wechselt das Gerät wieder zur zuvor eingestellten Frequenz Unveränderter Empfang eines Regionalsenders Wenn die AF Funktion aktiviert ist Der Empfang dieses Geräts wird werkseitig auf eine bestimmte Region beschränkt so dass nicht zu einem anderen Regionalsender mit einer stärkeren Frequenz gewechselt wird Wenn Sie den Em...

Page 88: ...zeigt wird Wenn Sie alle Verkehrsdurchsagen ausschalten wollen blenden Sie aus Tipps Eine laufende Verkehrsdurchsage können Sie auch mit der Taste SOURCE oder MODE abbrechen Sie können TA auch ein ausschalten indem Sie MODE am Gerät 2 Sekunden lang drücken Speichern der Lautstärke von Verkehrsdurchsagen Sie können die Lautstärke für die Verkehrsdurchsagen voreinstellen so dass Sie sie nicht überhö...

Page 89: ...llen Sie den gewünschten Sender ein Seite 27 2 Drücken Sie AF und oder TA so dass und oder angezeigt wird 3 Drücken Sie die gewünschte Stationstaste 1 bis 6 bis Memory erscheint Weitere Sender können Sie wie in den Schritten oben erläutert speichern Einstellen von Sendern nach Programmtyp PTY Sie können einen Sender einstellen indem Sie den Programmtyp auswählen den Sie hören möchten Hinweis Sie k...

Page 90: ...usgewählten Programmtyp ausstrahlt Automatisches Einstellen der Uhr CT Mit den CT Daten Clock Time die von RDS Sendern ausgestrahlt werden lässt sich die Uhr automatisch einstellen 1 Drücken Sie MENU 2 Drücken Sie mehrmals oder und wählen Sie Setup aus 3 Drücken Sie ENTER 4 Drücken Sie mehrmals M oder m und wählen Sie CT aus 5 Drücken Sie ENTER 6 Drücken Sie M oder m und wählen Sie ON aus Die Uhr ...

Page 91: ...emory Sticks werden als Hintergrundbilder gespeichert In diesem Fall können Sie die Bilder nicht individuell einstellen und auch den Anzeigetyp nicht auswählen Wenn die gespeicherten Bilder eine Größe von 400 96 Punkten aufweisen können Sie mit dieser Funktion mehrere Bilder auf einmal im Gerät speichern Wenn Sie beim Speichern von Bildern GRAPHIC drücken wird der Speichervorgang abgebrochen Pictu...

Page 92: ...hlen der angezeigt werden soll 6Drücken Sie ENTER Wenn Sie den ausgewählten Bildteil ausschneiden und anzeigen können Sie in Schritt 14 nicht mehr den Anzeigetyp auswählen Fahren Sie mit Schritt 16 fort 12Wählen Sie mit M oder m die Option Setup 13Drücken Sie ENTER 14Drücken Sie mehrmals M oder m und wählen Sie den Anzeigetyp aus Sie können einen von 3 Anzeigetypen auswählen Center Das eingestellt...

Page 93: ... gespeichert wurden Einstellen eines Panoramabildes Panorama Panorama Hintergrundbild modus Hierbei läuft ein Standbild von einem Memory Stick im Display durch oder wird mehrmals wiederholt nebeneinander angezeigt Die von Ihnen eingestellten Bilddaten werden dazu im Gerät gespeichert Sie können stattdessen auch werkseitig im Gerät gespeicherte Bilder anzeigen lassen siehe Auswählen des Anzeigemodu...

Page 94: ...zu 100 Bilder in einem Ordner auf einem Memory Stick gleichzeitig im Gerät speichern und anzeigen Die folgenden Ordner auf einem Memory Stick können nicht angezeigt werden CONTROL DCIM MSSONY VOICE HIFI Wenn Sie Schritt 5 oder 7 ausführen und keine Bilddaten vorhanden sind erscheint No Picture im Display Wie lange das Speichern dauert hängt vom Umfang der gespeicherten Daten ab Schalten Sie das Ge...

Page 95: ...uwählen das Sie verwenden wollen Picture Select Wählen Sie diese Option wenn sich das Bild das Sie verwenden wollen auf der obersten Ordnerebene eines Memory Stick befindet Cyber shot Wählen Sie diese Option wenn Sie ein Bild verwenden wollen das mit einer gesondert erhältlichen digitalen Cyber shot Standbildkamera von Sony aufgenommen wurde Ordnername Wenn sich auf dem Memory Stick ein Ordner bef...

Page 96: ...ählt Einstellen einer Clip Sequenz ClipMotion Standardmodus Sie können für jede Tonquelle ein GIF Bild oder eine GIF Animationsdatei speichern und im Standardmodus im Tonquellenbereich anzeigen lassen Die von Ihnen eingestellten Bilddaten werden dazu im Gerät gespeichert 1 Setzen Sie einen Memory Stick ein Seite 10 2 Wählen Sie eine Tonquelle Radio CD MD MS oder AUX aus für die Sie eine Clip Seque...

Page 97: ...zu 10 Frames einer GIF Animation werden angezeigt Bei einer Bildgröße von maximal 84 84 Punkten werden sogar bis zu 20 Frames angezeigt Wenn Sie ein Inhaltsbild Seite 37 eingestellt haben wird die Clip Sequenz nicht angezeigt Sie können bis zu 100 Bilder in einem Ordner auf einem Memory Stick gleichzeitig im Gerät speichern und anzeigen Die folgenden Ordner auf einem Memory Stick können nicht ange...

Page 98: ... Sony aufgenommen wurde OFF Hiermit schalten Sie den Präsentationsmodus aus OFF 6 Drücken Sie ENTER Wählen Sie in Schritt 5 die Option FolderSelect Wenn sich die Bilder in Ordnern auf einer niedrigeren Ordnerebene befinden wählen Sie wie in Schritt 5 und 6 erläutert den Ordner mit den gewünschten Bildern aus Auf diese Weise können Sie Bilder aus maximal 5 Ordnerebenen auf einem Memory Stick auswäh...

Page 99: ...Sie dann M Gehen Sie wie in Schritt 6 erläutert vor wenn Sie weitere Bilder zum Löschen auswählen wollen 7 Drücken Sie ENTER 8 Drücken Sie M oder m um YES auszuwählen Wählen Sie NO um den Vorgang abzubrechen 9 Drücken Sie ENTER Nach Abschluss des Löschvorgangs erscheint im Display wieder das Bildhauptmenü 10Drücken Sie GRAPHIC Im Display erscheint wieder die normale Anzeige Hinweise Die werkseitig...

Page 100: ... oder m um ON auszuwählen 8 Drücken Sie ENTER 9 Drücken Sie GRAPHIC Im Display erscheint wieder die normale Anzeige Hinweis Im Standard bzw Uhrzeitmodus lassen sich die Zeichen im Display nicht automatisch ausblenden Ändern der Transparenz der Zeichen im Display Blend Level Im Spektrumanalysator Panorama Hintergrundbild Bildschirmschoner und Präsentationsmodus können Sie die Transparenz Farbdichte...

Page 101: ...der Klang und Anzeigeeinstellungen Menü Sie können folgende Optionen einstellen Setup Konfiguration Clock Uhr Seite 18 CT Uhrzeit Seite 32 Beep Dient zum Ein oder Ausschalten des Signaltons AUX Skip 1 AUX auslassen Seite 48 Dient zum Ein bzw Ausblenden der AUX Tonquelle MS Auto Seite 21 Display Dimmer Dient zum Wechseln der Helligkeit im Display Mit AUTO wird das Display nur dunkler wenn Sie die B...

Page 102: ...ellt werden soll 5 Drücken Sie ENTER 6 Drücken Sie mehrmals M oder m um die gewünschte Einstellung auszuwählen Beispiel ON oder OFF 7 Drücken Sie ENTER Im Display erscheint wieder das Hauptmenü 8 Drücken Sie MENU Im Display erscheint wieder die normale Anzeige Hinweis Je nach aktueller Tonquelle werden unterschiedliche Optionen angezeigt Einstellen der DSO Funktion Dynamic Soundstage Organizer Wen...

Page 103: ...t SOURCE eine Tonquelle Radio CD MD MS oder AUX aus 2 Drücken Sie SOUND 3 Drücken Sie mehrmals oder um EQ7 auszuwählen 4 Drücken Sie ENTER 5 Drücken Sie mehrmals oder und wählen Sie die Equalizer Kurve aus Um den Equalizer Effekt auszuschalten wählen Sie OFF 6 Drücken Sie ENTER Hinweis Solange die DSO Funktion aktiv ist werden die Equalizer Einstellungen automatisch so gewählt dass der bestmöglich...

Page 104: ...n Sie weitere Frequenzen der Equalizer Kurve einstellen wollen 10Drücken Sie ENTER Nachdem Sie die Effekteinstellung vorgenommen haben erscheint im Display wieder die normale Anzeige Einstellen der Lautstärke vorne und hinten 1 Wählen Sie mit SOURCE eine Tonquelle Radio CD MD MS oder AUX aus 2 Drücken Sie SOUND 3 Drücken Sie mehrmals oder um Fader auszuwählen 4 Drücken Sie ENTER 5 Drücken Sie mehr...

Page 105: ... Einstellen der Grenzfrequenz des der Tiefsttonlautsprecher s Um den Klang auf die Merkmale des der angeschlossenen Tiefsttonlautsprecher s abzustimmen können Sie die unerwünschten Signale hoher und mittlerer Frequenz herausfiltern die in den die Tiefsttonlautsprecher eingespeist werden Wenn Sie die Grenzfrequenz siehe Abbildung unten festlegen geben die Tiefsttonlautsprecher nur die entsprechende...

Page 106: ...der und wählen Sie SoundTuning aus 3 Drücken Sie ENTER 4 Drücken Sie mehrmals M oder m und wählen Sie AUX Level aus 5 Drücken Sie ENTER 6 Drücken Sie mehrmals oder und stellen Sie die Lautstärke ein Die Lautstärke lässt sich in Schritten von 1 dB auf einen Wert zwischen 6 dB und 6 dB einstellen 7 Drücken Sie ENTER Im Display erscheint wieder das Hauptmenü 8 Drücken Sie MENU Im Display erscheint wi...

Page 107: ...cken Sie ENTER Im Display erscheint wieder die normale Anzeige Hinweise Der Sicherheitscode kann nicht über die Zahlentasten 1 6 eingegeben werden Merken Sie sich den Sicherheitscode unbedingt gut Wenn Sie in Schritt 7 NO wählen und ENTER drücken erscheint die Anzeige Code Set aus Schritt 5 wieder im Display Nach Eingabe des Sicherheitscodes Wenn Sie das Gerät in einem anderen Auto installieren od...

Page 108: ...in einem solchen Fall an Ihren Sony Händler Achtung Verwenden Sie unter keinen Umständen eine Sicherung mit einem höheren Ampere Wert als dem der Sicherung die ursprünglich mit dem Gerät geliefert wurde Andernfalls kann es zu Schäden am Gerät kommen Austauschen der Lithiumbatterie Unter normalen Bedingungen halten die Batterien etwa 1 Jahr Die Lebensdauer der Batterien kann je nach Gebrauch des Ge...

Page 109: ...n Seite vor Nun können Sie die vordere Abdeckung abnehmen 2 Nehmen Sie das Gerät heraus 1Drücken Sie mit dem Löseschlüssel auf die Federlasche an der linken Seite des Geräts und ziehen Sie die linke Seite heraus bis sich die Lasche nicht mehr in der Halterung befindet 2Gehen Sie wie in Schritt 1 erläutert auch an der rechten Seite vor 3Ziehen Sie das Gerät aus seiner Halterung heraus Hinweis Schli...

Page 110: ...her Luftfeuchtigkeit kann sich auf den Linsen im Inneren des Geräts und im Display Feuchtigkeit niederschlagen In diesem Fall funktioniert das Gerät nicht mehr richtig Nehmen Sie die CD heraus und warten Sie etwa eine Stunde bis die Feuchtigkeit verdunstet ist So bewahren Sie die hohe Tonqualität Achten Sie darauf keine Säfte oder andere zuckerhaltige Getränke auf das Gerät oder die CDs zu verschü...

Page 111: ...mit außergewöhnlichen Formen z B herzförmige quadratische oder sternförmige CDs können mit diesem Gerät nicht wiedergegeben werden Falls Sie es doch versuchen kann das Gerät beschädigt werden Verwenden Sie solche CDs nicht Reinigen Sie CDs vor dem Abspielen mit einem handelsüblichen Reinigungstuch Wischen Sie dabei von der Mitte nach außen Verwenden Sie keine Lösungsmittel wie Benzin oder Verdünne...

Page 112: ... mit einem CD Steuerungsbereich der als Vorspann bezeichnet wird und enden mit einem als Nachspann bezeichneten Bereich Eine Multi Session CD weist mehrere Sitzungen auf wobei jedes Segment zwischen Vorspann und Nachspann als einzelne Sitzung betrachtet wird CD Extra Bei diesem Format werden Audiodaten Audio CD Daten als Spur in Sitzung 1 und andere Daten als Spur in Sitzung 2 aufgezeichnet Misch ...

Page 113: ...ck kompatiblen Produkten auszutauschen und gemeinsam zu nutzen Da der Memory Stick ein austauschbarer Datenträger ist eignet er sich auch für externe Datenspeicherung Memory Stick Tyen Es gibt zwei Memory Stick Typen MagicGate Memory Stick weiß Ausgestattet mit MagicGate Urheberrechtsschutztechnologie Unterstützt die automatische Wiedergabe MS Auto Unterstützt auch den Zugriff auf Bilddaten Memory...

Page 114: ...icGate Memory Stick unterscheiden sich durch einen Vorsprung an der Rückseite von normalen Memory Stick C Bringen Sie an der Stelle die für einen Aufkleber vorgesehen ist ausschließlich den mitgelieferten Aufkleber an D Bringen Sie den Aufkleber so an dass er nicht über die dafür vorgesehene Fläche hinausragt Berühren Sie den Anschluss des Memory Stick nicht mit bloßen Händen oder metallenen Gegen...

Page 115: ...rantennen Steueranschluss Steueranschluss für Endverstärker Eingänge Steueranschluss für Stummschaltung beim Telefonieren ATT Funktion Steueranschluss für Beleuchtung BUS Steuereingang BUS Audioeingang Anschluss AUX IN Antenneneingang Klangregler Bässe 8 dB bei 100 Hz Höhen 8 dB bei 10 kHz Loudness 8 dB bei 100 Hz 2 dB bei 10 kHz Betriebsspannung 12 V Gleichstrom Autobatterie negative Erdung Abmes...

Page 116: ... bzw I t Schalten Sie das Gerät mit SOURCE ein Das Gerät wird permanent mit Strom versorgt Das Auto hat keine Zubehörposition ACC bzw I t Drücken Sie 2 Sekunden lang OFF Die Motorantenne wird nicht ausgefahren Die Motorantenne hat kein Relaiskästchen CD MD Wiedergabe Die Wiedergabe startet nicht Die MD ist beschädigt bzw die CD ist verschmutzt Einige CD Rs CD RWs werden je nach dem Gerät mit dem s...

Page 117: ...hlauf funktioniert nicht Der lokale Sendersuchmodus ist auf ON eingestellt tSetzen Sie den lokalen Suchmodus auf OFF Seite 43 Das Sendesignal ist zu schwach tStellen Sie die Sender manuell ein Die Anzeige STEREO blinkt Stellen Sie die Frequenz genau ein Das Sendesignal ist zu schwach tSchalten Sie in den Mono Empfangsmodus Seite 43 Eine Stereosendung ist nur monaural zu hören Das Gerät ist in den ...

Page 118: ...en Sie den Schreibschutzschalter des Memory Stick auf OFF Memory Stick Error Auf den Memory Stick kann nicht zugegriffen werden Am Memory Stick liegt ein Fehler vor Ein Memory Stick der mit diesem Gerät nicht wiedergegeben werden kann wurde eingesetzt Ein Memory Stick der mit diesem Gerät nicht kompatibel ist wurde eingesetzt tNehmen Sie den Memory Stick heraus und setzen Sie einen anderen ein Tri...

Page 119: ...iert Seite 26 ID3 Tag Version 2 Die folgenden Phänomene treten auf wenn eine MP3 Datei mit einem ID3 Tag der Version 2 wiedergegeben wird Es handelt sich dabei nicht um Fehlfunktionen Beim Überspringen eines Teils des ID3 Tags der Version 2 am Anfang des Titels wird kein Ton ausgegeben Welcher Teil des Titels übersprungen wird hängt von der Kapazität des ID3 Tags der Version 2 ab Beispiel Bei 64 K...

Page 120: ...8 43 Contrast 43 CT 32 43 CUSTOM FILE 23 25 D Dimmer 43 Disc Memo 22 23 Display 7 DSO 43 44 E Edit 7 23 24 25 31 EQ7 43 45 EQ7 Tune 44 45 F Fader 43 46 H HPF 44 46 I ID3 Tag 22 61 Image 15 J Jacket Pic 16 37 L List up 25 27 Lithiumbatterie 50 Local 26 43 Loudness 44 LPF 44 47 M MagicGate 56 MDLP 21 Memory Stick 16 33 35 37 38 40 55 MG Memory Stick 10 20 21 22 55 Mono 26 43 MP3 53 54 55 MS Auto 21 ...

Page 121: ... Security 49 Setup 7 18 21 32 48 49 SHUF Shuffle 23 Sicherung 50 Slide Show 17 40 SoundTuning 7 45 46 47 48 Spektrumanalysatormodus 13 21 26 28 Standardmodus 13 21 22 26 28 SubWoofer 43 47 T TA 30 31 TP 30 Treble 43 U Uhrzeit Präsentationsmodus 14 21 22 26 28 W Wall Paper 16 33 Z Zurücksetzen 18 ...

Page 122: ... que les illustrations contenues dans ce manuel diffèrent de l apparence réelle de l appareil G PROTECTION pour voiture Conçu à l origine pour les Walkman le système G PROTECTION permet de réduire l effet des chocs et des vibrations sur la lecture Le système G PROTECTION pour voiture est conçu et réglé spécialement pour les véhicules dont le système audio est basé sur le système de G PROTECTION or...

Page 123: ...chage automatique des titres 28 Fonction RDS Aperçu de la fonction RDS 29 Resyntonisation automatique pour une meilleure réception Fonction AF 30 Ecoute des messages de radioguidage TA TP 31 Préréglage des stations RDS avec les fonctions AF et TA 31 Syntonisation d une station en fonction du type d émission PTY 32 Réglage automatique de l horloge CT 33 Réglages de l image Personnalisation d un pap...

Page 124: ...4 03FR02CD EUR fm MEX 5DI 3 242 048 31 1 masterpage Left Position des commandes SHIFT VOL MODE OFF SOURCE SCREEN OPEN CLOSE MEX 5DI ...

Page 125: ...mini télécommande et du satellite de commande sans fil j Touche SHIFT levier de changement de sens 1 3 Permet de changer la fonction du levier qa k Levier Sélection de stations de radio des rubriques à régler de l image souhaitée l Touche OPEN CLOSE Z eject 8 9 19 Permet d éjecter un disque ouvrir ou fermer le plateau de lecture m Plateau de lecture n Touche N lecture 8 19 o Emplacement du Memory ...

Page 126: ...ouche TA n Touche GRAPHIC Permet d afficher les menus graphiques o Touche IMAGE Permet de changer les motifs d affichage p Touche LIST q Touches M m DISC r Touche ENTER s Touche BACK Remarque Si vous éteignez l appareil en appuyant sur OFF pendant 2 secondes il ne peut plus être activé avec la mini télécommande sauf si vous appuyez d abord sur la touche SOURCE de l appareil pour allumer le lecteur...

Page 127: ...al supérieur Affichage du menu général Icônes et contenu des réglages Setup Réglages de base Display Réglage de l affichage PlayMode Réglages de lecture et de réception radio Edit Réglage des caractères d affichage SoundTuning Réglages précis de la qualité du son a Menu de la catégorie sélectionnée Exemple Setup b Rubrique et réglage sélectionnés Exemple Beep ON activé Remarque Pour passer de 1 à ...

Page 128: ...4 Appuyez sur N La lecture commence lorsque le plateau et la façade sont fermés Remarques N insérez pas plus 1 disque à la fois dans le plateau de lecture Le plateau de lecture et la façade se referment automatiquement après le retentissement de l alarme d avertissement Si vous refermez le plateau de lecture sans y placer de CD l appareil émet un son Il ne s agit pas d un dysfonctionnement Conseil...

Page 129: ... levier vers le haut ou vers le bas une fois pour chaque piste Pour sauter plusieurs plages de suite poussez une fois le levier vers le haut ou vers le bas puis poussez le une nouvelle fois vers le haut ou vers le bas dans la seconde suivante et maintenez la position Pour localiser un album spécifique disponible uniquement lors de la lecture d un fichier MP3 Appuyez sur SHIFT puis poussez le levie...

Page 130: ...açade se referme automatiquement après le retentissement de l alarme d avertissement 3 Appuyez sur SOURCE plusieurs fois jusqu à ce que icône MG MS ou MS apparaisse La lecture commence Remarques Insérez le MG Memory Stick dans le bon sens Ne retirez pas le MG Memory Stick en forçant Veillez à ce que le MG Memory Stick ne soit pas éjecté de l appareil et qu il ne tombe pas Conseil Lorsque MS Auto e...

Page 131: ...sser Pour localiser un point spécifique sur une piste Recherche manuelle Poussez le levier vers le haut ou vers le bas jusqu à ce que le point souhaité soit atteint puis relâchez le Pour localiser une piste spécifique Accès automatique aux pistes Poussez le levier vers le haut ou vers le bas une fois pour chaque piste Pour sauter plusieurs plages de suite poussez une fois le levier vers le haut ou...

Page 132: ...ions déjà mémorisées page 28 La touche numérique 1 à 6 sur la mini télécommande peut également être sélectionnée Pour régler le niveau du volume Poussez le levier VOL volume vers le haut ou vers le bas Pour éteindre la radio Appuyez sur OFF Pour recevoir la station automatiquement Syntonisation automatique Poussez le levier vers le haut ou vers le bas Pour recevoir une fréquence précise Syntonisat...

Page 133: ... le nom du disque le nom de la piste et les réglages du son Vous pouvez afficher des rubriques telles que l icône de la source sur le côté gauche de l affichage l analyseur de spectre ou le papier peint en taille réduite qui apparaît au centre de la zone d affichage Mode standard 1 Analyseur de spectre Mode standard 2 Papier peint Mode analyseur de spectre Affiche sur l ensemble de l écran les par...

Page 134: ... pré mémorisée Mode horloge diaporama L affichage passe en mode Diaporama uniquement lorsque le diaporama est activé L affichage passe généralement en mode Horloge lorsque le diaporama n est pas activé Horloge Affiche l horloge et les informations relatives à la lecture et à la réception radio Diaporama Affiche les photos d un Memory Stick sous forme de diaporama ...

Page 135: ...e mode d affichage A chaque pression sur la touche SCREEN le mode d affichage change dans l ordre suivant Mode standard t Mode analyseur de spectre t Mode panorama papier peint t Mode économiseur d écran t Mode horloge diaporama t Mode standard 2 Poussez le levier vers le haut ou vers le bas lorsque Image s affiche dans la partie en bas à droite de l affichage pour sélectionner le motif d affichag...

Page 136: ...bles sont les suivants JPEG 1 600 1 200 points ou moins BMP GIF PNG 640 480 points ou moins Affichée comme clip vidéo Mode standard page 39 Les formats et tailles d image affichables sont les suivants JPEG 1 600 1 200 points ou moins BMP GIF PNG 640 480 points ou moins Fichier d animation GIF 160 120 points ou moins 10 images maximum 84 84 points ou moins 20 images maximum Affichée comme papier pe...

Page 137: ...a papier peint page 36 Les formats et tailles d image affichables sont les suivants JPEG 1 600 1 200 points ou moins Affichée comme diaporama Mode horloge diaporama page 40 JPEG 1 600 1 200 points ou moins BMP GIF PNG 640 480 points ou moins Remarque Il est possible que vos images personnelles créées sur votre ordinateur ne puissent pas s afficher ...

Page 138: ... touche de réinitialisation L appareil émet un bruit pendant l initialisation il ne s agit pas d un dysfonctionnement Régler l horloge et le calendrier L horloge numérique fonctionne suivant un cycle de 24 heures Jour mois année Heure Le réglage d usine est 01 01 2002 01 00 1 Appuyez sur MENU 2 Pour sélectionner Setup appuyez plusieurs fois sur ou 3 Appuyez sur ENTER 4 Appuyez plusieurs fois sur M...

Page 139: ... disque à la fois dans le plateau de lecture Le plateau de lecture et la façade se referment automatiquement après le retentissement de l alarme d avertissement Disponible uniquement lors de la lecture d un fichier MP3 Pour Appuyez sur Interrompre la lecture OFF Ejecter le disque OPEN CLOSE pendant 1 seconde OPEN CLOSE puis sur Z Passer d une plage à l autre Accès automatique aux pistes le levier ...

Page 140: ...portez vous à la section Recherche d un disque d une plage par son nom à la page 25 Lecture d un MG Memory Stick Vous pouvez lire des fichiers ATRAC3 tirés d un MG Memory Stick Appuyez plusieurs fois sur la touche SOURCE jusqu à ce que icône MG MS ou MS apparaisse La lecture commence Conseil Dans le cas d un fichier ATRAC3 qui utilise SonicStage ou OpenMG Jukebox ver 2 2 ou versions plus récentes ...

Page 141: ...tick automatiquement Réglez MS Auto sur ON et insérez le MG Memory Stick pour une lecture séquentielle automatiquement depuis la première plage 1 Appuyez sur MENU 2 Pour sélectionner Setup appuyez plusieurs fois sur ou 3 Appuyez sur ENTER 4 Appuyez sur M ou m pour sélectionner MS Auto 5 Appuyez sur ENTER 6 Appuyez sur M ou m pour sélectionner ON 7 Appuyez sur ENTER Le menu supérieur s affiche de n...

Page 142: ...cordé 4 Si le disque a été identifié par ce lecteur à l aide de la fonction CUSTOM FILE la fonction mémo de disque est affichée en priorité MG Memory Stick Mode standard Mode analyseur de spectre Mode panorama papier peint Mode économiseur d écran Mode horloge Nom du disque 4 Nom de l artiste Nom répertoire de l album 1 Nom fichier de la plage Temps de lecture écoulé Disque Album 1 Numéro de plage...

Page 143: ... CD ou MD en option sont raccordés En cours de lecture appuyez plusieurs fois sur 1 REP jusqu à ce que le réglage souhaité apparaisse dans la fenêtre d affichage La lecture répétée commence Lorsque le mode d affichage sélectionné n est pas le mode standard l icône disparaît brièvement après la fin du réglage Pour revenir au mode de lecture normale appuyez plusieurs fois sur 1 REP jusqu à ce que l ...

Page 144: ... ou m pour sélectionner Name Edit 6 Appuyez sur ENTER L appareil répète la lecture du disque au cours de la procédure d identification 7 Saisissez les caractères 1Appuyez plusieurs fois sur M pour sélectionner le caractère souhaité A t B t C t 0 t 1 t 2 t t t t insertion d un espace t A Pour reculer appuyez sur m 2Appuyez sur lorsque vous avez repéré le caractère souhaité Appuyez sur pour revenir ...

Page 145: ...ormale Si tous les mémos de disque sont effacés à l étape 9 l affichage revient automatiquement à la normale Recherche d un disque d une plage par son nom Affichage automatique des titres Avec cet appareil Lorsqu un nom est attribué à un fichier ATRAC3 dans un MG Memory Stick vous pouvez le localiser par son nom Avec un lecteur CD en option disposant de la fonction CD TEXT CUSTOM FILE ou un lecteu...

Page 146: ...sse 2 Appuyez plusieurs fois sur MODE pour sélectionner la bande 3 Appuyez sur MENU 4 Pour sélectionner Edit appuyez plusieurs fois sur ou 5 Appuyez sur ENTER 6 Appuyez plusieurs fois sur M ou m pour sélectionner BTM 7 Appuyez sur ENTER L appareil sélectionne les stations dont les signaux sont les plus puissants dans la bande sélectionnée et les mémorise dans l ordre des fréquences Pour annuler la...

Page 147: ...captiez la station souhaitée Conseils Si la syntonisation automatique s arrête trop fréquemment activez la recherche locale pour limiter la recherche aux stations dont les signaux sont plus puissants reportez vous à la section Modification des réglages du son et de l affichage à la page 44 Si vous connaissez la fréquence de la station que vous souhaitez écouter maintenez la touche ou enfoncée pour...

Page 148: ...tribuée à ce numéro et mémorisée Remarque Si vous mémorisez une nouvelle station sur le même numéro de présélection la station mémorisée précédemment est effacée Syntonisation d une station via une liste Affichage automatique des titres 1 En cours de réception radio appuyez brièvement sur LIST La fréquence ou le nom attribué à la station actuelle apparaît dans la fenêtre d affichage 2 Appuyez plus...

Page 149: ...matique d une émission très pratique pour les longs trajets AF t page 30 La réception de messages de radioguidage même si vous écoutez une autre émission ou une autre source TA t page 31 La sélection de stations selon le type d émission PTY t page 32 Le réglage automatique de l horloge CT t page 33 Remarques Selon le pays ou la région où vous vous trouvez il est possible que les services RDS ne so...

Page 150: ...mme PI l indication PI Seek apparaît Si l appareil ne parvient pas à trouver la même PI il revient à la fréquence syntonisée précédemment Ecoute continue d une émission régionale Lorsque la fonction AF est activée ce réglage par défaut restreint la réception à une région spécifique afin que la syntonisation ne passe pas automatiquement à une autre station régionale dont les signaux sont plus puiss...

Page 151: ... AF ou TA est activée l appareil passe automatiquement aux messages d urgence s ils sont diffusés pendant que vous écoutez une station FM un CD un MD ou une source AUX Préréglage des stations RDS avec les fonctions AF et TA Lorsque vous présélectionnez des stations RDS l appareil mémorise le réglage AF TA on off de chaque station ainsi que sa fréquence Vous pouvez effectuer un réglage différent po...

Page 152: ...ission n est pas spécifié dans les données RDS 3 Appuyez sur ENTER L appareil commence à rechercher une station diffusant le type d émission sélectionné Types d émission Ecran d affichage Actualités News Dossiers d actualité Current Affairs Informations Information Sports Sport Programmes éducatifs Education Théâtre Drama Culture Cultures Science Science Divers Varied Speech Musique populaire Pop ...

Page 153: ...on d un papier peint Wall Paper Mode standard panorama papier peint Vous pouvez afficher comme papier peint l image statique mémorisée sur un Memory Stick Les réglages que vous définissez pour cette image sont mémorisés dans cet appareil Pour afficher les images pré mémorisées dans cet appareil reportez vous à la section Sélection du mode et du motif d affichage à la page 13 1 Insérez un Memory St...

Page 154: ...che dans un Memory Stick 9 Appuyez plusieurs fois sur ou pour sélectionner la plage que vous souhaitez identifier 10Appuyez sur ENTER Si la taille de l image que vous avez sélectionnée à l étape 9 fait 400 96 points ou moins vous ne pouvez pas définir les réglages de l image Dans ce cas passez directement à l étape 12 Si vous sélectionnez FlashMemory à l étape 5 passez également directement à l ét...

Page 155: ... de Memory Stick Les dossiers suivants contenus dans un Memory Stick ne peuvent pas être affichés CONTROL DCIM MSSONY VOICE HIFI À l étape 6 ou 8 s il n existe pas de données d images l indication No Picture apparaît dans l écran d affichage Selon le volume de données mémorisé le temps de mémorisation peut varier N éteignez pas l appareil pendant que le message de l étape 17 est affiché Si vous co...

Page 156: ... définir se trouve sur la première couche d un Memory Stick sélectionnez ce réglage Cyber shot si vous souhaitez définir le réglage d une image tirée d un appareil photo numérique Sony Cyber shot sélectionnez ce réglage nom de dossier lorsqu un dossier se trouve dans un Memory Stick le nom de dossier s affiche 7 Appuyez sur ENTER Sélectionnez le nom de dossier à l étape 6 S il existe des images da...

Page 157: ... d une image de jaquette Jacket Pic Mode standard Vous pouvez mémoriser et définir une image de votre choix pour chacun des disques Vous pouvez également afficher cette image dans la zone d affichage source du mode standard Les réglages que vous définissez pour cette image sont mémorisés dans cet appareil 1 Insérez un Memory Stick page 10 2 Commencez la lecture du disque pour lequel vous souhaiter...

Page 158: ...GRAPHIC L affichage revient à la normale Appuyez sur SCREEN pour passer au mode standard Remarques Vous pouvez définir le format de l image comme suit JPEG 1 600 1 200 points ou moins BMP GIF PNG 640 480 points ou moins Vous pouvez prévisualiser en une fois jusqu à 100 images contenues dans un dossier de Memory Stick Les dossiers suivants contenus dans un Memory Stick ne peuvent pas être affichés ...

Page 159: ... d image que vous souhaitez régler Picture Select si l image que vous souhaitez définir se trouve sur la première couche d un Memory Stick sélectionnez ce réglage Cyber shot si vous souhaitez définir le réglage d une image tirée d un appareil photo numérique Sony Cyber shot sélectionnez ce réglage nom de dossier lorsqu un dossier se trouve dans un Memory Stick le nom de dossier s affiche 9 Appuyez...

Page 160: ...iser au maximum 16 clips animés Si Cyber shot est sélectionné à l étape 8 le dossier est sélectionné automatiquement Supprimez l image mémorisée pour afficher l icône correspondant à la source par défaut Affichage d une image comme diaporama Slide Show Mode diaporama Fait défiler des images statiques contenues dans un Memory Stick comme diaporama Ces données ne seront pas mémorisées 1 Insérez un M...

Page 161: ...pacité supérieure à 2 Mo 1 Appuyez sur GRAPHIC 2 Pour sélectionner Picture Del appuyez plusieurs fois sur ou A chaque pression sur ou la rubrique change de la façon suivante Wall Paper y Panorama y Jacket Pic y ClipMotion y Slide Show y Picture Del y Char Setup 3 Appuyez sur ENTER 4 Appuyez plusieurs fois sur M ou m pour sélectionner le mode dans lequel se trouve l image à supprimer Si vous efface...

Page 162: ...acket Pic maximum 100 ClipMotion maximum 16 Définition des caractères d affichage Char Setup Mode analyseur de spectre panorama papier peint économiseur d écran diaporama Vous pouvez régler la lisibilité de l affichage en changeant le niveau de transparence des caractères d affichage Disparition automatique des caractères Auto Clear Vous pouvez faire disparaître les caractères d affichage pendant ...

Page 163: ... sur GRAPHIC L affichage revient à la normale Remarques En mode standard horloge vous ne pourrez pas changer le niveau de transparence des caractères d affichage Si vous réglez Auto Clear sur ON page 42 le niveau de transparence des caractères d affichage ne change pas Autres fonctions Réglage des caractéristiques du son Vous pouvez régler les graves les aigus la balance gauche droite l équilibre ...

Page 164: ...quement les stations ayant des signaux puissants Mono mode mono page 27 Sélectionnez ON pour écouter l émission FM stéréo en mode mono Sélectionnez OFF pour revenir au mode normal Regional page 30 SoundTuning EQ7 Tune page 45 pour régler la courbe de l égaliseur HPF filtre passe haut page 46 LPF filtre passe bas page 47 Loudness pour une bonne reproduction des graves et des aigus même à faible vol...

Page 165: ...ement audibles réglez DSO sur OFF Conseil L effet sonore du mode DSO augmente proportionnellement à la valeur affichée Réglage de l égaliseur EQ7 Il est possible de sélectionner une courbe de l égaliseur pour 7 types de musique Xplod Vocal Club Jazz New Age Rock et Custom Vous pouvez procéder à un réglage d égaliseur différent pour chaque source Sélection de la courbe de l égaliseur 1 Appuyez sur ...

Page 166: ...égaliseur 10Appuyez sur ENTER Lorsque le réglage est terminé l affichage revient à la normale Réglage du volume avant et arrière 1 Appuyez sur SOURCE pour sélectionner une source radio CD MD MS ou AUX 2 Appuyez sur SOUND 3 Pour sélectionner Fader appuyez plusieurs fois sur ou 4 Appuyez sur ENTER 5 Appuyez plusieurs fois sur ou pour régler le volume des haut parleurs avant arrière 6 Appuyez sur ENT...

Page 167: ...re du ou des caissons de graves Pour mieux faire correspondre le son aux caractéristiques du ou des caissons de graves raccordés vous pouvez supprimer les signaux de haute et de moyenne fréquence émis vers les caissons de graves Lorsque vous réglez la fréquence de coupure reportez vous au diagramme ci dessous le les caisson s de graves émettent uniquement des signaux de basse fréquence Le résultat...

Page 168: ...onner SoundTuning appuyez plusieurs fois sur ou 3 Appuyez sur ENTER 4 Appuyez plusieurs fois sur M ou m pour sélectionner AUX Level 5 Appuyez sur ENTER 6 Appuyez plusieurs fois sur ou pour régler le niveau de volume Le niveau de volume peut être réglé par incréments de 1 dB de 6 dB à 6 dB 7 Appuyez sur ENTER Le menu supérieur s affiche de nouveau 8 Appuyez sur MENU L affichage revient à la normale...

Page 169: ...rques Le code de sécurité ne peut pas être saisi via les touches numériques 1 6 Assurez vous de ne pas oublier votre code de sécurité Si vous sélectionnez NO à l étape 7 et que vous appuyez sur ENTER l affichage revient en mode de réglage du code à l étape 5 Une fois le réglage du code de séurité terminé Si vous réinstallez l appareil dans un autre véhicule ou que vous changez la batterie l affich...

Page 170: ...u lithium Dans des conditions d utilisation normales une pile dure environ 1 an La durée de vie de la pile peut être plus courte selon les conditions d utilisation Lorsque la pile est faible la portée de la mini télécommande diminue Remplacez alors la pile par une nouvelle pile au lithium CR2025 L utilisation de tout autre type de pile entraîne un risque d incendie ou d explosion Remarques sur la ...

Page 171: ...ser Les antennes électriques se déploient automatiquement lorsque l appareil fonctionne N utilisez pas la fonction CUSTOM FILE pendant que vous conduisez ni aucune autre fonction susceptible de diminuer l attention portée à la route Afin d éviter tout risque d incendie ou de problème de fonctionnement ne pas faire tomber d eau ni de corps étrangers dans le plateau de lecture Si vous avez des quest...

Page 172: ... vos disques dans leurs boîtiers ou dans un chargeur lorsque vous ne vous en servez pas Ne soumettez pas les disques à une chaleur élevée Evitez de les laisser dans une voiture en stationnement sur le tableau de bord ou la plage arrière Ne collez pas d étiquettes sur les disques et n utilisez pas de disques rendus collants par de l encre ou des résidus De tels disques peuvent s arrêter de tourner ...

Page 173: ...équences audio Il permet la compression des fichiers audio à 1 10 de leur taille normale Les sons qui ne sont pas perçus par l ouïe humaine sont comprimés alors que les sons audibles ne le sont pas Remarques sur les disques Ce lecteur permet la lecture des fichiers MP3 enregistrés sur des disques CD ROM CD R CD enregistrables et CD RW CD réinscriptibles Le disque doit être enregistré soit au forma...

Page 174: ...n disques auxquels il est possible d ajouter des données Précautions à prendre lors de la lecture de disques enregistrés en multisession Lorsque la première plage de la première session est composée de données CD audio Seules les données de CD audio sont reproduites Les informations des données non musicales et des fichiers MP3 numéro de la plage durée etc s affichent sans qu aucun son ne soit émi...

Page 175: ...te veillez à demander un MagicGate Memory Stick qui porte le logo MG Memory Stick numéro 1 ci dessous pour enregistrer d autres données demandez un Memory Stick général qui porte le logo Memory Stick numéro 2 ci dessous Remarque Les capacités de stockage du MG Memory stick et du Memory Stick pour ce produit sont les suivantes MG Memory Stick 128 Mo maximum Memory Stick 128 Mo maximum Qu est ce que...

Page 176: ...lliques A Evitez de plier de faire tomber ou de heurter le Memory Stick Ne démontez par et ne modifiez pas la structure du Memory Stick Ne laissez pas de liquide en contact avec le Memory Stick N utilisez pas et ne stockez pas le Memory Stick dans un lieu sujet à des températures très élevées comme dans un véhicule stationné en plein soleil une exposition directe au soleil une forte humidité ou un...

Page 177: ... électrique Borne de commande d amplificateur de puissance Entrées Borne de commande ATT téléphone Borne de commande de l éclairage Borne d entrée de commande BUS Borne d entrée AUX IN ou audio BUS Borne d entrée de l antenne Commandes de tonalité Graves 8 dB à 100 Hz Aigus 8 dB à 10 kHz Intensité sonore 8 dB à 100 Hz 2 dB à 10 kHz Alimentation requise Batterie de voiture 12 V CC masse négative Di...

Page 178: ...re n est pas équipée d une position ACC t Appuyez sur OFF pendant 2 secondes L antenne électrique ne se déploie pas L antenne électrique ne dispose pas de relais Lecture de CD ou de MD La lecture ne commence pas Disque MD défectueux ou disque CD souillé Certains CD R ou CD RW peuvent ne pas être lus en raison de l appareil utilisé pour l enregistrement ou de l état du disque Lecture des fichiers M...

Page 179: ...45 La syntonisation automatique est impossible Le mode de recherche locale est réglé sur ON tRéglez le mode de recherche locale sur OFF page 44 Le signal capté est trop faible tUtilisez la syntonisation manuelle L indication STEREO clignote Syntonisez la fréquence correctement Le signal capté est trop faible tActivez le mode de réception mono page 44 Une émission stéréo est entendue en mono L appa...

Page 180: ...rement du Memory Stick Memory Stick Error Accès impossible au Memory Stick Le Memory Stick ne fonctionne pas normalement Le Memory Stick inséré ne peut pas être lu sur cet appareil Le Memory Stick inséré n est pas compatible avec cet appareil tRetirez le Memory Stick puis replacez le dans l appareil Si le problème persiste vérifiez l état des données dans votre ordinateur puis reformatez le Memory...

Page 181: ...i dessous peuvent se produire lors de la lecture de fichiers MP3 portant une étiquette ID3 de version 2 Il ne s agit pas de problèmes de fonctionnement Lors du saut d une partie d un fichier portant une étiquette ID3 version 2 au début de la plage aucun son n est émis La durée du saut varie selon la taille de l étiquette ID3 de version 2 Exemple A 64 ko le saut est d environ 2 secondes avec RealJu...

Page 182: ...ible 50 H HPF 44 46 I Image 15 J Jacket Pic 16 37 L Local 27 44 Loudness 44 LPF 44 47 M MagicGate 55 MDLP 22 Mémo de disque 22 24 Memory Stick 16 33 36 37 39 40 55 MG Memory Stick 10 20 21 22 55 Mode analyseur de spectre 13 22 27 29 Mode économiseur d écran 14 22 27 29 Mode horloge diaporama 14 22 27 29 Mode panorama papier peint 13 22 27 29 Mode standard 13 22 27 29 Mono 27 44 MP3 53 54 MS Auto 2...

Page 183: ...63 03FR01INT EURIX fm masterpage Right MEX 5DI 3 242 048 31 1 ...

Page 184: ...ießend unbedingt aus der Bedienungsanleitung heraus falls Sie diese im Fahrzeug aufbewahren möchten Bitte bewahren Sie den Geräte Pass an einem sicheren Ort auf Er kann im Falle eines Diebstahls zur ldentifikation lhres Eigentums dienen caraudio Geräte Pass Dieser Geräte Pass dient als Eigentumsnachweis für Ihrcaraudio Gerät im Falle eines Diebstahls Wir empfehlen den Geräte Pass nicht im Fahrzeug...

Reviews: