background image

masterpage:Left

(3 column)

filename[F:\My Document\mds-
s50\4230403131\4230403131\423040313MDSS50U2\GB05OPE-U2.fm]

model name1[MDS-S50]]

[4-230-403-13(1)]

20

Erasing recordings (continued)

Erasing a single track

— Track Erase Function

You can erase a track simply by selecting its
track number. When you erase a track, the total
number of tracks on the MD decreases by one
and al the tracks following the erased one are
renumbered.

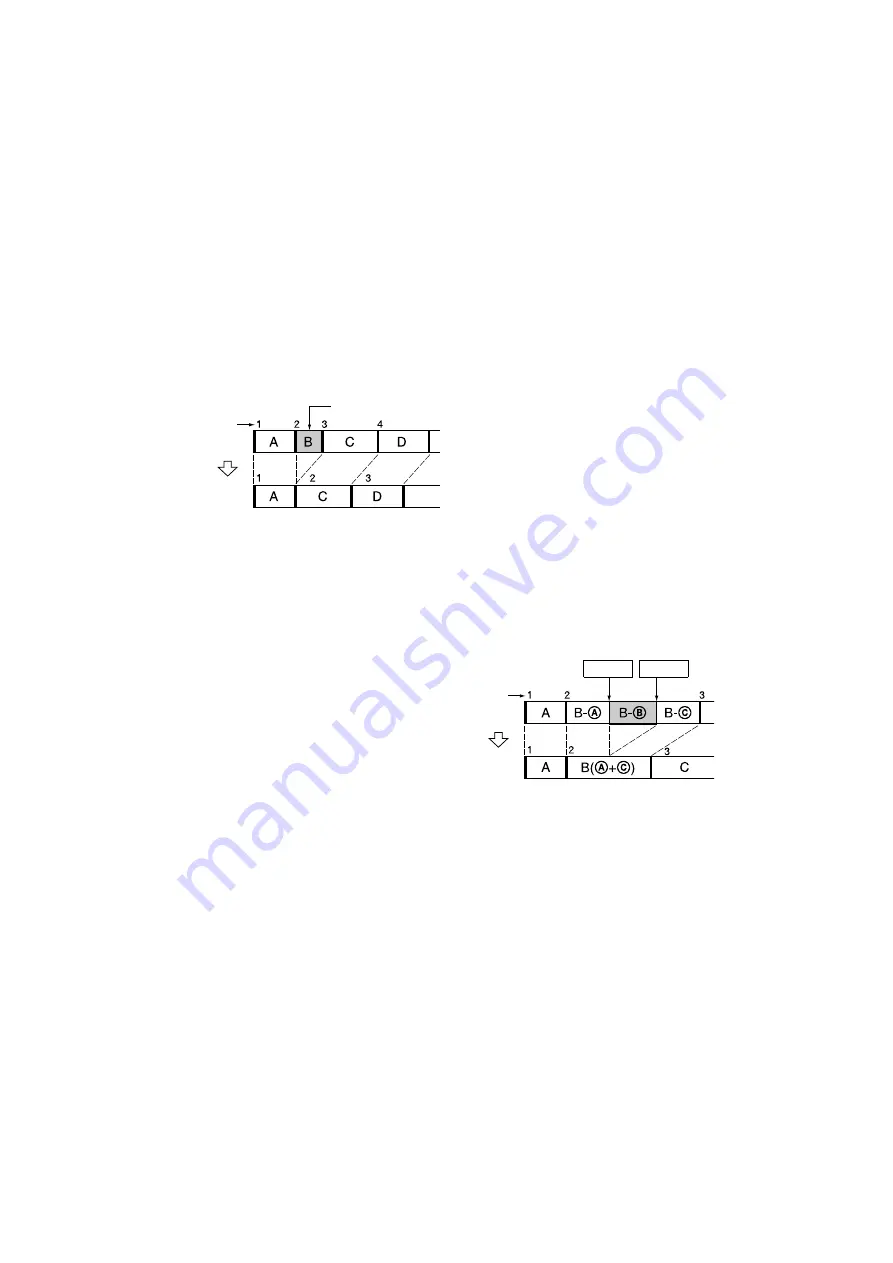
Example: Erasing track 2.

1

While the deck is stopped, playing, or
paused, press MENU/NO.

“Edit Menu” appears in the display.

2

Turn AMS (or press

.

/

>

repeatedly) until “Tr Erase ?” appears,
then press AMS or YES.

The deck starts to play the track indicated by
the number in the display.

3

Turn AMS (or press

.

/

>

repeatedly) until the track number you
want to erase appears.

4

Press AMS or YES.

“Complete!!” appears. The track following
the erased track starts to play. If the erased
track is the last one on the MD, the track
preceding the erased track starts to play.

Tip

If “Erase ???” appears in step 4 above, the track has
been record-protected on another MD deck. If you still
want to erase the track, press AMS or YES again
while the indication appears.

Erasing all the tracks on an 
MD

— All Erase Function

Do the procedure below to erase all the tracks,
track names, and disc name at once.

1

While the deck is stopped, playing, or
paused, press MENU/NO.

“Edit Menu” appears in the display.

2

Turn AMS (or press

.

/

>

repeatedly) until “All Erase ?” appears,
then press AMS or YES.

“All Erase ??” appears in the display.

3

Press AMS or YES.

“Complete!!” appears.

Erasing a portion of a track

— A-B Erase Function

You can specify a portion within a track and
erase the portion with ease. You can shift the
desired portion by frame

1)

, minute or second

intervals.

1)

1 frame is 1/86 second.

Example: Erasing a portion of track 2.

1

While the deck is stopped, playing, or
paused, press MENU/NO.

“Edit Menu” appears in the display.

2

Turn AMS (or press

.

/

>

repeatedly) until “A-B Erase ?” appears,
then press AMS or YES.

Track
number

Erase track 2

After
ERASE

Original
tracks

rack

umber

Original
tracks

After A-B
ERASE

Point A

Point B

Summary of Contents for MDS-S50

Page 1: ...2 2001 Sony Corporation 4 230 403 13 2 MiniDisc Deck Operating Instructions Owner s Record The model and serial numbers are located on the rear of the unit Record the serial number in the space provided below Refer to them whenever you call upon your Sony dealer regarding this product Model No ____________ Serial No ____________ MDS S50 ...

Page 2: ...equipment generates uses and can radiate radio frequency energy and if not installed and used in accordance with the instructions may cause harmful interference to radio communications However there is no guarantee that interference will not occur in a particular installation If this equipment does cause harmful interference to radio or television reception which can be determined by turning the e...

Page 3: ... Synchro recording with a Sony CD player CD Synchro recording 14 Playing MDs Loading an MD 16 Playing an MD Normal Play Shuffle Play Repeat Play 16 Creating your own program Program Play 18 Editing Recorded MDs Erasing recordings Erase Function 19 Dividing recorded tracks Dividing Function 21 Combining recorded tracks Combine Function 22 Moving recorded tracks Move Function 23 Naming a track or MD...

Page 4: ... parentheses for details Main unit AMS qf 8 10 12 13 24 CLEAR qd 18 24 Display qg 8 17 INPUT qj 8 LEVEL DISPLAY CHAR 2 8 12 24 MD insertion slot 5 16 MD LP indicator 3 10 17 MENU NO 7 10 18 20 PHONE LEVEL w 17 PHONES jack ql 17 PLAY MODE 4 16 REC MODE qk 9 Remote sensor qh 7 YES 8 10 18 20 1 power STANDBY indicator 1 8 16 Z eject 6 8 17 NX play pause 9 8 16 x stop 0 8 16 m go back M go forward qa ...

Page 5: ... 14 15 CLEAR 6 18 24 DISPLAY ws 8 12 FADER 3 28 INPUT wf 8 Letter number buttons 5 17 25 LEVEL qa 12 MENU NO w 10 18 20 MUSIC SYNC 8 14 NAME EDIT SELECT wa 24 PLAY MODE 2 16 REC MODE wg 9 REPEAT qd 16 SCROLL wd 17 T REC qj 13 YES 4 10 18 20 1 power 1 8 16 X pause 9 8 16 x stop 0 8 16 m fast reverse M fast forward qf 17 18 24 go back go forward qg 8 10 16 25 26 z recording qh 8 N play qk 16 Z eject...

Page 6: ...olor coded pins to the appropriate jacks white left to white and red right to red B Optical cables supplied When connecting an optical cable take the caps off the connectors and insert the cable plugs straight in until they click into place Do not bend or tie the optical cables Hookup considerations Turn off the power of all components before making any connections Do not connect any AC power cord...

Page 7: ... Insert two R6 size AA batteries into the battery compartment with the and properly oriented to the markings When using the remote point it at the remote sensor on the deck Tip When the remote no longer operates the deck replace both batteries with new ones Notes Do not leave the remote in an extremely hot or humid place Do not drop any foreign object into the remote casing particularly when repla...

Page 8: ...anges to recording pause 7 If necessary adjust the recording level For details see Adjusting the recording level on page 12 8 Press NX or press N or X Recording starts The MD deck is recording over existing track s Tr flashes in the display during recording The indication stops flashing when the deck reaches the end of the recorded portion Recording to an MD When the source is connected to the Set...

Page 9: ... to open the slot To enable re recording close the slot Recording for long times In addition to normal stereo recording this deck has two long time recording modes LP2 and LP4 When recording in LP2 Stereo mode you can record 2 times the normal recordable time and in LP4 Stereo mode you can record 4 times the normal recordable time In addition the recordable time for monaural recording is approxima...

Page 10: ...P LP2 or LP4 Stereo mode should be played back on a deck that supports MD LP mode These MDs cannot be played back on other decks Even if you press REC MODE during recording or recording pause you cannot change the recording mode Even if you press REC MODE repeatedly to select MONO the monitor signal during recording does not become monaural Marking track numbers while recording Manual Automatic Tr...

Page 11: ...track number might not be marked for tracks less than 4 seconds long in Stereo mode Monaural mode and LP2 Stereo mode or 8 seconds long in LP4 Stereo mode during recording When recording from a component connected to the ANALOG IN jacks with T Mark Off selected or when recording from a DAT deck or DBS tuner connected to the DIGITAL IN connector the entire material may be recorded as a single track...

Page 12: ...epeatedly to raise the recording level to its highest level without turning on OVER on the peak level meters Avoid turning on these indicators 5 Stop playing the program source 6 To start recording continue from step 8 of Recording to MDs on page 8 Tips To adjust the recording level press LEVEL on the remote repeatedly during recording or recording pause Peak hold function freezes the peak level m...

Page 13: ...his time To stop Input Monitor Press x When recording from an FM or satellite broadcast the fist few seconds of material are often lost due to the time it takes you to ascertain the contents and press the record button To prevent the loss of this material the Time Machine Recording feature constantly stores the most recent audio data in a buffer memory This lets you record the sound from 6 seconds...

Page 14: ...g the deck s remote Because the MD remote operates both the MD deck and the CD player or CD player section of the component system make sure to place the MD deck and the CD player as close together as possible 1 Turn on the amplifier and the CD player and select CD on the amplifier 2 Do steps 2 to 5 of Recording to MDs on page 8 3 Insert a CD into the CD player and select the playing mode Shuffle ...

Page 15: ...raming the MD s remote you can use the procedure above to perform synchro recording with a Sony video CD player Press number button 2 on the remote while pressing down 1 on the remote You can now operate the MD deck and the video CD player with the remote To control the CD player again press number button 1 on the remote while pressing down 1 on the remote Notes When performing CD Synchro recordin...

Page 16: ... all tracks Press REPEAT repeatedly until Repeat All appears in the display Cancel Repeat Play Press REPEAT repeatedly until Repeat Off appears in the display Repeat a specific portion within a track Repeat A B Play 1 While the deck is playing press AyB on the remote at the starting point point A of the portion to be played repeatedly REP A lights up and B flashes in the display 2 Continue playing...

Page 17: ...o change the display during playing press DISPLAY on the remote repeatedly Each press of the button changes the display cyclically as follows Track number and elapsed time of the current track t Track number and remaining time of the current track t Remaining time of all recorded tracks t The contents of a program only when PGM lights up t Track name1 Tip To check the track name while playing only...

Page 18: ... above again or press CLEAR to erase the track number If 0 flashes press m so that the last track number flashes then enter a correct number To enter a track number over 10 Use 10 For details see page 17 4 Repeat step 3 to enter other tracks The entered track is added to the location where the 0 flashes Each time you enter a track the total program time appears in the display 5 Press YES Complete ...

Page 19: ...umber of the track to be changed flashes then do steps 3 to 5 Editing Recorded MDs Before editing You can edit an MD only when The MD is recordable The MD play mode is normal play Check the following before editing Canceling the last edit Use Undo Function to cancel the last edit and restore the contents of the MD to the condition before the edit To quit while editing Press MENU NO After editing P...

Page 20: ...e erased track starts to play Tip If Erase appears in step 4 above the track has been record protected on another MD deck If you still want to erase the track press AMS or YES again while the indication appears Erasing all the tracks on an MD All Erase Function Do the procedure below to erase all the tracks track names and disc name at once 1 While the deck is stopped playing or paused press MENU ...

Page 21: ... or YES to enter point A Point B set appears and the deck starts playing from point A until the track ends 7 Continue playing the track or press M to locate the ending point of the portion to be erased point B then press AMS or YES A B Ers and Point B ok alternate in the display and a few seconds of the track before point A and after point B play back repeatedly 8 Repeat step 4 until you have loca...

Page 22: ...Note that new track has no name Tip You can divide tracks while recording For details see Marking track numbers while recording on page 10 Dividing a track after selecting the dividing point 1 While the deck is playing press AMS at the point you want to divide the track Divide and Rehearsal alternate in the display and the deck starts to play from the selected point repeatedly 2 If necessary do st...

Page 23: ...sc When you move tracks the tracks are automatically renumbered Example Moving track 3 to position 2 1 While the deck is stopped playing or paused press MENU NO Edit Menu appears in the display 2 Turn AMS or press repeatedly until Move appears then press AMS or YES 3 Turn AMS or press repeatedly until the number of the track to be moved appears then press AMS or YES 4 Turn AMS or press repeatedly ...

Page 24: ...ol You can use the following symbols in titles _ To change a selected character Repeat steps 5 and 6 7 Press AMS The selected character is entered and lights continuously The cursor shifts to the right flashes and waits for the input of the next character 8 Repeat steps 5 to 7 to enter the rest of the name To change a character Press m M repeatedly until the character to be changed flashes then re...

Page 25: ... Copy appears then press AMS or YES 4 Turn AMS or press repeatedly until the track number when copying the track name or Disc when copying the disc name flashes then press AMS or YES to copy the selected name When No Name appears in the display The selected track or disc has no name 5 Turn AMS or press repeatedly until the track number when naming a track or Disc when naming a disc flashes then pr...

Page 26: ...above You can change the volume of recorded tracks using S F Scale Factor Edit The original track is recorded over at the new recording level When changing the recording level you can select Fade in Recording to gradually increase the signal level at the start of recording or Fade out Recording to gradually decrease the signal level at the end of recording Changing the overall recording level 1 Pr...

Page 27: ...e recorded over using Fade in or Fade out Recording You can set the time at any value between 1 second and 15 seconds in 0 1 second increments You cannot set the time longer than the track 6 Press AMS or YES S F Edit OK appears in the display 7 Press AMS or YES The deck starts recording over the existing track S F Edit appears while the track is being recorded When the recording finishes Complete ...

Page 28: ...S Complete appears Undoing the last edit UNDO Other Functions You can use Fade in Play to gradually increase the signal level to the ANALOG OUT jacks and the PHONES jack at the start of playing Fade out Play gradually decreases the signal level at the end of playing Fade in Recording gradually increases the signal level at the start of recording Fade out Recording gradually decreases the signal le...

Page 29: ...ons can be set in 0 1 second steps 4 Press MENU NO You can set the deck so that it turns off automatically after 60 minutes 1 While the deck is stopped press MENU NO twice Setup Menu appears in the display 2 Turn AMS or press repeatedly until Sleep Off appears in the display then press AMS or YES 3 Turn AMS or press repeatedly to select the setting then press AMS or YES 4 Press MENU NO Tip You can...

Page 30: ... on for several hours until the moisture evaporates On cleaning Clean the cabinet panel and controls with a soft cloth slightly moistened with a mild detergent solution Do not use any type of abrasive pad scouring powder or solvent such as alcohol or benzine Precautions If you have any questions or problems concerning your deck please consult your nearest Sony dealer Do not touch the internal disc...

Page 31: ...y not be displayed You may find it impossible to record over a track if that track has been recorded over several times already If this happens erase the track see page 19 The remaining recordable time may be shortened out of proportion to the total recorded time Recording over a track to eliminate noise is not recommended since this may shorten the duration of the track You may find it impossible...

Page 32: ...eck does not play Moisture has formed inside the deck Take the MD out and leave the deck in a warm place for several hours until the moisture evaporates The deck is not on Press 1 to turn on the deck The deck may not be connected to the amplifier correctly Check the connection page 6 The MD is inserted in the wrong direction Slide the MD into the disc slot with the label side up and the arrow poin...

Page 33: ...cording While recording from a digital component connected through the DIGITAL IN connector the digital connecting cable was unplugged or the digital component turned off Connect the cable or turn the digital component back on The following table explains the various messages that appear in the display Messages are also displayed by the deck s Self diagnosis function see page 33 Auto Cut The Auto ...

Page 34: ...ce The Smart Space Function is on page 11 TOC Reading The deck is checking the TOC Table Of Contents on the MD 1 If REMOTE appears under other circumstances turn off the deck then turn it on again System MiniDisc digital audio system Disc MiniDisc Laser Semiconductor laser λ 780 nm Emission duration continuous Laser output MAX 44 6 µW1 1 This output is the value measured at a distance of 200 mm fr...

Page 35: ... output from the LINE ANALOG OUT jacks Set BEEP located at the rear panel of the deck to ON Beeps are output according to the deck status as follows One short beep high The deck has been turned on started playing started recording 1 etc Two short beep high The deck has been turned off One short beep low The deck has stopped or the MD has been ejected Menu operation has finished or canceled normal ...

Page 36: ... has no effect on recording results 2 One low beep for each 10 minutes of remaining recordable time e g one beep for 11 to 20 minutes two beeps for 21 to 30 minutes and three beeps for 31 to 40 minutes No beep is output for a remaining time of 10 minutes or less To turn off the beeps Set BEEP to OFF Note If you press SCROLL while BEEP is set to ON and no MD is inserted a beep is emitted and the st...

Reviews: