background image

O

p

er

at

io

n

Performing Settings on the Main Tab

17

• [OK]  button

Click to execute the settings or changes made to 
previous settings, or to start printing.

• [Cancel] button

Click to cancel setting operations done in the dialog 
box. 

Performing Settings on 
the Main Tab

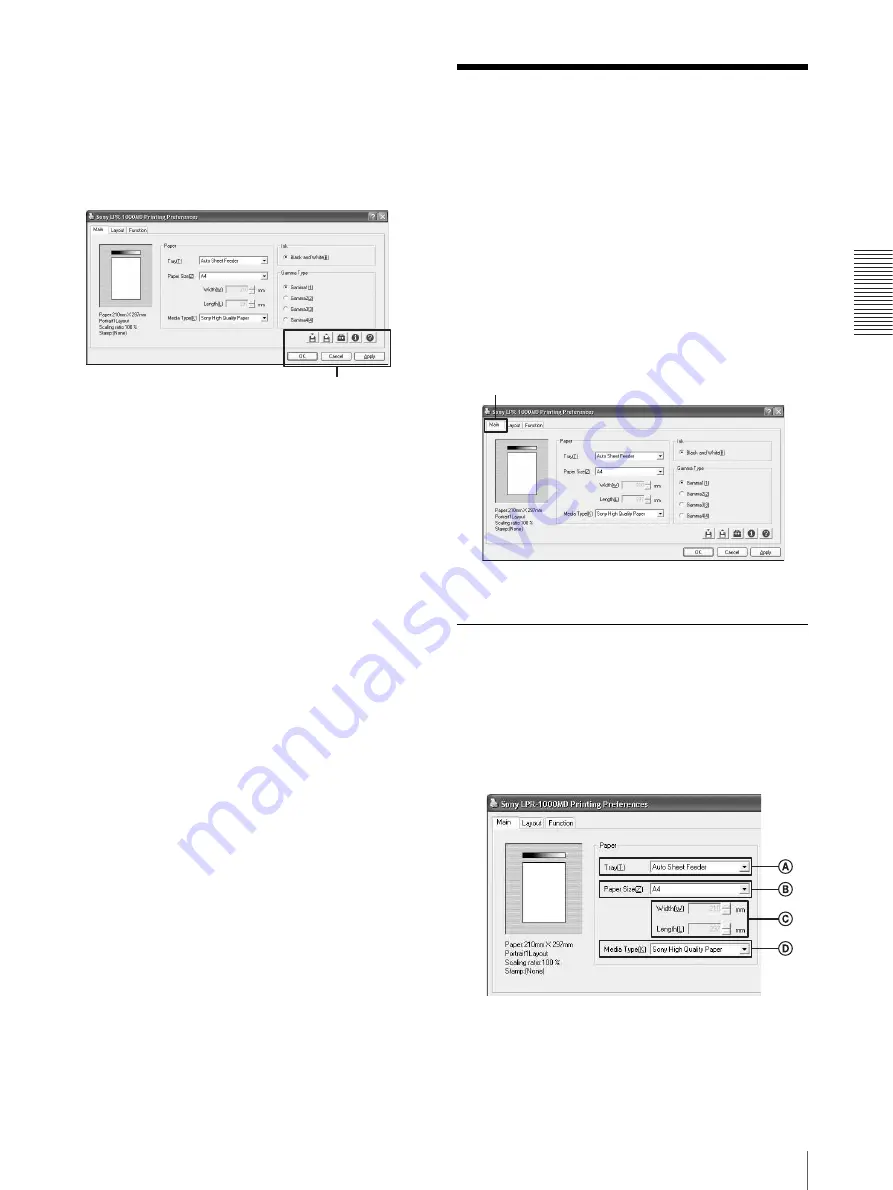
The Main tab allows you to perform the following basic 
settings required for printing.
• Paper

– Tray (paper feeding method)
– Paper size
– Media type

• Ink

This printer supports only black and white printing.

• Gamma  type

Sets the quality level of the printouts.

Settings for Paper

1

Click the [Main] tab.
The Main tab dialog appears.

2

Select the proper settings according to the paper 
loaded in the auto sheet feeder tray.

A

Tray
Since the printer corresponds to automatic 
paper feeding system, “Auto Sheet Feeder” is 

Common features

Main tab

Summary of Contents for LPR-1000MD

Page 1: ...2 318 474 12 1 Line Shot Printer 2004 Sony Corporation LPR 1000MD Instructions For Use ...

Page 2: ... pursuant to Subpart B of Part 15 of FCC Rules For the customers in Canada This unit has been certified according to Standard CSA C22 2 NO 60601 1 For the customers in the U S A and Canada Model LPR 1000MD is Non Patient Equipment This unit can not be used in the vicinity of patients Patient Vicinity Important safeguards notices for use in the medical environments 1 All the equipments connected to...

Page 3: ...forming to the proper ratings Voltage Ampere Warning on power connection for medical use Please use the following power supply cord With connectors plug or female and cord types other than those indicated in this table use the power supply cord that is approved for use in your area Note Grounding reliability can only be achieved when the equipment is connected to an equivalent receptacle marked Ho...

Page 4: ...celling a Print Job from the Status Monitor 24 Cancelling a Print Job From the Operation Panel of the Printer 24 Useful Functions 25 Aligning the Print Position 25 Advanced Functions 26 Embedding Stamps on the Printouts 26 Sort Printing 33 Setting the Printing Order 34 Saving and Retrieving Print Settings 34 Saving Print Settings 34 Changing the Print Settings 35 Retrieving the Print Settings Save...

Page 5: ...tup the various printing methods maintenance troubleshooting and so on CD ROM This disc includes the printer drivers and PDF files of the multi lingual Instructions For Use and Setup Manual Help window An explanation appears when you click the mark on the upper right of the window of the printer driver or when you click the Help button Read this manual when you are in trouble Conventions used Cros...

Page 6: ...s allows you to enjoy a quiet work friendly environment USB connector The printer is equipped with a USB connector Pure paper extracting the printer characteristics The EPP 300A4MD Sony High Quality Paper not supplied comes in 100 sheet packs and has good color and a high degree of whiteness Since this coated paper absorbs the ink quickly printouts without blotted characters and with clear high qu...

Page 7: ...icator will light Also if you push the READY button during printing the READY indicator starts blinking and the printer stops printing temporarily To restart printing push the READY button again For detailed information on the relationship between the ON STANDBY indicator and the READY indicator see Relationship Between the ON STANDBY Indicator and the READY indicator on page 10 C Printer window d...

Page 8: ...t the printer to a wall outlet with a power cable Refer to Warning on power connection on page 3 and Warning on power connection for medical use on page 3 E Main power switch 9 This is the main power switch of the printer Used to turn the printer on or off When this switch is set to on the power to the printer is on when the ON STANDBY button on the front panel is set to on Note on turning the mai...

Page 9: ...READY indicators light in green after a while and READY appears on the printer window display the printer is ready to print Setting the Printer to Standby Mode In standby mode the printer cannot print However the power can be saved when the printer is not being used To set the printer to standby mode Push the ON STANDBY button The ON STANDBY and READY indicators light in orange and the printer ent...

Page 10: ...to print The printer is cleaning the print head Or the printer has stopped printing temporarily because the READY button was pushed while printing was in progress Not lit Not lit Not lit Lit Orange Not lit Blinks Orange Lit Green Lit Green Blinks Green Lit Green The printer is in setting mode confirming mode or maintenance mode The printer cannot print The ON STANDBY button was pushed while printi...

Page 11: ...s on handling paper When holding paper hold it at both ends of the sheet so as not to touch the printing surface Dust scratches or finger prints on the paper are likely to cause unsatisfactory printing After printing do not touch the surface printed until the ink dries Also if you wet the printed sheet with water do not touch the surface printed until it dries There are some types of paper whose p...

Page 12: ...of 105g m2 excluding paper manufactured by Sony Corporation Paper with holes such as loose leaf paper Loading Paper The printer feeds paper automatically one sheet at a time from the auto sheet feeder tray supplied To load paper follow the procedure below Be careful not to touch the printing surface 1 Remove the auto sheet feeder tray If you use the printer for the first time skip this step Start ...

Page 13: ...number of sheets which can be loaded see page 11 Do not mix different types of paper in the auto sheet feeder tray To remove jammed paper push the READY button blinking in orange The jammed paper is automatically ejected Should the jammed paper remain after you have pushed the READY button see If the Paper Jams on page 56 Do not use paper listed in Unsuitable paper on page 12 Do not pull the paper...

Page 14: ...n the auto sheet feeder tray if a different media type is selected on the Main tab of the Printing Preferences dialog box the printed paper may not be ejected correctly For detailed information on how to select the media type see Settings for Paper on page 17 ...

Page 15: ...000MD from the list and then click the Preferences button The Sony LPR 1000MD Properties dialog box appears 3 Perform the required settings on the Main tab Layout tab and Function tab respectively For detailed information on how to perform settings on each tab see the corresponding pages of each tab Performing Settings on the Main Tab on page 17 Performing Settings on the Layout Tab on page 19 Adv...

Page 16: ...the required settings have been completed click the OK button About the Printing Preferences dialog box The Sony LPR 1000MD Properties dialog box which appears when you click the Properties or Preferences button after displaying the Print Settings dialog on the software application or the Sony LPR 1000MD Printing Preferences dialog box from the Windows Start menu are basically same window and have...

Page 17: ...rm the following basic settings required for printing Paper Tray paper feeding method Paper size Media type Ink This printer supports only black and white printing Gamma type Sets the quality level of the printouts Settings for Paper 1 Click the Main tab The Main tab dialog appears 2 Select the proper settings according to the paper loaded in the auto sheet feeder tray A Tray Since the printer cor...

Page 18: ...e selected For detailed information on media types see Recommended Paper on page 11 3 Click the OK button The settings appropriate to the paper are saved Selecting the Gamma Type You can set the quality level of the printout You can select the gamma type according to the print data and the purpose of the printout 1 Click the Main tab 2 Click the radio button corresponding to the desired gamma type...

Page 19: ...ut according to the setting made using the following procedure 1 Click the Layout tab The Layout tab dialog box appears 2 Select the Orientation Note The setting of portrait or landscape orientation of the page is automatically switched according to the page layout of the printing data Therefore even if the Portrait setting is selected the printer may not print the printing data in portrait orient...

Page 20: ...be printed on one sheet To print one page on one sheet Select 1 page When the print orientation is set to Portrait When the print orientation is set to Landscape To print two pages on one sheet 1 Select 2 Page 2 Select the page layout to be used on the page When page orientation is set to Portrait When page orientation is set to Landscape To print four pages on one sheet 1 Select 4 Page 2 Select t...

Page 21: ...tiple pages per sheet is saved Printing Single Page Printing Data on Multiple Sheets You can divide single page data and print the results on multiple sheets 1 Click the Layout tab 2 Set the print orientation according to the page layout setting of the printing data 3 Click the Poster button on the Page Layout group 4 Click V and select the dividing method Portrait Landscape Poster Click V ...

Page 22: ...ows Start Menu on page 15 Displaying the Description of Functions of Setting Items 1 Click at the right top on the Printing Preferences dialog box The pointer changes to a 2 Click the setting item whose function you want to know about A popup window describing the function of the setting item appears 3 Click any point on the window to close the popup window Item Comments 4 Page 2 2 To divide one p...

Page 23: ... you click the Print button Cancelling the print job from the Windows spooler window page 23 Cancelling the print job from the status monitor page 24 Cancelling the print job from the operation panel of the printer page 24 Cancelling a Print Job from the Windows Spooler Window 1 Select Start Control Panel Printers and other hardware and Printers and Fax in turn so as to display the Printer window ...

Page 24: ...er window Cancelling a Print Job From the Operation Panel of the Printer You can cancel a print job which is just starting from the operation panel of the printer This method is to be used when you want to stop a printing job while printing multiple sheets It can be used in the following two situations When the printing data is left on the spooler window first cancel the job from the spooler windo...

Page 25: ...printer window display To cancel print data waiting to be printed Cancel the print job from the Windows spooler window or the status monitor It is not necessary to cancel the print job from the operation panel of the printer Useful Functions Aligning the Print Position You can align the print position on one sheet 1 Display the Sony LPR 1000MD Printing Preferences dialog box from the Start menu of...

Page 26: ...gnment setting is saved Advanced Functions The Function tab allows you to set the following advanced functions Embedding stamps You can embed stamps on the printout Sort printing You can print by volume or by sheet Printing order You can print from first page to last or last page to first Note When print settings are performed on a software application such as word processing or image processing s...

Page 27: ...p dialog 1 Click the Function tab on the Printing Preferences dialog box 2 Click Stamp Setting The Stamp dialog box appears 3 Place a check mark in the Embedding Stamp box 4 Select the type of stamps which you want to add by clicking either the Text or Bitmap radio button 5 Click the Add Remove Stamp button Stamp Setting button Embedding Stamp Text or Bitmap Add Remove Stamp ...

Page 28: ... register the same character string twice You can register any number of characters between one and 60 as a stamp string When a graphics stamp is added 1 Enter the stamp name 2 Click the Add button The Stamp dialog box reappears 3 Specify the bitmap file to be used You can specify the bitmap file using the following two methods Enter the name of the bitmap file in the bitmap file text box Click th...

Page 29: ...gs for a new stamp entry is saved Embedding a stamp character string Seven kinds of stamps such as CONFIDENTIAL URGENT DRAFT TENTATIVE SAMPLE INFORMATIVE and PROPOSAL are registered already You can add other character strings as stamps 1 Click the Function tab on the Printing Preferences dialog box 2 Click Stamp Setting The Stamp dialog box appears 3 Place a check mark in the Embedding Stamp box a...

Page 30: ... displayed properly In such a case select another font Changing a font may allow the characters to be displayed B Color Adjusts the brightness of a stamp You can adjust the brightness of a stamp in 11 steps A stamp becomes lighter toward the Light direction A stamp becomes darker toward the Dark direction C Alignment You can select the page on which the stamp is to be embedded from among First She...

Page 31: ...ck Stamp Setting The Stamp dialog box appears 3 Place a check mark in the Embedding Stamp box and then click the Bitmap radio button 4 Select the stamp name corresponding to the bitmap file which you want to be embedded Click V at the right of the list and select the desired stamp name of the graphics data to be embedded from the list You can embed a new graphic For detailed information on how to ...

Page 32: ...tamp dialog box after the settings have been completed The window returns to the Function tab 7 Click the OK button on the Printing Preferences dialog box The settings for the graphic stamp to be embedded are saved Printing without a stamp Proceed as follows to print without embedding stamps 1 Click the Function tab on the Printing Preferences dialog box 2 Click Stamp Setting The Stamp dialog box ...

Page 33: ...elete button A message asking you to confirm that you wan to delete the stamp appears 5 Click the Yes button 6 Click the Back button on the Add Remove Stamp dialog The window returns to the Stamp dialog box 7 Click the OK button on the Stamp dialog box Note You cannot remove the stamps registered as defaults Sort Printing You can print in a set or by sheet using the Function tab window 1 Click the...

Page 34: ...ut tab Function tab and or the Print Alignment Position window of the Utilities dialog box All of items set in those dialog boxes can be saved as a file 2 Click the Save button on the Printing Preferences dialog box The Save Settings dialog box appears 3 Name the file in which the print settings will be saved Item Comments Collate To print a document consisting of multiple pages in sets By Sheet T...

Page 35: ...g the Print Settings You can change some parts of print settings saved as a file 1 Re enter the value for the print settings you want to change on the Main tab Layout tab Function tab and or the Print Alignment Position window of the Utilities dialog box 2 Click the Save button on the Printing Preferences dialog box The Save Setting dialog appears The names of files currently saved are listed 3 Cl...

Page 36: ...ame is displayed in the Name text box 3 Click the Retrieve button The Retrieve Settings dialog disappears The printer switches to the print settings retrieved Note Settings for adding and removing stamps are not saved Resetting the print settings to default settings 1 Click the Retrieve Settings button on the Printing Preferences dialog box 2 Select Default from the list 3 Click the Retrieve butto...

Page 37: ... Preferences dialog box The Retrieve Settings dialog appears 2 Click the file name which you wish to delete on the list The selected file name is displayed in the Name text box 3 Click the Delete button A confirmation window appears 4 Click the Yes button The file selected in step 2 is deleted The file name selected in step 2 is displayed ...

Page 38: ...tor appears When printing is completed the status monitor automatically disappears Status monitor Confirming the Ink Level Display the status monitor by double clicking the icon The ink level is displayed at the right top corner of the window How to check the ink level The number of squares indicates the remaining amount of the ink The ink level is sufficient The ink level is 10 to 50 The ink leve...

Page 39: ...oler window appears 2 Right click the name of the job you wish to control A drop down list appears 3 Select the desired item Item Comments Pause To pause printing Restart To reset the printer so that it is ready to print ready status Cancel To cancel the print job Click the Job button ...

Page 40: ...Printing Preferences dialog box according to the operation procedure of Displaying the Printing Preferences Dialog Box from the Windows Start Menu on page 15 2 Click the Utility button The Utilities dialog box appears 3 Click the Head Cleaning button The printer starts cleaning the head It takes one minute to one minute and 30 seconds to clean the head When the head cleaning is completed Check the...

Page 41: ...shes cleaning the head the message Cleaning appears again 5 Push the READY button The READY indicator lights in green and the message READY appears on the printer window display When the head cleaning is completed Check the result of the head cleaning by printing a test page For detailed information on test printing see Printing a Test Page on page 42 If stains or smudges remain on the test sheet ...

Page 42: ... a print job left to be done the test printing is not performed Start the test printing after the printing of the current job is completed 1 Display the Sony LPR 1000MD Printing References dialog using the procedure explained in Displaying the Printing Preferences Dialog Box from the Windows Start Menu on page 15 2 Click the Utility button The Utilities dialog box appears 3 Click the Print Test Pa...

Page 43: ...e the protective cap before using a new ink cartridge If you don t you cannot load the ink cartridge correctly in the printer Load the ink cartridge in the printer promptly after you remove the protective cap If dust accumulates in the ink cartridge this may choke the print head and cause a malfunction of the printer Do not close the air hole located on the top of the ink cartridge If the air hole...

Page 44: ...olding the handle of the ink cartridge 3 Remove the protective cap from the new ink cartridge Check that the air hole located on the top of the ink cartridge is open 4 Matching the protruding part placed on the right side of the ink cartridge with the groove of the Head cover Do not touch the points marked with If you touch those points the ink may get on your fingers Do not touch the points marke...

Page 45: ...If they are not inserted securely the unit may not print correctly because the ink cartridges are crooked Also even if the remaining ink is sufficient the message Ink depleted may appear Before replacing the ink cartridge check the remaining amount of ink If there is enough left insert the same ink cartridge again without replacing it 6 Push the READY button The READY indicator lights in green and...

Page 46: ...The READY indicator goes out and the message Ink level Black BL appears on the printer window display 3 Push the MENU button or the m M button and hold it until the message Replace roller appears on the printer window display 4 Push the SET button The message Replace Yes_ appears on the printer window display If the message Replace No_ appears Display Yes_ by pressing the m M button and then push ...

Page 47: ... the inside of the printer 7 Remove the head cleaning roller from the head cleaning unit and then attach the new head cleaning roller 1 Press the roller ejector C into the metal parts at both ends of the roller straight down until it clicks Notes The cleaning roller may come off if it is not caught securely Be sure to press the roller ejector until it clicks To prevent the cleaning roller from bei...

Page 48: ... move around inside the unit Note If it is not inserted completely the unit cannot clean the head properly 3 Pull the two claws at the bottom of the unit ejector downward and remove the unit ejector horizontally 9 After confirming that the message End Yes_ has appeared push the SET button The printer starts cleaning and the message Now cleaning head is displayed When the printer finishes cleaning ...

Page 49: ...n material on the head cleaning roller may cause clogging of the printer head Dispose of the used head cleaning roller with the roller ejector attached and throw away the unit ejector and the gloves too The head cleaning roller is a mixture of plastic metal and ink Dispose of it as incombustible waste observing local rules and regulations ...

Page 50: ...printer for assembly and so on pay attention to the following The printer is heavy When lifting the printer be careful not to hurt your back When lifting the printer put your hands under the bottom of the printer from both sides and pick it up horizontally Be sure not to lift the printer by paper outlet or head cover If you do so these parts may break or the printer may fall and this may cause inj...

Page 51: ...rature of the rack is within the specified limit of this product 4 Preventionagainstachievinghazardouscondition due to uneven mechanical loading When this product is installed in a rack please make sure that the rack does not achieve hazardous condition due to uneven mechanical loading 5 Install the equipment while taking the operating temperature of the equipment into consideration For the operat...

Page 52: ...ounter with your printer Before proceeding with these trouble checks first check that the power cord is firmly connected Should the problem persist after you have applied the remedy suggested below unplug the printer and contact your dealer Symptoms Possible causes and remedies The printer is not turned on The ON STANDBY indicator does not light in green The main power switch located on the back o...

Page 53: ...ing two or three times and print a test page If the printed surface is still dirty replace the head cleaning roller page 46 Symptoms Possible causes and remedies The printed surface is dirty The paper path system may be dirty tOpen the top cover and wipe the plastic surface gently with a cotton swab to remove the dust Do not use alcohol The life span of the head cleaning roller may have run out tT...

Page 54: ...tware interfere with each other tDeactivate Back to Front item on the Printing Preferences dialog box of the printer or the print setup dialog box of the software application Printing multiple pages per sheet cannot be done The setting on the layout tab and the print settings of the application software interfere each other tDeactivate Printing multiple pages per sheet item on the Printing Prefere...

Page 55: ... not match up with paper size setting The printer has been designed to use size A4 paper Do not use paper other than size A4 paper Paper feed error A Paper Feed error has occurred The printer is not in print mode tMake the ON STANDBY and READY indicators light in green page 10 The Auto sheet feeder tray is empty tLoad the paper page 12 Paper other than size A4 paper is loaded tBe sure to use size ...

Page 56: ...en The print head cover is open The head cover is open tClose the cover firmly The head cartridge lock screws are not tightened securely tCheck them and tighten them securely Refer to Attaching the Head Cartridge described in the printed Setup Manual The harness of the head cartridge cable is not pushed in to the groove securely tPush the harness of the head cartridge cable into the groove securel...

Page 57: ...n the paper is jammed inside the printer 1 If you can remove the jammed paper from the feeding input or output slot pull the jammed paper straight out slowly If you cannot remove the jammed paper from the outside go to the next step 2 Set the printer to standby mode by pushing the ON STANDBY button and turn the power of the printer off by setting the main power switch to the off side 3 Remove the ...

Page 58: ...ve it slowly Note Be careful not to touch any parts except the green roller 8 Reset the section with the belts as it was after you have removed the jammed paper and then close the main cover Note When resetting the section with belts be sure to put the shaft located at the front of the section into the center groove If you put the shaft into the wrong groove the printer may break 9 Re insert the a...

Page 59: ...nsport humidity 20 to 80 no condensation allowed Temporary storage temperature in the user environment 0 C to 35 C 32 F to 95 F Temporary storage humidity in the user environment 20 to 80 no condensation allowed Power requirements 100 to 240 V AC 50 60 Hz Input Current 4 0 to 1 6 A max at 25 C Power consumption At standby Approx 16W or less When printing Approx 70W Dimensions With the auto sheet f...

Page 60: ...quirements for the Printer Driver Computer A computer on which Micrsoft Windows XP Home Edition Professional English version or Microsoft Windows 2000 Professional English version runs Also a computer equipped with a USB interface Basic software Microsoft Windows XP English version Microsoft Windows 2000 English version Hard disk space required Disk space required when installing the printer drive...

Page 61: ...e the operation may become unstable This printer is applied to Hi Speed USB When the printer is connected to the computer which corresponds to Hi Speed USB the data can be loaded at high speed maximum 480Mbsp a If the printer is connected to the computer which does not correspond to Hi Speed USB the down loading speed is based the specifications of the computer a 480Mbps is the maximum value on th...

Page 62: ... flow chart indicates that you push the button MENU SET BACK and bb BB indicate the buttons on the operation panel of the printer _ indicates the blinking of the cursor and this is the status where the printer is waiting to push the SET or BACK button Indicates the status that the printer is processing in some operation Main flow Go to Job cancel on page 64 Go to Head cleaning on page 63 Go to Tes...

Page 63: ...Miscellaneous Menu Flow of the Printer Window Display 63 Head cleaning Test printing ...

Page 64: ...Miscellaneous Menu Flow of the Printer Window Display 64 Job cancel Cleaning roller replacement ...

Page 65: ...page Poster 4page 2 2 9page 3 3 16page 4 4 4page 2 2 Function Stamp Setting Text Bitmap Text Printing Order Front to Back from the first page Back to Front from the last page Front to Back Sort Collate By Sheet Collate 1 Model name of the printer 2 Serial No 3 Computer manufacturer 4 Computer OS Windows2000 SP WindowsXP SP Memory MB Hard disk space GB 5 Connecting cable of the printer USB cable 6 ...

Page 66: ...andbymode 9 turning the printer off 9 turning the printer on 9 Precautions before asking repairment 52 before transporting the printer 51 handling the printer 50 installation 50 mounting the printer on a rack 51 safety 50 when not using the printer for long periods 52 Print Preferences dialog box common operations on each tab 16 displaying from a software application 15 Function tab 26 Main tab 17...

Page 67: ...Sony Corporation ...

Reviews: