background image

38

-EN

Additional Information

Additional Information

Troubleshooting

If the problem persists after trying the methods below,
contact your nearest Sony dealer.

No picture (screen not lit), no sound

/

Make sure the power cord is connected
securely.

/

Operate with the buttons on the projection TV.

/

Insert the batteries in the remote control with
the correct polarity.

/

Replace the batteries with new ones if they are
weak.

/

Check to see if the TV/VIDEO setting is correct:
when watching TV, set to TV, and when
watching video tapes, set to VIDEO1, 2, or 3
(for KP-41T35 only).

/

Try another channel. It could be station trouble.

/

Perform AUTO SET UP again using the SETUP
button to return to the factory preset condition.
(page 

14

)

Poor or no picture (screen lit), good sound

/

Adjust PICTURE in the VIDEO menu. (page 

23

)

/

Adjust BRIGHTNESS in the VIDEO menu.
(page 

23

)

/

Adjust convergence. (page 

16

)

/

Check antenna/cable connections. (page 

6

)

/

Perform AUTO SET UP again using the SETUP
button to return to the factory preset condition.
(page 

14

)

/

Remove objects from the front of the projection
TV.

Good picture, no sound

/

Press MUTING so that “MUTING” disappears
from the screen. (page 

19

)

/

Check the MTS setting in the AUDIO menu.
(page 

27

)

/

Make sure SPEAKER is set to ON in the AUDIO
menu. (page 

27

)

/

Perform AUTO SET UP again using the SETUP
button to return to the factory preset condition.
(page 

14

)

No color

/

Adjust the COLOR in the VIDEO menu. (page

23

)

/

Confirm that black and white program is not
being broadcast.

/

Perform AUTO SET UP again using the SETUP
button to return to the factory preset condition.
(page 

14

)

Only snow and noise appear on the screen

/

Check the CABLE setting in the SET UP menu.
(page 

17

)

/

Check the antenna/cable connections. (page 

6

)

/

Make sure the channel is broadcasting
programs.

/

Press TV (black button) to change the input
mode. (page 

20

)

Dotted lines or stripes

/

Adjust the antenna.

/

Move the projection TV away from noise
sources such 

as 

cars, neon signs, and hair-

dryers.

Double images or ghosts

/

Use a highly directional outdoor antenna or a
cable (when the problem is caused by
reflections from nearby mountains or tall
buildings).

Cannot operate menu

/

If the item you want to choose appears in gray,
you cannot select it.  Press TV/VIDEO
correctly.

/

Check the CABLE setting in the SET UP menu.
(page 

17

)

Cannot receive upper channels (UHF) when using an
antenna

/

Make sure CABLE is OFF in the SET UP menu.
(page 

17

)

/

Use AUTO PROGRAM to add receivable
channels that are not presently in projection TV
memory. (pages 

14, 18

)

Cannot receive any channels when using
cable TV

/

Make sure CABLE is ON in the SET UP menu.
(page 

17

)

/

Use AUTO PROGRAM to add receivable
channels that are not presently in projection TV
memory. (pages 

14, 18

)

Remote control does not operate

/

Batteries could be weak. Replace the batteries.
(page 

13

)

/

Make sure the projection TV’s power cord is
connected securely to the wall outlet.

/

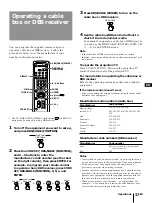
Press TV (FUNCTION) when operating your
projection TV.

/

Are fluorescent lights too close to the projection
TV?  Move them at least 3-4 feet away from the
projection TV.

Cannot gain enough volume when using a cable box

/

Increase the volume at the cable box. Then press
TV (FUNCTION) and adjust the projection TV’s
volume.

The projection TV needs to be cleaned

/

Clean the projection TV with a soft dry cloth.
Never use strong solvents such as thinner or
benzine, which might damage the finish of the
cabinet.

Summary of Contents for KP-41T35 - 41" Projection Tv

Page 1: ...Operating Instructions Manual de instrucciones Color Rear Video Projector 1997 by Sony Corporation 3 859 371 31 2 EN ES KP 41T35 KP 46C36 KP 48S35 KP 53S35 KP 61S35 ...

Page 2: ...t of cable entry as practical Use of this television receiver for other than private viewing of programs broadcast on UHF or VHF or transmitted by cable companies for the use of the general public may require authorization from the broadcaster cable company and or program owner Note on convergence adjustment Before you use your projection TV make sure to adjust convergence For the procedure see pa...

Page 3: ...t SURROUND 27 Selecting stereo or bilingual programs MTS 27 Setting the speaker switch SPEAKER 28 Setting audio out AUDIO OUT 29 Setting daylight saving time DAYLIGHT SAVING 29 Setting the clock CURRENT TIME SET 30 Setting the timer to turn the projection TV on and off ON OFF TIMER 31 Customizing the channel names CHANNEL CAPTION 32 Blocking out a channel CHANNEL BLOCK 32 Setting your favorite cha...

Page 4: ...unplug the projection TV and have it checked by qualified personnel before operating it further Unplug the projection TV from the wall outlet if you are not going to use it for several days or more To disconnect the cord pull it out by the plug Never pull the cord itself For details concerning safety precautions see the supplied leaflet IMPORTANT SAFEGUARDS Note on cleaning Clean the cabinet of th...

Page 5: ...areas indicated when carrying the projection TV and to use more than two people p KP 61S35 only Carry your projection TV by the casters Preparing for your projection TV Before you use your projection TV adjust convergence For the procedure see Step 4 Setting up the projection TV automatically AUTO SET UP on page 14 Getting Started Step 1 Installing the projection TV For the best picture quality in...

Page 6: ...nd antenna Note Do not connect anything to the TO CONVERTER connector in this case A 75 ohm coaxial cable B VHF only or UHF only or VHF UHF C Notes Most VHF UHF combination antennas have a signal splitter Remove the splitter before attaching the appropriate connector If you use the U V mixer snow and noise may appear in the picture when viewing cable TV channels over 37 EAC 66 U V mixer not suppli...

Page 7: ...manual Before making the connection disconnect the AC power cords of the equipment to be connected To a conventional VCR Notes For models KP 41T35 46C36 you can connect the audio and video outputs of the VCR to VIDEO 3 IN jacks instead of the VIDEO 2 IN jacks To connect a monaural VCR connect the audio output of the VCR to AUDIO L MONO of VIDEO 1 2 3 IN on the projection TV Without a cable box VID...

Page 8: ...O L white AUDIO R red Rear of projection TV Note Video signals are composed of Y luminance and C chroma signals The S connection sends the two signals separately preventing degradation and gives better picture quality compared to conventional connections RK 74A not supplied YC 15V 30V not supplied VCR Antenna cable Cable box Splitter not supplied Antenna cable VHF UHF Antenna cable Antenna cable Y...

Page 9: ...rojection TV VMC 810S 820S not supplied VIDEO yellow AUDIO L white AUDIO R red VHF UHF Rear of projection TV Cable or cable box Antenna Note You can use the S VIDEO connector or the composite video connector for the video connection To a projection TV and VCR DBS receiver Satellite antenna input Cable or cable box DBS receiver Antenna VMC 810S 820S not supplied VIDEO yellow AUDIO L white AUDIO R r...

Page 10: ...utputs Note To connect a monaural camcorder connect the audio output of the camcorder to AUDIO L MONO of VIDEO 2 INPUT on the projection TV Front of KP 41T35 46C36 Connecting an audio system When connecting audio equipment see page 28 for more information AUDIO OUT L white AUDIO OUT R red RK 74A not supplied Set the amplifier s function to line input Rear of projection TV Line input Note You can a...

Page 11: ...ut signal will also change You can use the S video jack to connect a VCR for playback and the composite video connector to connect a VCR for recording For models KP 41T35 46C36 you can connect the audio and video outputs of the VCR to VIDEO 3 IN jacks instead of the VIDEO 2 IN jacks AUDIO R red AUDIO L white VIDEO yellow Rear of projection TV VCR for playback VCR for recording VMC 810S 820S not su...

Page 12: ...kers Dolby Pro Logic surround system and super woofer mode and control them with the supplied remote control When connecting a Sony SAVA series speaker system see page 27 for more information Manufactured under license from Dolby Laboratories Licensing Corporation Additionally licensed under Canadian patent number 1 037 877 Dolby the double D symbol a and Pro Logic are trademarks of Dolby Laborato...

Page 13: ...mpartment Notes Under normal conditions batteries will last up to six months If the remote control does not operate properly or the indicators of the buttons on the remote control do not light up the batteries may be worn out When replacing batteries replace both of them with new ones Do not mix old batteries with new ones or mix different types of batteries together If the electrolyte inside the ...

Page 14: ...es cable TV channels CABLE is set to ON automatically To exit AUTO PROGRAM Press any button 6 Adjust convergence 1 Press CHANNEL The CONVERGENCE adjustment screen appears Before you start using AUTO SET UP be sure to connect the antenna or cable to the projection TV see page 6 1 Press POWER to turn the projection TV on 2 Press SETUP on the front of the projection TV AUTO SET UP screen appears SETU...

Page 15: ...EL or VOLUME move the line until it converges with the center green line To move horizontal line up down press CHANNEL To move vertical line right left press VOLUME 4 Repeat steps 2 and 3 to adjust the other lines until all three lines converge and are seen as a white cross Note Using the AUX connector press TV black button first and make sure that AUX is displayed beside the channel number on the...

Page 16: ...channel with the same number is also erased or added and vice versa Erasing and adding channels is also available for the AUX input Adjusting convergence CONVERGENCE The projection tube image appears on the screen in three layers red green and blue If they do not converge the color is poor and the picture blurs To correct this adjust convergence You do not have to do this procedure if you perform ...

Page 17: ... button so that a channel number appears SET UP CHANNEL ERASE ADD CHANNEL CAPTION CHANNEL BLOCK FAVORITE CHANNEL CABLE OFF AUTO PROGRAM CC CONVERGENCE MENU VIDEO LABEL LANGUAGE ENGLISH Use Exit MENU RED BLUE MENU CONVERGENCE Us e Ex MENU i t RETURN Us e Ex MENU i t RED BLUE MENU CONVERGENCE RETURN 4 Press V B v or b to move the cursor z to the symbol showing the line you want to adjust and press R...

Page 18: ...CHANNEL CABLE ON AUTO PROGRAM LANGUAGE ENGLISH MENU VIDEO LABEL CONVERGENCE Use Exit MENU AUTO PROGRAM Presetting channels You can preset TV channels easily by using the AUTO PROGRAM feature You do not have to do this procedure if you perform AUTO SET UP page 14 Do this procedure only when you want to set it manually 1 Press MENU 2 Press V or v to select and press 3 Press V or v to select AUTO PRO...

Page 19: ...en two channels Press JUMP Pressing JUMP again switches the channel back to the one you selected last Note You cannot jump to channels you scanned through using the CH buttons Muting the sound Press MUTING MUTING appears on the screen To restore the sound press MUTING again or press VOL Watching the TV Operations TV POWER MUTING SLEEP DISPLAY TV VIDEO TV black button 0 9 buttons ENTER JUMP CH VOL ...

Page 20: ...d SAP indication disappears after three seconds Some programs are broadcast with XDS Extended Data Service which shows a network name program name program type program length call letters and time of the show When you select XDS with the DISPLAY button this information will be displayed on the screen if the broadcaster offers this service Some programs are broadcast with Caption Vision When you se...

Page 21: ...a window picture simultaneously Use the yellow labelled buttons for PIP operations Displaying a window picture Press PIP Press PIP again to display a smaller window picture To remove the window picture press PIP again Note The window picture may be affected by the condition of the main picture CH TV VTR AUDIO TV VIDEO PIP PIP Watching two programs at one time PIP To restore the main picture sound ...

Page 22: ...anges as follows depending on whether the PIP function is used or not Swapping the main and window pictures Press SWAP Each time you press SWAP the images and sound from the main and window pictures switch places with another Note The channels being received through the AUX connector cannot be displayed as a window picture FREEZE To remove the frozen window picture press FREEZE again When the PIP ...

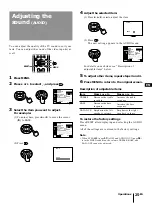
Page 23: ...ess V or v to move the cursor z to BRIGHTNESS 4 Adjust the selected item 1 Press V B v or b to adjust the item 2 Press The new setting appears in the VIDEO menu For details on each item see Description of adjustable items below 5 To adjust other items repeat steps 3 and 4 6 Press MENU to return to the original screen Description of adjustable items To restore the factory settings Press RESET after...

Page 24: ...affecting skin tones 1 Press MENU 2 Press V or v to select and press 3 Press V or v to select TRINITONE and press 4 Press V or v to select NTSC STD MEDIUM or HIGH and press VIDEO MODE MOVIE PICTURE HUE COLOR BRIGHTNESS SHARPNESS CC TRINITONE HIGH MENU Use Exit MENU 7 8 0 9 Selecting the video mode VIDEO Choose To STANDARD Receive a standard picture MOVIE Receive a finely detailed picture SPORTS Re...

Page 25: ...UDIO OUT VARIABLE SURROUND MODE Use Exit MENU 1 Press MENU 2 Press V or v to select and press 3 Select the item you want to adjust For example 1 To adjust bass press V or v to move the cursor z to BASS 7 8 0 9 Item TREBLE BASS BALANCE Press V or b to Increase the treble response Increase the bass response Emphasize the right speaker s volume Press v or B to Decrease the treble response Decrease th...

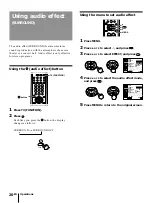
Page 26: ...ER ON Use Exit MENU AUDIO TREBLE BASS BALANCE MTS STEREO AUDIO OUT VARIABLE EFFECT SURROUND CC SUPER WOOFER MODE MENU SURROUND MODE SPEAKER ON Use Exit MENU 0 TV DBS 1 2 3 4 5 6 7 8 0 9 Using audio effect SURROUND The audio effect SURROUND feature simulates sound reproduction with the atmosphere of a movie theater or a concert hall Audio effect is only effective for stereo programs Using the audio...

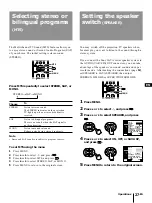
Page 27: ...AKER and press 4 Press V or v to select ON OFF or SAVA SP and press 5 Press MENU to return to the original screen 0 Setting the speaker switch SPEAKER Selecting stereo or bilingual programs MTS The Multichannel TV Sound MTS feature allows you to enjoy stereo sound or Second Audio Programs SAP of your choice The initial setting is stereo sound STEREO V v MENU To Listen to stereo sound The STEREO in...

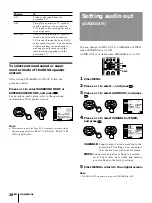
Page 28: ...io out AUDIO OUT You can change AUDIO OUT to VARIABLE or FIXED when SPEAKER is set to OFF AUDIO OUT is variable when SPEAKER is set to ON 1 Press MENU 2 Press V or v to select and press 3 Press V or v to select AUDIO OUT and press 4 Press V or v to select VARIABLE or FIXED and press VARIABLE Sound output varied according to the projection TV settings You can adjust the volume bass treble and balan...

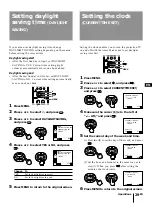
Page 29: ...se To YES Set for daylight saving start NO Set for daylight saving end 5 Press MENU to return to the original screen If your area uses daylight saving time change DAYLIGHT SAVING setting depending on the season before setting the current time Daylight saving start After the first Sunday in April set DAYLIGHT SAVING to YES Current time setting right column automatically moves one hour ahead Dayligh...

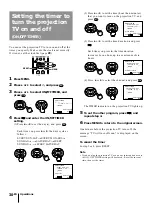
Page 30: ...ss Each time you press V or v the days cycle as follows EVERY SUN SATnEVERY MON FRIn SUNDAYn nSATURDAYnEVERY SUNDAYn nEVERY SATURDAY Setting the timer to turn the projection TV on and off ON OFF TIMER V v MENU 2 Press V or v to set the time hour then minutes that you want to turn on the projection TV and press 3 Press V or v to set the time duration and press Each time you press V the time duratio...

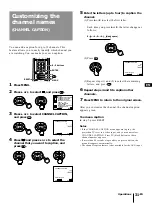
Page 31: ... 0 9 Customizing the channel names CHANNEL CAPTION RESET 0 9 buttons ENTER V v MENU 5 Enter the letters up to four to caption the channel 1 Press V or v to select the first letter Each time you press V or v the letter changes as follows 0 9 A Z _ blank space 2 Press 3 Repeat steps 1 and 2 to select the remaining letters and press 6 Repeat steps 4 and 5 to caption other channels 7 Press MENU to ret...

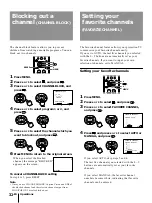
Page 32: ...nels FAVORITE CHANNEL The favorite channel feature allows your projection TV to memorize your favorite channels easily If you set to AUTO the last five channels you selected with the 0 9 buttons are automatically set as your favorite channels If you want to input your own selection of channels set to MANUAL Setting your favorite channels 1 Press MENU 2 Press V or v to select and press 3 Press V or...

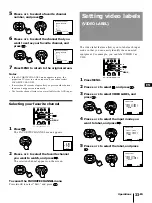
Page 33: ...AVORITE CHANNEL menu Press V or v to select Exit and press 7 8 0 9 V v MENU Setting video labels VIDEO LABEL The video label feature allows you to label each input mode so that you can easily identify the connected equipment For example you can label VIDEO 1 as VHS 1 Press MENU 2 Press V or v to select and press 3 Press V or v to select VIDEO LABEL and press 4 Press V or v to select the input mode...

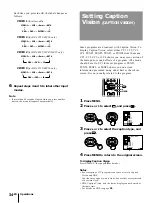
Page 34: ...sion Press DISPLAY See page 20 for details Notes Poor reception of TV programs can cause errors in Caption Vision and XDS Captions may appear with a white box or other errors instead of a certain word XDS Caption Vision and the status display cannot be used at the same time For details on XDS see page 20 VIDEO 1 for all models VIDEO 1 VHS 8 mm BETA DBS DVD S VIDEO LD VIDEO 2 for KP 41T35 46C36 onl...

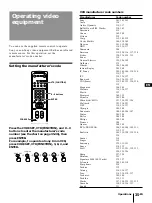
Page 35: ...Electric 329 304 309 Goldstar 332 Hitachi 306 304 305 Instant Replay 309 308 JC Penny 309 305 304 330 314 336 337 JVC 314 336 337 Kenwood 314 336 332 337 LXI Sears 332 305 333 334 330 335 Magnavox 308 309 Marantz 314 336 337 Marta 332 Memorex 309 335 Minolta 305 304 Mitsubishi MGA 323 324 325 326 Multitech 325 338 321 NEC 314 336 337 Olympic 309 308 Panasonic 308 309 306 307 Pentax 305 304 Philco ...

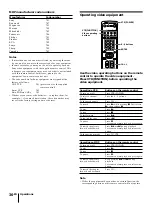
Page 36: ...ting an MDP To turn on or off To play To stop To pause To search the picture forward or backward To search the chapter forward and backward Note If the video equipment does not have a certain function the corresponding button on this remote control will not operate MDP manufacturer code numbers Manufacturer Code number Sony 701 Kenwood 707 Magnavox 703 Maranz 702 Mitsubishi 702 Panasonic 704 Phili...

Page 37: ...is remote control and you may not be able to operate your equipment with the supplied remote control In this case use the equipment s own remote control unit Whenever you remove the batteries to replace them for example if too much time is taken the code numbers may revert to the factory setting and must be reset Manufacturer Hamlin Regal Jerrold G I Oak Panasonic Pioneer Scientific Atlanta Tocom ...

Page 38: ...w and noise appear on the screen Check the CABLE setting in the SET UP menu page 17 Check the antenna cable connections page 6 Make sure the channel is broadcasting programs Press TV black button to change the input mode page 20 Dotted lines or stripes Adjust the antenna Move the projection TV away from noise sources such as cars neon signs and hair dryers Double images or ghosts Use a highly dire...

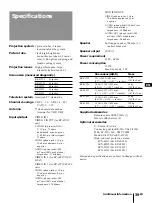
Page 39: ...acks 1 Vp p 75 ohms unbalanced sync negative AUDIO phono jacks 500 mVrms 100 modulation Impedance 47 kilohms Supplied accessories Remote control RM Y136A 1 Size AA R6 battery 2 Optional accessories U V mixer EAC 66 Connecting cables RK 74A VMC 810S 820S YC 15V 30V VMC 720M Stand SU 41T2 For KP 41T35 High contrast protective screen SCN 46X1 For KP 46C36 SCN 48X2 For KP 48S35 SCN 53X2 For KP 53S35 S...

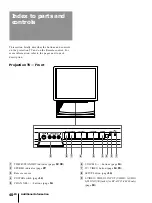
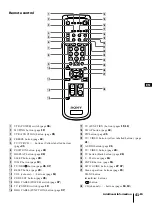
Page 40: ...trols on the projection TV and on the Remote control For more information refer to the pages next to each description Projection TV Front 1 TIMER STANDBY indicator pages 19 30 2 STEREO indicator page 27 3 Remote sensor 4 POWER switch page 14 5 CHANNEL buttons page 14 6 VOLUME buttons page 14 7 TV VIDEO button page 14 15 8 SETUP button page 14 9 S VIDEO VIDEO 2 INPUT VIDEO AUDIO L MONO R jacks for ...

Page 41: ...V DBS button page 26 37 RESET button page 23 VOL volume buttons page 19 CODE SET button page 35 DBS CABLE POWER switch page 37 TV POWER switch page 19 DBS CABLE FUNCTION button page 37 TV FUNCTION button pages 15 19 SWAP button page 22 ª PIP button page 21 º TV VIDEO button yellow labelled button page 21 AUDIO button page 21 TV VIDEO button page 20 TV button black button page 20 0 9 buttons page 1...

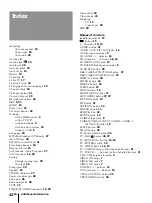
Page 42: ...ideo mode 24 Watching TV 19 video tapes 20 XDS 20 Names of controls V B v b buttons 15 button 15 0 9 buttons 16 19 AUDIO button 21 AUDIO VAR FIX OUT jacks 12 AUX antenna terminal 6 CHANNEL buttons 14 CH channel buttons 16 19 CONTROL S OUT jack 12 CONVERTER antenna terminal 6 CODE SET button 35 DBS CABLE FUNCTION button 37 DBS CABLE POWER switch 37 DISPLAY button 20 ENTER button 16 FREEZE button 22...

Page 43: ...43 EN Additional Information EN ...

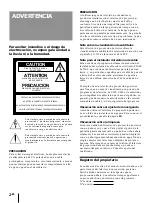
Page 44: ...tículo 820 40 de NEC que contiene las directrices para la puesta a tierra y en particular especifica que el cable de puesta a tierra debe estar conectado al sistema de puesta a tierra de un edificio más cercano al de la entrada de cable El empleo de este televisor de proyección posterior para fines que no sean la visualización en privado de programas de televisión de UHF VHF o transmitidos por com...

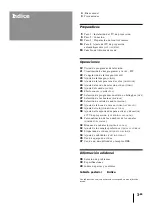
Page 45: ...ramas en estéreo o bilingües MTS 27 Selección de las bocinas BOCINAS 28 Selección de salida de audio SALIDA 29 Ajuste de la hora de verano HORA DE VERANO 29 Ajuste del reloj FIJAR HORA ACTUAL 30 Ajuste del temporizador para activar y desactivar el TV de proyección ENCENDIDO APAGADO 31 Personalización de los nombres de los canales NOMBRE DEL CANAL 32 Bloqueo de canales BLOQUEAR CANAL 32 Ajuste de l...

Page 46: ... a 120 V CA Una clavija del enchufe es más ancha que la otra por razones de seguridad y sólo podrá enchufarse en una posición Si no consigue insertar completamente el enchufe en la toma póngase en contacto con el proveedor Sony Si dentro de la unidad cae algún objeto o se vierte líquido desenchúfela de la red y haga que sea revisada por personal especializado antes de utilizarla nuevamente Cuando ...

Page 47: ... de proyección por las ruedas Preparativos para el TV de proyección Antes de utilizar el TV de proyección defina la convergencia Para este procedimiento consulte el Paso 4 Ajuste del TV de proyección automáticamente AUTO AJUSTES en la página 14 Preparativos Paso 1 Instalación del TV de proyección Para la mejor calidad de imagen instale el TV de proyección en las áreas indicadas a continuación Area...

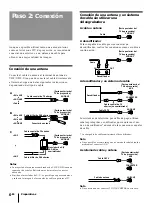
Page 48: ...ctor TO CONVERTER en este caso Los sistemas de televisión por cable de pago utilizan señales protegidas o codificadas que requieren el uso de un decodificador además de las conexiones usuales de cable La compañía de cable suministrará el decodificador Nota No es posible ver como imagen en ventana la señal obtenida mediante el conector AUX A sistema de cable y antena B Sólo VHF o Sólo UHF o VHF UHF...

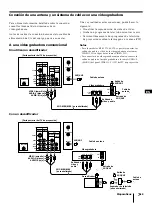
Page 49: ...s tomas VIDEO 2 IN Para conectar una videograbadora monofónica conecte la salida de audio de la videograbadora a la toma AUDIO L MONO del panel VIDEO 1 2 3 IN del TV de proyección VIDEO amarillo AUDIO L blanco AUDIO R rojo VHF UHF Parte posterior del TV de proyección Videograbadora VMC 810S 820S no suministrado Cable de antena Con un decodificador Parte posterior del TV de proyección Cable de ante...

Page 50: ...ojo A una videograbadora provista de conector S vídeo Si su videograbadora tiene un conector S VIDEO realice las siguientes conexiones Siempre que conecte el cable al conector S VIDEO el TV de proyección recibe automáticamente las señales de S vídeo Sin utilizar un decodificador RK 74A no suministrado S VIDEO AUDIO L blanco AUDIO R rojo Videograbadora Cable de antena Parte posterior del TV de proy...

Page 51: ...tipo F no suministrado VMC 810S 820S no suministrado Parte posterior del TV de proyección Entrada de antena por satélite Entrada de antena por satélite Salida de vídeo Salidas de audio Salidas de vídeo Salidas de audio Entradas de audio Entrada de vídeo Salida de vídeo Salidas de audio Nota Para los modelos KP 41T35 46C36 es posible conectar las salidas de audio y vídeo de la videograbadora a las ...

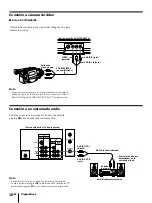
Page 52: ...ar una cámara de vídeo monofónica conecte la salida de audio de la cámara de vídeo al conector AUDIO L MONO del panel VIDEO 2 INPUT del TV de proyección Conexión a un sistema de audio Si desea conectar un equipo de audio consulte la página 28 para obtener más información RK 74A no suministrado Parte posterior del TV de proyección AUDIO OUT L blanco AUDIO OUT R rojo Ajuste la función del amplificad...

Page 53: ...IO R rojo AUDIO L blanco VIDEO amarillo Cuando conecte una sola videograbadora al TV de televisión no conecte las tomas MONITOR OUT de la parte posterior del televisor a la entrada de línea de la videograbadora si al mismo tiempo realiza la conexión de las tomas VIDEO IN del televisor a la salida de línea de la videograbadora como se muestra arriba a continuación Parte posterior del TV de proyecci...

Page 54: ...Cuando conecte el sistema de bocinas de la serie SAVA de Sony consulte la página 27 para más información Fabricado bajo licencia de Dolby Laboratories Licensing Corporation DOLBY el símbolo de la doble D a y PRO LOGIC son marcas de Dolby Laboratories Licensing Corporation RK G34 etc no suministrado 1 IN L 1 IN R Sistema de bocinas de la serie SAVA Frontal izquierdo Cable de audio suministrado con ...

Page 55: ...as viejas por otras nuevas Para prevenir la fuga del electrólito retire las pilas cuando no vaya a utilizar el control remoto durante un período largo de tiempo Maneje el control remoto cuidadosamente No lo pise no lo deje caer ni permita que se moje No lo coloque bajo la luz solar directa cerca de fuentes de calor o en lugares muy húmedos Teclas del control remoto Los nombres de las teclas del co...

Page 56: ...R SETUP TV VIDEO VOLUME CHANNEL POWER STEREO STAND BY TIMER Paso 4 Ajuste del TV de proyección automáticamente AUTO AJUSTES Es posible definir el TV de proyección con facilidad mediante la función AUTO AJUSTES Programa todos los canales que se reciban y cambia el idioma del menú en la pantalla Para definir el TV de proyección manualmente consulte Ajuste de la convergencia página 16 Activación y de...

Page 57: ...alquier tecla PREFERENCIAS BORRAR AÑADIR CANAL NOMBRE DEL CANAL BLOQUEAR CANAL CANAL FAVORITO CABLE SI AUTO PROGRAMACION CONVERGENCIA MENU ETIQUETA DE VIDEO LENGUAJE ESPAÑOL CC Usar Salir MENU 1 2 3 4 5 6 7 8 0 9 CONVERGENCIA AZUL CH CH VOL VOL ROJO TV VIDEO S SET UP AZUL a l i r CONVERGENCIA ROJO CH CH VOL VOL ROJO TV VIDEO S SET UP AZUL a l i r VOLUME CHANNEL CONVERGENCIA ROJO CH CH VOL VOL ROJO...

Page 58: ...ra volver a la pantalla original Notas Si borra o añade un canal de VHF o UHF el canal de televisión por cable con el mismo número también se borra o se añade y viceversa También es posible disponer de la función de borrado y adición de canales para la entrada AUX Ajuste de la convergencia CONVERGENCIA La imagen del tubo de proyección aparece en la pantalla en tres niveles rojo verde y azul Si no ...

Page 59: ...TV tecla negra para que aparezca un número de canal 4 Oprima V B v o b para mover el cursor z al símbolo que muestra la línea que desea definir y oprima RED Línea roja vertical y horizontal ajuste izquierda derecha arriba abajo BLUE Línea azul vertical y horizontal ajuste izquierda derecha arriba abajo 5 Oprima V B v o b para mover la línea hasta que converja con la línea verde central y oprima Pa...

Page 60: ... MENU Programación de canales Es posible programar canales de televisión con facilidad mediante la función AUTO PROGRAMACION No es necesario que siga este procedimiento si ejecuta AUTO AJUSTES página 14 Realice este procedimiento sólo si desea ajustarlo de forma manual 1 Oprima MENU 2 Oprima V o v para seleccionar y oprima 3 Oprima V o v para seleccionar AUTO PROGRAMACION y oprima AUTO PROGRAMACIO...

Page 61: ...uelve a oprimir JUMP pasará al canal que ha seleccionado anteriormente Nota No es posible pasar a los canales que ha explorado mediante las teclas CH Eliminación del sonido Oprima MUTING MUTING aparece en la pantalla Para restaurar el sonido vuelva a oprimir MUTING o oprima VOL Visión de programas de televisión Operaciones MUTING SLEEP DISPLAY TV VIDEO TV tecla negra ENTER JUMP 1 Oprima TV POWER p...

Page 62: ...idos tres segundos Algunos programas se transmiten a través del servicio ampliado de datos XDS que muestra el nombre de la red el nombre del programa el tipo de programa la duración del programa el distintivo de llamada y la duración del programa Cuando haya seleccionado XDS con la tecla DISPLAY esta información aparecerá en la pantalla si la emisora ofrece este servicio Algunos programas se trans...

Page 63: ...rabadora sin un decodificador la fuente de entrada de PIP es la videograbadora Si conecta la videograbadora con un decodificador la fuente de entrada de PIP es la videograbadora o el decodificador Recepción del sonido de la imagen en ventana Oprima AUDIO La indicación aparece durante unos segundos indicando que se recibe el sonido de la imagen en ventana Para restaurar el sonido de la imagen princ...

Page 64: ...como imagen en ventana los canales recibidos mediante la toma AUX Congelación de la imagen FREEZE La función FREEZE resulta útil si desea anotar información como recetas de un programa de cocina direcciones en pantalla o números de teléfono La imagen congelada cambia como se indica a continuación dependiendo de si se utiliza la función PIP o no Oprima FREEZE Si no se utiliza la función PIP FREEZE ...

Page 65: ...ima 3 Seleccione la opción que desee ajustar Por ejemplo 1 Para ajustar el brillo Oprima V o v para desplazar el cursor z hasta BRILLO 2 Oprima 7 8 0 9 Opción CONTRASTE TINTE COLOR BRILLO NITIDEZ Para restaurar los ajustes de fábrica Oprima RESET después de visualizar y seleccionar el menú VIDEO Todos los ajustes recuperan los niveles ajustados de fábrica Oprima B o v para Reducir el contraste de ...

Page 66: ...VIDEO MODO PELICULAS CONTRASTE TINTE COLOR BRILLO NITIDEZ TRINITONE ALTO MENU CC Usar Salir MENU La función TRINITONE controla la temperatura de color permitiendo un ajuste de preferencia del equilibrio del blanco sin afectar a los tonos de imagen de la piel 1 Oprima MENU 2 Oprima V o v para seleccionar y oprima 3 Oprima V o v para seleccionar TRINITONE y oprima 4 Oprima V o v para seleccionar NTS...

Page 67: ... la pantalla original Descripción de opciones ajustables 0 V v MENU RESET Opción AGUDOS GRAVES BALANCE Para restaurar los ajustes de fábrica Oprima RESET después de visualizar y seleccionar el menú AUDIO Todos los ajustes recuperan los niveles ajustados de fábrica Nota Si la opción BOCINAS página 27 se encuentra en la posición NO y SALIDA página 28 se encuentra en la condición FIJA no es posible a...

Page 68: ...INAS SI Usar Salir MENU AUDIO AGUDOS GRAVES BALANCE MTS ESTEREO SALIDA VARIABLE EFECTO AMBIENTAL CC MODO SUPER WOOFER MENU MODO DE SURROUND BOCINAS SI Usar Salir MENU 0 TV DBS 1 2 3 4 5 6 7 8 0 9 V v MENU Efecto sonoro AMBIENTAL La función de efecto sonoro AMBIENTAL simula la reproducción de sonido con el ambiente de un cine o una sala de conciertos El efecto sonoro sólo funciona con programas est...

Page 69: ... CC MODO SUPER WOOFER MENU MODO DE SURROUND BOCINAS SI NO SAVA SP Usar Salir MENU 7 8 0 9 7 8 0 9 Selección de las bocinas BOCINAS V v MENU Selección de programas en estéreo o bilingües MTS La función MTS Multichannel TV Sound permite disfrutar de sonido estéreo o escuchar programas SAP Second Audio Programs según prefiera El ajuste inicial es sonido estéreo ESTEREO Oprima MTS varias veces para se...

Page 70: ...desde el TV de proyección NO Desactivar el sonido de las bocinas del TV de proyección y escuchar el sonido de éste sólo mediante las bocinas del sistema de audio SAVA SP Desactivar el sonido de las bocinas del TV de proyección para que escuche el sonido de éste mediante el sistema de bocinas serie SAVA de Sony Puede definir el volumen cancelación de sonido modo de sonido periférico o de potenciaci...

Page 71: ...ELOJ AM FIJAR HORA ACTUAL ENCENDIDO APAGADO HORA DE VERANO NO MENU CC Usar Salir MENU RELOJ AM FIJAR HORA ACTUAL ENCENDIDO APAGADO HORA DE VERANO SI MENU CC Usar Salir MENU 0 Ajuste del reloj FIJAR HORA ACTUAL V v MENU Ajuste de la hora de verano HORA DE VERANO Seleccione Para SI Ajustar el reloj a la hora de verano NO Cancelar el ajuste de la hora de verano 5 Oprima MENU para volver a la pantalla...

Page 72: ...a continuación CADA DOM SABnCADA LUN VIEn DOMINGOn nSABADOnCADA DOMINGOn nCADA SABADO AM h CH DOM 12 00 AM ENCENDIDO APAGADO MENU Usar Salir MENU 7 8 0 9 2 Oprima V o v para definir la hora hora y a continuación minutos de activación del televisor y oprima 3 Oprima V o v para definir el espacio de tiempo y oprima Cada vez que oprima V el espacio de tiempo aumentará en una hora hasta un máximo de s...

Page 73: ...rren más de 90 segundos después de oprimir una tecla el menú desaparecerá automáticamente La función de nombre del canal no se encuentra disponible para la entrada AUX 125 ESP NOMBRE DEL CANAL Seleccione la letra MENU Usar Salir MENU 125 NOMBRE DEL CANAL Seleccione la letra MENU Usar Salir MENU NOMBRE DEL CANAL MENU Usar Salir MENU n n 1 2 3 4 5 6 7 8 0 9 Personalización de los nombres de los cana...

Page 74: ...O 1 MENU 2 3 4 5 Usar Salir MENU Esta función permite que el TV de proyección memorice fácilmente sus canales preferidos Si realiza el ajuste en AUTO los últimos cinco canales seleccionados con las teclas de 0 9 quedarán memorizados como sus canales preferidos Si desea introducir su propia selección de canales realice el ajuste en MANUAL Programación de los canales preferidos 1 Oprima MENU 2 Oprim...

Page 75: ... o v para seleccionar el canal preferido que desee ver y oprima El canal seleccionado aparecerá en la pantalla Para cancelar el menú CANAL FAVORITO Oprima V o v para seleccionar Salir y a continuación oprima 125 ESPN Salir 14 ABC 48 CBS 16 HBO 5 CBC CANAL FAVORITO MODO MANUAL 1 MENU 2 3 4 5 Seleccione posición 5 Usar Salir MENU 5 Oprima V o v para seleccionar un número de canal preferido y oprima ...

Page 76: ... 0 Cada vez que se oprime V o v la etiqueta cambia de la siguiente forma 6 Repita los pasos 4 y 5 para asignar etiquetas a otros modos de entrada Nota Si transcurren más de 90 segundos antes de oprimir otra tecla el menú desaparecerá automáticamente VIDEO 1 para todos los modelos VIDEO 1 VHS 8 mm BETA DBS DVD S VIDEO LD VIDEO 2 sólo para KP 41T35 46C36 VIDEO 2 VHS 8 mm BETA DBS DVD S VIDEO LD VIDE...

Page 77: ...37 Dimensia 304 Emerson 319 320 316 317 318 Fisher 330 334 335 333 Funai 338 General Electric 329 304 309 Goldstar 332 Hitachi 306 304 305 Instant Replay 309 308 JC Penny 309 305 304 330 314 336 337 JVC 314 336 337 Kenwood 314 336 332 337 LXI Sears 332 305 333 334 330 335 Magnavox 308 309 Marantz 314 336 337 Marta 332 Memorex 309 335 Minolta 305 304 Mitsubishi MGA 323 324 325 326 Multitech 325 338...

Page 78: ...ara detener Para hacer pausa Para buscar la imagen adelante y atrás Para buscar la el capítulo adelante o atrás Teclas del control remoto Oprima VTR POWER Oprima Oprima p Oprima P Para vovler a la reproducción normal vuelva a oprimirlo Siga oprimiendo o 0 durante la reproducción Para volver a la reproducción normal suelte la tecla Oprima CH Notas Si aparece más de un código introdúzcalos uno por u...

Page 79: ... pueden utilizarse con un receptor DBS 1 Apague el equipo que desee instalar y oprima DBS CABLE FUNCTION 2 Oprima las teclas CODE SET DBS CABLE FUNCTION y 0 9 para introducir el código del fabricante consulte la tabla en la columma derecha y a continuación ENTER Por ejemplo si desea programar el control remoto para emplear un receptor DBS Sony oprima CODE SET DBS CABLE FUNCTION 8 0 1 y ENTER Fabri...

Page 80: ... nieve y ruido en la pantalla Compruebe el ajuste CABLE del menú AJUSTES página 17 Compruebe las conexiones de antena y de cable página 6 Asegúrese de que el canal está emitiendo programas Oprima TV tecla negra para cambiar el modo de entrada página 20 Estrías o líneas con puntos Ajuste la antena Aleje el TV de proyección de fuentes ruidosas como automóviles letreros de neón y secadores de pelo Im...

Page 81: ...mas phono 1 Vp p 75 ohmios no equilibrado sincronismo negativo AUDIO tomas phono 500 mVrms 100 de modulación Impedancia 47 kilohmios MONITOR OUT VIDEO toma phono 1 Vp p 75 ohmios no equilibrado sincronismo negativo AUDIO tomas phono 500 mVrms 100 de modulación Impedancia 10 kilohmios AUDIO OUT tomas phono 900 mVrms 100 de modulación Impedancia 5 kilohmios Bocina Bocina de gama completa de 100 mm 3...

Page 82: ...e proyección y el control remoto Para más información consulte las páginas junto a cada descripción Parte delantera del TV de proyección 1 Indicador TIMER STANDBY páginas 19 30 2 Indicador STEREO página 27 3 Sensor remoto 4 Interruptor POWER página 14 5 Teclas CHANNEL página 14 6 Teclas VOLUME página 14 7 Tecla TV VIDEO páginas 14 15 8 Tecla SETUP página 14 9 Conector S VIDEO y tomas VIDEO 2 INPUT...

Page 83: ...página 26 27 Tecla RESET página 23 Teclas VOL volumen página 19 Tecla CODE SET página 35 Interruptor DBS CABLE POWER página 37 Interruptor TV POWER página 19 Tecla DBS CABLE FUNCTION página 37 Tecla TV FUNCTION páginas 15 19 Tecla SWAP página 22 ª Tecla PIP página 21 º Tecla TV VIDEO tecla con etiqueta amarilla página 21 Tecla AUDIO página 21 Tecla TV VIDEO página 20 Tecla TV tecla negra página 20...

Page 84: ...tulos 34 Surround 26 Texto 34 Visualización de cintas de vídeo 20 de televisión 19 XDS 20 Nombre de los controles Conector S VIDEO 8 Conector S VIDEO y tomas VIDEO 2 INPUT VIDEO AUDIO L MONO R 10 Interruptor DBS CABLE POWER 37 Interruptor POWER 14 Interruptor TV POWER 19 Interruptor VTR POWER 36 Tecla 15 Tecla AUDIO 21 Tecla CODE SET 35 Tecla DBS CABLE FUNCTION 37 Tecla DISPLAY 20 Tecla ENTER 16 T...

Reviews: