background image

31

Ex
plori

ng Fu

n Fe

ature

s

Photo

The 

Photo

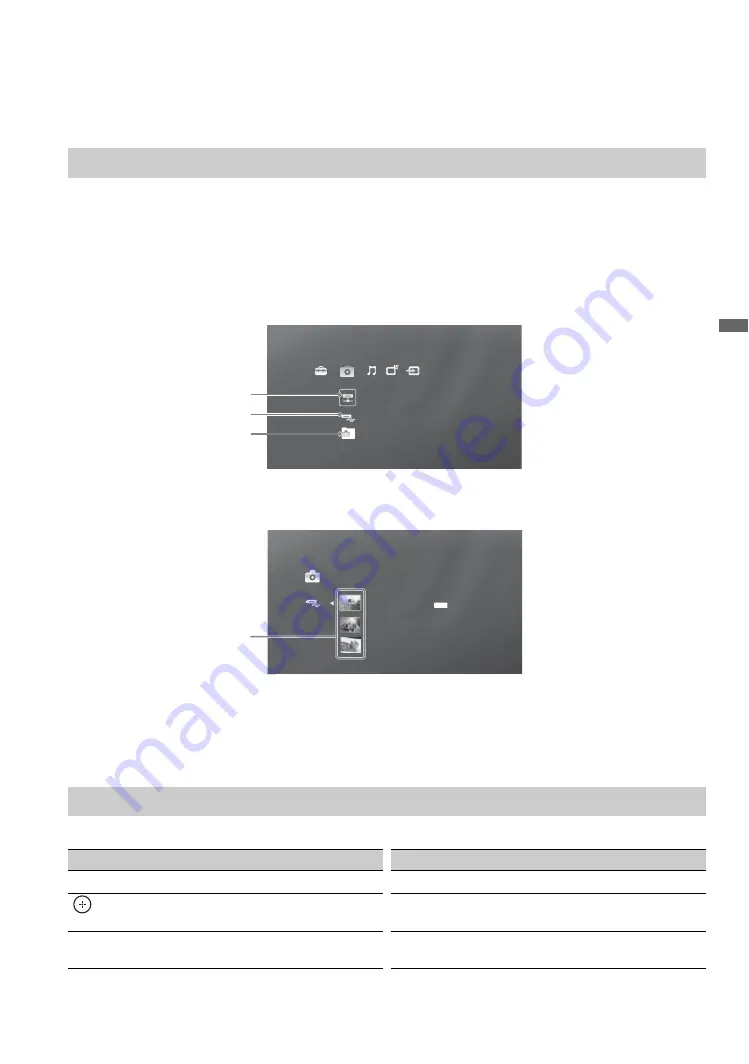
 feature allows easy access to JPEG files from Sony USB connected equipment and DLNA 

Certified media servers.

Under the 

Photo

 icon found on the 

XMB

, select the DLNA Certified media server, 

USB

, or 

Samples


icon to locate your photo files. 

1

Press 

HOME

.

2

Highlight and select the 

Photo

 icon.

3

Press 

V

/

v

 to highlight and select the photo file location. 

A sample DLNA Certified media server icon is shown below (actual icon may differ).

4

After locating your photo files, the 

List View

 will appear and display photo folders and files. Press 

V

/

v

 to highlight a file or folder and select (shown below with USB selected).

~

• To view available DLNA Certified media servers, your TV must be connected and configured to an active network 

(see page 52).

• The TV can display a maximum photo file size of 8 megabytes from DLNA Certified media servers. 
• The photo display resolution range is 16 x 16 to 4,096 x 4,096 pixels. 

Use the remote control buttons described below to navigate through the feature.

Accessing Photos

US0013A92B6949: server: 

Photo 

DLNA Certified

media server

USB

Samples

Photo 

D

S

C02991 

Fri   5/25/2007   12:06 PM    

JPG 

D

S

C00140.JPG 

D

S

C00141.JPG 

List View

Navigating through Photo

Button

To do...

Button

To do…

OPTIONS

To access Photo Options menu

PLAY

To play a slideshow

To play and pause a slideshow or 
select a folder

PAUSE

To pause a slideshow

RETURN

To stop slideshow and return to 

List 

View/Thumbnail View

STOP

To stop slideshow and return to

 List 

View/Thumbnail View

Summary of Contents for KDL-40Z4100 - Bravia Z Series Lcd Television

Page 1: ... 2008 Sony Corporation LCD Digital Color TV 3 297 695 12 1 KDL 40Z4100 KDL 46Z4100 Operating Instructions ...

Page 2: ...ther related marks are registered marks of Gemstar TV Guide International Inc and or one of its affiliates In Canada TV Guide is a registered mark of Transcontinental Inc and is used under license by Gemstar TV Guide International Inc The TV Guide On Screen system is manufactured under license from Gemstar TV Guide International Inc and or one of its affiliates The TV Guide On Screen system is pro...

Page 3: ...er s Code List 27 Sony Equipment Codes 27 Other Manufacturer Equipment Codes 27 Using Other Equipment with Your Remote Control 28 Exploring Fun Features Favorites 29 Displaying Favorites 29 Navigating Favorites 29 Adding to Favorites 29 Removing from Favorites 29 Background TV 30 Navigating Background TV 30 DLNA Certified Photo Media Player 30 Enjoying Photos and Music through USB Port 30 Using US...

Page 4: ...r satellite provider for information on upgrading to HD programming To learn more about HDTV visit U S A http www sony com HDTV Canada http www sonystyle ca hd Picture Quality and Aspect Ratio You can enjoy crisp clear images smooth movement and high impact visuals from 1080 HD signals When you compare a high definition signal to a standard analog signal you will notice a big difference High defin...

Page 5: ...ee page 31 Music listen to music files via USB or add music to a slideshow see page 33 TV Channels TV Guide On Screen and available channels are displayed on the vertical Category Object Bar External Inputs cable satellite VCR DVD players or other optional equipment can also be selected from the vertical Category Object Bar from the External Inputs This manual is for the 40 and 46 inch BRAVIA KDL ...

Page 6: ...ur palm directly underneath the panel but do not put stress on the LCD panel Do not lift the TV from the bottom center Follow the assembling steps required to place on a TV stand 1 Remove the Table Top Stand and screws from the carton The screws can be found in the accessory bag 2 Place the Table Top Stand on a level and stable surface 3 Gently slide the TV unit onto the neck of the Table Top Stan...

Page 7: ...pending on the Wall Mount Bracket model Use of screws other than those supplied may result in internal damage to the TV set or cause it to fall etc Be sure to store the unused screws and Table Top Stand in a safe place until you are ready to attach the Table Top Stand Keep the screws away from small children Make sure that your TV has adequate air circulation Allow enough space around the TV as sh...

Page 8: ... and walls are not of a reflective material When moving the TV from a cold area to a warm area a sudden room temperature change may cause the TV s picture to blur or show poor color due to moisture condensation Should this occur please wait a few hours to allow the moisture to evaporate before powering on the TV You can bundle the connecting cables as illustrated below Bundling the Connecting Cabl...

Page 9: ...e to the wall stud attach the other side to the TV stand Secure the TV to the Stand Use the optional hardware listed below not supplied M6 12 18 mm anchor bolt screwed into the TV s Table Top Stand A screw or similar attach it to the TV stand Rope or chain strong enough to support the weight of the TV Make sure that there is no excess slack in the rope or chain An alternative way to secure the TV ...

Page 10: ...nd 1080p video formats 1080 24p is available only with HDMI connection VIDEO L MONO AUDIO R VIDEO IN IN 2 2 CABLE ANTENNA DMPORT DMe x SERVICE LAN 10 100 4 1 3 1 3 2 IN VIDEO IN VIDEO L MONO AUDIO R S VIDEO COMPONENT IN L R PB RGB DIGITAL AUDIO OUT OPTICAL PC IN AUDIO OUT VAR FIX 1080p 1080i 720p 480p 480i 1 AUDIO L R AUDIO AUDIO AUDIO R L PR Y AC IN Rear of TV 1 2 8 9 4 3 5 6 7 4 Side Panel 0 qa ...

Page 11: ...I supports enhanced or high definition video plus digital audio If the equipment has a DVI jack and not an HDMI jack connect the DVI jack to the HDMI IN 4 with DVI to HDMI cable or adapter jack and connect the audio jack to the AUDIO IN L R jacks of HDMI IN 4 Be sure to use only an HDMI cable that bears the HDMI logo When connecting a DVI equipped PC to an HDMI jack also connect an Audio cable bet...

Page 12: ...t the Signal Type setting to Cable or Antenna in the Channel settings for the type of input signal you choose see page 47 You can enjoy high definition programming by subscribing to a high definition cable service or a high definition satellite service For the best possible picture make sure you connect this equipment to your TV via the HDMI or component video with audio input on the back of your ...

Page 13: ...480i 1 AUDIO L R AUDIO AUDIO AUDIO R L Y DIGITAL AUDIO OUT OPTICAL PB PR AUDIO L white AUDIO R red Audio cable DVI to HDMI cable HD cable box HD satellite box CATV Satellite antenna cable Rear of TV 4 1 3 1 3 2 IN VIDEO IN VIDEO L MONO AUDIO R S VIDEO COMPONENT IN L R RGB PC IN AUDIO OUT VAR FIX 1080p 1080i 720p 480p 480i 1 AUDIO L R AUDIO AUDIO AUDIO R L Y DIGITAL AUDIO OUT OPTICAL PB PR Componen...

Page 14: ...0 Hz vertical frequency In plug and play signals with a 60 Hz vertical frequency will be detected automatically PC reboot may be necessary The 1080p timing when applied to the HDMI input will be treated as a video timing and not PC timing This affects Picture settings Wide Mode settings and PIP function To view PC content set Picture Mode to Custom Wide Mode to Full and Display Area to Full Pixel ...

Page 15: ...80p 480i 1 AUDIO L R AUDIO AUDIO AUDIO R L Y CABLE ANTENNA DMPORT DIGITAL AUDIO OUT OPTICAL DMe x SERVICE LAN 10 100 PR PB DVD player Personal computer Digital satellite receiver CABLE ANTENNA Digital audio equipment A V Receiver Home Theater Analog audio equipment A V Receiver Home Theater Digital recorder VCR Camcorder Blu ray Disc player PS3 Game system Digital cable box Rear of TV Audio system...

Page 16: ... only available for digital programs see page 45 4 Set the date and time Begin your TV Guide On Screen Setup When the Initial Setup is completed the TV will display this screen and prompt you to set up the electronic program guide Follow the on screen instructions using your remote control Next you will see a confirmation screen with instructions on how to acquire the TV Guide On Screen service Th...

Page 17: ...dd Digital Channels feature as described on page 47 Useful for antenna installations If you accidentally turn off the TV during the Initial Setup process the Initial Setup will restart from the beginning when the TV is turned back on Auto Program may be canceled while the channels are being scanned Press RETURN first then press either B b on the remote control Select Yes to cancel or No to resume ...

Page 18: ......

Page 19: ...int your remote control directly at the IR sensor located on your TV Make sure that no objects are blocking the path between the remote control and the IR sensor on your TV Fluorescent lamps can interfere with your remote control try turning off the fluorescent lamps If you are having problems with the remote control reinsert or replace your batteries and make sure that they are correctly inserted...

Page 20: ...eriod of time when playing back a recorded program NEXT Press to advance forward to the next chapter mark if any or to live TV when playing back a recorded program m fast reverse Press to play a program in fast rewind mode N PLAY Press to play a program at a normal speed M fast forward Press to play a program in fast forward mode X PAUSE Press to pause playback x STOP Press to stop playback SYNC M...

Page 21: ...gital channels For example to enter 2 1 press and ENT qd MUTING Press to mute the sound Press again or press VOL to restore the sound qf VOL Press to adjust the volume qg DVR VCR Record Buttons z REC Press to record Pressing this button alone starts the recording process X REC PAUSE Press to pause recording x REC STOP Press to stop recording qh BD DVD TOP MENU Press to display the top menu of the ...

Page 22: ...th 720p 1080i 1080p and 1080 24p sources Changing the Wide Screen Mode for PC Timing Button Description DISPLAY VOL CH MUTING REC RECPAUSE RECSTOP F2 F1 MENU TOPMENU BD DVD JUMP DVD AMP STB TV PREV REPLAY ADVANCE NEXT THEATER SOUND PICTURE WIDE CC FREEZE LIGHT POWER TV POWER SYNC MENU PAUSE PLAY FUNCTION STOP wa ql w 4 3 Original source Standard definition source 16 9 Original source High definiti...

Page 23: ...51 on setting up the External Inputs labels wh V v B b Press V v B b to move focus highlight Press to select confirm an item wj OPTIONS Press to display a list of convenient functions and menu shortcuts The OPTIONS menu items vary based on current input and content The Digital Rating and Alternate Audio options will appear in Options only when digital ratings or alternate audio streams are availab...

Page 24: ...nnels press and hold down either e F1 F2 Press to select the function of connected components For details see Using Other Equipment with Your Remote Control on page 28 Button Description DISPLAY VOL CH MUTING REC RECPAUSE RECSTOP F2 F1 MENU TOPMENU BD DVD JUMP DVD AMP STB TV PREV REPLAY ADVANCE NEXT THEATER SOUND PICTURE WIDE CC FREEZE LIGHT POWER TV POWER SYNC MENU PAUSE PLAY FUNCTION STOP wk wl ...

Page 25: ...ll remain lit even if the TV is turned off For details see page 41 Timer and page 53 Picture Off 4 STANDBY LED Lights up in red when your TV is in PC standby mode If the LED blinks in red continuously this may indicate that the TV needs servicing see contacting Sony information on the back cover 5 POWER LED Lights up in green when the TV is turned on 6 IR Infrared Receiver Receives IR signals from...

Page 26: ...the next code listed In some cases you may not be able to program your remote control If this is the case use your equipment s own remote control The backlight can be set to light up when a button is pressed To set backlight Press LIGHT and MUTING simultaneously until the four FUNCTION buttons blink red To turn off backlight Press LIGHT and MUTING until the TV button blinks red The remote control ...

Page 27: ...ic 30695 31419 Panasonic 31762 Toshiba 30503 31854 Zenith 30741 30869 Manufacturer Code Daewoo 20037 20045 20046 20278 21137 JVC 20041 20067 21162 Panasonic 20000 20035 20162 20225 20226 20614 20616 21062 21162 21262 Philips 20000 20035 20045 20048 20081 20162 20209 20616 20618 20739 21081 21181 Sylvania 20000 20035 20043 20081 20593 21593 Manufacturer Code Audiovox 30790 51390 Bose 50674 51229 51...

Page 28: ...T Input Select RETURN Exit HOME Setup Menu OPTIONS Options N A List List List TOP MENU Top Menu List Top Menu List List Top Menu MENU Menu Menu Menu Menu Menu F1 For selecting between DVD VCR in combo units HDD DVD HDD DVD VCR VCR VCR DVD N A N A F2 DVD DVD N A N A Equipment Control POWER Turn on off Previous Skip backward Replay Band Advance Skip Surround Next Skip forward m Rewind N Play M Fast ...

Page 29: ...em highlight its icon and press To clear your recently viewed channels and inputs list highlight the list in Favorites and press OPTIONS then select Clear Recently Viewed Recently viewed items are also cleared when the TV is powered off 1 From the XMBTM select a Photo Music TV or External Inputs icon Locate the item you wish to add and press OPTIONS 2 Press V v to highlight Add to Favorites and pr...

Page 30: ...d DLNA Certified equipment depends on the media formats supported by the DLNA Certified equipment Enjoying Photos and Music through USB Port The TV offers easy access to JPEG photos and MP3 music files stored on Sony digital cameras not supplied connected via USB interface and Sony MICRO VAULT USB Flash Drives not supplied The USB port is located on the side TV panel With the TV powered off gently...

Page 31: ... To view available DLNA Certified media servers your TV must be connected and configured to an active network see page 52 The TV can display a maximum photo file size of 8 megabytes from DLNA Certified media servers The photo display resolution range is 16 x 16 to 4 096 x 4 096 pixels Use the remote control buttons described below to navigate through the feature Accessing Photos US0013A92B6949 ser...

Page 32: ...play speed Display Size Select to view photos in Standard or Expanded size File Order Sets the order in which files will be listed Select from Original Alphabetical Alphabetical Reverse Date Order or Date Order Reverse Thumbnail View Select to fill the display screen with thumbnails View Select to view the photo file highlighted Start Slideshow Select to start the slideshow File Actions Select to ...

Page 33: ...ocation A sample USB icon is selected below 4 Music files and folders will be displayed in a List View Highlight and select your selection Photo Options menu Picture Adjustments Select to make adjustments to photos see page 42 Picture Adjustments Sound Adjustments Select to make sound adjustments see page 44 Sound Adjustments Speakers Select to set sound to TV Speakers or Audio System For Display ...

Page 34: ...ethod Sets the play order and visual effect settings while playing music files Repeat Select On to continuously play tracks Shuffle Select On to shuffle the track play order Track Selection Select Single Track or All Tracks to play during a slideshow Visualizer Effect Select Album Art Bloom or Burst visual effects during a track play shown below is Burst effect File Order Sets the order in which f...

Page 35: ...his View TV Guide Press GUIDE to display the TV Guide Press GUIDE again to exit or press HOME to exit to XMB The TV Guide will time out in approximately 5 minutes when no action is taken Find a program to watch Use V v B b to highlight a program The CH buttons can be used to page up down through the listings The program information will appear in the Info Box Press to tune to the highlighted progr...

Page 36: ...gress and diagnostics information Change channel display Highlight SETUP on the Service Bar then press v to highlight the Change channel display then press Highlight a channel then press OPTIONS to display the Grid Options Make the changes using V v and or 0 9 buttons When the changes are made select done and press The Grid Options can also be used to re sort the channel display numerically Displa...

Page 37: ... BRAVIA Sync is connected the following additional operations are possible Turning on the A V receiver when the TV is turned on Automatically switching to the audio output of the A V receiver s attached speakers Adjusting the volume and muting of the A V receiver with the TV s remote control The A V receiver cannot be selected from the XMB Using DIGITAL MEDIA PORT Adapter Connecting a DIGITAL MEDI...

Page 38: ... Chart see page 14 Press B b to highlight the window to change for P P Press B b to move the Sub Window for PIP In the main window press INPUT to select an input to watch In the sub window change the channel by pressing CH entering the channel number using the 0 9 numeric buttons or pressing JUMP to switch to the previously viewed channel 1 Press OPTIONS 2 Press V v to highlight Exit P P or Exit P...

Page 39: ... customize slideshows see page 31 Listening to Music Listen to music or add a music track to a slideshow see page 33 Watching TV Navigate through the channel list or select the TV Guide On Screen icon located at the top of the channel list to select a channel see page 35 You can also select a TV channel using the 0 9 or CH buttons see remote control section on pages 21 and 24 Accessing External In...

Page 40: ...ide On Screen and available channels are listed under the TV icon Select inputs from CTRL HDMI Control for HDMI Video 1 3 Component 1 2 HDMI 1 4 DMPORT PC under the External Inputs icon Available TV settings and features are listed under the Settings icon Photo file access Music file access CC Product Support page 41 Clock Timers page 41 Picture page 42 Sound page 44 Screen page 45 Channel page 47...

Page 41: ...gital TV programming not available with the use of a cable box The broadcast download is performed while the TV is off The software update is performed while the TV is powered on Do not turn off the TV during the software update it may damage the TV software Clock Timers Settings Current Time Set the current day and time date hour minutes and AM PM The Timer feature will not be available until you...

Page 42: ... the text shown on the screen Picture Mode for all inputs can also be accessed by pressing PICTURE on the remote control to directly toggle the modes The options for Picture Mode may vary depending on the Video Photo Optimizer setting see page 44 and PC input Reset Resets the current settings to the default values Backlight Brightens or darkens the backlight Picture Increases or decreases picture ...

Page 43: ...Picture settings available during PC input are Picture Mode Reset Backlight Picture Brightness and Color Temperature Motion Enhancer Activates Motionflow to enhance the smoothness of picture movement and to reduce blur High Provides smoother picture movement for film based content Standard Provides smooth picture movement Use this setting for standard use Off Use this setting when the High and Sta...

Page 44: ...n dialog Reset Resets the current settings to the default values Treble Increases or decreases higher pitched sounds Bass Increases or decreases lower pitched sounds Balance Emphasizes left or right speaker balance Surround S FORCE Front Surround Provides a virtual surround sound experience made possible using just two front speakers Off Select for normal stereo or mono reception Voice Zoom Adjust...

Page 45: ...t you have selected in the Language setting your TV will automatically switch to the matching language with the Alternate Audio feature The Alternate Audio option may be accessed by pressing OPTIONS on the remote control when an alternate audio stream is available from the broadcaster Screen Settings Wide Mode Wide Zoom Fills the screen with minimum distortion Normal Displays the 4 3 picture in it...

Page 46: ...pressing V v Press B b to adjust the Horizontal positioning Screen Position feature is useful if the TV is connected to game equipment Vertical position is available only when Wide Mode is set to Zoom For high definition signals Vertical and Horizontal positions are not available Vertical Size Adjusts the vertical size of a standard definition picture Vertical Size is available only when Wide Mode...

Page 47: ...l channels Be sure to have the Signal Type option selected appropriately for the signal source Useful for antenna installations Show Hide Channels Allows you to show or hide channels when you surf with the CH button or in the TV channel list on the XMB 1 Press V v to scroll through the channels until you highlight the channel to show or hide 2 Press to select Shown or Hidden To show or hide more c...

Page 48: ...analog EIA 608 and digital EIA 708 closed caption options Select from Service 1 6 and CC1 4 advanced digital closed caption options Display Options Customize the Closed Captions CC displays with Text Character Size Character Style Character Color Character Opacity Edge Type Edge Color Background Color and Background Opacity Closed Captions CC can be turned On Off or On with Muting directly by pres...

Page 49: ... U S A where advanced ratings exist Off Turn Digital Rating off No programs containing digital ratings are blocked from viewing Custom Select to customize the Parental Lock with downloadable digital ratings Clear All Select to clear the downloaded ratings Unrated Available only when Country is set to U S A Allow Allows programs and movies that are broadcasted without a rating Block Blocks all prog...

Page 50: ... audience TV PG Parental guidance suggested TV 14 Parents strongly cautioned TV MA Mature audience only Content Based Ratings FV Fantasy violence D Suggestive dialogue L Strong language S Sexual situations V Violence To ensure maximum blocking capability set the Age Based Ratings English Rating C All children C8 Children 8 years and older G General programming PG Parental guidance 14 Viewers 14 an...

Page 51: ...g an external input Enabled Select to allow the TV to exit from the external input and return to a TV channel when pressing the tuning keys Disabled Select to disable the tuning keys during external input mode and prevent unintentionally exiting the external input Useful for applications that do not have a connection to the CABLE ANTENNA input HDMI Settings Control for HDMI On Off feature allows y...

Page 52: ...onnected server Delete Select to delete the highlighted server The items above can only be accessed by pressing OPTIONS while in the Show Hide Servers menu Server Diagnostics Select to view the server diagnostic information General Setup Settings Language Select the language of your choice from English Español and Français to be used for displaying all the on screen settings Info Banner Displays t...

Page 53: ...isable it Light Sensor Enables the automatic picture screen brightness control The Light Sensor measures the room brightness which allows the TV to automatically adjust the backlight brightness based on the picture settings and the ambient room light conditions Be sure not to put anything around the sensor as its function may be affected see page 19 In low light the range of the backlight control ...

Page 54: ......

Page 55: ...eo equipment and the TV Press INPUT on the remote control see page 23 Press HOME on the remote control Select your desired input from the External Inputs list Poor picture Picture quality not as good as viewed at the store Picture quality depends on the signal content See Quick Setup Guide supplied to display the best possible picture for that signal Broadcast HD formats have poor quality Content ...

Page 56: ...ohm coaxial cable Keep the antenna cable away from other connecting cords To avoid TV interference make sure to use an undamaged antenna cable No Audio or Low Audio with Home Theater System Press THEATER for BRAVIA Sync activated Theater System see page 20 Set Speakers to Audio System in the Sound settings see page 45 Set Audio Out to Fixed in the Sound settings see page 45 BRAVIA Sync Cannot find...

Page 57: ...n to display less detail than usual or cause artifacts small blocks or dots pixelations to appear on your screen These signal compressions are more visible and are dependent on the clarity and resolution of the TV Remote control does not operate To determine if the problem is with the remote control or not press a button on the TV Check the polarity of the batteries or replace the batteries Point ...

Page 58: ...ptical signal PC IN D sub 15 pin analog RGB 0 7 Vp p 75 ohms positive See the PC Input Signal Reference Chart on page 14 PC AUDIO INPUT Stereo mini jack 500 mVrms Typical Impedance 47 kilohms LAN 10 100 10 BASE T 100 BASE TX Connector connection speed may vary depending on the network environment This product does not guarantee network quality or speed of 10 BASE T 100 BASE TX terminals DMPORT VID...

Page 59: ...53 Hue 42 I Info Banner 52 Information 32 34 Infrared Receiver IR 25 INPUT button 23 Installing the TV on a wall 7 J JUMP button 24 L Language 52 LIGHT button 20 Light Sensor Described 25 Setting 53 Logo Illumination 53 M Manage Inputs 51 Motion Enhancer 43 Movie Rating 50 MPEG Noise Reduction 42 MTS 45 Music 33 MUTING button 21 N Network Setup 52 Noise Reduction 42 O Omit from Slideshow 34 OPTION...

Page 60: ...to Power On 51 TV Guide On Screen 35 TV POWER button 22 TV Rating 50 U U S A Rating 50 Unrated 49 USB Auto Start 52 V V Center 46 Vertical Size 46 VIDEO IN jack 11 Video Photo Optimizer 44 View 32 Voice Zoom 44 VOL button 21 Volume Offset 44 W WIDE button 22 Wide Mode 45 46 ...

Page 61: ......

Page 62: ......

Page 63: ......

Page 64: ...de z Experience difficulty operating your television Contact Sony Customer Support at http www sony com tvsupport or to speak with a support representative United States 1 800 222 SONY 7669 Canada 1 877 899 SONY 7669 Sony will work to resolve your questions more quickly than your retailer or place of purchase Please Do Not Return the Product to the Store Printed in U S A ...

Reviews: