


A
d
mini
s
tra
ting
t
he
Came
ra
Setting the Camera Image and Audio — Camera Menu
47
2
Setting the trimming portion
Hold down the left button of the mouse on the still
image and drag the cursor diagonally. The area in a red
frame is the trimming portion.
3
Click
OK
at the bottom of the window.
The cropped image is displayed on the main viewer.
4
To close the image, click
in the upper-right
corner.
Image 1 and Image 2
Up to two image codec modes can be set. Configure the
following setting for each image mode.
Codec
Select
JPEG
,
MPEG4
,
H.264
or
Off
. Note that Image
1 cannot be set to
Off
.
Note
The selectable size of images and frame rate for
Image 2 may be limited depend on the setting of codec
type, size of images and/or frame rate for Image 1.
Image size
You can select the size of images sent from the camera.
The selectable size of images are depend on the setting
of maximum image size. For details on selecting
maximum image size, refer to “Installation tab” in
“System menu” in page 38.
When you set the different image size to Image 1 and
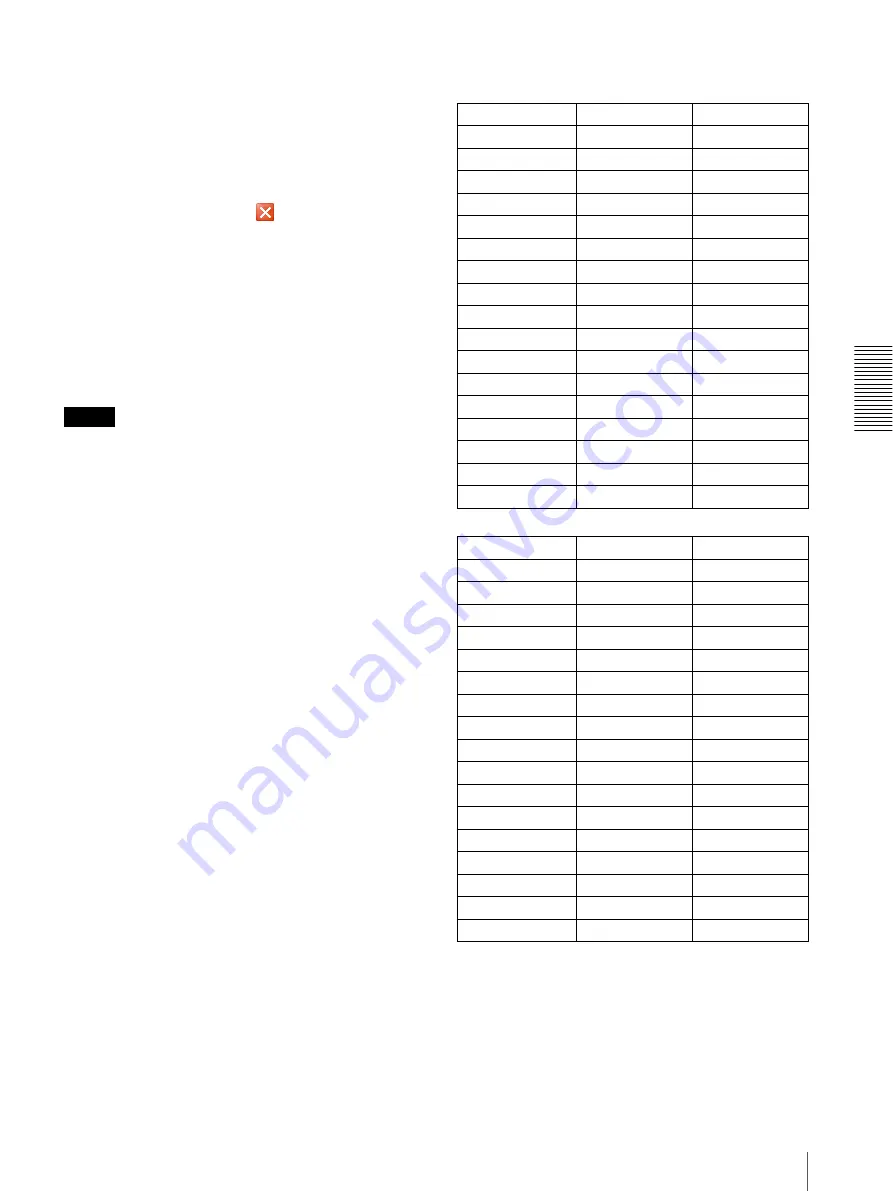
Image 2, the available combinations are as follows:
SNC-CH135/CH140/DH140/CH180/DH180
Maximum image size [1280 × 720]
Maximum image size [1280 × 1024]
Image 1
Image 2
1280
×
1024
×
×
1280
×
960
×
×
1280
×
800
×
×
1280
×
720
a
×
1024
×
768
×
×
1024
×
576
a
×
800
×
600
a
×
800
×
480
a
×
768
×
576
a
×
720
×
576
a
×
704
×
576
a
×
720
×
480
a
×
640
×
480
a
a
640
×
368
a
a
384
×
288
a
a
320
×
240
a
a
320
×
192
a
a
Image 1
Image 2
1280
×
1024
a
×
1280
×
960
a
×
1280
×
800
a
×
1280
×
720
a
×
1024
×
768
a
×
1024
×
576
a
×
800
×
600
a
×
800
×
480
a
×
768
×
576
a
×
720
×
576
a
×
704
×
576
a
×
720
×
480
a
×
640
×
480
a
a
640
×
368
a
a
384
×
288
a
a
320
×
240
a
a
320
×
192
a
a


