Ot
her
s
Using the SNC privacy masking tool — Masking a Camera Image
81
Using the SNC privacy
masking tool
— Masking a
Camera Image
The supplied SNC privacy masking tool allows you to
mask parts of the camera image to be transmitted.
Installing the SNC privacy masking
tool
1
Insert the CD-ROM in your CD-ROM drive.
A cover page appears automatically in your Web
browser.
If it does not appear automatically in the Web
browser, double-click on the index.htm file on the
CD-ROM.
When you are using Windows Vista, pop-up
“AutoPlay” may appear. For details, “Installing
software” in “When using Windows Vista” on
page 11.
2
Click the
Setup
icon of SNC privacy masking tool.
The “File Download” dialog opens.
When you are using Windows XP Service Pack 2 or
Windows Vista, a message regarding the active
contents may appear. For details, see “Installing
software” in “When using Windows XP Service
Pack 2” on page 9 or “Installing software” in
“When using Windows Vista” on page 11.
3
Click
Open
.
Note
If you click “Save this program to disk” on the “File
Download” dialog, you cannot install the program
correctly. Delete the downloaded file, and click the
Setup
icon again.
4
Install the SNC privacy masking tool following the
wizard displayed.
If the Software License Agreement is displayed,
read it carefully and accept the agreement to
continue installation.
Using the SNC privacy masking
tool
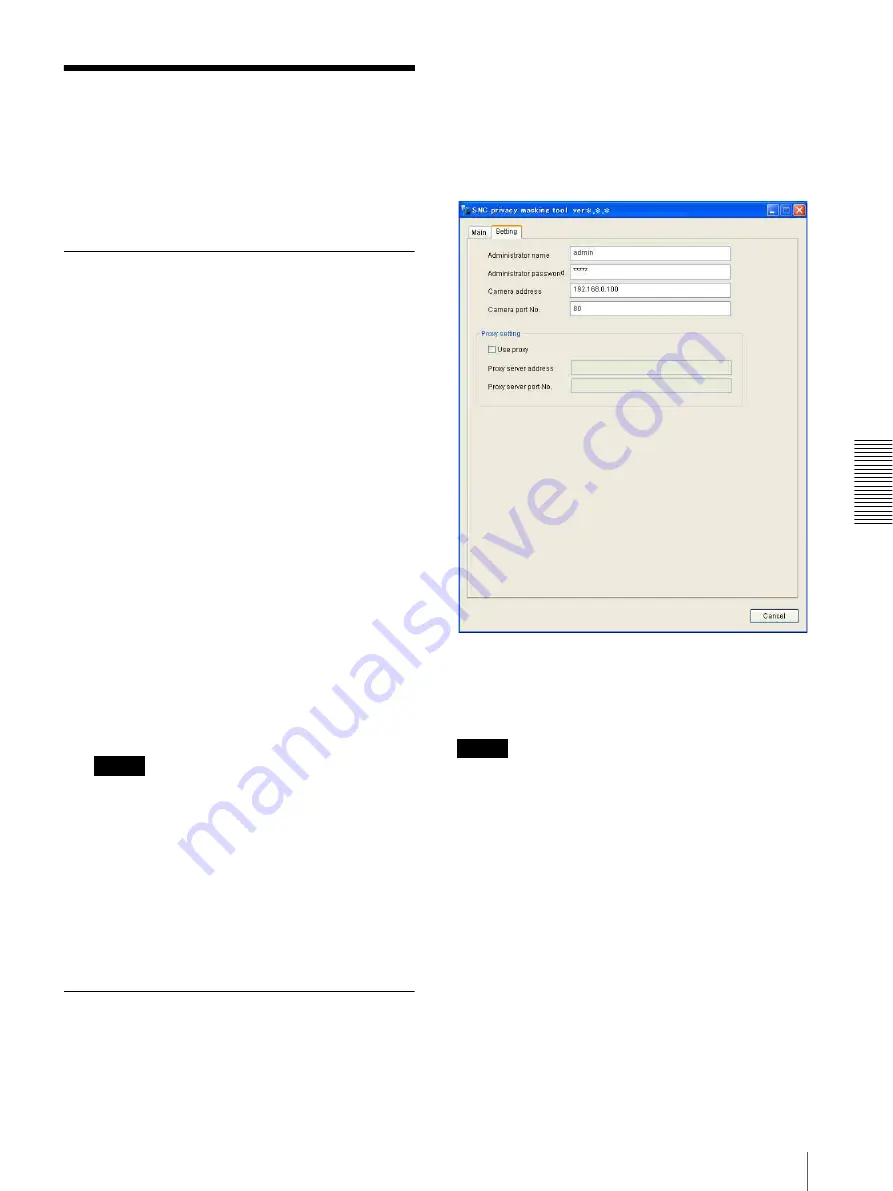
The SNC privacy masking tool consists of the Main tab
to set the privacy mask positions and the Setting tab to
prepare for connection to the camera.
When you start the SNC privacy masking tool, the
Setting tab is displayed.
Setting tab
Before creating a privacy mask, set the following items
in the Setting tab to allow connection to the camera.
Administrator name:
Type the ID of the administrator
of the camera to be connected.
Administrator password:
Type the password of the
administrator of the camera to be connected.
Tip
The factory settings of both items are “admin.”
Camera address:
Type the IP address or host name of
the camera to be connected.
Camera port No.:
Type the port number of the camera
to be connected.
When you use a proxy server for camera connection,
check the Use proxy check box and set the following
items.
Proxy server address:
Type the IP address or host name
of the proxy server.
Proxy server port No.:
Type the port number of the
proxy server.
Preparations for connecting to the camera are now
completed.


