Interchangeable Lens Digital Camera
ILCE-7SM3
α7SIII
Using the keyboard
When manual character entry is required, a keyboard is displayed on the screen. For examples of functions that use the
keyboard, see "Related Topic" at the bottom of this page.
The procedure for entering alphabetic characters is explained below.
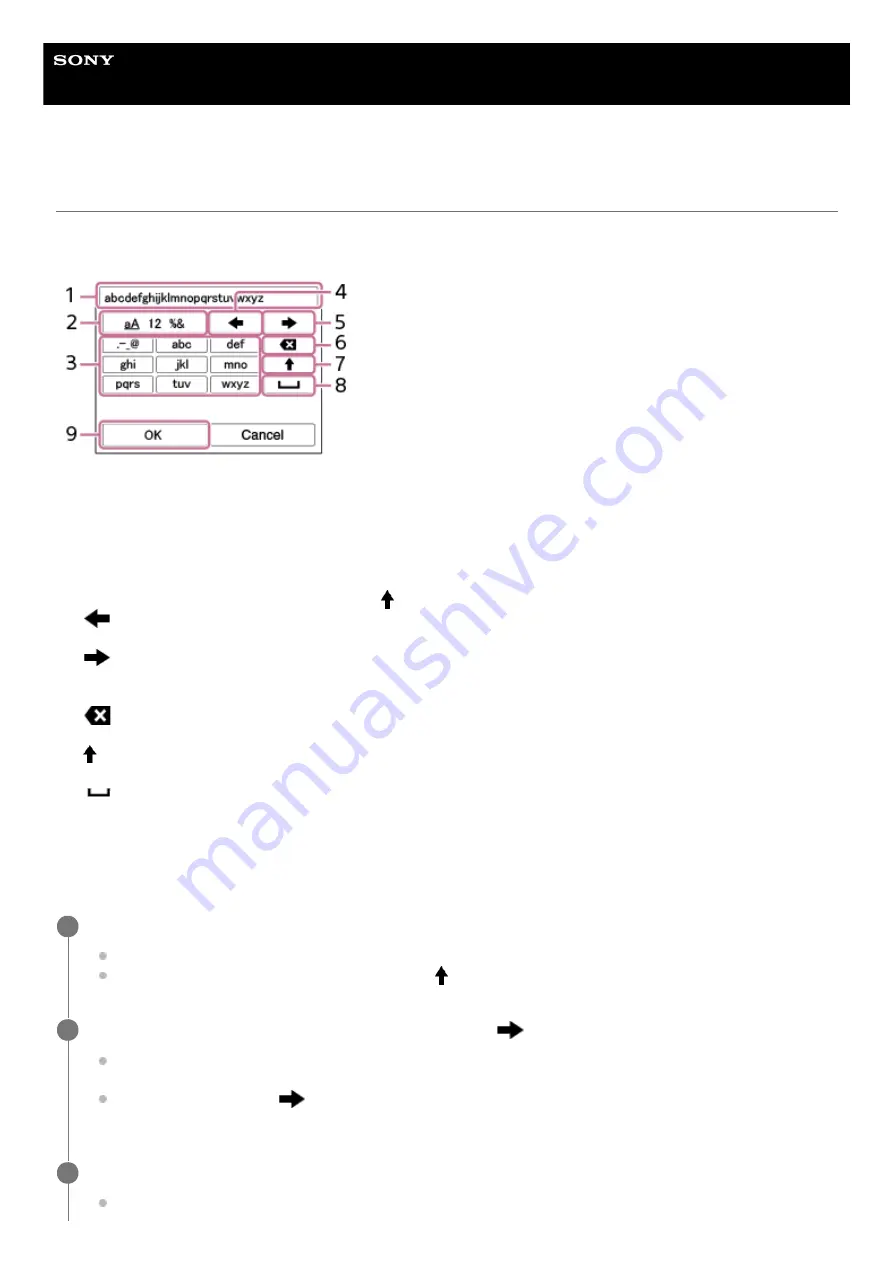
Input box
The characters you entered are displayed.
1.
Switch character types
Each time you press this key, the character type will switch between alphabet letters, numerals and symbols.
2.
Keyboard
Each time you press this key, the characters corresponding to that key will be displayed one-by-one in order. To
switch letters from lower to upper case, press
(Up arrow).
3.
(Left arrow)
Moves the cursor in the input box to the left.
4.
(Right arrow)
Moves the cursor in the input box to the right. This key is also used to finalize the input of a character being edited
and move to the next character.
5.
(Delete)
Deletes the character preceding the cursor.
6.
(Up arrow)
Switches a letter to upper or lower case.
7.
(Space)
Enters a space.
8.
OK
Press this key after entering characters to finalize the entered characters.
9.
Use the control wheel to move the cursor to the desired key.
Each time you press the center of the control wheel, the characters will change
To switch the letter to upper or lower case, press
(Up arrow).
1
When the character that you want to enter appears, press
(Right arrow) to confirm the character.
Make sure to confirm one character at a time. Unless a character is confirmed, you cannot enter the next
character.
Even if you do not press
(Right arrow), the entered character will be automatically confirmed after several
seconds.
2
After you finish entering all characters, press [OK] to finalize the entered characters.
To cancel input, select [Cancel].
3
64
Summary of Contents for ILCE-7SM3
Page 90: ...GB 90 ...
Page 91: ...GB 91 Index ...
Page 92: ...GB 92 ...
Page 93: ...GB 93 Index ...
Page 94: ...GB 94 ...
Page 95: ...GB 95 Index ...
Page 96: ... 2020 Sony Corporation Printed in Thailand ...
Page 111: ...5 021 326 11 1 Copyright 2020 Sony Corporation 15 ...
Page 126: ...5 021 326 11 1 Copyright 2020 Sony Corporation 30 ...
Page 146: ...5 021 326 11 1 Copyright 2020 Sony Corporation 50 ...
Page 170: ...74 ...
Page 177: ...Related Topic Mount Adaptor 5 021 326 11 1 Copyright 2020 Sony Corporation 81 ...
Page 204: ...Long Exposure NR 5 021 326 11 1 Copyright 2020 Sony Corporation 108 ...
Page 248: ...Related Topic Focus Magnifier 5 021 326 11 1 Copyright 2020 Sony Corporation 152 ...
Page 269: ...D Range Optimizer still image movie 5 021 326 11 1 Copyright 2020 Sony Corporation 173 ...
Page 279: ...Shockless WB 5 021 326 11 1 Copyright 2020 Sony Corporation 183 ...
Page 299: ...203 ...
Page 314: ...218 ...
Page 317: ...Memory cards that can be used 5 021 326 11 1 Copyright 2020 Sony Corporation 221 ...
Page 328: ...5 021 326 11 1 Copyright 2020 Sony Corporation 232 ...
Page 333: ...Related Topic Touch Panel Pad 5 021 326 11 1 Copyright 2020 Sony Corporation 237 ...
Page 338: ...5 021 326 11 1 Copyright 2020 Sony Corporation 242 ...
Page 354: ...Related Topic Flash Mode Wireless Flash 5 021 326 11 1 Copyright 2020 Sony Corporation 258 ...
Page 393: ...TC UB Disp Setting 5 021 326 11 1 Copyright 2020 Sony Corporation 297 ...
Page 396: ...5 021 326 11 1 Copyright 2020 Sony Corporation 300 ...
Page 425: ...Viewing images on a TV using an HDMI cable 5 021 326 11 1 Copyright 2020 Sony Corporation 329 ...
Page 518: ...Ctrl w Smartphone Send to Smartphone 5 021 326 11 1 Copyright 2020 Sony Corporation 422 ...
Page 526: ...Send to Smartphone Bluetooth Settings 5 021 326 11 1 Copyright 2020 Sony Corporation 430 ...
Page 573: ...477 ...
Page 579: ...Recover Image DB still image movie 5 021 326 11 1 Copyright 2020 Sony Corporation 483 ...


