background image

11

GB

Ge
tti

n

g

 S
ta

rte

d

Preventing unintentional 
operations (HOLD)

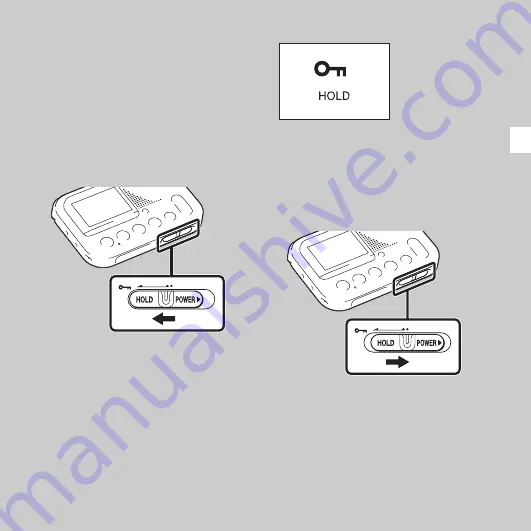
You can disable all the buttons (HOLD) 
in order to prevent unintentional 
operations when you carry the memory 
card recorder while the power is on.

To put the memory card recorder 
in the HOLD status

Slide the HOLD•POWER switch in the 
direction of “HOLD.”
“HOLD” will appear for approximately 3 
seconds, indicating that all the button 
operations are disabled.

“HOLD. Slide HOLD Switch to 
Activate.” appears if you press any 
button when the HOLD function is 
activated.

To release the memory card 
recorder from the HOLD status

Slide the HOLD•POWER switch 
towards the center.

P

Note

When the HOLD function is activated 
during recording, all the button operations 
are disabled. To stop recording, cancel the 
HOLD function first.

Summary of Contents for ICD-LX30

Page 1: ...4 297 164 13 1 ICD LX30 Memory Card Recorder Operating Instructions Getting Started Recording Listening Erasing About the Menu Function Additional Information Troubleshooting Index ...

Page 2: ...for the environment and human health which could otherwise be caused by inappropriate waste handling of this product The recycling of materials will help to conserve natural resources For more detailed information about recycling of this product please contact your local Civic Office your household waste disposal service or the shop where you purchased the product Applicable accessory SD memory ca...

Page 3: ...ed service staff only To ensure that the battery will be treated properly hand over the product at end of life to the applicable collection point for the recycling of electrical and electronic equipment For all other batteries please view the section on how to remove the battery from the product safely Hand the battery over to the applicable collection point for the recycling of waste batteries Fo...

Page 4: ...reserves the right to make any modification to this manual or the information contained herein at any time without notice The software described herein may also be governed by the terms of a separate user license agreement Trademarks MPEG Layer 3 audio coding technology and patents licensed from Fraunhofer IIS and Thomson SD SDHC microSD and microSDHC logos are trademarks of SD 3C LLC All other tr...

Page 5: ...Recorder On 19 Turning the power on 19 Turning the power off 19 Step 5 Setting the Clock 20 Setting the clock using the menu 21 Step 6 Setting the Language to Be Used in the Display Window 22 Recording Starting to Record 24 To stop recording 25 Note while accessing 25 Recording via Other Devices 27 Recording with an external microphone 27 Recording from other equipment 28 Listening Starting Playba...

Page 6: ...ing Settings for the Menu 38 Menu Settings 40 Additional Information Precautions 44 Specifications 47 Memory card recorder section 47 Battery life 49 Troubleshooting Troubleshooting 50 Message List 54 Display Window Guide 57 Index 59 ...

Page 7: ...ap is attached via the strap hole of the memory card recorder Quick Start Guide Operating Instructions The operating instructions are stored as PDF files in the supplied SD memory card with the memory card recorder The AC adaptor is supplied with Chinese Korean European model only You are cautioned that any changes or modifications not expressly approved in this manual could void your authority to...

Page 8: ...parts and controls Front A Display window B m microphone jack 1 C i headphone jack 2 D Strap hole 3 E PREV button F Memory card access indicator G N PLAY ENTER 1 button H Memory card slot I m FR button J M FF button ...

Page 9: ...These buttons and the jack have a tactile dot Use it as a reference point for operations or to identify each terminal 2 Connect a stereo headphones not supplied to the i headphone jack When noise is heard clean the plug of the headphones 3 The strap is attached via the strap hole when you purchase the memory card recorder i headphone jack Headphone not supplied ...

Page 10: ...10GB Rear R Built in microphones S ERASE button T MENU button U DC IN 3V jack V Battery compartment ...

Page 11: ...tch in the direction of HOLD HOLD will appear for approximately 3 seconds indicating that all the button operations are disabled HOLD Slide HOLD Switch to Activate appears if you press any button when the HOLD function is activated To release the memory card recorder from the HOLD status Slide the HOLD POWER switch towards the center PNote When the HOLD function is activated during recording all t...

Page 12: ...using the headphones When you try to adjust the volume to a level that exceeds the specified level Check The Volume Level message appears Press N PLAY ENTER then adjust the volume PNote The volume is lowered automatically and the Volume Lowered message appears if you do not lower the volume for specified period of time after the Check The Volume Level message appears ...

Page 13: ...ime See Step 5 Setting the Clock on page 20 to set the date and time z Tips When replacing the batteries files recorded are not erased even when you remove the batteries When replacing the batteries the clock continues moving for about 20 days after you remove the batteries The batteries you can use LR03 size AAA alkaline batteries NH AAA B2KN rechargeable batteries not supplied You cannot charge ...

Page 14: ...d to a wall outlet via an AC adaptor This is useful for long time use without worrying about battery consumption The batteries are not depleted even if you use the memory card recorder with the batteries inserted because the power is supplied via the AC adaptor PNote Do not remove the memory card or batteries or disconnect the AC adaptor while recording the recording lamp lights up in red or acces...

Page 15: ...e supplied AC adaptor securely into the DC IN 3V jack until it stops to the end 2 Connect the supplied AC adaptor to a wall outlet For other country region model 1 Insert a commercially available applicable AC adaptor securely into the DC IN 3V jack until it stops to the end 2 Connect a commercially available applicable AC adaptor to a wall outlet You can use an AC adaptor that supports Output vol...

Page 16: ...d if the write protect switch on the memory card is set to write protect Slide the write protect switch in the direction of the arrow if the lock has not released 1 Open the cover of the memory card slot in the stop mode 2 Insert a memory card securely to the end of the slot until it clicks into place Check on the direction of the notched corner Write protect switch ...

Page 17: ...ase Wait animation appears in the display window Doing so may damage the data If a memory card is not recognized remove it and then insert it into the memory card recorder again Close the cover of the memory card slot firmly Also do not insert any liquid metal flammable or any object other than a memory card into the slot Doing so may cause fire electric shock or malfunctions About compatible memo...

Page 18: ...of the memory card recorder you can record and play back a file smaller than 1 GB You can record for approximately 11 hours and 10 minutes of audio when you record with the memory card recorder using a memory card You can record up to 4 074 files on an memory card media PNote An adaptor is needed to use a microSD or microSDHC memory card Memory cards of 64 MB or less or more than 32 GB are not sup...

Page 19: ...ection of POWER and keep it there until Power Off animation appears The memory card recorder will turn off in a few seconds z Tips When you are not going to use the memory card recorder for a long time we recommend to turn off the memory card recorder When the memory card recorder is in the stop mode and you leave the memory card recorder without attempting an operation for approx 30 minutes the a...

Page 20: ...first time or when you insert batteries after the memory card recorder has been without batteries for more than 20 days the Set Date Time Set to Search by Date message appears Select YES by pressing PREV or NEXT then press N PLAY ENTER The year section is selected with the cursor in the clock setting window Set the clock as follows 1 Set the year Press PREV or NEXT to set the year and then press N...

Page 21: ...NTER within 1 minute of entering the clock setting data the clock setting mode is canceled and the stop mode window will be displayed To display the current date and time While the memory card recorder is in the stop mode press x STOP to display the current date and time for about 3 seconds Setting the clock using the menu While the memory card recorder is in the stop mode you can set the clock us...

Page 22: ... messages menus etc from some languages 1 Press MENU to enter the menu mode The menu mode window will be displayed 2 Press PREV or NEXT to select Language and then press N PLAY ENTER 3 Press PREV or NEXT to select the language that you want to use and then press N PLAY ENTER x STOP N PLAY ENTER PREV NEXT MENU ...

Page 23: ...23GBGetting Started The language you can select depends on the country or region where you purchased the memory card recorder Refer to Language on page 42 4 Press x STOP to exit the menu mode ...

Page 24: ...bject such as your finger etc accidentally rubs or scratches the memory card recorder during recording Do not remove the memory card while recording The Start Recording message appears when you insert a blank memory card z Tips Before you start recording we recommend you make a trial recording first or monitor the recording Try to record closer to the sound source if the playback volume is low 1 S...

Page 25: ...ops at the beginning of the current recording file You can find the recorded file using the date search function page 30 for playback later Note while accessing The memory card recorder is recording data and storing it on the memory card when the Please Wait animation appears in the display window or the memory card access indicator flashes in orange While the memory card recorder is accessing dat...

Page 26: ...current recording and the icon of the recording pause flashes in the display Press z REC PAUSE again to release pause and resume recording One hour after you pause recording recording pause is automatically released and the memory card recorder enters the stop mode z Tip Files recorded using this memory card recorder will be recorded as MP3 files ...

Page 27: ...layed set it in the menu page 42 2 Press PREV or NEXT to select MIC IN and then press N PLAY ENTER Select Input is set to MIC IN when you purchase the memory card recorder 3 Press x STOP to exit the menu mode 4 Press z REC PAUSE to start recording The built in microphones are automatically cut off and the memory card recorder starts recording sounds from the external microphone m microphone jack z...

Page 28: ...phone from the memory card recorder 5 Press x STOP to stop recording Recording from other equipment You can make MP3 files without using the computer by recording sound from other equipment connected to the memory card recorder m microphone jack z REC PAUSE CD player etc x STOP PREV NEXT N PLAY ENTER ...

Page 29: ...ni plug of other equipment to the m microphone jack of the memory card recorder using an audio connecting cable not supplied Select Input appears in the display window If Select Input is not displayed set it in the menu page 42 2 Press PREV or NEXT to select AUDIO IN and then press N PLAY ENTER Select Input is set to MIC IN when you purchase the memory card recorder 3 Press x STOP to exit the menu...

Page 30: ...he recorded date box 3 Press PREV or NEXT to select the date when you recorded the desired file then press N PLAY ENTER z Tips Go to step 5 if only one file is shown in the selected recorded date box A file labeled without a date is stored in the No Date Info box MP3 files recorded on other devices are stored in the box And podcast files recorded on other devices are stored in x STOP N PLAY ENTER ...

Page 31: ...rrent recording instantly Press N PLAY ENTER after you stop the recording Playback starts from the beginning of the file just recorded Other operations To stop at the current position Press x STOP To resume playback from that point press N PLAY ENTER To go back to the beginning of the current file Press PREV once The number of the recorded file the total number of files that were recorded on the s...

Page 32: ... The beep does not sound if you select OFF for Beep in the menu Listening with better sound quality To listen with headphones Connect the stereo headphones not supplied to the i headphone jack The built in speaker will be automatically disconnected To listen from an external speaker Connect an active or passive speaker not supplied to the i headphone jack Searching forward backward during playback...

Page 33: ...date Displays the recording start date z Tip When a file that was recorded on another device is selected the folder name is displayed on the 1st line and the file name is displayed on the 2nd line C File information The number of the recorded file in the sequence of files that were recorded on the same day Displays the total number of files that were recorded on the same date as the file currently...

Page 34: ...not supplied 2 Press N PLAY ENTER to start playback and at the same time set the connected equipment to the recording mode A file from the memory card recorder will be recorded on the equipment connected 3 Press the stop button on the connected equipment then press x STOP on the memory card recorder to stop recording z Tip If the recorded sound has dropouts or the volume of the recorded sound is t...

Page 35: ...rasing a file 1 Slide the HOLD POWER switch towards the center to release the memory card recorder from the HOLD status page 11 The stop mode window appears 2 Press SEARCH to display the date selection screen The recorded date box 3 Press PREV or NEXT to select the date when you recorded the desired file then press N PLAY ENTER SEARCH N PLAY ENTER ERASE HOLD POWER PREV NEXT ...

Page 36: ...more recent file Press PREV to select an earlier file 5 Press ERASE Erase appears and the specified file is played back for confirmation 6 Press PREV or NEXT to select YES 7 Press N PLAY ENTER The Erasing animation appears in the display window and the selected file will be erased When a file is erased the remaining files will advance so that there will be no space between files The number of the ...

Page 37: ...s N PLAY ENTER The Erasing animation appears in the display window and the selected file will be erased Erasing all files in a recorded date box 1 Press PREV or NEXT in step 2 of Erasing the File to select the date that you want then press ERASE 2 Press PREV or NEXT to select YES 3 Press N PLAY ENTER The Erasing animation appears in the display window and all files in the selected box will be eras...

Page 38: ...d 2 Press PREV or NEXT to select the menu item for which you want to make setting and then press N PLAY ENTER 3 Press PREV or NEXT to make the setting and then press N PLAY ENTER 4 Press x STOP to exit the menu mode PNote If you do not press any button for 60 seconds the menu mode is automatically N PLAY ENTER x STOP MENU PREV NEXT ...

Page 39: ...39GBAbout the Menu Function canceled and the window will return to the normal display To return to the previous window During menu operations press MENU To exit the menu mode Press x STOP ...

Page 40: ...ings Menu items Operation mode a the setting can be made the setting cannot be made Stop mode Playback mode Recording mode Re Sort by Date a Date Time a Beep a Language a System Information a Select Input a Format a ...

Page 41: ...N PLAY ENTER Re Sorting appears Re Sorting Completed appears when the re sorting has completed PNotes It may take a few minutes to finish re sorting the data Do not remove the memory card or turn off the memory card recorder while re sorting Could Not Erase Some Files is displayed after step 2 if there was data that could not be re sorted Date Time Set the clock to record the recording date and us...

Page 42: ...orean Chinese Chinese Thai z Tip Number of selectable language options and the default setting differ depending on the area you purchased your memory card recorder 22 System Information The following system information is displayed Model name software version of the memory card recorder Select Input Selects the external input to be recorded that is connected to the m microphone jack MIC IN Select ...

Page 43: ...otes Use the memory card recorder formatting function to format the memory card When you format the memory card all the data which you have stored on the memory card recorder will be erased Once the memory card has been erased you cannot retrieve the data that was erased When you format the supplied SD memory card the operating instructions stored in the supplied SD memory card will also be erased...

Page 44: ...the unit The unit is not water proof In particular be careful in the following situations When you have the unit in your pocket and go to the bathroom etc When you bend down the unit may drop into the water and may get wet When you use the unit in an environment where the unit is exposed to rain snow or humidity In circumstances where you get sweaty If you touch the unit with wet hands or if you p...

Page 45: ...rical shock avoid placing the AC adaptor in a location subject to humidity On using a memory card PNotes Format the memory card if the Format Error message or the Process Error message appears When formatting initializing a memory card make sure to use the memory card recorder to format it Operations of the memory cards formatted with Windows or other devices are not guaranteed Format the memory c...

Page 46: ...ectrical noise We assume no responsibility for any loss or damage of recorded data We recommend that you save a backup copy of the important data Do not touch the terminal of a memory card with your hand or a metal object Do not strike bend or drop a memory card Do not disassemble or modify a memory card Do not expose a memory card to water Do not use a memory card under the following conditions L...

Page 47: ...es 16 kHz 22 05 kHz 24 kHz 32 kHz 44 1 kHz 48 kHz File extension mp3 1 Speaker Approx 36 mm dia Input Output Microphone jack minijack stereo input for plug in power minimum input level 1 0 mV DC IN 3V jack SD memory card slot Headphone jack minijack stereo output for 16 ohms 300 ohms impedance headphones Rated power consumption 780 mW Power output 330 mW Power requirements Two LR03 size AAA alkali...

Page 48: ...rder User available capacity 2 GB approx 1 80 GB 1 932 734 976 Byte A part of the memory capacity is used as a management area Supplied accessories See page 7 Optional accessories Audio connecting cable RK G136 RK G139 Except China Europe Headphone MDR EX Series such as MDR EX60LP Battery charger For Europe Other country region BCG 34HSN For Korea BCG 34HSSN Rechargeable battery NH AAA B2KN Except...

Page 49: ...sing Sony LR03 SG size AAA alkaline batteries 1 When using Sony NH AAA B2KN rechargeable batteries 1 1 The battery life is measured in testing using methods proprietary to Sony The battery life may shorten depending on how you operate the memory card recorder 2 When playing back music through the internal speaker with the volume level set to 14 SD memory card 2 GB 4 GB 8 GB 16 GB 32 GB 22 hr 20 mi...

Page 50: ...mers in other countries regions http www sony asia com support Please note that recorded files may be deleted during service or repair work Symptom Remedy Noise is heard An object such as your finger etc accidentally rubbed or scratched the memory card recorder during recording so that noise was recorded The memory card recorder was placed near a fluorescent lamp or a mobile phone during recording...

Page 51: ...takes a long time for the memory card recorder to start If the memory card recorder is required to process a large amount of data it may take longer for the memory card recorder to start This is not a malfunction of the memory card recorder Wait until the start up display disappears The memory card recorder does not operate You may have formatted memory card using the computer Use the memory card ...

Page 52: ... insufficient The playback volume is low The volume is turned down completely Press VOL or to adjust the volume page 31 Record closer to the sound source if possible The playback volume is low Volume Lowered is displayed The volume of the playback sound is lowered automatically if you do not lower the volume for specified period of time after the Check The Volume Level message appears When recordi...

Page 53: ...use the memory card recorder for an extended period of time it is recommended that you turn the power off page 19 or remove the batteries A character in a folder or file name is displayed in unreadable characters The memory card recorder cannot support or display some special characters and symbols that are entered on a computer using Windows Explorer or the Macintosh desktop The Please Wait anima...

Page 54: ...inserted into the memory card slot Remove and try inserting it again If this message persists use a new memory card Memory Card Not Supported A memory card that the memory card recorder does not support is inserted See About compatible memory cards on page 17 Memory Card Locked The memory card is write protected A write protected memory card cannot be used with the memory card recorder Read Only M...

Page 55: ...nsert the batteries Save a backup copy of your data and format the memory card using the menu page 43 No File No file is recorded on the memory card Low Battery Cannot Execute You cannot use the Format function the Re Sort by Date function or using the ERASE button because the batteries are exhausted Replace the old LR03 size AAA alkaline batteries with new ones page 13 Unknown Data This data is n...

Page 56: ... no target files Could Not Re sort Some Files Results of the Re Sort by Date function some files had not arranged chronologically Could Not Erase Some Files Results of the Re Sort by Date function some files have not been erased Cannot Erase This File The file cannot be erased because the selected file is a protected file or a read only file Start Recording No file is recorded on the memory card C...

Page 57: ...e is displayed on the 2nd line C Memory card indicator D Battery indicator E File information The number of the recorded file in the sequence of files that were recorded on the same day Displays the total number of files that were recorded on the same date as the file currently selected F The elapsed playback time G Remaining recording time Display when recording H The status of the memory card re...

Page 58: ...e position bar for the current file Display in the HOLD status L HOLD indicator Appears when the memory card recorder is in the HOLD status to prevent unintentional operations To release the HOLD status slide the HOLD POWER switch towards the center page 11 ...

Page 59: ...OWER switch 11 19 I Index to parts and controls Display window 57 Front 8 Rear 10 Input selection 27 28 40 42 Inserting batteries 13 L Listening 30 M Maintaining the moderate volume level 12 Maintenance 45 Memory card 16 45 Menu Beep 40 42 Date Time 40 41 Format 40 43 Language 40 42 Making settings 38 Menu settings 40 Re Sort by Date 40 41 Select Input 40 42 System Information 40 42 Message list 5...

Page 60: ...rding 24 Recording from other equipment 28 Recording pause 26 Recording time 49 Recording with other equipment 34 Re Sort by Date 40 41 Review 32 S SD SDHC memory card 16 Setting the clock 20 40 41 Setting the language 22 40 42 Specifications 47 T Troubleshooting 50 ...

Page 61: ... 2011 Sony Corporation ...

Reviews: