background image

46

* Focuses on only distant subjects.

You can shoot bright video, even in low 
light conditions, such as outdoor locations 
with limited street lighting or dimly lit 
indoors, by automatically optimizing the 
gain and shutter speed.

b

Note

This function is available only when FULL 
AUTO is turned on and [AUTO MODE SET] is 
set to “AUTO.”

1

Press the FULL AUTO button to 
set auto mode on.

The FULL AUTO button lamp turns on.

2

Press the ASSIGN3/LOW LUX 
button.

 is displayed.

• To cancel, press the ASSIGN3/LOW 

LUX button again.

You can shoot scenes under very dark 
conditions.

b

Note

This function is available only when FULL 
AUTO is turned on.

1

Press the FULL AUTO button to 
set auto mode on.

The FULL AUTO button lamp turns on.

2

Assign [NIGHTSHOT] to an 
ASSIGN button (p. 58).

3

Press the ASSIGN button.

 is displayed.

• To cancel, press the ASSIGN button 

again.

b

Notes

• NIGHTSHOT uses infrared light. Make sure 

that your finger does not cover the infrared light 
emitter when shooting.

• Do not use NIGHTSHOT in bright conditions. 

Doing so may damage the camcorder.

 Landscape*

([LANDSCAPE])

Shoots distant subjects 
clearly. This setting also 
prevents your camcorder 
from focusing on any 
glass or mesh in 
windows between the 
camcorder and the 
subject.

 Portrait

([PORTRAIT])

Brings out the subject, 
such as people or 
flowers, while creating a 
soft background.

 Spotlight

([SPOTLIGHT])

Prevents people’s faces 
from appearing 
excessively white when 
subjects are lit by strong 
light.

 Beach

([BEACH])

Takes the vivid blue of 
the ocean or a lake.

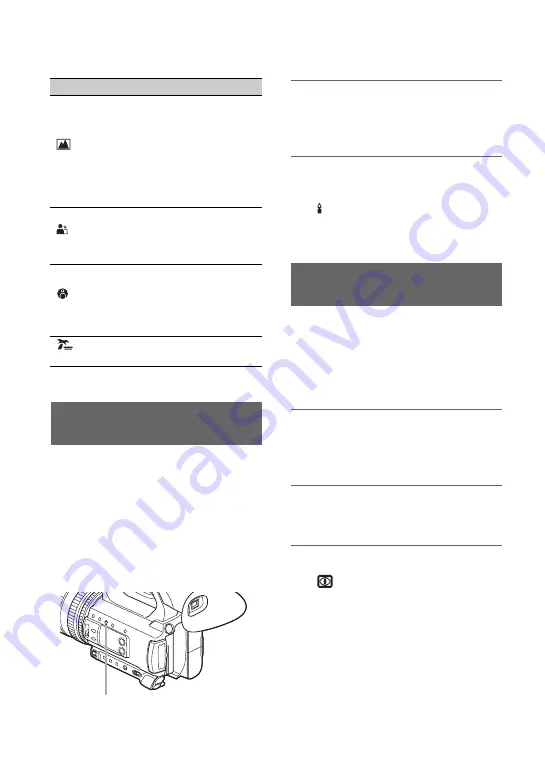
Shooting in dimly lit locations 
(LOW LUX)

Setting values

Recording conditions

LOW LUX button

Shooting in dark conditions 
(NIGHTSHOT)

Useful functions (Continued)

Summary of Contents for HXR-NX200

Page 1: ...4 745 818 11 1 Solid State Memory Camcorder Operating Guide HXR NX200 Table of Contents Getting Started Recording Playback Editing Using the Menu Troubleshooting Additional Information ...

Page 2: ...or flashing In addition over a long period of use because of the physical characteristics of the liquid crystal display such stuck pixels may appear spontaneously These problems are not a malfunction Note that any such problems have no effect on recorded data On sunlight Do not record the sun or leave the camcorder under the sun for a long time The internal parts of the camcorder may be damaged If...

Page 3: ...image signals the following phenomena may occur The subjects passing by the frame rapidly might appear crooked depending on the recording conditions This phenomenon may be notable in displays having high motion resolution Horizontal lines appear on the LCD screen during recording under fluorescent lights sodium lamps or mercury lamps The phenomena can be reduced by adjusting the shutter speed p 39...

Page 4: ...s in are reference pages A Hook for shoulder strap B ASSIGN4 LAST SCENE button p 56 C Microphone holder D Multi interface shoe p 44 79 E Power zoom lever p 32 F Grip belt attachment G ASSIGN5 FOCUS MAG button p 33 58 H Grip belt attachment Body ...

Page 5: ...onnect an external microphone sold separately 1 Place the microphone A into the microphone holder B 2 Connect the plug of the microphone to the INPUT1 jack or INPUT2 jack C 3 Place the microphone cable into the cable holder D Put the cable in the outer cable holder Continued ...

Page 6: ...ASSIGN3 LOW LUX button p 46 58 J DISPLAY button p 63 K SLOT SEL button p 27 L INPUT1 LINE MIC MIC 48V switch p 42 M CH 1 INT MIC EXT MI SHOE switch p 42 N AUTO MAN CH 1 switch p 43 O AUDIO LEVEL CH 1 dial p 43 P AUDIO LEVEL CH 2 dial p 43 Q AUTO MAN CH 2 switch p 43 R CH 2 INT MIC EXT MI SHOE switch p 42 S INPUT2 LINE MIC MIC 48V switch p 42 T IRIS AUTO MAN button p 38 U FOCUS AUTO MAN button p 33...

Page 7: ...n the marks on the lens hood to those on the camcorder and turn the lens hood in the direction of the arrow 2 until it is locked z Tip If you attach or remove a 62 mm 2 1 2 in PL filter or MC protector remove the lens hood Continued ...

Page 8: ...5 5 mm or shorter The tripod may not be able to mount in some orientations depending on the tripod specifications L START STOP button p 28 M POWER CHG lamp About the cable clamper loop clamper Attaching the power cord HDMI cable and other cables inserted in the corresponding connectors in the cable clamper helps prevent the cords from being disconnected However not all HDMI cables are supported At...

Page 9: ...9 b Note Do not use the cable clamper loop clamper for any purpose other than securing cables for example attaching a strap for carrying the camcorder Cable clamper Loop clamper Continued ...

Page 10: ...lder strap E Viewfinder p 24 F Large eyecup p 24 G BATT RELEASE button p 20 H Battery pack p 19 I ON STANDBY switch p 22 J FULL AUTO button p 45 K SHUTTER button p 39 L WHT BAL button p 41 M GAIN button p 39 N Manual lever p 39 41 Identifying Parts and Controls Continued ...

Page 11: ...s p 72 D THUMBNAIL button p 60 E Memory card slot A Memory card access lamp p 26 F Memory card slot B Memory card access lamp p 26 G i headphones jack H REMOTE jack p 91 The REMOTE jack connects to a video deck or other devices used to control playback Continued ...

Page 12: ...er your video device may also operate In that case select a commander mode other than DVD2 for your video device or cover the sensor of your video device with black paper To change the battery of the Wireless Remote Commander 1 While pressing on the tab inset your fingernail into the slit to pull out the battery case 2 Place a new battery with the side facing up 3 Insert the battery case until it ...

Page 13: ... p 102 N Playback indicator p 60 Processing Relay recording HDMI REC CONTROL Upper left Upper right Bottom Center Indicator Meaning 0min Estimated remaining recording time Recording playback media 00 00 00 00 Time code hour minute second frame Indicator Meaning Face detection ON PEAKING p 85 ZEBRA p 85 STEADYSHOT p 79 9 Manual focus p 33 to PICTURE PROFILE p 47 F5 6 Iris p 38 9dB Gain p 39 100 180...

Page 14: ...cording media They are not displayed while recording However you can check them by selecting DISPLAY SET t DATA CODE and choosing the data that you want to display or by pressing the ASSIGN button to which the DATA CODE function is assigned during playback Multi Interface Shoe video light p 79 Manual volume adjustment p 44 Indicator Meaning Screen Indicators Continued ...

Page 15: ... Continuous recording on the memory cards Relay recording 30 Recording movies using both the memory card A and B Simultaneous recording 31 Changing the setting of the START STOP button and handle record button 31 Adjusting the zoom 32 Adjusting the focus 33 Using the focus magnifier 33 Focusing on a detected face Face detection 34 Changing the recording setting 36 Selecting the file format and rec...

Page 16: ...ting time data 54 Recording with the Slow Quick Motion function 55 Reviewing the most recently recorded scene Last Scene Review 56 Assigning functions to the ASSIGN buttons 58 Playback 60 Playing back movies 60 Changing checking the settings in your camcorder 63 Changing the screen display 63 Displaying recording data Data code 63 Checking the settings in your camcorder Status check 64 Connecting ...

Page 17: ...nu 88 Time code settings TC PRESET UB PRESET etc OTHERS menu 90 Settings while recording or other basic settings AREA SET BEEP etc Troubleshooting 93 Warning indicators and messages 102 Recording time of movies 105 Using your camcorder abroad 107 File folder structure on the recording media 108 Maintenance and precautions 109 About the XAVC S format 109 About the AVCHD format 109 About memory card...

Page 18: ...emote Commander RMT 845 p 12 A button type lithium battery is already installed Large eyecup p 24 Lens hood p 7 Lens cap p 28 USB cable Rechargeable battery pack NP F570 Battery charger BC L1 CD ROM Manuals for Solid State Memory Camcorder Before Using This Unit Software Downloads When the unit is used with a PC connection download any device drivers plug ins and application software you require f...

Page 19: ...egarding recorded materials are stored over multiple files and folders you can easily handle the clips without considering its data and directory structure by using the dedicated application software Step 2 Charging the battery pack You can charge the InfoLITHIUM battery pack L series with the supplied AC Adaptor b Note You can use a large capacity battery pack NP F970 sold separately with your ca...

Page 20: ...is connected to the wall outlet wall socket Disconnect the AC Adaptor from the DC IN jack z Tip You can check the remaining battery life with the status check function p 64 To remove the battery pack Turn the ON STANDBY switch to STANDBY 1 Press and hold the BATT RELEASE button and slide the battery up and out To store the battery pack If the battery pack is not in use for a while run down the bat...

Page 21: ...C plug of the AC Adaptor or battery terminal with any metallic objects This may cause a malfunction To charge the battery pack using the supplied battery charger BC L1 1 Connect the DC plug to the DC IN jack of the battery charger 2 Connect the power cord mains lead to the AC Adaptor and the wall outlet wall socket 3 Push the battery in and slide it in the direction of the arrow in the diagram The...

Page 22: ...he date and time when you use your camcorder for the first time z Tip If you do not use your camcorder for about 3 months the built in rechargeable battery gets discharged and the date and time settings may be cleared from the memory In that case charge the rechargeable battery and then set the date and time again p 113 To set the date and time again press the MENU button and select OTHERS t CLOCK...

Page 23: ... press the button The clock starts Set SUMMERTIME to ON to move the time forward 1 hour You can set any year up to the year 2037 Midnight is indicated as 12 00 AM and noon as 12 00 PM z Tip The date and time are automatically recorded on the selected recording media and can be displayed during playback p 87 ...

Page 24: ...the viewfinder if you change your line of sight but this is not a malfunction These colors are not recorded onto the memory cards When the picture in the viewfinder is hard to see If you cannot see the picture in the viewfinder clearly under bright circumstances use the supplied large eyecup To attach the large eyecup stretch it slightly and fit it over the groove of the eyecup attached to the cam...

Page 25: ...25 Getting Started b Note Do not remove the eyecup pre attached to the camcorder Large eyecup supplied ...

Page 26: ...ecting equipment is supporting the exFAT file system If you connect equipment not supporting the exFAT file system and the format screen appears do not perform the format All the data recorded will be lost If unsupported media is used you may be able to record without an error message being displayed on the screen but the recorded data is not guaranteed File format Supported memory cards AVCHD SD ...

Page 27: ... for recording Press the SLOT SEL button to change which slot is selected for recording You can confirm the selected slot on the screen b Notes You can only select a slot that already has a memory card inserted While movies are being recorded on the memory card you cannot switch the slot even if you press the SLOT SEL button z Tip When only one slot has a memory card inserted the slot that has the...

Page 28: ...ecords movies on a memory card The factory setting for recording movies is AVCHD Do the following steps to record movies 1 Press the latches on both sides of the lens cap and remove it Recording movies Handle record button START STOP button ...

Page 29: ...he recording media battery pack or the AC Adaptor The image data may be destroyed See page 105 about the recording time of movies If a movie file size exceeds 2 GB while recording in DV or AVCHD format the camcorder automatically divides the file and creates a new one If a movie file size exceeds 6 hours duration while recording in XAVC S HD format the camcorder automatically divides the file and ...

Page 30: ...while recording movies you cannot switch the slot currently being used When the remaining recording time of the memory card being used is less than 1 minute and the other slot has a recordable memory card inserted or appears on the camcorder screen The indicator turns off when the memory card is switched If you start recording on a memory card with the remaining recording time of less than 1 minut...

Page 31: ...TON SETTING with the V v B b SET button Recording movies using both the memory card A and B Simultaneous recording Changing the setting of the START STOP button and handle record button REC BUTTON SETTING setting Button and recording media REC BUTTON HANDLE REC BUTTON Recording on both the memory card A and the memory card B starts and stops at the same time when either record button is pressed RE...

Page 32: ...eration sound of the power zoom lever C may also be recorded Press the handle zoom lever A to zoom in or out z Tip You can turn the handle zoom function on off and change the zoom operation speed HANDLE ZOOM p 78 You can zoom at the desired speed by turning the zoom ring B Fine adjustment is also possible b Note Turn the zoom ring B at a moderate speed If you turn it too fast the zoom may lag behi...

Page 33: ...s to when the focus cannot be adjusted any closer To adjust automatically Press the FOCUS AUTO MAN button B to set the focus to automatic 9 disappears and the automatic focus adjustment is restored z Tips The focal length information the distance at which the subject is in focus for when it is dark and hard to adjust the focus appears for about 3 seconds in the following cases When you press the F...

Page 34: ... faces are detected frames appear on the LCD screen 3 Press the V v B b SET button D move the selection cursor orange colored frame to select the priority face then press the button again The frame on the priority face changes to a double frame To cancel the priority face Move the selection cursor orange colored frame onto the frame double frame on the priority face using the V v B b SET button D ...

Page 35: ...ign this function to an ASSIGN button p 58 To make it easy to detect faces record under the following conditions Record in a moderately bright place Do not obscure the face with a hat mask sunglasses etc Face the front of the camera ...

Page 36: ... 25p 50 Mbps For AVCHD 1080 50p PS 1080 50i FX 1080 50i FH 1080 50i HQ 1080 50i LP 1080 25p FX 1080 25p FH 720 50p FX 720 50p FH 720 50p HQ About setting values Bit rate PS max 28 Mbps FX max 24 Mbps FH approx 17 Mbps average HQ approx 9 Mbps average LP approx 5 Mbps average Image size 2160 3 840 2 160 4K 1080 1 920 1 080 PS FX FH 1 440 1 080 HQ LP 720 1 280 720 Frame rate Either 50 or 25 Scanning...

Page 37: ...REC SET t DV MODE t YES with the V v B b SET button The camcorder restarts in DV mode Functions not available in DV mode Slow Quick Motion recording Protecting recorded movies Protect PROTECT is not displayed in the menu Dividing a movie DIVIDE is not displayed in the menu b Note When DV mode is selected the audio format is fixed to LPCM Available menus in DV mode only REC OUT SET WIDE REC CANCEL ...

Page 38: ... AUTO MAN button C to set the iris to manual The next to the iris value disappears 3 Turn the iris ring A to adjust the value The volume of the light increases the more that you open the aperture decreasing F value The volume of the light decreases the more that you close the aperture increasing F value To temporarily adjust the iris automatically If the IRIS PUSH AUTO function has been assigned t...

Page 39: ...just and fix the shutter speed manually You can make a moving subject look still or emphasize the movement of a subject by adjusting the shutter speed 1 Press the FULL AUTO button G to set auto mode off The FULL AUTO button lamp turns off 2 Press the SHUTTER button F The next to the shutter speed value disappears and the shutter speed value is highlighted 3 Adjust the value using the manual lever ...

Page 40: ...d 1 64 respectively If flashes during the iris automatic adjustment set the ND filter to 1 If flashes during the iris automatic adjustment set the ND filter to 2 If flashes during the iris automatic adjustment set the ND filter to 3 The ND filter indicator will stop flashing and remain on the screen If flashes set the ND filter B to CLEAR The ND filter icon will disappear from the screen b Notes I...

Page 41: ...T A or B using the manual lever A x Setting the A B value Select A or B for recording with the white balance setting stored in memory A or B x To use the PRESET value of white balance Select CAMERA SET t WB PRESET and select a desired setting To save the adjusted white balance value in memory A or B 1 Press the FULL AUTO button C to set auto mode off Adjusting the white balance Setting values Exam...

Page 42: ...4 to 7 b Note When a white balance adjustment value has not been obtained successfully A or B starts flashing slowly Adjust the subject appropriately and set the shutter speed to auto or around 1 50 then try adjusting the white balance again To restore automatic adjustment Press the WHT BAL button B b Note When you turn the FULL AUTO button C on all other manual adjustments iris gain and shutter s...

Page 43: ...onnected to INPUT1 jack A INPUT2 jack B To record using a microphone select MIC or MIC 48V See page 5 for details about connecting a microphone b Notes If the switch is set to MIC 48V and you connect a device that is not compatible with 48V power it may damage the connected device Check the switch before connecting the device To prevent unwanted noise when no audio device is connected to the INPUT...

Page 44: ...ti Interface Shoe compatible microphone sold separately to the Multi Interface Shoe 2 Set the CH 1 INT MIC EXT MI SHOE switch D and CH 2 INT MIC EXT MI SHOE switch H to MI SHOE When the CH 1 and CH 2 switches are both set to INT MIC both the left and right channels are adjusted by the CH 1 switch dial 1 Set the AUTO MAN switch for the channel that you want to adjust CH 1 E or CH 2 I to MAN appears...

Page 45: ... AUTO Face detection Portrait Baby Scene detection Backlight Landscape Night Scene Spotlight Low Light Macro Camera shake detection Walk Tripod To use SCENE SELECTION 1 Press the MENU button A press the V v B b SET button B and select CAMERA SET t SCENE SELECTION SET then press the button again 2 Press the V v B b SET button B select the desired setting then press the button again Selecting suitab...

Page 46: ...IGHTSHOT to an ASSIGN button p 58 3 Press the ASSIGN button is displayed To cancel press the ASSIGN button again b Notes NIGHTSHOT uses infrared light Make sure that your finger does not cover the infrared light emitter when shooting Do not use NIGHTSHOT in bright conditions Doing so may damage the camcorder Landscape LANDSCAPE Shoots distant subjects clearly This setting also prevents your camcor...

Page 47: ...ith PICTURE PROFILE To cancel picture profile recording Select OFF in step 2 with the V v B b SET button then press the button To change the picture profile You can change the settings stored in PP1 through PP6 1 In step 3 press the V v B b SET button select SETTING then press the button again 2 Press the V v B b SET button select the item that you want to adjust then press the button again 3 Pres...

Page 48: ...48 6 Press the V v B b SET button select OK then press the button again The picture profile indicator is displayed Useful functions Continued ...

Page 49: ...tings STANDARD Standard gamma curve STILL Gamma curve to create the tone of a still image CINEMATONE1 Gamma curve 1 for producing tone of film camera images CINEMATONE2 Gamma curve 2 for producing tone of film camera images ITU709 Gamma curve that corresponds to ITU 709 Gain in low intensity area 4 5 Item Description and settings RANGE Selects a correcting range HIGH MIDDLE LOW LEVEL Sets the corr...

Page 50: ...utomatic mode MAX POINT Sets the maximum point 90 to 100 SENSITIVITY Sets the sensitivity HIGH MIDDLE LOW MANUAL SET Sets the knee point and slope manually POINT Sets the knee point 75 to 105 SLOPE Sets the knee slope 5 gentle to 5 steep KNEE is set to off when you set to 5 Item Description and settings STANDARD Suitable colors when GAMMA is set to STANDARD STILL Suitable colors when GAMMA is set ...

Page 51: ... deep red G 7 light green to 7 deep green B 7 light blue to 7 deep blue C 7 light cyan to 7 deep cyan M 7 light magenta to 7 deep magenta Y 7 light yellow to 7 deep yellow Item Description and settings TYPE Selects color correction type OFF Not correct colors COLOR REVISION Corrects colors stored in memory Colors not stored in memory displayed in black and white when COLOR EXTRACT is set will not ...

Page 52: ...tions of your recording environment Manual white balance adjustment is recommended when you use COLOR CORRECTION MEMORY1 COLOR Sets colors stored in Memory 1 PHASE Sets color phase 0 purple to 8 red to 16 yellow to 24 green to 31 blue PHASE RANGE Sets color phase range 0 no color selection 1 narrow to select only a single color to 31 wide to select multiple colors in similar color phase SATURATION...

Page 53: ...em Description and settings LEVEL Sets the detail level 7 to 7 MANUAL SET ON OFF Turns on and off the manual detail adjustment Set to ON to enable the manual detail adjustment automatic optimization will not be performed V H BALANCE Sets the vertical V and horizontal H balance of DETAIL 2 off to the vertical V side to 2 off to the horizontal H side B W BALANCE Selects the balance of the lower DETA...

Page 54: ...e camcorder records movies accompanied by time data such as time code and user bit 1 Press the MENU button press the V v B b SET button and select TC UB SET t TC PRESET then press the button again 2 Press the V v B b SET button select PRESET then press the button again 3 Press the V v B b SET button select the first two digits then press the button again You can set the time code within the follow...

Page 55: ...as follows b Notes For details about the recording media that can used to record with Slow Quick Motion see page 26 When recording with the Quick Motion recording function your camcorder may continue recording for some time approximately 30 seconds at most after you press the button to stop recording Do not operate your camcorder while the REC indicator is flashing on the screen and wait till it t...

Page 56: ...the ASSIGN button or the MENU button A during standby b Notes When you are recording with a slow frame rate the camcorder may continue recording for a few more seconds after you press the START STOP button to stop recording You cannot change the frame rate during Slow Quick Motion recording To change the frame rate first stop Slow Quick Motion recording The time code is recorded in REC RUN mode du...

Page 57: ... the most recently recorded scene then returns to standby mode To stop reviewing the last scene Press the ASSIGN4 LAST SCENE button during playback The camcorder returns to standby mode b Note If you edit the movie or remove the recording media after you stop recording the Last Scene Review function may not work correctly ...

Page 58: ...CUS MAGNIFIER p 33 Functions you can assign to the ASSIGN buttons no function LOW LUX p 46 FOCUS MAGNIFIER p 33 LAST SCENE REVIEW p 56 WHT BAL p 41 WB PRESET p 77 WB SET p 41 AE SHIFT p 78 D EXTENDER p 78 STEADYSHOT p 79 S Q MOTION p 55 AUTO MODE SET p 45 SCENE SELECTION SET p 45 NIGHTSHOT p 46 IRIS PUSH AUTO p 38 FACE DETECTION p 34 COLOR BAR p 80 PICTURE PROFILE p 47 VOLUME p 82 HISTOGRAM p 84 Z...

Page 59: ... B b SET button B select the ASSIGN button that you want to set then press the button again 4 Press the V v B b SET button B select the function that you want to assign then press the button again 5 Press the V v B b SET button B select OK then press the button again ASSIGN1 to 3 buttons ASSIGN5 button ASSIGN4 button ...

Page 60: ...60 Playback Playback 1 Open the LCD panel Playing back movies THUMBNAIL button ...

Page 61: ... then press the SET button Memory card A Memory card B 2 Select the playback mode using the V v B b SET buttons 3 Select the thumbnail you want to play using the V v B b buttons and press the SET button Selecting the thumbnail will show information about the movie in the lower part of the LCD screen ADate and time of recording start BResolution CFrame rate DRecording mode Recording media Playback ...

Page 62: ... play back movies slowly The playback speed increases based on the number of times that you select In DV mode SCAN SLOW buttons are disabled In DV mode fast forward and fast reverse during playback are 5 times faster than normal playback speed When you play back a DV file recorded with a camcorder other than this camcorder the F value may not be displayed correctly To adjust the volume Press the M...

Page 63: ...ally stored during recording on the screen during playback Select DISPLAY SET t DATA CODE and choose the data that you want to display or press the ASSIGN button to which the DATA CODE function is assigned during playback or pause The screen changes in the order date and time display t camera data display t no display with each press of the button A White balance will appear during the playback of...

Page 64: ...on setting Recording media information You can check the estimated used and free spaces Battery Info You can check the remaining capacity of the attached battery STATUS CHECK is assigned to the ASSIGN2 STATUS button A p 58 1 Press the ASSIGN2 STATUS button A 2 Press the V v B b SET button C to display the items Switches in the order AUDIO t OUTPUT t ASSIGN t CAMERA t REC BUTTON SET t MEDIA INFO t ...

Page 65: ... make the connection b Notes Video signals cannot be output from HDMI OUT and VIDEO OUT jacks simultaneously The output resolution of VIDEO OUT is 576i Monitor TV To video input jack HDMI cable sold separately To HDMI input jack Video cable sold separately Signal flow Audio cable sold separately To audio input jack Continued ...

Page 66: ...0 25p 576i 2160p 720p 576i 2160p 1080i 576i 1080p 576i 1080 50p 720p 576i 720 50p 1080i 576i 1080 50i 576p 576 50p 576i 576 50i Menu item HDMI OUT VIDEO OUT Recording format HDMI REC OUT SET REC SET REC FORMAT REC OUT SET VIDEO OUT HDMI All recording formats 2160p 1080p 576i 1080 50p 576i 2160p 720p 576i 720 50p 2160p 1080i 576i 1080 50i 1080p 576i 1080 50p 720p 576i 720 50p 1080i 576i 1080 50i 57...

Page 67: ...ressive through pull down conversion If you display the edit screen while outputting signals to a monitor or TV the menu may not be displayed correctly This camcorder is not compatible with BRAVIA sync z Tip HDMI High Definition Multimedia Interface is an interface for transferring uncompressed digital audio and video signals between a TV and a connected device By connecting a cable from the camco...

Page 68: ...vie at a designated point 1 Press the MENU button while playing back movies 2 Press the V v B b SET button then select EDIT t DIVIDE 3 Select X at the point where you want to divide 4 Select t b Notes You cannot restore movies once they are divided Do not remove the battery pack the AC Adaptor or the recording media that contains the movies from your camcorder during the operation It may damage th...

Page 69: ...ortant movies beforehand z Tip To delete all data recorded on the recording media and recover all the recordable space of the media format the media p 70 1 Press the MENU button when the thumbnail screen is displayed 2 Press the V v B b SET button then select EDIT t DELETE 3 Select a move to delete is displayed on the selected images Press the DISPLAY button to preview the image Press to return to...

Page 70: ...om the memory card completely If a memory card is used repeatedly garbage data accumulate which may prevent the image data from being written at the fixed speed In this case recording may stop suddenly If this happens empty the memory card to avoid the writing error Emptying the memory card can erase more data than ordinary formatting b Notes If you perform this operation all stored data are delet...

Page 71: ...te errors that might occur when recording Repairing the image database file This function checks the database information and the consistency of movies on the recording media and repairs any inconsistencies found b Note Connect your camcorder to the wall outlet wall socket using the supplied AC Adaptor to prevent your camcorder from running out of power during the operation 1 Press the MENU button...

Page 72: ...ress the V v B b SET button select the desired menu icon then press the button again CAMERA SET p 77 REC OUT SET p 80 AUDIO SET p 82 DISPLAY SET p 84 TC UB SET p 88 OTHERS p 90 EDIT p 77 3 Press the V v B b SET button select the item that you want to set then press the button again 4 Press the V v B b SET button select the desired setting then press the button again MENU button V v B b SET buttons...

Page 73: ...e the menu screen To return to the previous screen select RETURN b Notes The available menu items vary depending on the context of your camcorder during recording or playback Items and setting values not available due to other settings are grayed out ...

Page 74: ...AR IMAGE ZOOM ON DIGITAL ZOOM HANDLE ZOOM ZOOM OPERATION BON OFF ZOOM SPEED 1 to 8 B3 STEADYSHOT BSTANDARD ACTIVE OFF CONVERSION LENS BOFF WIDE CONVERSION S Q MOTION AVCHD REC FORMAT 1080 50p PS B1080 25p FX 1080 25p FH FRAME RATE 1 to 50fps B50fps AUTO MODE SET BAUTO INTELLIGENT AUTO SCENE SELECTION SCENE SELECTION SET NIGHT SCENE SUNRISE SUNSET FIREWORKS LANDSCAPE BPORTRAIT SPOTLIGHT BEACH AUTO ...

Page 75: ...ANDLE REC BUTTON REC BUTTON HANDLE REC BUTTON REC BUTTON HANDLE REC BUTTON DV MODE WIDE REC ON BOFF CANCEL DV MODE VIDEO OUT OUTPUT SELECT 4K REC OUTPUT BVF LCD PANEL EXTERNAL OUTPUT HDMI 2160p 1080p 576i 2160p 720p 576i 2160p 1080i 576i 1080p 576i 720p 576i B1080i 576i 576p 576i DOWN CONVERT TYPE BSQUEEZE LETTER BOX 16 9 EDGE CROP WIDE CONVERT BSQUEEZE LETTER BOX 16 9 EDGE CROP HDMI TC OUTPUT BOF...

Page 76: ...R FOCUS DISPLAY BMETER FEET SHUTTER DISPLAY BSECOND DEGREE DATA CODE BOFF DATE TIME CAMERA DATA LCD BRIGHT BNORMAL BRIGHT VF BRIGHT BNORMAL BRIGHT DISPLAY OUTPUT BLCD PANEL ALL OUTPUT z Tips You can display DATA CODE by pressing the MENU button when the playback screen is displayed LCD BRIGHT is available only when using a battery pack It is grayed out when using the AC Adaptor TC UB SET p 88 TC U...

Page 77: ...B See page 72 for details on selecting menu items You can select the upper limit for the Auto Gain Control AGC BOFF 24dB to 0dB 3dB increments b Note This function is not active while you adjust the gain manually You can use the preset white balance For more details see page 41 You can set an offset value to adjust the outdoor white balance when you set WB PRESET to OUTDOOR 7 to B0 to 7 bluish to ...

Page 78: ...8 x ZOOM TYPE B OPTICAL ZOOM ONLY Uses only optical zoom You can zoom up to 12 ON CLEAR IMAGE ZOOM You can use the clear image zoom in addition to the optical zoom XAVC S 4K 12 optical zoom 18 clear image zoom XAVC S HD AVCHD DV 12 optical zoom 24 clear image zoom ON DIGITAL ZOOM You can use the digital zoom in addition to the optical zoom and clear image zoom You can zoom up to 192 but the image ...

Page 79: ...n lens See page 55 See page 45 See page 45 You can automatically correct for backlighting B OFF Does not correct for backlighting ON Automatically corrects for backlighting See page 34 This sets the lighting method for a video light sold separately attached to the multi interface shoe B POWER LINK Video light turns on off when the camcorder power is turned on off REC LINK Video light turns on off ...

Page 80: ...ignals ON Outputs audio tone signals 1 kHz full bit 18dB Set ON OFF to ON too z Tips You can assign ON OFF to an ASSIGN button p 58 If you record color bars with TONE set to OFF the camcorder records sound from the microphone See page 47 COLOR BAR PICTURE PROFILE REC OUT SET menu Recording settings input and output settings REC SET VIDEO OUT etc The default settings are marked with B See page 72 f...

Page 81: ... movies recorded with WIDE REC set to ON B SQUEEZE Outputs a horizontally compressed image while maintaining its original height LETTER BOX 16 9 Outputs a vertically compressed image while maintaining its original aspect ratio EDGE CROP Outputs the central portion of the original image by cropping its right and left edges b Notes When you view a movie recorded in DV with WIDE REC set to ON on a st...

Page 82: ...tails on selecting menu items You can adjust the volume z Tip You can assign this function to an ASSIGN button p 58 You can set the audio format for AVCHD recording B LINEAR PCM Records in LPCM format DOLBY DIGITAL Records in Dolby Digital format b Note The above setting can be switched only when the recording format is AVCHD Sets the sound distortion prevention function for CH 1 CH 2 B OFF Disabl...

Page 83: ...ol of CH 1 and CH 2 when using an external microphone B SEPARATE Unlinks AGC CH 1 and CH 2 are recorded with separate AGC LINKED Links AGC CH 1 and CH 2 are recorded with linked AGC like stereo appears on the status check screen b Note Available when the same source LINE MIC MIC 48V is selected on both INPUT1 and INPUT2 switches and the AUTO MAN switches for both CH 1 and CH 2 are set to AUTO p 42...

Page 84: ...ding stage To counter distortion of the input stage adjust the level using the INPUT TRIM function To counter distortion in the recording stage reduce the overall level manually If the INPUT TRIM is adjusted in the negative direction too far the audio level from the microphone may become too small adversely affecting the S N ratio Test the effect of using XLR SET beforehand to suit the microphone ...

Page 85: ...lps you to adjust the focus x COLOR You can select the peaking color BWHITE RED YELLOW x LEVEL You can select the peaking sensitivity HIGH BMIDDLE LOW b Note The enhanced outlines will not be recorded on the recording media z Tips You can focus more easily using this function in combination with the expanded focus function p 33 You can assign ON OFF to an ASSIGN button p 58 x ON OFF B OFF Does not...

Page 86: ...ct at the cross points of the guideframe marker You can assign ON OFF to an ASSIGN button p 58 You can set the magnification of expanded focus 4 0 8 0 B 4 0 8 0 The setting changes in the order 4 0 t 8 0 t OFF with each press of the ASSIGN5 FOCUS MAG button OFF Does not display the iris gain and shutter speed settings B ON Constantly displays the iris gain and shutter speed settings on the LCD scr...

Page 87: ...he shutter speed is 1 50 the shutter angle is 360 degrees With a frame rate of 25 selected in REC FORMAT when the shutter speed is 1 25 the shutter angle is 360 degrees See page 36 for details on the REC FORMAT setting b Note When you press the ASSIGN button to which DATA CODE is assigned the shutter speed is displayed in seconds regardless of this setting z Tip If the shutter speed is more than 3...

Page 88: ...utput b Notes Only the time code zebra peaking and the frame on the face are output when MARKER is set to ON and a marker is displayed on the LCD screen Even when set to LCD PANEL some information appears on the external output LCD BRIGHT VF BRIGHT DISPLAY OUTPUT TC UB SET menu Time code settings TC PRESET UB PRESET etc The default settings are marked with B See page 72 for details on selecting me...

Page 89: ...he following cases When the recording format is changed When the recording media is removed B PRESET Records the newly set time code on the recording media REGENERATE Reads the last time code of the previous recording from the recording media and records the new time code consecutively from the last time code during the backspace editing The time code runs in REC RUN mode regardless of the setting...

Page 90: ...ra profile to be loaded with the V v B b SET button 2 Select YES on the confirmation screen The camcorder restarts and the loaded camera profile becomes effective Press the MENU button t select OTHERS with the V v B b SET button STATUS CHECK CAMERA PROFILE b Note A camera profile saved on a camcorder with different model name or edited on a computer cannot be loaded x SAVE You can save the camera ...

Page 91: ...stop recording or when you are warned with warning indicators etc B ON Turns on the recording lamp OFF Turns off the recording lamp z Tip You can assign this function to an ASSIGN button p 58 B ON Enables the supplied Wireless Remote Commander p 12 OFF Disables the supplied Wireless Remote Commander to prevent misoperation by the remote control of another device See page 70 See page 71 Select this...

Page 92: ...ements Displays the current version of your camcorder Be sure to check for firmware updates b Note To perform an update use the AC Adaptor You can reset all settings including the clock setting to their default values b Note The picture profile settings are not reset OPERATION TIME VERSION DISPLAY INITIALIZE OTHERS menu Continued ...

Page 93: ...isconnect the power source battery or AC Adaptor then reconnect it after about 1 minute Select OTHERS t INITIALIZE The camcorder gets warm Camera body may get warm with use this is normal The POWER CHG lamp is not lit while charging the battery pack Turn off the power Reattach the battery pack correctly Re insert the plug in the power outlet correctly The battery pack is already fully charged 1 Ch...

Page 94: ...he battery pack discharges too quickly Ambient temperature is too high or too low or the battery pack has not been charged enough This is not a malfunction Fully charge the battery again If the problem persists the battery may be worn out Replace with a new battery p 19 110 The image on the viewfinder is not clear Move the viewfinder lens adjustment dial until the image appears clearly p 24 The su...

Page 95: ...to be deleted on the edit screen The images are protected Unprotect the images p 68 Cannot play back or memory card is not recognized on another device The playback device does not support playback of the memory card The recording does not start when you press the START STOP button The playback screen is displayed Finish playback operation p 62 The previously shot scene is still being written to t...

Page 96: ...the default setting when the power is turned off The FOCUS MAGNIFIER setting is not stored The battery pack or AC Adaptor was disconnected while the power was turned on Before disconnecting the battery pack or AC Adaptor turn off the power and make sure that the access lamp is turned off There is a time difference between the point when the START STOP button is pressed and the point that the recor...

Page 97: ...ultaneously The following list shows examples of unworkable combinations of functions and menu items The settings of menu items change When the FULL AUTO button is set to AUTO settings related to picture quality automatically change Iris gain shutter speed or white balance cannot be adjusted manually Press the FULL AUTO button to set auto mode off Tiny spots in white red blue or green appear on th...

Page 98: ... speed p 39 Black bands appear when you record a TV screen or computer screen Adjust the shutter speed p 39 Fine patterns flicker diagonal lines look jagged Adjust DETAIL to the negative side p 53 The time code is not recorded in sequence The time code may not be recorded sequentially if you change the settings of REC FORMAT Image color is not correct Cancel NIGHTSHOT p 46 The image is not visible...

Page 99: ...ted on your camcorder p 109 Only the file name is displayed if the folder structure does not conform to the universal standard Audio is not recorded properly If an external microphone or other device is connected or disconnected while recording a movie the audio may not be recorded properly Audio is recorded properly by restoring the connection state of the microphone that was in force at the star...

Page 100: ... VIDEO OUT t DOWN CONVERT TYPE and set the appropriate down conversion type p 81 Black zone appears at top and bottom of a 4 3 TV screen This happens when viewing a movie recorded in the 16 9 wide mode on a 4 3 TV This is not a malfunction Time code and other information appear on the display of the connected device Set DISPLAY OUTPUT to LCD PANEL p 88 Copy cannot be done correctly using the A V c...

Page 101: ...der Disconnect the cable from the computer then connect it again securely Disconnect the cable from your computer and camcorder Reboot your computer and connect your computer and camcorder following the steps in the correct order Movies cannot be viewed or copied to the computer Disconnect the cable from the computer then connect it again You need to install Catalyst Browse to copy movies from you...

Page 102: ...ons the indicator may flash even if around 10 is displayed as the battery remaining figure Warning indicators pertaining to battery pack temperature The battery pack is too hot Replace the battery pack or remove the battery pack and put it in a cool place Warning indicator pertaining to the video light The battery level is too low Warning indicators pertaining to memory cards Slow flashing Free sp...

Page 103: ...ecognized If you connect to a computer on which Catalyst Browse is installed you can copy the backed up movies However the loading of all moves is not guaranteed Buffer overflow Writing to the media was not completed in time You have performed recording and erasing operations repeatedly or a memory card that has been formatted by other device is used Back up the data to another device such as a co...

Page 104: ...ony dealer Do not eject the memory card during writing Data may be damaged Reinsert the memory card and follow the instructions on the LCD screen Other Maximum number of images already selected You can select only 100 images at one time for Deleting movies Protecting movies or releasing the protection Protected file Cannot delete An attempt was made to delete protected data Release the protection ...

Page 105: ...ter depending on the conditions under which you use your camcorder Playing time Unit minute XAVC S 4K Unit minute XAVC S HD AVCHD x When AVCHD AUDIO FORMAT is set to LINEAR PCM Unit minute x When AVCHD AUDIO FORMAT is set to DOLBY DIGITAL Unit minute Estimated time of recording and playback with each battery pack Battery pack Continuous recording time Typical recording time NP F570 150 75 NP F970 ...

Page 106: ...t to automatically adjust image quality to suit the recording scene This technology causes fluctuations in the recording time of the media Movies containing quickly moving and complex images are recorded at a higher bit rate and this reduces the overall recording time Bit rate movie audio etc number of pixels and aspect ratio of each recording mode of movies are as follows XAVC S 4K 100 Mbps 3 840...

Page 107: ...zil Bulgaria China Croatia Czech Republic Denmark Finland France French Guiana Germany Greece Hong Kong Hungary Indonesia Iran Iraq Italy Kuwait Malaysia Monaco the Netherlands New Zealand Norway Paraguay Poland Portugal Romania Russia Singapore Slovak Republic Spain Sweden Switzerland Thailand Turkey Ukraine United Kingdom Uruguay Vietnam etc Simple setting of the clock by time difference When yo...

Page 108: ... numbers go up automatically D Camera profiles Stores camera profile data E DV movie management information folder This folder contains recording data of DV movie Do not try to open this folder or access the contents of this folder from a computer Doing so might damage image files or prevent image files from being played back Do not modify the files or folders on the camcorder from the computer Do...

Page 109: ... on the combination of the memory card and memory card compliant product you use Damaged or lost image data will not be compensated for and may occur in the following cases If you eject the memory card turn the power off on your camcorder or remove the battery pack for replacement while your camcorder is reading or writing image files on the memory card while the access lamp is lit or flashing If ...

Page 110: ...ery packs and AC adaptors listed below NP F570 NP F770 NP F970 The battery terminal of this unit the connector for battery packs and AC adaptors is a consumable part Power may not be supplied to the unit properly if the pins of the battery terminal are bent or deformed by shock or vibrations or if they become corroded due to prolonged outdoor use Periodic inspections are recommended to keep the un...

Page 111: ...d usage time between charges becomes significant it is probably time to replace it with a new one Battery capacity decreases over time and through repeated use If decreased usage time between charges becomes significant it is probably time to replace it with a new one Each battery s life is governed by storage operating and environmental conditions About charging the battery pack Be sure to charge...

Page 112: ... malfunction Sometimes this malfunction cannot be repaired Near windows or outdoors where the LCD screen the viewfinder or the lens may be exposed to direct sunlight This damages the inside of the viewfinder or the LCD screen Anywhere very humid Operate your camcorder on 7 2 V battery pack or 8 4 V DC AC Adaptor For DC or AC operation use the accessories recommended in these operating instructions...

Page 113: ...with a soft cloth lightly moistened with water and then wipe the casing with a dry soft cloth Avoid the following to prevent damage to the finish Using chemicals such as thinner benzine alcohol chemical cloths repellent insecticide and sunscreen Handling with above substances on your hands Leaving the casing in contact with rubber or vinyl objects for a long period of time Care and storage of the ...

Page 114: ...a from the memory card completely When you give the memory card to somebody it is recommended that you delete data completely using data deletion software on a computer Also when you dispose of the memory card it is recommended that you destroy the actual body of the memory card Operation is not guaranteed when using a card adaptor Maintenance and precautions Continued ...

Page 115: ...ofile AVCHD MPEG 4 AVC H 264 AVCHD 2 0 format compatible SD image quality DV standard compatible Audio recording system XAVC S Linear PCM 2ch 16 bit 48 kHz AVCHD Linear PCM 2ch 16 bit 48 kHz Dolby Digital 2ch 16 bit 48 kHz DV Linear PCM 2ch 16 bit 48 kHz Recording media Memory Stick PRO Duo and SD card Camera Imaging device 1 0 inch type ExmorR CMOS sensor Total picture elements Approx 20 900 000 ...

Page 116: ... 3 pin female 2 line mic mic 48 V selectable DC input DC IN jack Remote jack Stereo mini jack φ2 5 mm 1 Multi Interface Shoe 1 7 2 V DC 0 15 A Screen LCD screen 8 8 cm 3 5 type Approx 1 56M dots Viewfinder 0 6 cm 0 24 type Approx 1 56M dots Internal microphone Omni directional stereo electret condenser microphone AC Adaptor Power requirements 100 V to 240 V AC 50 Hz 60 Hz Output voltage 8 4 V DC S...

Page 117: ... CONTENT OF ANY TYPE Always verify that the unit is operating properly before use SONY WILL NOT BE LIABLE FOR DAMAGES OF ANY KIND INCLUDING BUT NOT LIMITED TO COMPENSATION OR REIMBURSEMENT ON ACCOUNT OF THE LOSS OF PRESENT OR PROSPECTIVE PROFITS DUE TO FAILURE OF THIS UNIT EITHER DURING THE WARRANTY PERIOD OR AFTER EXPIRATION OF THE WARRANTY OR FOR ANY OTHER REASON WHATSOEVER SONY WILL NOT BE LIAB...

Page 118: ...VIDE 68 DOWN CONVERT TYPE 81 DV MODE 37 DV WIDE CONVERT 81 DV WIDE REC 80 F FACE DETECTION 34 Focus 33 FOCUS DISPLAY 87 FOCUS MAG RATIO 86 Focus Magnifier 33 Focus ring 33 Format media 70 FREE RUN 89 FULL AUTO 45 G Gain 39 GAMMA 49 Getting started 18 GUIDEFRAME 86 H Handle record button 31 Handle zoom 32 Handle zoom lever 32 HDMI 81 HDMI REC CONTROL 82 HDMI TC OUTPUT 81 HISTOGRAM 84 I Image databa...

Page 119: ...ION SET 45 Screen indicators 13 63 Self diagnosis display 102 Shooting 28 SHUTTER DISPLAY 87 Shutter speed 39 SIMUL RELAY REC 31 Simultaneous recording 31 S Q MOTION 55 Slow Quick Motion 55 Specifications 115 STATUS CHECK 64 90 STEADYSHOT 79 SUMMERTIME 91 Supplied accessories 18 T TC MAKE 89 TC PRESET 54 97 TC RUN 89 TC UB DISPLAY 88 TC UB SET menu 88 Telephoto 32 TONE 80 Trademark 120 Troubleshoo...

Page 120: ...Trademarked items are not indicated by or symbols in this manual Notes on the License THIS PRODUCT IS LICENSED UNDER THE AVC PATENT PORTFOLIO LICENSE FOR THE PERSONAL USE OF A CONSUMER OR OTHER USES IN WHICH IT DOES NOT RECEIVE REMUNERATION TO i ENCODE VIDEO IN COMPLIANCE WITH THE AVC STANDARD AVC VIDEO AND OR ii DECODE AVC VIDEO THAT WAS ENCODED BY A CONSUMER ENGAGED IN A PERSONAL ACTIVITY AND OR...

Page 121: ...e access to modify and redistribute source code for these software programs under the conditions of the supplied GPL LGPL Source code is provided on the web Use the following URL to download it http oss sony net Products Linux We would prefer you do not contact us about the contents of source code Licenses in English are recorded in the internal memory of your product Establish a Mass Storage conn...

Page 122: ... 2018 Sony Corporation ...

Reviews: