


54
Image Search
You can search for recorded data stored on the unit’s
internal hard disk.
Use the on-screen keyboard to enter text.
For details on use, see “Using the On-Screen Keyboard
(Text Entry)” (page 29).
Specifying Search Conditions
Search for recorded data by specifying conditions such as
patient ID and recording date.
1
Press the MENU button.
The [MENU] screen appears.
2
Select [Recording List], and press the ENTER button.
The [Recording List] screen appears.
3
Select [Search], and press the ENTER button.
The [Search] screen appears.
4
Specify the search conditions, select [Search], and
press the ENTER button.
[Patient ID]
Enter an identification number for the patient.
[Patient Name]
Enter the patient’s name.
[Doctor]
Select the name of the doctor performing the surgical
procedure or examination.
[Recording Date]
Select the year (last two digits), month, and day.
[Status]
Select whether the recorded data has been saved to
external media.
You can select from [Saved to Media], [Not Saved to
Media], or [DICOM Unsent], or leave the field
empty.
The [DICOM Unsent] setting appears only if
[DICOM] is set to [Use] in the [System Admin
Settings] screen – [DICOM Settings] screen –
[Server] tab.
[2D/3D]
Select whether the recorded data is 2D data or 3D
data.
Select [Clear] and press the ENTER button to clear all
specified search conditions.
5
Select [Search], and press the ENTER button.
A search for recorded data matching the specified
conditions is performed, and the results are displayed.
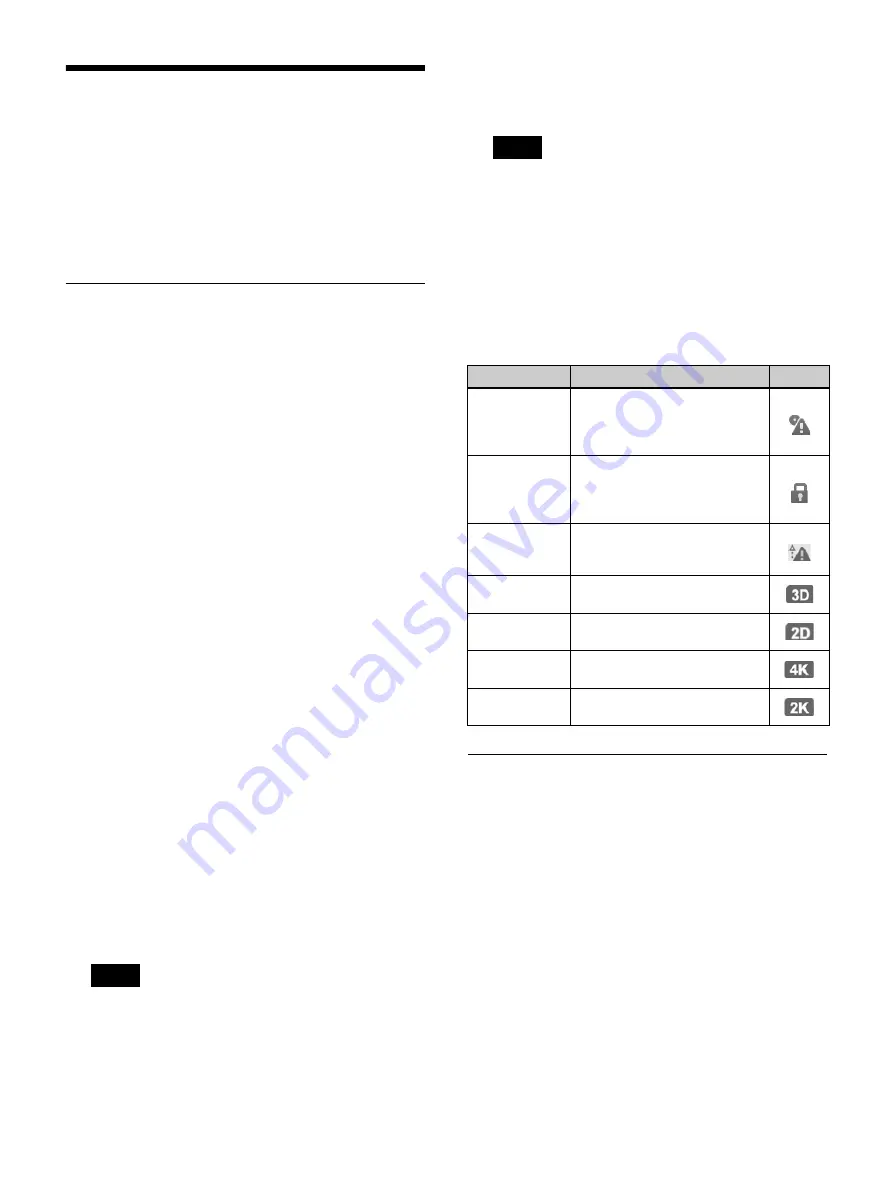
Status of recorded data
The following icons appear based on the status of the
recorded data.
Viewing Thumbnails of Recorded
Data
You can view thumbnail images of recorded data in an
image list.
1
Select [Image List] for the operation box in the
[Recording List] screen.
2
Select the recorded data in the [Recording List]
screen, and press the ENTER button.
The [Image List] screen appears, and thumbnail
images of the recorded data are displayed.
Tip
Tip
Status
Description
Icon
Not saved to
external media
The recorded data has not been
saved to external media. The
icon disappears when saving is
completed.
Protected
The recorded data is protected
and cannot be deleted. The icon
disappears when the protection
is released.
DICOM
transfer failed
DICOM transfer failed. The icon
disappears when transfer is
successful.
3D data
The data was recorded in 3D
mode.
2D data
The data was recorded in 2D
mode.
4K data
The recorded data is in 4K
format.
2K data
The recorded data is in 2K
format.
Summary of Contents for HVO-4000MT
Page 117: ......


