35
To configure the output mode
1
Select [Advanced], and press the ENTER button.
The [Advanced] settings screen for the output mode
appears.
2
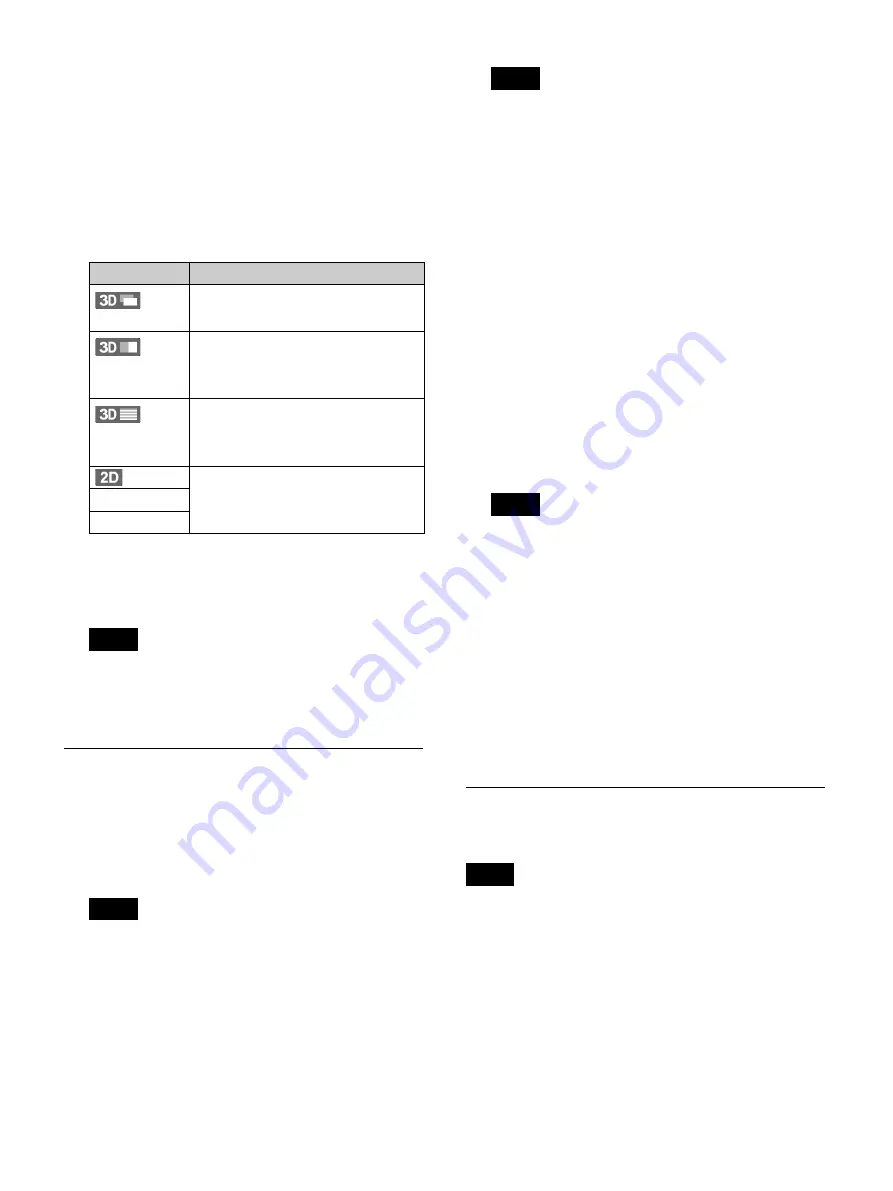
Select the output mode.
The selectable output modes and default setting will
differ depending on the input signal.
3
When you finish configuration, select [Apply] and
press the ENTER button.
The previous screen appears again.
Whenever you change the input signal, the default
output mode setting for the current input signal will
be reset.
Configuring Image Quality Settings
Configure image quality settings for videos and still
images.
1
Display the [Quality] tab, and configure video
settings in the [Video] area.
The recording capacities displayed in [Rec Time] are
estimations for recording both Ch1 and Ch2 images
to single-layer BD discs (25 GB). However, when
[Ch2 Rec] is set to [Not Used] in the [Rec/Streaming]
tab, the estimations will be based on Ch1 only.
[Quality]
Select the video recording quality.
You can select from [Best], [High], and [Standard].
The default setting is [High].
The setting specified here will become the default
setting for [Video Quality] in the [Recording
Preparation] screen.
2
Configure still image settings in the [Still] area.
[Format]
Select the still image format (file format).
You can select from [Bitmap], [TIFF], and [JPEG].
The default setting is [Bitmap].
[Quality]
Select the still image (JPEG) recording quality.
You can select from [Best], [High], and [Standard].
This item is available when [Format] is set to [JPEG].
The default setting is [High].
[Capture]
Select the still image format used during image
capture or during use of the multi auto live function.
You can select from [Frame], [Field 1], and [Field 2].
The default setting is [Frame].
• For progressive input signals, image capture will be
performed using the [Frame] setting, even if
[Field 1] or [Field 2] is specified.
• The recording capacities displayed in [Rec
Quantity] are estimations for recording the Ch1
input signal to single-layer BD discs (25 GB).
3
To configure recording settings, proceed to
“Configuring Recording Settings (User Settings)”
(page 34)
If you are finished configuring settings, select
[Apply] and press the ENTER button.
Configuring Recording and
Streaming Settings
Ch2 recording and streaming cannot be performed
simultaneously. A warning message will appear if you
configure the settings to perform both simultaneously.
1
Display the [Rec/Streaming] tab, and configure
recording settings.
[Ch2 Rec]
Select whether to record Ch2 images.
The default setting is [Not Used].
Input signal
Selectable output modes
(2-stream)
[Side by Side] and [Line by Line]
Default setting: [Side by Side]
(side-by-side)
[Side by Side] and [Line by Line]
Default setting: [Side by Side]
Pass-through output is possible for
[Side by Side].
(line-by-line)
[Line by Line] and [Top and Bottom]
Default setting: [Line by Line]
Pass-through output is possible for
[Line by Line].
(2D)
[Side by Side], [Line by Line], and
[Top and Bottom]
Default setting: [Side by Side]
VIDEO
S VIDEO
Tip
Tip
Tip
Tips
Tip
Summary of Contents for HVO-3300MT
Page 99: ......


