background image

masterpage:Left

lename[E:\SEM_Janet\Revision_HT-

SL900W\J9040000_4254829121SL900WGB\4254829121\GB03CON_HT-SL900W-CEL.fm]

6

GB

 model name1[HT-SL900W]

 [4-254-829-

12

(1)]

.

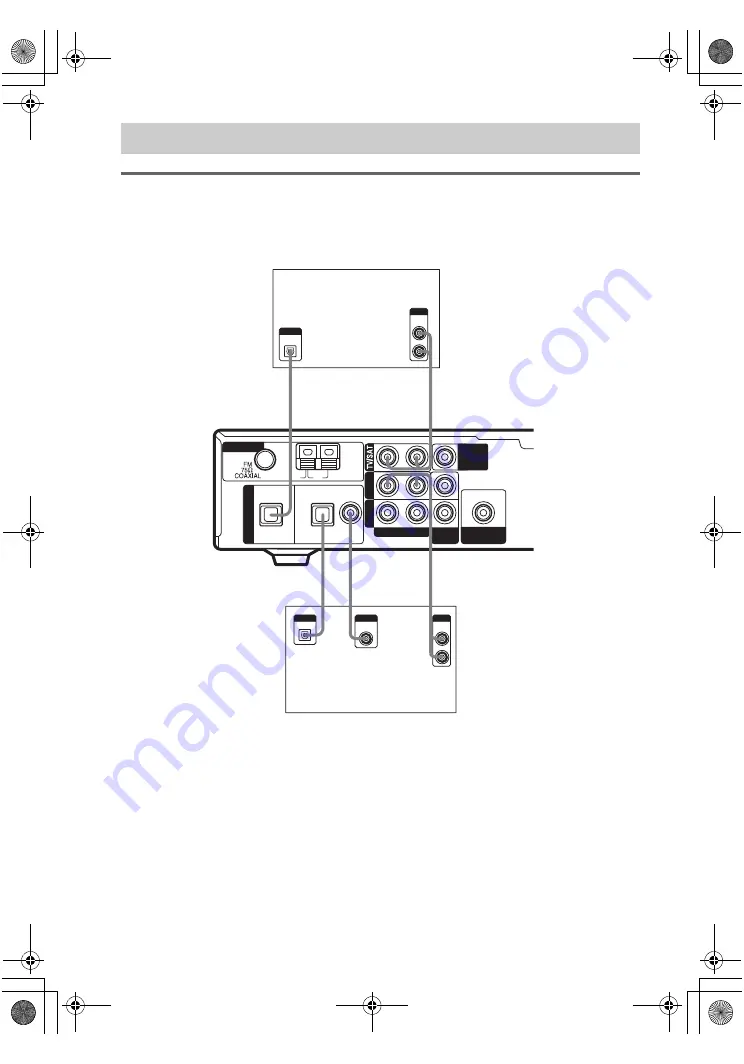
Hooking up a DVD player or satellite tuner

For details on the required cords (

A

E

), see page 5.

1

Connect the audio jacks.

* Connect to either the COAX IN or OPT IN jack. We recommend making connections to the COAX IN jack.

Tip

All the digital audio jacks are compatible with 32 kHz, 44.1 kHz, 48 kHz and 96 kHz sampling frequencies. 

1a: Connecting components with digital audio output jacks

OPT IN

COAX IN

AM

U

OPT IN

TV/SAT

DVD

VIDEO

AUDIO IN

DIGITAL

ANTENNA

R

L

VIDEO 

IN

SUB

WOOFER

OUT

MONITOR

OUT

DVD

DIGITAL

OPTICAL

OUTPUT

D

A

A

E

*

D

*

R

AUDIO

OUT

OUTPUT

L

DIGITAL

COAXIAL

OUTPUT

OPTICAL

OUTPUT

AUDIO

OUT

OUTPUT

L

R

OPT IN

COAX IN

Satellite tuner

DVD player

GB01COV_HT-SL900W-CEL.book  Page 6  Monday, May 24, 2004  8:22 AM

Summary of Contents for HT-SL900W

Page 1: ...net Revision_HT SL900W J9040000_4254829121SL900WGB 4254829121 GB01COV_HT SL900W CEL fm masterpage Right 2004 Sony Corporation 4 254 829 12 1 Home Theatre System Operating Instructions HT SL900W GB01COV_HT SL900W CEL book Page 1 Monday May 24 2004 8 22 AM ...

Page 2: ...e the controls on the remote You can also use the controls on the receiver if they have the same or similar names as those on the remote For details on the use of your remote see pages 33 36 The HT SL900W consists of Receiver STR KSL900W Speaker system Front surrond speakers SS SLP701 Center speaker SS CNP901 Sub woofer SA WMSP601 IR transmitter DIR T1 IR receiver DIR R1 Surround amplifier TA WR1 ...

Page 3: ...ng to FM AM radio 20 Storing FM stations automatically 21 AUTOBETICAL Presetting radio stations 22 Using the Radio Data System RDS 23 About the indications in the display 25 Enjoying Surround Sound Using only the front speakers and sub woofer 26 2CH STEREO Enjoying higher fidelity sound 26 Selecting a sound field 27 Advanced Adjustments and Settings Customizing sound fields 29 Adjusting the tone 3...

Page 4: ... hooking up all your components proceed to 2 Connecting the antennas page 9 Connectable components a Model with a DIGITAL OPTICAL OUTPUT or DIGITAL COAXIAL OUTPUT jack etc b Model equipped only with AUDIO OUT L R jacks etc Getting Started 1 Check how to hookup your components Component to be connected Page DVD player With digital audio outputa 6 7 With analog audio output onlyb 6 7 TV monitor With...

Page 5: ...udio C Video cord Yellow D Optical digital cord E Coaxial digital cord supplied Orange Notes Turn off the power to all components before making any connections Be sure to make connections firmly to avoid hum and noise When connecting an audio video cord be sure to match the color coded pins to the appropriate jacks on the components yellow video to yellow white left audio to white and red right au...

Page 6: ...nd making connections to the COAX IN jack Tip All the digital audio jacks are compatible with 32 kHz 44 1 kHz 48 kHz and 96 kHz sampling frequencies 1a Connecting components with digital audio output jacks OPT IN COAX IN AM U OPT IN TV SAT DVD VIDEO AUDIO IN DIGITAL ANTENNA R L VIDEO IN SUB WOOFER OUT MONITOR OUT DVD DIGITAL OPTICAL OUTPUT D A A E D R AUDIO OUT OUTPUT L DIGITAL COAXIAL OUTPUT OPTI...

Page 7: ...03CON_HT SL900W CEL fm 7GB model name1 HT SL900W 4 254 829 12 1 2 Connect the video jacks AM U OPT IN TV SAT DVD VIDEO AUDIO IN DIGITAL ANTENNA R L VIDEO IN SUB WOOFER OUT MONITOR OUT OPT IN COAX IN DVD C VIDEO OUTPUT C VIDEO INPUT DVD player TV monitor GB01COV_HT SL900W CEL book Page 7 Monday May 24 2004 8 22 AM ...

Page 8: ...the MONITOR OUT jack you can watch the video from the selected input page 20 For details on the required cords A E see page 5 1b Connecting components with only analog audio jacks AM U OPT IN TV SAT DVD VIDEO AUDIO IN DIGITAL ANTENNA R L VIDEO IN SUB WOOFER OUT MONITOR OUT OPT IN COAX IN DVD C VIDEO INPUT B VIDEO OUT AUDIO OUT OUTPUT R L TV monitor VCR GB01COV_HT SL900W CEL book Page 8 Monday May ...

Page 9: ... pickup keep the AM loop antenna away from the receiver and other components Be sure to fully extend the FM wire antenna After connecting the FM wire antenna keep it as horizontal as possible 2 Connecting the antennas OPT IN COAX IN AM U OPT IN TV SAT DVD VIDEO AUDIO IN DIGITAL ANTENNA R L VIDEO IN SUB WOOFER OUT MONITOR OUT OPT IN COAX IN DVD AM loop antenna supplied FM wire antenna supplied GB01...

Page 10: ...mple of 5 1 channel speaker system configuration About the wireless system This wireless system adopts the Digital Infrared Audio Transmission system page 41 The following diagram indicates the infrared transmission area the range that the infrared rays can reach Notes Do not install the IR receiver in a place exposed to direct sunlight or strong light such as an incandescent lamp Do not use the I...

Page 11: ...er Receives the sound from the IR receiver and sends to the surround speakers Connect the surround speakers and the IR receiver to the surround amplifier IR transmitter Transmits the sound by the infrared ray Connect it to the receiver IR receiver Receives the sound by the infrared ray Connect it to the surround amplifier Tip To attach the IR receiver stand push the cord upward and insert the stan...

Page 12: ... supplied foot pads to the sub woofer Tip Since the sub woofer does not emit highly directional signals you can place it wherever you want SUB WOOFER OUT DIR T1 MONITOR OUT FRONT R FRONT L INPUT B E e A A E e E e A A E e A E e SPEAKERS DIR R1 IMPEDANCE USE 6Ω SURROUND L CENTER SURROUND R Front speaker Right Front speaker Left Subwoofer Center speaker Surround speaker Left Surround speaker Right Su...

Page 13: ...ccording to its polarity to and to Otherwise the sound will be distorted and will lack bass 4 Remove the connector from the flat surface Note To avoid the speaker cord from coming off the speaker connector do not use a smaller size speaker cord We recommend that you use the AWG 18 to AWG 24 speaker cords use the same speaker cord size for all the speaker connectors twist the stripped ends of the s...

Page 14: ...on and the ON STANDBY indicator on the surround amplifier lights up in red 2 Place the IR transmitter and IR receiver to face each other Adjust the position of the IR transmitter and the IR receiver until the ON STANDBY and ON LINE indicators on the surround amplifier lights up in green Tip The IR transmitter can be rotated during adjustment Notes Make sure that there is no obstruction such as a p...

Page 15: ...smitter and IR receiver on a wall when There are obstacles between the IR transmitter and IR receiver people often move between the IR transmitter and IR receiver When you install both the IR transmitter and IR receiver on a wall be sure to install the IR receiver first before you install the IR transmitter To install the IR receiver on a wall 1 Fix a commercially available screw into the wall so ...

Page 16: ...oes not move after installation Tip Store the cords in the troughs as shown below Notes Use the screws that are suitable for the material and strength of the wall Do not install the IR transmitter or IR receiver to a wall of low strength Sony is not liable for any damage or accident incurred by incorrect installation i e low strength wall etc incorrect use of this product or natural disaster Detac...

Page 17: ...etting 3 0 m Lets you set the distance from your listening position to the surround speakers Surround speaker distance should be set from a distance equal to the front speaker distance A to a distance 4 5 meters closer to your listening position C If both surround speakers are not placed an equal distance from your listening position set the distance to the closest speaker Tip The receiver lets yo...

Page 18: ... minimum on the receiver 1 Turn on the receiver 2 Press input buttons e g DVD to select the program source e g DVD player Tip You can also use INPUT SELECTOR on the receiver to select the program source 3 Press POWER on the sub woofer The POWER indicator on the sub woofer lights up 4 Play the program source Adjusting the level Slight adjustments to the system can enhance your sound enjoyment Turn ...

Page 19: ...t from each speaker in sequence Front left t Center t Front right t Surround right t Surround left t Sub woofer 3 Adjust the speaker levels and balance using the LEVEL menu so that the level of the test tone sounds the same from each speaker For details on the LEVEL menu settings see page 29 Tips To adjust the level of all speakers at the same time press MASTER VOL on the remote or turn MASTER VOL...

Page 20: ...cted the FM and AM antennas to the receiver see page 9 Tip The tuning scale is FM 50 kHz AM 9 kHz Automatic tuning If you do not know the frequency of the station you want you can let the receiver scan all available stations in your area 1 Press TUNER repeatedly to select the FM or AM band The last received station is tuned in Tip You can also use INPUT SELECTOR on the receiver 2 Press TUNING or T...

Page 21: ...he receiver for the operation 1 Press 1 to turn off the receiver 2 Hold down INPUT SELECTOR and press 1 to turn the receiver back on AUTO BETICAL SELECT appears in the display and the receiver scans and stores all the FM and FM RDS stations in the broadcast area For RDS stations the tuner first checks for stations broadcasting the same program then stores only the one with the clearest signal The ...

Page 22: ... also press SHIFT repeatedly to select a memory page A B or C and then press the numeric buttons to select a preset number 5 Press MEMORY again The station is stored to the selected preset number If MEMORY goes out before you press MEMORY start again from step 3 6 Repeat steps 2 to 5 to preset another station Tuning to preset stations 1 Press TUNER repeatedly to select the FM or AM band The last r...

Page 23: ...adio Text indicationb t Current Time indication in 24 hour system t Sound field currently applied t Volume level a Type of program being broadcast see page 23 b Text messages sent by the RDS station Notes If there is an emergency announcement by government authorities ALARM flashes in the display When the message consists of 9 characters or more the message scrolls across the display If a station ...

Page 24: ...igious content PHONE IN Programs where members of the public express their views by phone or in a public forum TRAVEL Programs about travel Not for announcements that are located by TP TA LEISURE Programs on recreational activities such as gardening fishing cooking etc JAZZ Jazz programs COUNTRY Country music programs NATION M Programs featuring the popular music of the country or region OLDIES Pr...

Page 25: ...e receiver to tune in radio stations etc See pages 20 24 for tuner operations F D RANGE Lights up when dynamic range compression is activated page 29 G COAX Lights up when the source signal is a digital signal being input through the COAX terminal H OPT Lights up when the source signal is a digital signal being input through the OPT terminal I LFE Lights up when the disc being played back contains...

Page 26: ...eiver switches to the 2CH STEREO mode Decoding the input audio signal automatically AUTO FORMAT DIRECT In this mode the receiver automatically detects the type of audio signal being input Dolby Digital DTS standard 2 channel stereo etc and performs the proper decoding if necessary This mode presents the sound as it was recorded encoded without adding any surround effects However if there are no lo...

Page 27: ... sound simply by selecting one of the receiver s pre programmed sound fields They bring the exciting and powerful sound of movie theaters and concert halls into your home Selecting a sound field for movies Press SOUND FIELD or SOUND FIELD repeatedly to select the sound field you want The selected sound field appears in the display About DCS Digital Cinema Sound Sound fields with D CSmarks use DCS ...

Page 28: ...en listening with sound fields that employ the virtual speakers you will not be able to hear any sound coming directly from the surround speakers Selecting a sound field for music Press SOUND FIELD or SOUND FIELD repeatedly to select the sound field you want The selected sound field appears in the display x HALL Reproduces the acoustics of a classical concert hall x JAZZ JAZZ CLUB Reproduces the a...

Page 29: ...x BAL L R XX Front speaker balance Initial setting BALANCE 0 Lets you adjust the balance between front left and right speakers You can adjust in the range of BAL L 1 to 8 BALANCE 0 BAL R 1 to 8 in 17 steps x CTR XXX dB Center speaker level x SUR L XXX dB Surround speaker left level x SUR R XXX dB Surround speaker right level x S W XXX dB Sub woofer level Initial setting 0 dB You can adjust from 10...

Page 30: ...etc 2 Press MAIN MENU repeatedly to select TONE 3 Press or repeatedly to select the parameter you want to adjust For details see TONE menu parameters below 4 While monitoring the sound press or repeatedly to select the setting you want The setting is entered automatically 5 Repeat steps 3 and 4 to adjust the other items Notes You cannot adjust the tone when the receiver is decoding signals with a ...

Page 31: ...re are both digital and analog connections If there are no digital signals analog is selected OPT Specifies the digital audio signals input to the DIGITAL TV SAT OPT IN jack ANLG Specifies the the analog audio signals input to the TV SAT AUDIO IN L R jacks x DUAL XXX Digital broadcast language selection Lets you select the language you want to listen to during digital broadcast This feature only f...

Page 32: ...wer is on Each time you press SLEEP the display changes cyclically as follows 2 00 00 t 1 30 00 t 1 00 00 t 0 30 00 t OFF The display dims after you have specified the time Tip To check the remaining time before the receiver turns off press ALT to light up the button page 33 then press SLEEP The remaining time appears in the display If you press SLEEP again the sleep timer will be canceled Other O...

Page 33: ...ause a malfunction If you don t use the remote for an extended period of time remove the batteries to avoid possible damage from battery leakage and corrosion The tables below show the settings of each button Operations Using the Remote RM U700 Before you use your remote Remote button description Remote Button Operations Function A F D wh Receiver Selects A F D AUTO ALT ws Remote When ALT button l...

Page 34: ...ceiver Enters direct tuning mode DUAL MONO 6 Receiver Selects the language you want during digital broadcast DVD 2 Receiver To watch DVD Remote Button Operations Function ENTER qa Receiver VCR satellite tuner DVD player Enters the selection ENTER 12 wd TV VCR satellite tuner Enters the selection FM MODE 6 Receiver Selects FM monaural or stereo reception JUMP 6 TV Toggles between the previous and t...

Page 35: ...ays DVD title GUIDE qa Satellite tuner Displays guide menu TUNER wj Receiver To listen to radio programs TUNING 8 Receiver Scans radio stations TV wl Receiver To watch TV programs TV CH qd TV Selects preset TV channels Remote Button Operations Function TV VIDEO qh TV Selects input signal TV input or video input TV VOL qs TV Adjusts the volume of the TV TV 1 1 TV Turns the TV on or off VIDEO 3 Rece...

Page 36: ...ut you want to change for example DVD 2 Press the corresponding button of the component you want to assign to the input button for example 1 CD player The following buttons are assigned to select the input Sony VCRs are operated with a VTR 2 or 3 setting These correspond to 8mm and VHS respectively Now you can use the DVD button to control the CD player To reset a button to its factory setting Rep...

Page 37: ...st or mechanical shock Do not place anything on top of the cabinet that might block the ventilation holes and cause malfunctions Use caution when placing the receiver surround amplifier or speakers on surfaces that have been specially treated with wax oil polish etc as staining or discoloration of the surface may result On operation Before connecting other components be sure to turn off and unplug...

Page 38: ... noise Check that the speakers and components are connected securely Check that the connecting cords are away from a transformer or motor and at least 3 meters away from a TV set or fluorescent light Move your TV away from the audio components The plugs and jacks are dirty Wipe them with a cloth slightly moistened with alcohol There is no sound or only a very low level sound is heard from the cent...

Page 39: ...or monitor Select the appropriate input on the receiver Set your TV to the appropriate input mode Move your TV away from the audio components Remote control The remote does not function The AUX button on the remote is not available for receiver operation Point the remote at the remote sensor on the receiver Remove any obstacles in the path between the remote and the receiver Replace all the batter...

Page 40: ...ts 230 V AC 50 60 Hz Power consumption 130 W Power consumption during standby mode 0 3 W Dimensions w h d Approx 430 352 64 mm including projecting parts and controls Mass Approx 5 5 kg Surround amplifier TA WR1 Power requirements 230 V AC 50 60 Hz Power consumption 92 W Power consumption during standby mode 2 W Dimensions w h d Approx 95 156 241 mm including projecting parts and control Mass Appr...

Page 41: ...pecifications are subject to change without notice Digital Infrared Audio Transmission Recent times have been witness to the rapid spread of DVDs Digital Broadcasting Satellite Receiver and other high quality media In order to ensure that the subtle nuances endowed by these high quality media would be transmitted with no accompanying deterioration Sony developed a technology called Digital Infrare...

Page 42: ...ELD qa 30 TUNER indicator 7 20 TV SAT indicator 6 20 VIDEO indicator 4 20 1 power 1 14 19 21 PLII q 27 Surround amplifer ON LINE indicator 3 14 15 39 ON STANDBY indicator 2 14 15 POWER 1 14 List of button locations and reference pages How to use pages 42 Use this page to find the location of buttons that are mentioned in the text Illustration number r INPUT SELECTOR qd 20 21 22 R R Name of button ...

Page 43: ...10 41 Direct tuning 21 Dual Mono 31 I IR receiver 10 11 14 15 37 38 39 IR transmitter 10 11 14 15 37 38 39 L LEVEL menu 29 P Preset stations how to 22 how to tune 22 R RDS 23 S Selecting component 20 sound field 27 28 SET UP menu 17 31 Sleep Timer 32 Sound field customizing 29 pre programmed 27 28 resetting 30 selecting 27 28 Speakers adjusting speaker levels and balance 19 connection 10 placement...

Page 44: ...EM_Janet Revision_HT SL900W J9040000_4254829121SL900WGB 4254829121 GB10BKC_HT SL900W CEL fm Sony Corporation Printed in Malaysia model name1 HT SL900W 4 254 829 12 1 GB01COV_HT SL900W CEL book Page 44 Monday May 24 2004 8 22 AM ...

Reviews: