background image

GB

19

Sa
vi

ng im

a

g

e

s

Saving images

Using PlayMemories Home™

PlayMemories Home allows you to import movies and photos to your 
computer to use them in a variety of ways.

To download PlayMemories Home

PlayMemories Home can be downloaded from the following URL.
www.sony.net/pm/

To check the computer system

You can check the computer requirements for the 
software at the following URL.
www.sony.net/pcenv/

What you can do with PlayMemories Home

Viewing 
images on 
Calendar

Sharing images on 
PlayMemories 
Online™

Import images from the camcorder.

Creating 
movie 
discs

Uploading 
images to 
network services

Playing back 
imported images

For Windows, the following functions are 
also available.

Summary of Contents for HDR-CX620

Page 1: ...d Recording Playback Saving images Customizing your camcorder Others Digital HD Video Camera Recorder Operating Guide http rd1 sony net help cam 1420 h_zz Help Guide Web manual Refer to Help Guide for in depth instructions on the many functions of the camera ...

Page 2: ...e like SAVE THESE INSTRUCTIONS DANGER TO REDUCE THE RISK OF FIRE OR ELECTRIC SHOCK CAREFULLY FOLLOW THESE INSTRUCTIONS Read these instructions Keep these instructions Heed all warnings Follow all instructions Do not use this apparatus near water Clean only with dry cloth Do not block any ventilation openings Install in accordance with the manufacturer s instructions Do not install near any heat so...

Page 3: ...burst cause a fire or even chemical burns Observe the following cautions Do not disassemble Do not crush and do not expose the battery pack to any shock or force such as hammering dropping or stepping on it Do not short circuit and do not allow metal objects to come into contact with the battery terminals Do not expose to high temperature above 60 C 140 F such as in direct sunlight or in a car par...

Page 4: ... for an uncontrolled environment and meets the FCC radio frequency RF Exposure Guidelines and RSS 102 of the IC radio frequency RF Exposure rules This equipment has very low levels of RF energy that are deemed to comply without testing of specific absorption ratio SAR If you have any questions about this product you may call Sony Customer Information Center 1 800 222 SONY 7669 The number below is ...

Page 5: ... on a circuit different from that to which the receiver is connected Consult the dealer or an experienced radio TV technician for help The supplied interface cable must be used with the equipment in order to comply with the limits for a digital device pursuant to Subpart B of Part 15 of FCC Rules This device complies with Industry Canada licence exempt RSS standard s Operation is subject to the fo...

Page 6: ...ly negative consequences for the environment and human health which could otherwise be caused by inappropriate waste handling The recycling of the materials will help to conserve natural resources In case of products that for safety performance or data integrity reasons require a permanent connection with an incorporated battery this battery should be replaced by qualified service staff only To en...

Page 7: ...ions 29 Parts and controls 33 Learning more about the camcorder Help Guide Help Guide is an on line manual Refer to it for in depth instructions on the many functions of the camcorder This manual describes 1080 60i compatible devices and 1080 50i compatible devices To check whether your camera is a 1080 60i compatible device or 1080 50i compatible device check for the following marks on the bottom...

Page 8: ... Adaptor differs depending on the countries regions USB connection support cable 1 The USB connection support cable is designed for use with this camcorder only Use this cable when the Built in USB Cable of the camcorder is too short for connection HDMI cable 1 Rechargeable battery pack NP FV50 1 Operating Guide This manual 1 ...

Page 9: ...nection support cable and connect the AC Adaptor to the wall outlet wall socket The POWER CHG charge lamp turns orange The POWER CHG charge lamp turns off when the battery pack is fully charged Disconnect the USB connection support cable from the camcorder The shape of the AC Adaptor differs depending on the countries regions Battery pack Built in USB Cable USB connection support cable AC Adaptor ...

Page 10: ...er to a running computer using the Built in USB Cable To use your camcorder connected to the wall outlet wall socket Connect the camcorder to the wall outlet wall socket in the same way as Charging the battery pack Attach the battery pack to the camcorder The battery pack may be consumed even if the camcorder is connected to the wall outlet wall socket ...

Page 11: ... the operating sound select Setup General Settings Beep Off 1 Open the LCD monitor of your camcorder and turn the power on 2 Following the instructions on the LCD monitor select the language the geographical area Daylight Savings or Summer Time date format and the date and time To go to the next page touch Next To turn off the power close the LCD monitor Touch the button on the LCD monitor ...

Page 12: ...cording images in the XAVC S format 1 Open the cover and insert the memory card until it clicks The Preparing image database file Please wait screen appears if you insert a new memory card Wait until the screen disappears Insert the memory card straight in the right direction so that the camcorder can recognize it SD Speed Class Capacity operation verified microSDXC memory card Class 10 or faster ...

Page 13: ...ecording images in a format other than XAVC S SD Speed Class Capacity operation verified microSD memory card microSDHC memory card microSDXC memory card Class 4 or faster Up to 64 GB Memory Stick Micro Mark2 media Up to 16 GB ...

Page 14: ... To display items again touch anywhere except the buttons on the LCD monitor You can check the recording time of a medium on the LCD monitor in the shooting mode To change the image quality of the movies you record select Image Quality Size REC Mode You can change the recording format by selecting Image Quality Size File Format Recording movies 1 Open the LCD monitor and press START STOP to start ...

Page 15: ...k Shooting photos 1 Open the LCD monitor and select MODE Photo 2 Press PHOTO lightly to adjust the focus then press it fully When the focus is adjusted properly AE AF lock indicator appears on the LCD monitor Power zoom lever ...

Page 16: ...ghlight Movie Maker will be displayed when Movie format is set to AVCHD To select the XAVC S movies or AVCHD movies you want to play edit or copy to other devices select Image Quality Size File Format To the MENU screen Event name To the previous event Events Change to the movie photo recording mode Switch Movie Format button HD MP4 To the next event Time line bar Change Event Scale button Highlig...

Page 17: ...D monitor HD Quality or MP4 3 Select the image Volume Previous Next Delete Fast reverse Fast forward Context Play Pause Stop Play Stop slide show Motion Shot Video Motion Interval ADJ To go back to the Event View screen Previous Next Change to the movie photo recording mode Event name Recorded time number of photos Movie Photo Last played image Switch Image Type button ...

Page 18: ...deo audio input jacks of the TV using an AV cable sold separately Using the built in projector HDR PJ620 PJ670 1 Press the PROJECTOR button page 33 2 Select Image Shot on This Device 3 Follow the operating guide on the LCD monitor and then select Project 1 Adjust the focus of the projected image 2 Use the power zoom lever to move the selection frame that appears on the projected image then press t...

Page 19: ...the following URL www sony net pm To check the computer system You can check the computer requirements for the software at the following URL www sony net pcenv What you can do with PlayMemories Home Viewing images on Calendar Sharing images on PlayMemories Online Import images from the camcorder Creating movie discs Uploading images to network services Playing back imported images For Windows the ...

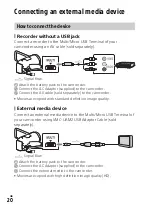
Page 20: ...the AV cable sold separately to the camcorder Movies are copied with standard definition image quality External media device Connect an external media device to the Multi Micro USB Terminal of your camcorder using VMC UAM2 USB Adaptor Cable sold separately Signal flow Attach the battery pack to the camcorder Connect the AC Adaptor supplied to the camcorder Connect the external media to the camcord...

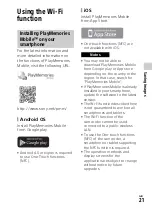
Page 21: ... play or App store depending on the country or the region In that case search for PlayMemories Mobile If PlayMemories Mobile is already installed in your smartphone update the software to the latest version The Wi Fi function described here is not guaranteed to work on all smartphones and tablets The Wi Fi function of the camcorder cannot be used connected to a public wireless LAN To use the One t...

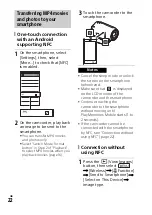
Page 22: ...FC see Connection without using NFC page 22 Connection without using NFC Transferring MP4 movies and photos to your smartphone 1 On the smartphone select Settings then select More to check that NFC is enabled 2 On the camcorder play back an image to be sent to the smartphone You can transfer MP4 movies and photos only Select Switch Movie Format button in Step 2 of Playback to select MP4 movies whe...

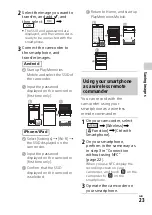
Page 23: ...order first time only Select Settings Wi Fi the SSID displayed on the camcorder Input the password displayed on the camcorder first time only Confirm that the SSID displayed on the camcorder is selected Android iPhone iPad Return to Home and start up PlayMemories Mobile Using your smartphone as a wireless remote commander 1 On your camcorder select Wireless Function Ctrl with Smartphone 2 On your ...

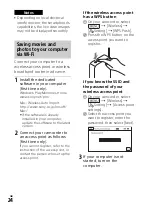
Page 24: ...led in your computer update the software to the latest version 2 Connect your camcorder to an access point as follows first time only If you cannot register refer to the instruction of the access point or contact the person who set up the access point If the wireless access point has a WPS button On your camcorder select Wireless Setting WPS Push Press the WPS button on the access point you want t...

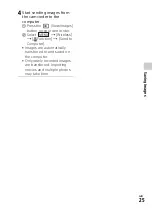
Page 25: ...to the computer Press the View Images button on your camcorder Select Wireless Function Send to Computer Images are automatically transferred to and saved on the computer Only newly recorded images are transferred Importing movies and multiple photos may take time ...

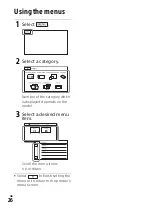
Page 26: ... the menus Select to finish setting the menu or to return to the previous menu screen 1 Select 2 Select a category Number of the category which is displayed depends on the model 3 Select a desired menu item Scroll the menu items up or down ...

Page 27: ...f recordings cannot be provided even if recording or playback is not possible due to a malfunction of the camcorder recording media etc The camcorder is not dustproofed dripproofed or waterproofed Do not let your camcorder get wet for example from rain or sea water If your camcorder gets wet it may malfunction Sometimes this malfunction cannot be repaired Do not aim the camcorder at the sun or str...

Page 28: ...r any damage caused by unauthorized access to or unauthorized use of destinations loaded on the camcorder resulting from loss or theft Notes on security when using wireless LAN products Always make sure that you are using a secure wireless LAN to avoid hacking access by malicious third parties or other vulnerabilities It is important that you set the security settings when using a wireless LAN If ...

Page 29: ...preinstalled demonstration movie may be deleted Image device 3 1 mm 1 5 8 type CMOS Sensor Recording pixels photo 16 9 Max 9 2 mega pixels 4 032 2 272 3 Gross Approx 2 510 000 pixels Effective movie 16 9 4 Approx 2 290 000 pixels Effective photo 16 9 Approx 2 290 000 pixels Effective photo 4 3 Approx 1 710 000 pixels Lens G Lens 30 Optical 4 60 Clear Image Zoom while recording movies 5 350 Digital...

Page 30: ...tructure Mode NFC NFC Forum Type 3 Tag compliant General Power requirements DC 6 8 V battery pack DC 5 V 1 500 mA AC Adaptor DC 8 4 V DC IN jack USB Charging DC 5 V 1 500 mA Average power consumption During camera recording using LCD monitor at normal brightness 2 5 W Operating temperature 0 C to 40 C 32 F to 104 F Storage temperature 20 C to 60 C 4 F to 140 F Dimensions approx HDR CX620 CX670 57 ...

Page 31: ...e Shooting Mode and zooming Trademarks AVCHD AVCHD Progressive AVCHD logotype and AVCHD Progressive logotype are trademarks of Panasonic Corporation and Sony Corporation XAVC S and are registered trademarks of Sony Corporation Memory Stick and are trademarks or registered trademarks of Sony Corporation Blu ray Disc and Blu ray are trademarks of the Blu ray Disc Association Dolby and the double D s...

Page 32: ...lliance The N Mark is a trademark or registered trademark of NFC Forum Inc in the United States and in other countries Facebook and the f logo are trademarks or registered trademarks of Facebook Inc YouTube and the YouTube logo are trademarks or registered trademarks of Google Inc iPhone and iPad are trademarks of Apple Inc registered in the U S and other countries All other product names mentione...

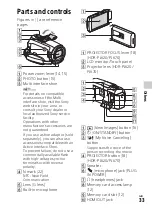
Page 33: ... use accessories compatible with an Active Interface Shoe To prevent failure do not use a commercially available flash with high voltage synchro terminals or with reverse polarity N mark 22 NFC Near Field Communication Lens G lens Built in microphone PROJECTOR FOCUS lever 18 HDR PJ620 PJ670 LCD monitor Touch panel Projector lens HDR PJ620 PJ670 View Images button 16 ON STANDBY button My Voice Canc...

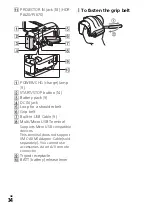
Page 34: ...k Loop for a shoulder belt Grip belt Built in USB Cable 9 Multi Micro USB Terminal Supports Micro USB compatible devices This terminal does not support VMC AVM1 Adaptor Cable sold separately You cannot use accessories via an A V remote connector Tripod receptacle BATT battery release lever To fasten the grip belt ...

Page 35: ...GB 35 Others ...

Page 36: ... 2015 Sony Corporation Printed in China Additional information on this product and answers to frequently asked questions can be found at our Customer Support Website http www sony net GB ...

Reviews: