background image

54

1

2

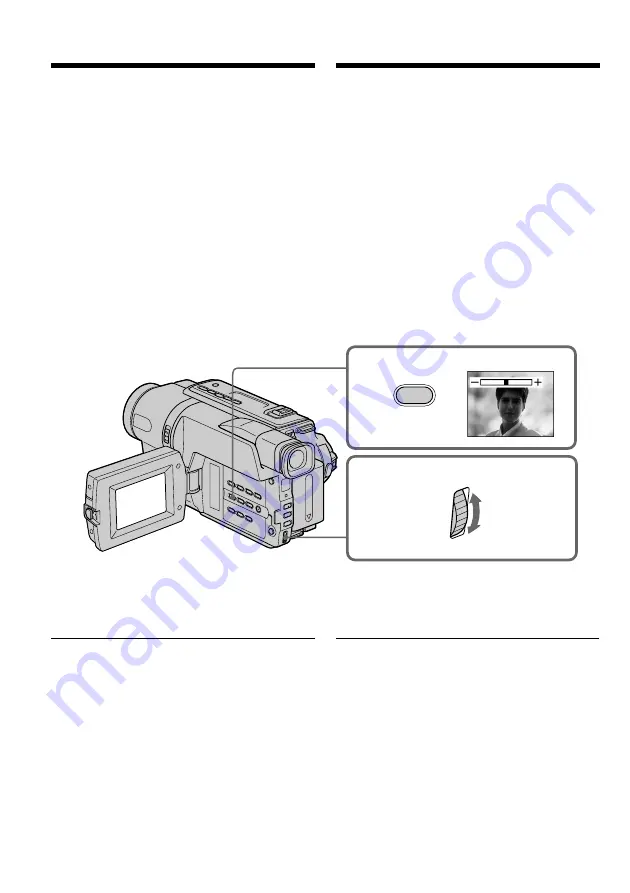
EXPOSURE

Handmatig instellen
van de belichting

U kunt de belichting met de hand instellen.
Onder de volgende omstandigheden kunt u
betere opnamen verkrijgen door de belichting
met de hand bij te stellen:
– Bij tegenlicht, dus met een erg heldere

achtergrond

– Als het onderwerp juist erg helder is en de

achtergrond donker

– Als u een donkere sfeer (bijv. nachtscènes)

natuurgetrouw wilt vastleggen

(

1

)

Druk in de CAMERA stand op de EXPOSURE
toets.
De belichtingsinstelbalk verschijnt op het
scherm.

(

2

)

Draai aan de SEL/PUSH EXEC regelknop om
de helderheid naar wens in te stellen.

Terugkeren naar de automatische
belichtingsregeling

Druk op de EXPOSURE toets.

Opmerking

Bij handmatig instellen van de belichting kunt u
de tegenlicht-compensatie niet gebruiken, in de
CAMERA stand.

Uw camcorder keert automatisch terug naar
de automatische belichtingsregeling:

– als u een ander PROGRAM AE

belichtingsprogramma kiest

– als u de NIGHTSHOT schakelaar op ON zet

You can manually adjust and set the exposure.
Adjust the exposure manually in the following
cases:
– The subject is backlit
– Bright subject and dark background
– To record dark pictures (e.g. night scenes)

faithfully

(

1

)

In CAMERA mode, press EXPOSURE.
The exposure indicator appears on the screen.

(

2

)

Turn the SEL/PUSH EXEC dial to adjust the
brightness.

To return to the automatic exposure
mode

Press EXPOSURE.

Note

When you adjust the exposure manually, the
backlight function does not work in CAMERA
mode.

Your camcorder automatically returns to the
automatic exposure mode:

– if you change the PROGRAM AE mode
– if you slide NIGHTSHOT to ON

Adjusting the
exposure manually

Summary of Contents for Handycam Vision CCD-TRV107E

Page 1: ...manual thoroughly and retain it for future reference Gebruiksaanwijzing Lees alvorens het apparaat in gebruik te nemen de gebruiksaanwijzing aandachtig door en bewaar ze voor eventuele naslag Video Camera Recorder 2002 Sony Corporation CCD TRV107E TRV108E TRV208E TRV408E CCD TRV408E ...

Page 2: ... functies en is toch zeer eenvoudig te bedienen zodat u al gauw in staat zult zijn home video s te maken waar u nog jaren plezier aan beleeft WAARSCHUWING Om het gevaar van brand of elektrische schokken te voorkomen mag het apparaat niet worden blootgesteld aan regen of vocht Om elektrische schokken te voorkomen mag de behuizing niet worden geopend Laat reparaties uitsluitend door vakkundig person...

Page 3: ...3 ...

Page 4: ...give images more impact Digital zoom p 30 The default settings is set to OFF To zoom greater than 20 select the digital zoom power in D ZOOM in the menu settings FADER p 46 Picture effect p 49 TITLE p 57 Function to give a natural appearance to your recordings Manual focus p 55 Functions to use in editing in the recording mode Wide mode p 44 Date and time p 22 ORC MENU p 81 Function to use after r...

Page 5: ...uncties om beelden meer impact te geven Digital zoom p 30 De standaard instelling is OFF Voor meer dan 20 zoom moet u de digitale D ZOOM in het menu instellen FADER p 46 Beeldeffect p 49 TITLE p 57 Functie die de kwaliteit van uw opnamen verhoogt Handmatig scherpstellen p 55 Functies om te bewerken tijdens opnemen Breedbeeld opnamefunctie p 44 Datum en tijd p 22 ORC MENU p 86 Functie na opname Eas...

Page 6: ...ng on TV 42 Advanced Recording Operations Using the wide mode 44 Using the fader function 46 Using special effects Picture effect 49 Using the PROGRAM AE function 51 Adjusting the exposure manually 54 Focusing manually 55 Superimposing a title 57 Making your own titles 60 Using the built in light 62 Editing Dubbing a tape 66 Dubbing a tape easily Easy Dubbing 68 Customising Your Camcorder Changing...

Page 7: ...namefuncties Breedbeeld opnamefunctie 44 Beelden in en uit faden 46 Speciale effecten Beeldeffect kleurenpalet 49 PROGRAM AE belichtingsprogramma s 51 Handmatig instellen van de belichting 54 Handmatig scherpstellen 55 Een titelbeeld opnemen 57 Eigen titelbeelden samenstellen 60 Gebruik van de ingebouwde videolamp 62 Montage Kopiëren van video opnamen 66 Vlot een cassette kopiëren Easy Dubbing 68 ...

Page 8: ...ck when using your camcorder outdoors p 15 AC power adaptor supplied Quick Start Guide 3Close the cassette compartment by pressing the mark on the cassette compartment The cassette compartment automatically goes down Close the lid of the cassette compartment 2Insert a cassette into the cassette compartment with its window facing out and the write protect tab on the cassette up EJECT 1Open the lid ...

Page 9: ...e Adjust the viewfinder lens to your eyesight p 31 Quick Start Guide Monitoring the playback picture on the LCD screen p 38 NOTE Do not pick up your camcorder by the viewfinder the LCD panel or the battery pack 2Press m to rewind the tape 1Set the POWER switch to PLAYER while pressing the small green button When you purchase your camcorder the clock setting is set to off If you want to record the ...

Page 10: ...ik buitenshuis dient u een batterijpak aan te brengen p 15 Inleggen van een videocassette p 24 3Druk op de kant van de cassettehouder waar staat aangegeven om deze te sluiten De cassettehouder gaat automatisch omlaag Vervolgens sluit u het deksel van de cassettehouder 1Open de klep van de cassettehouder en druk op Z EJECT De cassettehouder opent automatisch 2Plaats een videocassette in de houder m...

Page 11: ...ne knopje op de POWER schakelaar in en zet de schakelaar in de PLAYER stand 2Druk op de m toets om de band terug te spoelen Snelle startgids Bij aankoop van uw camcorder is de tijd nog niet ingesteld Als u de opnamedatum en tijd voor beelden wilt vastleggen zult u voor de opname eerst de klok op de juiste tijd gelijk moeten zetten p 22 C A M E R A PL A Y E R O F F C H G POWER C A M E R A PL A Y E ...

Page 12: ...450 460 560 560 Digitale zoomfunctie Remote sensor z z z Afstandsbedieningssensor SteadyShot z SteadyShot beeldstabilisatie z Provided Voorzien Not provided Niet voorzien Verschillende televisie kleursystemen Televisie kleursystemen verschillen van land tot land Om de videobeelden van deze camcorder op uw TV te bekijken moet het TV toestel werken met het PAL kleursysteem Getting started Using this...

Page 13: ...en leiden c Richt de camcorder niet op de zon Direct zonlicht kan storing in de werking van de camcorder veroorzaken Alleen bij zonsondergang als het licht niet meer zo fel is mag u de zon in beeld nemen d b d a c Using this manual Precautions on camcorder care Lens and LCD screen finder on mounted models only The LCD screen and the finder are manufactured using extremely high precision technology...

Page 14: ...opnamen kunnen niet worden vergoed ook niet als er bij het opnemen of weergeven iets misgaat door een storing in de camcorder de opnamemedia e d Checking supplied accessories Make sure that the following accessories are supplied with your camcorder 1 Wireless Remote Commander 1 p 124 CCD TRV107E TRV208E TRV408E only 2 AC L10A L10B L10C AC power adaptor 1 Mains lead 1 p 16 3 NP FM30 battery pack 1 ...

Page 15: ... van het batterijpak Hou V BATT ingedrukt en schuif het batterijpak in de richting van de pijl omhoog en los V BATT release lever V Batterijvrijmaakknop Installing the battery pack Slide the battery pack down until it clicks To remove the battery pack Slide the battery pack out in the direction of the arrow while pressing V BATT down Step 1 Preparing the power supply ...

Page 16: ...oorbereiden van de stroomvoorziening 4 2 3 1 C A M E R A PL A Y E R O F F C H G POWER FULL Het afgebeelde cijfer in het uitleesvenster kan verschillen van dat op uw camcorder Step 1 Preparing the power supply Charging the battery pack Use the battery pack after charging it for your camcorder Your camcorder operates only with the InfoLITHIUM battery pack M series See page 105 for details of the Inf...

Page 17: ...en van de stroomvoorziening Na het opladen van het batterijpak Trek de stekker van de netspanningsadapter uit de DC IN gelijkstroomingang van de camcorder After charging the battery pack Disconnect the AC power adaptor from the DC IN jack on your camcorder Note Prevent metallic objects from coming into contact with the metal parts of the DC plug of the AC power adaptor This may cause a short circu...

Page 18: ...ering bij filmen met herhaaldelijk starten stoppen van het opnemen in uit zoomen en in uitschakelen van de stroom De gebruiksduur van het batterijpak kan in werkelijkheid korter uitvallen Charging time Vereiste oplaadtijd Battery pack Full charge normal charge Batterijpak Volledige lading normale lading NP FM30 145 85 supplied meegeleverd NP FM50 150 90 NP FM70 240 180 NP QM71 260 200 NP FM90 330 ...

Page 19: ...erk InfoLITHIUM is een handelsmerk van Sony Corporation Playing time Beschikbare speelduur Playing time Playing time Battery pack on LCD screen with LCD closed Batterijpak Speelduur op Speelduur met LCD scherm LCD scherm gesloten NP FM30 120 175 supplied meegeleverd NP FM50 195 280 NP FM70 400 570 NP QM71 465 675 NP FM90 600 865 NP FM91 QM91 695 1010 Step 1 Preparing the power supply Approximate n...

Page 20: ...ingang met het v driehoekje van de stekker boven 2 Sluit het netsnoer aan op de netspanningsadapter 3 Steek de stekker van het netsnoer in het stopcontact 2 3 1 Step 1 Preparing the power supply Connecting to a wall socket When you use your camcorder for a long time we recommend that you power it from a wall socket using the AC power adaptor 1 Open the DC IN jack cover and connect the AC power ada...

Page 21: ... op een auto accu Gebruik van de Sony gelijkstroomadapter lader los verkrijgbaar Zie voor nadere bijzonderheden de gebruiksaanwijzing van de netspanningsadapter lader Stap 1 Voorbereiden van de stroomvoorziening Step 1 Preparing the power supply PRECAUTION The set is not disconnected from the AC power source wall socket as long as it is connected to a wall socket even if the set itself has been tu...

Page 22: ...tting the date and time Set the date and time settings when you use your camcorder for the first time CLOCK SET will be displayed each time when you set the power switch to CAMERA unless you set the date and time settings If you do not use your camcorder for about 6 months the date and time settings may be released bars may appear because the built in rechargeable battery in your camcorder will ha...

Page 23: ... instelt als u de videocassette uitneemt en weer insteekt als u de eerste opname binnen 10 seconden beëindigt als u de AUTO DATE instelling in het instelmenu eenmaal op OFF en dan weer op ON zet Stap 2 Instellen van de datum en tijd t 1995 T t 2002 T t 2079 T Step 2 Setting the date and time To check the preset date and time Press DATE to display the date indicator Press TIME to display the time i...

Page 24: ... Volg de bovenstaande aanwijzingen en neem in stap 3 de cassette uit de houder Stap 3 Inleggen van een videocassette 2 3 4 When you want to record in the Hi8 system use Hi8 video cassettes 1 Prepare the power supply p 15 2 Open the lid of the cassette compartment and press Z EJECT The cassette compartment opens automatically 3 Insert a cassette into the cassette compartment with its window facing ...

Page 25: ...eluk wissen Schuif het wispreventienokje van de videocassette opzij zodat het rode vlakje zichtbaar wordt Stap 3 Inleggen van een videocassette Notes Do not press the cassette compartment down Doing so may cause a malfunction The cassette compartment may not be closed when you press any part of the cassette compartment other than the mark Do not pick up your camcorder by the lid of the cassette co...

Page 26: ...eer u opneemt met de zoeker ingeschakeld gaat in het zoekerbeeld het opnamelampje branden 5 3 1 2 40min REC 0 00 01 4 C A M E R A PL A Y E R O F F C H G POWER C A M E R A PL A Y E R O F F C H G POWER Recording lamp Opnamelampje Microphone Microfoon Recording Basics Recording a picture Your camcorder automatically focuses for you 1 Remove the lens cap by pressing both knobs on its sides and attach ...

Page 27: ... een enkele videocassette zowel met de SP als de LP snelheid opneemt of als u bepaalde scènes tussendoor opneemt met de LP snelheid Het weergavebeeld kan vervormd zijn De teller op 0 00 00 zetten Druk op COUNTER RESET p 122 Video opnamen maken Notes Fasten the grip strap firmly Do not touch the built in microphone during recording Note on Recording mode Your camcorder records and plays back in the...

Page 28: ...erm in een hoek van 90 graden Beeldweergave in de spiegelstand Het beeld op het LCD scherm verschijnt in de spiegelstand ook werkelijk in spiegelbeeld met links en rechts verwisseld De opgenomen beelden zijn echter wel normaal dus niet in spiegelbeeld 90 180 Adjusting the LCD screen The LCD panel moves about 90 degrees to the viewfinder side and about 180 degrees to the lens side If you turn the L...

Page 29: ...nste helderheid in te stellen p 85 Na aanpassen van de helderheid van het LCD scherm De schermverlichting of helderheid heeft geen enkele invloed op de opgenomen beelden 1 MENU END LCD VF SET LCD BR I G HT LCD B L LCD COLOUR VF B L RETURN MENU Adjusting the brightness of the LCD screen 1 In CAMERA mode select LCD BRIGHT in in the menu settings p 80 2 Turn the SEL PUSH EXEC dial to adjust the brigh...

Page 30: ... minder omdat het beeld digitaal wordt bewerkt The right side of the bar shows the digital zooming zone The digital zooming zone appears when you select the digital zoom power in D ZOOM in the menu settings De rechterkant van de zoombalk toont het digitale zoombereik Het digitale zoombereik verschijnt in beeld wanneer u het onderdeel D ZOOM in het instelmenu activeert Recording a picture After rec...

Page 31: ...het zoekerscherpstelknopje in de beste stand Video opnamen maken Achtergrondverlichting beeldzoeker Desgewenst kunt u de achtergrondverlichting regelen Kies bij het onderdeel VF B L in het instelmenu de gewenste schermverlichting p 86 Notes on digital zoom Digital zoom starts to function when zoom exceeds 20 The picture quality deteriorates as you go toward the T side When you shoot close to a sub...

Page 32: ...cherm sluit en weer opent zal het ongeveer 1 minuut duren voordat de juiste resterende batterij gebruiksduur weer aangegeven wordt Indicators displayed in the recording mode The indicators are not recorded on tape Recording a picture a Remaining battery time indicator b Hi8 format indicator This appears while playing back or recording in Hi8 format c Recording mode indicator Mirror mode indicator ...

Page 33: ... de tegenlicht compensatie uit te schakelen drukt u nogmaals op de BACK LIGHT toets Als u op de EXPOSURE toets drukt tijdens het opnemen bij tegenlicht Dan wordt de tegenlicht compensatie uitgeschakeld BACK LIGHT Recording a picture Shooting backlit subjects BACK LIGHT When you shoot a subject with the light source behind the subject or a subject with a light background use the backlight function ...

Page 34: ...hot nachtopnamefunctie uit te schakelen schuift u de NIGHTSHOT schakelaar in de OFF stand Video opnamen maken NIGHTSHOT OFF ON Infrared rays emitter Infraroodlichtzender Shooting in the dark NightShot The NightShot function enables you to shoot a subject in a dark place For example you can satisfactorily record the environment of nocturnal animals for observation when you use this function While y...

Page 35: ...ncties niet kunnen gebruiken Belichtingsregeling PROGRAM AE belichtingsprogramma s NightShot Light lamp De stralen van de NightShot Light lamp zijn infrarood en dus onzichtbaar De maximale reikwijdte van de infrarode NightShot lichtstralen bedraagt ongeveer 3 m Using the NightShot Light The picture will be clearer with the NightShot Light on To enable the NightShot Light set N S LIGHT to ON in the...

Page 36: ...eelden Neem de datum en of tijdsaanduiding ongeveer 10 seconden lang tegen een zwarte achtergrond op en laat dan de datum en of tijdsaanduiding weer uit beeld verdwijnen voor u de gewenste beelden gaat opnemen DATE TIME Video opnamen maken Recording a picture Superimposing the date and time on pictures You can record the date and or time displayed on the screen superimposed on the picture Carry ou...

Page 37: ...ct aansluiten op het eind van de voorgaande opnamen Als de cassette na het opnemen al eens uit de camcorder is verwijderd zal de eindzoekfunctie niet meer werken END SEARCH Checking the recording END SEARCH You can use this button to record a picture from the last recorded scene successively You can go to the end of the recorded section after you record Press END SEARCH in CAMERA mode The last 5 s...

Page 38: ... bediening bij het afspelen kunt u ook de bij uw camcorder geleverde afstandsbediening gebruiken alleen CCD TRV107E TRV208E TRV408E 3 6 2 5 4 VOLUME 1 C A M E R A PL A Y E R O F F C H G POWER REW PLAY Stoppen met afspelen Druk op de x stoptoets To stop playback Press x Playback Basics Playing back a tape You can monitor the playback picture on the LCD screen If you close the LCD panel You can moni...

Page 39: ...TRV107E TRV208E TRV408E De aanduidingen verschijnen op het scherm Om de schermaanduidingen weer te laten verdwijnen drukt u nogmaals op de DISPLAY toets Afspelen van een videocassette a b 7 DISPLAY DISPLAY When monitoring on the LCD screen You can turn the LCD panel over and move it back to the camcorder body with the LCD screen facing out a You can adjust the angle of the LCD panel by lifting the...

Page 40: ...male weergave te hervatten drukt u op de N weergavetoets Het eind van de laatst opgenomen scéne opzoeken END SEARCH eindzoekfunctie Druk in de stopstand op de END SEARCH toets De laatste 5 seconden van de video opnamen worden weergegeven en dan stopt de band Afspelen van een videocassette Playing back a tape Various playback modes To operate video control buttons set the POWER switch to PLAYER To ...

Page 41: ...fspelen Hierbij kunnen boven en onder in beeld ruisbalken verschijnen Dat is normaal en duidt niet op storing Alleen CCD TRV107E TRV208E TRV408E Afspelen van een videocassette Playing back a tape In the various playback modes Sound is muted When the playback pause mode lasts for 5 minutes Your camcorder automatically enters the stop mode To resume playback press N If slow playback lasts for about ...

Page 42: ...de lijningangen van de videorecorder LINE IN met behulp van het bij uw camcorder geleverde audio video aansluitsnoer Zet de ingangskeuzeschakelaar van de videorecorder in de LINE stand A V connecting cable supplied A V aansluitkabel meegeleverd Viewing the recording on TV Connect your camcorder to your TV with the A V connecting cable supplied with your camcorder to watch the playback picture on t...

Page 43: ...idingen tonen op het TV scherm In het instelmenu is DISPLAY op V OUT LCD gezet p 88 Druk dan op DISPLAY op uw camcorder Druk nogmaals op DISPLAY om de aanduidingen op uw camcorder te laten verdwijnen Aansluitingen voor videoweergave op TV TV Viewing the recording on TV To connect to a TV without Video Audio input jacks Use a PAL system RFU adaptor optional Refer to the operating instructions of yo...

Page 44: ... scherm g vreemd in elkaar gedrukt uitzien Wanneer u het breedbeeld televisietoestel instelt op schermvullende weergave zal het beeld precies op het scherm passen h b CINEMA a c f g CINEMA 16 9FULL 16 9FULL e d h You can record a cinema like picture CINEMA or a 16 9 wide picture to watch on the 16 9 wide screen TV 16 9FULL Refer to the operating instructions of your TV CINEMA Black bands appear on...

Page 45: ...mode the date or time indicator will be widened on wide screen TVs During recording You cannot select or cancel the wide mode When you cancel the wide mode set your camcorder to the standby mode and then set 16 9WIDE to OFF in the menu settings Wanneer de breedbeeld opnamefunctie is ingesteld op 16 9FULL alleen CCD TRV408E De SteadyShot beeldstabilisatie werkt niet Wanneer u 16 9FULL in het instel...

Page 46: ...infaden neemt het oorspronkelijke zwart wit beeld geleidelijk steeds meer kleur aan Bij uitfaden vervagen de kleuren geleidelijk om te eindigen met een zwart wit beeld You can fade in or out to give your recording a professional appearance Using the fader function MONOTONE When fading in the picture gradually changes from black and white to colour When fading out the picture gradually changes from...

Page 47: ...faden keert de camcorder automatisch terug naar de normale opnamefunctie Uitschakelen van de in uit fader functie Voor het indrukken van de START STOP toets drukt u eerst enkele malen op de FADER toets totdat de fader indicator dooft 1 When fading in a In the standby mode press FADER until the desired fader indicator flashes When fading out b In the recording mode press FADER until the desired fad...

Page 48: ...digitale zoombereik in het instelmenu is ingeschakeld Breedbeeld opnamefunctie Bij de speciale beeld kleureffecten Bij de PROGRAM AE belichtingsprogramma s Beelden in en uit faden Using the fader function The date time indicator and title do not fade in or fade out Erase them before operating the fader function if they are not needed While using the bounce function you cannot use the following fun...

Page 49: ... van een illustratie MOSAIC d Uw onderwerp komt als een mozaïek van kleine blokjes in beeld SLIM e Het beeld wordt smaller in de hoogte uitgerekt STRETCH f Het beeld wordt in de breedte uitgerekt You can digitally process images to obtain special effects like those in films or on the TV PASTEL a The contrast of the picture is emphasised and the picture looks like an animated cartoon NEG ART b The ...

Page 50: ...male beeldweergave Speciale effecten Beeldeffect kleurenpalet 1 MANUA L SE T NEG ART SEP I A B W SOL AR I Z E S L I M S TRE TCH PAS T E L MOSA I C MENU END PROGRAM AE P EFFECT RETURN OFF MENU Using special effects Picture effect 1 In CAMERA mode select P EFFECT in in the menu settings p 79 2 Select the desired picture effect mode in the menu settings then press the SEL PUSH EXEC dial To cancel the...

Page 51: ...ct behind glass or a screen Voor een optimale aanpassing aan de lichtomstandigheden kunt u kiezen uit de volgende PROGRAM AE belichtingsprogramma s voor uw video opnamen SPOTLIGHT Spotlight programma Om te zorgen dat de gezichten van personen er niet te bleek uitzien onder felle lampen zoals bij officiële gelegenheden op het toneel bij een persconferentie e d PORTRAIT Portret programma Deze stand ...

Page 52: ... belichtingsprogramma s Zet het onderdeel PROGRAM AE op AUTO in het instelmenu MANUAL SET PROGRAM AE P EFFECT RETURN 1 AUTO PORTRA I T SPORT S BEACH SK I SUNSE TMOON SPOT L I GHT L ANDSCAPE MENU END Using the PROGRAM AE function 1 In CAMERA mode select PROGRAM AE in in the menu settings p 79 2 Select the desired PROGRAM AE mode in the menu settings then press the SEL PUSH EXEC dial To cancel the P...

Page 53: ...r kan een flikkerend effect en een zekere kleurverschuiving optreden bij de volgende programma s In dit geval kunt u de PROGRAM AE belichtingsprogramma s beter uitschakelen Portret programma Sport programma PROGRAM AE belichtingsprogramma s Notes In the spotlight sports lesson and beach ski modes you cannot take close ups This is because your camcorder is set to focus only on subjects in the middl...

Page 54: ...hting kunt u de tegenlicht compensatie niet gebruiken in de CAMERA stand Uw camcorder keert automatisch terug naar de automatische belichtingsregeling als u een ander PROGRAM AE belichtingsprogramma kiest als u de NIGHTSHOT schakelaar op ON zet You can manually adjust and set the exposure Adjust the exposure manually in the following cases The subject is backlit Bright subject and dark background ...

Page 55: ...nduiding verschijnt op het scherm 2 Draai aan de SEL PUSH EXEC regelknop tot u uw onderwerp scherp in beeld hebt Terugkeren naar de automatische scherpstelling Druk weer op de FOCUS scherpsteltoets Handmatig scherpstellen FOCUS You can gain better results by manually adjusting the focus in the following cases The autofocus mode is not effective when shooting subjects through glass coated with wate...

Page 56: ... 9 aanduiding zal plaats maken voor de volgende aanduidingen bij opnemen van een ver verwijderd onderwerp wanneer het onderwerp te dichtbij is om op te kunnen scherpstellen To focus precisely Adjust the zoom by first focusing at the T telephoto position and then shooting at the W wide angle position This makes focusing easier When you shoot close to the subject Focus at the end of the W wide angle...

Page 57: ... deze stappen 1 en 2 totdat uw titelbeeld geheel naar wens is ingesteld 5 Druk tenslotte nog eens op de SEL PUSH EXEC regelknop om de titelkeuze af te ronden 6 Druk op de START STOP toets om het titelbeeld op te nemen 7 Wanneer u de titel weer uit beeld wilt laten verdwijnen drukt u op de TITLE toets Superimposing a title You can select one of eight preset titles and two custom titles p 60 You can...

Page 58: ...E T T I T L E HE L LO HAPPY B I RTHDAY HAPPY HOL I DAYS CONGRA TU L A T I ONS OUR SWEE T BABY WEDD I NG VACA T I ON THE END T I T L E END PRESE T T I T L E HE L LO HAPPY B I RTHDAY HAPPY HOL I DAYS CONGRA TU L A T I ONS OUR SWEE T BABY WEDD I NG VACA T I ON THE END T I T L E END RE TURN PRESE T T I T L E HE L LO HAPPY B I RTHDAY HAPPY HOL I DAYS CONGRA TU L A T I ONS OUR SWEE T BABY WEDD I NG VACA...

Page 59: ... Er zal nu geen pieptoon klinken Tijdens het afspelen Hierop kunt u een titel vastleggen De titel wordt echter niet opgenomen op de cassette U kunt een titel opnemen bij het kopiëren van een cassette door uw camcorder met behulp van de A V kabel aan te sluiten op de videorecorder Note Both the date and time or either of them may not be displayed depending on the size or position of the title If yo...

Page 60: ... Ì ÒÙ Á É Í ÓÚ Â Ê Î ÆŒ ÃÕÑ ç ß Ä Ï ÖÜ Å FGH I J K LMNO PQRS T UVWXY Z 12345 67890 cP 2 C SE T T I T L E END _ _ _ _ _ _ _ _ _ _ _ _ _ _ _ _ _ _ _ _ T I T L E SE T T I T L E END _ _ _ _ _ _ _ _ _ _ _ _ _ _ _ _ _ _ _ _ T I T L E SE T T I T L E END _ _ _ _ _ _ _ _ _ _ _ _ _ _ _ _ _ _ _ _ T I T L E SE T T I T L E END S _ _ _ _ _ _ _ _ _ _ _ _ _ _ _ _ _ _ _ T I T L E SE T T I T L E END ABCDE i ø F DM ...

Page 61: ...of het Russische alfabet Stel in op om terug te keren naar het voorgaande scherm Wissen van een letterteken Kies bij de letter het invoerpijltje C Bij elke druk wordt het laatste letterteken gewist Invoeren van een spatie Stel in op de spatie tussen de tekens Z en druk de regelknop in Eigen titelbeelden samenstellen To change a title you have stored In step 3 select CUSTOM1 SET or CUSTOM2 SET depe...

Page 62: ...ken Druk herhaaldelijk op LIGHT tot de indicator verschijnt op het scherm De ingebouwde videolamp wordt dan automatisch in en uitgeschakeld wanneer de lichtomstandigheden in uw omgeving dit vereisen Built in light Ingebouwde lamp Using the built in light You can use the built in light to suit your shooting situation The recommended distance between the subject and camcorder is about 1 5 m 5 feet P...

Page 63: ...amcorder niet meer gebruikt schakelt u eerst de ingebouwde videolamp uit en dan verwijdert u het batterijpak om per ongeluk inschakelen van de videolamp te voorkomen Indien er bij het filmen in de auto stand geknipper optreedt druk dan op LIGHT tot de indicator verschijnt t t t geen aanduiding CAUTION Be careful not to touch the lighting section because the plastic window and surrounding surfaces ...

Page 64: ...ek vast en steek de lamp in de fitting 4 Bevestig de lampbehuizing door ze rechtsom te draaien en vervang dan de ingebouwde lampeenheid 1 3 2 4 NOTE Be sure to align the tab with the groove when inserting OPMERKING Lipje tegenover groef plaatsen bij het inbrengen The built in light may turn on off when you use the PROGRAM AE or backlight function while shooting in the AUTO mode The built in light ...

Page 65: ...rking Om te voorkomen dat er vingerafdrukken op de halogeenlamp komen is het raadzaam om deze met een zacht droog doekje vast te pakken Mocht de lamp toch vuil geworden zijn veeg deze dan vooral zorgvuldig schoon Using the built in light CAUTION When replacing the bulb use only the Sony XB 3D halogen lamp optional to reduce the risk of fire To prevent possible burn hazard disconnect the power sour...

Page 66: ...tand 4 Start het afspelen van de cassette met opnamen op uw camcorder 5 Start de opname op de andere videorecorder Zie voor nadere bijzonderheden de gebruiksaanwijzing van uw videorecorder Montage Kopiëren van video opnamen A V connecting cable supplied A V aansluitkabel meegeleverd Editing Dubbing a tape Using the A V connecting cable Connect your camcorder to the VCR using the A V connecting cab...

Page 67: ...iten hoeft u de gele video stekker van het audio video aansluitsnoer niet aan te sluiten Verbind een S video aansluitsnoer los verkrijgbaar met de S video stekkerbussen van uw camcorder en de opname videorecorder Dubbing a tape When you have finished dubbing a tape Press x on both your camcorder and the VCR To prevent deterioration of pictures when dubbing Set EDIT to ON in the menu settings befor...

Page 68: ...dio video aansluitsnoer niet aan te sluiten Verbind het S video aansluitsnoer los verkrijgbaar met de S video stekkerbussen van uw camcorder en de videorecorder Vlot een cassette kopiëren Easy Dubbing Dubbing a tape easily Easy Dubbing VCR operation for dubbing can be controlled easily by using your camcorder when the VCR is connected You can select one of eight preset titles and two custom titles...

Page 69: ...n Easy Dubbing 1 C A M E R A PL A Y E R O F F C H G POWER EASY DUBBING EASY DUBBING START T I T LE SEL MODE SEL SETUP 0 0 0 0 0 EASY DUBBING SETUP I R SETUP PAUSE MODE I R TEST RETURN 3 NORMAL NORMAL NORMAL 3 4 5 0 0 0 0 0 EASY DUBBING SETUP I R SETUP PAUSE MODE I R TEST RETURN PAUSE REC PB 0 0 0 0 0 EA DUB SY END EA DUB SY END EA DUB SY END b Dubbing a tape easily Easy Dubbing Step 2 Setting the ...

Page 70: ... de IR SETUP code p 71 EASY DUBBING SETUP I R SETUP PAUSE MODE I R TEST RETURN 3 0 0 0 0 0 EASY DUBBING SETUP I R SETUP PAUSE MODE I R TEST RETURN 3 0 0 0 0 0 NORMAL NORMAL 1 EA DUB SY END EA DUB SY END Vlot een cassette kopiëren Easy Dubbing Buttons for cancelling recording pause on the VCR The buttons vary depending on your VCR To cancel recording pause Select PAUSE if the button to cancel recor...

Page 71: ...84 47 21 76 91 89 22 52 93 94 32 36 10 84 83 73 47 74 89 10 36 26 91 92 76 100 36 47 40 93 47 70 92 84 47 58 83 Vlot een cassette kopiëren Easy Dubbing Brand Merk Sony Aiwa Akai Alba Amstrad Baird Blaupunkt Bush CGM Clatronic Daewoo Ferguson Fisher Funai Goldstar Goodmans Grundig Hitachi ITT Nokia Instant JVC Kendo Loewe Luxor Mark Matsui Mitsubishi Dubbing a tape easily Easy Dubbing TV VCR compon...

Page 72: ...s de instelling correct Na afloop van de opname gaat de aanduiding over in COMPLETE EASY DUBBING SETUP I R SETUP PAUSE MODE I R TEST RETURN READY 0 0 0 0 0 EASY DUBBING SETUP I R SETUP PAUSE MODE I R TEST RETURN ENGAGE REC PAUSE RETURN EXECUTE 0 0 0 0 0 NORMAL NORMAL 2 EA DUB SY END EA DUB SY END Vlot een cassette kopiëren Easy Dubbing Dubbing a tape easily Easy Dubbing 4 Confirming the VCR operat...

Page 73: ...unt u desgewenst kleur formaat of achtergrondkleur aanpassen 1 Draai aan de SEL PUSH EXEC regelknop om kleur formaat of achtergrondkleur te kiezen en druk de regelknop in Het gekozen menu onderdeel verschijnt 2 Draai aan de SEL PUSH EXEC regelknop om het gekozen menu onderdeel naar wens in te stellen en druk de regelknop in 3 Herhaal deze stappen 1 en 2 tot uw titelbeeld geheel naar wens is ingest...

Page 74: ...enpozen kopiëren door de camcorder automatisch achtereenvolgens te laten overschakelen naar de weergave en wachtstand a Opname videorecorder b Wachttijd videorecorder c Weergavetijd camcorder 25 s 30 s 30 s 25 s 5 s 5 s a b c Vlot een cassette kopiëren Easy Dubbing Dubbing a tape easily Easy Dubbing Note You can put a title only into the tape of the VCR Title setting The title colour changes as fo...

Page 75: ...BBING om Easy Dubbing te stoppen EASY DUBBING START TITLE SEL MODE SEL SETUP 0 0 0 0 0 EASY DUBBING START TITLE SEL MODE SEL SETUP 0 0 0 0 0 NORMAL NORMAL NORMAL NORMAL PREVIEW 1 EA DUB SY END EA DUB SY END Vlot een cassette kopiëren Easy Dubbing Dubbing a tape easily Easy Dubbing Step 5 Performing Easy Dubbing Make sure that your camcorder and VCR are connected and that the VCR is set to recordin...

Page 76: ... opnamepauze te stoppen De aanduiding NOT READY verschijnt op het scherm wanneer START niet is voltooid Vlot een cassette kopiëren Easy Dubbing Dubbing a tape easily Easy Dubbing Note If you set the background colour to FADE in step 3 the picture may not appear properly depending on the connected VCR You cannot record on the VCR when The tape has run out The write protect tab is set to expose the ...

Page 77: ...e gewenste stand te zetten en druk de regelknop weer in 5 Als u nog andere punten wilt wijzigen stelt u in op RETURN en drukt u de regelknop in en dan herhaalt u de stappen 2 t m 4 Zie voor nadere bijzonderheden het Overzicht van de instellingen voor elk menu onderdeel p 84 Customising Your Camcorder Changing the menu settings To change the mode settings in the menu settings select the menu items ...

Page 78: ...L SE T PROGRAM AE P E F F ECT OTHERS WOR L D T I ME BEEP 0 HR OTHERS WOR L D T I ME BEEP REC L AMP RE TURN ON OF F D I SP L AY COMMANDER ED I T TBC DNR NTSC PB OTHERS WOR L D T I ME BEEP D I SP L AY REC L AMP COMMANDER OTHERS ON WOR L D T I ME BEEP REC L AMP RE TURN D I SP L AY COMMANDER OTHERS OF F WOR L D T I ME BEEP REC L AMP RE TURN D I SP L AY COMMANDER OTHERS 0 HR WOR L D T I ME BEEP REC L A...

Page 79: ...nt p 51 To add special effects like those in films or on the TV to images p 49 If you set to OFF digital zoom is deactivated and up to 20 is carried out If you set to 40 560 digital zoom is activated and more than 20 to 40 560 is performed digitally p 30 CCD TRV208E TRV408E only If you set to OFF digital zoom is deactivated and up to 20 is carried out If you set to 40 460 digital zoom is activated...

Page 80: ...OFF when playing back a tape on which you have dubbed over and recorded the signal of a TV game or similar machine To reduce picture noise To reduce a conspicuous afterimage when the picture has a lot of movement To play back a tape recorded in the NTSC colour system on a PAL system TV To play back a tape recorded in the NTSC colour system on a TV with the NTSC 4 43 mode Meaning To adjust the brig...

Page 81: ...MERA CAMERA PLAYER CAMERA Notes on the LP mode When you record a tape in the LP mode on your camcorder we recommend playing back the tape on your camcorder When you play back the tape on other camcorders or VCRs noise may occur in images or sound When you record in the LP mode we recommend using a Sony video cassette so that you can get the most out of your camcorder When you record in both the SP...

Page 82: ...play the following information indicators in English min STBY REC VOL END SEARCH and START To display the information indicators in French To display the information indicators in Spanish To display the information indicators in Portuguese To display the information indicators in German To display the information indicators in Italian To display the information indicators in Chinese traditional To...

Page 83: ... LCD z ON OFF Meaning To set the clock to the local time Turn the SEL PUSH EXEC dial to set the time difference The clock changes by the time difference you set here If you set the time difference to 0 the clock returns to the originally set time To output the melody when you start stop recording or when an unusual condition occurs on your camcorder To output the beep instead of the melody To canc...

Page 84: ...0 gezoomd In de stand 40 560 is digital zoom aangeschakeld en gebeurt 20 tot 40 560 digitaal p 30 alleen CCD TRV208E TRV408E In de stand OFF is digital zoom uitgeschakeld en wordt tot maximum 20 gezoomd In de stand 40 460 is digital zoom aangeschakeld en gebeurt 20 tot 40 460 digitaal p 30 alleen CCD TRV108E In de stand OFF is digital zoom uitgeschakeld en wordt tot maximum 20 gezoomd In de stand ...

Page 85: ...tschakelt De SteadyShot uit indicator verschijnt De camcorder zal nu niet over compenseren voor camerabewegingen Alleen CCD TRV408E Pictogram item EDIT TBC TBC staat voor Time Base Corrector DNR DNR staat voor Digital Noise Reduction NTSC PB Opmerking betreffende NTSC PB Bij weergave op een multi systeem TV toestel kiest u de weergavestand die het beste beeld op het scherm oplevert Als de camcorde...

Page 86: ...z SP LP z AUTO ON Betreffende LP langspeelsnelheid Een videoband die is opgenomen met de LP langspeelsnelheid op deze camcorder kunt u beter ook afspelen op deze camcorder Als u een dergelijke videoband afspeelt op een andere camcorder of videorecorder kan er storing in beeld of geluid optreden Voor opnemen in de LP stand op uw videorecorder is het aanbevolen Sony videocassettes te gebruiken voor ...

Page 87: ...cties te laten zien Om de demonstratiefunctie uit te schakelen Opmerkingen bij DEMO MODE De DEMO MODE demonstratie kan niet worden ingeschakeld wanneer er een cassette in de camcorder aanwezig is De DEMO MODE demonstratiefunctie is in de fabriek op STBY paraatstand ingesteld Dit houdt in dat de demonstratie automatisch begint zo n 10 minuten nadat u de POWER schakelaar op CAMERA zet zonder dat er ...

Page 88: ...EL PUSH EXEC regelknop om het zonetijdverschil in te stellen De klok verspringt dan het gekozen aantal uren Door instellen op 0 verkrijgt u weer de oorspronkelijk ingestelde tijd Om een wijsje te horen wanneer u begint of stopt met opnemen of wanneer er iets vreemds aan de hand is met uw camcorder Om bij de bediening een pieptoon te horen in plaats van het wijsje Om bij de bediening geen geluid te...

Page 89: ...s c Set the POWER switch to OFF CHG and then to CAMERA again p 26 The battery pack is dead or nearly dead c Install a fully charged battery pack p 15 16 The viewfinder lens is not adjusted c Adjust the viewfinder lens p 31 STEADYSHOT is set to OFF in the menu settings c Set it to ON p 79 The wide mode is set to 16 9FULL c Set it to OFF p 79 The setting is the manual focus mode c Press FOCUS to ret...

Page 90: ...AMERA or OFF CHG c Set it to PLAYER p 38 The tape has run out c Rewind the tape p 38 The television s video programme position is not adjusted correctly c Adjust it p 42 EDIT is set to ON in the menu settings c Set it to OFF p 80 The video head may be dirty c Clean the heads using the Sony V8 25CLD cleaning cassette optional p 109 The volume is turned to minimum c Open the LCD panel and press VOLU...

Page 91: ... Charge the battery pack fully again p 15 16 A deviation has occurred in the remaining battery time c Charge the battery pack fully again so that the indication on the battery remaining indicator is correct p 15 16 The power source is disconnected c Connect it firmly p 15 20 The battery pack is dead c Use a charged battery pack p 15 16 Moisture condensation has occurred c Remove the cassette and l...

Page 92: ...corder c Remove the cassette and insert it again then operate your camcorder Disconnect the mains lead of the AC power adaptor or remove the battery pack then reconnect it after about 1 minute Turn the power on p 20 26 If the functions still do not work press RESET using a sharp pointed object If you press RESET all the settings including the date and time return to the default p 123 The AC power ...

Page 93: ...battery pack c Use an InfoLITHIUM battery pack p 105 Moisture condensation has occurred c Remove the cassette and leave your camcorder for at least 1 hour to acclimatize p 108 The video heads are dirty c Clean the heads using the Sony V8 25CLD cleaning cassette optional p 109 A malfunction other than the above that you can service has occurred c Remove the cassette and insert it again then operate...

Page 94: ...beep sound 2 This indicator appears in the viewfinder only The battery pack is dead or nearly dead Slow flashing The battery pack is nearly dead P 16 Depending on conditions the environment or the battery pack the warning indicator may flash even if there are 5 to 10 minutes battery remaining Fast flashing The battery pack is dead The battery pack is completely dead and cannot be charged Tape Batt...

Page 95: ...Insert a cassette tape Q TAPE END 1 The tape has reached the end CLEANING CASSETTE 2 The video heads are dirty p 109 START STOP KEY Press START STOP to activate the ORC setting This message is displayed in white p 81 ORC The ORC setting is working This message is displayed in white p 81 1 You hear the melody or beep sound 2 The x indicator and CLEANING CASSETTE message appear one after another on ...

Page 96: ...WER schakelaar eenmaal op OFF CHG en dan weer in de CAMERA stand p 26 Het batterijpak is bijna leeg c Plaats een opgeladen batterijpak p 15 16 Het lensje van de zoeker is niet goed scherpgesteld c Stel het zoekerbeeld scherp p 31 De STEADYSHOT instelling in het instelmenu staat op OFF c Zet de instelling op ON p 84 Wanneer wide mode is ingesteld op 16 9FULL c Zet de instelling op OFF p 84 De camco...

Page 97: ...kelaar staat in de CAMERA of OFF CHG stand c Zet de instelling op PLAYER p 38 Het einde van de band is bereikt c Spoel de band terug p 38 Het videokanaal van het TV toestel is niet goed afgesteld c Stel dit kanaal beter af p 42 EDIT in het instelmenu staat op ON c Zet de instelling op OFF p 85 Wellicht zijn de videokoppen vuil c Reinig de koppen met een Sony V8 25CLD videokoppen reinigingscassette...

Page 98: ...jpak opnieuw volledig op p 15 16 De resterende batterijduur klopt niet c Laad het batterijpak opnieuw helemaal op zodat de resterende batterijduur correct wordt aangegeven p 15 16 De stroomaansluiting is losgeraakt c Sluit de netspanningsadapter stevig aan p 15 20 Het batterijpak is leeg c Gebruik een opgeladen batterijpak p 15 16 Er is vocht uit de lucht in de camcorder gecondenseerd c Verwijder ...

Page 99: ... een andere storing in de camcorder opgetreden c Verwijder de cassette plaats deze opnieuw en neem de camcorder dan weer in gebruik Maak het netsnoer van de netspanningsadapter of het batterijpak los en breng het na ongeveer 1 minuut weer aan Schakel de stroom in p 20 tot 26 Indien de functies nog altijd niet werken druk dan op RESET met behulp van een puntig voorwerp Houd er wel rekening mee dat ...

Page 100: ...erkende Sony onderhoudsdienst en geef de waarschuwingscode van vijf tekens door bijvoorbeeld E 61 10 Als het niet lukt een bepaald probleem te verhelpen raadpleegt u dan uw Sony handelaar of een plaatselijke erkende Sony onderhoudsdienst Om het storingzoeken te vergemakkelijken is deze camcorder voorzien van een zelfdiagnosefunctie Als er iets mis is met de camcorder toont deze op het LCD scherm i...

Page 101: ...nd is bereikt De zelfdiagnosefunctie is in werking getreden p 100 Band batterijpak waarschuwingsindicator 2 Langzaam knipperend Het batterijpak begint leeg te raken Het einde van de cassetteband komt in zicht Snel knipperend Het batterijpak is helemaal leeg Het einde van de band is bereikt 1 Het batterijpak is bijna leeg Langzaam knipperend Het batterijpak begint leeg te raken p 16 Afhankelijk van...

Page 102: ...cassette in Q TAPE END 1 De band is ten einde CLEANING CASSETTE 2 De videokoppen zijn vuil p 109 START STOP KEY Druk op START STOP om de ORC instelling te activeren De melding verschijnt in het wit p 86 ORC De ORC instelling is actief De melding verschijnt in het wit p 86 1 Er klinkt een wijsje of een pieptoon 2 De x indicator en de melding CLEANING CASSETTE verschijnen achtereenvolgens op het sch...

Page 103: ...systemen is het mogelijk dat buitenlandse video s niet op deze camcorder kunnen worden afgespeeld Zie de lijst onder Gebruik van uw camcorder in het buitenland p 107 wanneer u wilt weten welk kleursysteem in een bepaald land gebruikt wordt Selecting the cassette type You can use both Hi8 and standard 8 mm video cassettes on your camcorder When you use a Hi8 video cassette recording and playback ar...

Page 104: ...wel PAL als NTSC opnamen staan zal de tijd die de bandteller aangeeft niet juist zijn Deze afwijking wordt veroorzaakt door het verschil in de telling bij de PAL en NTSC kleursystemen Het is niet mogelijk NTSC cassettes naar een andere videorecorder te kopiëren of te monteren About video cassettes Playing back an NTSC recorded tape You can play back tapes recorded in the NTSC video system using th...

Page 105: ...aar terug op OFF CHG wanneer u niet filmt of afspeelt met uw camcorder Ook in de opname of weergavepauzestand verbruikt het batterijpak stroom About the InfoLITHIUM battery pack What is the InfoLITHIUM battery pack The InfoLITHIUM battery pack is a lithium ion battery pack that has functions for communicating information related to operating conditions between your camcorder and the AC adaptor cha...

Page 106: ...enomen zal het batterijpak waarschijnlijk het eind van zijn nuttige levensduur naderen Koop dan a u b een nieuw batterijpak De levensduur van de batterij wordt bepaald door de opslag en werkingsomstandigheden Have spare battery packs handy for two or three times the expected recording time and make a trial recording before the actual recording Do not expose the battery pack to water The battery pa...

Page 107: ...ijdzone Via het instelmenu kunt u de tijdinstelling eenvoudig omschakelen naar de plaatselijke tijd in een andere tijdzone Kies het menu onderdeel WORLD TIME en stel het geldende tijdsverschil in Zie blz 88 voor nadere bijzonderheden Gebruik van uw camcorder in het buitenland Using your camcorder abroad You can use your camcorder in any country or area with the AC power adaptor supplied with your ...

Page 108: ...ondensvorming Voordat u de camcorder van een koude omgeving naar een warme plaats brengt verpakt u het apparaat eerst in een plastic zak die u goed luchtdicht afsluit Neem de camcorder pas uit de plastic zak wanneer de lucht daarin en het apparaat dezelfde temperatuur hebben aangenomen als de omringende warme lucht na ongeveer een uur Maintenance information and precautions Moisture condensation I...

Page 109: ...oordoen maakt u de videokoppen schoon met een Sony V8 25CLD videokoppen reinigingscassette los verkrijgbaar Controleer de beelden en als er nog steeds storing is reinig de koppen dan nogmaals Onderhoud en voorzorgsmaatregelen Maintenance information and precautions Maintenance information Cleaning the LCD screen If fingerprints or dust make the LCD screen dirty we recommend using a LCD Cleaning Ki...

Page 110: ...voor uw Sony handelaar of een plaatselijke erkende Sony onderhoudsdienst Onderhoud en voorzorgsmaatregelen Note on video heads When the playback pictures still contain noise even if you have cleaned the video heads with a cleaning cassette the video heads may have worn down due to long use If this is the case they must be replaced with new heads Contact your Sony dealer or local authorised Sony se...

Page 111: ...t in de buurt plaats dan een volledig opgeladen batterijpak in de camcorder en laat het apparaat zo meer dan 24 uur ongebruikt staan met de POWER schakelaar in de uit stand Charging the built in rechargeable battery in your camcorder A built in rechargeable battery is supplied with your camcorder so as to retain the date and time etc regardless of the setting of the POWER switch The rechargeable b...

Page 112: ...werp aan Wanneer u de camcorder gebruikt in een koude omgeving kunnen er nabeelden op het LCD scherm verschijnen Dit duidt niet op storing in de werking Tijdens het gebruik van de camcorder kan de achterkant van het LCD scherm nogal warm worden Dit is normaal en duidt niet op storing Onderhoud en voorzorgsmaatregelen Maintenance information and precautions Precautions Camcorder operation Operate y...

Page 113: ... Zorg dat er geen zand in de camcorder terecht kan komen Als u de camcorder gebruikt op een plaats met veel opwaaiend zand of dwarrelend stof let dan op dat er niets in de camcorder terechtkomt Zand of stof kan het apparaat zodanig beschadigen dat reparatie niet meer mogelijk is Onderhoud en voorzorgsmaatregelen Built in light Do not knock or jolt the built in light while it is turned on as it may...

Page 114: ... de lens op een goed geventileerde plaats met niet veel stof of vuil Doe dit regelmatig om schimmelvorming op de lens te voorkomen Wij raden u aan uw camcorder minstens eenmaal per maand aan te schakelen en te gebruiken om hem lang in goede conditie te houden Onderhoud en voorzorgsmaatregelen Maintenance information and precautions AC power adaptor Unplug the unit from a wall socket when you are n...

Page 115: ...ijpak stevig aan uw camcorder of video apparatuur U kunt het batterijpak gerust gaan opladen als er nog wat spanning resteert dit zal de capaciteit en gebruiksduur niet nadelig beïnvloeden Onderhoud en voorzorgsmaatregelen Maintenance information and precautions Battery pack Use only the specified charger or video equipment for the charging function To prevent an accidental short circuit do not al...

Page 116: ...er batterijvloeistof in uw ogen komen was ze dan onmiddellijk uit met ruim water en raadpleeg zo spoedig mogelijk een arts Mocht u problemen hebben met de apparatuur schakel de camcorder dan uit trek de stekker uit het stopcontact en neem contact op met uw dichtstbijzijnde Sony handelaar Note on dry batteries CCD TRV107E TRV208E TRV408E only To avoid possible damage from battery leakage or corrosi...

Page 117: ...5 Ω ohms unbalanced Chrominance signal 0 3 Vp p 75 Ω ohms unbalanced Audio Video output AV MINIJACK 1 Vp p 75 Ω ohms unbalanced sync negative 327 mV at output impedance more than 47 kΩ kilohms Output impedance with less than 2 2 kΩ kilohms Monaural minijack ø 3 5 mm RFU DC OUT Mini mini jack ø 2 5 mm DC 5V LCD screen Picture 6 2 cm 2 5 type 50 3 37 4 mm 2 1 1 2 in Total dot number 61 600 280 220 G...

Page 118: ...pname weergaveduur met standaard 8 Hi8 videocassette van 90 min SP stand 1 5 uur LP stand 3 uur Vooruit achteruitspoelduur met standaard 8 Hi8 videocassette van 90 min Ong 5 min Beeldzoeker Elektronische zoeker Z W Beeldvormend orgaan CCD TRV408E 4 5 mm 1 4 type CCD Charge Coupled Device Ca 380 000 beeldpunten Effectief ca 230 000 beeldpunten CCD TRV107E TRV108E TRV208E 3 0 mm 1 6 type CCD Charge ...

Page 119: ...geleverde schouderband door de bevestigingsogen hiervoor op de camcorder Compleet overzicht Plaats en functie van de bedieningsorganen Camcorder Camcorder Quick Reference Identifying the parts and controls 1 Eyecup 2 Viewfinder lens adjustment lever p 31 3 V BATT release lever p 15 4 OPEN button p 26 5 SEL PUSH EXEC dial p 22 77 6 Power zoom lever p 30 7 POWER switch p 26 8 START STOP button p 26 ...

Page 120: ...de camcorder kunnen beschadigen Deze toets is voorzien van een voelstip Plaats en functie van de bedieningsorganen Identifying the parts and controls qa Video control buttons p 38 40 x STOP stop m REW rewind N PLAY playback M FF fastforward X PAUSE pause qs LIGHT button p 62 qd Recording lamp p 26 qf Infrared rays emitter p 34 qg Remote sensor CCD TRV107E TRV208E TRV408E only p 124 qh NIGHTSHOT sw...

Page 121: ... 55 es MENU knop p 77 Deze toets is voorzien van een voelstip Plaats en functie van de bedieningsorganen wh wk wj es wd wf wg wa ws w wl ea e Identifying the parts and controls w VOLUME buttons p 38 wa Speaker ws LCD screen p 26 wd EXPOSURE button p 54 wf TITLE button p 57 60 wg EASY DUBBING button p 68 wh DISPLAY button p 39 wj END SEARCH button p 37 wk Viewfinder p 31 wl FADER button p 46 e BACK...

Page 122: ...n ed ef eg ed DATE knop p 36 ef TIME knop p 36 eg COUNTER RESET knop p 27 Deze toets is voorzien van een voelstip Identifying the parts and controls ed DATE button p 36 ef TIME button p 36 eg COUNTER RESET button p 27 This button has a tactile dot ...

Page 123: ...p 62 rs A V OUT aansluiting p 42 66 rd RFU DC OUT RFU adapter DC uitgang aansluiting p 43 Vastmaken van de handgreepband Trek de handgreepband goed strak aan Identifying the parts and controls eh Z EJECT button p 24 ej Cassette compartment p 24 ek Grip strap el RESET button p 92 r S VIDEO OUT jack p 42 66 68 ra Built in light p 62 rs A V OUT jack p 42 66 rd RFU DC OUT RFU adaptor DC output jack p ...

Page 124: ...E De toetsen op de afstandsbediening met hetzelfde opschrift als die op de camcorder hebben ook dezelfde functie Remote Commander CCD TRV107E TRV208E TRV408E only The buttons that share the same name on the Remote Commander and your camcorder function identically to the buttons on your camcorder Identifying the parts and controls 1 Transmitter Point toward the remote sensor to control the camcorde...

Page 125: ...sstand VTR 2 gebruikt dan is het voor bediening van deze camcorder aanbevolen om eerst de bedieningsstand van de andere videorecorder te veranderen of de afstandsbedieningssensor van dat apparaat met een stukje zwart papier af te dekken Identifying the parts and controls To prepare the Remote Commander Insert 2 R6 size AA batteries by matching the and polarities on the batteries to the marks insid...

Page 126: ...en Bedieningsaanduidingen FULL 2 wd 3 wf min T W 0 00 00 REC 40 SEP I A M F ADER C I NEMA END SEARCH 7 4 6 5 5 0 0 0 2 0 0 2 9 4 5 6 7 0 8 qa qd qs 3 1 2 qf qh qk ql w wa ws qg qj LCD screen and Viewfinder LCD scherm en beeldzoeker Operation indicators 1 Recording mode indicator p 81 Mirror mode indicator p 28 2 Hi8 format indication p 32 3 Remaining battery time indicator p 32 4 Zoom indicator p ...

Page 127: ...indicator p 32 DATE of TIME indicator p 22 36 Zelfdiagnoseweergave indicator p 100 Plaats en functie van de bedieningsorganen Identifying the parts and controls qa SteadyShot off indicator CCD TRV408E only p 80 qs Manual focusing indicator p 55 qd Built in light indicator p 62 qf STBY REC indicator p 26 Video control mode indicator p 40 qg Tape counter indicator p 32 Self diagnosis display indicat...

Page 128: ...108 MONOTONE 46 Mosaic fader 46 NightShot 34 O P Q Operation indicators 126 ORC 81 PAL system 107 Picture effect 49 Picture search 40 Playback pause 40 PROGRAM AE 51 R Recording and playback systems 103 Recording mode 81 Recording time 18 Remaining battery time indicator 32 Remaining tape indicator 32 Remote Commander 124 Remote sensor 120 RESET 123 RFU adaptor 43 S Self diagnosis display 93 Shoul...

Page 129: ... Instelmenu 77 Klok gelijkzetten 22 Kopiëren van video opnamen 66 LCD scherm 28 LP mode 86 M N MONOTONE 46 Mozaïekbeeld in uitfaden 46 Netspanningsadapter 20 NightShot 34 O P Q Opname en weergavesystemen 103 Opnameduur 18 Opnamestand 86 ORC 86 PAL systeem 107 Pieptoon 88 PROGRAM AE 51 R RESET terugsteltoets 123 Restbandindicator 32 Resterende batterijladingsindicator 32 RFU adapter 43 S S VIDEO OU...

Page 130: ......

Page 131: ......

Page 132: ... 307231531 Sony Corporation Printed in Japan ...

Reviews: