background image

114

Quick Reference

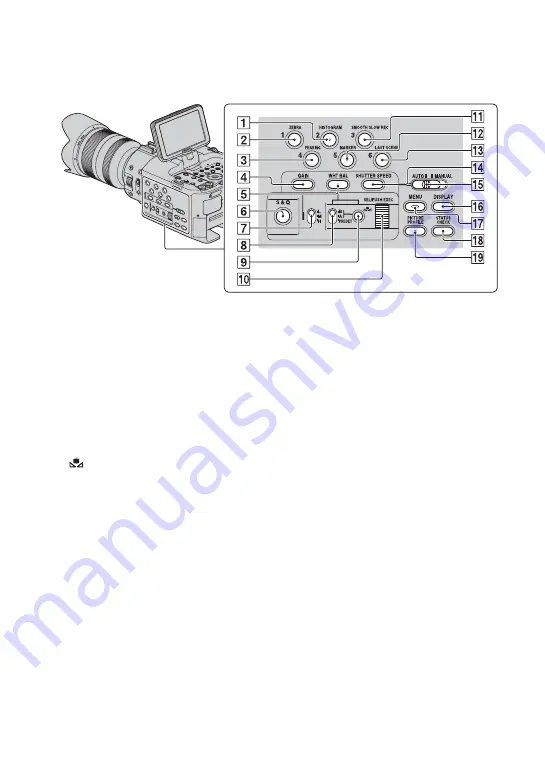
Identifying parts and controls

The numbers in ( ) are reference pages.

A

HISTOGRAM/ASSIGN 2


button* (48)

B

ZEBRA/ASSIGN 1 button (48)

C

PEAKING/ASSIGN 4 button (48)

D

GAIN button (31)

E

WHT BAL button* (33)

F

S&Q button (46)

G

Gain switch (31)

H

White balance memory switch (33)

I

 (One push) button (34)

J

SEL/PUSH EXEC dial (21, 66)

K

SMOOTH SLOW REC/ASSIGN 3 
button (45, 48)

L

MARKER/ASSIGN 5 button* (48)

M

LAST SCENE/ASSIGN 6 button (48, 
48)

N

SHUTTER SPEED button (32)

O

AUTO/MANUAL switch (31)

P

DISPLAY button (54)

Q

MENU button** (21, 66)

R

STATUS CHECK button (55)

S

PICTURE PROFILE button* (38)

* HISTOGRAM/ASSIGN 2 button, 

MARKER/

ASSIGN 5 button, 

PICTURE PROFILE 

button, and WHT BAL button have raised 

tactile dots for your convenience in locating the 
buttons.

**MENU button has a raised tactile bar for your 

convenience in locating the buttons.

Summary of Contents for FS100EK

Page 1: ... HD Video Camera Recorder Operating Guide E mount NEX FS100E FS100P FS100EK FS100PK Table of Contents Getting Started Recording Playback Editing Using the Menu Connecting with another device Troubleshooting Additional Information Quick Reference ...

Page 2: ...red blue or green in color that appear constantly on the LCD screen These points are normal results of the manufacturing process and do not affect the recording in any way Do not record the sun or leave the camcorder under the sun for a long time The inside of the camcorder may be damaged If sunlight is focused on a nearby object it may cause a fire When you must place the camcorder under direct s...

Page 3: ...cent lights The phenomena can be reduced by adjusting the shutter speed p 32 Images on the screen look horizontally divided when a subject is continuously lit with a flash The effect of this phenomenon may be reduced by using a slower shutter speed Also you may try using the Content Management Utility software on the supplied CD ROM to repair the image On playing back movies Movies recorded using ...

Page 4: ...rder using the SEL PUSH EXEC dial p 21 66 V v B b EXEC buttons p 66 and the touch panel However you cannot use the touch panel to make some settings such as the MENU items About this manual Operations in the manual are described using the E 18 200 mm F3 5 6 3 OSS lens supplied with the NEX FS100EK FS100PK When the operation differs depending on the lens used you will find the relevant information ...

Page 5: ...e focus 29 Adjusting manually 31 Adjusting the iris 31 Adjusting the gain 31 Adjusting the shutter speed 32 Adjusting the white balance 33 Adjusting the black balance 34 Audio setup 35 Recording sound via the supplied microphone 36 Recording sound from an external audio device 36 Adjusting the volume 37 Setting the headphone sound 37 Useful functions 38 Customizing the picture quality Picture prof...

Page 6: ...nting data on recording media from being recovered 64 Repairing the image database file 65 Operating the menu 66 Menu items 68 CAMERA SET menu 71 Settings to adjust your camcorder to the recording conditions GAIN SET STEADYSHOT etc REC OUT SET menu 73 Recording settings input and output settings REC SET VIDEO OUT AUDIO SET menu 74 Settings for the audio recording AUDIO FORMAT XLR SET etc DISPLAY S...

Page 7: ...ng time of movies 99 Using your camcorder abroad 101 File folder structure on the memory card and the flash memory unit 102 Maintenance and precautions 103 About the AVCHD format 103 About GPS 103 About the memory card 104 About the InfoLITHIUM battery pack 105 About charging the battery pack 106 About handling of your camcorder 107 Specifications 110 Identifying parts and controls 114 Screen indi...

Page 8: ...Charger AC VL1 1 p 15 Power cord mains lead 1 p 15 Rechargeable battery pack NP F770 1 p 15 105 Wireless Remote Commander RMT 845 1 p 119 A button type lithium battery is already installed Component video cable 1 p 56 A V connecting cable 1 p 56 86 USB cable 1 p 87 USB Adaptor Cable 1 p 83 Large LCD viewfinder 1 p 13 Large eyecup 1 p 13 Wind Screen 1 Microphone ECM XM1 1 p 11 Handle 1 p 10 All mod...

Page 9: ...ry shoe plate 1 p 15 Connecting cord DK 415 1 p 17 CD ROM Content Management Utility 1 CD ROM Manuals for Interchangeable Lens Digital HD Video Camera Recorder 1 Operating Guide 2 Zoom lens E 18 200 mm F3 5 6 3 OSS 1 p 18 Lens hood 1 p 20 Front lens cap 1 rear lens cap 1 attached to the lens p 18 NEX FS100EK FS100PK ...

Page 10: ...andle into the accessory shoe in the direction of the arrow 2 While pressing the screw down turn it clockwise to fasten the handle If the light to the lens is blocked Certain types of microphone may block the light to the lens If this happens attach the handle facing the other way round 1 Remove the screws and cap of the handle slide bar and pull the handle slide bar out Attaching the lens Attachi...

Page 11: ...ide and replace the cap and screws b Tips The screw holes of the handle slide bar are for following screws 1 For 1 4 20UNC screws 2 For 3 8 16UNC screws Attach the microphone to the handle 1 Attach the wind screen B to the supplied microphone A 2 Place the microphone A in the microphone holder C with the model name facing upward close the cover and shut the clamp Attaching the microphone Continued...

Page 12: ...the screw and boss of the grip Choose the grip angle and fasten the grip securely by turning the knob 2 clockwise 2 Connect the cable to the REMOTE jack Connecting the cable allows you to start stop recording by using the record button on the grip When changing the grip angle Unfasten the knob adjust the angle then tighten the knob Attaching the grip Cable clamp Record button Step 2 Attaching the ...

Page 13: ...mage on the LCD screen clearly When the picture on the LCD screen is hard to see If you cannot see the picture on the LCD screen clearly under bright circumstances use the supplied large eyecup To attach the large eyecup stretch it slightly and align it with the groove in the large LCD viewfinder You can attach the large eyecup facing either the right or left side Attaching the large LCD viewfinde...

Page 14: ...pe measure here The LCD panel is placed above the centerline of the lens on the same angle as the lens views the subject so the subject will be captured as you see it The LCD screen can be rotated right or left allowing a person other than the camera operator to see the image You can set and hold the LCD screen angle by turning the LCD HOLD dial Loosen the LCD HOLD dial when you change the angle U...

Page 15: ... You can charge the InfoLITHIUM battery pack L series with the supplied AC Adaptor Charger b Notes You can use a large capacity battery back NP F770 supplied or NP F970 sold separately with your camcorder You cannot use NP F570 1 Set the mode switch to CHARGE 2 Connect the power cord mains lead to the AC Adaptor Charger 3 Connect the power cord mains lead to the wall outlet wall socket 4 Place the...

Page 16: ...ry pack as shown below To store the battery pack If the battery pack is not in use for a while run down the battery and store it See page 106 for details on storage of the battery pack Charging time Approximate time minute required when you charge a fully discharged battery pack b Notes The supplied battery pack is NP F770 You cannot use the NP F570 battery pack with your camcorder On the battery ...

Page 17: ...ection of the arrow On the AC Adaptor Charger Use the nearby wall outlet when using the AC Adaptor Charger Disconnect the AC Adaptor Charger from the wall outlet wall socket immediately if any malfunction occurs while using your camcorder Do not use the AC Adaptor Charger placed in a narrow space such as between a wall and furniture Do not short circuit the DC plug of the AC Adaptor Charger or bat...

Page 18: ...ing inside the camcorder body 1 Remove the body cap from the camcorder body and the packaging lid from the rear of the lens 2 Mount the lens by aligning the mounting indexes white on the lens and the camcorder body While pushing the lens lightly toward the camcorder body turn the lens clockwise until it clicks into the locked position Be sure to put the lens on straight Front lens cap Zoom lock sw...

Page 19: ...ure that you hold both of the lens and the camcorder body 2 Replace the packaging lid on the lens and attach the body cap to the camcorder body Align the mark on the body cap to the mounting indexes and turn the cap clockwise Before you attach caps remove dust from them b Notes When changing the lens if dust or debris gets inside the camcorder body and adheres to the surface of the image sensor th...

Page 20: ...sult your Sony dealer or local authorized Sony service facility A mount lenses You need a Mount Adaptor sold separately to use A mount lenses For details refer to the operating manuals that come with the Mount Adaptor When an A mount lens is attached you cannot use the auto focus and auto iris functions You may not be able to use certain A mount lenses For the compatibility of a particular A mount...

Page 21: ...ime z Tips If you do not use your camcorder for about 3 months the built in rechargeable battery gets discharged and the date and time settings may be cleared from the memory In that case charge the rechargeable battery and then set the date and time again p 108 Skip to step 4 when you set the clock for the first time 1 Press the MENU button 2 Select OTHERS by turning the SEL PUSH EXEC dial then p...

Page 22: ... DATA CODE button p 54 Once the clock is set the clock time is automatically adjusted with AUTO CLOCK ADJ p 81 and AUTO AREA ADJ p 81 set to ON The clock may not be adjusted to the correct time automatically depending on the country region selected for your camcorder In this case set AUTO CLOCK ADJ and AUTO AREA ADJ to OFF You can change the on screen displays to show messages in a specified langu...

Page 23: ...ith all memory cards is not assured Memory Stick PRO Duo media half the size of Memory Stick media or standard size SD cards can be used for this camcorder Do not attach a label or the like on memory card or memory card adaptor Doing so may cause a malfunction Memory Stick PRO Duo media of up to 32 GB and SD cards of up to 64 GB have been verified to operate with your camcorder See page 99 for the...

Page 24: ...e file is corrupted The media must be restored to use again appears in step 2 format the memory card p 63 When inserting or ejecting the memory card be careful to prevent the memory card from popping out and dropping You can attach a flash memory unit HXR FMU128 sold separately to your camcorder for recording movies While sliding the RELEASE lever align the mark on the camcorder with the one on th...

Page 25: ... lever in the direction of the arrow attach the flash memory unit jack cover z Tips Your camcorder does not have the relay recording function If the memory card is fully recorded during recording the camcorder stops recording automatically You can record movies on both of the memory card and the flash memory unit simultaneously p 27 ...

Page 26: ...99 on the recording time of movies Your camcorder can record a movie for about 13 hours continuously If a movie file exceeds 2 GB during recording the camcorder divides the file and create a new file automatically The menu settings the PICTURE PROFILE settings and the settings made by the AUTO MANUAL switch are stored in your camcorder when you slide the POWER switch to OFF The access lamp lights ...

Page 27: ... both of these recording media simultaneously Press MENU t select REC OUT SET t REC SET t SIMULTANEOUS REC t ON default setting with the SEL PUSH EXEC dial z Tips Set SET to p 28 for the simultaneous recording If one of the recording media used becomes unable to continue recording during simultaneous recording the other recording media continues recording without pause When SIMULTANEOUS REC is ON ...

Page 28: ... recording format bit rate image size frame rate scanning system In the default setting is selected To change the setting Press MENU t select REC OUT SET t REC SET t REC FORMAT t a desired format with the SEL PUSH EXEC dial Selecting high definition image quality HD or standard definition image quality SD Selecting the recording format Setting value Description Bit rate PS max 28 Mbps FX max 24 Mb...

Page 29: ...decide on the size of the subject in your image Zooming must be done before focusing b Notes The operations and operating methods available depend on the lens attached Refer to the operating manuals that comes with your lens Do not grab or apply a strong force to the lens cylinder that rolls out when zooming The lens may be damaged You can adjust the focus manually for different recording conditio...

Page 30: ...cord the subject while pressing and holding the PUSH AUTO button D If you release the button the setting returns to manual focusing Use this function to shift the focus on one subject to another The scenes will shift smoothly z Tips The focal distance information for when it is dark and hard to adjust the focus appears for about 3 seconds in the following cases When you set the FOCUS switch C to M...

Page 31: ... the button down To adjust the iris automatically Press the IRIS button A appears next to the iris value b Notes You can make this adjustment only with an E mount lens When you use A mount lenses sold separately you must adjust the iris manually using the iris ring B When you set the AUTO MANUAL switch H to AUTO iris gain shutter speed and white balance are adjusted automatically You cannot adjust...

Page 32: ... EXEC dial G You can adjust the shutter speed in a range of 1 3 second through 1 10000 second The denominator of the set shutter speed appears on the screen For example 100 appears on the screen when you set the shutter speed to 1 100 second The larger the value on the screen is the faster the shutter speed is 4 Press the SEL PUSH EXEC dial G to lock the shutter speed To readjust the shutter speed...

Page 33: ...r recording with the white balance setting stored in memory A or B x To use the white balance you adjusted in advance 1 Preset the white balance offset value as described in To save the adjusted white balance value in memory A or B p 34 2 Set the white balance memory switch B to A or B z Tips This adjustment is recommended when you use a commercially available ND filter x To use the preset white b...

Page 34: ...nt value has not been obtained successfully A or B turns to slow flashing Adjust the subject appropriately and set the shutter speed to auto or around 1 50 then try adjusting the white balance again It may take a long time to adjust the white balance depending on the recording conditions If you want to perform a different operation before completing the adjustment set the white balance memory swit...

Page 35: ...itches allow you to set the sound to be recorded See page 11 on connecting the microphones External audio jacks and switches INPUT 1 jack F INPUT 2 jack E INPUT 1 switch A INPUT 2 switch G Audio source switches CH1 INPUT 1 INPUT 2 switch B CH2 INPUT 1 INPUT 2 switch H Audio level controls CH1 AUTO MAN switch C CH2 AUTO MAN switch I AUDIO LEVEL CH1 dial D AUDIO LEVEL CH2 dial J Continued ...

Page 36: ...esult from setting this switch to MIC 48V Check before connecting the device When there is no audio device connected to an INPUT jack set the INPUT switch of that jack to LINE to prevent noise 2 Set the input level of the microphone Set the input level to the sensitivity of an XLR microphone you are using with INPUT1 TRIM INPUT2 TRIM in the menu p 75 0dB will be appropriate for the supplied microp...

Page 37: ... INPUT 2 jacks 1 Set the AUTO MAN switch C or I of the channel to be adjusted to MAN appears on the screen 2 Turn the AUDIO LEVEL dial D or J of the channel to be adjusted during recording or standby To restore automatic adjustment Set the AUTO MAN witch G or I of the manually adjusted channel to AUTO You can select the channel by setting the switch to CH1 or CH2 to output from the headphone See H...

Page 38: ... profile number with the SEL PUSH EXEC dial A You can record with the settings of the selected picture profile 3 Select OK with the SEL PUSH EXEC dial A Customizing the picture quality Picture profile Picture profile number Recording condition PP1 Default settings the same as when Picture Profile is OFF PP2 Default settings the same as when Picture Profile is OFF PP3 Example settings of natural co...

Page 39: ...LE button B 2 Select the PICTURE PROFILE number with the SEL PUSH EXEC dial A 3 Select SETTING with the SEL PUSH EXEC dial A 4 Select an item to be adjusted with the SEL PUSH EXEC dial A 5 Adjust the picture quality with the SEL PUSH EXEC dial A 6 Repeat steps 4 and 5 to adjust other items 7 Select RETURN with the SEL PUSH EXEC dial A 8 Select OK with the SEL PUSH EXEC dial A A picture profile ind...

Page 40: ...ra images ITU709 Gamma curve that corresponds to ITU 709 Gain in low intensity area 4 5 Item Description and settings RANGE Selects a correcting range HIGH MIDDLE LOW LEVEL Sets the correcting level 7 maximum black compression to 7 maximum black stretch Item Description and settings MODE Selects a mode either automatic or manual AUTO to set the knee point and slope automatically MANUAL to set the ...

Page 41: ...ATONE1 Film camera image like colors good with GAMMA set to CINEMATONE1 CINEMATONE2 Film camera image like colors good with GAMMA set to CINEMATONE2 PRO Similar color tones to those of Sony professional cameras when combined with ITU 709 ITU709 MATRIX Colors corresponding to ITU 709 LEVEL Sets a color level when you set TYPE to the settings other than STANDARD 1 close to color settings of STANDARD...

Page 42: ...o 7 MANUAL SET ON OFF Turns on and off the manual detail adjustment ON Enables the manual detail adjustment automatic optimization will not be performed OFF Disables the manual detail adjustment V H BALANCE Sets the vertical V and horizontal H balance of DETAIL 2 off to the vertical V side to 2 off to the horizontal H side B W BALANCE Selects the balance of the lower DETAIL B and the upper DETAIL ...

Page 43: ...ss the PICTURE PROFILE button B 2 Select the number of the picture profile that you want to reset with the SEL PUSH EXEC dial A 3 Select SETTING t RESET t YES t RETURN t OK with the SEL PUSH EXEC dial A 1 Press the MENU button during standby 2 Select OTHERS t GPS SETTING t ON default setting with the SEL PUSH EXEC dial appears and your camcorder starts trying to triangulate When your camcorder tri...

Page 44: ...dial 2 Select PRESET with the SEL PUSH EXEC dial 3 Select the first 2 digits with the SEL PUSH EXEC dial You can set the time code between 00 00 00 00 and 23 59 59 24 4 Set other digits by repeating step 3 5 Select OK with the SEL PUSH EXEC dial To reset the time code You can reset the time code 00 00 00 00 Select RESET in step 2 of Presetting the time code To reset the time code using the Wireles...

Page 45: ...desired setting with the SEL PUSH EXEC dial The default setting is START TRIGGER b Notes Sounds cannot be recorded The image quality is lower than with the regular recording You cannot set a slower shutter speed than 1 215 second The simultaneous recording on the memory card and the flash memory unit is not available The time of the movie recorded using SMOOTH SLOW REC is recorded after being conv...

Page 46: ...Slow Quick Motion recording When recording with the Quick Motion recording function your camcorder may continue recording for some time approximately 30 seconds at most after you press the button to stop recording Do not operate your camcorder while the REC indicator is flashing on the screen but wait till it turns to STBY After you press the button to stop recording your camcorder continues recor...

Page 47: ...n again for about 1 second restores the previous setting To cancel Slow Quick Motion recording Press the S Q button A or the MENU button C during standby z Notes When you are recording with a slow frame rate the camcorder may continue recording for a few more seconds after you press the START STOP button to stop recording You cannot change the frame rate during Slow Quick Motion recording To chang...

Page 48: ...most recently recorded scene Last Scene Review Assigning the functions to the ASSIGN buttons Some functions can be assigned to the ASSIGN buttons for use You can assign a single function to any one of the ASSIGN 1 to 6 buttons See Menu items p 68 on the function of each item Default function of each ASSIGN button ASSIGN 1 ZEBRA p 76 ASSIGN 2 HISTOGRAM p 76 ASSIGN 3 SMOOTH SLOW REC p 45 ASSIGN 4 PE...

Page 49: ...h you want to assign a function with the SEL PUSH EXEC dial A appears if no function is assigned to the ASSIGN button 4 Select the function that you want to assign with the SEL PUSH EXEC dial A 5 Select OK with the SEL PUSH EXEC dial A 6 Select RETURN with the SEL PUSH EXEC dial A 7 Press the MENU button B to hide the menu screen ASSIGN buttons ...

Page 50: ...The VISUAL INDEX screen appears after a few seconds You can turn on or off the time and date display on the thumbnails by pressing the DISPLAY button VOLUME buttons VISUAL INDEX button POWER switch Press and hold the green button Thumbnail movie Previous Recording media Playback mode Next Current movie data p 51 ...

Page 51: ...he screen ADate and time of recording started BResolution CFrame rate DRecord mode EDuration FTime code of recording started Time code will not be displayed correctly when you play back recording media with no time code or recording media with time code that your camcorder does not support GGPS data Appears on the movie that was recorded with GPS SETTING set to ON default setting on the OTHERS men...

Page 52: ...bout 10 times t about 30 times t about 60 times Reduced size images which enable you to view many movies at the same time on the VISUAL INDEX screen are called thumbnails You can operate playback using the PREV PLAY NEXT STOP PAUSE SCAN SLOW buttons on the camcorder To adjust the volume Adjust the volume with the VOLUME buttons To return to the recording mode Press the VISUAL INDEX button You can ...

Page 53: ...touch will show the information on the still image at the lower part of the screen ADate and time of recording BResolution CImage size DGPS data Appears on a still image that was created from a movie recorded with GPS SETTING set to ON default setting on the OTHERS menu Your camcorder displays the selected still image Playback mode Previous Next ...

Page 54: ...on including date time camera data and GPS triangulation data automatically stored during recording on the screen during playback Press the DATA CODE button A during playback or pause The screen changes like date and time display t camera data display t GPS triangulation data t no display as you press the button A White balance appears during playback of the movie recorded with MANU WB TEMP B Shut...

Page 55: ... the following items Audio setup such as microphone volume level p 74 Output signal setup VIDEO OUT etc p 73 Functions assigned to the ASSIGN buttons p 48 Camera setup p 71 Recording media information You can check the estimated used and free spaces Battery Info You can check the remaining capacity of the attached battery 1 Press the STATUS CHECK button D 2 Turn the SEL PUSH EXEC dial C until a de...

Page 56: ...are output from the HDMI OUT and COMPONENT OUT jacks simultaneously In the case of the A V connecting cable connection signals are output from the VIDEO OUT jack Component video cable supplied Monitor TV A V connecting cable supplied HDMI cable sold separately To component input jacks To audio video input jacks To HDMI input jack Signal flow ...

Page 57: ...if HDMI COMPONENT is set to 720p 576i or 576p the screen of the connected device becomes blank until you change the setting If you display the edit screen while outputting signals to a TV or monitor the menu may not be displayed correctly This camcorder is not compatible with BRAVIA sync z Tips HDMI High Definition Multimedia Interface is an interface to send both video audio signals The HDMI OUT ...

Page 58: ... t PROTECT with the SEL PUSH EXEC dial 3 Touch the movies or still images to be protected is displayed on the selected images z Tips Press and hold the image down to preview the image Touch to return to the previous screen You can select up to 100 images at one time 4 Touch t t To undo the protection of movies and still images Touch the movie or still image marked with in step 3 disappears ...

Page 59: ...ng on the image quality of the movie 2 1M with high definition image quality HD 0 2M in 16 9 wide with standard definition image quality SD VGA 0 3M in 4 3 with standard definition image quality SD The recording media where you want to save still images should have enough free space The recording date and time of captured still images is the same as the recording date and time of the movies If the...

Page 60: ...recording media that contains the movies from your camcorder during the operation It may damage the recording media A slight difference may occur from the point where you touch X and the actual dividing point as your camcorder selects the dividing point based in about half second increments z Tips Only simple editing is available on this camcorder Use commercially available editing software for mo...

Page 61: ...ry to delete them p 58 Save important movies and still images in advance p 87 z Tips You can select up to 100 images at one time To delete all data recorded on the recording media and recover all the recordable space of the media format the media p 63 1 Press the MENU button when the VISUAL INDEX screen is displayed 2 Select EDIT t DELETE with the SEL PUSH EXEC dial 3 Touch the movies or still ima...

Page 62: ... wall outlet wall socket using the supplied AC Adaptor Charger to prevent your camcorder from running out of power during the operation z Tips The original movie will not be deleted after copying 1 Press the MENU button when the VISUAL INDEX screen is displayed 2 Select EDIT t COPY with the SEL PUSH EXEC dial 3 Select the recording media to copy from and to 4 Select Multiple Images 5 Select the im...

Page 63: ...he loss of important images you should save them p 87 before formatting the recording media Protected movies and still images are also deleted 1 Press the MENU button 2 Select OTHERS t MEDIA FORMAT with the SEL PUSH EXEC dial 3 Select the recording media to be formatted 4 Touch t b Notes While Executing is displayed do not operate the buttons on the camcorder disconnect the AC Adaptor Charger or r...

Page 64: ...cket Disconnect all cables except the AC Adaptor Charger Do not disconnect the AC Adaptor Charger during the operation Do not apply any vibrations or shocks to your camcorder during this operation 1 Operate the camcorder on an outside power source using the AC Adaptor Charger p 17 2 Set the POWER switch to ON 3 Press the MENU button 4 Select OTHERS t MEDIA FORMAT with the SEL PUSH EXEC dial 5 Sele...

Page 65: ...from running out of power during the operation 1 Press the MENU button 2 Select OTHERS t REPAIR IMAGE DB FILE with the SEL PUSH EXEC dial 3 Select the recording media you want to check the database file 4 Touch The database file check starts Touch and quit the database file check if no inconsistency is found 5 Touch After Completed appears touch b Notes If you stop the operation while Repairing th...

Page 66: ...pears 3 Turn the SEL PUSH EXEC dial until the icon of the desired menu is highlighted then press the dial to select the menu CAMERA SET p 71 REC OUT SET p 73 AUDIO SET p 74 DISPLAY SET p 76 TC UB SET p 79 OTHERS p 80 EDIT p 70 4 Turn the SEL PUSH EXEC dial until the desired menu item is highlighted then press the dial to select the item SEL PUSH EXEC dial MENU button POWER switch MENU button V v B...

Page 67: ...etting is highlighted then press the dial to confirm the setting 6 Press the MENU button to hide the menu screen To return to the previous screen select RETURN b Notes The available menu items vary depending on the context of your camcorder during recording or playback ...

Page 68: ... be played back as either slow motion or quick motion COLOR BAR Turns on or off the color bars and tone z REC OUT SET menu p 73 REC SET Sets the image quality and aspect ratio for recording VIDEO OUT Sets output signals AUDIO SET menu p 74 AUDIO FORMAT Sets the audio format for high definition image quality HD recording AUDIO LIMIT Sets the clipping noise reduction function HEADPHONE OUT Sets the ...

Page 69: ...urate time automatically by acquiring time information from the GPS system AUTO AREA ADJ Compensates for time differences automatically by acquiring location information from the GPS system DATE REC Superimposes the date and time on images BEEP Sounds the operation melody REC LAMP F Turns off the front recording lamp REC LAMP R Turns off the rear recording lamp REMOTE CONTROL Disables the supplied...

Page 70: ...en is displayed EDIT menu p 58 59 60 61 62 PROTECT Protects movies and still images to avoid deleting them by mistake DIVIDE Divides movies DELETE Deletes images PHOTO CAPTURE Captures still images from movies COPY Copies movies or still images from a memory card to a flash memory unit Menu items Continued ...

Page 71: ...f you adjust the gain manually you cannot obtain the effect of AGC LIMIT Press the MENU button t select CAMERA SET with the SEL PUSH EXEC dial GAIN SET AGC LIMIT You can use the preset white balance For more details see page 33 You can set an offset value to adjust the outdoor white balance when you set WB PRESET to OUTDOOR 7 B0 7 bluish normal reddish You can set the color temperature when you se...

Page 72: ...cording media and outputs tone signals This function helps you to adjust colors when you view movies recorded with your camcorder on a TV or a monitor b Notes This function is automatically set to OFF when you switch the format perform the function by the MENU button or turn off the camcorder You cannot change the setting during recording or expanded focus operation The time code does not advance ...

Page 73: ... HDMI COMPONENT jacks 1080p 576i 720p 576i B 1080i 576i 576p 576i x DOWN CONVERT TYPE You can select a down convert type when you down covert video signal Use this function for outputting movies and still images recorded in 16 9 B SQUEEZE Outputs a horizontally compressed image while maintaining its original height LETTER BOX 16 9 Outputs a vertically compressed image while maintaining its origina...

Page 74: ... menu Settings for the audio recording AUDIO FORMAT XLR SET etc The default settings are marked with B The indicators in parentheses appear when the items are selected See page 66 for details on selecting menu items You can set the audio format for high definition image quality HD recording B LINEAR PCM Records in Linear PCM system DOLBY DIGITAL Records in Dolby Digital system b Notes Audio format...

Page 75: ...appears on the status check screen b Notes The setting is not effective when you set the INPUT 1 switch to LINE x INPUT2 TRIM x INPUT2 WIND You can set INPUT 2 in the same way as INPUT 1 z Tips 48 dBu is set as 0 dB in your camcorder Set INPUT TRIM to 0dB for the supplied microphone The INPUT TRIM function adjusts the input level from an external microphone When using a highly sensitive microphone...

Page 76: ...ET with the SEL PUSH EXEC dial HISTOGRAM Histogram You can display a zebra pattern as a guide for adjusting brightness x ON OFF B OFF Does not display the zebra pattern ON Displays and the brightness level appear on the screen The zebra pattern will not be recorded with the image x LEVEL You can select the brightness level B70 to 100 or 100 z Tips The zebra pattern is a strip pattern displayed ove...

Page 77: ... x GUIDEFRAME B OFF Does not display the guide frame ON You can display frame markers that help you to check horizontal and vertical positions of a subject b Notes Only the time code is output to an external device via external output jacks when MARKER is set to ON even if DISPLAY OUTPUT is set to ALL OUTPUT You cannot display markers under following conditions EXPANDED FOCUS During SMOOTH SLOW RE...

Page 78: ...R Displays a number 0 through 99 that indicates the zoom position You can adjust the brightness of the LCD screen Changes in the LCD brightness will not affect the brightness of recording images You can select where to output the display information such as time code B LCD PANEL Outputs the information to the LCD screen ALL OUTPUT Outputs the information to the LCD screen HDMI output component out...

Page 79: ...llowing cases When the recording format is changed When the images are recorded on the memory card and the flash memory unit simultaneously When the recording media is removed REC RUN is selected automatically for the Slow Quick Motion recording Press the MENU button t select TC UB SET with the SEL PUSH EXEC dial TC PRESET UB PRESET TC RUN B PRESET Records the newly set time code on the recording ...

Page 80: ... SIMP simplified English in case that you cannot find your native tongue among the options Press the MENU button t select OTHERS with the SEL PUSH EXEC dial ASSIGN BUTTON CLOCK SET AREA SET SUMMERTIME LANGUAGE See page 43 The camcorder displays the triangulating information How to check the triangulating information GPS SETTING GPS INFORMATION Color of the satellites triangulating gauge Status z x...

Page 81: ...clock may not be adjusted to the correct time automatically using the GPS system depending on the country region selected for your camcorder In this case set AUTO CLOCK ADJ to OFF The camcorder can compensate for time differences automatically by acquiring location information from the GPS system B ON Compensates for time differences automatically OFF Does not compensates for time differences auto...

Page 82: ... Wireless Remote Commander p 119 OFF Disables the supplied Wireless Remote Commander See page 63 See page 65 Select this item when USB CONNECT does not appear on the LCD screen by connecting the camcorder to another device with the USB cable Displays the total hours of operation in 10 hour increments See page 108 REC LAMP F Recording lamp front REC LAMP R Recording lamp rear REMOTE CONTROL MEDIA F...

Page 83: ...hub card reader b Notes You may not be able to use external media devices with a code function The FAT file system is available for your camcorder If the storage medium of the external device was formatted for the NTFS file system etc format the external media device using the camcorder before use The format screen appears when an external media device is connected to your camcorder Make sure that...

Page 84: ...umber The number of scenes may be smaller depending on the camcorder setting and the type of images recorded High definition image quality HD movies Max 3 999 Standard definition image quality STD movies Max 9 999 Still images Max 40 000 When the camcorder is connected to the external media device the images saved in the external media device are displayed on the LCD screen of the camcorder The re...

Page 85: ...the DC IN jack of your camcorder and the wall outlet wall socket p 17 2 Turn on your camcorder and connect a DVD writer etc to the USB jack of your camcorder with the USB cable supplied The USB CONNECT screen appears on the camcorder screen If the USB CONNECT screen does not appear press the MENU button and select OTHERS t USB CONNECT 3 Record movies on the connected device For details refer to th...

Page 86: ...r to the input jacks of the recording device 3 Start playback on your camcorder and record it on the recording device Refer to the instruction manuals supplied with your recording device for details 4 When copy is finished stop the recording device and then your camcorder b Notes Since copying is performed via analog data transfer the image quality may deteriorate You cannot copy images to recorde...

Page 87: ... XP My OS 1 Microsoft Windows XP SP3 2 Windows Vista SP2 3 Windows 7 CPU To play back movies with high definition image quality HD in the highest image quality mode use an Intel Core 2 Duo 2 80 GHz CPU or faster Movies with high definition image quality HD recorded in other than the highest image quality mode may be played back with a slower CPU Depending on the performance of your video card vide...

Page 88: ...mputer To disconnect your camcorder from the computer 1 Click the icon at the bottom right of the desktop of the computer t Safely remove USB Mass Storage Device Drive 2 Touch t YES on the camcorder screen 3 Disconnect the USB cable b Notes Use the supplied Content Management Utility software when you import long movies or edited images from the camcorder to a computer If you use other software th...

Page 89: ... it after about 1 minute Press the RESET button p 118 using a pointed object The camcorder gets warm The camcorder may get warmer while you use it This is not a malfunction The remaining battery time indicator does not indicate the correct figure Ambient temperature is too high or too low or the battery pack has not been charged enough This is not a malfunction Fully charge the battery again If th...

Page 90: ...ve any obstructions between the Wireless Remote Commander and the remote sensor of the camcorder Keep strong light sources such as sunlight or overhead lighting away from the remote sensor otherwise the Wireless Remote Commander may not function properly Insert a fresh battery in the compartment with its terminals matching those of the compartment p 119 Another video device malfunctions when you u...

Page 91: ... recording media p 63 Total number of movie scenes exceeds the recordable capacity of your camcorder p 100 Delete unnecessary images p 61 The temperature of your camcorder is extremely high Turn off your camcorder and leave it for a while in a cool place The temperature of your camcorder is extremely low Turn off your camcorder and leave it for a while in a warm place Something wrong happened to o...

Page 92: ...6 9 wide 4 3 cannot be changed The aspect ratio of high definition image quality HD movies is 16 9 wide Automatic focus does not function Set the FOCUS switch to AUTO to enable the automatic focus function p 29 Adjust the focus manually if the automatic focus does not work properly p 29 Use an E mount lens p 18 Menu items are grayed out or do not work You cannot select grayed out display items in ...

Page 93: ... a fluorescent lamp sodium lamp or mercury lamp This is not a malfunction This can be improved by changing the shutter speed p 32 The image appears divided horizontally This occurs when you light the subject using a flash This may be avoided by using a shutter speed as slow as possible p 32 You may try using the Content Management Utility software on the supplied CD ROM to repair the image Black b...

Page 94: ...t supported on your camcorder p 102 Only the file name is displayed if the folder structure does not conform to the universal standard No sound or only a low sound is heard Turn up the volume p 52 Movies recorded with the SMOOTH SLOW REC function do not have sounds is displayed on the screen Bars will be displayed for the camera data of the movies recorded with the SMOOTH SLOW REC function or COLO...

Page 95: ...C OUT SET t VIDEO OUT t DOWN CONVERT TYPE t the appropriate down conversion type p 73 Black zone appears at top and bottom of a 4 3 TV screen This happens when viewing a movie recorded in the 16 9 wide mode on a 4 3 TV This is not a malfunction Time code and other information appear on the display of the connected device Set DISPLAY OUTPUT to LCD PANEL when you connect a device with the A V connec...

Page 96: ...of error can be as wide as several hundred meters at a maximum The computer does not recognize the camcorder Disconnect the cable from the computer then connect it again securely Disconnect the cable from your computer and camcorder Reboot your computer and connect your computer and camcorder following the steps in the correct order p 87 Movies cannot be viewed or copied to the computer Disconnect...

Page 97: ...around 10 is displayed as the battery remaining figure Warning indicator pertaining to battery pack temperature The battery pack is too hot Replace the battery pack or remove the battery pack and put it in a cool place Warning indicator pertaining to memory cards Slow flashing Free spaces for recording images are running out For the type of memory cards you can use with your camcorder see page 23 ...

Page 98: ...database file may be damaged Check the database file by pressing the MENU button then select OTHERS t REPAIR IMAGE DB FILE t the recording medium The external media device is damaged Warning indicator pertaining toformatting of the external media device The external media device is damaged Format the external media device correctly If the message still appears reconnect the external media device t...

Page 99: ... Playing time Approximate time available when you use a fully charged battery pack unit minute b Notes Playing on the LCD screen High definition image quality HD x When AUDIO FORMAT is set to LINEAR PCM unit minute x When AUDIO FORMAT is set to DOLBY DIGITAL unit minute Estimated time of recording and playback with each battery pack Battery pack Continuous recording time Typical recording time NP ...

Page 100: ...0 16 9 FX max 24 Mbps 1920 1080 16 9 1280 720 16 9 FH approx 17 Mbps ave 1920 1080 16 9 1280 720 16 9 HQ approx 9 Mbps ave 1440 1080 16 9 LP approx 5 Mbps ave 1440 1080 16 9 Standard definition image quality SD HQ approx 9 Mbps ave 720 576 16 9 4 3 Number of pixels and aspect ratio of still images Still images are created from movies 1920 1080 dots 16 9 640 360 dots 16 9 640 480 dots 4 3 The maxim...

Page 101: ... TV with AUDIO VIDEO input jacks An A V connecting cable must be connected On TV color systems Your camcorder is PAL system so its picture can only be viewed on a PAL system TV with AUDIO VIDEO input jacks Simple setting of the clock by time difference When you are abroad you can easily adjust the clock to the local time by setting the time difference Select AREA SET then set the time difference p...

Page 102: ...ile exceeds 2 GB the file becomes divided The file numbers go up automatically When the capacity of a file number exceeds 9999 another folder is created to record new movie files The folder name goes up 101PNV01 t 102PNV01 D Still image files JPEG files The extension of the files is JPG The file numbers go up automatically When the capacity of a file number exceeds 9999 another folder is created t...

Page 103: ...stem that calculates geographical location from highly accurate US space satellites This system allows you to pinpoint your exact location on the earth The GPS satellites are located in 6 orbits 20 000 km above the earth The GPS system consists of 24 or more GPS satellites A GPS receiver receives radio signals from the satellites and calculates the current location of the receiver based on the orb...

Page 104: ...liant product you use Damaged or lost image data will not be compensated for and may occur in the following cases If you eject the memory card turn the power off on your camcorder or remove the battery pack for replacement while your camcorder is reading or writing image files on the memory card while the access lamp is lit or flashing If you use the memory card near magnets or magnetic fields It ...

Page 105: ...M L series battery packs have the mark What is an InfoLITHIUM battery pack An InfoLITHIUM battery pack is a lithium ion battery pack that has functions for communicating information related to operating conditions between your camcorder and a supplied AC Adaptor Charger The InfoLITHIUM battery pack displays the remaining battery time in according to the operating situations of your camcorder To ch...

Page 106: ...nditions Use the AC Adaptor Charger supplied to charge the designated batteries only If you charge other types of batteries those batteries may leak heat up burst or give an electric shock resulting in burns or injury Remove the charged battery from the AC Adaptor Charger The CHARGE lamp of the supplied AC Adaptor Charger flashes in 2 patterns as follows Fast flashing Turns on and off rapidly at a...

Page 107: ...el for example and operate it Doing so might cause heat to build up inside When disconnecting the power cord mains lead pull it by the plug and not the lead Do not damage the power cord mains lead such as by placing anything heavy on it Keep metal contacts clean Keep the Wireless Remote Commander and button type battery out of children s reach If the battery is accidentally swallowed consult a doc...

Page 108: ...again Do not use a sharp pointed object for calibration Doing so may damage the LCD screen You cannot perform the calibration when the LCD screen is turned around or facing up and closed to the camcorder Casing If the casing is soiled clean the camcorder body with a soft cloth lightly moistened with water and then wipe the casing with a dry soft cloth Avoid the following to prevent damage to the f...

Page 109: ...viewfinder Remove dust inside the eye piece and viewfinder with a blower Note on disposal of the camcorder When you dispose of the camcorder it is recommended that you destroy the actual body of the camcorder Note on disposal transfer of memory card Even if you delete data in the memory card or format the memory card on your camcorder or a computer you may not delete data from the memory card comp...

Page 110: ...fective movie 4 3 Approx 2 530 000 pixels Color temperature AUTO one push A B INDOOR 3 200K OUTDOOR 5 800K Minimum illumination 1 5 lx lux with Shutter Speed 1 25 auto gain control auto iris using the E 18 200 mm F3 5 6 3 OSS lens Supplied with NEX FS100EK FS100PK Input output connectors VIDEO OUT jack Pin connector Video output 1 Vp p 75 Ω ohms unbalanced sync negative AUDIO OUT jacks Pin connect...

Page 111: ...ithout the belt attached Mass approx Camcorder body only 1 040 g 2 lb 4 oz When recording 2 660 g 5 lb 13 oz With the accessories battery pack NP F770 lens lens hood large LCD viewfinder large eyecup handle microphone ECM XM1 grip and flash memory unit cover attached Supplied with NEX FS100EK FS100PK AC Adaptor Charger AC VL1 Power requirements AC 100 V 240 V 50 Hz 60 Hz Power consumption 22 W Out...

Page 112: ...ration InfoLITHIUM is a trademark of Sony Corporation BRAVIA is a trademark of Sony Corporation Blu ray Disc and Blu ray are trademarks of the Blu ray Disc Association Dolby and the double D symbol are trademarks of Dolby Laboratories Microsoft Windows and Windows Vista are trademarks or registered trademarks of U S Microsoft Corporation in the U S and other countries Macintosh and Mac OS are regi...

Page 113: ...n requests by the owners of copyright of these software applications we have an obligation to inform you of the following Please read the following sections Read license3 pdf in the License folder on the CD ROM Content Management Utility You will find licenses in English of C Library zlib and libjpeg software On GNU GPL LGPL applied software The software that is eligible for the following GNU Gene...

Page 114: ...SH EXEC dial 21 66 K SMOOTH SLOW REC ASSIGN 3 button 45 48 L MARKER ASSIGN 5 button 48 M LAST SCENE ASSIGN 6 button 48 48 N SHUTTER SPEED button 32 O AUTO MANUAL switch 31 P DISPLAY button 54 Q MENU button 21 66 R STATUS CHECK button 55 S PICTURE PROFILE button 38 HISTOGRAM ASSIGN 2 button MARKER ASSIGN 5 button PICTURE PROFILE button and WHT BAL button have raised tactile dots for your convenienc...

Page 115: ... F Lens lock pin G Lens contacts Do not touch or dirty the lens contacts H Iris ring 31 I IRIS PUSH AUTO button 31 J PUSH AUTO button 30 K FOCUS switch 29 L BATT RELEASE button 16 M Hook for shoulder strap N Access lamp 24 O Memory card slot 23 P Battery pack 15 Q Tripod receptacles For attaching a tripod with a screw shorter than 5 5 mm sold separately 1 For 1 4 20UNC screws 2 For 3 8 16UNC screw...

Page 116: ...ceptacles For 1 4 20UNC screws J Accessory shoe 15 K Tape measure hook 14 L Image sensor position index M Focusing ring 29 NEX FS100EK FS100PK N Zooming ring 29 NEX FS100EK FS100PK O Zoom lock switch NEX FS100EK FS100PK P Lens hood 18 NEX FS100EK FS100PK Q Lens 18 NEX FS100EK FS100PK To attach a shoulder strap Attach a shoulder strap sold separately to the hooks for a shoulder strap Identifying pa...

Page 117: ...it C i headphones jack For connecting stereo mini jack headphones D HEADPHONE MONITOR switch 37 E Rear recording lamp 82 The recording lamp flashes if the remaining capacity of recording media or battery is low F Remote sensor 82 G INPUT 2 jack 11 H HDMI OUT jack 56 I COMPONENT OUT jack 56 J VIDEO OUT AUDIO OUT jacks 56 K USB jack 85 87 L INPUT 1 jack 11 Continued ...

Page 118: ...switch 21 L START STOP button 26 M RESET button If you press the RESET button all settings including the clock setting except the picture profile settings return to the default N DATA CODE button 54 O TC U BIT button Switches between time code and user bit to display on the LCD screen P DISPLAY button 54 Q VISUAL INDEX button 50 R MENU button 21 66 S VOLUME buttons 50 VOLUME button and PLAY button...

Page 119: ...der supplied with your camcorder your video device may also operate In that case select a commander mode other than DVD2 for your video device or cover the sensor of your video device with black paper To change the battery of the Wireless Remote Commander 1 While pressing on the tab inset your fingernail into the slit to pull out the battery case 2 Place a new battery with the side facing up 3 Ins...

Page 120: ... Indicator Meaning 100 Remaining battery SET 28 REC FORMAT 28 WIDE REC 73 Indicator Meaning Recording media STBY REC Recording status 26 E Warning 97 N Playback indicator 50 Indicator Meaning 0min Estimated remaining recording time Recording playback media 00 00 00 00 Time code hour minute second frame Upper left Upper right Bottom Center Indicator Meaning GPS triangulating status 43 PEAKING 76 ZE...

Page 121: ...86 TV 56 Connecting cord 17 COPY 62 D DATA CODE button 54 Date and time 22 120 DATE REC 81 DELETE 61 DETAIL 42 DISPLAY button 54 DISPLAY OUTPUT 78 DISPLAY SET menu 76 DIVIDE 60 DOWN CONVERT TYPE 73 E EXPANDED FOCUS 30 F Flash memory unit 24 Flash memory unit jack 24 Focus 29 FOCUS switch 30 Focusing ring 30 FREE RUN 79 G Gain 31 GAIN button 31 GAIN SET 71 Gain switch 31 GAMMA 40 GPS 43 GPS INFORMA...

Page 122: ... F 82 REC LAMP R 82 REC RUN 79 REC SET 73 Recording 26 Recording format 28 Recording image quality 28 Recording lamp 26 REC OUT SET menu 73 REMOTE CONTROL 82 Remote sensor 117 REPAIR IMAGE DB FILE 65 RESET button 118 S SAFETY ZONE 77 Screen indicators 120 SD WIDE REC 73 Self diagnosis display 97 SEL PUSH EXEC dial 21 66 Shoulder strap 116 Shutter speed 32 SHUTTER SPEED button 32 Simultaneous recor...

Page 123: ... OUTDOOR LEVEL 71 WB PRESET 71 WB SHIFT 42 WB TEMP SET 71 White balance 33 White balance memory switch 34 WHT BAL button 33 Wireless Remote Commander 119 X XLR AGC LINK 75 XLR SET 75 Z ZEBRA 76 92 ZOOM DISPLAY 78 Zooming 29 ...

Page 124: ...http www sony net Printed in Japan ...

Reviews: