


Mis
c
e
llan
eous
Troubleshooting
27
Troubleshooting
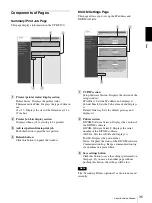
If Damage is Suspected
If a problem appears, check the following trouble
shooting guide first and perform whatever action is
necessary to solve the problem. If the problem persists,
turn off the printer and consult your Sony dealer.
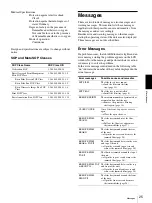
If the Film Jams
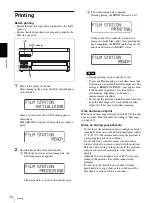
If the film jams before printing starts or during printing,
printing stops and the following messages appear on the
LCD.
An error message indicates the position where the film
has jammed. Check the position and follow the steps
below to remove the jammed film.
After the jammed film has been removed, the unit starts
printing if there is image data still to be printed.
• REMOVE FILM TRAY: J0
• REMOVE FILM REAR: J1
• REMOVE FILM REAR & TOP: J2
• REMOVE FILM TOP: J3
• REMOVE FILM TOP & FRONT: J4
• REMOVE FILM FRONT: J5
• REMOVE FILM TOP & INNER: J6
• REMOVE FILM TRAY: J7
• REMOVE FILM SOME PLACES: J8
Notes
• When you put your hands inside of the unit, be careful
not to hurt yourself by touching parts.
• If you turn off the power, image data that has not been
printed yet is cleared.
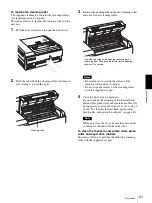
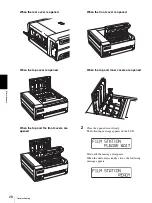
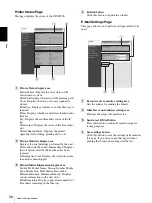
When REMOVE FILM TRAY: J0 appears
1
Remove the film tray.
When the unit is not turned on, you can pull the film
tray out without pushing the EJECT TRAY button.
Note
When you pull out the film tray, hold both sides of
the film tray and the tray cover with both hands.
Note
If any printouts have been ejected onto the film tray,
remove them first before removing the film tray.
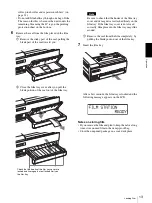
2
Remove the film jammed around the sepration
rubbers.
3
Re-insert the film tray as it was.
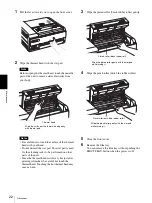
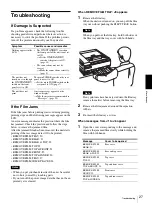
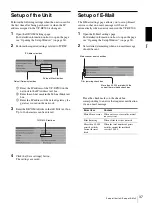
When messages from J1 to J6 appear
1
Open the cover corresponding to the message and
remove the jammed film slowly while holding the
film with both hands.
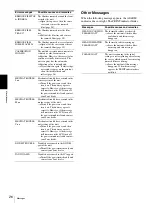
Symptom
Possible causes and remedies
Nothing appears in the
LCD.
• The
ON/STANDBY
switch on
the front panel of the unit is not set
to ON.
t
Set the
ON/STANDBY
switch of the printer to ON.
(page 14)
• The connections may not be
correct.
t
Make the connections correctly.
(page 9)
The unit has not
turned on even though
the
ON/STANDBY
switch on the front
panel is set to ON.
The main POWER switch on the rear
panel is not set to ON.
t
Set the main POWER switch on the
rear panel to ON. (page 7)
The unit does not
print.
An error message appears on the
window display.
t
Take the measures recommended in
“Messages”. (page 25)
Message
Cover to be opened
REMOVE FILM
REAR: J1
Rear cover
REMOVE FILM
REAR & TOP: J2
Rear and top cover
REMOVE FILM
TOP: J3
Top cover
REMOVE FILM
TOP & FRONT: J4
Top and front cover
REMOVE FILM
FRONT: J5
Front cover
REMOVE FILM
TOP & INNER: J6
Top and inner cover
Summary of Contents for film imager
Page 39: ...Sony Corporation ...


