background image

12

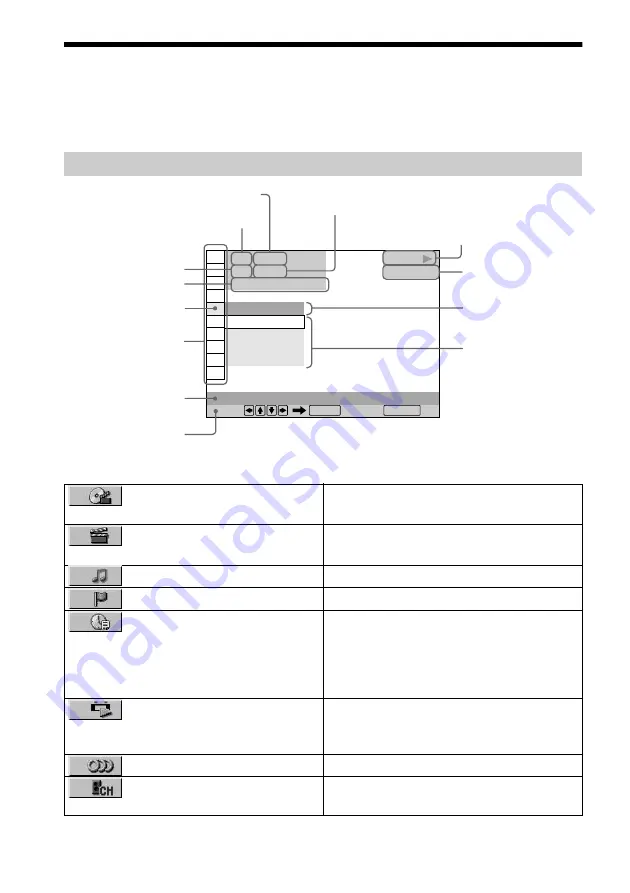
Guide to the Control Menu Display

Use the Control Menu to select a function that you would like to use. The Control Menu display 
appears when the DISPLAY button is pressed. For details, please refer to the page in parentheses.

List of Control Menu Items

Control Menu

OFF
1: ENGLISH
2: FRENCH
3: SPANISH

OFF

1 8 ( 3 4 )

1 2 ( 2 7 )

T       1 : 3 2 : 5 5

DVD VIDEO

PLAY

Select:                                  Cancel: 

SUBTITLE

ENTER

RETURN

Currently playing chapter 
number (VIDEO CD/SACD/
CD: index number)

Playing time

Total number of chapters or indexes recorded

Currently playing title number 
(VIDEO CD/SACD/CD: track number)

Options

Current setting

Total number of titles or tracks recorded 

Playback status
(

N

 Playback, 

X

 Pause, 

x

 Stop, etc.)

Function name of selected 
Control Menu item

Operation message

Icon of selected 
Control Menu item

Control Menu items

Type of disc being 
played back

TITLE (page 46)/SCENE (page 

46)/TRACK (page 46)

Selects the title, scene, or track to be played.

 CHAPTER (page 46)/INDEX 

(page 46)

Selects the chapter or index to be played.

TRACK (page 46)

Selects the track to be played.

INDEX (page 46)

Selects the index to be played.

TIME/TEXT (page 46)

Checks the elapsed time and the remaining 
playback time.
Input the time code for picture and music 
searching.
Displays the DVD or SACD/CD text.

ORIGINAL/PLAY LIST (page 

35)

Selects the type of titles (DVD-RW) to be 
played, the ORIGINAL one, or an edited 
PLAY LIST.

AUDIO (page 53)

Changes the audio setting.

MULTI/2CH (page 36)

Selects the playback area on 2 Multi-
channel SACDs.

Summary of Contents for DVP-NS500V

Page 1: ...3 070 605 11 1 SACD DVD Player Operating Instructions DVP NS500V 2001 Sony Corporation ...

Page 2: ...TION You are cautioned that any change or modifications not expressly approved in this manual could void your authority to operate this equipment Note This equipment has been tested and found to comply with the limits for a Class B digital device pursuant to Part 15 of the FCC Rules These limits are designed to provide reasonable protection against harmful interference in a residential installatio...

Page 3: ... location or is placed in a very damp room moisture may condense on the lenses inside the player Should this occur the player may not operate properly In this case remove the disc and leave the player turned on for about half an hour until the moisture evaporates When you move the player take out any discs If you don t the disc may be damaged On adjusting volume Do not turn up the volume while lis...

Page 4: ...cting the Audio Cords 20 Step 3 Connecting the Power Cord 27 Step 4 Quick Setup 27 Playing Discs 32 Playing Discs 32 Resuming Playback from the Point Where You Stopped the Disc Resume Play 33 Using the DVD s Menu 34 Selecting ORIGINAL or PLAY LIST on a DVD RW Disc 35 Selecting a Playback Area for an SACD Disc 36 Playing VIDEO CDs with PBC Functions PBC Playback 37 Various Play Mode Functions Progr...

Page 5: ...Using Various Additional Functions 64 Locking Discs CUSTOM PARENTAL CONTROL PARENTAL CONTROL 64 Operation Sound Effects Sound Feedback 68 Controlling Your TV or AV Amplifier Receiver with the Supplied Remote 69 Settings and Adjustments 72 Using the Setup Display 72 Setting the Display or Sound Track Language LANGUAGE SETUP 73 Settings for the Display SCREEN SETUP 74 Custom Settings CUSTOM SETUP 75...

Page 6: ...ns The player cannot play the following discs CD ROMs PHOTO CDs included All CD Rs CD RWs other than music and VCD format CD Rs CD RWs Data part of CD Extras DVD ROMs DVD Audio discs Also the player cannot play the following discs A disc recorded in a color system other than NTSC such as PAL or SECAM This player conforms to the NTSC color system A DVD with a different region code page 86 A disc th...

Page 7: ...rotection technology that is protected by method claims of certain U S patents other intellectual property rights owned by Macrovision Corporation and other rights owners Use of this copyright protection technology must be authorized by Macrovision Corporation and is intended for home and other limited viewing uses only unless otherwise authorized by Macrovision Corporation Reverse engineering or ...

Page 8: ... signal channels the disc is not inserted 5 Disc tray 32 6 A open close button 32 7 previous next buttons 33 8 C X x c ENTER buttons 27 9 JOG button indicator 45 q TOP MENU button 34 qa MENU button 34 qs O RETURN button 37 qd DISPLAY button 12 qf Click shuttle 45 qg x stop button 32 qh X pause button 33 68 qj H play button 32 qk Front panel display 9 ql SURROUND button indicator 55 w BNR Block Noi...

Page 9: ...tatus Current chapter 49 Currentaudio signal 54 Lights up when you can change the angle 59 Current play mode 38 Current title 49 Digital TITLE TRACK CHAP INDEX ANGLE HOUR MIN SEC MULTI REPEAT 1 MPEG SHUFFLE PGM A B Playing status Current play mode 38 Disc type Current scene 49 Playing time 49 Digital TITLE TRACK CHAP INDEX ANGLE HOUR MIN SEC MULTI REPEAT 1 MPEG SHUFFLE PGM A B Playing time 49 Disc...

Page 10: ...4 LINE OUT L R AUDIO 1 2 jacks 21 24 25 5 LINE OUT VIDEO 1 2 jacks 18 6 S VIDEO OUT 1 2 jacks 18 7 COMPONENT VIDEO OUT jacks 18 5 1CH OUTPUT DIGITAL OUT WOOFER L R FRONT REAR CENTER LINE OUT R AUDIO 2 L VIDEO 2 R AUDIO 1 L VIDEO 1 1 2 PCM DTS DOLBY DIGITAL COAXIAL OPTICAL S VIDEO OUT COMPONENT VIDEO OUT Y PB PR ...

Page 11: ...P 1 on standby button 32 69 Q VOL volume buttons 69 The button has a tactile dot R TV VIDEO button 69 S WIDE MODE DVE Digital Video Enhancer 63 69 T ENTER button U BNR Block Noise Reduction button 61 V SEARCH MODE button 46 W TIME TEXT button 49 X SUBTITLE button 60 Y A B button 42 Z REPEAT button 41 wj REPLAY button 33 wk SURROUND button 55 wl y SCAN SLOW buttons 44 e x STOP button 32 ea X PAUSE ...

Page 12: ...Playback status N Playback X Pause x Stop etc Function name of selected Control Menu item Operation message Icon of selected Control Menu item Control Menu items Type of disc being played back TITLE page 46 SCENE page 46 TRACK page 46 Selects the title scene or track to be played CHAPTER page 46 INDEX page 46 Selects the chapter or index to be played TRACK page 46 Selects the track to be played IN...

Page 13: ...ings in SETUP to the default setting PROGRAM page 38 Selects the title chapter or track to play a disc in the order you want SHUFFLE page 40 Plays the title chapter or track in random order REPEAT page 41 Plays the entire disc all titles all tracks repeatedly or one title chapter track repeatedly A B REPEAT page 42 Specifies the parts you want to play repeatedly BNR page 61 Adjusts the picture qua...

Page 14: ...up in green when you select any item except OFF SURROUND PROGRAM SHUFFLE REPEAT A B REPEAT BNR DIGITAL VIDEO ENHANCER only The ANGLE indicator lights up in green only when the angles can be changed The VIDEO EQUALIZER indicator lights up in green when any setting other than STANDARD is selected Control Menu display 1 m Control Menu display 2 m ADVANCED display Appears if you select any setting oth...

Page 15: ...131A 1 Size AA R6 batteries 2 Step 2 Inserting Batteries into the Remote You can control the player using the supplied remote Insert two size AA R6 batteries by matching the 3 and ends on the batteries to the markings inside the compartment When using the remote point it at the remote sensor on the player Notes Do not leave the remote in an extremely hot or humid place Do not drop any foreign obje...

Page 16: ...ect ratio please refer to page 74 DIGITAL OUT WOOFER L R FRONT REAR CENTER LINE OUT R AUDIO 2 L VIDEO 2 R AUDIO 1 L VIDEO 1 1 2 PCM DTS DOLBY DIGITAL COAXIAL OPTICAL S VIDEO OUT COMPONENT VIDEO OUT Y PB PR 5 1CH OUTPUT VIDEO AUDIO INPUT L R yellow white red LINE OUT R AUDIO 2 L VIDEO 2 R AUDIO 1 L VIDEO 1 3 Power source SACD DVD Player TV l Signal flow to video input to LINE OUT L R AUDIO 1 1 Audi...

Page 17: ...ses and the player begins playing the disc After Step 6 Depending on the disc a menu may be displayed on the TV screen If so select the item you want from the menu and play the DVD VIDEO page 34 or VIDEO CD disc page 37 To stop playing Press x To take out the disc Press A To turn off the player Press 1 on the remote The player is set to standby mode and the power indicator lights up in red Press P...

Page 18: ...r using a video cord Select one of the patterns A through C according to the input jack on your TV monitor projector or AV amplifier receiver INPUT S VIDEO B PR PB Y COMPONENT VIDEO IN C AUDIO INPUT L R A VIDEO DIGITAL OUT WOOFER L R FRONT REAR CENTER LINE OUT R AUDIO 2 L VIDEO 2 R AUDIO 1 L VIDEO 1 1 2 PCM DTS DOLBY DIGITAL COAXIAL OPTICAL S VIDEO OUT 5 1CH OUTPUT COMPONENT VIDEO OUT Y PB PR SACD...

Page 19: ... video cords not supplied of the same kind and length You will enjoy accurate color reproduction and high quality images Note Do not connect the player to a VCR If you pass the player signals via the VCR you may not receive a clear image on the TV screen A If you are connecting to a video input jack B If you are connecting to an S VIDEO input jack C If you are connecting to a monitor projector or ...

Page 20: ...re trademarks of Digital Theater Systems Inc 1996 Digital Theater Systems Inc All rights reserved Select a connection Connection Components to be connected page 21 TV stereo page 22 AV amplifier receiver having 5 1ch input jacks 4 speakers front L and R rear L and R 6 speakers front L and R center rear L and R subwoofer page 22 AV amplifier receiver having a Dolby Digital or DTS decoder and a digi...

Page 21: ...ignals page 18 Connecting to your TV A DIGITAL OUT WOOFER L R FRONT REAR CENTER LINE OUT R AUDIO 2 L VIDEO 2 R AUDIO 1 L VIDEO 1 1 2 PCM DTS DOLBY DIGITAL COAXIAL OPTICAL S VIDEO OUT 5 1CH OUTPUT COMPONENT VIDEO OUT Y PB PR A LINE OUT R AUDIO 2 L VIDEO 2 R AUDIO 1 L VIDEO 1 TV l Signal flow SACD DVD player white red Audio video cord supplied to audio input yellow white red yellow continued ...

Page 22: ...S 5 1ch page 86 SACD Multi channel page 86 Connecting to a digital jack This connection will allow you to use the Dolby Digital or DTS decoder function of your AV amplifier receiver You are not able to enjoy the surround sound effects of the player xRecommended surround sound effects using this connection with your amplifier receiver Dolby Digital 5 1ch page 86 DTS 5 1ch page 86 96kHz 24bit PCM No...

Page 23: ...1 L VIDEO 1 1 2 PCM DTS DOLBY DIGITAL COAXIAL OPTICAL S VIDEO OUT 5 1CH OUTPUT COMPONENT VIDEO OUT Y PB PR DIGITAL OUT B 2 B 1 PCM DTS DOLBY DIGITAL COAXIAL OPTICAL DIGITAL OUT WOOFER L R FRONT REAR CENTER 5 1CH OUTPUT Front R Front L Rear R AV amplifier receiver having 5 1ch inputs or and a decoder Subwoofer Center Coaxial digital cord not supplied Monaural audio cord not supplied Stereo audio co...

Page 24: ...re that your listening position is in between your speakers Note SACD audio signals are not output from the digital jack Connecting to a stereo amplifier receiver and 2 speakers Connecting to an MD deck or DAT deck C C 1 C 2 C 2 C 1 C 1 WOOFER L R FRONT REAR CENTER LINE OUT R AUDIO 2 L VIDEO 2 R AUDIO 1 L VIDEO 1 1 2 PCM DTS DOLBY DIGITAL COAXIAL OPTICAL S VIDEO OUT 5 1CH OUTPUT COMPONENT VIDEO OU...

Page 25: ...l The surround effects are enhanced if 6 speakers front L and R center rear L and R and subwoofer are used If your amplifier receiver has L and R audio input jacks only use If your amplifier receiver has a digital input jack use xRecommended surround sound effects using this connection with your amplifier receiver Dolby Surround Pro Logic page 86 z For correct speaker setting location please refer...

Page 26: ...PB PR DIGITAL OUT D 2 D 1 PCM DTS DOLBY DIGITAL COAXIAL OPTICAL DIGITAL OUT LINE OUT R AUDIO 2 L VIDEO 2 R AUDIO 1 L VIDEO 1 SACD DVD player or Front R Front L Rear R Subwoofer l Signal flow Rear L Amplifier receiver with Dolby Surround decoder Center Rear mono Stereo audio cord not supplied Speakers Coaxial digital cord not supplied white red to coaxial or optical digital input Optical digital co...

Page 27: ...he minimum number of basic adjustments for using the player To skip an adjustment press To return to the previous adjustment press 1 Turn on the TV 2 Switch the input selector on the TV to the player 3 Press POWER on the player and press 1 on the remote Press ENTER to run QUICK SETUP appears at the bottom of the screen If this message does not appear select QUICK under SETUP in the Control Menu to...

Page 28: ...r appears 9 Press X x to select the item then press ENTER TV Type You select Page 4 3 standard TV 4 3 LETTER BOX or 4 3 PAN SCAN 74 A wide screen TV or a 4 3 standard TV with a wide screen mode 16 9 74 Audio Cord Connecting Type You select LINE OUTPUT L R AUDIO DIGITAL OUTPUT or both and DIGITAL 5 1CH OUTPUT NO LANGUAGE SETUP OSD MENU AUDIO SUBTITLE FRENCH ENGLISH ENGLISH SPANISH PORTUGUESE SCREEN...

Page 29: ...s finished All connections and setup operations are complete When DIGITAL 5 1CH OUTPUT is selected in Step 8 the Setup Display for SPEAKER SETUP appears Audio Cord Connection Type You select Page D PCM 78 DOLBY DIGITAL only if the amplifier receiver has a Dolby Digital decoder 78 Audio Cord Connection Type You select Page D PCM 78 DTS only if the amplifier receiver has a DTS decoder 78 B D AUDIO S...

Page 30: ...appears qk Press X x to select the item ql Press ENTER Quick Setup is finished All connections and setup operations are complete Note You can directly start Quick Setup only when you run it for the first time To run Quick Setup a second time select QUICK under SETUP in the Control Menu page 72 SPEAKER SETUP SIZE DISTANCE BALANCE LEVEL OFF TEST TONE FRONT CENTER SMALL LARGE NONE LARGE REAR SUBWOOFE...

Page 31: ...ional settings are needed If the sound distorts even when the volume is turned down set AUDIO ATT to ON page 77 Set 48kHz 96kHz PCM to 96kHz 24bit only if you connect an amplifier receiver that conforms to the 96 kHz sampling frequency page 78 If the sound distorts even when the volume is turned down set AUDIO ATT to ON page 77 Enjoying the surround sound effects Item You select Page DISTANCE BALA...

Page 32: ...on the TV screen You can play the disc interactively by following the instructions on the menu DVD VIDEO page 34 VIDEO CD page 37 To turn on the player Press POWER on the player The player enters standby mode and the power indicator lights up in red Press 1 on the remote The player turns on and the power indicator lights up in green In standby mode the player also turns on by pressing A on the pla...

Page 33: ...playing a disc press x to stop playback RESUME appears on the front panel display and you can restart the disc from the point where you stopped the disc If RESUME does not appear Resume Play is not available 2 Press H The player starts playback from the point where you stopped the disc in Step 1 z To play from the beginning of the disc press x twice then press H Additional operations To Operation ...

Page 34: ...VD which contains several titles you can select the title you want using the TOP MENU button When you play DVDs that allow you to select items such as the language for the subtitles and the language for the sound select these items using the MENU button 1 Press TOP MENU or MENU The disc s menu appears on the TV screen The contents of the menu vary from disc to disc 2 Press C X x c or the number bu...

Page 35: ...mode The Control Menu appears 2 Press X x to select ORIGINAL PLAY LIST then press ENTER The options for ORIGINAL PLAY LIST appear 3 Press X x to select the setting PLAY LIST plays the titles created from ORIGINAL for editing ORIGINAL plays the titles originally recorded 4 Press ENTER To turn off the Control Menu Press DISPLAY repeatedly until the Control Menu is turned off Note Repeat Play and A B...

Page 36: ... 2CH then press ENTER 3 Press X x to select the playback area MULTI or 2CH then press ENTER Some SACDs consist of an HD layer and a CD layer You can select the playback layer you want to listen to Press SACD CD in stop mode Each time you press the button an HD layer or a CD layer is alternately selected When playing a CD layer the CD indicator in the front panel display lights up Notes For details...

Page 37: ... menu for interactive operations Refer to the instructions supplied with the disc as the operating procedure may differ depending on the VIDEO CD To go back to the menu Press O RETURN z To play without using PBC press or the number buttons while the player is stopped to select a track then press H or ENTER Play without PBC appears on the TV screen and the player starts continuous play You cannot p...

Page 38: ...AY twice when playing an SACD CD press once The Control Menu appears 2 Press X x to select PROGRAM then press ENTER The options for PROGRAM appear 3 Press X x to select SET t then press ENTER The display for programming appears 4 Press c The cursor moves to the title or track in this case 01 Creating your own program Program Play 1 2 3 4 5 6 7 8 9 0 H X x c PROGRAM CLEAR ENTER DISPLAY Number butto...

Page 39: ...ntil the Control Menu is turned off To change or cancel a program 1 Follow Steps 1 through 3 of Creating your own program Program Play 2 Select the program number of the title chapter or track you want to change or cancel using X x or the number buttons and press c 3 Follow Step 5 for new programming To cancel a program select under T then press ENTER To cancel all the titles chapters or tracks in...

Page 40: ...s them in random order xWhen playing a VIDEO CD SACD CD Program Play is set to OFF TRACK shuffles tracks and plays them in random order xWhen Program Play is set to ON ON shuffles titles or tracks selected in Program Play and plays them in random order 4 Press ENTER To return to normal play Press CLEAR or select OFF in Step 3 To turn off the Control Menu Press DISPLAY repeatedly until the Control ...

Page 41: ...current title on a disc CHAPTER repeats the current chapter xWhen playing a VIDEO CD SACD CD Program Play and Shuffle Play are set to OFF DISC repeats all of the tracks TRACK repeats the current track xWhen Program Play is set to ON or Shuffle Play is activated ON repeats Program Play or Shuffle Play 4 Press ENTER To return to normal play Press CLEAR or select OFF in Step 3 To turn off the Control...

Page 42: ...ortion to be played repeatedly press ENTER The starting point point A is set 5 When you reach the ending point point B press ENTER again The set points are displayed and the player starts repeating this specific portion A B appears on the front panel display during A B Repeat Play To return to normal play Press CLEAR or select OFF in Step 3 Repeating a specific portion A B Repeat Play 1 2 3 4 5 6 ...

Page 43: ...y pressing A B Press the button once to set the point A and press it again to set the point B Notes You can set A B Repeat Play for only one specific section When you set A B Repeat Play the settings for Shuffle Play Repeat Play and Program Play are canceled A B Repeat Play does not work for titles containing still pictures on a DVD RW in VR mode ...

Page 44: ...ion The 2B 2b playback speed is about twice the normal speed The FF2M FR2m playback speed is faster than FF1M FR1m Press or y when the player is in the pause mode To return to the normal speed press H Each time you press the or y buttons during Slow motion play the playback speed changes Two speeds are available With each press the indication changes as follows Playback direction SLOW2y y SLOW1y O...

Page 45: ... During pause mode VIDEO CD only SLOW1y Slow playback direction Y SLOW2y Slow playback direction slower than SLOW1y Y PAUSEX Pause To return to Continuous Play Press H 1 Press JOG The player enters pause mode 2 Turn the click shuttle Depending on the turning speed playback goes to frame by frame playback in the direction that the click shuttle is turned Turn the click shuttle clockwise to go forwa...

Page 46: ...Time search see below xWhen playing a VIDEO CD TRACK or INDEX xWhen playing a VIDEO CD with PBC Playback SCENE xWhen playing an SACD CD TRACK or INDEX Example when you select CHAPTER is selected refers to a number The number in parentheses indicates the total number of titles chapters tracks indexes or scenes 3 Press ENTER changes to 4 Press X x or the number buttons to select the title chapter tr...

Page 47: ...can display the first scene of titles chapters or tracks recorded on the disc on a screen divided into 9 sections You can start playback directly by selecting one of the scenes For details see below Notes The title chapter or track number displayed is the same number recorded on the disc You cannot search for a still picture on a DVD RW in VR mode Searching by Scene VIEWER You can divide the scree...

Page 48: ...ayback starts from the selected scene z If there are more than 9 titles chapters or tracks V is displayed at the bottom right To display the additional titles chapters or tracks select the bottom right scene the position 9 and press x To return to the previous scene select the top left scene the position 1 and press X You can display 9 consecutive moving pictures on the screen When you press X the...

Page 49: ...SEC TITLE TRACK CHAP INDEX ANGLE NTSC HOUR MIN SEC TITLE TRACK CHAP INDEX ANGLE NTSC HOUR MIN SEC TITLE TRACK CHAP INDEX ANGLE NTSC HOUR MIN SEC TITLE TRACK CHAP INDEX ANGLE NTSC HOUR MIN SEC Title playing time and the current title and chapter number Remaining time of the current title Playing time and number of the current chapter Remaining time of the current chapter Text TITLE TRACK CHAP INDEX...

Page 50: ... mode the above mentioned disc information may not be displayed Checking the Playing Time and Remaining Time You can check the playing time and remaining time of the current title chapter or track in addition to the playing time and remaining time of the disc Also you can check the DVD SACD CD text recorded on the disc 1 Press DISPLAY during playback The Control Menu appears 2 Press TIME TEXT repe...

Page 51: ...l Menu Press DISPLAY repeatedly until the Control Menu is turned off To check the DVD SACD CD text Press TIME TEXT repeatedly in Step 2 to display the text recorded on the DVD SACD CD The DVD SACD CD text appears only when the text is recorded in the disc You cannot change the text If the disc does not contain text NO TEXT appears z If the DVD SACD CD text does not fit on a single line you can see...

Page 52: ...nu Press DISPLAY repeatedly until the Control Menu is turned off By pressing DISPLAY repeatedly you can display either BIT RATE or LAYER whichever was selected in ADVANCED BIT RATE Bit rate refers to the amount of video audio data per second in a disc The higher the bit rate the larger the amount of data When the bit rate level is high there is a large amount of data However this does not always m...

Page 53: ...layed 2 Press X x to select AUDIO then ENTER The options for AUDIO appear 3 Press X x to select the desired audio signal xWhen playing a DVD VIDEO Depending on the DVD VIDEO the choice of language varies When 4 digits are displayed they indicate a language code Refer to Language Code List on page 90 to see which language the code represents When the same language is displayed two or more times the...

Page 54: ...ffer PCM DTS or DOLBY DIGITAL is displayed In the case of DOLBY DIGITAL the channels in the playing track are displayed by numbers as follows For Dolby Digital 5 1 ch The letters in the program format display mean the following sound component L Front left R Front right C Center LS Rear left RS Rear right S Rear monaural The rear component of the Dolby Surround processed signal and the Dolby Digit...

Page 55: ...e surround effect is enhanced page 55 SURROUND Mode Settings You can enjoy surround sounds while playing discs including Dolby Digital and DTS DVDs even if you have only 2 or 4 speakers Select the surround mode that best suits your speaker setup 1 Press DISPLAY during playback The Control Menu appears 2 Press X x to select SURROUND then press ENTER The options for SURROUND appear PCM 96kHz 24bit P...

Page 56: ...nly when DOLBY DIGITAL and DTS are set to D PCM in AUDIO SETUP page 78 TVS DYNAMIC Uses sound imaging to create virtual rear speakers from the sound of the front speakers L R without using actual rear speakers shown below The sound imaging effect is distinct and clearly reproduces each aural element of the audio track This mode is effective when the distance between the front L and R speakers is s...

Page 57: ...he Dolby Surround Pro Logic decoder to create surround effects The rear speakers will emit identical monaural sounds If you are using a center speaker the appropriate sounds for the center speaker will be delivered ENHANCED SURROUND Provides a greater sense of presence from a Dolby Surround Pro Logic source with a monaural rear channel signal Produces a stereo like effect in the rear channels VIRT...

Page 58: ...s may be difficult to hear When you select TVS DYNAMIC TVS WIDE TVS NIGHT or TVS STANDARD the player does not output the sound from the center speaker When you select one of the surround modes turn off the surround setting of the connected TV or amplifier receiver If the player is set up to output the signal from the DIGITAL OUT OPTICAL or COAXIAL jack the TVS effect will not be heard when you pla...

Page 59: ...umber of the angle changes to 4 Select the angle number using the number buttons or X x then press ENTER The angle changes to the selected angle To turn off the Control Menu Press DISPLAY repeatedly until the Control Menu is turned off z You can select the angle directly by pressing ANGLE Each time you press the button the angle changes z You can display all the angles recorded on the disc on the ...

Page 60: ...n playing a DVD VIDEO Select the language Depending on the DVD VIDEO the choice of language varies When 4 digits are displayed they indicate a language code Refer to Language Code List on page 90 to see which language the code represents xWhen playing a DVD RW Select ON 4 Press ENTER To cancel the SUBTITLE setting Select OFF in Step 3 To turn off the Control Menu Press DISPLAY repeatedly until the...

Page 61: ... more than 1 3 reduces the block noise more than 2 4 Press ENTER The disc plays with the setting you selected To cancel the BNR setting Select OFF in Step 3 To turn off the Control Menu Press DISPLAY repeatedly until the Control Menu is turned off z You can select BNR directly by pressing BNR Each time you press the button the item changes If you select any setting other than OFF the BNR indicator...

Page 62: ...produces a bold dynamic picture by increasing the picture contrast and the color intensity DYNAMIC 2 produces a more dynamic picture than DYNAMIC 1 by further increasing the picture contrast and the color intensity CINEMA 1 enhances details in dark areas by increasing the black level CINEMA 2 White colors become brighter and black colors become richer and the color contrast is increased 4 Press EN...

Page 63: ...re than 2 SOFT softens the image DVD VIDEO DVD RW only 4 Press ENTER The disc plays with the setting you selected To cancel the DIGITAL VIDEO ENHANCER setting Select OFF in Step 3 To turn off the Control Menu Press DISPLAY repeatedly until the Control Menu is turned off z You can select DIGITAL VIDEO ENHANCER directly by pressing DVE Each time you press the button the item changes Note Depending o...

Page 64: ... you want to lock If the disc is playing press x to stop playback 2 Press DISPLAY while the player is in stop mode The Control Menu appears 3 Press X x to select PARENTAL CONTROL then press ENTER The options for PARENTAL CONTROL appear 4 Press X x to select ON t then press ENTER xIf you have not entered a password The display for registering a new password appears Enter a 4 digit password by using...

Page 65: ...ssword enter the 6 digit number 199703 using the number buttons when the CUSTOM PARENTAL CONTROL display asks you for your password then press ENTER The display will ask you to enter a new 4 digit password Playback of some DVD VIDEOs can be limited according to a predetermined level such as the age of the users The PARENTAL CONTROL function allows you to set a playback limitation level A scene tha...

Page 66: ...TANDARD are displayed 6 Press X x to select a geographic area as the playback limitation level then press ENTER The area is selected When you select OTHERS t select and enter a standard code in the table on page 67 using the number buttons 7 Press X to select LEVEL then press ENTER The selection items for LEVEL are displayed 8 Select the level you want using X x then press ENTER Parental Control s...

Page 67: ...display appears enter your new password Notes When you play DVD VIDEOs which do not have the Parental Control function playback cannot be limited on this player Depending on the DVD VIDEO you may be asked to change the parental control level while playing the disc In this case enter your password then change the level If the Resume Play mode is canceled the level returns to the original level Area...

Page 68: ...l the Control Menu is turned off Operation Sound Effects Sound Feedback The player beeps when the following operations are performed The default setting of the Sound Feedback function is set to off 1 Press POWER on the player then press 1 on the remote The power indicator lights up in green When there is a disc in the player press A and remove the disc Then press A again to close the disc tray 2 P...

Page 69: ...d you may not be able to control your TV or AV amplifier receiver using some of the buttons below If you enter a new code number the code number previously entered will be erased When you replace the batteries of the remote the code number you have set may be reset to the default setting Set the appropriate code number again 1 Slide the TV DVD switch to TV 2 Hold down 1 and enter your TV s manufac...

Page 70: ...V VIDEO Switch the TV s input source between the TV and other input sources The button works even if the TV DVD switch is set to DVD Number buttons and ENTER Select the channel of the TV Manufacturer Code number Sony default 01 Akai 04 AOC 04 Centurion 12 Coronado 03 Curtis Mathes 12 Daytron 12 Emerson 03 04 14 Fisher 11 General Electric 06 10 Gold Star 03 04 17 Hitachi 02 03 J C Penney 04 12 JVC ...

Page 71: ...Using Various Additional Functions 71 Controlling the AV amplifiers receivers When you set the TV DVD switch to DVD you can control the volume of the AV amplifier receiver using VOL ...

Page 72: ...press ENTER The options for SETUP appear 3 Press X x to select CUSTOM then press ENTER The Setup Display appears 4 Press X x to select the setup item from the displayed list LANGUAGE SETUP SCREEN SETUP CUSTOM SETUP AUDIO SETUP or SPEAKER SETUP Then press ENTER The selected Setup item appears Example SCREEN SETUP 5 Select an item using X x then press ENTER The options for the selected item appear E...

Page 73: ...SETUP allows you to set various languages for the on screen display or sound track Select LANGUAGE SETUP in the Setup Display For details on using the display see Using the Setup Display page 72 xOSD On Screen Display Switches the display language on the screen Select the language from the displayed list xMENU DVD VIDEO only You can select the desired language for the disc s menu xAUDIO DVD VIDEO ...

Page 74: ...ils on using the display see Using the Setup Display page 72 The default settings are underlined xTV TYPE Selects the aspect ratio of the connected TV 4 3 standard or wide 4 3 LETTER BOX Select this when you connect a 4 3 screen TV Displays a wide picture with bands on the upper and lower portions of the screen 4 3 PAN SCAN Select this when you connect a 4 3 screen TV Automatically displays the wi...

Page 75: ...t the Auto Play setting when you turn on the player ON Turns on the screen saver OFF Turns off the screen saver JACKET PICTURE The jacket picture still picture appears in the background but only when the jacket picture is already recorded on the disc CD EXTRA etc If the disc does not contain a jacket picture the GRAPHICS picture appears GRAPHICS A preset picture stored in the player appears in the...

Page 76: ...remote After the power indicator lights up in red and the player enters standby mode press POWER on the player xTRACK SELECTION DVD VIDEO only Gives the sound track which contains the highest number of channels priority when you play a DVD VIDEO on which multiple audio formats PCM DTS or Dolby Digital format are recorded Notes When you set the item to AUTO the language may change The TRACK SELECTI...

Page 77: ...The player reduces the audio output level This function affects the output of the following jacks LINE OUT L R AUDIO 1 2 jacks 5 1CH OUTPUT jacks xAUDIODRC DynamicRangeControl DVD VIDEO DVD RW only Makes the sound clear when the volume is turned down when playing a DVD that has the AUDIO DRC function This affects the output from the following jacks LINE OUT L R AUDIO 1 2 jacks 5 1CH OUTPUT jacks O...

Page 78: ...TICAL or COAXIAL jack Amplifier receiver with digital input jack Amplifier receiver with a built in DTS or DOLBY DIGITAL decoder MD or DAT deck STANDARD Normally select this position TV MODE Makes the low sounds clear even if you turn the volume down It is especially recommended when you listen to the sound using the speakers of the TV WIDE RANGE Gives you the feeling of being at a live performanc...

Page 79: ...cted to an audio component lacking a built in Dolby Digital decoder do not set this Otherwise when you play the Dolby Digital sound track a loud noise or no sound will come out from the speakers affecting your ears or causing the speakers to be damaged AUDIO SETUP AUDIO ATT AUDIO DRC DIGITAL OUT DOLBY DIGITAL OFF STANDARD AUDIO FILTER SHARP ON DOWNMIX DOLBY SURROUND D PCM 48kHz 96kHz PCM 48kHz 16b...

Page 80: ... speakers corresponds to section B below LARGE Normally select this position SMALL When the sound cracks or the surround sound effects are difficult to hear select this This activates the bass redirection circuitry and outputs the bass frequencies of the front speaker from the subwoofer SPEAKER SETUP DISTANCE BALANCE LEVEL OFF TEST TONE FRONT CENTER YES LARGE REAR LARGE LARGE REAR SUBWOOFER SIZE N...

Page 81: ... to the listening position is shown below Be sure to change the value in the Setup Display when you move the speakers The default adjustments are in parentheses NONE If you do not connect a subwoofer select this This activates the bass redirection circuitry and outputs the LFE signals from the front speakers as long as the front speaker size is set to LARGE YES If you connect a subwoofer select th...

Page 82: ...From your listening position select BALANCE or LEVEL and adjust the value of BALANCE using C c and LEVEL using X x The test tone is emitted from both left and right speakers simultaneously 4 Select TEST TONE and set to OFF to turn off the test tone Notes When you adjust the speaker settings the sound cuts off for a moment The test tone signals are not output from the digital jack FRONT 0dB Adjust ...

Page 83: ...t page 18 Even though you set the aspect ratio in TV TYPE of SCREEN SETUP the picture does not fill the screen The aspect ratio of the disc is fixed on your DVD There is no sound The connecting cord is not connected securely The connecting cord is damaged The player is connected to the wrong input jack on the amplifier receiver page 22 24 25 The amplifier receiver input is not correctly set The pl...

Page 84: ... the beginning Program Play Shuffle Play Repeat Play or A B Repeat Play has been selected page 38 Press CLEAR to cancel these functions before playing a disc Resume Play has been selected During stop press x on the player or the remote and then start playback page 33 Depending upon the disc the menu may automatically appear on the screen The player starts playing the disc automatically The disc fe...

Page 85: ...s are not recorded on the DVD being played The angle can only be changed when the ANGLE indicator lights up on the front panel display page 9 The DVD prohibits changing of the angles The player does not operate properly When static electricity etc causes the player to operate abnormally press POWER on the player to turn the player off and then on again Nothing is displayed on the front panel displ...

Page 86: ...ms to 5 1 channel surround sound The rear channel is stereo and there is a discrete subwoofer channel in this format Dolby Digital provides the same 5 1 discrete channels of high quality digital audio found in Dolby Digital cinema audio systems Good channel separation is realized because all of the channel data are recorded discretely and little deterioration is realized because all channel data p...

Page 87: ...th the DVD DVD RW page 6 A DVD RW is a recordable and rewritable disc with the same size as the DVD VIDEO The DVD RW can be recorded in two different modes VR mode and Video mode VR Video Recording mode enables various programming and editing functions some of which are limited in the case of Video mode Video mode complies with DVD VIDEO format and is compatible with DVD players while a DVD RW rec...

Page 88: ...e on one side only you do not have to turn the disc over during playback You can play the CD layer using a conventional CD player 2 channel Multi channel Super Audio CD This disc consists of the 2 channel playback area and the multi channel playback area Title page 9 The longest section of a picture or music feature on a DVD movie etc in video software or the entire album in audio software Track p...

Page 89: ... to 35 C 41 F to 95 F Operating humidity 25 to 80 Supplied accessories See page 15 Specifications and design are subject to change without notice ENERGY STARR is a U S registered mark As an ENERGY STARR Partner Sony Corporation has determined that this product meets the ENERGY STARR guidelines for energy efficiency Jack name Jack type Output level Load impedance LINE OUT L R AUDIO 1 2 Phono jack 2...

Page 90: ...Javanese 1287 Georgian 1297 Kazakh 1298 Greenlandic 1299 Cambodian 1300 Kannada 1301 Korean 1305 Kashmiri 1307 Kurdish 1311 Kirghiz 1313 Latin 1326 Lingala 1327 Laothian 1332 Lithuanian 1334 Latvian Lettish 1345 Malagasy 1347 Maori 1349 Macedonian 1350 Malayalam 1352 Mongolian 1353 Moldavian 1356 Marathi 1357 Malay 1358 Maltese 1363 Burmese 1365 Nauru 1369 Nepali 1376 Dutch 1379 Norwegian 1393 Occ...

Page 91: ...LISH FRENCH SPANISH PORTUGUESE GERMAN ITALIAN DUTCH CHINESE JAPANESE DANISH SWEDISH FINNISH NORWEGIAN RUSSIAN OTHERS t AUDIO ORIGINAL All other selections are the same as the MENU language SUBTITLE AUDIO FOLLOW All other selections are the same as the MENU language TV TYPE 4 3 LETTER BOX 4 3 PAN SCAN 16 9 SCREEN SAVER ON OFF BACKGROUND JACKET PICTURE GRAPHICS BLUE BLACK continued ...

Page 92: ...E MODE AUTO FRAME PLAYBACK MEMORY ON OFF TRACK SELECTION OFF AUTO CD DIRECT OFF ON AUDIO ATT OFF ON AUDIO DRC STANDARD TV MODE WIDE RANGE AUDIO FILTER SHARP SLOW DOWNMIX DOLBY SURROUND NORMAL DIGITAL OUT ON DOLBY DIGITAL D PCM DOLBY DIGITAL DTS D PCM DTS 48 kHz 96 kHz PCM 48 kHz 16 bit 96 kHz 24 bit OFF ...

Page 93: ...S DISTANCE The distance from the listening position FRONT 4ft 50ft 1 2m 15 2m CENTER 0ft 52ft 0m 15 8m It changes according to the distance from the front speaker REAR 0ft 50ft 0m 15 2m It changes according to the distance from the front speaker BALANCE FRONT 6dB 6dB REAR 6dB 6dB LEVEL FRONT 6dB 0dB CENTER 12dB 0dB REAR 12dB 0dB SUBWOOFER 10dB 10dB TEST TONE OFF ON ...

Page 94: ...5 55 79 87 DVD 32 87 DVD RW 35 87 F Fast forward 44 Fast reverse 44 Front panel display 9 H Handling discs 7 Hooking up 18 I INDEX 46 Index 87 J JOG 45 Jog mode 45 L LANGUAGE SETUP 73 LEVEL 82 Locating a specific point by watching the TV screen 44 M MENU 73 Menu disc s menu 34 top menu 34 MULTI 2CH 36 O On screen display Control Menu display 12 Setup Display 72 ORIGINAL 35 ORIGINAL PLAY LIST 35 OS...

Page 95: ...IME TEXT 46 49 50 TITLE 46 Title 88 TITLE VIEWER 47 Top menu 34 TRACK 46 Track 88 TRACK SELECTION 76 TRACK VIEWER 47 Troubleshooting 83 TV TYPE 74 TVS TV Virtual Surround 56 88 U Usable discs 6 V VIDEO CD 32 VIDEO EQUALIZER 62 VIEWER 47 ...

Page 96: ...Sony Corporation Printed in Malaysia ...

Reviews: