Sony DVP-F35P Operating Instructions Manual Download Page 66

66

Settings and Adjustments

Using the Setup Display

By using the Setup Display, you can make 
various adjustments to items such as picture 
and sound. You can also set a language for the 
subtitles and the Setup Display, among other 
things. 
For details on each Setup Display item, see 
pages from 67 to 72.
The on-screen displays differ depending on 
the player model. Note the differences 
indicated in the text, for example, “European 
models only.”

Note

Playback settings stored in the disc take priority 
over the Setup Display settings and not all of the 
functions described may work.
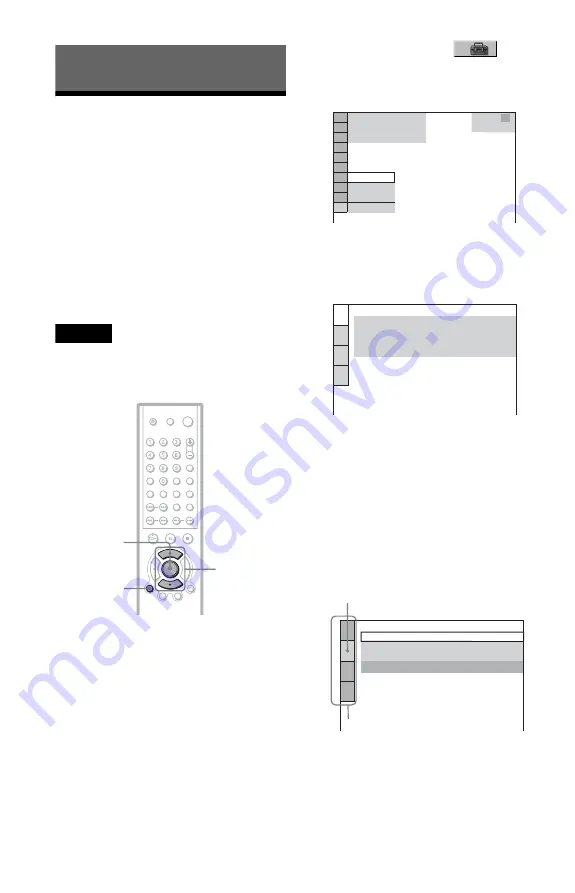
1

Press DISPLAY when the player is 
in stop mode.

The Control Menu appears.

2

Press 

X

/

x

 to select 


(SETUP), then press ENTER.

The options for “SETUP” appear.

3

Press 

X

/

x

 to select “CUSTOM,” 

then press ENTER.

The Setup Display appears.

4

Press 

X

/

x

 to select the setup item 

from the displayed list: 

“LANGUAGE SETUP,” “SCREEN 
SETUP,” “CUSTOM SETUP,” or 

“AUDIO SETUP.” Then press 

ENTER.

The Setup item is selected.
Example: “SCREEN SETUP”

ENTER

DISPLAY

X

/

x

STOP

 ( 47 )

QUICK
CUSTOM
RESET

DVD VIDEO

QUICK

LANGUAGE SETUP

OSD:
MENU:
AUDIO:
SUBTITLE:

ENGLISH
ENGLISH

ORIGINAL

ENGLISH

SCREEN SETUP

TV TYPE:

16:9

SCREEN SAVER:

ON

BACKGROUND:

JACKET PICTURE

MODE 

(PROGRESSIVE)

:

AUTO

Selected item

Setup items

Summary of Contents for DVP-F35P

Page 1: ...2 021 511 12 1 Operating Instructions 2004 Sony Corporation DVP F35P CD DVD Player ...

Page 2: ...y and convenience Should the fuse in the plug supplied need to be replaced a 5AMP fuse approved by ASTA or BSI to BS1362 i e marked with or mark must be used If the plug supplied with this equipment has a detachable fuse cover be sure to attach the fuse cover after you change the fuse Never use the plug without the fuse cover If you should lose the fuse cover please contact your nearest Sony servi...

Page 3: ...m a cold to a warm location or is placed in a very damp room moisture may condense on the lenses inside the player Should this occur the player may not operate properly In this case remove the disc and leave the player turned on for about half an hour until the moisture evaporates Do not insert a disc with non standard shape e g card heart into the player The disc may not be ejected and cause a ma...

Page 4: ...Multi disc Resume 31 Using the DVD s Menu 32 Selecting ORIGINAL or PLAY LIST on a DVD RW 32 Playing VIDEO CDs With PBC Functions PBC Playback 33 Various Play Mode Functions Programme Play Shuffle Play Repeat Play A B Repeat Play 34 Searching for a Scene 39 Searching for a Particular Point on a Disc Search Scan Slow motion Play Freeze Frame 39 Searching for a Title Chapter Track Scene etc 40 Search...

Page 5: ...ONTROL 60 Controlling Your TV With the Supplied Remote 64 Settings and Adjustments 66 Using the Setup Display 66 Setting the Display or Sound Track Language LANGUAGE SETUP 67 Settings for the Display SCREEN SETUP 68 Custom Settings CUSTOM SETUP 70 Settings for the Sound AUDIO SETUP 71 Additional Information 73 Troubleshooting 73 Self diagnosis Function When letters numbers appear in the display 76...

Page 6: ...r Can Play the Following Discs DVD VIDEO and DVD RW are trademarks Note about CDs The player can play CD ROMs CD Rs CD RWs recorded in the following formats music CD format video CD format MP3 audio tracks and JPEG image files of format conforming to ISO9660 Level 1 Level 2 or its extended format Joliet KODAK Picture CD format A logical format of files and folders on CD ROMs defined by ISO Interna...

Page 7: ...ing device and authoring software The disc will not play if it has not been correctly finalized For more information refer to the operating instructions for the recording device Note that some playback functions may not work with some DVD RWs DVD Rs even if they have been correctly finalized In this case view the disc by normal playback Also some DATA CDs created in Packet Write format cannot be p...

Page 8: ... half ejected Remove the disc completely from the player After playing store the disc in its case If glue is present on the outer edge of the disc wipe the edge of the disc with the side of a pen or pencil so that the glue is spread evenly along the edge before inserting the disc into the player Be sure not to touch the playback side of the disc when wiping the edge If burrs remain on the outer ed...

Page 9: ...in parentheses Front panel A 1 on standby button 29 B Disc slot 29 C Z eject button 30 D x stop button 30 E N play previous next button 29 39 F remote sensor 16 G Front panel display 10 H PROGRESSIVE indicator 18 Lights up when the player outputs progressive signals continued ...

Page 10: ...isplay by setting DIMMER in CUSTOM SETUP page 70 Current title chapter or playing time 43 Disc type Current audio signal 47 Lights up when you can change the angle 49 Lights up during Repeat Play 36 Playing status Disc type Current scene or playing time 43 Playing status Lights up during A B Repeat Play 37 Playing time 43 Disc type Current track 43 Lights up during Repeat Play 36 Lights up when pl...

Page 11: ...ck 22 23 24 Do not set the NORMAL PROGRESSIVE switch to PROGRESSIVE if you have connected the TV to these jacks page 19 Only set the NORMAL PROGRESSIVE switch on the rear panel to PROGRESSIVE if you have connected a progressive signal compatible TV to the player page 19 PROGRESSIVE NORMAL VIDEO OUT COMPONENT VIDEO OUT DIGITAL OUT PR CR PB CB PCM DTS MPEG DOLBY DIGITAL Y S VIDEO OUT R AUDIO OUT L O...

Page 12: ...ns 32 L DISPLAY button 13 M TOP MENU button 32 N 1 on standby button 29 O 2 volume buttons 64 The button has a tactile dot P t TV video button 64 Q TIME TEXT button 43 R PICTURE MODE button 50 S angle button 49 T SUR surround button 47 U PICTURE NAVI picture navigation button 42 55 V ZOOM button 30 55 W instant advance step button 30 40 X instant replay step button 30 40 Y x stop button 30 Z ENTER...

Page 13: ...or DATA CDs Displays the index number for VIDEO CDs MP3 audio track number or JPEG image file number for DATA CDs Displays Super VCD as SVCD Displays the date for JPEG files To turn off the display Press DISPLAY Control Menu display 1 m Control Menu display 2 DATA CD only m Control Menu display off OFF OFF SET ON PLAY 1 8 3 4 1 2 2 7 T 1 3 2 5 5 DVD VIDEO Quit PROGRAM ENTER DISPLAY Currently playi...

Page 14: ...l titles all tracks all albums repeatedly or one title chapter track album repeatedly A B REPEAT page 37 Specifies the parts you want to play repeatedly SHARPNESS page 51 Exaggerates the outline of the image to produce a sharper picture PARENTAL CONTROL page 60 Set to prohibit playback on this player SETUP page 66 QUICK Setup page 25 Use Quick Setup to choose the desired language of the on screen ...

Page 15: ...cept OFF PROGRAM SHUFFLE REPEAT A B REPEAT SHARPNESS only The ORIGINAL PLAY LIST indicator lights up in green when you select PLAY LIST default setting MODE MP3 JPEG page 57 Selects the data type MP3 audio track AUDIO JPEG image file IMAGE or both AUTO to be played when playing a DATA CD t ...

Page 16: ...d 1 Screw 2 EURO AV adapter European models only Step 2 Inserting Batteries Into the Remote You can control the player using the supplied remote Insert two R6 size AA batteries by matching the 3 and ends on the batteries to the markings inside the compartment When using the remote point it at the remote sensor on the player Notes Do not leave the remote in an extremely hot or humid place Do not dr...

Page 17: ...OUT DIGITAL OUT PR CR PB CB PCM DTS MPEG DOLBY DIGITAL Y S VIDEO OUT R AUDIO OUT L OPTICAL COAXIAL C B VIDEO AUDIO INPUT L R PR CR PB CB Y COMPONENT VIDEO IN INPUT S VIDEO A D Audio video cord supplied Component video cord not supplied yellow TV projector or AV amplifier receiver to S VIDEO OUT TV projector or AV amplifier receiver green S VIDEO cord not supplied TV projector or AV amplifier recei...

Page 18: ...AV input jack of the TV and connect the player and the EURO AV adapter using the audio video cord supplied Connect the yellow plug of the audio video cord to the yellow video jack Use the red and white plugs to connect the audio input jacks page 21 Set the NORMAL PROGRESSIVE switch on the rear panel to NORMAL when using this connection C If you are connecting to a video input jack Connect the yell...

Page 19: ...re questions regarding your TV set compatibility with this 525p and 625p DVD player model please contact our customer service centre Using the NORMAL PROGRESSIVE switch By using the NORMAL PROGRESSIVE switch you can select the signal format in which the player outputs video signals interlace or progressive Connect the player using the COMPONENT VIDEO OUT jacks pattern A above and set the NORMAL PR...

Page 20: ...ies DTS and DTS Digital Out are trademarks of Digital Theater Systems Inc Components to be connected Connection Your setup example TV Surround effects TVS DYNAMIC page 47 TVS WIDE page 47 page 21 Stereo amplifier receiver and two speakers Surround effects TVS STANDARD page 47 or MD deck DAT deck Surround effects TVS STANDARD page 47 page 22 AV amplifier receiver having a Dolby Surround Pro Logic d...

Page 21: ...e AUDIO OUT L R jacks to the TV s audio input jack A PROGRESSIVE NORMAL VIDEO OUT COMPONENT VIDEO OUT DIGITAL OUT PR CR PB CB PCM DTS MPEG DOLBY DIGITAL Y S VIDEO OUT R AUDIO OUT L OPTICAL COAXIAL A R AUDIO OUT L TV l Signal flow CD DVD player white red Audio video cord supplied yellow white red yellow to AUDIO OUT L R For European models Use the EURO AV adapter supplied to connect to the SCART EU...

Page 22: ...iver B B 1 B 2 PROGRESSIVE NORMAL VIDEO OUT COMPONENT VIDEO OUT DIGITAL OUT PR CR PB CB PCM DTS MPEG DOLBY DIGITAL Y S VIDEO OUT R AUDIO OUT L OPTICAL COAXIAL B 1 B 2 R AUDIO OUT L DIGITAL OUT PCM DTS MPEG DOLBY DIGITAL OPTICAL COAXIAL CD DVD player or Stereo amplifier receiver MD deck DAT deck Front L Front R Speakers white red red white Optical digital cord not supplied Remove jack cap before co...

Page 23: ...a subwoofer C C 1 C 2 PROGRESSIVE NORMAL VIDEO OUT COMPONENT VIDEO OUT DIGITAL OUT PR CR PB CB PCM DTS MPEG DOLBY DIGITAL Y S VIDEO OUT R AUDIO OUT L OPTICAL COAXIAL C 1 C 2 R AUDIO OUT L DIGITAL OUT PCM DTS MPEG DOLBY DIGITAL OPTICAL COAXIAL CD DVD player or Front R Front L Rear R Subwoofer Rear L Amplifier receiver with Dolby Surround decoder Centre Rear mono Stereo audio cord not supplied Speak...

Page 24: ... DTS sound tracks you must use this connection DTS sound tracks are not output through the AUDIO OUT L R jacks even if you set DTS to ON in Quick Setup page 25 When you connect an amplifier receiver that conforms to the 96 kHz sampling frequency set 48kHz 96kHz PCM in AUDIO SETUP to 96kHz 24bit page 72 D PROGRESSIVE NORMAL VIDEO OUT COMPONENT VIDEO OUT DIGITAL OUT PR CR PB CB PCM DTS MPEG DOLBY DI...

Page 25: ...or on your TV so that the signal from the player appears on the TV screen Press ENTER to run QUICK SETUP appears at the bottom of the screen If this message does not appear select QUICK under SETUP in the Control Menu to run Quick Setup page 67 4 Press ENTER without inserting a disc The Setup Display for selecting the language used in the on screen display appears The available languages differ de...

Page 26: ... and connections are complete Select DIGITAL OUTPUT The Setup Display for DOLBY DIGITAL appears 10Press X x to select the type of Dolby Digital signal you wish to send to your amplifier receiver Choose the signal that matches the audio connection you selected on pages 22 to 24 through D PCM page 72 DOLBY DIGITAL only if the amplifier receiver has a Dolby Digital decoder page 72 11Press ENTER DTS i...

Page 27: ...ough Each of these is the default setting and does not need to be adjusted when you first connect the player See page 66 for using the Setup Display Audio Connection pages 22 to 24 No additional settings are needed Set DOWNMIX to DOLBY SURROUND page 71 If the sound distorts even when the volume is turned down set AUDIO ATT to ON page 71 Set DOWNMIX to DOLBY SURROUND page 71 Set DIGITAL OUT to ON p...

Page 28: ...screw holes in step 2 Notes Do not attach the stand when using the player laid horizontally Also be sure to attach the stand when positioning the player vertically as the player may fall over When moving the player hold the player itself If you hold the stand it may break Keep the screws out of reach of children as they may swallow them ...

Page 29: ...ntinuous play Adjust the volume on the TV or the amplifier receiver Depending on the disc a menu may appear on the TV screen For DVD VIDEOs see page 32 For VIDEO CDs see page 33 To turn off the player Press 1 The player enters standby mode When playing 8 cm discs You can play an 8 cm disc without the need for an adapter An adapter may cause a malfunction z Hint You can have the player turn off aut...

Page 30: ...ETURN ENTER and then 1 on the remote The player turns on and LOCKED appears on the front panel display The Z buttons on the player or the remote do not work while the Child Lock is set To unlock the disc slot When the player is in standby mode press O RETURN ENTER and then 1 again z Hint You can insert a disc even when the Child Lock is set Note Even if you select RESET under SETUP in the Control ...

Page 31: ...otes MULTI DISC RESUME in CUSTOM SETUP must be set to ON default for this function to work page 70 The point where you stopped playing is cleared when you change the play mode you change the settings on the Setup Display For DVD RWs in VR mode CDs and DATA CDs the player remembers the resume playback point for the current disc The resume point is cleared when you eject the disc you disconnect the ...

Page 32: ...pears Press the number buttons to select the item you want 3 Press ENTER Selecting ORIGINAL or PLAY LIST on a DVD RW Some DVD RWs in VR Video Recording mode have two types of titles for playback originally recorded titles ORIGINAL and titles that can be created on recordable DVD players for editing PLAY LIST You can select the type of title to be played 1 Press DISPLAY when the player is in stop m...

Page 33: ...ions supplied with the disc as the operating procedure may differ depending on the VIDEO CD To return to the menu Press O RETURN z Hint To play without using PBC press or the number buttons while the player is stopped to select a track then press H or ENTER Play without PBC appears on the TV screen and the player starts continuous play You cannot play still pictures such as a menu To return to PBC...

Page 34: ... ENTER The options for PROGRAM appear 3 Press X x to select SET t then press ENTER 4 Press c The cursor moves to the title or track row T in this case 01 5 Select the title chapter or track you want to programme When playing a DVD VIDEO For example select chapter 03 of title 02 Press X x to select 02 under T then press ENTER CLEAR DISPLAY ENTER X x c H OFF OFF SET ON PLAY 1 8 3 4 1 2 2 7 T 1 3 2 5...

Page 35: ...ing To cancel a programme select under T then press ENTER To cancel all of the titles chapters or tracks in the programmed order 1 Follow steps 1 to 3 of Creating your own programme Programme Play 2 Press X and select ALL CLEAR 3 Press ENTER z Hint You can perform Repeat Play or Shuffle Play of programmed titles chapters or tracks During Programme Play follow the steps of Repeat Play page 36 or Sh...

Page 36: ... this function with VIDEO CDs or Super VCDs with PBC playback Playing repeatedly Repeat Play You can play all of the titles or tracks on a disc or a single title chapter or track repeatedly You can use a combination of Shuffle or Programme Play modes 1 Press DISPLAY during playback The Control Menu appears 2 Press X x to select REPEAT then press ENTER The options for REPEAT appear When playing a D...

Page 37: ...s Notes You cannot use this function with VIDEO CDs or Super VCDs with PBC playback When repeating a DATA CD which contains MP3 audio tracks and JPEG image files and their playing times are not the same the sound will not match the image When MODE MP3 JPEG is set to IMAGE JPEG page 57 you cannot select TRACK Repeating a specific portion A B Repeat Play You can play a specific portion of a title ch...

Page 38: ...oint B press ENTER again The set points are displayed and the player starts repeating this specific portion To return to normal play Press CLEAR or select OFF in step 3 Notes When you set A B Repeat Play the settings for Shuffle Play Repeat Play and Programme Play are cancelled A B Repeat Play does not work across multiple titles A 18 1 32 55 B 18 1 33 05 A 18 1 32 55 B 18 1 34 30 ...

Page 39: ...press and hold or to search forward or backwards and release the button when you find the point you want to return to normal playback Search Locating a point quickly by playing a disc in fast forward or fast reverse Scan Press m or M while playing a disc When you find the point you want press H to return to normal speed Each time you press m or M during scan the scan speed changes With each press ...

Page 40: ...ck press H Note You cannot search for a still picture on a DVD RW in VR mode Searching for a Title Chapter Track Scene etc You can search a DVD by title or chapter and you can search a VIDEO CD CD DATA CD by track index or scene As titles and tracks are assigned unique numbers on the disc you can select the desired one by entering its number You can also search for a scene using the time code 1 Pr...

Page 41: ... select TIME TEXT T playing time of the current title is selected 2 Press ENTER T changes to T 3 Input the time code using the number buttons then press ENTER For example to find the scene at 2 hours 10 minutes and 20 seconds after the beginning just enter 2 10 20 z Hints When the Control Menu display is turned off you can search for a chapter DVD VIDEO DVD RW or track CD by pressing the number bu...

Page 42: ... Press ENTER The first scene of each chapter title or track appears as follows 4 Press C X x c to select a chapter title or track and press ENTER Playback starts from the selected scene To return to normal play during setting Press O RETURN z Hint If there are more than 9 chapters titles or tracks V is displayed at the bottom right of the screen To display the additional chapters titles or tracks ...

Page 43: ... of the current chapter When playing a VIDEO CD or Super VCD with PBC functions minutes seconds Playing time of the current scene When playing a VIDEO CD without PBC functions or CD T minutes seconds Playing time of the current track T Remaining time of the current track D Playing time of the current disc D Remaining time of the current disc When playing a Super VCD without PBC functions T minutes...

Page 44: ...the TV screen also on the front panel display The information on the front panel display changes as follows when you change the time information on your TV screen When playing a DVD VIDEO or DVD RW When playing a DATA CD MP3 audio T 17 30 128k JAZZ RIVER SIDE Bit rate Album name Track name Playing time of the current title Remaining time of the current title Playing time of the current chapter Rem...

Page 45: ...tion and text using the Control Menu page 13 Notes Depending on the type of disc being played the DVD CD text or track name may not be displayed The player can only display the first level of the DVD CD text such as the disc name or title Playing time of MP3 audio tracks may not be displayed correctly If you play a disc containing JPEG image files only NO AUDIO DATA appears when MODE MP3 JPEG is s...

Page 46: ...page 80 to see which language the code represents When the same language is displayed two or more times the DVD VIDEO is recorded in multiple audio formats When playing a DVD RW The types of sound tracks recorded on a disc are displayed The default setting is underlined Example 1 MAIN main sound 1 SUB sub sound 1 MAIN SUB main and sub sound When playing a VIDEO CD CD or DATA CD MP3 audio The defau...

Page 47: ...and Front R signals will be output from your two front speakers TV Virtual Surround Settings TVS When you connect a stereo TV or 2 front speakers TVS TV Virtual Surround lets you enjoy surround sound effects by using sound imaging to create virtual rear speakers from the sound of the front speakers L left R right without using actual rear speakers TVS was developed by Sony to produce surround soun...

Page 48: ...re unaffected This feature is useful when you want to hear the dialog and enjoy the surround sound effects of TVS WIDE at low volume TVS STANDARD Creates three sets of virtual rear speakers from the sound of the front speakers L R without using actual rear speakers shown below Use this setting when you want to use TVS with 2 separate speakers Notes When the playing signal does not contain a signal...

Page 49: ... subtitles are recorded on the discs you can change the subtitles or turn them on and off whenever you want while playing a DVD 1 Press subtitle during playback The following display appears 2 Press subtitle repeatedly to select a setting When playing a DVD VIDEO Select the language Depending on the DVD VIDEO the choice of language varies When 4 digits are displayed they indicate a language code S...

Page 50: ...ng you want The default setting is underlined STANDARD displays a standard picture DYNAMIC 1 produces a bold dynamic picture by increasing the picture contrast and the colour intensity DYNAMIC 2 produces a more dynamic picture than DYNAMIC 1 by further increasing the picture contrast and colour intensity CINEMA 1 enhances details in dark areas by increasing the black level CINEMA 2 white colours b...

Page 51: ...Control Menu appears 2 Press X x to select SHARPNESS then press ENTER The options for SHARPNESS appear 3 Press X x to select a level 1 enhances the outline 2 enhances the outline more than 1 4 Press ENTER The selected setting takes effect To cancel the SHARPNESS setting Select OFF in step 3 DISPLAY ENTER X x DVD VIDEO 1 8 3 4 1 2 2 7 T 1 3 2 5 5 2 1 OFF OFF ...

Page 52: ...ly the first session will be played back Note The player may not be able to play some DATA CDs created in the Packet Write format In this case you cannot view the JPEG images recorded MP3 audio tracks or JPEG image files that the player can play The player can play the following tracks and files MP3 audio tracks with the extension MP3 JPEG image files with the extension JPEG or JPG JPEG image file...

Page 53: ... Depending on the software you use to create the DATA CD the playback order may differ from the above illustration The playback order above may not be applicable if there are more than 200 albums and 300 tracks files in each album The player can recognize up to 200 albums the player will count just albums including albums that do not contain MP3 audio tracks and JPEG image files The player will no...

Page 54: ...CD press ENTER The list of tracks in the album appears 2 Press X x to select a track and press ENTER Playback starts from the selected album To stop playback Press x To go to the next or previous page Press c or C To return to the previous display Press O RETURN To go to the next or previous MP3 audio track Press or during playback You can select the first track of the next album by pressing durin...

Page 55: ...the current album Note that you cannot return to the previous album by using C and that you need to select the previous album from the album list To rotate a JPEG image Press X x while viewing the image Each time you press X the image rotates counterclockwise by 90 degrees To return to normal view press CLEAR Note that the view also returns to normal if you press C c to go to the next or previous ...

Page 56: ...3 is selected in MODE MP3 JPEG page 57 Enjoying JPEG Images as a Slide Show You can play JPEG image files on a DATA CD successively as a slide show 1 Press MENU The list of albums on the DATA CD appears 2 Press X x to select an album 3 Press H The JPEG images in the selected album start playing as a slide show To stop playback Press x Notes The slide show stops when X x or ZOOM is pressed To resum...

Page 57: ...DE MP3 JPEG is set to AUTO See Playing repeatedly Repeat Play page 36 to repeat the track or album The player recognizes a maximum of 200 albums regardless of the selected mode Of each album the player recognizes up to 300 MP3 audio tracks and 300 JPEG image files when AUTO is selected 600 MP3 audio tracks when AUDIO MP3 is selected 600 JPEG image files when IMAGE JPEG is selected Notes This funct...

Page 58: ...ration longer than SLOW1 4 Press ENTER Note Some JPEG files especially progressive JPEG files or JPEG files of 3 000 000 pixels or more may take longer to display than others which may make the duration seem longer than the setting you selected Selecting the slides appearance EFFECT You can select the way the slides are displayed during a slide show 1 Press DISPLAY twice while viewing a JPEG image...

Page 59: ...E1 the image sweeps in from top to bottom MODE2 the image sweeps in from left to right MODE3 the image stretches out from the centre of the screen MODE4 the images randomly cycle through the effects MODE5 the next image slides over the previous image OFF turns off this function 4 Press ENTER ...

Page 60: ...c is playing press x to stop playback 2 Press DISPLAY while the player is in stop mode The Control Menu appears 3 Press X x to select PARENTAL CONTROL then press ENTER The options for PARENTAL CONTROL appear 4 Press X x to select ON t then press ENTER If you have not entered a password The display for registering a new password appears Enter a 4 digit password using the number buttons then press E...

Page 61: ... display asks you for your password then press ENTER The display will ask you to enter a new 4 digit password Parental Control limited playback Playback of some DVD VIDEOs can be limited according to a predetermined level such as the age of the users The PARENTAL CONTROL function allows you to set a playback limitation level 1 Press DISPLAY while the player is in stop mode The Control Menu appears...

Page 62: ...ing the number buttons 7 Press X x to select LEVEL then press ENTER The selection items for LEVEL are displayed 8 Select the level you want using X x then press ENTER Parental Control setting is complete The lower the value the stricter the limitation To turn off the Parental Control function Set LEVEL to OFF in step 8 To play a disc for which Parental Control is set 1 Insert the disc and press H ...

Page 63: ...yback cannot be limited on this player Depending on the disc you may be asked to change the parental control level while playing the disc In this case enter your password then change the level If the Resume Play mode is cancelled the level returns to the previous level Area Code Standard Code number Argentina 2044 Australia 2047 Austria 2046 Belgium 2057 Brazil 2070 Canada 2079 Chile 2090 China 20...

Page 64: ...he number buttons then press ENTER 6 To confirm your password re enter it using the number buttons then press ENTER If you make a mistake entering your password Press C before you press ENTER and input the correct number Controlling Your TV With the Supplied Remote You can control the sound level input source and power switch of your Sony TV with the supplied remote You can control your TV using t...

Page 65: ... listed try entering them one at a time until you find the one that works with your TV Notes Depending on the unit being connected you may not be able to control your TV using all or some of the buttons on the supplied remote If you enter a new code number the code number previously entered will be erased When you replace the batteries of the remote the code number you have set may be reset to the...

Page 66: ...lay settings and not all of the functions described may work 1 Press DISPLAY when the player is in stop mode The Control Menu appears 2 Press X x to select SETUP then press ENTER The options for SETUP appear 3 Press X x to select CUSTOM then press ENTER The Setup Display appears 4 Press X x to select the setup item from the displayed list LANGUAGE SETUP SCREEN SETUP CUSTOM SETUP or AUDIO SETUP The...

Page 67: ... display see Using the Setup Display page 66 OSD On Screen Display Switches the display language on the screen MENU DVD VIDEO only You can select the desired language for the disc s menu AUDIO DVD VIDEO only Switches the language of the sound track When you select ORIGINAL the language given priority in the disc is selected SUBTITLE DVD VIDEO only Switches the language of the subtitle recorded on ...

Page 68: ...or more than 15 minutes The screen saver will help prevent your display device from becoming damaged ghosting Press H to turn off the screen saver 16 9 Select this when you connect a wide screen TV or a TV with a wide mode function 4 3 LETTER BOX Select this when you connect a 4 3 screen TV Displays a wide picture with bands on the upper and lower portions of the screen 4 3 PAN SCAN Select this wh...

Page 69: ...DVD software contains both Video and Film In order for these images to appear natural on your screen when output in PROGRESSIVE mode 50 or 60 frames per second the progressive video signal needs to be converted to match the type of DVD software that you are watching Note When you play video based software with progressive signals sections of some types of images may appear unnatural due to the con...

Page 70: ...n if you set TRACK SELECTION to AUTO If PCM DTS MPEG audio and Dolby Digital sound tracks have the same number of channels the player selects PCM DTS Dolby Digital and MPEG audio sound tracks in this order MULTI DISC RESUME DVD VIDEO VIDEO CD only Switches the Multi disc Resume setting on or off Resume playback can be stored in memory for up to 6 different DVD VIDEOs VIDEO CDs page 31 ON The playe...

Page 71: ...to D PCM page 72 DIGITAL OUT Selects if audio signals are output via the DIGITAL OUT OPTICAL or COAXIAL jack Setting the digital output signal Switches the method of outputting audio signals when you connect a component such as an amplifier receiver or MD deck with a digital input jack For connection details see page 20 Select DOLBY DIGITAL MPEG DTS and 48 kHz 96 kHz PCM after setting DIGITAL OUT ...

Page 72: ...t by making adjustments to the DOWNMIX item in AUDIO SETUP page 71 DOLBY DIGITAL Select this when the player is connected to an audio component with a built in Dolby Digital decoder PCM Select this when the player is connected to an audio component without a built in MPEG decoder If you play multi channel MPEG audio sound tracks only the Front L and Front R signals will be output from your two fro...

Page 73: ...rogressive signal In this case set the NORMAL PROGRESSIVE switch to NORMAL on the rear panel so that the PROGRESSIVE indicator turns off You set the NORMAL PROGRESSIVE switch to PROGRESSIVE on the rear panel the PROGRESSIVE indicator lights up but did not connect your TV to the player s COMPONENT VIDEO OUT jacks using a component video cord Set to PROGRESSIVE only when you connect your TV to the p...

Page 74: ... contain copy protection signals are played a blue screen may appear instead of the images It may take a while when looking for playable images The MP3 audio track cannot be played page 53 The DATA CD is not recorded in an MP3 format that conforms to ISO 9660 Level 1 Level 2 or Joliet The MP3 audio track does not have the extension MP3 The data is not formatted in MP3 even though it has the extens...

Page 75: ...ot be changed Try using the DVD s menu instead of the direct selection button on the remote page 32 Multi angles are not recorded on the DVD being played The angle can only be changed when the indicator lights up on the front panel display page 10 The DVD prohibits changing of the angles The player does not operate properly When static electricity etc causes the player to operate abnormally unplug...

Page 76: ...rioration is realized because all channel data processing is digital Dolby Surround Pro Logic page 20 Audio signal processing technology that Dolby Laboratories developed for surround sound When the input signal contains a surround component the Pro Logic process outputs the front centre and rear signals The rear channel is monaural DTS page 20 72 Digital audio compression technology that Digital ...

Page 77: ...n for this player A single file consist of a single image Film based software Video based software page 19 DVDs can be classified as Film based or Video based software Film based DVDs contain the same images 24 frames per second that are shown at movie theatres Video based DVDs such as television dramas or sit coms displays images at 30 frames 60 fields 24 frames 50 fields per second MPEG audio pa...

Page 78: ...feature on a DVD movie etc in video software or the entire album in audio software Track page 10 Sections of a picture or a music feature on a VIDEO CD CD or DATA CD the length of a song Track in DATA CD is an exclusive definition for this player Video Index VIDEO CD page 13 A number that divides a track into sections to easily locate the point you want on a VIDEO CD Depending on the disc no index...

Page 79: ...impedance AUDIO OUT L R Phono jack 2 Vrms 10 kilohms DIGITAL OUT OPTICAL Optical output jack 18 dBm wave length 660 nm DIGITAL OUT COAXIAL Phono jack 0 5 Vp p 75 ohms VIDEO OUT Phono jack 1 0 Vp p 75 ohms S VIDEO OUT 4 pin mini DIN Y 1 0 Vp p C 0 3 Vp p PAL 0 286 Vp p NTSC 75 ohms COMPONENT VIDEO OUT Y PB CB PR CR Phono jack Y 1 0 Vp p PB CB PR CR 0 7 Vp p 75 ohms General Power requirements 100 24...

Page 80: ...Javanese 1287 Georgian 1297 Kazakh 1298 Greenlandic 1299 Cambodian 1300 Kannada 1301 Korean 1305 Kashmiri 1307 Kurdish 1311 Kirghiz 1313 Latin 1326 Lingala 1327 Laothian 1332 Lithuanian 1334 Latvian Lettish 1345 Malagasy 1347 Maori 1349 Macedonian 1350 Malayalam 1352 Mongolian 1353 Moldavian 1356 Marathi 1357 Malay 1358 Maltese 1363 Burmese 1365 Nauru 1369 Nepali 1376 Dutch 1379 Norwegian 1393 Occ...

Page 81: ...ng discs 8 Hooking up 16 I INDEX 40 Index 78 Instant Advance 30 Instant Replay 30 Interlace format 77 INTERVAL 58 J JPEG 52 L LANGUAGE SETUP 67 Locating a specific point by watching the TV screen 39 M MENU 67 MODE MP3 JPEG 57 MODE PROGRESSIVE 69 MP3 6 52 MPEG 46 72 77 MULTI DISC RESUME 31 70 N Normal Interlace format 77 O On screen display Control Menu Display 13 Setup Display 66 ORIGINAL 32 ORIGI...

Page 82: ...82 U Usable discs 6 V Video based software 77 VIDEO CD 6 29 Z ZOOM 30 55 ...

Page 83: ......

Page 84: ...Sony Corporation Printed in Malaysia Printed on 100 recycled paper using VOC Volatile Organic Compound free vegetable oil based ink ...

Reviews: