8
GB
Setting Up
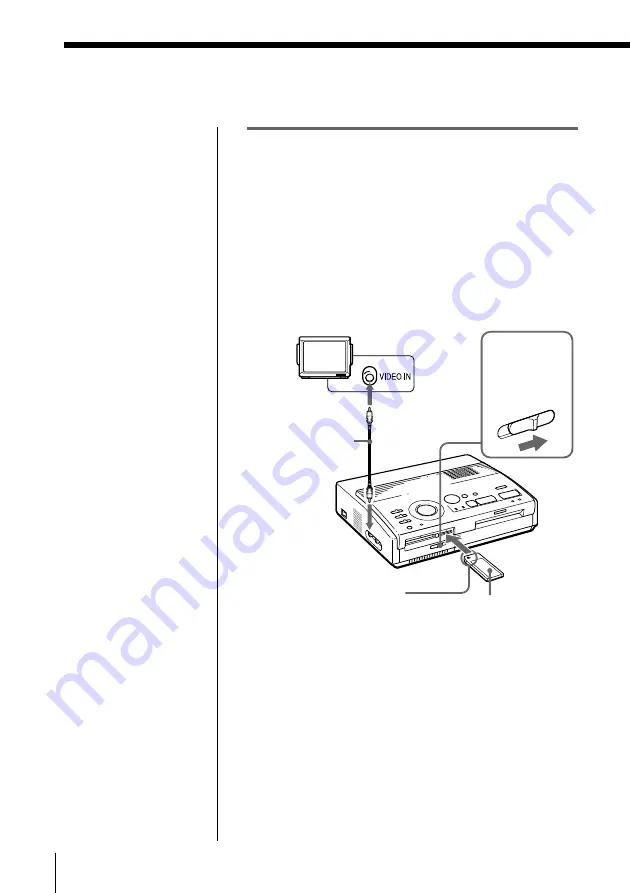
Inserting a “Memory Stick” or PC card
When printing images recorded on a “Memory Stick”
or PC card, insert either the “Memory Stick” or PC card
into its insertion slot on the printer. Also connect the
printer to the television to display the images to be
printed. For using a “Memory Stick,” see page 44, and
for using a PC card, see page 46.
Inserting a “Memory Stick”
1
Slide the “Memory Stick”/PC card selection switch
to the right so that the “Memory Stick” insertion
slot opens.
2
With the notch facing left and the arrow facing
forward on the left, insert the “Memory Stick” into
the “Memory Stick” insertion slot until it clicks into
place.
Ejecting the “Memory Stick”
Push the “Memory Stick” further into the insertion slot
and let it pop out. After it pops out, remove it slowly.
Notes
• If the “Memory Stick”
does not fit into the slot
properly, confirm the
position of the
“Memory Stick”/PC
card selection switch
and the direction of the
notch and arrow on the
“Memory Stick.” Then
re-insert it into the slot.
• Do not attempt to force
the “Memory Stick”
into or out of the slot.
Otherwise, the
“Memory Stick” or the
printer may be
damaged.
Setting Up
Connecting the printer
Notes
• You cannot insert both
the “Memory Stick”
and PC card at the
same time.
• Before making
connections, turn off
the power of both the
printer and television.
With the notch facing
left and the arrow facing
forward on the left
Television
Set input selector
to “VIDEO.”
“Memory Stick”
To VIDEO OUTPUT
Video connection
cable (supplied)
Memory
Stick/PC card
selection switch


