background image

FR

Pr
é

paratifs

Préparatifs

1

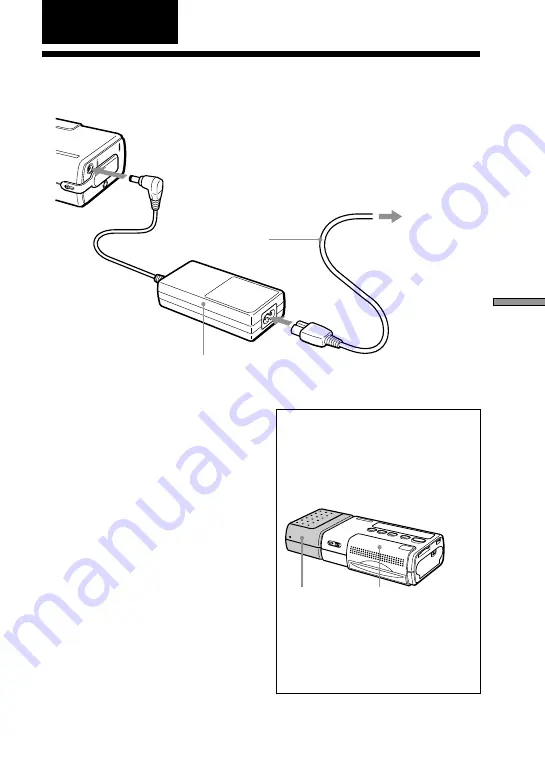
Raccordement de l’alimentation

Prise secteur

Cordon
d’alimentation

Adaptateur
secteur

1

2

1

Raccordez l’adaptateur
secteur au connecteur DC 12
V de la DPP-MP1.

2

Raccordez le cordon
d’alimentation à l’adaptateur
secteur et branchez-le dans
la prise secteur.

Fonction de mise hors tension
automatique

L’appareil se met automatiquement
hors tension s’il reste inutilisé pendant
environ 3 minutes (fonction de mise
hors tension automatique). Lorsque
l’appareil est raccordé à un PC à l’aide
d’un câble USB, la fonction de mise
hors tension automatique est
désactivée.

Kit de piles (option)

Vous pouvez alimenter l’appareil
avec le kit de piles MPA-BT1A
disponible séparément.

Pour les informations sur la façon
de monter le kit de piles dans
l’appareil, reportez-vous au mode
d’emploi du kit de piles.

MPA-BT1A

DPP-MP1

2

Summary of Contents for DPP-MP1

Page 1: ...3 206 255 12 1 2001 Sony Corporation Digital Photo Printer DPP MP1 Operating Instructions Mode d emploi Manual de instrucciones FR ES GB ...

Page 2: ...sted and found to comply with the limits for a Class B digital device pursuant to Part 15 of the FCC Rules These limits are designed to provide reasonable protection against harmful interference in a residential installation This equipment generates uses and can radiate radio frequency energy and if not installed and used in accordance with the instructions may cause harmful interference to radio ...

Page 3: ...Printing Images With Print Mark DPOF Print 15 Assigning a Print Mark 15 Bulk printing of images with Print Mark 15 Changing the number of duplicates 17 Direct Select Printing 18 Selecting an image 18 Printing 19 Print settings 21 PC Interface Kit 23 Preparation 23 Printing 24 GB Others 25 Precautions 25 Print Cartridge Storage Precautions 26 Print Paper Storage Precautions 26 Memory Stick 27 Image...

Page 4: ...directly on the DPP MP1 Compact and lightweight The DPP MP1 is a compact and lightweight printer measuring approximately 66 39 111 mm and weighing approximately 260 grams It can easily be carried and used anywhere Photo quality printing The dye sublimation thermal method produces high quality prints that rival actual photos Versatile print functions The DPP MP1 lets you adjust image properties sha...

Page 5: ...sories shown below are complete AC adapter Power cord U S A and Canada Europe Paper tray Card size color printing pack SVM 24CS Clamp filter 3 PC interface kit USB cable CD ROM Carrying pouch 1 Operating Instructions 1 Owner registration card 1 Warranty 1 Sony End User Software License Agreement 1 ...

Page 6: ... pack is required Printing pack Application SVM 24CS Photo paper 12 pack 2 print cartridge for 24 prints Note Be sure to use only the dedicated printing packs for this unit Do not try to reinsert used print paper or print cartridges Otherwise paper jam or malfunction can occur ...

Page 7: ...9 0 5 qaqsqd 1Power switch pages 15 19 2Paper tray 3Paper tray insertion door page 12 4Ventilation openings 5Display page 8 6SELECT buttons 7ENTER OPTION button 8DPOF button page 16 9PRINT STOP button pages 16 20 0Memory Stick slot page 13 qaPrint cartridge door page 10 qsPrint cartridge door latch page 10 qdUSB port ...

Page 8: ...IFF DPOF 1 7 8 90 2 3 3 4 6 5 1Battery capacity indicator 2Print setting display page 22 3USB cable connection indicator 4DPOF indicator page 16 5ERROR indicator page 30 6MS ACCESS indicator page 13 7Folder number display pages 16 19 8File number display pages 16 19 9TIFF image indicator page 20 0Print count display pages 16 19 ...

Page 9: ...nction The unit will automatically turn itself off if it is not being used for about 3 minutes auto power off function While the unit is connected to a PC with an USB cable the auto power off function is disabled Battery Kit option The separately available Battery Kit MPA BT1A can be used to power the unit For information on how to mount the Battery Kit in the unit refer to the documentation of th...

Page 10: ...m the print cartridge 3 Push the print cartridge into the unit until it audibly snaps into place Then close the print cartridge door Replacing the print cartridge When the print cartridge is used up the indication RIBON flashes on the display 1 Open the print cartridge door as described in step 1 above 2 Grasp the removal knob on the cartridge and pull the old cartridge out Then insert the new car...

Page 11: ...ome hot Do not put your fingers or other objects into the print cartridge slot 3 Loading the Print Paper The print paper is supplied as part of the printing pack page 6 Mount it in the unit as shown below 1 Open the cover of the paper tray 2 Place the print paper on the tray Align the paper and place it on the tray with the protective sheet in place and facing up You can insert up to 12 print pape...

Page 12: ... tray take care not to exceed the maximum of 12 sheets Do not mix different types of print papers Otherwise a paper jam can occur Do not write or print anything on the print paper before inserting it into this unit After printing if you wish to write onto the image side of the paper use an oil based marker You cannot further print on the image side of the paper Do not attach any labels stamps stic...

Page 13: ... the Memory Stick from the unit during this interval Otherwise the unit and or the Memory Stick may be damaged Do not forcibly push or remove the Memory Stick into or from the unit Otherwise the unit and or the Memory Stick may be damaged While printing is in progress do not remove the Memory Stick from the unit Otherwise the unit and or the Memory Stick may be damaged The maximum Memory Stick cap...

Page 14: ...are no obstructions behind the unit which could block the smooth exit of the paper There should be a clearance of at least 12 cm Do not place any objects on top of the paper tray Do not touch the paper during printing and do not try to pull the paper out Do not pull the paper tray out of the unit during printing Do not open the print cartridge door or remove the print cartridge from the unit durin...

Page 15: ...print 3 Assign a Print Mark as described in the documentation of the camera or camcorder This information should be found in a section entitled Selecting Images for Print or Assigning Print Marks or similar 4 Verify that a Print Mark is shown with the image on the LCD of the Sony CyberShot digital camera or Handycam camcorder Bulk printing of images with Print Mark 1 Push down the power switch and...

Page 16: ...folder numbers file numbers and number of duplicates for the images with Print Mark 4 Make the print settings as required You can make settings for image quality print format etc For details see Print Settings on page 21 5 Press the PRINT STOP button to start printing During printing the indication PRINT is shown on the display 6 Remove the printed paper If you have specified several prints remove...

Page 17: ...ff DPOF mode To turn off the DPOF mode after printing press the DPOF button once more The indication DPOF disappears from the display and the normal indication is shown again Changing the number of duplicates The number of duplicates for a Print Mark image that has been set with the digital camera can be changed on the DPP MP1 To do this perform the operation described below after step 3 in the se...

Page 18: ...ng Selecting an image 1 Insert the Memory Stick in the Sony CyberShot digital camera or Handycam camcorder 2 Verify the folder number and file number of the image that you want to print on the LCD of the Sony CyberShot digital camera or Handycam camcorder Example from CyberShot h c M w I E 10 30PM 2001 7 4 100 0028 6 8 640 Example from Handycam U P O O P O O O O O U 640 For information on folder n...

Page 19: ...er is not shown 3 Use the SELECT buttons If a folder number is not shown the file number flashes If a folder number is shown the folder number flashes Repeatedly press the SELECT buttons to select the folder number and press the ENTER button The file number flashes 4 Repeatedly press the SELECT buttons to select the image file number and press the ENTER button The number of duplicates flashes 5 Re...

Page 20: ... about 3 minutes auto power off function To cancel the operation while printing is in progress If you have specified several prints but want to cancel the operation before it is completed press the PRINT STOP button The indication WAIT appears on the display and printing stops after the current print is finished Printing images in TIFF non compressed format If the image specified in step 5 above i...

Page 21: ...tc Pressing SELECT cycles in the opposite direction The available settings are explained in the table Print Setting Items at the end of this section 3 Press the ENTER button The selected setting for the flashing item is shown 4 Use the SELECT buttons to change the setting For example if DATE is flashing each push of the SELECT button toggles between ON date is printed and OFF date is not printed 5...

Page 22: ...l camera or Handycam camcorder the date will be printed twice x OFF The image is printed without a date Note A date inserted with the Sony CyberShot digital camera or Handycam camcorder may exceed the printable range and may be cut off FIT ON The image is scaled so that the entire image fits on the paper and no section is cut off There is a rim around the image x OFF The image is printed as is to ...

Page 23: ...stalled you can install it from the digital photo printer for DPP MP1 CD ROM With Windows double click the file ar500eng exe file in the Acrobat English folder With the Macintosh install by double clicking the Acrobat Reader Installer Connect to your computer 1 Connect the DPP MP1 to your computer using the supplied USB cable 2 Connect the AC adapter to the DPP MP1 then turn on the power switch No...

Page 24: ...ired print settings When the DPP MP1 is connected by USB cable print settings are made from the computer For the print settings see Installation Guide included on the digital photo printer for DPP MP1 CD ROM 3 Print from your image processing software Note When the DPP MP1 is connected by USB cable all controls other than the power switch are disabled When using the DPP MP1 to print images directl...

Page 25: ...and servicing the printer On installation Avoid placing the printer in a location subject to vibration high humidity excessive dust direct sunlight extremely high or low temperatures Do not use electrical equipment near the printer The printer will not work properly in electromagnetic fields The printer is designed to operate horizontally Never attempt to operate the printer in a tilted position D...

Page 26: ...eo printing of such materials may infringe the provisions of the copyright law Print Cartridge Storage Precautions Avoid exposure to high temperatures or humidity high levels of dust and direct sunlight When removing a partly used print cartridge from the unit for long term storage return it to the original packing bag or another suitable container Print Paper Storage Precautions Avoid exposure to...

Page 27: ...rval Data on the Memory Stick may be damaged or destroyed if power to the unit is turned off while the Memory Stick is being accessed strong electrostatic or noise interference is encountered Do not attach anything except the designated label to the label field on the Memory Stick Put the Memory Stick in its case for carrying or storing Do not touch the connector section with your hand or with any...

Page 28: ... viewed under Windows Me will look as follows Assuming that the Memory Stick has been recognized as drive E File numbers for still image data in JPEG format are allocated automatically and the files are stored in the 100MSDCF folder using the following file name pattern DSC0ssss JPG File numbers for still image data in TIFF format are allocated automatically and the files are stored in the IMCIF10...

Page 29: ...y Unit does not operate when turned on Some images cannot be printed Image is cut off at top and bottom or left and right Power cord is disconnected c Is the power cord connected correctly Page 9 Battery Kit is not mounted properly c Refer to the documentation of the Battery Kit Image files are not compatible with DPP MP1 c Image files whose file format is not compatible with the DPP MP1 may displ...

Page 30: ...c The image file is corrupt and cannot be printed When this error occurs while printing an image that has a Print Mark printing is suspended To start printing the next image press PRINT STOP Folder number File number Warning Messages Messages that may appear on the display are listed and explained in the table below Message Meaning WAIT RIBON PAPER Printing was stopped c The indication is shown wh...

Page 31: ... that can be printed by the DPP MP1 c Append the Print Mark with a Sony CyberShot digital camera or Handycam camcorder page 15 An attempt was made to print an image file in an incompatible format c Printing such an image on the DPP MP1 is not possible When this error occurs while printing an image that has a Print Mark printing is suspended To start printing the next image press PRINT STOP An erro...

Page 32: ...paper jam has occurred c Try turning the unit off and then on again The paper should be ejected automatically An internal error has occurred c Try turning the unit off and then on again What to Do in Case of a Paper Jam Caution Do not try to pull out the paper by hand because this can lead to damage and malfunction Always turn power to the unit off wait a moment and then turn the unit on again so ...

Page 33: ...after the warranty period Repairs can be carried out if requested by the customer All costs will have to be borne by the customer Availability of parts All major parts that are necessary for maintaining operation of the digital photo printer will be held available by the manufacturer for a period of at least 8 years after production of this model has ceased Also after the warranty period has expir...

Page 34: ... Approx 260 g without paper tray Supplied accessories AC adapter power cord Paper tray Carrying pouch Card size color printing pack SVM 24CS Clamp filter USB cable CD ROM Operating Instructions Owner registration card Warranty Sony End User Software License Agreement 1 Some special file formats may not be supported 2 DCF Design rule for Camera File system is a standard defined by the JEIDA Japan E...

Page 35: ......

Page 36: ...il à l abri de la pluie et de l humidité Pour prévenir tout risque d électrocution ne pas ouvrir le boîtier Confier l entretien de cet appareil exclusivement à un personnel qualifié Pour les utilisateurs au Canada Cet appareil numérique de la classe B est conforme à la norme NMB 003 du Canada ...

Page 37: ...impression impression DPOF 15 Attribution d un repère d impression 15 Impression en vrac d images avec repère d impression 15 Modification du nombre de copies 17 Impression par sélection directe 18 Sélection d une image 18 Impression 19 Paramètres d impression 21 Lot d interface PC 23 Préparatifs 23 Impression 24 Autres informations 25 Précautions 25 Précautions de rangement pour la cartouche d im...

Page 38: ...rimées directement sur la DPP MP1 Compacte et légère La DPP MP1 est une imprimante compacte et légère qui mesure environ 66 39 111 mm et qui pèse environ 260 g Elle se transporte et s utilise n importe où en toute facilité Impression de qualité photo La méthode de sublimation thermique produit des impressions de haute qualité qui rivalisent avec les photos elles mêmes Nombreuses fonctions d impres...

Page 39: ...nts Adaptateur secteur Cordon d alimentation Etats Unis et Canada Europe Cassette de papier Ensemble pour impression de cartes couleur SVM 24CS Filtre à fixation rapide 3 Lot d interface PC Câble USB CD ROM Pochette de transport 1 Guide d installation 1 Carte d enregistrement du propriétaire 1 Garantie 1 Contrat de licence de logiciel pour utilisateur final Sony 1 ...

Page 40: ...24CS 2 packs de 12 papiers photo cartouche d impression pour 24 impressions Remarques Veillez à utiliser exclusivement les packs d impression spécialement conçus pour l appareil N essayez pas de réinsérer du papier d impression ou des cartouches d impression qui ont déjà servi Vous risqueriez de provoquer des bourrages papier ou un mauvais fonctionnement ...

Page 41: ...pteur d alimentation pages 15 19 2Cassette papier 3Volet d insertion de la cassette papier page 12 4Orifices de ventilation 5Afficheur page 8 6Touches SELECT 7Touche ENTER OPTION 8Touche DPOF page 16 9Touche PRINT STOP pages 16 20 0Fente pour Memory Stick page 13 qaVolet de cartouche d impression page 10 qsVerrou de volet de cartouche d impression page 10 q dPort USB ...

Page 42: ... 4 6 5 1Indicateur de charge des piles 2Affichage des paramètres d impression page 22 3Indicateur de connexion de câble USB 4Indicateur DPOF page 16 5Indicateur ERROR page 30 6Indicateur MS ACCESS page 13 7Affichage du numéro de dossier pages 16 19 8Affichage du numéro de fichier pages 16 19 9Indicateur d image TIFF page 20 0Affichage du nombre d impressions pages 16 19 ...

Page 43: ...ction de mise hors tension automatique L appareilsemetautomatiquement horstensions ilresteinutilisépendant environ3minutes fonctiondemise horstensionautomatique Lorsque l appareilestraccordéàunPCàl aide d uncâbleUSB lafonctiondemise horstensionautomatiqueest désactivée Kit de piles option Vouspouvezalimenterl appareil aveclekitdepilesMPA BT1A disponibleséparément Pourlesinformationssurlafaçon demo...

Page 44: ...ée de la bobine de ruban de la cartouche d impression 3 Enfoncez la cartouche d impression dans l appareil jusqu à ce que vous l entendiez se mettre en place dans un déclic Puis refermez le volet de la cartouche d impression Remplacement de la cartouche d impression Lorsquelacartouched impressionest vide l indication RIBON clignote surl afficheur 1 Ouvrez le volet de la cartouche d impression comm...

Page 45: ...e pourretendreleruban Attention L intérieur de l appareil peut devenir chaud Ne mettez pas les doigts ni des objets dans la fente pour cartouche d impression 3 Chargement du papier d impression Lepapierd impressionfaitpartiedu packd impression page6 Insérez ledansl appareilcomme indiquéci dessous 1 Ouvrez le couvercle de la cassette papier 2 Placez le papier d impression dans la cassette papier Al...

Page 46: ...ession à la fois Lorsque vous ajoutez du papier d impression dans la cassette papier faites attention à ne pas dépasser le maximum de 12 feuilles Ne mélangez pas différentes sortes de papier d impression Vous risqueriez de provoquer un bourrage papier N écrivez et n imprimez rien sur le papier d impression avant de l insérer dans l appareil Après l impression si vous voulez écrire sur la face imag...

Page 47: ...ory Stick de l appareil pendant cet intervalle Vous risqueriez d endommager l appareil et ou le Memory Stick N enfoncez pas et ne retirez pas le Memory Stick de force dans l appareil Vous risqueriez d endommager l appareil et ou le Memory Stick Pendant l impression ne retirez pas le Memory Stick de l appareil Vous risqueriez d endommager l appareil et ou le Memory Stick La capacité maximum des Mem...

Page 48: ...ssurez vous qu il n y a pas d obstacles derrière l appareil qui pourraient empêcher le papier de sortir Il faut qu il y ait un espace d au moins 12 cm Ne posez pas d objets sur la cassette papier Ne touchez pas le papier d impression pendant l impression et n essayez pas de tirer sur le papier pour le sortir Ne sortez pas la cassette papier de l appareil pendant l impression N ouvrez pas le volet ...

Page 49: ...e que vous voulez imprimer 3 Assignez un repère d impression comme indiqué dans le mode d emploi de l appareil photo ou du camescope Vous trouverez les explications dans la section intitulée Sélection des images à imprimer ou Attribution de repères d impression ou un titre approchant 4 Vérifiez qu un repère d impression est affiché avec l image sur l écran LCD de l appareil photo numérique CyberSh...

Page 50: ... impression apparaissent sur l afficheur S il n y a qu un seul dossier le numéro de dossier ne s affiche pas DPOF Dans cette situation vous pouvez utiliser les touches SELECT pour vérifier les numéros de dossier les numéros de fichier et le nombre de copies des images avec repère d impression 4 Réglez les paramètres d impression Vous pouvez régler la qualité d image le format d impression etc Pour...

Page 51: ...s remettez du papier d impression ou remplacez la cartouche d impression sans mettre l appareil hors tension Appuyez sur la touche PRINT STOP pour reprendre l impression Pour désactiver le mode DPOF Pour désactiver le mode DPOF après l impression appuyez une nouvelle fois sur la touche DPOF L indication DPOF disparaît de l afficheur et l indication normale réapparaît Modification du nombre de copi...

Page 52: ...Memory Stick Sélection d une image 1 Insérez le Memory Stick dans l appareil photo numérique CyberShot ou le camescope Handycam Sony 2 Vérifiez le numéro de dossier et le numéro de fichier de l image que vous voulez imprimer sur l écran LCD de l appareil photo numérique CyberShot ou du camescope Handycam Sony Exemple avec le CyberShot h c M w I E 10 30PM 2001 7 4 100 0028 6 8 640 Exemple avec le H...

Page 53: ...vé est indiqué Si le Memory Stick que vous avez inséré ne possède qu un seul dossier le numéro de dossier ne s affiche pas 3 Utilisez les touches SELECT Si le numéro de dossier n est pas affiché le numéro de fichier clignote Si le numéro de dossier est affiché le numéro de dossier clignote Appuyez de façon répétée sur les touches SELECT pour sélectionner le numéro de dossier puis appuyez sur la to...

Page 54: ...sur l afficheur Même si vous n utilisez pas l interrupteur d alimentation l appareil se mettra hors tension au bout de 3 minutes fonction de mise hors tension automatique Pour annuler l impression en cours Si vous avez spécifié plusieurs exemplaires et que vous voulez annuler l impression avant qu elle ne soit terminée appuyez sur la touche PRINT STOP L indication WAIT apparaît sur l afficheur et ...

Page 55: ...ycle dans l ordre inverse Les paramètres disponibles sont expliqués au tableau des Paramètres de réglage d impression à la fin de cette section 3 Appuyez sur la touche ENTER Le paramètre sélectionné pour l élément affiché est indiqué 4 Utilisez les touches SELECT pour modifier les paramètres Par exemple si DATE clignote chaque pression sur la touche SELECT fait commuter automatiquement le paramètr...

Page 56: ...photo numérique CyberShot ou le camescope Handycam Sony la date s imprimera deux fois x OFF L image s imprime sans date Remarque La date enregistrée avec l appareil photo numérique CyberShot ou le camescope Handycam Sony peut dépasser la plage d impression et être coupée FIT ON L image est proportionnée de façon que l image tout entière tienne dans le papier et qu aucune section en haut en bas ou ...

Page 57: ...tal photo printer for DPP MP1 Sous Windows double cliquez sur le fichier ar500fra exe du dossier Acrobat French Sous Macintosh installez le en double cliquant sur Acrobat Reader Installateur Lot d interface PC Raccordez l imprimante à votre ordinateur 1 Raccordez la DPP MP1 à votre ordinateur à l aide du câble USB fourni 2 Raccordez l adaptateur secteur à la DPP MP1 puis mettez l interrupteur d al...

Page 58: ...ccordée via le câble USB les paramètres d impression se règlent sur l ordinateur Pour le réglage des paramètres d impression reportez vous au Guide d installation contenu dans le CD ROM digital photo printer for DPP MP1 3 Effectuez l impression depuis votre logiciel de traitement d image Remarque Lorsque la DPP MP1 est raccordée via le câble USB toutes les commandes sont désactivées à l exception ...

Page 59: ...oumis à des vibrations une forte humidité une poussière excessive la lumière du soleil des températures extrêmement élevées ou basses N utilisez pas d appareils électriques à proximité de l imprimante L imprimante ne fonctionnera pas correctement dans des champs électromagnétiques L imprimante est conçue pour fonctionner à l horizontale N essayez jamais de la faire fonctionner en position inclinée...

Page 60: ... des droits d auteur L impression vidéo sans autorisation de ces documents peut contrevenir à la loi sur les droits d auteur Précautions de rangement pour la cartouche d impression Evitez toute exposition à des températures ou des humidités élevées à de fortes concentrations de poussière et aux rayons du soleil Lorsque vous retirez une cartouche d impression partiellement utilisée de l appareil en...

Page 61: ... ACCESS s allume Ne retirez pas le Memory Stick de l appareil pendant cet intervalle Les données du Memory Stick risquent d être endommagées ou détruites si vous mettez l appareil hors tension pendant que le Memory Stick est sollicité il se trouve en présence d interférences électrostatiques ou de bruit élevés Ne collez rien d autre que les étiquettes spéciales sur l espace du Memory Stick réservé...

Page 62: ... images sous Windows Me sera comme ci dessous Supposant que le Memory Stick a été reconnu comme lecteur E Les numéros de fichier des données d image fixe au format JPEG sont assignés automatiquement et les fichiers sont enregistrés dans le dossier 100MSDCF selon le schéma de nom de fichier suivant DSC0ssss JPG Les numéros de fichier des données d image fixe au format TIFF sont assignés automatique...

Page 63: ...sous tension Certaines images ne s impriment pas L image est coupée en haut et en bas ou à gauche et à droite Le cordon d alimentation est débranché c Le cordon d alimentation est il raccordé correctement Page 9 Le kit de piles n est pas monté correctement c Voyez la documentation du kit de piles Les fichiers d image ne sont pas compatibles avec la DPP MP1 c Les fichiers d image dont le format de ...

Page 64: ...age est impossible en raison d un problème avec le numéro du fichier d image L image possède un repère d impression mais l impression sur cet appareil est impossible c Le fichier d image est altéré et l impression est impossible Si cette erreur se produit pendant l impression d une image avec repère d impression l impression s arrête Pour commencer à imprimer l image suivante appuyez sur PRINT STO...

Page 65: ...ompatible avec la DPP MP1 peuvent s afficher sur un ordinateur mais ne pas s imprimer page 34 Il n y a pas d images portant un repère d impression sur le Memory Stick c Insérer un Memory Stick qui contient des images auxquelles un repère d impression a été assigné par un appareil photo numérique CyberShot ou un camescope Handycam Sony Le Memory Stick ne contient pas d image avec repère d impressio...

Page 66: ...lisez un Memory Stick formaté sur un appareil photo numérique CyberShot ou un camescope Handycam Sony Vous avez inséré un Memory Stick d un type non supporté par la DPP MP1 ou Memory Stick défectueux c Insérez un Memory Stick supporté Il y a un problème avec la cartouche d impression c Essayez de mettre l appareil hors tension puis à nouveau sous tension Si cela ne résout pas le problème retirez l...

Page 67: ...sur la carte de garantie Pour les détails lisez attentivement la carte de garantie Réparations après expiration de la période de la garantie Les réparations seront effectuées aux frais du client Tous les frais seront à la charge du client Disponibilité des pièces de rechange Le fabricant assurera la disponibilité des principales pièces de rechange nécessaires au maintien des fonctions de l imprima...

Page 68: ... Compatible DPOF nombre d impressions Alimentation Adaptateur secteur Entrée 100 à 240 V CA 50 60 Hz Sortie 12 V CC 3 A Consommation Entrée 12 V CC 2 1 A 25 W pendant l impression avec le cordon d alimentation Température ambiante de fonctionnement 5 à 35ºC Dimensions externes Environ 66 39 111 L H P mm sans la cassette papier ni les pièces faisant saillie Poids Environ 260 g sans la cassette papi...

Page 69: ...couleur SVM 24CS Filtre à fixation rapide Câble USB CD ROM Guide d installation Carte d enregistrement du propriétaire Garantie Contrat de licence de logiciel pour utilisateur final Sony La conception et les spécifications sont sujettes à modifications sans préavis Accessoires en option Ensemble pour impression de cartes couleur SVM 24CS Kit de piles MPA BT1A ...

Page 70: ...odelo DPP MP1 AVISO Para evitar el riesgo de incendios y electrocución no exponga la unidad a la lluvia ni a la humedad Para evitar descargas eléctricas no abra la unidad Solicite asistencia técnica sólo a personal especializado Para los usuarios en México ...

Page 71: ...ón Impresión DPOF 15 Asignación de una marca de imprimir 15 Impresión de un grupo de imágenes con marcas de impresión 15 Cambio del número de duplicados 17 Impresión mediante selección directa 18 Para seleccionar una imagen 18 Impresión 19 Ajustes de impresión 21 Kit de interfaz para PC 23 Preparación 23 Impresión 24 Otros 25 Precauciones 25 Precauciones para almacenar el cartucho de imprimir 26 P...

Page 72: ...den imprimir directamente en la DPP MP1 Compacta y ligera La DPP MP1 es una impresora compacta y ligera que mide aproximadamente 66 39 111 mm y pesa aproximadamente 260 gramos Se puede transportar fácilmente y utilizar en cualquier lugar Impresión de fotos de calidad El método térmico de coloreado por sublimación produce copias de una calidad comparable a la de cualquier fotografía de calidad actu...

Page 73: ...Adaptador de CA Cable de alimentación EE UU y Canadá Europa Bandeja de papel Paquete de impression a color del tamaño de una tarjeta SVM 24CS Filtro abrazadera 3 Kit de interfaz para PC Cable USB CD ROM Bolso de transporte 1 Guía de instalacíon 1 Tarjeta de registro del propietario 1 Garantía 1 Contrato de licencia de software Sony para usuario final 1 ...

Page 74: ...n de imprimir SVM 24CS 2 paquetes de 12 hojas de papel para fotos cartucho de imprimir para 24 copias Notas Asegúrese de utilizar solamente los paquetes de imprimir exclusivos para esta unidad No intente reinsertar papel de imprimir ni cartuchos de imprimir usados De lo contrario podrán producirse atascos de papel o un mal funcionamiento ...

Page 75: ...entación páginas 15 19 2Bandeja de papel 3Tapa de inserción de la bandeja de papel página 12 4Aberturas de ventilación 5Visualizador página 8 6Botones SELECT 7Botón ENTER OPTION 8Botón DPOF página 16 9Botón PRINT STOP páginas 16 20 0Ranura del Memory Stick página 13 qaTapa del cartucho de imprimir página 10 qsCierre de la tapa del cartucho de imprimir página 10 q dPuerto USB ...

Page 76: ...r de potencia de las pilas 2Visualización de ajustes para imprimir página 22 3Indicador de conexión del cable USB 4Indicador DPOF página 16 5Indicador de ERROR página 30 6Indicador MS ACCESS página 13 7Visualización del número de carpeta páginas 16 19 8Visualización del número de archivo páginas 16 19 9Indicador de imagen TIFF página 20 0Visualización del contador de copias páginas 16 19 ...

Page 77: ...oma de CA Función de apagado automático Launidadseapagaráautomáticamente sisedejasinusarunos3minutos funcióndeapagadoautomático Mientraslaunidadestéconectadaaun PCconelcableUSB lafunciónde apagadoautomáticoestaráanulada Kit de pilas opción Paraalimentarlaunidadtambiénse puedeutilizarelkitdepilasMPA BT1Adisponibleporseparado Paraverinformaciónsobrecómo colocarelkitdepilasenlaunidad consulteladocume...

Page 78: ...e el retén del carrete de cinta del cartucho de imprimir 3 Empuje el cartucho de imprimir hacia el interior de la unidad hasta que encaje en su sitio produciendo un sonido Después cierre la tapa del cartucho de imprimir Sustitución del cartucho de imprimir Cuandoseagoteelcartuchode imprimir laindicación RIBON parpadearáenelvisualizador 1 Abra la tapa del cartucho de imprimir como se describe en el...

Page 79: ...dapor laflechaparatensarlacinta Precaución El interior de la unidad puede calentarse No ponga los dedos ni otros objetos en la ranura del cartucho de imprimir 3 Carga del papel de imprimir Elpapeldeimprimirsesuministra comopartedelpaquetedeimprimir página 6 Colóqueloenlaunidadcomose muestraabajo 1 Abra la tapa de la bandeja de papel 2 Ponga papel de imprimir en la bandeja Alineeelpapelypóngaloenla...

Page 80: ...una vez Cuando quiera añadir papel de imprimir a la bandeja de papel tenga cuidado de no exceder el máximo de 12 hojas No mezcle diferentes tipos de papel de imprimir De lo contrario podrá producirse un atasco de papel No escriba ni imprima nada en el papel de imprimir antes de insertarlo en esta unidad Después de imprimir si desea escribir en la cara de imagen del papel utilice un rotulador a bas...

Page 81: ...unidad durante este intervalo De lo contrario la unidad y o el Memory Stick podrán dañarse No empuje el Memory Stick al interior de la unidad ni lo extraiga de ella a la fuerza De lo contrario la unidad y o el Memory Stick podrán dañarse Mientras se esté efectuando la impresión no extraiga el Memory Stick de la unidad De lo contrario la unidad y o el Memory Stick podrán dañarse La capacidad máxima...

Page 82: ...rese de que detrás de la unidad no haya obstrucciones que puedan impedir que el papel salga suavemente Deberá haber un espacio de 12 cm por lo menos No ponga ningún objeto encima de la bandeja de papel No toque el papel durante la impresión y no intente tirar del papel para sacarlo No extraiga la bandeja de papel de la unidad durante la impresión No abra la tapa del cartucho de imprimir ni extraig...

Page 83: ... una marca de imprimir como se describe en la documentación de la cámara o videocámara Esa información deberá encontrarse en una sección titulada Selección de imágenes para imprimir o Asignación de marcas de impresión o similar 4 Verifique que en el visualizador LCD de la cámara digital CyberShot o la videocámara Handycam Sony se muestra una marca de imprimir Impresión de un grupo de imágenes con ...

Page 84: ... números de archivos y número de duplicados para las imágenes con marca de imprimir 4 Haga los ajustes de impresión requeridos Puede hacer ajustes para la calidad de imagen formato de impresión etc Para más detalles consulte Ajustes de impresión en la página 21 5 Pulse el botón PRINT STOP para empezar a imprimir Durante la impresión la indicación PRINT se mostrará en el visualizador 6 Retire el pa...

Page 85: ...agar el modo DPOF Para apagar el modo DPOF después de imprimir pulse el botón DPOF otra vez La indicación DPOF desaparecerá del visualizador y se volverá a mostrar la indicación normal Cambio del número de duplicados El número de duplicados para una imagen con marca de imprimir que haya sido puesto con la cámara digital se puede cambiar en la DPP MP1 Para cambiarlo realice la operación descrita ab...

Page 86: ...ar una imagen 1 Inserte el Memory Stick en la cámara digital CyberShot o videocámara Handycam Sony 2 Verifique en el LCD de la cámara digital CyberShot o videocámara Handycam Sony el número de carpeta y el número de archivo de la imagen que quiera imprimir Ejemplo con la CyberShot h c M w I E 10 30PM 2001 7 4 100 0028 6 8 640 Ejemplo con la Handycam U P O O P O O O O O U 640 Para ver información s...

Page 87: ... tenga el número más alto Si se inserta un Memory Stick que solamente tenga una carpeta no se mostrará el número de carpeta 3 Utilice los botones SELECT Si no se muestra un número de carpeta parpadeará el número de archivo Si se muestra un número de carpeta parpadeará el número de carpeta Pulse repetidamente los botones SELECT para seleccionar el número de carpeta y pulse el botón ENTER Parpadeará...

Page 88: ...an saliendo 9 Doble los bordes del papel y retírelos a lo largo de las líneas perforadas Desconexión de la alimentación Empuje hacia dentro el interruptor de alimentación y deslícelo hacia la izquierda hasta que la indicación desaparezca del visualizador Aunque no utilice el interruptor de alimentación la unidad se apagará automáticamente después de unos 3 minutos función de apagado automático Par...

Page 89: ...dor 2 Utilice los botones SELECT hasta que el elemento deseado parpadee en el visualizador Al pulsar SELECT el visualizador avanza los elementos disponibles en el orden SHARP t BRIGHT t DATE t FIT t MULTI t SHARP etc Al pulsar SELECT se avanza en dirección contraria Los ajustes disponibles se explican en la tabla Elementos de ajuste para imprimir al final de esta sección 3 Pulse el botón ENTER Se ...

Page 90: ... o videocámara Handycam Sony la fecha se imprimirá dos veces x OFF La imagen se imprime sin fecha Nota Una fecha insertada con la cámara digital CyberShot o videocámara Handycam Sony puede exceder el rango imprimible y podrá ser recortada FIT Llenar ON La imagen cambia de escala para que pueda entrar entera en el papel y no sea cortada ninguna sección Hay un círculo alrededor de la imagen x OFF La...

Page 91: ...lo desde el CD ROM digital photo printer for DPP MP1 Con Windows haga doble clic en el archivo ar500esp exe en la carpeta Acrobat Spanish Con Macintosh instálelo haciendo doble clic en el Acrobat Reader Installer Conecte a su ordenador 1 Conecte la DPP MP1 a su ordenador utilizando el cable USB suministrado 2 Conecte el adaptador de CA a la DPP MP1 y después active el interruptor de alimentación p...

Page 92: ...onecte la DPP MP1 con el cable USB los ajustes para imprimir se hacen en el ordenador Para conocer los ajustes para imprimir consulte la Guía de instalación incluida en el CD ROM digital photo printer for DPP MP1 3 Imprima desde su software de procesamiento de imágenes Nota Cuando conecte la DPP MP1 con el cable USB se anularán todos sus controles excepto el interruptor de alimentación Cuando util...

Page 93: ...corriente antes de limpiarla o de hacerle el servicio Instalación Evite poner la impresora en un lugar expuesto a vibración alta humedad polvo excesivo luz solar directa temperaturas muy altas o bajas No utilice equipo eléctrico cerca de la impresora La impresora no funcionará debidamente en campos electromagnéticos La impresora ha sido diseñada para funcionar horizontalmente No intente nunca util...

Page 94: ... podrá infringir lo estipulado por la ley de los derechos de autor Precauciones para almacenar el cartucho de imprimir Evite exponerlo a altas temperaturas o humedad altos niveles de polvo y a la luz solar directa Cuando extraiga de la unidad un cartucho de imprimir parcialmente usado para almacenarlo por largo tiempo vuelva a ponerlo en su bolsa de empaquetado original u otro envase apropiado Pre...

Page 95: ...tervalo Los datos almacenados en el Memory Stick podrán dañarse o destruirse si se desconecta la alimentación de la unidad mientras se está accediendo al Memory Stick hay corriente electroestática o interferencia de ruidos fuerte No adhiera nada excepto la etiqueta designada en el área para etiqueta del Memory Stick Ponga el Memory Stick en su caja para transportarlo o almacenarlo No toque la secc...

Page 96: ...do Windows Me Asumiendo que el Memory Stick ha sido reconocido como unidad E Los números de archivos para datos de imágenes fijas en el formato JPEG se asignan automáticamente y los archivos se almacenan en la carpeta 100MSDCF utilizando el siguiente patrón de nombre de archivo DSC0ssss JPG FLos números de archivos para datos de imágenes fijas en el formato TIFF se asignan automáticamente y los ar...

Page 97: ...as imágenes no se pueden imprimir La imagen está recortada en las partes superior e inferior o izquierda y derecha El cable de alimentación está desconectado c Está conectado correctamente el cable de alimentación página 9 El kit de pilas no está colocado correctamente c Consulte la documentación del kit de pilas Los archivos de imágenes no son compatibles con la DPP MP1 c Los archivos de imágenes...

Page 98: ...blema con el número de archivo de la imagen La imagen tiene marca de imprimir pero no se puede imprimir utilizando esta unidad c El archivo de imagen está estropeado y no se puede imprimir Cuando este error se produzca mientras se imprime una imagen que tenga marca de imprimir se suspenderá la impresión Para empezar a imprimir la siguiente imagen pulse el botón PRINT STOP Número de carpeta Número ...

Page 99: ...ompatibles con la DPP MP1 podrán visualizarse en un ordenador pero algunas veces no se podrán imprimir página 34 En el Memory Stick no hay imágenes que tengan puesta marca de imprimir c Inserte un Memory Stick que tenga imágenes a las que se les haya asignado una marca de imprimir en una cámara digital CyberShot o videocámara Handycam Sony El Memory Stick no tiene ninguna imagen con marca de impri...

Page 100: ...te c Un Memory Stick formateado en un PC podrá no funcionar en la DPP MP1 Utilice un Memory Stick formateado en una cámara digital CyberShot o videocámara Handycam Sony Se ha insertado un Memory Stick de un tipo no compatible con la DPP MP1 o el Memory Stick tiene algún defecto c Insertse un Memory Stick compatible Hay un problema con el cartucho de imprimir c Intente apagando y volviendo a encend...

Page 101: ...con las condiciones indicadas en la tarjeta de garantía Para ver detalles lea cuidadosamente la tarjeta de garantía Reparaciones después del periodo de garantía Las reparaciones se llevarán a cabo si así lo solicita el cliente Todos los costes tendrán que ser abonados por el cliente Disponibilidad de piezas Todas las piezas principales que son necesarias para mantener en funcionamiento la impresor...

Page 102: ...DPOF número de copias Alimentación Adaptador de CA Entrada 100 240 V CA 50 60 Hz Salida 12 V CC 3 A Consumo Entrada 12 V CC 2 1 A 25 W durante la impresión con el adaptador de CA Temperatura ambiente para funcionamiento 5 35ºC Dimensiones externas Aprox 66 39 111 An Al Pr mm sin la bandeja de papel y partes salientes Peso Aprox 260 g sin la bandeja de papel 1 Algunos formatos de archivo especiales...

Page 103: ... Filtro abrazadera Kit de interfaz para PC Guía de instalacíon Tarjeta de registro del usuario Garantía Contrato de licencia de software Sony para usuario final El diseño y las especificaciones están sujetos a cambios sin previo aviso Accesorios opcionales Paquete de impression a color del tamaño de una tarjeta SVM 24CS Kit de pilas MPA BT1A ...

Page 104: ...Printed in Japan ...

Reviews: