background image

61

Editing

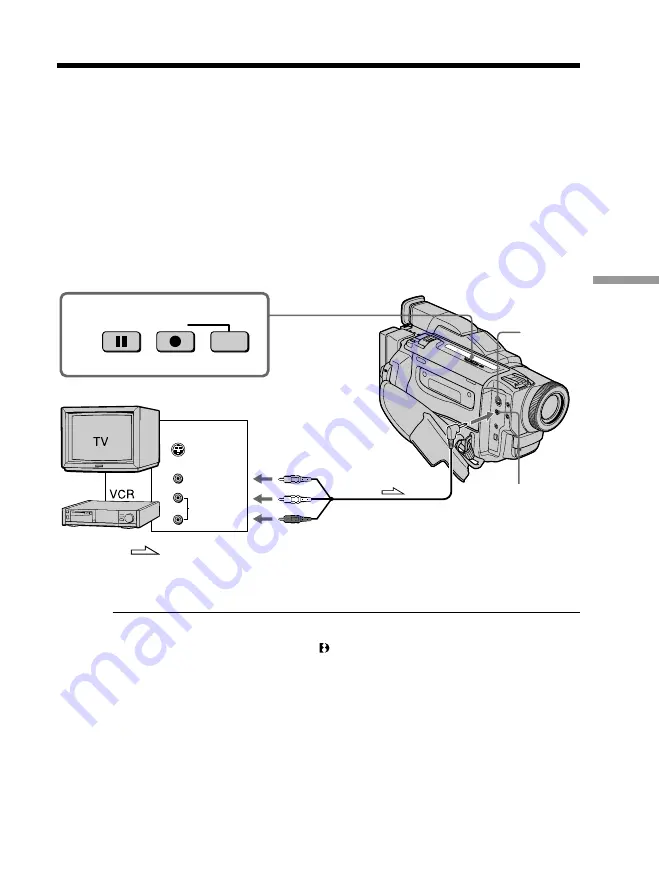
Recording video or TV programs

Using the A/V connecting cable

You can record a tape from another VCR or a TV program from a TV that has video/
audio outputs. Use your camcorder as a recorder.

(

1

)

Insert a blank tape (or a tape you want to record over) into your camcorder. If
you are recording a tape from the VCR, insert a recorded tape into the VCR.

(

2

)

Set the POWER switch to VTR.

(

3

)

Set DISPLAY to LCD in the menu settings (p. 65).

(

4

)

Press 

z

 REC and the button on its right simultaneously on your camcorder,

then immediately press 

X

 on your camcorder.

(

5

)

Press 

N

 on the VCR to start playback if you are recording a tape from VCR.

Select a TV program if you are recording from TV.
The picture from a TV or VCR appears on the LCD screen or in the viewfinder.

(

6

)

Press 

X

 on your camcorder at the scene where you want to start recording

from.

When you have finished dubbing a tape

Press 

x

 on both your camcorder and the VCR.

Notes

•To enable smooth transition, we recommend that you do not mix pictures recorded in

the Hi8/standard 8 with the Digital8   system on a tape.

•If you fast-forward or slow-playback on the other equipment, the image being

recorded may fluctuate. When recording from other equipment, be sure to play back
the original tape at normal speed.

If your VCR is a monaural type

Connect the yellow plug of the A/V connecting cable to the video output jack and the
white or the red plug to the audio output jack on the VCR or the TV. When the white
plug is connected, the left channel audio is output, and the red plug is connected, the
right channel audio is output.

If your TV or VCR has an S video jack

Connect using an S video cable (not supplied) to obtain high-quality pictures.
With this connection, you do not need to connect the yellow (video) plug of the A/V
connecting cable.
Connect an S video cable (not supplied) to the S video jacks of both your camcorder and
the TV or VCR.

: Signal flow

S VIDEO

S VIDEO

VIDEO

AUDIO

OUT

4

AUDIO / VIDEO

PAUSE

REC

Summary of Contents for DCR-TRV720

Page 1: ...s manual thoroughly and retain it for future reference Owner s Record The model and serial numbers are located on the bottom Record the serial number in the space provided below Refer to these numbers whenever you call upon your Sony dealer regarding this product 3 059 564 13 1 DCR TRV720 TRV820 Digital Video Camera Recorder DCR TRV820 ...

Page 2: ...ed operation Declaration of Conformity Trade Name SONY Model No DCR TRV820 Responsible Party Sony Electronics lnc Address 1 Sony Drive Park Ridge NJ 07656 USA Telephone No 201 930 6972 This device complies with Part15 of the FCC Rules Operation is subject to the following two conditions 1 This device may not cause harmful interference and 2 this device must accept any interference received includi...

Page 3: ...and on the user is encouraged to try to correct the interference by one or more of the following measures Reorient or relocate the receiving antenna Increase the separation between the equipment and receiver Connect the equipment into an outlet on a circuit different from that to which the receiverisconnected Consult the dealer or an experienced radio TV technician for help For customers in CANADA...

Page 4: ...g back a tape with picture effects 50 Playing back a tape with digital effects 51 Enlarging recorded images PB ZOOM 52 Quickly locating a scene using the zero set memory function 53 Searching a recording by date Date search 54 Searching for a photo Photo search Photo scan 56 Editing Dubbing a tape 58 Using with analog video unit and PC Signal convert function 60 Recording video or TV programs 61 I...

Page 5: ...ntents Printing operations DCR TRV820 only Using the printer Introduction 104 Making prints Standard print 112 Making prints of split screens Split printing 119 Additional Information Digital8 system recording and playback 121 About i LINK 123 Changing the lithium battery in your camcorder 125 Troubleshooting 127 Self diagnosis display 133 Warning indicators and messages 134 Using your camcorder a...

Page 6: ... Use the battery pack when using your camcorder outdoors p 11 3Close the cassette compartment by pressing the mark on the cassette compartment The cassette compartment automatically goes down Close the lid of the cassette compartment 1Open the lid of the cassette compartment and press EJECT The compartment opens automatically 2Insert a cassette into the cassette compartment with its window facing ...

Page 7: ... viewfinder placing your eye against its eyecup 2SetthePOWER switch to CAMERA while pressing the small green button 4Press the red button Your camcorder starts recording To stop recording press the red button again 2Press m to rewind the tape 3Press N to start playback REW PLAY 1SetthePOWER switch to VTR while pressing the small green button Monitoring the playback picture on the LCD screen p 25 V...

Page 8: ...e AA R6 battery for Remote Commander 2 p 151 6 A V connecting cable 1 p 28 7 Shoulder strap 1 p 147 8 Lens cap 1 p 17 9 PC serial cable 1 p 93 0 Memory Stick 1 p 74 qa Application software PictureGear 4 1 Lite CD ROM 1 p 93 qs Print paper p 109 Standard type 20 sheets 1 Sticker type Standard size 10 sheets 1 Sticker type 9 split size 10 sheets 1 DCR TRV820 only qd Print cartridge 2 p 106 DCR TRV82...

Page 9: ...our camcorder With your digital camcorder you can use Hi8 Digital8 video cassettes Your camcorder records and plays back pictures in the Digital8 system Also your camcorder plays back tapes recorded in the Hi8 standard 8 analog system You however cannot use the functions in Advanced Playback Operations on page 50 to 57 for playback in the Hi8 standard 8 system To enable smooth transition we recomm...

Page 10: ...way from rain and sea water Letting your camcorder get wet may cause your camcorder to malfunction Sometimes this malfunction cannot be repaired a Never leave your camcorder exposed to temperatures above 140 F 60 C such as in a car parked in the sun or under direct sunlight b However do not leave your camcorder exposed to temperature above 131 F 55 C when the print cartridge is in your camcorder D...

Page 11: ...To remove the battery pack Slide the battery pack out in the direction of the arrow while pressing BATT RELEASE down Afterinstallingthebatterypack Do not carry your camcorder by holding the battery pack If you do so the battery pack may slide off your camcorder unintentionally damaging your camcorder Step 1 Preparing the power supply BATT RELEASE ...

Page 12: ...ompleted until FULL appears in the display window Fully charging the battery allows you to use the battery longer than usual After charging the battery pack Disconnect the AC power adaptor from the DC IN jack on your camcorder Notes Prevent metallic objects from coming into contact with the metal parts of the DC plug of the AC power adaptor This may cause a short circuit damaging the AC power adap...

Page 13: ...h Recording with Battery pack the viewfinder the LCD screen Continuous Typical Continuous Typical NP F330 supplied 105 95 60 55 70 65 40 35 NP F530 175 160 100 90 110 100 60 55 NP F550 210 190 120 110 140 125 80 70 NP F730 365 325 210 185 255 230 145 130 NP F730H F750 440 395 250 225 290 260 165 150 NP F930 575 520 325 295 400 360 230 205 NP F950 675 610 385 345 455 410 260 235 NP F960 790 710 450...

Page 14: ...tery life will be shorter if you use your camcorder in a cold environment Theremainingbatterytimeindicator The indicator may not be correct depending on the conditions in which you are recording When you close the LCD panel and open it again it takes about 1 minute for the correct remaining battery time to be displayed Ifthepowermaygooffalthoughthebatteryremainingindicatorindicatesthat thebatteryp...

Page 15: ...a wall outlet PRECAUTION The set is not disconnected from the AC power source house current as long as it is connected to the wall outlet even if the set itself has been turned off Notes The AC power adaptor can supply power even if the battery pack is attached to your camcorder The DC IN jack has source priority This means that the battery pack cannot supply any power if the power cord is connect...

Page 16: ...artment down Doing so may cause malfunction Your camcorder records pictures in the Digital8 system The recording time when you use your camcorder is half of indicated time on Hi8 tape If you select the LP mode in the menu settings 3 4 of indicated time on Hi8 tape If you use standard 8 tape be sure to play back the tape on this camcorder Mosaic pattern noise may appear when you play back standard ...

Page 17: ...CD panel while pressing OPEN The viewfinder automatically turns off 5 Press START STOP Your camcorder starts recording The REC indicator appears The camera recording lamp located on the front of your camcorder lights up To stop recording press START STOP again Camera recording lamp Microphone Notes Fasten the grip strap firmly Do not touch the built in microphone during recording NoteonRecordingmo...

Page 18: ...D panel moves about 90 degrees to the viewfinder side and about 180 degrees to the lens side If you turn the LCD panel over so that it faces the other way the indicator appears on the LCD screen and in the viewfinder Mirror mode When closing the LCD panel set it vertically until it clicks and swing it into the camcorder body Note When using the LCD screen except in the mirror mode the viewfinder a...

Page 19: ...gs p 65 The picture quality deteriorates as the picture is processed digitally Notesondigitalzoom Digital zoom starts to function when zoom exceeds 25 The picture quality deteriorates as you go toward the T side Whenyoushootclosetoasubject If you cannot get a sharp focus move the power zoom lever to the W side until the focus is sharp You can shoot a subject that is at least about 2 feet 5 8 inch ...

Page 20: ...ours minutes seconds in CAMERA mode and 0 00 00 00 hours minutes seconds frames in VTR mode You cannot rewrite only the time code When you play back tapes recorded in the Hi8 standard 8 system the tape counter appears You cannot reset the time code or the tape counter SP 0 00 01 12 05 56 AM JUL 4 2000 40min REC Recording a picture STBY REC indicator Remaining tape indicator This appears after you ...

Page 21: ... LIGHT again IfyoupressEXPOSUREwhenshootingbacklitsubjects The backlight function will be canceled Shooting in the dark NightShot Super Nightshot The NightShot function enables you to shoot a subject in a dark place For example you can satisfactorily record the environment of nocturnal animals for observation when you use this function While your camcorder is in CAMERA or MEMORY mode slide NIGHTSH...

Page 22: ...n bright places ex outdoors in the daytime This may cause your camcorder to malfunction When you keep NIGHTSHOT set to ON in normal recording the picture may be recorded in incorrect or unnatural colors If focusing is difficult with the autofocus mode when using the NightShot function focus manually WhileusingtheNightShotfunction youcannotusethefollowingfunctions Exposure PROGRAM AE WhileusingtheS...

Page 23: ...ds of the countdown the beep sound gets faster then recording starts automatically To stop the self timer recording PressSTART STOP Use the Remote Commander for convenience To record still images using the self timer Press PHOTO in step 2 p 31 To cancel self timer recording Press self timer so that the indicator disappears from the LCD or viewfinder screen while your camcorder is in the standby mo...

Page 24: ...press START STOP re recording begins from the point you released EDITSEARCH You cannot monitor the sound Rec Review You can check the section which you have stopped most recently Press the 7 side of EDITSEARCH momentarily in the standby mode The section you have stopped most recently will be played back for a few seconds and then your camcorder will return to the standby mode You can monitor the s...

Page 25: ...erecordedtape 2 SetthePOWERswitchtoVTRwhilepressingthesmallgreenbutton The videocontrolbuttonslightup 3 OpentheLCDpanelwhilepressingOPEN 4 Press mtorewindthetape 5 Press Ntostartplayback 6 Toadjustthevolume presseitherofthetwobuttonsonVOLUME The speakeronyourcamcorderissilentwhentheLCDpanelisclosed To stop playback Pressx When monitoring on the LCD screen You can turn the LCD panel over and move i...

Page 26: ...no indicator Not to display recording date Set DATA CODE to DATE in the menu settings p 65 The display changes as follows date time t no indicator Notes on the data code function The data code function works only for tapes recorded in the Digital8 system Various settings of the recording data are not recorded when recording images on Memory Stick Recording data Recording data is your camcorder s i...

Page 27: ... Press 2 on the Remote Commander during playback For double speed playback in the reverse direction press then press 2 on the Remote Commander To resume normal playback press N To view the picture frame by frame Press C on the Remote Commander in the playback pause mode For frame by frame playback in the reverse direction press c To resume normal playback press N To search the last scene recorded ...

Page 28: ...th this connection you do not need to connect the yellow video plug of the A V connecting cable Connect an S video cable not supplied to the S video jacks on both your camcorder and the TV or the VCR Connect your camcorder to your TV or VCR with the A V connecting cable supplied with your camcorder to watch the playback picture on the TV screen You can operate the playback control buttons in the s...

Page 29: ...res To cancel the super laser link function Press S LASER LINK The lamp on the S LASER LINK button goes out If you use a Sony TV You can turn on the TV automatically when you press S LASER LINK on your camcorder To do so do as follows in advance Turn the TV s main switch on Set AUTO TV ON to ON in the menu settings Point the super laser link emitter of your camcorder at the TV s remote sensor You ...

Page 30: ...age You can record a still image like a photograph This mode is useful when you want to record an image such as a photograph or when you print a picture using a video printer not supplied You can record about 510 images in the SP mode and about 765 images in the LP mode on a tape which can record for 60 minutes in the SP mode Besides the operation described here your camcorder can record still ima...

Page 31: ...viewfinder 2 Press PHOTO firmly Self timer starts counting down from 10 with a beep sound In the last two seconds of the countdown the beep sound gets faster then recording starts automatically To cancel self timer recording Press self timer so that the indicator disappears from the LCD or viewfinder screen while your camcorder is in the standby mode You cannot cancel self timer recording with the...

Page 32: ...o printer Refer to the operating instructions of the video printer as well Besides the video printer not supplied you can use the printer on your camcorder to print images on the specified paper DCR TRV820 only p 104 If the video printer is equipped with S video input Use the S video connecting cable not supplied Connect it to the S VIDEO jack and the S video input of the video printer S VIDEO AUD...

Page 33: ...cannot select or cancel the wide mode When you cancel the wide mode set your camcorder to the standby mode and then set 16 9WIDE to OFF in the menu setting Connection for a TV Pictures recorded in the 16 9WIDE mode automatically appear on the TV screen at full size when you connect your camcorder to a TV that is compatible with the video ID ID 1 ID 2 system you connect your camcorder to the S vide...

Page 34: ...When fading in the picture gradually changes from black and white to color When fading out the picture gradually changes from color to black and white 1 You can use this function when D ZOOM is set to OFF in the menu setting 2 Fade in only FADER M FADER mosaic BOUNCE1 2 OVERLAP2 WIPE2 DOT2 ramdom dot a REC STBY REC STBY b ...

Page 35: ...r indicator flashes The indicator changes as follows FADER t M FADER t BOUNCE t MONOTONE t OVERLAP t WIPE t DOT The last selected fader mode is indicated first of all 2 Press START STOP The fader indicator stops flashing After the fade in out is carried out your camcorder automatically returns to the normal mode To cancel the fader function Before pressing START STOP press FADER until the indicato...

Page 36: ...overlap wipe or dot function Your camcorder stores the image on the tape As the image is being stored the indicator flashes quickly and the image you are shooting disappears from the LCD or viewfinder screen Depending on the tape condition the image may not be recorded clearly While using the bounce function you cannot use the following functions Focus Zoom Picture effect Note on the bounce functi...

Page 37: ...e image is emphasized and the picture looks like an animated cartoon MOSAIC f The image is mosaic 1 Press PICTURE EFFECT in CAMERA mode The picture effect indicator appears 2 Turn the SEL PUSH EXEC dial to select the desired picture effect mode The indicator changes as follows NEG ART y SEPIA y B W y SOLARIZE y SLIM y STRETCH y PASTEL y MOSAIC To turn the picture effect function off Press PICTURE ...

Page 38: ...can swap a brighter area in a still image with a moving image TRAIL You can record the image so that an incidental image like a trail is left SLOW SHTR SLOW SHUTTER You can slow down the shutter speed The slow shutter mode is good for recording dark images more brightly However the image may be less clear OLD MOVIE You can add an old movie type atmosphere to images Your camcorder automatically set...

Page 39: ...SEL PUSH EXEC dial to adjust the effect as follows STILL The rate of the still image you want to superimpose on the moving image FLASH The interval of flash motion LUMI The color scheme of the area in the still image which is to be swapped with a moving image TRAIL The vanishing time of the incidental image SLOW SHTR Shutter speed The larger the shutter speed number the slower the shutter speed OL...

Page 40: ...hutter mode Exposure PROGRAM AE The following functions do not work in the old movie mode Exposure Wide mode Picture effect PROGRAM AE When you turn the power off The digital effect is automatically canceled When recording in the slow shutter mode Auto focus may not be effective Focus manually using a tripod Shutter speed Shutter speed number Shutter speed SLOW SHTR 1 1 30 SLOW SHTR 2 1 15 SLOW SH...

Page 41: ...minimizes shake on fast moving subjects such as in tennis or golf Beach ski mode This mode prevents people s faces from appearing dark in strong light or reflected light such as at a beach in midsummer or on a ski slope Sunset moon mode This mode allows you to maintain atmosphere when you are recording sunsets general night views fireworks displays and neon signs Landscape mode This mode is for wh...

Page 42: ...cus only on distantsubjects The following functions do not work in the PROGRAM AE mode Slow shutter Old movie Bounce The following functions do not work in the low lux mode Digital effect Overlap Wipe Dot Exposure While setting the NIGHTSHOT to ON the PROGRAM AE function does not work The indicator flashes While shooting in MEMORY mode the low lux mode does not work If you are recording under a di...

Page 43: ...enorintheviewfinder 2 Turn the SEL PUSH EXEC dial to adjust the brightness To return to the automatic exposure mode PressEXPOSURE Notes When you adjust the exposure manually the following function and modes do not work in CAMERA mode Backlight Old movie Slow shutter When you adjust the exposure manually the backlight function does not work in MEMORY mode Your camcorder automatically returns to the...

Page 44: ...ngtosharpenfocus To return to the autofocus mode Set FOCUS to AUTO To record distant subjects When you press FOCUS down to INFINITY The lens focuses on infinity and indicator appears When you release FOCUS your camcorder returns to the manual focus mode Use this mode when your camcorder focuses on near objects even though you are trying to shoot a distant object To focus precisely Adjust the zoom ...

Page 45: ...and 2 until the title is laid out as desired 5 Press the SEL PUSH EXEC dial again to complete the setting 6 Press START STOP to start recording 7 When you want to stop recording the title press TITLE VACATION 1 2 TITLE VACATION SIZE SMALL VACATION 3 4 TITLE TITLE END TITLE TITLE END PRESET TITLE HELLO HAPPY BIRTHDAY HAPPY HOLIDAYS CONGRATULATIONS OUR SWEET BABY WEDDING VACATION THE END TITLE END P...

Page 46: ...y YELLOW y VIOLET y RED y CYANy GREEN y BLUE The title size changes as follows SMALL y LARGE You cannot input more than 12 characters in LARGE size The title position changes as follows 1y2y 3y 4y 5y 6y 7y 8y 9 The larger the position number the lower the title is positioned When you select the title size LARGE you cannot choose position 9 When you are selecting and setting the title You cannot re...

Page 47: ...itlemenudisappear 1 2 3 4 6 TITLE PRESET TITLE HELLO HAPPY BIRTHDAY HAPPY HOLIDAYS CONGRATULATIONS OUR SWEET BABY WEDDING VACATION THE END TITLE END TITLE SET CUSTOM1 CUSTOM2 TITLE END TITLE SET RETURN TITLE END TITLE SET RETURN TITLE END TITLE SET TITLE END P1 A B C D E 12345 F DM F GH I J 67890 K L MNO À È Ì ÒÙ P QR S T Á É Í ÓÚ P 2 U VWX Y Â Ê ÔÆŒ SE T Z à ÕÑ çß Ä Ï ÖÜ Å TITLE SET TITLE END P1 ...

Page 48: ...er The power automatically goes off The characters you have entered remain stored in memory Set the POWER switch to OFF CHARGE once and turn it to CAMERA again then proceed from step 1 We recommend setting the POWER switch to VTR or removing the cassette so that your camcorder does not automatically turn off while you are entering title characters If you select The menu for selecting alphabet and ...

Page 49: ...es and the counter resets to zero 3 Keep pressing the 7 side of EDITSEARCH and release the button at the insert start point a 4 Press START STOP to start recording The scene is inserted Recording stops automatically near the counter zero point Your camcorder returns to the standby mode Notes The zero set memory function works only for tapes recorded in the Digital8 system The picture and the sound...

Page 50: ...not process externally input scenes using the picture effect function You cannot record pictures that you have processed using the picture effect function with this camcorder To record pictures that you have processed using the picture effect function record the pictures on the VCR using your camcorder as a player Pictures processed by the picture effect function Pictures processed by the picture ...

Page 51: ...cancel the digital effect function Press DIGITAL EFFECT Notes The digital effect function works only for tapes recorded in the Digital8 system You cannot process externally input scenes using the digital effect function You cannot record images that you have processed using the digital effect function with this camcorder To record images that you have processed using the digital effect function re...

Page 52: ... downwards t The image moves leftward Turn the dial upwards To cancel PB ZOOM function Press PB ZOOM Notes PB ZOOM works only for tapes recorded in the Digital8 system You cannot process externally input scenes using PB ZOOM function You cannot record pictures that you have processed using PB ZOOM function with this camcorder To record pictures that you have processed using PB ZOOM function record...

Page 53: ...e time code appears 5 Press N Playback starts from the counter s zero point Notes The zero set memory function works only for tapes recorded in the Digital8 system When you press ZERO SET MEMORY before rewinding the tape the zero set memory function is canceled There may be a discrepancy of several seconds from the time code If a tape has a blank portion in the recorded portions The zero set memor...

Page 54: ... Commander repeatedly until the date search indicator appears The indicator changes as follows DATE SEARCH t PHOTO SEARCH t PHOTO SCAN 3 When the current position is b press to search towards a or press to search towards c Your camcorder automatically starts playback at the point where the date changes Each time you press or the camcorder searches for the previous or next date To stop searching Pr...

Page 55: ...earch works only for tapes recorded in the Digital8 system If one day s recording is less than two minutes your camcorder may not accurately find the point where the recording date changes If a tape has a blank portion in the recorded portions The date search function may not work correctly ...

Page 56: ...h to VTR 2 Press SEARCH MODE on the Remote Commander repeatedly until the photo search indicator appears The indicator changes as follows DATE SEARCH t PHOTO SEARCH t PHOTO SCAN 3 Press or to select the photo for playback Each time you press or the camcorder searches for the previous or next photo Your camcorder automatically starts playback from the photo To stop searching Press x Searching for a...

Page 57: ...pears The indicator changes as follows DATE SEARCH t PHOTO SEARCH t PHOTO SCAN 3 Press or Each photo is played back for about 5 seconds automatically To stop scanning Press x Note The photo search and photo scan work only for tapes recorded in the Digital8 system If a tape has a blank portion in the recorded portions The photo search and photo scan functions may not work correctly 3 2 SEARCH MODE ...

Page 58: ... to record the indicators on the dubbed tape DISPLAY DATA CODE SEARCH MODE on the Remote Commander You can edit on VCRs that support the following systems 8 mm Hi8 VHS S VHS VHSC S VHSC Betamax ED Betamax mini DV DV or Digital8 If your VCR is a monaural type Connect the yellow plug of the A V connecting cable to the video input jack and the white or the red plug to the audio input jack on the VCR ...

Page 59: ...the VCR Refer to the operating instructions of your VCR for more information When you have finished dubbing a tape Press xon both your camcorder and the VCR Note on tapes that are not recorded in the Digital8 system The picture may fluctuate This is not a malfunction During playback of tapes recorded in the Hi8 standard 8 system Digital signals are output as the image signals from the DV IN OUT ja...

Page 60: ...d sound Stop capturing procedures on your PC and stop the playback on the analog video unit Notes You need to install software which can exchange video signals Depending on the condition of the analog video signals the PC may not be able to output the images correctly when you convert analog video signals into digital video signals via your camcorder Depending on the analog video unit the image ma...

Page 61: ...Press x on both your camcorder and the VCR Notes To enable smooth transition we recommend that you do not mix pictures recorded in the Hi8 standard 8 with the Digital8 system on a tape If you fast forward or slow playback on the other equipment the image being recorded may fluctuate When recording from other equipment be sure to play back the original tape at normal speed If your VCR is a monaural...

Page 62: ...e from a TV or VCR appears on the LCD screen or in the viewfinder 6 Press X on your camcorder at the scene where you want to start recording from When you have finished dubbing a tape Press xon both your camcorder and the VCR You can connect one VCR only using the i LINK cable DV connecting cable During digital editing The color of the display may be uneven However this does not affect the dubbed ...

Page 63: ...om a VCR onto your originally recorded tape by specifying the insert start and end points Use the Remote Commander for this operation Connections are the same as in Recording video or TV programs on page 61 62 Insert a cassette containing the desired scene to insert into the VCR a b c ...

Page 64: ...to VTR 2 On the VCR locate just before the insert start point a then press X to set the VCR to the playback pause mode 3 On your camcorder locate the insert end point c by pressing m or M Then press X to set it to the playback pause mode 4 Press ZERO SET MEMORY on the Remote Commander The ZERO SET MEMORY indicator flashes and the end point of the insert is stored in memory 5 On your camcorder loca...

Page 65: ...ems select RETURN and press the dial then repeat steps from 2 to 4 For details see Selecting the mode setting of each item p 66 To make the menu display disappear Press MENU 1 2 3 4 MENU MANUAL SET AUTO SHTR MENU END CAMERA MEMORY VTR MANUAL SET AUTO SHTR OTHERS WORLD TIME BEEP 0 HR MANUAL SET WORLD TIME BEEP COMMANDER DISPLAY REC LAMP INDICATOR RETURN ON OFF VTR SET H i F i SOUND TBC DNR AUDIO MI...

Page 66: ... bright conditions To deactivate digital zoom Up to 25 zoom is carried out To activate digital zoom More than 25 to 50 zoom is performed digitally p 19 To activate digital zoom More than 25 to 450 zoom is performed digitally p 19 To record a 16 9 wide picture p 33 To compensate for camera shake To cancel the SteadyShot function Natural pictures are produced when shooting a stationary object with a...

Page 67: ...movement To adjust the balance between the stereo 1 and stereo 2 To automatically select the system Hi8 standard 8 or Digital8 that was used to record on the tape and play back the tape To play back a tape that was recorded in the Hi8 standard 8 system when your camcorder does not automatically distinguish the recording system To convert digital video signals into analog video signals via your cam...

Page 68: ... screen turning the SEL PUSH dial to adjust the fowllowing bar To set the brightness in the viewfinder normal To brighten the viewfinder POWER switch to lighten to darken Notes on LCD B L and VF B L When you select BRIGHT battery life is reduced by about 10 percent during recording When you use power sources other than the battery pack BRIGHT is automatically selected VTR CAMERA MEMORY VTR CAMERA ...

Page 69: ...SH EXEC dial then press the dial 2 Turn the SEL PUSH EXEC dial to select FORMAT then press the dial 3 After EXECUTE appears press the SEL PUSH EXEC dial FORMATTING appears during formatting COMPLETE appears when formatting is finished To duplicate still images p 89 POWER switch MEMORY VTR MEMORY MEMORY VTR MEMORY VTR MEMORY MEMORY VTR MEMORY VTR VTR MEMORY Note on print marks You can print images ...

Page 70: ...rding data during playback To display date and time during playback POWER switch VTR MEMORY VTR MEMORY VTR CAMERA VTR CAMERA DCR TRV 820 only Note on REC MODE When you record on the standard 8 tape your camcorder records in the SP mode even you select the LP mode in the menu settings In this case the indicator 8mm TAPE t SP REC Hi8 TAPE t LP SP REC appears on the LCD screen or in the viewfinder Us...

Page 71: ...e To make the demonstration appear To cancel the demonstration mode POWER switch CAMERA MEMORY VTR CAMERA MEMORY CAMERA Notes on DEMO MODE You cannot select DEMO MODE when a cassette is inserted in your camcorder DEMO MODE is set to STBY Standby at the factory and the demonstration starts about 10 minutes after you have set the POWER switch to CAMERA without a cassette inserted To cancel the demon...

Page 72: ...d in the viewfinder To light up the camera recording lamp at the front of your camcorder To turn the camera recording lamp off so that the subject is not aware of the recording To turn off the backlight on display window To turn on the backlight POWER switch CAMERA MEMORY VTR CAMERA MEMORY VTR CAMERA MEMORY VTR CAMERA MEMORY CAMERA MEMORY VTR CAMERA MEMORY Note If you press DISPLAY with DISPLAY se...

Page 73: ...date and time You must reset the date and time when the lithium battery becomes dead with no power source installed First set the year then the month the day the hour and then the minute 1 While the camcorder is in the standby mode press MENU to display the menu settings 2 Turn the SEL PUSH EXEC dial to select then press the dial 3 Turn the SEL PUSH EXEC dial to select CLOCK SET then press the dia...

Page 74: ...is set to LOCK We recommend backing up important data Image data may be damaged in the following cases If you remove the Memory Stick turn the power off or detach the battery for replacement when the access lamp is flashing If you use Memory Stick s near static electricity or magnetic fields Prevent metallic objects or your finger from coming into contact with the metal parts of the connecting sec...

Page 75: ... JEIDA Japan Electronic Industry Development Association You cannot play back on your camcorder still images recorded on other equipment DCR TRV890E TRV900 TRV900E or DSC D700 D770 that does not conform with this universal standard These models are not sold in some areas If you cannot use the Memory Stick that has been used on other equipment format the Memory Stick on your camcorder following the...

Page 76: ...e compartment To eject the Memory Stick Open the lid of the cassette compartment then press the Memory Stick once lightly The Memory Stick pops up When the access lamp is lit or flashing Do not shake or strike your camcorder Do not turn the power off eject the Memory Stick or remove the battery pack Otherwise the image data breakdown may occur 2 Using Memory Stick introduction Memory Stick compart...

Page 77: ...urn the SEL PUSH EXEC dial to select the desired image quality then press the dial 6 Press MENU to erase the menu display Note In some cases changing the image quality mode may not affect the image quality depending on the types of images you are shooting 1 2 6 3 4 5 MENU VTR OFF MEMORY CAMERA CHARGE MEMORY SET CONTINUOUS QUAL I TY FLD FRAME PRINT MARK PROTECT SLIDE SHOW DELETE ALL FORMAT RETURN M...

Page 78: ...wn in the table below The number of pixels is 640 480 regardless of image quality mode The data size before compression is about 600 KB Image quality mode Memory capacity FINE About 100 KB STANDARD About 60 KB Approximate number of images you can record on a Memory Stick The approximate number of images you can record on a Memory Stick formatted using this camcorder varies depending on which image...

Page 79: ...et 3 Press PHOTO deeper The image displayed on the screen will be recorded on the Memory Stick Recording is complete when the bar scroll indicator disappears Notes When recording fast moving subjects in the FRAME mode the recorded image blurry When recording in the FRAME mode your camcorder may not correct camera shake We recommend that you shoot objects with a tripod When recording still images a...

Page 80: ... mode of PROGRAM AE When you are recording a still image You can neither turn off the power nor press PHOTO When you press PHOTO on the Remote Commander Your camcorder immediately records the image that is on the screen when you press the button Recording images continuously You can record still images continuously Multi screen mode You can record 9 still images continuously on a single page ...

Page 81: ... display If the capacity of the Memory Stick becomes full FULL appears on the LCD screen or in the viewfinder and you cannot record still images on the Memory Stick 2 6 3 4 5 1 MENU VTR OFF MEMORY CAMERA CHARGE MEMORY SET CONTINUOUS QUAL I TY FLD FRAME PRINT MARK PROTECT SLIDE SHOW DELETE ALL FORMAT RETURN MENU END OFF MEMORY SET CONTINUOUS QUAL I TY FLD FRAME PRINT MARK PROTECT SLIDE SHOW DELETE ...

Page 82: ...corder shoots 9 still images at about 0 5 sec intervals and displays the images on a single page divided into 9 boxes Note on using the video flash light not supplied The video flash light does not work in the multi screen mode if you install it to the accessory shoe When recording in the multi screen mode The image is recorded in the FIELD mode automatically even you select the FRAME mode in the ...

Page 83: ...elf timer starts counting down from 10 with a beep sound In the last two seconds of the countdown the beep sound gets faster then recording starts automatically To cancel self timer recording Press self timer so that the indicator disappears from the LCD or viewfinder screen while your camcorder is in the standby mode You cannot cancel self timer recording with the Remote Commander Note The self t...

Page 84: ...ten illustlation or title with a moving image Record a title on the Memory Stick before a trip or event for convenience C CHROM Camera chroma key You can superimpose a moving image on top of a still image such as an image can be used as background Shoot the subject against a blue background The blue area of the moving image will be swapped with a still image M OVERLAP Memory overlap You can make a...

Page 85: ...previous image press MEMORY To see the next image press MEMORY 4 Turn the SEL PUSH EXEC dial to select the desired mode The mode changes as follows M CHROM y M LUMI y C CHROM y M OVERLAP 5 Press the SEL PUSH EXEC dial The still image is superimposed on the moving image 6 Turn the SEL PUSH EXEC dial to adjust the effect M CHROM The color blue scheme of the area in the still image which is to be swa...

Page 86: ... step 7 and repeat the procedure from step 4 To cancel M CHROM M LUMI C CHROM M OVERLAP Press MEMORY MIX During recording You cannot change the mode setting The Memory Stick supplied with your camcorder stores 20 images For M CHROM 18 images such as a frame 100 0001 100 0018 For C CHROM 2 images such as a background 100 0019 100 0020 Sample images Sample images stored in the Memory Stick supplied ...

Page 87: ...Recording is complete when the bar scroll indicator disappears When the acccess lamp is lit or flashing Do not shake or strike the unit Also do not turn the power off eject the Memory Stick or remove the battery pack Otherwise an image data breakdown may occur If appears on the LCD screen or in the viewfinder The inserted Memory Stick is imcompartible with your camcorder because its format does no...

Page 88: ...necting cable Connect the yellow plug of the A V connecting cable to the video jack on the VCR or the TV If your TV or VCR has an S video jack Connect using an S video cable not supplied to obtain high quality pictures With this connection you do not need to connect the yellow video plug of the A V connecting cable Connect an S video cable not supplied to the S video jacks of both your camcorder a...

Page 89: ...the SEL PUSH EXEC dial to select PHOTO SAVE then press the dial PHOTO BUTTON appears on the LCD screen or in the viewfinder 5 Press PHOTO firmly The still image from the tape is recorded on the Memory Stick The number of still images copied is displayed END is displayed when copying is completed 2 3 5 4 1 MENU VTR OFF MEMORY CAMERA CHARGE PHOTO PHOTO SAVE 0 00 00 00 21 40 F I NE SAVING 0 MENU END ...

Page 90: ...power off eject the Memory Stick or remove the battery pack Otherwise the image data breakdown may occur To record all the images recorded on the tape Rewind the tape all the way back and start copying If the write protect tab on the Memory Stick is set to LOCK NOT READY appears when you select PHOTO SAVE in the menu settings When you change the Memory Stick in the middle of copying Your camcorder...

Page 91: ... press MEMORY To stop memory photo playback Press MEMORY PLAY To play back recorded images on a TV screen Connect your camcorder to the TV with the A V connecting cable supplied with your camcorder before the operation When operating memory photo playback on a TV or the LCD screen the image quality may appear to have deteriorated This is not a malfunction The image data is as good as ever Turn the...

Page 92: ... that is displayed before changing to the index screen mode To display the following 6 images keep pressing MEMORY To display the previous 6 images keep pressing MEMORY To return to the normal playback screen single screen Press MEMORY to move the B mark to the image you want to display on full screen then press MEMORY PLAY Data file name MEMORY INDEX Image number Total number of recorded images P...

Page 93: ...splayed on the index screen Image files shot with other equipment may not be displayed on the index screen either Viewing the recorded images using a personal computer The image data recorded with your camcorder is compressed in the JPEG format If you use the application software PictureGear 4 1 Lite supplied with your camcorder you can see images recorded on the Memory Stick on a computer screen ...

Page 94: ...ons search a point where you want to record the desired still image Set the Hi8 Digital8 tape to playback pause mode 3 Press z REC and the button on its right simultaneously on your camcorder The Hi8 Digital8 tape is set to the recording pause mode 4 Press MEMORY PLAY to play back the still image you want to copy p 91 5 Press X to start recording and press X again to stop 6 If you have more to cop...

Page 95: ...tops Image data modified with personal computers or shot with other equipment You may not be able to copy them with your camcorder If you press DISPLAY in the standby or recording mode You can see memory playback and the file name indicators in addition to the indicators pertinent to Hi8 Digital8 tapes such as the time code indicator When copying You cannot copy the image recorded on Memory Stick ...

Page 96: ...ress the dial R The image moves downwards r The image moves upwards T t becomes available 4 Turn SEL PUSH EXEC dial to move the enlarged image then press the dial T The image moves rightward Turn the dial downwards t The image moves leftward Turn the dial upwards To cancel memory PB ZOOM function Press PB ZOOM Notes Pictures processed by PB ZOOM function are not output through the DV IN OUT jack Y...

Page 97: ...then press the dial 5 Press MEMORY PLAY Your camcorder plays back the images recorded on the Memory Stick in sequence Playing back images in a continuous loop SLIDE SHOW To stop the slide show Press MENU To pause during a slide show Press MEMORY PLAY To start the slide show from a particular image Select the desired image using MEMORY buttons before step 2 2 5 3 4 1 PLAY MENU VTR OFF MEMORY CAMERA...

Page 98: ...V connecting cable supplied with your camcorder before operation If you change the Memory Stick during operation The slide show does not operate If you change the Memory Stick be sure to follow the steps again from the beginning Playing back images in a continuous loop SLIDE SHOW ...

Page 99: ...ata file name of the protected image To cancel image protection Select OFF in step 6 then press the SEL PUSH EXEC dial Note Formatting erases all information on the Memory Stick including the protected image data Check the contents of the Memory Stick before formatting If the write protect tab on the Memory Stick is set to LOCK You cannot carry out image protection 3 7 MENU 1 VTR OFF MEMORY CAMERA...

Page 100: ... LCD screen 4 Press MEMORY DELETE again The selected image is deleted To cancel deleting an image Press MEMORY in step 4 To delete an image displayed on the index screen Press MEMORY to move the B indicator to the desired image and follow steps 3 and 4 Notes To delete a protected image first cancel image protection Once you delete an image you cannot restore it Check the images to delete carefully...

Page 101: ...URN in step 5 then press the SEL PUSH EXEC Deleting images 2 3 4 6 5 MENU VTR OFF MEMORY CAMERA CHARGE 1 MEMORY SET CONTINUOUS QUAL I TY FLD FRAME PRINT MARK PROTECT SLIDE SHOW DELETE ALL FORMAT RETURN MENU END OFF MEMORY SET CONTINUOUS QUAL I TY FLD FRAME PRINT MARK PROTECT SLIDE SHOW DELETE ALL FORMAT RETURN MENU END READY MEMORY SET CONTINUOUS QUAL I TY FLD FRAME PRINT MARK PROTECT SLIDE SHOW D...

Page 102: ...102 While DELETING appears Do not turn the POWER switch or press any buttons If the write protect tab on the Memory Stick is set to LOCK You cannot delete images Deleting images ...

Page 103: ... to select PRINT MARK then press the dial 6 Turn the SEL PUSH EXEC dial to select ON then press the dial 7 Press MENU to erase the menu display The mark is displayed beside the data file name of the image with a print mark To cancel writing print marks Select OFF in step 6 then press the SEL PUSH EXEC dial If the write protect tab on the Memory Stick is set to LOCK You cannot write print marks on ...

Page 104: ...the print surface of print paper after printing use an oil based pen Printing on the print surface is not possible on a word processor When handling print paper do not touch the print surface Do not leave print paper in dusty locations Fingerprints or dust on the ribbon sometimes prevent good looking prints from being made Do not load sticker print paper whose seals have been peeled off Doing so m...

Page 105: ...Slow flashing orange During printing PRINT PAPER lamp red Fast flashing Print paper error Slow flashing Print paper not inserted PRINT CARTRIDGE lamp red Fast flashing Ribbon error Run out of ribbon Slow flashing Print cartridge not inserted Using the printer Introduction PRINT CARTRIDGE lamp PRINT lamp PRINT PAPER lamp PRINT ...

Page 106: ...t cartridge as far as possible in the direction of the arrow on the cartridge case until it clicks into the cartridge compartment Insert the print cartridge so that the printing head is located between the ribbon and the cartridge case When the print cartridge is inserted the ribbon protector comes loose 3 Close the print cartridge lid Using the printer Introduction 1 2 3 PRINT CARTRIDGE OPEN Prin...

Page 107: ...to the cartridge compartment Insert the print cartridge as it is into the cartridge compartment without removing the ribbon protector When the print cartridge is inserted the ribbon protector comes loose Dispose of the ribbon protector after the print cartridge is inserted If the print cartridge is not inserted when the power is turned on The PRINT CARTRIDGE lamp flashes slowly The PRINT CARTRIDGE...

Page 108: ...reinsert the print cartridge before you use it up the possible number of prints per print cartridge roll may be reduced by one If the removal switch is not slid to the end You may not be able to remove the print cartridge When the print cartridge cannot be inserted easily Remove the print cartridge and then re insert it Turn in the direction of the arrow to take up ribbon slack only if ribbon slac...

Page 109: ...the arrow to open The PRINT lamp is lit and the PRINT PAPER lamp flashes slowly 4 Insert print paper into the part of the paper feeder marked with making sure that the print surface is facing towards you Insert the print paper until less than 3 cm of print paper is protruding from your camcorder Press the print paper into the paper feeder for about two seconds after the beep The print paper starts...

Page 110: ... 9 split size Notes The print paper will not be automatically drawn in unless it is firmly inserted as far as possible Do not insert print paper from the printer cover side or from the paper dispenser Doing so may cause your camcorder to malfunction When the cassette compartment is open print paper will not be automatically drawn in Do not pull out drawn in print paper forcibly Doing so may cause ...

Page 111: ...C power adaotor Printing is not possible if the battery is low However recording may be possible depending on how much the battery power remains The remaining battery time indicator does not indicate the possible printing time If you press PRINT while the battery is low the warning indicator E will be displayed on the LCD screen ...

Page 112: ... that the PRINT PAPER lamp is flashing slowly Insert the print paper p 109 4 Keep pressing PRINT lightly until a still image appears The CAPTURE indicator appears 5 Press PRINT deeper PREPARING appears on the LCD screen The image on screen when PRINT is pressed in is printed This image is not recorded on Memory Stick or tape 6 Printing is started The image on the LCD screen disappears During print...

Page 113: ...per will automatically be ejected You cannot continue the printing Repeat prints cannot be made of the same screen We recommend making repeat prints from images stored on Memory Stick Printing images recorded continuously multi screen is not possible To print those images store them on Memory Stick in advance The quality of printed images sometimes deteriorates considerably or printing is not perf...

Page 114: ...een 5 Open the LCD panel and the printer cover then make sure that the PRINT PAPER lamp is flashing slowly Insert the print paper p 109 6 Perform steps 4 to 7 on page 112 Using the A V connecting cable Connect the yellow plug of the A V connecting cable to the video jack on the VCR or the TV If your TV or VCR has an S video jack Connect using an S video cable not supplied to obtain high quality pi...

Page 115: ...g cable S VIDEO LANC DV Signal flow not supplied DV IN OUT DV OUT Note Prints cannot be made when images from other equipment are being recorded on your camcorder Print paper is not drawn in even if inserted Titles superimposed on the image You cannot print titles superimposed on the image ...

Page 116: ... the PRINT PAPER lamp is flashing slowly Insert the print paper p 109 5 Press PRINT firmly PREPARING appears on the LCD screen 6 Printing is started The image on the LCD screen disappears During printing PRINT lamp flashes slowly and the print paper is fed to the left and right four times When printing ends the image appears on the LCD screen and the beep sounds 7 When printing ends draw out the p...

Page 117: ...y to vibration or shock Printing is canceled midway if the LCD panel or printer cover is closed during printing If you open the LCD panel or printer cover again the print paper will automatically be ejected You cannot continue the printing After printing started While the ribbon is being aligned print paper is sometimes inserted and ejected from the left and right sides of the body without the LCD...

Page 118: ...erimpose To see the previous image press MEMORY To see the next image press MEMORY 5 Turn the SEL PUSH EXEC dial to select the desired mode then press the dial to set The mode changes as follows M CHROM y M LUMI y C CHROM 6 Press the SEL PUSH EXEC dial The still image is superimposed on the moving image Turn the SEL PUSH EXEC dial to adjust the effect p 85 7 Open the LCD panel and the printer cove...

Page 119: ...ight unlock position 3 Playback the still image you want to print p 91 4 Open the LCD panel and the printer cover then make sure that the PRINT PAPER lamp is flashing slowly Insert the print paper Sticker type 9 split size p 109 5 Select 9PIC SAME in the menu settings then press the SEL PUSH EXEC dial p 65 6 Perform steps 5 to 7 on page 112 5 MENU PR I NT SET 9P I C SAME READY 9P I C MULT I RETURN...

Page 120: ...nd the printer cover then make sure that the PRINT PAPER lamp is flashing slowly Insert the print paper Sticker type 9 split size p 109 5 Select 9PIC MULTI in the menu settings then press the SEL PUSH EXEC dial p 65 Nine still images are displayed divided in order from the playback screen selected in step 3 6 Perform steps 5 to 7 on page 112 In 9PIC MULTI mode You cannot select respective images y...

Page 121: ...lly detected before the tape is played back During playback of tapes recorded in the Hi8 standard 8 system digital signals are output as the image signals from the DV IN OUT jack Display during automatic detection of system The Digital8 system or Hi8 standard 8 system is automatically detected and the playback system is automatically switched to During switching of systems the screen turns blue an...

Page 122: ...ack tape STEREO Stereo Main sound and sub sound 1 Lch Main sound 2 Rch Sub sound When you use a tape recorded in the Hi8 standard 8 system When you play back a dual sound track tape recorded in an AFM HiFi stereo system set HiFi SOUND to the desired mode in the menu settings p 65 Sound from speaker HiFi Sound Playing back Playing back a dual Mode a stereo tape sound track tape STEREO Stereo Main s...

Page 123: ...ipment can be connected to this unit by the i LINK cable DV cable When connecting this unit to i LINK compatible equipment having two or more i LINK jacks DV jacks refer to the instruction manual of the equipment to be connected About the Name i LINK i LINK is a more familiar term for IEEE 1394 data transport bus proposed by SONY and is a trademark approved by many corporations IEEE 1394 is an int...

Page 124: ...VAIO series personal computer other than video equipment Before connecting this unit to a personal computer make sure that application software supported by this unit is already installed on the personal computer For details on precautions when connecting this unit also refer to the instruction manuals for the equipment to be connected Required i LINK Cable Use the Sony i LINK 4 pin to 4 pin cable...

Page 125: ...CAMERA or MEMORY In this case replace the battery with a Sony CR2025 or Duracell DL 2025 lithium battery Use of any other battery may present a risk of fire or explosion Discard used batteries according to the manufacturer s instructions WARNING The battery may explode if mistreated Do not recharge disassemble nor dispose of it in fire Lithium battery Keep the lithium battery out of the reach of c...

Page 126: ...thium battery compartment 2 Push the lithium battery in the direction of the arrow and pull it out from the holder 3 Install a Sony CR2025 or Duracell DL 2025 lithium battery with the positive side facing out 4 Close the lid Changing the lithium battery in your camcorder 1 1 2 3 4 ...

Page 127: ... p 137 While being operated in CAMERA mode your camcorder has been in the standby mode for more than 3 minutes c Set the POWER switch to OFF CHARGE and then to CAMERA again p 17 The viewfinder lens is not adjusted c Adjust the viewfinder lens p 20 STEADYSHOT is set to OFF in the menu settings c Set it to ON p 65 16 9 WIDE is set to ON in the menu settings c Set it to OFF p 65 FOCUS is set to MANUA...

Page 128: ...ume is turned to minimum c Open the LCD panel and press VOLUME p 25 AUDIO MIX is set to ST2 side in the menu settings c Adjust AUDIO MIX p 65 The tape has a blank portion in the recorded portions p 54 PB MODE is set to in the menu settings c Set it to AUTO p 65 Set PB MODE to in the menu settings p 65 Troubleshooting An unknown picture is displayed on the LCD screen or in the viewfinder A vertical...

Page 129: ...ly dead and cannot be recharged c Replace with a new battery pack p 11 The battery is dead c Use a charged battery pack p 11 12 Charge the battery pack fully again so that the indication on the battery remaining indicator is correct The power source is disconnected c Connect it firmly p 12 15 The battery is dead c Use a charged battery pack p 11 12 Moisture condensation has occurred c Remove the c...

Page 130: ...e protect tab on the Memory Stick is set to LOCK c Release the lock p 74 The write protect tab on the Memory Stick is set to LOCK c Release the lock p 74 The write protect tab on the Memory Stick is set to LOCK c Release the lock p 74 The image to protect is not played back c Press MEMORY PLAY to play back the image p 91 The write protect tab on the Memory Stick is set to LOCK c Release the lock p...

Page 131: ...n If you disconnect the power source such as the battery pack during printing the platen roller may not move back to the original position c Install the charged battery pack and perform the operation again p 109 Print paper or the print cartridge is not inserted c Insert the print paper or the print cartridge p 106 109 You have pressed PRINT lightly c Press PRINT deeper p 116 Print paper is insert...

Page 132: ...to ON p 65 Something is blocking the infrared rays c Remove the obstacle The batteries are inserted in the battery holder with the polarities incorrectly matching the marks c Insert the batteries with the correct polarity p 151 The batteries are dead c Insert new ones p 151 DISPLAY is set to V OUT LCD in the menu settings c Set it to LCD p 65 Moisture condensation has occurred c Remove the cassett...

Page 133: ... occurred c Contact your Sony dealer or local authorized Sony service facility and inform them of the 5 digit code example E 61 10 If you are unable to rectify the problem even if you try corrective actions a few times contact your Sony dealer or local authorized Sony service facility Your camcorder has a self diagnosis display function This function displays the current condition of your camcorde...

Page 134: ...red p 16 Fast flashing Moisture condensation has occurred p 137 The tape has run out The self diagnosis display function is activated p 133 You hear the melody or beep sound The still image is protected Slow flashing The still image is protected p 68 The battery is dead or nearly dead Slow flashing The battery is nearly dead p 12 Fast flasing The battery is dead Depending on conditions the E indic...

Page 135: ...picture that has a copyright control signal p 121 FULL The Memory Stick is full p 81 The write protect tab on the Memory Stick is set to LOCK p 74 NO FILE No still image is recorded on the Memory Stick p 91 NO MEMORY STICK No Memory Stick is inserted p 76 MEMORY STICK ERROR The Memory Stick data is corrupted FORMAT ERROR Check the type of formatting DIRECTORY ERROR The Memory Stick has more than o...

Page 136: ...via Canada Central America Chile Colombia Ecuador Jamaica Japan Korea Mexico Peru Surinam Taiwan the Philippines the U S A Venezuela etc PAL system Australia Austria Belgium China Czech Republic Denmark Finland Germany Great Britain Holland Hong Kong Italy Kuwait Malaysia New Zealand Norway Portugal Singapore Slovak Republic Spain Sweden Switzerland Thailand etc PAL M system Brazil PAL N system Ar...

Page 137: ...corder and leave it for about 1 hour with the cassette compartment open Your camcorder can be used again if the indicator does not appear when the power is turned on again Note on moisture condensation Moisture may condense when you bring your camcorder from a cold place into a warm place or vice versa or when you use your camcorder in a hot place as follows You bring your camcorder from a ski slo...

Page 138: ...ack pictures do not move playback pictures are hardly visible playback pictures do not appear the x indicator and CLEANING CASSETTE message appear one after another on the LCD screen or in the viewfinder When you play back in the Hi8 Standard 8 analog system The video head may be dirty when playback pictures contain noise playback pictures are hardly visible playback pictures do not appear If the ...

Page 139: ...dge About cleaning printer heads We recommend that you clean the printer heads with the head cleaner supplied when you exchange the print cartridge If printed images have thin lines remove the print cartridge and clean the heads Handle the print cartridge with care See Using the printer Introduction for details when inserting the print cartridge How to clean the printer heads Insert and remove the...

Page 140: ...f you insert the platen roller cleaner in the wrong direction it will not be drawn in the paper feeder Insert the platen roller cleaner vertically against the body Inserting inappropriately may cause a malfunction You can clean the platen roller 3 times per platen roller cleaner You cannot use it more than 3 times Because cleaning the platen roller can be done by printing an image on the platen ro...

Page 141: ...he type and thickness of the tape and if the recording tab is in or out Camcorder care Remove the tape and periodically turn on the power operate the CAMERA and VTR sections and play back a tape for about 3 minutes when your camcorder is not to be used for a long time Clean the lens with a soft brush to remove dust If there are fingerprints on the lens remove them with a soft cloth Clean the camco...

Page 142: ...ipment with the charging function To prevent accident from a short circuit do not allow metal objects to come into contact with the battery terminals Keep the battery pack away from fire Never expose the battery pack to temperatures above 140 F 60 C such as in a car parked in the sun or under direct sunlight Keep the battery pack dry Do not expose the battery pack to any mechanical shock Do not di...

Page 143: ...uites Fastforward rewind time using 120 min Hi8 video cassette Approx 5 min Viewfinder Electric Viewfinder color Image device 1 4 type CCD Charge Coupled Device Approx 460 000 pixels Effective Approx 290 000 pixels Lens Combined power zoom lens Filter diameter 1 1 2 in 37 mm 25 Optical 450 Digital Focal length 5 32 3 3 4 in 3 7 92 5 mm When converted to a 35 mm still camera 1 15 16 47 1 4 in 48 12...

Page 144: ... Mass approx 9 8 oz 280 g excluding power cord Battery pack Output voltage DC 7 2 V Capacity 5 0 Wh Dimensions approx 1 9 16 13 16 2 7 8 in 38 4 20 6 70 8 mm w h d Mass approx 2 5 oz 70 g Type Lithium ion Specifications Memory Stick Memory Flash memory 4MB MSA 4A Operating voltage 2 7 3 6 V Power consumption Approx 45 mA in the operating mode Approx 130 µA in the standby mode Dimensions approx 2 1...

Page 145: ...17 5 POWER switch p 17 6 BATT RELEASE lever p 11 7 Hooks for shoulder strap p 147 8 DC IN jack p 12 This mark indicates that this product is a genuine accessory for Sony video products When purchasing Sony video products Sony recommends that you purchase accessories with this GENUINE VIDEO ACCESSORIES mark Camcorder 3 2 6 7 8 1 VTR OFF MEMORY CAMERA CHARGE 5 4 ...

Page 146: ...SUPER NIGHTSHOT button p 21 qj NIGHTSHOT switch p 21 qk Display window p 152 ql FOCUS switch p 44 w Tripod receptacle base Make sure that the length of the tripod screw is less than 9 32 inch 6 5 mm Otherwise you cannot attach the tripod securely and the screw may damage your camcorder wa Remote sensor Identifying the parts and controls What is SUPER LASER LINK The super laser link system sends an...

Page 147: ...lder strap ws Eyecup wd MEMORY PLAY button p 91 wf MEMORY button p 85 91 wg LCD screen p 18 wh Speaker wj self timer button p 23 31 83 wk Viewfinder lens adjustment lever p 20 wl MEMORY DELETE button p 100 e FADER button p 34 ea BACK LIGHT button p 21 es PROGRAM AE button p 41 ed EXPOSURE button p 43 ef MEMORY MIX button p 84 wj wg ws wd wf wh ef ed es e wk wl ea ...

Page 148: ...ory shoe is linked to the POWER switch allowing you to turn the power supplied by the shoe on and off Refer to the operating instructions of the accessory for further information The intelligent accessory shoe has a safety device for fixing the installed accessory securely To connect an accessory press down and push it to the end and then tighten the screw To remove an accessory loosen the screw a...

Page 149: ...sed for controlling the tape transport of video equipment and other peripherals connected to the video equipment This jack has the same function as the jack indicated as CONTROL L or REMOTE tg S VIDEO ID 2 jack p 28 th i headphones jack tj AUDIO VIDEO ID 2 jack p 28 58 88 tk MIC PLUG IN POWER jack Connect an external microphone not supplied This jack also accepts a plug in power microphone tl DV I...

Page 150: ...Lithium battery compartment p 126 yd MEMORY button p 85 91 yf PRINT lamp p 105 yg PRINT PAPER lamp p 105 yh PRINT CARTRIDGE lamp p 105 yj PRINT button p 105 yk Printer cover p 109 yl Print cartridge lid p 106 u PRINT CARTRIDGE OPEN knob p 106 DCR TRV820 only ys y ya yd yh yf yg yj yk yl u ...

Page 151: ...ote Commander may not function properly Your camcorder works in the Commander mode VTR 2 Commander modes 1 2 and 3 are used to distinguish your camcorder from other Sony VCRs to avoid remote control misoperation If you use another Sony VCR in the Commander mode VTR 2 we recommend changing the Commander mode or covering the sensor of the VCR with black paper 1 PHOTO button p 30 80 2 DISPLAY button ...

Page 152: ...ntrol mode p 27 qg Tape counter indicator p 20 49 53 Time code indicator p 20 Self diagnosis display indicator p 133 Tape photo recording indicator p 30 qh Remaining tape indicator p 20 qj ZERO SET MEMORY indicator p 49 53 64 qk Search mode indicator p 24 54 56 ql NIGHTSHOT indicator p 21 w A V t DV indicator p 67 DV IN indicator p 62 wa Audio mode indicator p 70 ws Warning indicators p 134 wd Vid...

Page 153: ...tions to give a natural appearance to your recordings in the recording mode Preventing deterioration of picture quality D ZOOM MENU p 65 in digital zoom Focusing manually Manual focus p 44 Shooting distant subjects Landscape mode p 41 Recording fast moving subjects Sports lesson mode p 41 Functions to use in editing in the recording mode Watching the picture on a wide screen TV Wide mode p 33 View...

Page 154: ...ording 91 Memory Stick 74 Menu settings 65 Mirror mode 18 Moisture condensation 137 Monaural 28 MONOTONE 34 Mosaic fader 34 NIGHTSHOT 21 Normal charge 12 NTSC system 136 O P Q OLD MOVIE 38 Operation indicators 152 OVERLAP 34 PB ZOOM 52 PC serial cable 93 Photo scan 57 Photo search 56 PICTURE EFFECT 37 50 Picture search 27 Playback pause 27 Power sources battery pack 11 house current 15 car battery...

Page 155: ......

Page 156: ...Sony Corporation Printed in Japan ...

Reviews: