background image

100

US

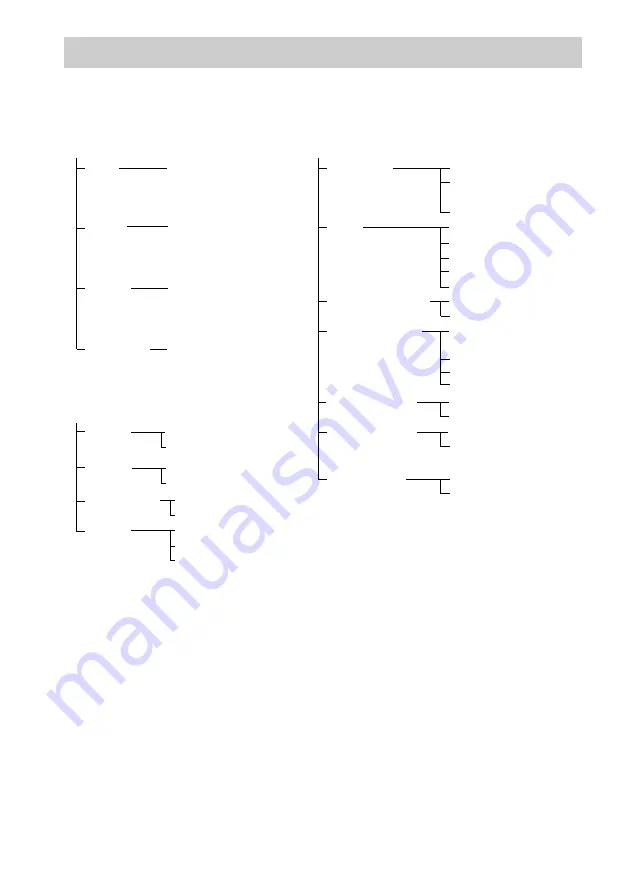
You can set the following items with the DVD Setup Display.

The order of the displayed items may be different from the actual display.

DVD Setup Display List

LANGUAGE SETUP

OSD

 MENU

AUDIO

SUBTITLE

(Select the language you 
want to use from the 
displayed language list.)

(Select the language you 
want to use from the 
displayed language list.)

(Select the language you 
want to use from the 
displayed language list.)

(Select the language you 
want to use from the 
displayed language list.)

SCREEN SETUP

TV TYPE

SCREEN SAVER

BACKGROUND

16:9
4:3 LETTER

4:3 PAN SCAN

ON
OFF

PICTURE

BLUE
BLACK

JACKET

CUSTOM SETUP

TRACK  
SELECTION

AUTO

BOX

MULTI-DISC 
RESUME

ON
OFF

GRAPHICS

PAUSE 
MODE

AUTO
FRAME

SUBTITLE

(Select the language you 
want to use from the 
displayed language list.)

AUDIO

OFF

BLACK LEVEL

ON
OFF

BLACK LEVEL
(COMPONENT 
OUT)

OFF
ON

4:3 OUTPUT

FULL
NORMAL

HDMI 
RESOLUTION

720 

× 

480p

AUTO

1280 

× 

720p

1920 

× 

1080i

720 

× 

480i

AUDIO 
(HDMI)

OFF
AUTO
PCM

Summary of Contents for DAV-FX80 - Dvd Dream System

Page 1: ... 2005 Sony Corporation 2 590 761 11 1 DVD Home Theatre System Operating Instructions DAV FX80 ...

Page 2: ...or relocate the receiving antenna aerial Increase the separation between the equipment and receiver Connect the equipment into an outlet on a circuit different from that to which the receiver is connected Consult the dealer or an experienced radio TV technician for help CAUTION You are cautioned that any changes or modifications not expressly approved in this manual could void your authority to op...

Page 3: ...damage to the lenses When you first install the unit or when you move it from a cold to a warm location wait for about 30 minutes before operating the unit ENERGY STAR is a U S registered mark As an ENERGY STAR partner Sony Corporation has determined that this product meets the ENERGY STAR guidelines for energy efficiency Thank you for purchasing Sony DVD Home Theatre System Before operating this ...

Page 4: ...6 Playing Audio Tracks and Images as a Slide Show with Sound 48 Adjusting the Delay Between the Picture and Sound 50 A V SYNC Searching for a Particular Point on a Disc 51 Scan Slow motion Play Freeze Frame Searching for a Title Chapter Track Scene etc 52 Searching by Scene 54 Picture Navigation Viewing Information About the Disc 55 Sound Adjustments Changing the Sound 58 Enjoying Surround Sound b...

Page 5: ...stom Settings 81 CUSTOM SETUP Settings for the Speakers 82 SPEAKER SETUP Additional Information Precautions 85 Notes about the Discs 86 Troubleshooting 86 Self diagnosis Function 89 When letters numbers appear in the display Specifications 90 Glossary 91 Language Code List 94 Index to Parts and Controls 95 DVD Setup Display List 100 AMP Menu List 102 Index 103 ...

Page 6: ...orded in the following formats audio CD format video CD format MP3 audio tracks and JPEG image files of format conforming to ISO 9660 Level 1 Level 2 or its extended format Joliet About This Manual Symbol Meaning Functions available for DVD VIDEOs DVD Rs DVD RWs in video mode and DVD Rs DVD RWs Functions available for DVD RWs in VR Video Recording mode Functions available for VIDEO CDs including S...

Page 7: ... DualDisc A DualDisc is a two sided disc product which mates DVD recorded material on one side with digital audio material on the other side However since the audio material side does not conform to the Compact Disc CD standard playback on this product is not guaranteed Note on PBC Playback Control VIDEO CDs This system conforms to Ver 1 1 and Ver 2 0 of VIDEO CD standards You can enjoy two kinds ...

Page 8: ...uper Audio CD page 42 4To select an area see Selecting a Playback Area for a Super Audio CD page 42 Region code Your system has a region code printed on the back of the unit and will only play DVDs labeled with the same region code DVD VIDEOs labeled will also play on this system If you try to play any other DVD VIDEO the message Playback prohibited by area limitations will appear on the TV screen...

Page 9: ...s otherwise authorized by Macrovision Reverse engineering or disassembly is prohibited This system incorporates with Dolby 1 Digital and Dolby Pro Logic II adaptive matrix surround decoder and the DTS 2 Digital Surround System 1Manufactured under license from Dolby Laboratories Dolby Pro Logic and the double D symbol are trademarks of Dolby Laboratories 2Manufactured under license from Digital The...

Page 10: ...D VIDEO Guide to the Control Menu Display DISPLAY Control Menu display 1 m Control Menu display 2 appears for certain discs only m Control Menu display off OFF T 1 3 2 5 5 1 8 3 4 1 2 2 7 DVD VIDEO Quit REPEAT ENTER DISPLAY DISC TITLE CHAPTER OFF Currently playing title number 1 Playing time 4 Total number of chapters 2 Options Current setting Total number of titles 1 Playback status N Playback X ...

Page 11: ...Y LIST page 42 Selects the type of titles DVD RW to be played the ORIGINAL one or an edited PLAY LIST TIME TEXT page 53 Checks the elapsed time and the remaining playback time Input the time code for picture and music searching Displays the DVD CD text or the MP3 track name MULTI 2CH page 42 Selects the playback area on Super Audio CDs when available PROGRAM page 38 Selects the track to play in th...

Page 12: ...n a Super Audio CD ALBUM page 52 Selects the album to be played FILE page 52 Selects the JPEG image file to be played DATE page 57 Displays the date the picture was taken by a digital camera INTERVAL page 49 Specifies the duration for which the slides are displayed on the screen EFFECT page 50 Selects the effects to be used for changing slides during a slide show MODE MP3 JPEG page 48 Selects the ...

Page 13: ...ies to the markings inside the compartment When using the remote point it at the remote sensor on the system Do not leave the remote in an extremely hot or humid place Do not use a new battery with an old one Do not drop any foreign object into the remote casing particularly when replacing the batteries Do not expose the remote sensor to direct light from the sun or lighting apparatus Doing so may...

Page 14: ...e 30 Step 5 Connecting the AC Power Cord Mains Lead page 32 Step 6 Turning off the Demonstration page 32 Step 7 Performing the Quick Setup page 33 Video signal is sent to the TV and is output from the TV screen audio signals are processed by this system and output from the speakers of this system You can also enjoy sound of other sources such as TV programs in addition to DVDs or CDs Hookup Overvi...

Page 15: ... Required cords Speaker cords The connector and the color tube of the speaker cords are the same color as the label of the jacks to be connected Attaching the speaker stand to the speaker Front speakers only Before connecting the speakers attach the speaker stand to the speaker Spread a cloth on the floor to avoid damaging the floor You can use the speaker without the speaker stand by installing i...

Page 16: ...short post is for tabletop use 2 Secure the base to the post by screws 3 Draw the speaker cord through the hole on the base then stand it up Post long Post short Screw holes Base or Screws 3 Bottom of the base Speaker cord Bottom of the base ...

Page 17: ...the speaker cord through the hole on the speaker 5 Mount the speaker on the post Do not catch the speaker cord between the speaker and the post Do not drop the speaker when mounting Note Speaker cord Speaker Hole Speaker continued ...

Page 18: ...8US 6 Connect the speaker cord to the speaker then adjust the length of the speaker cord 7 Attach the terminal cover to the speaker by screws Adjust the length of the speaker cord Screws 2 Terminal cover ...

Page 19: ... FM 75 SPEAKER VIDEO 2 VIDEO 2 COMPONENT VIDEO OUT OUT HDMI MONITOR OUT VIDEO 1 DIGITAL IN OPTICAL DVD ONLY VIDEO DVD ONLY S VIDEO Y PB CB PR CR FRONT R FRONT L SURR R SURR L CENTER WOOFER DVD ONLY Front speaker R Center speaker Front speaker L Surround speaker R Subwoofer Surround speaker L Rear side of the front speaker Rear side of the front speaker continued ...

Page 20: ...r may fall down To connect the speaker cords Connect the speaker cords after bending the bare wire at the end of the insulation This prevents the speaker insulation from being inserted in the speaker terminal Do not catch the speaker cord insulation in the SPEAKER jack Avoiding short circuiting the speakers Short circuiting of the speakers may damage the system To prevent this be sure to follow th...

Page 21: ...e components 3 to 3 and to If the cords are reversed the sound will lack bass and may be distorted Installing the speakers on the wall 1 Prepare screws not supplied that are suitable for the hole on the back of each speaker See the illustrations below 2 Fasten the screws to the wall The screws should protrude 7 to 8 mm 9 32 to 11 32 inch for the front speakers 8 to 9 mm 11 32 to 3 8 inch for the s...

Page 22: ...aker 5 Hang the speakers on the screws Front speaker Surround speaker Wall mount pads 7 7 mm 3 mm thick 9 32 9 32 inch 1 8 inch thick Wall mount pads 7 7 mm 3 mm thick 9 32 9 32 inch 1 8 inch thick 4 6 mm 3 16 inch 10 mm 13 32 inch Hole on the back of the speaker ...

Page 23: ... a beam and fasten them to the wall Install the speakers on a vertical and flat wall where reinforcement is applied Contact a screw shop or installer regarding the wall material or screws to be used Sony is not responsible for accident or damage caused by improper installation insufficient wall strength or improper screw installation natural calamity etc Note ...

Page 24: ...necting the FM wire antenna aerial keep it as horizontal as possible When you connect the supplied AM loop antenna aerial cord A or cord B can be connected to either terminal If you have poor FM reception use a 75 ohms coaxial cable not supplied to connect the system to an outdoor FM antenna aerial as shown below Step 2 Antenna Aerial Hookup Note Tip AM loop antenna aerial FM wire antenna aerial A...

Page 25: ...ultimedia interface The system is based on version 1 1 of High Definition Multimedia Interface Specifications Step 3 TV Hookup Y PB CB PR CR VIDEO IN S VIDEO IN IN COAXIAL IN AUDIO IN R L R L AUDIO IN VIDEO IN VIDEO IN COAXIAL AM FM 75 SPEAKER VIDEO 2 VIDEO 2 COMPONENT VIDEO OUT OUT HDMI MONITOR OUT VIDEO 1 DIGITAL IN OPTICAL DVD ONLY VIDEO DVD ONLY S VIDEO Y PB CB PR CR FRONT R FRONT L SURR R SUR...

Page 26: ...page 27 D To connect to a TV with the HDMI high definition multimedia interface DVI digital visual interface input jack Use a certified HDMI high definition multimedia interface cord not supplied to enjoy high quality digital picture and sound through the HDMI OUT high definition multimedia interface out jack Note that Super Audio CD sound is not output from the HDMI OUT high definition multimedia...

Page 27: ...UT jacks Normally select this under the above condition This automatically detects the software type and selects the appropriate conversion method Note that the picture will not be clear or no picture will appear if you select these settings when either of the above conditions is not met x P VIDEO PROGRESSIVE VIDEO Select this setting when your TV accepts progressive signals and the TV is connecte...

Page 28: ...en you play video based software in progressive signal format sections of some types of images may appear unnatural due to the conversion process when output through the COMPONENT VIDEO OUT jacks Even though you set to PROGRESSIVE AUTO or PROGRESSIVE VIDEO images from the MONITOR OUT VIDEO or S VIDEO jack are unaffected as they are output in the interlace format Connecting the audio cords Outputs ...

Page 29: ... from the speakers of this system To listen to the TV sound select the function by pressing FUNCTION For details see page 62 When you want to output the TV sound or stereo sound of a 2 channel source from the 6 speakers select the Dolby Pro Logic Dolby Pro Logic II MOVIE or Dolby Pro Logic II MUSIC sound field page 60 Note Tip White L audio Red R audio ...

Page 30: ...o the VIDEO 1 COAXIAL IN or VIDEO 2 OPTICAL DIGITAL IN jack instead of the VIDEO 1 or VIDEO 2 AUDIO IN jacks of the system The system can accept both the digital and analogue signals Digital signals have priority over analogue signals If the digital signal ceases the analogue signal will be processed after 2 seconds Step 4 Other Component Hookup R AUDIO OUT L VIDEO OUT R AUDIO OUT L VIDEO OUT COAX...

Page 31: ...L OUT jack Connect the digital satellite receiver to the VIDEO 1 or VIDEO 2 AUDIO IN jacks only of the system Be sure to make connections securely to avoid hum and noise When you connect another component to the system you can enjoy the component by pressing FUNCTION page 72 Note Tip ...

Page 32: ...tion turns off When you press 1 on the system the demonstration does not turn off When you set the demonstration mode in the AMP menu to on the demonstration does not turn off even though you press 1 on the remote To turn off the demonstration set the demonstration mode to off then press 1 on the remote Setting the demonstration mode on off 1 Press AMP MENU 2 Press X x repeatedly until DEMO appear...

Page 33: ...the on screen display appears 5 Press X x to select a language The system displays the menu and subtitles in the selected language The selectable language is different depending on the area 6 Press ENTER The Setup Display for selecting the aspect ratio of the TV to be connected appears 7 Press X x to select the setting that matches your TV type x If you have a 4 3 standard TV 4 3 LETTER BOX or 4 3...

Page 34: ... in any Step If you want to change each setting see Using the Setup Display page 77 To recall the Quick Setup display 1 Press DISPLAY when the system is in stop mode The Control Menu appears 2 Press X x to select SETUP then press ENTER The options for SETUP appear 3 Press X x to select QUICK then press ENTER The Quick Setup display appears Note Note SPEAKER SETUP TEST TONE LEVEL FRONT LEVEL SURROU...

Page 35: ...her away from the listening position than the front speakers If you encounter color irregularity on a nearby TV screen The front and center speakers and the subwoofer are magnetically shielded to allow it to be installed near a TV set However color irregularities may still be observed on certain types of TV sets As the surround speakers are not magnetically shielded we recommend that you place the...

Page 36: ...starts playback continuous play of the disc whose DISC indicator is green To play back other discs press DISC SKIP on the remote or DISC 1 5 of the system Adjust the volume on the system The DISC 1 5 indicators change color as follows green the disc is selected or the disc is being played back off there is no disc orange a disc is loaded in the disc stocker but not selected The indicator turns off...

Page 37: ...n the stocker Do not insert an 8 cm 3 inch CD with an 8 cm 3 inch adapter It may damage the system and disc Resuming playback from the point where you stopped the disc Resume Play When you stop the disc the system remembers the point where you pressed x and Resume appears in the front panel display As long as you do not remove the disc Resume Play will work even if the system enters standby mode b...

Page 38: ...p to 40 discs and resumes playback the next time you insert the same disc If you store a resume playback point for the 41st disc the resume playback point for the first disc is deleted To activate this function set MULTI DISC RESUME in CUSTOM SETUP to ON For details see MULTI DISC RESUME DVD VIDEO VIDEO CD only page 81 If MULTI DISC RESUME in CUSTOM SETUP is set to ON page 81 and you playback a re...

Page 39: ...ed order 1 Follow steps 1 to 3 of Creating your own program Program Play 2 Press X and select ALL CLEAR 3 Press ENTER You can perform Shuffle Play or Repeat Play of programmed tracks During Program Play follow the steps of Shuffle Play page 39 or Repeat Play page 40 All Discs Repeat is automatically changed into Program Repeat when you set to program play mode You can only program the contents of ...

Page 40: ...ear 3 Press X x to select the item to be repeated The default setting is underlined x When playing a DVD VIDEO or DVD RW OFF does not play repeatedly ALL DISCS repeats all of the discs ONE DISC repeats all of the titles on the current disc When playing a DVD RW in VR mode ONE DISC repeats all of the titles of the selected type TITLE repeats the current title on a disc CHAPTER repeats the current c...

Page 41: ... IMAGE JPEG page 48 you cannot select TRACK A DVD is divided into a lot of sections which make up a picture or music feature These sections are called titles When you play a DVD which contains several titles you can select the title you want using TOP MENU When you play DVDs that allow you to select items such as the language for the subtitles and the language for the sound select these items usin...

Page 42: ...lly recorded 4 Press ENTER Selecting a playback area on a 2 channel Multi channel Super Audio CD Some Super Audio CDs consist of a 2 channel playback area and a multi channel playback area You can select the playback area you want to listen to 1 Press MULTI 2CH when the system is in stop mode The following display appears 2 Press MULTI 2CH repeatedly to select the item MULTI plays a multi channel ...

Page 43: ... MULTI 2CH Super Audio CD audio signals are not output from the HDMI OUT high definition multimedia interface out jack With PBC Playback Control functions you can enjoy simple interactive operations search functions and other such operations PBC playback allows you to play VIDEO CDs interactively by following the menu on the TV screen 1 Start playing a VIDEO CD with PBC functions The menu for your...

Page 44: ...format for the system to recognize the tracks or files You can also play discs recorded in Multi Session See the instructions supplied with the CD R CD RW drives and the recording software not supplied for details on the recording format About the multi session disc If MP3 audio tracks or JPEG image files are recorded in the first session the system will also play MP3 audio tracks or JPEG image fi...

Page 45: ...ge 46 the album names are arranged in the following order A t B t C t D t F t G Albums that do not contain tracks or files such as album E do not appear in the list If you add numbers 01 02 03 etc to the front of the track file names when you store the tracks or files in a disc the tracks and files will be played in that order Since a disc with many trees takes longer to start playback it is recom...

Page 46: ...m by continuing to press after the last track on the first album but that you cannot return to the previous album by pressing To return to the previous album select the album from the album list To play the next or previous JPEG image file Press C c when the Control Menu is not displayed Note that you can select the next album by continuing to press c after the last image on the first album but th...

Page 47: ...m is being played its title is shaded 3 Press X x to select an album and press PICTURE NAVI Images of files in the album appear in 16 subscreens 4 Press C X x c to select the image you want to view and press ENTER To play the next or previous JPEG image file Press C c when the Control Menu is not displayed Note that you can select the next album by continuing to press c after the last image on the...

Page 48: ...ow duration page 49 and effect page 50 while playing JPEG image file You can play a slide show with sound by first placing both MP3 and JPEG files in the same album on a DATA CD When you play back the DATA CD select AUTO mode as explained below 1 Load a DATA CD The system starts playing from the first album 2 Press x The system stops playback 3 Press DISPLAY The Control Menu appears 4 Press X x to...

Page 49: ...P3 audio tracks and JPEG image files in the DATA CD the No audio data and No image data messages appear on the screen If you set MODE MP3 JPEG to IMAGE JPEG on a disc that contains MP3 tracks only or AUDIO MP3 on a disc that contains JPEG files only you may not able to change the MODE MP3 JPEG setting PICTURE NAVI does not work when AUDIO MP3 is selected If you play large MP3 track data and JPEG i...

Page 50: ...image slides over the previous image OFF Turns off this function 4 Press ENTER The selected setting takes effect When the sound does not match the pictures on the screen you can adjust the delay between the picture and sound 1 Press AMP MENU 2 Press X x repeatedly until A V SYNC appears in the front panel display then press ENTER or c 3 Press X x to select the setting SYNC OFF does not adjust SYNC...

Page 51: ... 1M 1m Watching frame by frame Slow motion Play DVD DVD RW VIDEO CD only Press m or M when the system is in pause mode To return to the normal playback speed press H Each time you press m or M during Slow motion Play the playback speed changes Two speeds are available With each press the indication changes as follows Playback direction 2 y 1 Opposite direction DVD VIDEO only 2 y 1 The 2 2 playback...

Page 52: ...r Or you can search for a scene using the time code 1 Press DISPLAY When playing a DATA CD with JPEG image files press DISPLAY twice The Control Menu appears 2 Press X x to select the search method x When playing a DVD VIDEO DVD RW TITLE CHAPTER TIME TEXT Select TIME TEXT to search for a starting point by inputting the time code x When playing a VIDEO CD Super VCD without PBC Playback TRACK Note S...

Page 53: ...en select another number 5 Press ENTER The system starts playback from the selected number To search for a scene using the time code DVD VIDEO only 1 In Step 2 select TIME TEXT T playing time of the current title is selected 2 Press ENTER T changes to T 3 Input the time code using the number buttons then press ENTER For example to find the scene at 2 hours 10 minutes and 20 seconds after the begin...

Page 54: ...apter or track appears as follows 4 Press C X x c to select a title chapter or track and press ENTER Playback starts from the selected scene To return to normal play during setting Press O RETURN or DISPLAY If there are more than 9 titles chapters or tracks V is displayed at the bottom right of the screen To display the additional titles chapters or tracks select the bottom scenes and press x To r...

Page 55: ... Audio CD or CD When playing an MP3 ViewingInformationAbout the Disc DISPLAY DISPLAY With cover opened t Playing time and number of the current title r Remaining time of the current title r Playing time and number of the current chapter r Remaining time of the current chapter r Disc name r Title and chapter r The display returns to the top image after 2 seconds t Playing time of the current track ...

Page 56: ...check the frequency using the front panel display Press DISPLAY Each time you press DISPLAY the display changes as shown in the charts 1 This is displayed if you have entered a name for a preset station page 74 2 Returns to the original display when several seconds has elapsed Checking the Playing Time and Remaining Time You can check the playing time and remaining time of the current title chapte...

Page 57: ...le playing MP3 audio tracks on a DATA CD you can display the name of the album track and the audio bit rate the amount of data per second of the current audio on your TV screen Appears when playing an MP3 audio track on DATA CDs Checking the date information JPEG only You can check the date information during playback when the Exif tag is recorded in the JPEG image data Press DISPLAY twice during ...

Page 58: ...r more times the DVD VIDEO is recorded in multiple audio formats x When playing a DVD RW The audio streams recorded on a disc are displayed The default setting is underlined Example 1 AUDIO 2 AUDIO 2 AUDIO does not appear when one audio stream is recorded on the disc x When playing a VIDEO CD CD or DATA CD MP3 audio The default setting is underlined STEREO the standard stereo sound 1 L the sound o...

Page 59: ...in the sound elements channels shown below Each channel is output from a separate speaker Front L Front R Center Surround L Surround R Surround Monaural This signal can be either the Dolby Surround Sound processed signals or the Dolby Digital sound s monaural Surround audio signals LFE Low Frequency Effect signal L R C LFE LS RS 1 ENGLISH DOLBY DIGITAL3 2 1 Surround L R Front L R Center LFE Low Fr...

Page 60: ...e outputs the sound from the front left and right speakers and subwoofer Standard 2 channel stereo sources completely bypass the sound field processing Multi channel surround formats are downmixed to two channels This allows you to play any source using only the front left and right speakers and subwoofer Outputting 2 channel sources like CDs by 5 1channel x Dolby Pro Logic Dolby Pro Logic produce...

Page 61: ...oduces the sound characteristics of the Sony Pictures Entertainment scoring stage This mode is ideal for watching musicals or classic films where music is featured in the soundtrack About Cinema Studio EX Cinema Studio EX is ideal for enjoying the movie software encoded with multi channel format such as the Dolby Digital DVD This mode reproduces the sound characteristics of Sony Pictures Entertain...

Page 62: ...rizes the last sound field selected for each function mode Whenever you select a function such as DVD or TUNER the sound field that was last applied to function is automatically applied again For example if you listen to DVD with HALL as the sound field then change to another function and then return to DVD HALL will be applied again You can enjoy TV or VCR sound from all speakers of this system F...

Page 63: ...ate at night 1 Press AMP MENU 2 Press x X repeatedly until AUDIO DRC appears in the front panel display then press ENTER or c 3 Press x X to select the setting DRC STD reproduces the sound track with the kind of dynamic range that the recording engineer intended DRC MAX compresses dynamic range fully DRC OFF no compression of dynamic range 4 Press ENTER or AMP MENU The AMP menu turns off AUDIO DRC...

Page 64: ...es are recorded on a disc you can turn the subtitles on or off while playing If multilingual subtitles are recorded on the disc you can change the subtitle language while playing or turn the subtitles on or off whenever you want You can select a language you are learning for example and turn on the subtitles for better understanding Press SUBTITLE during playback Each time you press SUBTITLE the s...

Page 65: ...ress DISPLAY while the system is in stop mode The Control Menu appears 3 Press X x to select PARENTAL CONTROL then press ENTER The options for PARENTAL CONTROL appear 4 Press X x to select ON t then press ENTER x If you have not entered a password The display for registering a new password appears Enter a 4 digit password using the number buttons then press ENTER The display for confirming the pas...

Page 66: ...a predetermined level such as the age of the users The PARENTAL CONTROL function allows you to set a playback limitation level 1 Press DISPLAY while the system is in stop mode The Control Menu appears 2 Press X x to select PARENTAL CONTROL then press ENTER The options for PARENTAL CONTROL appear 3 Press X x to select PLAYER t then press ENTER x If you have not entered a password The display for re...

Page 67: ... playback If you forget your password remove the disc and repeat steps 1 to 3 of Preventing playback of specific discs CUSTOM PARENTAL CONTROL When you are asked to enter your password enter 199703 using the number buttons then press ENTER The display will ask you to enter a new 4 digit password After you enter a new 4 digit password replace the disc in the system and press H When the display for ...

Page 68: ... confirm your password re enter it using the number buttons then press ENTER If you make a mistake entering your password Press C before you press ENTER and input the correct number Standard Code number Argentina 2044 Australia 2047 Austria 2046 Belgium 2057 Brazil 2070 Canada 2079 Chile 2090 China 2092 Denmark 2115 Finland 2165 France 2174 Germany 2109 India 2248 Indonesia 2238 Italy 2254 Japan 2...

Page 69: ...ontrol the TV by using following buttons Other Operations Controlling the TV with the Supplied Remote Note TV VOL TV VIDEO Number buttons TV CH TV 1 TV ENTER TV VOL with the TV button TV CH with the TV button With cover opened Manufacturer Code number SONY 001 default DAEWOO 002 004 005 006 FISHER 009 GOLDSTAR 020 HITACHI 014 015 JVC 018 LOEWE 027 028 MAGNAVOX 034 MITSUBISHI MGA 022 PANASONIC 049 ...

Page 70: ... and then switches the TV s input source you set with one button push Preparing for the THEATRE SYNC function Register the TV s input source connected to this system Press and hold TV VIDEO while entering the code for the TV s input source connected to this system see the table using the number buttons The TV s input source is selected If you successfully set the TV s input source code the TV butt...

Page 71: ... time code the TV button flashes twice slowly If the setting is unsuccessful the TV button flashes 5 times quickly This function is only for SONY TVs This function may not work on some SONY TVs If distance between TV and this system is too far this function may not work Install the system near the TV Keep the remote pointed in the direction of the TV and this system while the TV button is flashing...

Page 72: ...nect a digital satellite tuner to the system with an optical cable or coaxial cable page 30 and set the digital output mode of the digital satellite tuner to AC 3 When you connect the system and TV with the HDMI cord this function does not apply to the sound that is output from the TV The main sound is output from the TV 1 Press AMP MENU 2 Press x X repeatedly until DUAL MONO appears in the front ...

Page 73: ...CTION repeatedly until the band you want appears in the front panel display 2 Press and hold TUNING or until the auto scanning starts Scanning stops when the system tunes in a station TUNED and ST for stereo program appear in the front panel display 3 Press TUNER MENU 4 Press C X x c repeatedly until Memory appears in the front panel display 5 Press ENTER A preset number appears in the front panel...

Page 74: ...pressing VOLUME To turn off the radio Press 1 To listen to non preset radio stations Use manual or automatic tuning in Step 2 For manual tuning press TUNING or repeatedly For automatic tuning press and hold TUNING or Press x when you stop the automatic tuning If an FM program is noisy press FM MODE so that MONO appears in the front panel display There will be no stereo effect but the reception wil...

Page 75: ... Press ENTER The station name is stored You can set the system to turn off at a preset time so you can fall asleep listening to music You can preset the time in 10 minutes decrements Press SLEEP Each time you press this button the minutes display the remaining time changes as follows To check the remaining time Press SLEEP once To change the remaining time Press SLEEP repeatedly to select the desi...

Page 76: ...panel display 4 Press ENTER or AMP MENU The AMP menu turns off You can return the system parameters such as preset stations to the default settings 1 Press 1 to turn on the system 2 Press x A and 1 on the system at the same time COLD RESET appears in the front panel display and the default settings are returned Changing the Brightness of the Front Panel Display AMP MENU X x c ENTER With cover open...

Page 77: ... setup item from the displayed list LANGUAGE SETUP SCREEN SETUP CUSTOM SETUP or SPEAKER SETUP Then press ENTER The Setup item is selected Example SCREEN SETUP 5 Select an item using X x then press ENTER The options for the selected item appear Example TV TYPE 6 Select a setting using X x then press ENTER The setting is selected and setup is complete Settings and Adjustments Using the Setup Display...

Page 78: ...anguage for the disc s menu x AUDIO DVD VIDEO only Switches the language of the sound track When you select ORIGINAL the language given priority in the disc is selected x SUBTITLE DVD VIDEO only Switches the language of the subtitle recorded on the DVD VIDEO When you select AUDIO FOLLOW the language for the subtitles changes according to the language you selected for the sound track If you select ...

Page 79: ... TV cannot accept the resolution the system automatically adjusts the video signals that are suitable for the TV x SCREEN SAVER The screen saver image appears when you leave the system in pause or stop mode for 15 minutes or when you play back a Super Audio CD CD or DATA CD MP3 audio for more than 15 minutes The screen saver will help prevent your Settings for the Display SCREEN SETUP 4 3 LETTER B...

Page 80: ...OUT jacks This setting is effective only when P AUTO PROGRESSIVE AUTO or P VIDEO PROGRESSIVE VIDEO is selected by using PROGRESSIVE page 27 This setting is not effective when you use the HDMI OUT jack and set HDMI RESOLUTION to 720 480i page 79 ON Turns on the screen saver OFF Turns off the screen saver JACKET PICTURE The jacket picture still picture appears but only when the jacket picture is alr...

Page 81: ...e type of audio signal output from the HDMI OUT jack A loud noise or no sound will be output if you connect the system to a TV that is not compatible with DOLBY DIGITAL DTS digital theater system signals and AUTO is selected In this case select PCM When you connect the system and TV with the HDMI cord and AUTO or PCM is selected DUAL MONO AUDIO DRC A V SYNC DSGX and sound field functions are not a...

Page 82: ...OUND and specify the surround speaker position Since the front speaker setting is fixed you cannot change them When you select an item the sound cuts off for a moment Depending on the settings of other speakers subwoofer may be excessive x DISTANCE The default distance setting for the speakers in relation to the listening position is shown below When you set the distance using the Quick Setup page...

Page 83: ...g the test tone 1 Press DISPLAY when the system is in stop mode FRONT 3 0 m 10 ft Front speaker distance from the listening position can be set in 0 2 meter 1 ft increments from 1 0 to 7 0 meters 4 to 23 ft CENTER 3 0 m 10 ft appears when you set CENTER to YES in the SIZE setting Center speaker distance from the listening position can be set in 0 2 meter 1 ft increments from 0 0 to 7 0 meters 0 to...

Page 84: ...N then press ENTER You will hear the test tone from each speaker in sequence 7 From your listening position adjust the value of LEVEL FRONT or LEVEL SURROUND using C X x c The test tone is emitted from only the speaker which you are adjusting 8 Press ENTER when you have finished making adjustments 9 Press X x repeatedly to select TEST TONE then press ENTER 10Press X x repeatedly to select OFF then...

Page 85: ...vel inputs or no audio signals If you do the speakers may be damaged when a peak level section is suddenly played On cleaning Clean the cabinet panel and controls with a soft cloth slightly moistened with a mild detergent solution Do not use any type of abrasive pad scouring powder or solvent such as alcohol or benzine If you have any questions or problems concerning your system please consult you...

Page 86: ...ly in the front panel display Immediately unplug the AC power cord mains lead and check the following items Are the and speaker cords short circuited Are you using only the specified speakers Is anything blocking the ventilation holes of the system After checking the above items and fixing any problems connect the AC power cord mains lead again and turn on the system If the cause of the problem ca...

Page 87: ...l visual interface jacks do not accept audio signals The HDMI OUT jack does not output Super Audio CD sound The left and right sounds are unbalanced or reversed Check that the speakers and components are connected correctly and securely There is no sound from the subwoofer Check the speaker connections and settings page 15 82 Set the sound field to AUTO FORMAT DIRECT AUTO page 60 Severe hum or noi...

Page 88: ...IMAGE JPEG page 48 If you cannot change the MODE MP3 JPEG setting re load the disc or turn the system off then on The JPEG image file cannot be played The DATA CD is not recorded in a JPEG format that conforms to ISO 9660 Level 1 Level 2 or Joliet It has an extension other than JPEG or JPG It is larger than 3 072 width 2 048 height in normal mode or more than 3 300 000 pixels in Progressive JPEG I...

Page 89: ...EG image file you want to play is broken The data is not MPEG1 Audio Layer 3 data The JPEG image file format does not conform to DCF The JPEG image file has the extension JPG or JPEG but is not in JPEG format The system does not work normally Disconnect the AC power cord mains lead from the wall outlet mains then reconnect after several minutes When the self diagnosis function is activated to prev...

Page 90: ...CD 2 Hz to 20 kHz 1 0 dB Tuner section System PLL quartz locked digital synthesizer system FM tuner section Tuning range 87 5 108 0 MHz 100 kHz step Antenna aerial FM wire antenna aerial Antenna aerial terminals 75 ohms unbalanced Intermediate frequency 10 7 MHz AM tuner section Tuning range 530 1 710 kHz with the interval set at 10 kHz 531 1 710 kHz with the interval set at 9 kHz Antenna aerial A...

Page 91: ...rround speakers output stereo sound with an expanded frequency range and a subwoofer channel for deep bass is independently provided This format is also called 5 1 with the subwoofer channel designed as the 0 1 channel since it functions only when a deep bass effect is needed All six channels in this format are recorded separately for superior channel separation Furthermore since all the signals a...

Page 92: ...des VR mode and Video mode DVD RWs created in Video mode have the same format as a DVD VIDEO while discs created in VR Video Recording mode allow the contents to be programmed or edited DVD RW A DVD RW plus RW is a recordable and rewritable disc DVD RWs use a recording format that is comparable to the DVD VIDEO format File A JPEG image recorded on a DATA CD File is an exclusive definition for this...

Page 93: ... region code is shown on the system as well as on the disc packaging The system can play discs that match its region code The system can also play discs with the mark Even when the region code is not shown on the DVD the region limit may still apply Scene On a VIDEO CD with PBC playback control functions the menu screens moving pictures and still pictures are divided into sections called scenes Ti...

Page 94: ...9 Bulgarian 1060 Bihari 1061 Bislama 1066 Bengali Bangla 1067 Tibetan 1070 Breton 1079 Catalan 1093 Corsican 1097 Czech 1103 Welsh 1105 Danish 1109 German 1130 Bhutani 1142 Greek 1144 English 1145 Esperanto 1149 Spanish 1150 Estonian 1151 Basque 1157 Persian 1165 Finnish 1166 Fiji 1171 Faroese 1174 French 1181 Frisian 1183 Irish 1186 Scots Gaelic 1194 Galician 1196 Guarani 1203 Gujarati 1209 Hausa...

Page 95: ...s indicated in parentheses Front panel A Disc slot 36 B remote sensor 13 C Front panel display 96 D PHONES jack 36 E VOLUME 36 F FUNCTION 36 G 37 H x stop 37 76 I X pause 37 J H play 36 K A eject 36 76 L DISC 1 5 36 M 1 on standby 32 36 76 Index to Parts and Controls ...

Page 96: ...splay DVD only D Monaural Stereo effect Radio only 74 E Current sound effect Except for Super Audio CD 63 F Current surround format Except for JPEG and Super Audio CD 59 G Playing status DVD function only H Lights up when the HDMI OUT jack is correctly connected to a HDCP high bandwidth digital content protection compliant device with HDMI or DVI digital visual interface input 25 I Lights up durin...

Page 97: ...MONITOR OUT VIDEO S VIDEO jacks 25 G AM terminal 24 H FM 75Ω COAXIAL jack 24 I VIDEO 2 VIDEO AUDIO IN jacks 28 30 J HDMI OUT jack 25 COAXIAL IN AUDIO IN R L R L AUDIO IN VIDEO IN VIDEO IN COAXIAL AM FM 75 SPEAKER VIDEO 2 VIDEO 2 COMPONENT VIDEO OUT OUT HDMI MONITOR OUT VIDEO 1 DIGITAL IN OPTICAL DVD ONLY VIDEO DVD ONLY S VIDEO Y PB CB PR CR FRONT R FRONT L SURR R SURR L CENTER WOOFER DVD ONLY ...

Page 98: ...e number 5 button has a tactile dot N CLEAR 33 38 70 O ENTER P PROGRESSIVE TUNER MENU 27 73 Q TV 1 on standby 69 R 1 on standby 32 36 74 S THEATRE SYNC 70 T TV VIDEO SLEEP 69 75 U FUNCTION 27 36 62 72 V m M SLOW TUNING 51 73 W x stop 37 65 74 X X pause 37 Y MUTING 37 Z MENU 41 wj VOLUME TV VOL 36 74 The VOLUME TV VOL button has a tactile dot wk DISPLAY 10 33 38 65 77 wl REPLAY ADVANCE STEP 37 e DI...

Page 99: ...Additional Information 99US eh TV VOL 69 ej MULTI 2CH 42 ek SA CD CD 42 el AMP MENU 32 50 63 72 Use the tactile dot as a reference when operating the system ...

Page 100: ...u want to use from the displayed language list Select the language you want to use from the displayed language list SCREEN SETUP TV TYPE SCREEN SAVER BACKGROUND 16 9 4 3 LETTER 4 3 PAN SCAN ON OFF PICTURE BLUE BLACK JACKET CUSTOM SETUP TRACK SELECTION AUTO BOX MULTI DISC RESUME ON OFF GRAPHICS PAUSE MODE AUTO FRAME SUBTITLE Select the language you want to use from the displayed language list AUDIO...

Page 101: ...SURROUND YES YES NONE BEHIND SUBWOOFER YES FRONT 1 0 m 7 0 m 4 ft 23 ft CENTER SURROUND LEVEL FRONT L CENTER 6 dB 6 dB TEST TONE OFF ON R 6 dB 0 dB SIDE NONE SUBWOOFER 6 dB 6 dB LEVEL SURROUND L 6 dB 6 dB R 6 dB 6 dB 6 dB 0 dB 0 0 m 7 0 m 0 ft 23 ft 0 0 m 7 0 m 0 ft 23 ft ...

Page 102: ... the following items with AMP MENU on the remote AMP Menu List AMP menu AUDIO DRC DRC STD DRC MAX DIMMER DIMMER ON DIMMER OFF DRC OFF DUAL MONO MAIN SUB MAIN SUB MAIN SUB A V SYNC SYNC OFF SYNC ON DEMO DEMO ON DEMO OFF ...

Page 103: ...nel 95 Front panel display 55 96 H Handling discs 86 HDMI high definition multimedia interface 25 92 AUDIO HDMI 81 HDMI RESOLUTION 79 Hooking up 25 Hookup Overview 14 I INDEX 52 Installing the speakers on the wall 21 Instant Advance 37 Instant Replay 37 Interlace format 92 INTERVAL 49 J JPEG 44 46 L Language Code List 94 LANGUAGE SETUP 78 LEVEL FRONT 83 LEVEL SURROUND 83 Listening to other compone...

Page 104: ...Slide show 48 Slow motion play 51 Sound Field 60 SPEAKER SETUP 82 Speaker setup 35 Speaker System Hookup 15 SUBTITLE 64 78 Super Audio CD 7 42 T TEST TONE 83 THEATRE SYNC 70 TIME TEXT 53 TITLE 52 Title 93 TRACK 52 Track 93 TRACK SELECTION 81 Troubleshooting 86 TUNER MENU 73 TV Hookup 25 TV TYPE 79 U Usable discs 6 V VIDEO CD 93 Sony Corporation Printed in Korea ...

Reviews: