background image

47

Vie

wing s

til

l im

a

g

e

s

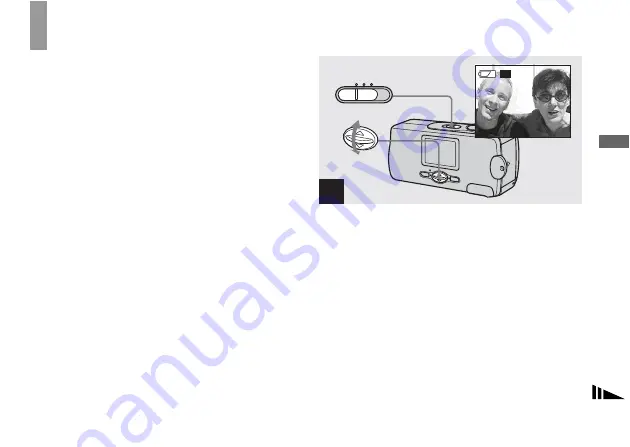
Choosing images to print – Print (DPOF) mark

You can mark a print (DPOF) mark on still images shot 
with your camera. This function is convenient when 
having images printed at a shop or by a printer that 
supports the DPOF (Digital Print Order Format) 
standard. 

You cannot mark movies.

,

Set the mode switch to PLAY, and 
display the image you want to print with 

v

/

V

 on the control button.

1

PLAY

6/8

10:30

AM

100-0006
2003 
 

7  4

1632

1632

1632

Summary of Contents for Cyber-shot DSC-U20

Page 1: ... below Refer to these numbers whenever you call upon your Sony dealer regarding this product Model No DSC U20 Serial No DSC U20 2002 Sony Corporation Getting started ________________________ Shooting still images __________________ Viewing still images ___________________ Enjoying movies ______________________ Deleting images _______________________ Copying images_____________________ Troubleshoot...

Page 2: ...alert the user to the presence of uninsulated dangerous voltage within the product s enclosure that may be of sufficient magnitude to constitute a risk of electric shock to persons This symbol is intended to alert the user to the presence of important operating and maintenance servicing instructions in the literature accompanying the appliance ...

Page 3: ... harmful interference to radio or television reception which can be determined by turning the equipment off and on the user is encouraged to try to correct the interference by one or more of the following measures Reorient or relocate the receiving antenna Increase the separation between the equipment and receiver Connect the equipment into an outlet on a circuit different from that to which the r...

Page 4: ...ge the fuse Never use the plug without the fuse cover If you should lose the fuse cover please contact your nearest Sony service station For the Customers in the U S A and Canada RECYCLING NICKEL METAL HYDRIDE BATTERIES Nickel Metal Hydride batteries are recyclable You can help preserve our environment by returning your used rechargeable batteries to the collection and recycling location nearest y...

Page 5: ...nnect the USB cable again Certain countries may regulate disposal of the battery used to power this product Please consult with your local authority For the Customers in the U S A and Canada THIS DEVICE COMPLIES WITH PART 15 OF THE FCC RULES OPERATION IS SUBJECT TO THE FOLLOWING TWO CONDITIONS 1 THIS DEVICE MAY NOT CAUSE HARMFUL INTERFERENCE AND 2 THIS DEVICE MUST ACCEPT ANY INTERFERENCE RECEIVED ...

Page 6: ...h materials may be contrary to the provision of the copyright laws Do not shake or strike the camera In addition to malfunctions and inability to record images this may render the Memory Stick unusable or image data breakdown damage or loss may occur LCD screen LCD finder only models with a finder and lens The LCD screen and the LCD finder are manufactured using extremely high precision technology...

Page 7: ...icrosoft and Windows are registered trademarks of the U S Microsoft Corporation in the United States and other countries Macintosh Mac OS and QuickTime are trademarks or registered trademarks of Apple Computer Inc In addition system and product names used in this manual are in general trademarks or registered trademarks of their respective developers or manufacturers However the or marks are not u...

Page 8: ...t Focus preset 37 Shooting five images continuously Burst 39 Adding special effects Picture Effect 41 Viewing still images on the LCD screen 43 Viewing single images 44 Viewing an index screen four image 45 Choosing images to print Print DPOF mark 47 Shooting movies 49 Viewing movies on the LCD screen 51 Deleting images 53 Formatting a Memory Stick 55 Copying images to your computer 57 1 Installin...

Page 9: ...arnings and messages 88 Self diagnosis display 89 Menu items 90 Precautions 93 On Memory Stick 95 On Nickel Metal Hydride batteries 96 Specifications 97 LCD screen displays 99 Index 102 Troubleshooting Additional information ...

Page 10: ...of operation A Shutter button 27 B POWER button 19 C POWER lamp 19 D Lens cover 19 E Mode switch PLAY To view images 43 STILL To shoot still images 26 To shoot five images continuously 39 MOVIE To shoot movies 49 F Flash 32 G Lens H Self timer lamp 31 1 2 3 6 4 8 7 5 ...

Page 11: ...jack cover L RESET button bottom surface 81 1 2 3 5 4 0 qa 9 7 6 8 qs Attaching the neck strap How to use the control button and EXEC button To change the current settings of the camera bring up the menu and use the control button to make the changes For each item press MENU and press v V on the control button to select the desired value then press EXEC to make the setting Press MENU then the menu...

Page 12: ...nto the charger supplied Be sure to charge the Nickel Metal Hydride batteries supplied with your camera before using them for the first time We recommend charging the batteries in an ambient temperature of between 10 C to 30 C 50 F to 86 F If the batteries are charged in an environment where the temperature is outside that range the batteries may not charge efficiently Connect the battery charger ...

Page 13: ... the terminals of the charger by wiping them with a dry cloth At the time of purchase or when the Nickel Metal Hydride batteries haven t been used for a long time they may not fully charge This is typical of this type of battery and is not a malfunction If this happens several cycles of using the battery until it is completely drained and then charging the battery fully should correct the problem ...

Page 14: ...the batteries Never use batteries from which the seals have been partially or completely removed or batteries that have been split in any way Charging time This represents the time required to charge fully depleted Nickel Metal Hydride batteries using the supplied BC CS1 charger in an environment where the ambient temperature is 25 C 77 F It takes about 13 hours to completely charge the batteries ...

Page 15: ...state of the charge or on the environment this information may not be correctly indicated The battery remaining indicator is not displayed in USB connecting Inserting the batteries Open the battery Memory Stick cover Slide the cover in the direction of the arrow 1 while pressing OPEN The battery Memory Stick cover opens in the direction the arrow 2 Battery remaining indicator Battery remaining gui...

Page 16: ...ry terminals and contacts can significantly shorten the operating time provided by the batteries Close the battery Memory Stick cover Close the battery Memory Stick cover while holding the batteries in Make sure the cover is closed securely To remove the batteries Hold the camera with the battery Memory Stick cover facing upward open the cover and remove the batteries Be careful not to drop the ba...

Page 17: ...nce every two times The power turns on and off once every ten times Shooting continuously 2 2 Shooting in the following situations The flash mode is set to no flash Continuous shooting approximately every 2 5 seconds Viewing still images 3 3 Viewing single images in order at about 3 second intervals with LCD LIGHT ON Still images with an image size of 1280 960 can only be viewed on this camera Ima...

Page 18: ...s you use it more and more and as time passes page 97 Using your camera abroad Power sources You can use your camera in any country or area with the supplied battery charger within 100 V to 240 V AC 50 60 Hz Use a commercially available AC plug adaptor a if necessary depending on the design of the wall outlet wall socket b Do not use an electronic transformer travel converter as this may cause a m...

Page 19: ...ion of the arrow or press the POWER button again The POWER lamp goes out and the camera turns off Slide the lens cover closed until it clicks into place If you open the lens cover too quickly the camera might not turn on If this happens close the cover and then open it again more slowly Auto power off function If you do not operate the camera for about 3 minutes during shooting or viewing or when ...

Page 20: ...rm the procedure from step 3 Select the desired date display format with v V on the control button then press EXEC Select from Y M D year month day M D Y month day year or D M Y day month year Then DATE TIME SET screen appears on the LCD screen If the rechargeable button battery which provides the power for saving the time data is ever fully discharged page 94 the DATE NOTATION screen will appear ...

Page 21: ... items are set If you selected D M Y in step 2 set the time on a 24 hour cycle Select OK with v V on the control button then press EXEC The date and time are entered and the clock starts to keep time If you make a mistake select CANCEL in step 4 to display the DATE NOTATION screen then repeat the procedure from step 2 3 Y M D 12 00AM DATE TIME SET 2003 1 1 EXEC 4 Y M D 10 30AM DATE TIME SET 2003 7...

Page 22: ...ert the Memory Stick Holding the Memory Stick as shown in the illustration insert it all the way in until it clicks Push the Memory Stick all of the way in so that it is securely seated in the connector If the Memory Stick is not inserted correctly you may not be able to record or display images in the Memory Stick Be careful not to drop the batteries when opening or closing the battery Memory Sti...

Page 23: ...p it means that image data is being read or written Never open the battery Memory Stick cover at this time as the data may be damaged Setting the still image size Set the mode switch to STILL and turn on the power then press MENU The menu appears on the LCD screen Open the lens cover when closed 3 Access lamp 1 STILL RETURN FOCUS SELFTIMER P EFFECT AUTO OFF OFF SIZE BURST 1632 1632 1632 MENU ...

Page 24: ...trol button then press EXEC The image size is set When the setting is complete press MENU so that the menu disappears from the LCD screen The image size selected here is maintained even when the power is turned off 2 RETURN FOCUS SELFTIMER P EFFECT AUTO OFF OFF SIZE BURST 1632 1632 1632 EXEC 3 SIZE BURST 1632 1224 640 480 BURST 640 640 640 1632 1632 1632 640 640 640 EXEC ...

Page 25: ...wing table Number of images that can be saved in a Memory Stick Units number of images Image size is the size when viewing the images on a personal computer Images viewed on the LCD screen of the camera all appear the same size The actual number of images may differ depending on the shooting conditions The image size value e g 1632 1224 indicates the number of pixels Image size Usage 1632 1224 Pri...

Page 26: ...tory setting Hold the camera steadily with both hands and position the subject in the center of the LCD screen Do not cover the lens or flash with your fingers When recording outdoors during clear weather or under other intense light undesired light ghosting may enter the screen If this happens shade the lens with your hand or other object while recording The exposure and focus are adjusted to the...

Page 27: ...be recorded in the Memory Stick When RECORDING disappears you can shoot the next image When operating the camera using batteries if you do not operate the camera for about three minutes during recording or playback the camera turns off automatically to prevent wearing down the batteries page 19 Depending on the subject and the recording conditions the message SHOOT AGAIN may on very rare occasions...

Page 28: ...und is poor The subject is seen through glass such as a window A fast moving subject The subject reflects or has a lustrous finish such as a mirror or a luminous body A flashing subject LCD light You can use LCD LIGHT under with MENU and v V on the control button to turn the LCD light on and off This is useful for extending the battery life This camera is equipped with a reflective type LCD screen...

Page 29: ...iled descriptions of the indicators see page 99 Indicators on the LCD screen are not recorded Using the self timer Set the mode switch to STILL and press MENU The menu appears on the LCD screen You can also carry out this operation when the mode switch is set to MOVIE Displays warnings only Displays all indicators that can be displayed When DISPLAY is OFF When DISPLAY is ON 23 1280 1632 1 STILL RE...

Page 30: ...trol button then press EXEC Select ON with v V on the control button then press EXEC When you press MENU the menu disappears The self timer indicator appears on the LCD screen 2 SIZE BURST RETURN FOCUS SELFTIMER P EFFECT AUTO OFF OFF 1632 1632 1632 EXEC 3 SELFTIMER ON OFF 1632 1632 1632 23 EXEC ...

Page 31: ...lashes in red and the beep sounds The image will be shot after approximately 10 seconds To cancel the self timer in the middle of the operation Close the lens cover or press POWER to turn off the power If you press the shutter button while standing in front of the camera the focus and the exposure may not be correctly set 4 1632 1632 1632 23 5 23 1632 1632 1632 Self timer lamp ...

Page 32: ...No indicator Auto Based on the lighting conditions the camera will decide if there is enough light and will use the flash accordingly factory setting r Red eye reduction Flash mode is set to Auto and the red eye reduction operates if the flash strobes r Forced flash The flash strobes regardless of the surrounding brightness r No flash The flash does not strobe 1632 1632 1632 23 ...

Page 33: ...flash charge lamp flashes After the charging is complete the lamp goes out When you press the shutter button halfway down while the flash is strobing the flash charge lamp turns on To reduce the red eye phenomenon when shooting live subjects When the red eye reduction is selected indicator appears on the LCD screen and the flash pre strobes before shooting to reduce the red eye phenomenon Red eye ...

Page 34: ...oting landscapes use the modes listed below to improve the quality of your images Soft snap mode The soft snap mode lets you shoot skin colors in brighter and warmer tones for more beautiful pictures In addition the soft focus effect creates a gentle atmosphere for portraits of people flowers etc Soft snap mode ...

Page 35: ...2 m When setting the focus to AUTO the focus is adjusted to approximately 1 m to infinite To record subjects closer than 1 m use the Focus preset page 37 When shooting in the Burst mode the recording interval may be longer Vivid nature mode The vivid nature mode enhances blues and greens such as the sky ocean and mountains letting you shoot natural landscapes with vivid striking colors The focus s...

Page 36: ...indicator changes as follows Soft snap mode t Illumination snap mode t Vivid nature mode t No indicator Auto If the menu is currently displayed press MENU first so that the menu disappears To cancel Scene Selection press V SCENE repeatedly to set to No indicator Auto You cannot use the Scene Selection when shooting movies 23 1632 1632 1632 ...

Page 37: ... window glass it is difficult to achieve a proper focus using the auto focus function The Focus preset function is useful in these cases Set the mode switch to STILL and press MENU The menu appears on the LCD screen You can also carry out this operation when the mode switch is set to MOVIE 0 5 m 0 2 m 1 RETURN FOCUS SELFTIMER P EFFECT AUTO OFF OFF SIZE BURST 1623 1623 1632 MENU ...

Page 38: ...ess EXEC You can select from the following distance settings AUTO No indicator 0 2 m 0 5 m 1 0 m and infinity The indicator is displayed on the LCD screen To reactivate auto focusing Select AUTO in step 3 Focus setting information is approximate and should be used as a reference 2 RETURN SELFTIMER P EFFECT AUTO OFF OFF SIZE BURST 1632 1632 1632 FOCUS EXEC 3 AUTO 0 2m 1 0m 0 5m FOCUS EXEC ...

Page 39: ...on before all five images are shot the camera stops shooting as soon as you release the button The recording interval is approximately 0 5 seconds However the recording interval may be longer in the Illumination snap mode Select with v V on the control button then press EXEC Select SIZE BURST with v V on the control button then press EXEC 1 RETURN FOCUS SELFTIMER P EFFECT AUTO OFF OFF SIZE BURST 1...

Page 40: ... button fully down Up to five images are recorded as long as you hold down the shutter button The images are recorded in 640 480 size If you release the shutter button before the camera records five images only the images that were shot while the shutter button was held down are recorded 3 SIZE BURST 1632 1224 640 480 BURST 640 640 640 1632 1632 1632 640 640 640 EXEC 4 640 640 23 ...

Page 41: ...n also carry out this operation when the mode switch is set to MOVIE SOLARIZE B W The light contrast is clearer and the picture looks like an illustration The picture is monochrome black and white SEPIA NEG ART The picture is sepia toned like an old photograph The color and brightness of the picture are reversed as in a negative 1 RETURN FOCUS SELFTIMER P EFFECT AUTO OFF OFF SIZE BURST 1632 1632 1...

Page 42: ...V on the control button then press EXEC Select the desired mode with v V on the control button then press EXEC To cancel Picture Effects Select OFF in step 3 2 RETURN FOCUS SELFTIMER AUTO OFF OFF SIZE BURST 1632 1632 1632 P EFFECT EXEC 3 P EFFECT SOLARIZE B W SEPIA NEG ART OFF EXEC ...

Page 43: ...n view one image at a time displayed over the entire screen Index four image screen Four images are displayed simultaneously in separate panels on the screen For a detailed description of the screen indicators see page 101 For details on viewing movies see page 51 Images other than 1632 1224 1600 1200 1280 960 or 640 480 size are displayed as thumbnail images 8 8 100 0008 2003 12 00PM 7 4 1632 163...

Page 44: ...appears on the LCD screen If you close the lens cover while viewing images the power is off Select the desired still image with v V on the control button v To display the preceding image V To display the next image 1 PLAY 8 8 100 0008 2003 12 00PM 7 4 1632 1632 1632 POWER button 2 10 30AM 6 8 100 0006 2003 7 4 1632 1632 1632 ...

Page 45: ... screen four image Set the mode switch to PLAY and press MENU The menu appears on the LCD screen Select with v V on the control button then press EXEC 1 PLAY RETURN DELETE DELETE ALL INDEX DPOF MENU 2 RETURN DELETE DELETE ALL INDEX DPOF EXEC ...

Page 46: ...screen To display the next previous index screen Press v V on the control button to move the yellow border To return to the single image screen Select SINGLE in step 3 When four frames are displayed press EXEC to display the single image shown with the yellow border 3 RETURN DELETE DELETE ALL INDEX DPOF EXEC ...

Page 47: ...our camera This function is convenient when having images printed at a shop or by a printer that supports the DPOF Digital Print Order Format standard You cannot mark movies Set the mode switch to PLAY and display the image you want to print with v V on the control button 1 PLAY 6 8 10 30AM 100 0006 2003 7 4 1632 1632 1632 ...

Page 48: ...mark in index image mode For details see page 46 and switch to index screen Select ON with v V on the control button then press EXEC When you press MENU the menu disappears and the mark is marked on the displayed image To unmark the print DPOF mark Select OFF in step 3 The mark disappears 2 RETURN DELETE DELETE ALL INDEX DPOF EXEC MENU 3 DPOF ON OFF EXEC ...

Page 49: ...ording the image The maximum recording time is 15 seconds The auto focus function can set the focus at any distance from approximately 1 0 m to infinity To shoot a subject at a closer distance than 1 0 m select 0 2 m or 0 5 m with the Focus preset function page 37 Recording stops when the Memory Stick is full For details on the recording time for each image size see page 51 The flash does not func...

Page 50: ...use DISPLAY under with MENU and v V on the control button to turn the display on and off page 29 For detailed descriptions of the indicators see page 100 To set the distance to the subject Set the mode switch to MOVIE and follow the procedure on page 38 To use the self timer Set the mode switch to MOVIE and follow the procedure on page 29 ...

Page 51: ... time may vary depending on the shooting conditions For numbers of still images that can be recordable see page 25 Viewing movies on the LCD screen Set the mode switch to PLAY and press the POWER button to turn on the power The last image you shot appears on the LCD screen Image size 160 112 Capacity 8MB 5 min 20 sec 16MB 10 min 40 sec 32MB 21 min 40 sec 64MB 45 min 128MB 90 min 1 PLAY MOV00018 18...

Page 52: ...played back To stop playback Press EXEC Indicators during viewing movies Indicators on the LCD screen are not recorded You can use DISPLAY under with MENU and v V on the control button to turn the display on and off page 29 For detailed descriptions of the indicators see page 101 2 MOV00016 16 18 0 00 10 30AM 2003 7 4 3 16 18 0 05 MOV00016 EXEC ...

Page 53: ... button to select the image you want to delete Press MENU and select with v V on the control button then press EXEC To delete the image in index image screen For details see page 46 and switch to index screen 1 PLAY 8 8 100 0008 10 30PM 1632 1632 1632 2003 7 4 POWER button 2 RETURN DELETE DELETE ALL INDEX DPOF EXEC MENU Deleting images ...

Page 54: ...delete all the images Select DELETE ALL in step 3 Select OK with v V on the control button then press EXEC MEMORY STICK ACCESS appears on the LCD screen When this message disappears the image has been deleted To cancel deleting Select CANCEL in step 4 3 RETURN DELETE DELETE ALL INDEX DPOF EXEC 4 CANCEL OK DELETE EXEC ...

Page 55: ...aring a Memory Stick to record images this process is also called initialization The Memory Stick provided with this camera and those available commercially are already formatted and can be used immediately When you format a Memory Stick be aware that all of the images in the Memory Stick will be permanently deleted Press the POWER button to turn on the power and press MENU The menu appears on the...

Page 56: ...V on the control button then press EXEC Select OK with v V on the control button then press EXEC The FORMATTING message appears When this message disappears the format is complete To cancel formatting Select CANCEL in step 4 3 RETURN FORMAT EXEC 4 OK CANCEL FORMAT FORMATTING EXEC ...

Page 57: ...essional Windows Millennium Edition Windows XP Home Edition or Windows XP Professional The above OS must be installed at the factory Operation is not assured in an environment upgraded to the operating systems described above or in a multi boot environment CPU MMX Pentium 200 MHz or faster USB connector Provided as standard Display 800 600 dots or higher High Color 16 bit color 65 000 colors or hi...

Page 58: ...en using a USB hub Operations are not guaranteed for all the recommended computer environments mentioned above USB mode There are two modes for a USB connection NORMAL and PTP modes The factory setting is the NORMAL mode This section describes the USB connection using the NORMAL mode When the camera is connected to your computer via a USB cable the camera can draw its power from your computer USB ...

Page 59: ... is used to display and edit images that are stored in a computer Start up your computer and insert the supplied CD ROM into the CD ROM drive The title screen appears If it does not appear double click My Computer t ImageMixer in that order Do not connect your camera to your computer at this time 1 Title screen The display settings should be 800 600 dots or higher and High Color 16 bit color 65 00...

Page 60: ...epending on your OS Close down all applications running on the computer before installing the driver When using Windows XP or Windows 2000 log on as Administrators Click USB Driver on the title screen The InstallShield Wizard screen appears When using Windows XP you need not install the USB driver Proceed to step 5 2 Click here ...

Page 61: ...click Next The USB driver installation starts When the installation is completed the screen informs you of completion Click Yes I want to restart my computer now then click Finish Your computer restarts Then you can establish USB connection 3 Click here 4 Click here ...

Page 62: ...ver is not already installed on your computer a screen that asks if you want to install the driver will appear Follow the instructions that appear on the screen This section describes the English screen Click Next When License Agreement screen appears click Yes Read the agreement carefully If you accept the terms of the agreement proceed with the installation The Information screen appears 5 Click...

Page 63: ...63 Copying images Click Next Select the folder to be installed then click Next Select the program folder then click Next 7 Click here 8 Click here ...

Page 64: ...t Image Transfer installation starts When the installation is completed the screen informs you of completion Click Finish The InstallShield Wizard screen closes If you wish to continue with the installation of ImageMixer follow the procedure that begins on page 65 9 Click here 10 Click here ...

Page 65: ...appears You can use the PIXELA ImageMixer for Sony software to copy view and edit images For details see the software s help files Select the desired language then click OK The Welcome to the InstallShield Wizard screen appears This section describes the English screen 11 Click here 12 Click here ...

Page 66: ... install screen to close the install screen If DirectX8 0a or a later version is not installed in your computer the Information screen appears Click OK The Microsoft DirectX8 0a Setup screen appears When using Windows XP you need not install DirectX Proceed to step qh You do not need to install DirectX again if DirectX Ver 8 0a or later is already installed in your computer Proceed to step qh 13 C...

Page 67: ...at the DirectX R Setup screen When the DirectX Setup screen appears click OK DirectX installation starts When installation is complete your computer restarts Remove the CD ROM Then you can establish the USB connection 15 Click here 16 ...

Page 68: ...For further details on the Memory Stick see page 22 When your camera is connected to a computer it draws power from the computer side Removing the Nickel Metal Hydride batteries before connecting the camera is recommended in order to prevent battery deterioration Turn on your computer 1 Memory Stick 2 ...

Page 69: ...r computer The camera is on The camera can receive power supply from most of the computers that are recommended for use through the USB connection USB Bus Powered so in this case there is no need to insert batteries into the camera When using a desktop computer connect the USB cable to the USB connector on the rear panel When using Windows XP the copy wizard automatically appears on the desktop Pr...

Page 70: ...computer or removing the Memory Stick from your camera during USB connection For Windows 2000 Me or XP users 1 Double click on the tasktray at the lower right of the screen 2 Click Sony DSC then click Stop 3 Confirm the device on the confirmation screen then click OK 4 Click OK This step is unnecessary for Windows XP users 5 Disconnect the USB cable or remove the Memory Stick For Windows 98 or 98S...

Page 71: ...ixer automatically launches and a list of images appears If Image Transfer does not launch automatically double click the Image Transfer icon in the tasktray Normally Image Transfer and Date folders are created inside the My Documents folder and all of the image files recorded with your camera are copied into these folders You can change the Image Transfer settings on the Image Transfer Settings s...

Page 72: ...e 73 When using Windows XP see page 75 b Double click DCIM then double click 100MSDCF The 100MSDCF folder opens The folder names vary depending on the type of images they contain page 77 c Drag and drop the image files into the My Documents folder The image files are copied to the My Documents folder When the copy destination already contains an image with the same file name the overwrite confirma...

Page 73: ...already installed 1 Click Device Manager 2 Double click Other Devices 3 Confirm if there is a Sony DSC or Sony Handycam with a mark 3 If you find either of the devices above follow the steps below to delete them 1 Click Sony DSC or Sony Handycam 2 Click Remove When using Windows 2000 click Uninstall The Confirm Device Removal screen appears 3 Click OK The device is deleted Try the USB driver insta...

Page 74: ...procedure below to cancel the setting b Click Start then click My Computer c Right click Sony MemoryStick then click Properties d Cancel the setting 1 Click AutoPlay 2 Set Content type to Pictures 3 Check Select an action to perform under Actions select Take no action then click Apply 4 Set Content type to Video files and Mixed content in step 2 and repeat step 3 5 Click OK The Properties screen c...

Page 75: ...to copy to your computer and remove the checkmark then click Next The Picture Name and Destination screen appears e Specify the image group names to be copied and the copy destination then click Next Image copying starts When the copying is completed the Other Options screen appears f Select Nothing I m finished working with these pictures then click Next The Completing the Scanner and Camera Wiza...

Page 76: ...ick the Image Transfer icon on the task tray select Open Settings The settings you can set are as follows Basic Copy and Delete When the Image Transfer starts the below window appears When you select Settings from the above window you can only change the Basic setting Right click here ...

Page 77: ... The meanings of the file names in the following table are as follows ssss stands for any number within the range from 0001 to 9999 Folder containing still image and Burst image data Folder containing movie data Folder File name File meaning 100MSDCF DSC0ssss JPG Still image file recorded normally Still image file recorded in Burst mode page 39 MOML0001 MOV0ssss MPG Movie file recorded normally pa...

Page 78: ...section describes the procedure for copying images to the My Documents folder When using Windows XP double click Start t My Documents in that order You can use the PIXELA ImageMixer for Sony software to view images on your computer For details see the software s help files Double click the desired image file The image is displayed 1 2 ...

Page 79: ...n step 4 Sony USB Driver Sony USB Shim 6 When the message for confirmation is shown click OK 2 Installing ImageMixer 1 Select the desired language 2 Follow the instructions on each succeeding screen 3 Restart your computer and remove the CD ROM from the CD ROM drive 2 Preparing your camera For details see page 68 3 Connecting your camera to your computer For details see page 69 Disconnecting the U...

Page 80: ...n copying the movie files 4 Drag and drop the image files to the hard disk icon The image files are copied to your hard disk 5 Viewing the images on your computer 1 Double click the hard disk icon 2 Double click the desired image file in the folder containing the copied files The image file opens You can use the PIXELA ImageMixer for Sony software to copy images to your computer and to view images...

Page 81: ...zed Sony service facility Batteries and power RESET button Symptom Cause Solution The battery remaining indicator is incorrect or sufficient battery remaining indicator is displayed but the power runs out soon You have used the camera for a long time in an extremely hot or an extremely cold location The batteries are discharged The battery contacts or the terminals on the battery Memory Stick cove...

Page 82: ...ymptom Cause Solution The subject does not appear on the LCD screen The mode switch is set to PLAY p Set the mode switch to STILL or MOVIE pages 26 and 49 The image is out of focus The subject is too close The vivid nature mode is selected for the Scene Selection function The Focus preset function is selected p Make sure to position the lens farther away from the subject than the shortest shooting...

Page 83: ...cording position page 95 p Wait until charging is complete before you begin shooting with the camera p Set it to STILL page 26 p Set it to MOVIE page 49 The flash does not work The mode switch is set to PLAY or MOVIE The flash is set to no flash The vivid nature mode is selected for the Scene Selection function or Burst mode in the image size p Set it to STILL p Set the flash to auto no indicator ...

Page 84: ...mera cannot delete an image The write protect switch on the Memory Stick is set to the LOCK position p Set it to the recording position page 95 Even though you attempted to delete all of the files the Memory Stick is still not empty The Memory Stick contains a file with a file name or storage destination that was changed through the computer Even the DELETE ALL function will not erase files that w...

Page 85: ...efore installing the USB driver so the device was not recognized by the computer No Memory Stick is inserted p Use the supplied USB cable page 69 p Disconnect the USB cable and connect it again firmly Make sure that USB MODE is displayed on the LCD screen pages 69 and 92 p Set it to NORMAL page 92 p Disconnect the USB cables except for the ones connected to the keyboard the mouse and your camera p...

Page 86: ...s for the PIXELA ImageMixer for Sony application software An error message appears when you set the supplied CD ROM in your computer The computer display is not set correctly p Set the computer display as follows Windows 800 600 dots or higher High Color 16 bit color 65 000 colors or higher Macintosh 800 600 dots or higher 32 000 color or higher Symptom Cause Solution Symptom Cause Solution You ca...

Page 87: ...a works properly The power is on but the camera does not work The built in microcomputer is not working properly p Remove the batteries then install them again after about one minute and turn on the camera If the functions still do not work press the RESET button located on the bottom of the camera using a fine tipped object then turn the power on again page 81 If you press the RESET button all se...

Page 88: ...ry Stick is insufficient You cannot record images Delete unnecessary images page 53 NO FILE No images have been recorded on the Memory Stick FILE ERROR An error occurred while playing back the image FOLDER ERROR A folder with the same name already exists on the Memory Stick INVALID OPERATION You are playing back a file that was created on equipment other than this camera You are attempting to assi...

Page 89: ...ecessary Contact your Sony dealer or local authorized Sony service facility and inform them of the 5 digit code Example E 61 10 C 32 ss Self diagnosis display Code Cause Corrective action C 32 ss There is trouble with your camera s hardware Turn the power off and on again page 19 C 13 ss The camera cannot read or write data in the Memory Stick Re insert the Memory Stick several times An unformatte...

Page 90: ... 480 BURST Selects the image size when shooting still images pages 23 and 39 FOCUS xAUTO 0 2 m 0 5 m 1 0 m Selects the auto focus method or sets the focus preset page 37 SELFTIMER ON xOFF Sets the self timer page 29 P EFFECT xOFF NEG ART SEPIA B W SOLARIZE Sets the image special effects page 41 Item Setting Description FOCUS xAUTO 0 2 m 0 5 m 1 0 m Selects the auto focus method or sets the focus p...

Page 91: ...ll images page 53 Cancels deleting of the image INDEX SINGLE Switches between four image display and single image display page 43 DPOF ON OFF Marks unmarks the print DPOF mark on still images you want to print page 47 Item Setting Description LCD LIGHT xON OFF Selects the brightness of the LCD light Selecting ON makes the screen bright and easy to see when using the camera in dark locations but al...

Page 92: ...en you press the control button shutter button Turns on the shutter sound The shutter sound is heard when you press the shutter button Turns off the beep shutter sound USB xNORMAL PTP Switches the USB mode page 58 LANG Displays the menu items warnings and messages in selected language Item Setting Description FORMAT OK CANCEL Formats the Memory Stick Note that formatting erases all the information...

Page 93: ... then wipe the surface dry Do not use any type of solvent such as thinner alcohol or benzine as this may damage the finish or the casing After using your camera at the seashore or other dusty locations Clean your camera carefully Otherwise the salty air may corrode the metal fittings or dust may enter the inside of your camera causing a malfunction Note on operating temperature Your camera is desi...

Page 94: ...aporate Note that if you attempt to shoot with moisture remaining inside the lens you will be unable to record clear images On internal rechargeable button battery This camera has an internal rechargeable button battery for maintaining the date and time and other settings regardless of whether the power is on or off This rechargeable button battery is continually charged as long as you are using t...

Page 95: ...r camera does not support the MagicGate standards data recorded with your camera is not subject to MagicGate copyright protection MagicGate is copyright protection technology that uses encryption technology Notes on using the supplied Memory Stick You cannot record or delete images when the write protect switch is set to LOCK The position or the shape of the write protect switch may differ dependi...

Page 96: ...serting the Memory Stick Duo facing the wrong direction may damage the equipment Do not insert a Memory Stick Duo without a Memory Stick Duo adaptor into Memory Stick compatible equipment as this may cause equipment trouble On Nickel Metal Hydride batteries Effective use of the battery We recommend that you use batteries until they are completely drained before charging them Battery performance de...

Page 97: ...t and is different for each battery Specifications System Image device 6 72 mm 1 2 7 type color CCD Primary color filter Total pixels number of camera Approx 2 110 000 pixels Effective pixels number of camera Approx 2 020 000 pixels Lens Single focal lens f 5 0 mm 7 32 inches 35 mm camera conversion 33 mm 1 5 16 inches F2 8 Exposure control Automatic Scene selection three modes Data formatsStill i...

Page 98: ...ng portions not included Mass Approx 118 g 4 2 oz AAA Nickel Metal Hydride batteries Memory Stick and neck strap included BC CS1 Ni MH battery charger Power requirements AC 100 to 240V 50 60Hz 2 2 W Output voltage Size AA DC 1 8V 165 mA 2 Size AAA DC 1 8V 70 mA 2 Dimensions 70 29 74 mm 2 7 8 1 3 16 3 inches W H D Mass Approx 70g 2 5 oz Operating temperature range 0 C to 40 C 32 F to 104 F Accessor...

Page 99: ...us preset indicator 37 F Image size indicator 23 39 G Remaining Memory Stick capacity indicator H Scene selection indicator 34 I Remaining number of recordable images indicator J Self diagnosis function indicator 89 K Self timer indicator 29 L Low battery warning indicator 15 1280 1280 1632 400 C 32 ss SLRZ 1 2 3 4 5 6 7 9 8 0 qa qs Page numbers in parentheses indicate the location of additional i...

Page 100: ... Low battery warning indicator 15 F Status indicator 49 G Remaining Memory Stick capacity indicator H Recording time maximum recordable time indicator 51 I Self diagnosis function indicator 89 J Self timer indicator 29 1 2 3 4 5 6 7 8 9 0 STBY SLRZ 12 55 C 32 ss Page numbers in parentheses indicate the location of additional important information ...

Page 101: ...ing date of the playback image When playing back moving images A Recording mode indicator 51 B File name 77 C Image number Number of images recorded in Memory Stick D Counter E Recording date of the playback image 100 0011 2003 1632 1632 1632 11 12 9 30AM 7 4 1 2 3 4 5 6 6 8 0 12 1 3 4 MOV00008 2003 7 4 10 30AM 2 5 Page numbers in parentheses indicate the location of additional important informati...

Page 102: ...atteries 12 remaining indicator 15 Battery life 17 BEEP 92 Burst 39 C Charging charging the batteries 12 charging time 14 Cleaning 93 Clock set 20 Computer copying images 57 71 Image Transfer 62 ImageMixer 65 USB cable 69 USB driver 59 Control button 11 Copying images 57 71 D Deleting images 53 DPOF 47 E EXEC 24 Exif 97 ...

Page 103: ...s 77 image size 23 25 90 Index screen 45 Installation Image Transfer 62 ImageMixer 65 USB driver 59 J JPEG 26 L LCD screen DISPLAY 29 99 LCD light 28 M Memory Stick formatting a Memory Stick 55 inserting removing a Memory Stick 22 number of images that can be saved shooting time 25 51 Memory Stick Duo 7 96 MENU 23 Menu settings 90 Mode switch 10 Moisture condensation 94 Movie shooting movies 49 sh...

Page 104: ...ooting mode auto adjustment mode 26 Burst 39 movie 49 Single image screen 44 Still image playback Viewing the images on your computer 78 Still image shooting auto focus 26 image size 23 number of images that can be saved 25 picture effect 41 Scene Selection 34 using auto adjustment mode 26 using the flash 32 using the self timer 29 Still image viewing index screen 45 single image screen 44 viewing...

Page 105: ...105 V Viewing movies on the LCD screen 51 Viewing the images on your computer 78 W Warnings and messages 88 ...

Page 106: ......

Page 107: ......

Page 108: ...nted in Japan Additional information on this product and answers to frequent asked questions can be found at our Customer Support Website Printed on 100 recycled paper using VOC Volatile Organic Compound free vegetable oil based ink ...

Reviews: