background image

18

Basic operations

B

 Recording

Basic operations

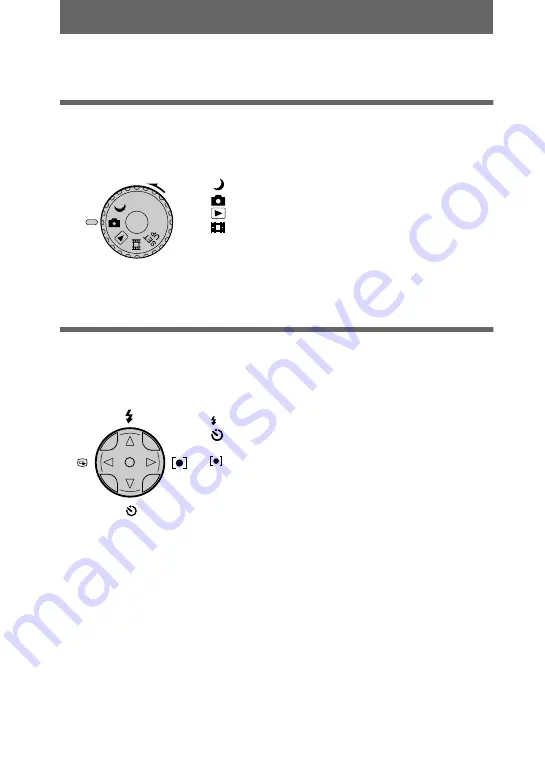
How to use the mode dial

The mode dial switches the function which is used for recording, playback, or 
editing. Set the dial as follows before starting to operate your camera.

How to use the control button

When the menu is not displayed, the control button is used to perform the following 
operations.

When you select above functions with the control button while recording with the 
LCD screen turned off, the LCD screen lights for approximately 2 seconds and the 
selected function icon appears on the screen. The LCD screen also lights 
automatically when the MENU button is pressed, but in this case the LCD screen 
does not turn off automatically.

:

To record still images in TWILIGHT mode

:

To record still images

:

To play back or edit images

:

To record moving images or Clip Motion images

SET UP: To set the setup items (The SET UP position 

changes the settings of infrequently-used 
items.)


(

v

): Recording with flash

  (

V

): Recording with self-timer

7

  (

b

): Checking the last recorded image

  (

B

): Recording while adjusting the exposure for the 

point that you want to record

Summary of Contents for Cyber-shot DSC-P20

Page 1: ...d retain it for future reference Owner s Record The model and serial numbers are located on the bottom Record the serial number in the space provided below Refer to these numbers whenever you call upon your Sony dealer regarding this product Model No DSC P20 Serial No ________________________ DSC P20 2001 Sony Corporation ...

Page 2: ...age within the product s enclosure that may be of sufficient magnitude to constitute a risk of electric shock to persons This symbol is intended to alert the user to the presence of important operating and maintenance servicing instructions in the literature accompanying the appliance Declaration of Conformity Trade Name SONY Model No DSC P20 Responsible Party Sony Electronics Inc Address 680 Kind...

Page 3: ...eceiver Connect the equipment into an outlet on a circuit different from that to which the receiver is connected Consult the dealer or an experienced radio TV technician for help The supplied interface cable must be used with the equipment in order to comply with the limits for a digital device pursuant to Subpart B of Part 15 of FCC Rules DISPOSAL OF LITHIUM ION BATTERY LITHIUM ION BATTERY DISPOS...

Page 4: ...amera or recording medium etc Notes on image data compatibility This camera conforms with the Design Rules for Camera File Systems universal standard established by the JEITA Japan Electric and Information Technology Industries Association You cannot play back on your camera still images recorded on other equipment DCR TRV890E TRV900 TRV900E DSC D700 DSC D770 that does not conform with this univer...

Page 5: ...ors Exposing the LCD screen the finder or the lens to direct sunlight for long periods may cause malfunctions Notes on batteries Be careful when removing the batteries as they may be hot after the camera is used for long periods Do not get the camera wet When taking pictures outdoors in the rain or under similar conditions be careful not to get the camera wet If moisture condensation occurs refer ...

Page 6: ...ter using the supplied USB cable and application software Viewing images using a personal computer page 29 Recording still images for e mail E MAIL page 46 Records a moving picture MPEG Movie or Clip Motion according to your purpose Recording moving images MPEG MOVIE page 25 Selects the recording mode from various types of recordings according to your situation Creating Clip Motion Files page 48 R...

Page 7: ...e white balance WHITE BALANCE 51 Enjoying picture effects P EFFECT 52 Recording the date and time on the still image DATE TIME 52 B Various playback Playing back three or nine images at once 54 Enlarging a part of the still image Zoom and trimming 55 Playing back the still images in order SLIDE 56 Rotating a still image ROTATE 57 B Editing Deleting images DELETE 58 Preventing accidental erasure PR...

Page 8: ...edit images To record moving images or Clip Motion images SET UP To set the setup items C Shutter button 19 26 D Flash 23 E Finder window F Photocell window for flash Do not block while recording with the flash G Self timer 22 26 H Lens I Lens cover OPEN CLOSE tab J Tripod receptacle bottom surface Use a tripod with a screw length of less than 5 5 mm 7 32 inch You will be unable to firmly secure t...

Page 9: ...orange 21 C MENU button 39 D Jack cover 12 14 E DC IN jack 12 14 F USB jack 31 33 G Control button 18 38 H LCD screen I DISPLAY LCD ON OFF button 21 J Digital zoom button for recording 22 INDEX zoom button for playback 55 K Hook for wrist strap L OPEN switch M Battery cover N Access lamp 17 O Memory Stick cover Attaching the strap ...

Page 10: ...eries not supplied The InfoLITHIUM battery pack is recommended for long operating times Note that in this Operating Instructions batteries refers to size AA alkaline batteries Sony stamina alkaline batteries are recommended When you use your camera with alkaline batteries refer to Notes on Using Batteries on page 85 Batteries InfoLITHIUM battery pack not supplied 1 Open the battery cover Open the ...

Page 11: ...into the USB jack or the DC IN jack What is InfoLITHIUM InfoLITHIUM is a lithium ion battery pack which can exchange information such as battery consumption with compatible video equipment This unit is compatible with the InfoLITHIUM battery pack S series InfoLITHIUM S series battery packs have the mark InfoLITHIUM is a trademark of Sony Corporation NP FS11 battery pack not supplied When you recor...

Page 12: ...en using size AA alkaline batteries the remaining time is not shown Using your camera abroad For details see page 70 Note When you turn the LCD screen on and off it takes about one minute for the correct battery remaining time to appear Charging the battery pack not supplied 1 Insert the battery pack into your camera 2 Open the jack cover and connect the DC connecting cable to the DC IN jack of yo...

Page 13: ...ion when using alkaline batteries Even when using an InfoLITHIUM battery pack not supplied the battery life and number of images will be decreased if you use your camera at low temperatures use the flash or repeatedly turn the power on off The numbers of images shown on tables above are as a guide The numbers may be smaller depending on conditions Battery life and number of images that can be reco...

Page 14: ...e Sony DC adaptor charger not supplied When using the AC power adaptor Be sure to use it near the wall outlet If a malfunction occurs disconnect the plug from the wall outlet Charging time Battery pack Full charge min NP FS11 not supplied Approx 180 Using the AC power adaptor not supplied 1 Open the jack cover and connect the DC connecting cable to the DC IN jack of your camera with the v mark fac...

Page 15: ...date and time set the mode dial to SET UP page 65 and perform the procedure from step 3 3 Select the desired date display format with v V on the control button then press the center z Select from Y M D year month day M D Y month day year or D M Y day month year 4 Select the year month day hour or minute item you want to set with b B on the control button The item to be set is indicated with v V Co...

Page 16: ...om step 3 above 5 Set the numeric value with v V on the control button then press the center z to enter it After entering the number v V moves to the next item If you selected D M Y in step 3 set the time on a 24 hour cycle 6 Select OK with B on the control button then press the center z at the desired moment to begin clock movement The date and time are entered 2001 1 7 12 00 AM Y M D D M Y OK CA...

Page 17: ...lit up You cannot record or edit images on a Memory Stick if the erasure prevention switch is set to the LOCK position The position and shape of the erasure prevention switch may differ depending on the types of Memory Stick used 1 Open the Memory Stick cover 2 Insert the Memory Stick Insert the Memory Stick with the B mark facing toward the battery compartment as illustrated until it clicks 3 Clo...

Page 18: ...off the LCD screen lights for approximately 2 seconds and the selected function icon appears on the screen The LCD screen also lights automatically when the MENU button is pressed but in this case the LCD screen does not turn off automatically To record still images in TWILIGHT mode To record still images To play back or edit images To record moving images or Clip Motion images SET UP To set the s...

Page 19: ...he shutter button halfway down The image freezes momentarily but is not yet recorded While the AE lock indicator z is flashing the camera automatically adjusts the exposure of the captured image When the camera finishes the automatic adjustments the AE lock indicator z stops flashing then lights up and the camera is ready for recording If you release the shutter button the recording will be cancel...

Page 20: ...omatic adjustment is complete However the recording cannot be carried out while the CHG lamp page 21 is flashing During this time the camera is charging the flash Hold the camera so that your fingers do not block the flash and do not touch the lens portion when recording images 4 Press the shutter button fully down The shutter sounds RECORDING appears on the LCD screen and the image will be record...

Page 21: ... finder Recording with the LCD screen is recommended when it is necessary to correctly understand the recording range Because of the difference of the portion of the finder and the lens use the LCD screen when you record a subject closer than 1 m 3 1 4 feet When DEMO is set to ON in the SET UP settings you cannot turn off the LCD screen once the demonstration starts You cannot turn off the LCD bac...

Page 22: ... function with a magnification of up to 3 Digital zoom enlarges the image by digital processing Digital zoom does not operate when the LCD screen is off Notes Digital zoom does not work for moving images Use the LCD screen when using digital zoom function Digitally zoomed images do not appear in the finder When you use the self timer function the subject is recorded about 10 seconds after you pres...

Page 23: ...gs page 40 To reduce the red eye phenomenon Set RED EYE REDUCTION to ON in the setup settings the flash strobes before recording to reduce the red eye phenomenon page 65 When ON is selected and the mode dial is set to or appears on the LCD screen Notes When ISO is set to AUTO in the menu settings the recommended shooting distance using the built in flash is 0 7 m to 2 0 m 27 5 8 inches to 6 feet 6...

Page 24: ... a subject as close as about 15 cm 6 inches to 19 cm 7 1 2 inches 0 2 m is indicated on the camera as the approximate recording distance Use this function to record a small subject such as a flower or insect at close range Notes After finishing recording in macro return the MACRO switch to OFF If you leave the MACRO switch set to ON the camera may not be able to focus on distant subjects or the im...

Page 25: ... V on the control button then press B 3 Select MOVING IMAGE with v V on the control button then press B 4 Select MPEG MOVIE with v V on the control button then press the center z 5 Set the mode dial to POWER DISPLAY LCD ON OFF CAMERA MOVING IMAGE DATE TIME RED EYE REDUCTION MPEG MOVIE OFF OFF PAGE SELECT MPEG MOVIE CLIP MOTION CAMERA MO MOVING IMA VING IMAGE GE DATE TIME RED EYE REDUCTION OK CAMER...

Page 26: ... off These indicators are not recorded See page 83 for a detailed description of the indicators Note If you remove the battery or otherwise turn off the power partway through a recording the moving image recorded thus far is not saved When the E mark appears while operating the camera with batteries stop the recording at this point before the batteries completely run out 6 Press the shutter button...

Page 27: ...ge Each time you press DISPLAY LCD ON OFF the status of the LCD screen changes as follows all indicators on t indicators off t LCD screen off See page 84 for a detailed description of the indicators 1 Set the mode dial to The last recorded image still or moving appears on the LCD screen 2 Select the desired still image with the control button b B b To display the preceding image B To display the n...

Page 28: ...ators 1 Set the mode dial to The last recorded image still or moving appears on the LCD screen 2 Select the desired moving image with the control button b B Moving images are displayed one size smaller than still images b To display the preceding image B To display the next image 3 Press the center z to start the playback The moving image is played back During playback B playback appears on the LC...

Page 29: ...he operation manuals for your personal computer and the application software Notes Data recorded with your camera is stored in the following formats Make sure that applications that support these file formats are installed on your personal computer Still images other than TEXT mode uncompressed mode and Clip Motion JPEG format Moving images MPEG format Uncompressed mode still images TIFF format TE...

Page 30: ...alled Macintosh computer with Mac OS X v10 0 The USB connector must be provided as standard QuickTime 3 0 or newer must be installed to play back moving pictures Notes If you connect two or more USB equipment to a single personal computer at the same time some equipment may not operate depending on the type of USB equipment Operations are not guaranteed when using a hub Operations are not guarante...

Page 31: ...ot connect the USB cable in this step 2 Insert the supplied CD ROM in the CD ROM drive of your personal computer The application software screen appears 3 Click USB Driver Installation for Windows 98 98SE Me and Windows 2000 USB driver installation starts 4 Follow the on screen messages to install the USB driver Your personal computer may restart 5 Connect the USB jack mini B on your camera with t...

Page 32: ... the USB cable before the USB driver installation is completed in step 4 In step 7 make sure that a Memory Stick is inserted into your camera before installing the USB driver Otherwise you will be unable to install the USB driver 1 Turn on your personal computer and allow the Mac OS to load 2 Insert the supplied CD ROM in the CD ROM drive of your personal computer 3 Double click the CD ROM drive i...

Page 33: ...al computer using the supplied USB cable 3 Insert a Memory Stick into your camera and connect the AC power adaptor not supplied to your camera and then to a wall outlet mains 4 Turn on the power of your camera USB MODE appears on the LCD screen of the camera For Windows 98 98SE Me and Windows 2000 users 5 Open My Computer on Windows and double click the newly recognized drive Example Removable Dis...

Page 34: ...Image file storage destinations and image files on page 36 Copying a file to the hard disk of your personal computer before viewing it is recommended If you play back the file directly from the Memory Stick the image may break off For Macintosh users 5 Double click the newly recognized icon on the desktop The folders inside the Memory Stick are displayed 6 Select and double click the desired image...

Page 35: ...e Depending on your application software the file size may increase when you open a still image file When you load an image modified using the supplied retouch software from your personal computer to the camera or when you directly modify the image on the camera the image format will differ so the FILE ERROR message may appear and you may be unable to open the file Depending on your application so...

Page 36: ...E MAIL mode page 46 TIFF mode page 48 CLP0ssss GIF Clip Motion file recorded in NORMAL mode page 48 CLP0ssss THM Index image file of Clip Motion file recorded in NORMAL mode MBL0ssss GIF Clip Motion file recorded in MOBILE mode page 48 MBL0ssss THM Index image file of Clip Motion file recorded in MOBILE mode TXT0ssss GIF Still image file recorded in TEXT mode page 47 TXT0ssss THM Index image file ...

Page 37: ...rmat Most digital still cameras operating systems of computers and browser software adopt this format This format is able to compress files without appreciable deterioration However if the image is compressed and saved on repeated occasions the image will deteriorate This camera records still images using the JPEG format for normal recording GIF format Using this format the image will not deterior...

Page 38: ...w to use the control button When the menu or setup screen is displayed the control button is used to select the buttons images and menu items displayed on the LCD screen of your camera and modify the settings The operation methods that are frequently used for Advanced operations are described below To record still images in TWILIGHT mode To record still images To play back or edit images To record...

Page 39: ...en the mode dial is set to SET UP or 1 Press v V b B on the control button to select the item you want to set up 2 Press the center z on the control button to enter the item When the mode dial is set to or Press v V b B on the control button to select the setting of the item The selected setting is turned to yellow and the setup is complete ISO 0 EV EV WB 0 EV Press MENU to display clear the menu ...

Page 40: ... setting except when the mode dial is set to IMAGE SIZE x1216 912 1216 3 2 1024 768 640 480 Selects the image size when recording still images page 43 P QUALITY xFINE Records still images in the fine image quality mode STANDARD Records still images in the standard image quality mode MODE REC MODE TIFF Records a TIFF uncompressed file in addition to the JPEG file page 48 TEXT Records a GIF file in ...

Page 41: ...AL HOLD xAUTO IN DOOR OUT DOOR Sets the white balance page 51 IMAGE SIZE 320 240 x160 112 Selects the MPEG image size when recording moving images page 43 PFX P EFFECT SOLARIZE B W SEPIA NEG ART xOFF Sets the image special effects page 52 Item Setting Description EV 2 0EV to 2 0EV Adjust the exposure value page 50 WB WHITE BAL HOLD xAUTO IN DOOR OUT DOOR Sets the white balance page 51 IMAGE SIZE x...

Page 42: ...age page 58 CANCEL Cancels deleting of the image PROTECT Protects images against accidental erasure page 59 PRINT Marks the print mark on still images page 62 SLIDE INTERVAL Sets the slide show interval x3 sec 5 sec 10 sec 30 sec 1 min REPEAT xON OFF START Starts the slide show CANCEL Cancels the slide show RESIZE 1216 912 1024 768 640 480 CANCEL Changes the recorded image size page 61 ROTATE OK C...

Page 43: ...v V Still image sizes 1216 912 1216 3 2 1024 768 640 480 The image is recorded in the ratio of three to two to fit the printing paper size Using this image size the margin of an image is not printed out However the slight amount of the upper and lower black portions are displayed on the LCD screen Moving image MPEG movie sizes 320 240 160 112 Clip Motion sizes NORMAL 160 120 MOBILE 80 72 ...

Page 44: ...tual number of remaining images or recordable time may differ depending on the recording conditions Image size Usage Quality STANDARD FINE 1216 912 Printing in post card size Approx 12 Approx 6 1216 3 2 Printing in 3 2 ratio Approx 12 Approx 6 1024 768 Viewing on PC Approx 16 Approx 10 640 480 Attaching to e mail Approx 57 Approx 23 Image size Usage Number of images or time 320 240 Viewing on PC A...

Page 45: ...that you use a tripod to prevent shaking 2 Record the image To cancel the TWILIGHT mode Set the mode dial to Notes Set the forced flash when you use the flash in the TWILIGHT mode You cannot record moving images in the TWILIGHT mode 1 2 Tips Under normal recording conditions the camera automatically makes various adjustments such as those for the iris exposure and white balance as it shoots Howeve...

Page 46: ...s MENU The menu appears 3 Select MODE REC MODE with b B E MAIL with v V 4 Record the image The number of images that you can record on a Memory Stick 4 MB in E MAIL mode Image size Quality STANDARD FINE 1216 912 Approx 11 Approx 6 1216 3 2 Approx 11 Approx 6 1024 768 Approx 15 Approx 9 640 480 Approx 46 Approx 21 1 4 2 3 Remaining number of recordable images page 82 The actual number of remaining ...

Page 47: ...able images depends on the document condition such as the amount of text portions To return to normal recording mode Select NORMAL with v V in step 3 Image size Number of images 1216 912 Approx 19 95 1216 3 2 Approx 22 95 1024 768 Approx 26 95 640 480 Approx 59 158 1 4 2 3 Notes If the subject is not evenly illuminated you may be unable to record a clear image Writing and reading data take more ti...

Page 48: ...ge 43 TIFF images are recorded in 1216 912 size other than when 1216 3 2 is selected Writing data takes more time than in normal recording 1 4 2 3 Creating Clip Motion Files Mode dial Clip Motion is an animation function that plays back still images in succession The images are stored in GIF format which is convenient for creating home pages or attaching images to an e mail 1 Set the mode dial to ...

Page 49: ... each time you repeat steps 1 through 3 the recorded frame is deleted from the newest one MAKING CLIP MOTION The number of Clip Motion frames that you can record on a Memory Stick 4 MB When recording 10 frames per Clip Motion file Notes You cannot change the image size partway through a Clip Motion recording Reading and writing data take more time than normal image recording Due to the limitations...

Page 50: ...0 EV in steps of 1 3 EV Note If a subject is under extremely bright or dark situations or the flash is used the exposure adjustment may not be effective 1 2 3 Tips Normally the camera automatically adjusts the exposure If the color of the image is too dark or bright as illustrated below we recommend that you adjust the exposure manually When recording a backlighted subject or a subject in the snow...

Page 51: ...ly Under fluorescent lighting IN DOOR n Places where the lighting condition changes quickly Under bright lighting such as photography studios Under sodium or mercury lamps OUT DOOR Recording a sunrise sunset night scene neon signs or fireworks 1 2 3 To reactivate auto adjustment Select AUTO with v V in step 3 Tips The image is susceptible to lighting conditions The image looks blue under sunlight ...

Page 52: ...old photograph NEG ART The color and brightness of the picture are reversed as in a negative OFF Does not use the picture effect function To cancel picture effect Select OFF with v V in step 3 1 2 3 Recording the date and time on the still image DATE TIME Mode dial 1 Set the mode dial to SET UP The setup screen appears 2 Select CAMERA with v V DATE TIME with B v V then press B 3 Select the date an...

Page 53: ... the LCD screen during shooting These appear during playback only Notes If you select DATE in step 3 the date is imposed onto the image in the order selected with Setting the date and time page 15 The date and time are not superimposed onto moving images or Clip Motion images 2001 7 ...

Page 54: ...rding to the image type and settings Moving image file E mail file Print mark Protect mark TEXT TEXT file TIFF TIFF file CLIP Clip Motion file No mark Normal recording no settings To display the next previous index screen Press the control button v V b B To return to normal playback single image Press the zoom T button repeatedly Press the control button z Note When viewing an image recorded in Cl...

Page 55: ...th B then press z 3 Select the image size with v V then press z The image is recorded and the image on the LCD screen returns to the normal size after recording 1 3 2 4 Notes You cannot zoom moving images You can zoom images recorded in TEXT mode but cannot trim them Zoom scaling is up to 5 regardless of the original image size The quality of enlarged images may be deteriorated The original data i...

Page 56: ...econds 5 sec 5 seconds or 3 sec 3 seconds REPEAT ON Plays back images in a continuous loop OFF After all images have been played back the slide show ends 4 Select START with v V b B then press z The slide show begins To cancel the SLIDE SHOW setting Select CANCEL with v V b B in step 3 then press z 1 2 3 4 To stop the SLIDE SHOW playback Press z select EXIT with B then press z To skip to the next ...

Page 57: ...ATE with b B then press z 4 Select with v V then rotate the image with b B Select OK with v V then press z To cancel rotation Select CANCEL with v V in step 4 then press z Notes You cannot rotate protected or uncompressed images or images recorded in TEXT mode You may not be able to rotate images recorded with other equipment Also when viewing images on a computer the image rotation information ma...

Page 58: ...image in triple image mode is deleted In single image or triple image mode 1 W 2 4 5 3 1 Set the mode dial to then display the index screen with the zoom W button 2 Press MENU The menu appears 3 Select DELETE with b B then press z 4 Select ALL or SELECT with b B then press z 5 When you select ALL Select ENTER with b B then press z All the unprotected images are deleted When you select SELECT The f...

Page 59: ...e dial to 2 In single image mode Display the image you want to protect with b B In triple image mode Press the zoom W button twice in the single image mode to turn to the triple image mode Display the image you want to protect with b B 3 Press MENU The menu appears 4 Select PROTECT with b B in single image mode or with v V in triple image mode then press z The displayed image or the middle positio...

Page 60: ...en press z To cancel press z again Repeat this step to select other images The indicator appears on the selected images 2 Press MENU In index mode 1 W 3 4 5 2 MENU SET TO NEXT 3 Select OK with b B then press z To release protection If you selected ALL in step 4 select OFF with b B then press z If you selected SELECT in step 4 select the images to be unprotected with v V b B then press z Repeat thi...

Page 61: ... step 4 then press z 1 2 3 4 Notes The original image is retained even after resizing You cannot change the size of images recorded in TEXT mode moving images uncompressed images or Clip Motion images The resized image is recorded as the newest file If you resize an image the remaining Memory Stick capacity will be decreased When you change from a small size to a large size the picture quality det...

Page 62: ...e image mode then press z The print mark is marked on the displayed image or the middle positioned image in triple image mode In single image or triple image mode 1 W 2 4 3 To unmark the print mark Press z again in step 4 mark disappears 1 Set the mode dial to then display the index screen with the zoom W button 2 Press MENU The menu appears 3 Select PRINT with b B then press z 4 Select SELECT wit...

Page 63: ...s recorded at the same time Dividing a moving image file DIVIDE Mode dial You can divide moving images recorded in MPEG MOVIE mode This is convenient when there is not enough space on a Memory Stick or when attaching moving images to e mails 1 Set the mode dial to and display the moving image you want to divide 2 Press MENU The menu appears 3 Select DIVIDE with b B then press z select OK with v V ...

Page 64: ... 1 Display the portion of the moving image you want to delete and press MENU 2 Select DELETE with b B then press z 3 Select OK with v V then press z 1 MOV00003 mpg 2 1 2 MOV00005 mpg MOV00004 mpg DIVIDE point Divided at the designated point Step 1 Divide the unwanted scene A Step 2 Divide the unwanted scene B Step 3 Delete the unwanted scenes A and B Step 4 Only the desired scene remains Notes You...

Page 65: ...e 23 Item Setting Description FORMAT OK Formats a Memory Stick Note that formatting erases all the information recorded on a Memory Stick including even erasure protected images page 79 CANCEL Cancels formatting of a Memory Stick FILE NUMBER xSERIES Assigns numbers to files in sequence even if the Memory Stick is changed RESET Resets the file numbering each time the Memory Stick is changed LANGUAG...

Page 66: ...faster BEEP SHUTTER Turns on the shutter sound only The shutter sound is heard when you press the shutter button xON Turns on the beep shutter sound when you press the control button shutter button OFF Turns off the beep shutter sound USB CONNECT PTP Switches the USB mode page 29 xNORMAL POWER SAVE xON Set to ON to extend the battery life when operating the camera with batteries OFF When POWER SAV...

Page 67: ...mera from a cold place to a warm place seal the camera in a plastic bag and allow it to adapt to conditions at the new location over a period of time about an hour If moisture condensation occurs Turn off the camera and wait about an hour for the moisture to evaporate Note that if you attempt to record with moisture remaining inside the lens you will be unable to record clear images Unplug the uni...

Page 68: ... or new alkaline batteries and leave the camera for 24 hours or more with the POWER button set to OFF On Memory Sticks Memory Stick is a new compact portable and versatile IC recording medium with a data capacity that exceeds a floppy disk Memory Stick is specially designed for exchanging and sharing digital data among Memory Stick compatible products Because it is removable Memory Stick can also ...

Page 69: ...using the LCD panel wears out the battery pack faster Be certain to turn the POWER to off when not taking shots or playing back on your camera We recommend having spare batteries handy for two or three times the expected shooting time and make trial shots before taking the actual shots Do not expose the battery pack to water The battery pack is not water resistant Remaining battery time indicator ...

Page 70: ...ces You can use your camera in any country or area with the battery charger not supplied within 100 V to 240 V AC 50 60 Hz Use a commercially available AC plug adaptor a if necessary depending on the design of the wall outlet mains b AC LS1 ...

Page 71: ...era does not work The battery level is low the E indicator appears on the LCD screen tReplace the alkaline batteries or charge the battery pack pages 10 12 The AC power adaptor is not connected securely tConnect it firmly to the DC IN jack of your camera and a wall outlet mains pages 12 14 The built in microcomputer is not working properly tDisconnect and then reconnect all power sources after one...

Page 72: ...y tAdjust so that the lighting strikes the subject evenly You cannot record images in TEXT mode The mode dial is set to tSet the mode dial to You cannot display a print mark You cannot display print marks on moving images text images and Clip Motion images The picture is noisy Your camera is placed near a TV or other equipment that uses strong magnets tMove your camera away from the TV etc The pic...

Page 73: ...pages 10 12 A deviation has occurred in the remaining battery time tFully charge the battery pack page 12 You cannot charge the battery pack The camera is turned on t Turn the camera off page 12 The CHG lamp flashes during charging the battery pack The battery pack is not installed correctly tInstall the battery pack correctly page 10 The battery pack has malfunctioned tContact your Sony dealer or...

Page 74: ...mera The battery level is low tUse the AC power adaptor not supplied page 14 The camera is turned off tTurn on the camera The USB cable is not connected firmly tDisconnect the USB cable and connect it again firmly Make sure that USB MODE is displayed on the LCD screen pages 31 33 The USB connectors on your personal computer are connected to other equipment besides the keyboard the mouse and your c...

Page 75: ...move the battery pack then install it again after about one minute If the function still do not work press the reset button located on the bottom using a sharp pointed object If you press the reset button the date and time setting is cleared Symptom Cause and or Solution ...

Page 76: ...he computer 8 Install the USB driver in the supplied CD ROM to the computer following the procedure on page 31 For Windows 98 Windows 98SE and Windows Me users For Windows 2000 Professional users Log in with the permission of administrator 1 Open Control Panel from My Computer then double click System 2 System properties is displayed Click the Device Manager tab located at the top 3 Click Sony DSC...

Page 77: ...mory Stick is full and you cannot record images NO FILE No image has been recorded on the Memory Stick FILE ERROR An error occurred while playing back the image FILE PROTECT The image is protected against erasure DIRECTORY ERROR A directory with the same name already exists on the Memory Stick IMAGE SIZE OVER You are playing back an image of a size that cannot be played back with your camera INVAL...

Page 78: ...78 The amount of light is not sufficient or the shutter speed is too slow Mount the camera on a tripod or otherwise secure the camera in place LENS COVER CLOSED The lens cover is closed Message Meaning ...

Page 79: ...emory Stick page 65 The inserted Memory Stick cannot be used with your camera or is damaged t Insert a new Memory Stick page 17 The camera cannot read or write data on the Memory Stick t Re insert the Memory Stick several times E 92 ss You are using a battery pack that is not InfoLITHIUM compatible t Use an InfoLITHIUM battery pack You installed or removed the InfoLITHIUM battery pack when using t...

Page 80: ...eset button located on the bottom contact your Sony dealer or local authorized Sony service facility E 61 ss E 91 ss A camera malfunction that you cannot reverse has occurred t Contact your Sony dealer or local authorized Sony service facility and inform them of the 5 digit service code example E 61 10 First three digits Cause and or Corrective Action ...

Page 81: ...Operation temperature 0 C to 40 C 32 F to 104 F Storage temperature 20 C to 60 C 4 F to 140 F Maximum dimensions 123 62 46 mm 4 7 8 2 1 2 1 13 16 inches w h d Mass Approx 230 g 8 oz including two size AA batteries Memory Stick and wrist strap etc AC LS1 AC power adaptor not supplied Power requirements 100 to 240 V AC 50 60 Hz Rated output voltage DC 4 2 V 1 5 A in operating mode Operation temperat...

Page 82: ...or L Remaining number of recordable images indicator Self diagnosis function indicator The actual number of remaining images may differ depending on the recording conditions M Remaining memory capacity indicator N Macro indicator O EV level indicator P Aperture value indicator Q Shutter speed indicator R Self timer indicator S Light amount warning indicator T Menu and guide menu Pressing MENU swit...

Page 83: ...ing time maximum recordable time indicator Self diagnosis function indicator G Remaining memory capacity indicator H Macro indicator I EV level indicator J Self timer indicator K Spot light metering cross hair L Menu and guide menu Pressing MENU switches the menu on off The indicators during recording moving images STBY min SOLARIZE WB PFX EV 456 7 8 9 qs qa 3 2 1 0 ...

Page 84: ...ate of the playback image menu and guide menu A Recording mode indicator B Image size indicator C Image number number of stored images in Memory Stick D Remaining memory capacity indicator E Counter F Playback image G Play bar H Menu and guide menu When playing back still images 120min 11 12 640 4 5 7 6 8 1 2 3 9 x1 3 FILE BACK NEXT When playing back moving images 60min 0 12 320 6 8 DELETE PROTECT...

Page 85: ...the camera for a long time Do not disassemble batteries short the terminals with metallic objects or place batteries in or near heat sources Be sure to replace both batteries at the same time In addition do not mix new and old batteries or different types of batteries such as alkaline and nickel metal hydride batteries InfoLITHIUM battery pack NP FS11 recommended not supplied Size AA alkaline batt...

Page 86: ...E mode 48 Mode dial 18 38 Moisture condensation 67 Moving images playing back 28 recording 25 MPEG 25 37 N Number of recordable images Clip Motion 49 E mail mode 46 Image size 44 TEXT mode 47 TIFF mode 48 P Picture effect 52 Playing back INDEX screen 54 moving images 28 Slide show 56 still images 27 POWER button 15 Power save mode 11 Power supply AC power adaptor 14 battery pack 12 PRINT MARK 62 P...

Page 87: ......

Page 88: ...Sony Corporation Printed in Japan 306976111 ...

Reviews: