

CMT-SBT100/SBT100B (GB) 4-464-274-
13
(2)
WARNING
To reduce the risk of fire, do not cover the
ventilation opening of the appliance with
newspapers, tablecloths, curtains, etc.
Do not expose the appliance to naked flame
sources (for example, lighted candles).
To reduce the risk of fire or electric shock, do not
expose this appliance to dripping or splashing,
and do not place objects filled with liquids, such
as vases, on the appliance.
Do not install the appliance in a confined space,
such as a bookcase or built-in cabinet.
As the main plug is used to disconnect the unit
from the mains, connect the unit to an easily
accessible AC outlet. Should you notice an
abnormality in the unit, disconnect the main plug
from the AC outlet immediately.
Do not expose batteries or appliances with
battery-installed to excessive heat, such as
sunshine and fire.
The unit is not disconnected from the mains as
long as it is connected to the AC outlet, even if the
unit itself has been turned off.
Excessive sound pressure from earphones and
headphones can cause hearing loss.
This equipment has been tested and found to
comply with the limits set out in the EMC Directive
using a connection cable shorter than 3 meters.
CAUTION
The use of optical instruments with this product
will increase eye hazard.
This appliance is
classified as a CLASS
1 LASER product. This
marking is located on
the rear exterior of the
unit.
For customers in Australia
This equipment should be installed and operated
with at least 20 cm and more between the
radiator and person’s body (excluding extremities:
hands, wrists, feet and ankles).
For customers in Europe
Properly shielded and grounded cables and
connectors must be used for connection to host
computers and/or peripherals.
Notice for customers: the following
information is only applicable to
equipment sold in countries applying
EU directives.
This product has been manufactured by or on
behalf of Sony Corporation, 1-7-1 Konan Minato-
ku Tokyo, 108-0075 Japan. Inquiries related to
product compliance based on European Union
legislation shall be addressed to the authorized
representative, Sony Deutschland GmbH,
Hedelfinger Strasse 61, 70327 Stuttgart, Germany.
For any service or guarantee matters, please refer
to the addresses provided in the separate service
or guarantee documents.
Hereby, Sony Corp., declares that this equipment
is in compliance with the essential requirements
and other relevant provisions of Directive 1999/5/
EC.
For details, please access the following URL:
http://www.compliance.sony.de/
For customers in Europe and Australia
Disposal of Old Electrical &
Electronic Equipment
(Applicable in the European
Union and other European
countries with separate
collection systems)
This symbol on the product or on its packaging
indicates that this product shall not be treated as
household waste. Instead it shall be handed over
to the applicable collection point for the recycling
of electrical and electronic equipment. By
ensuring this product is disposed of correctly, you
will help prevent potential negative consequences
for the environment and human health, which
could otherwise be caused by inappropriate
waste handling of this product. The recycling of
materials will help to conserve natural resources.
For more detailed information about recycling of
this product, please contact your local Civic Office,
your household waste disposal service or the
shop where you purchased the product.
Disposal of waste batteries
(applicable in the European
Union and other European
countries with separate
collection systems)
This symbol on the battery or on the packaging
indicates that the battery provided with this
product shall not be treated as household waste.
On certain batteries this symbol might be used
in combination with a chemical symbol. The
chemical symbols for mercury (Hg) or lead (Pb)
are added if the battery contains more than
0.0005% mercury or 0.004% lead.
By ensuring these batteries are disposed of
correctly, you will help prevent potentially
negative consequences for the environment and
human health which could otherwise be caused
by inappropriate waste handling of the battery.
The recycling of the materials will help to conserve
natural resources.
In case of products that for safety, performance
or data integrity reasons require a permanent
connection with an incorporated battery, this
battery should be replaced by qualified service
staff only. To ensure that the battery will be
treated properly, hand over the product at end-
of-life to the applicable collection point for the
recycling of electrical and electronic equipment.
For all other batteries, please view the section
on how to remove the battery from the product
safely. Hand the battery over to the applicable
collection point for the recycling of waste
batteries.
For more detailed information about recycling of
this product or battery, please contact your local
Civic Office, your household waste disposal service
or the shop where you purchased the product.
Europe Only
Getting Started
red
Remote
Operations
Playing a CD-DA/MP3 disc
1
Press CD FUNCTION
on the remote or press
FUNCTION
on the unit repeatedly until “CD”
appears in the display
.
2
Press the
(open/close) button
to open
the disc tray
.
3
Load a disc with the label side facing up.
Label side
(printed side)
(open/close)
4
Press the
(open/close) button
to close
the disc tray
.
5
Press
(play/pause) button
.
Playback starts.
Notes
ˎ
If you cannot remove the disc and “LOCKED” appears in the
display
, contact your nearest Sony dealer.
ˎ
Do not load a disc with non-standard shapes (e.g., heart,
square, star). Doing this may cause irreparable damage to
the system.
ˎ
Do not use a disc with tape, stickers or paste on it as this
may cause malfunction.
ˎ
When you remove a disc, do not touch the surface of the
disc.
Other operations
To
Do the following:
Pause playback
Press
. To resume play,
press the button again.
Stop playback
Press
.
Select a track
or file
Press
/
.
Find a point in a
track or file
Hold down
/
(or
/
on the unit)
during playback, and release
the button at the desired point.
Select Repeat
Play
Press REPEAT
repeatedly
until “ ” (all tracks of files)
or “ 1” (single track or file)
appears.
Select a folder on
an MP3 disc
Press
+/
repeatedly.
Remove a disc
Press
on the unit.
To change the play mode
Press PLAY MODE
repeatedly while the player
is stopped. You can select Normal Play mode (no
indication or “FLDR”* appears), Shuffle Play mode
(“SHUF” or “FLDR SHUF”* appears), or Program
Play mode (“PGM” appears).
Play mode
* When “FLDR” or “FLDR SHUF” appears, all the files in the
selected folder on the MP3 disc will be played. When
playing a CD-DA disc, the system performs the same
operation as Normal Play (no indication) or Shuffle Play
“SHUF.”
When “PUSH STOP” appears
You cannot change the play mode during
playback. Stop playback then change the play
mode.
Note on the play mode
If the power cord is disconnected when the
system is on, the play mode returns to Normal
Play.
Notes on Repeat Play
ˎ
“
” indicates that all tracks or files will be repeated until
you stop playback.
ˎ
“
1” indicates that a single track or file will be repeated
until you stop playback.
ˎ
If the power cord is disconnected when the system is on,
Repeat Play is cancelled.
Notes on Shuffle Play mode
ˎ
When Shuffle Play mode is set to “SHUF,” the system
shuffle-plays all tracks or files on the disc. When Shuffle
Play mode is set to “FLDR SHUF,” the system shuffle-plays all
tracks or files in selected folder.
ˎ
When you turn off the system, the selected Shuffle Play
mode (“SHUF” or “FLDR SHUF”) is cleared and the play mode
returns to Normal or FLDR Play mode.
Notes on playing MP3 discs
ˎ
Do not save unnecessary folders or files on a disc that has
MP3 files.
ˎ
Folders that have no MP3 files are not recognized on the
system.
ˎ
The system can only play MP3 files that have a file extension
of “.mp3.”
ˎ
Even when file name has the “.mp3” file extension, if it is
not an audio MP3 file, playing this file may generate a loud
noise, which could cause damage of the system.
ˎ
The maximum number of MP3 folders and files compatible
with this system is:
999* folders (including the root folder)
999 files
250 files in a single folder
8 folder levels (in the tree structure of files)
ˎ
Compatibility with all MP3 encoding/writing software, CD-R/
RW drive and recording device, and recording media cannot
be guaranteed. Incompatible MP3 discs may produce noise
or interrupted audio or may not play at all.
* This include folders that have no MP3 or other files. The
number of folders that the system can recognize may
be less than actual number of folders, depending on the
folder structure.
Creating your own program
(Program Play)
1
Press CD FUNCTION
on the remote or press
FUNCTION
on the unit repeatedly until “CD”
appears in the display
.
2
Press PLAY MODE
repeatedly until “PGM”
appears while the player is stopped.
3
Select a folder (MP3 disc only).
Press
+/
repeatedly to select the
desired folder.
If you want to program all files in the folder,
press
.
4
Select the desired track or file number.
Press
/
repeatedly until the desired
track or file number appears.
Total playing time
of the selected
track or file
Selected track
or file number
5
Press
.
“--.--” appears when the total playing time
exceeds 100 minutes for an CD-DA or when you
program an MP3 files.
6
Repeat steps 3 through 5 to program
additional tracks or files, up to a total of 25
tracks or files.
7
Press
.
Your program of tracks or files starts playback.
The programmed files or tracks remain
available until you remove the disc from the
disc tray
or unplug the power cord.
To play the same program again, press
.
To cancel Program Play
Press PLAY MODE
repeatedly until “PGM”
disappears while the player is stopped.
To delete the last track or file of the
program
Press CLEAR
while the player is stopped.
Notes
ˎ
If the disc is ejected after programming, all the programmed
tracks or files are deleted.
ˎ
If the power cord is disconnected when the system is on,
the programmed tracks or files are deleted.
Listening to the radio
Tuning in a radio station
1
Press TUNER FUNCTION
on the remote or
press FUNCTION
on the unit repeatedly
until “TUNER FM” or “TUNER AM” appears
(CMT-SBT100), or “DAB” or “TUNER FM”
appears (CMT-SBT100B) in the display.
2
Perform tuning.
For automatic scanning
Press TUNING MODE
repeatedly until “AUTO”
appears, and then press TUNE +/
. Scanning
stops automatically when a station is tuned in,
and “STEREO” (for stereo programs only) appears
in the display
.
If the scanning does not stop, press
to stop
scanning, then perform manual tuning (below).
When you tune in a station that provides RDS
services, information such as the service name or
station name is provided by broadcasts.
For manual tuning
Press TUNING MODE
repeatedly until
“MANUAL” appears, and then press TUNE +/
repeatedly to tune in the desired station.
Notes on DAB/DAB+ stations (CMT-
SBT100B only)
ˎ
Before tuning in DAB/DAB+ stations, make sure that the
DAB Initial Scan has been performed.
ˎ
When you tune in a station that provides RDS services,
information such as the service name or station name is
provided by broadcasts.
ˎ
When tuning in a DAB/DAB+ station, it may take a few
seconds before you hear any sound.
ˎ
Primary service is automatically received when secondary
service ends.
ˎ
This tuner does not support data services.
Tip
To reduce static noise on a weak FM stereo station, press FM
MODE
repeatedly until “MONO” appears to turn off stereo
reception.
To change the AM tuning interval
(except for European and Russian
models)
The default setting for AM tuning interval is 9 kHz
(or 10 kHz for some areas). Use the buttons on the
unit to perform this operation.
1
Press FUNCTION
on the unit repeatedly to
select the AM station.
2
Press
/
to turn off the system.
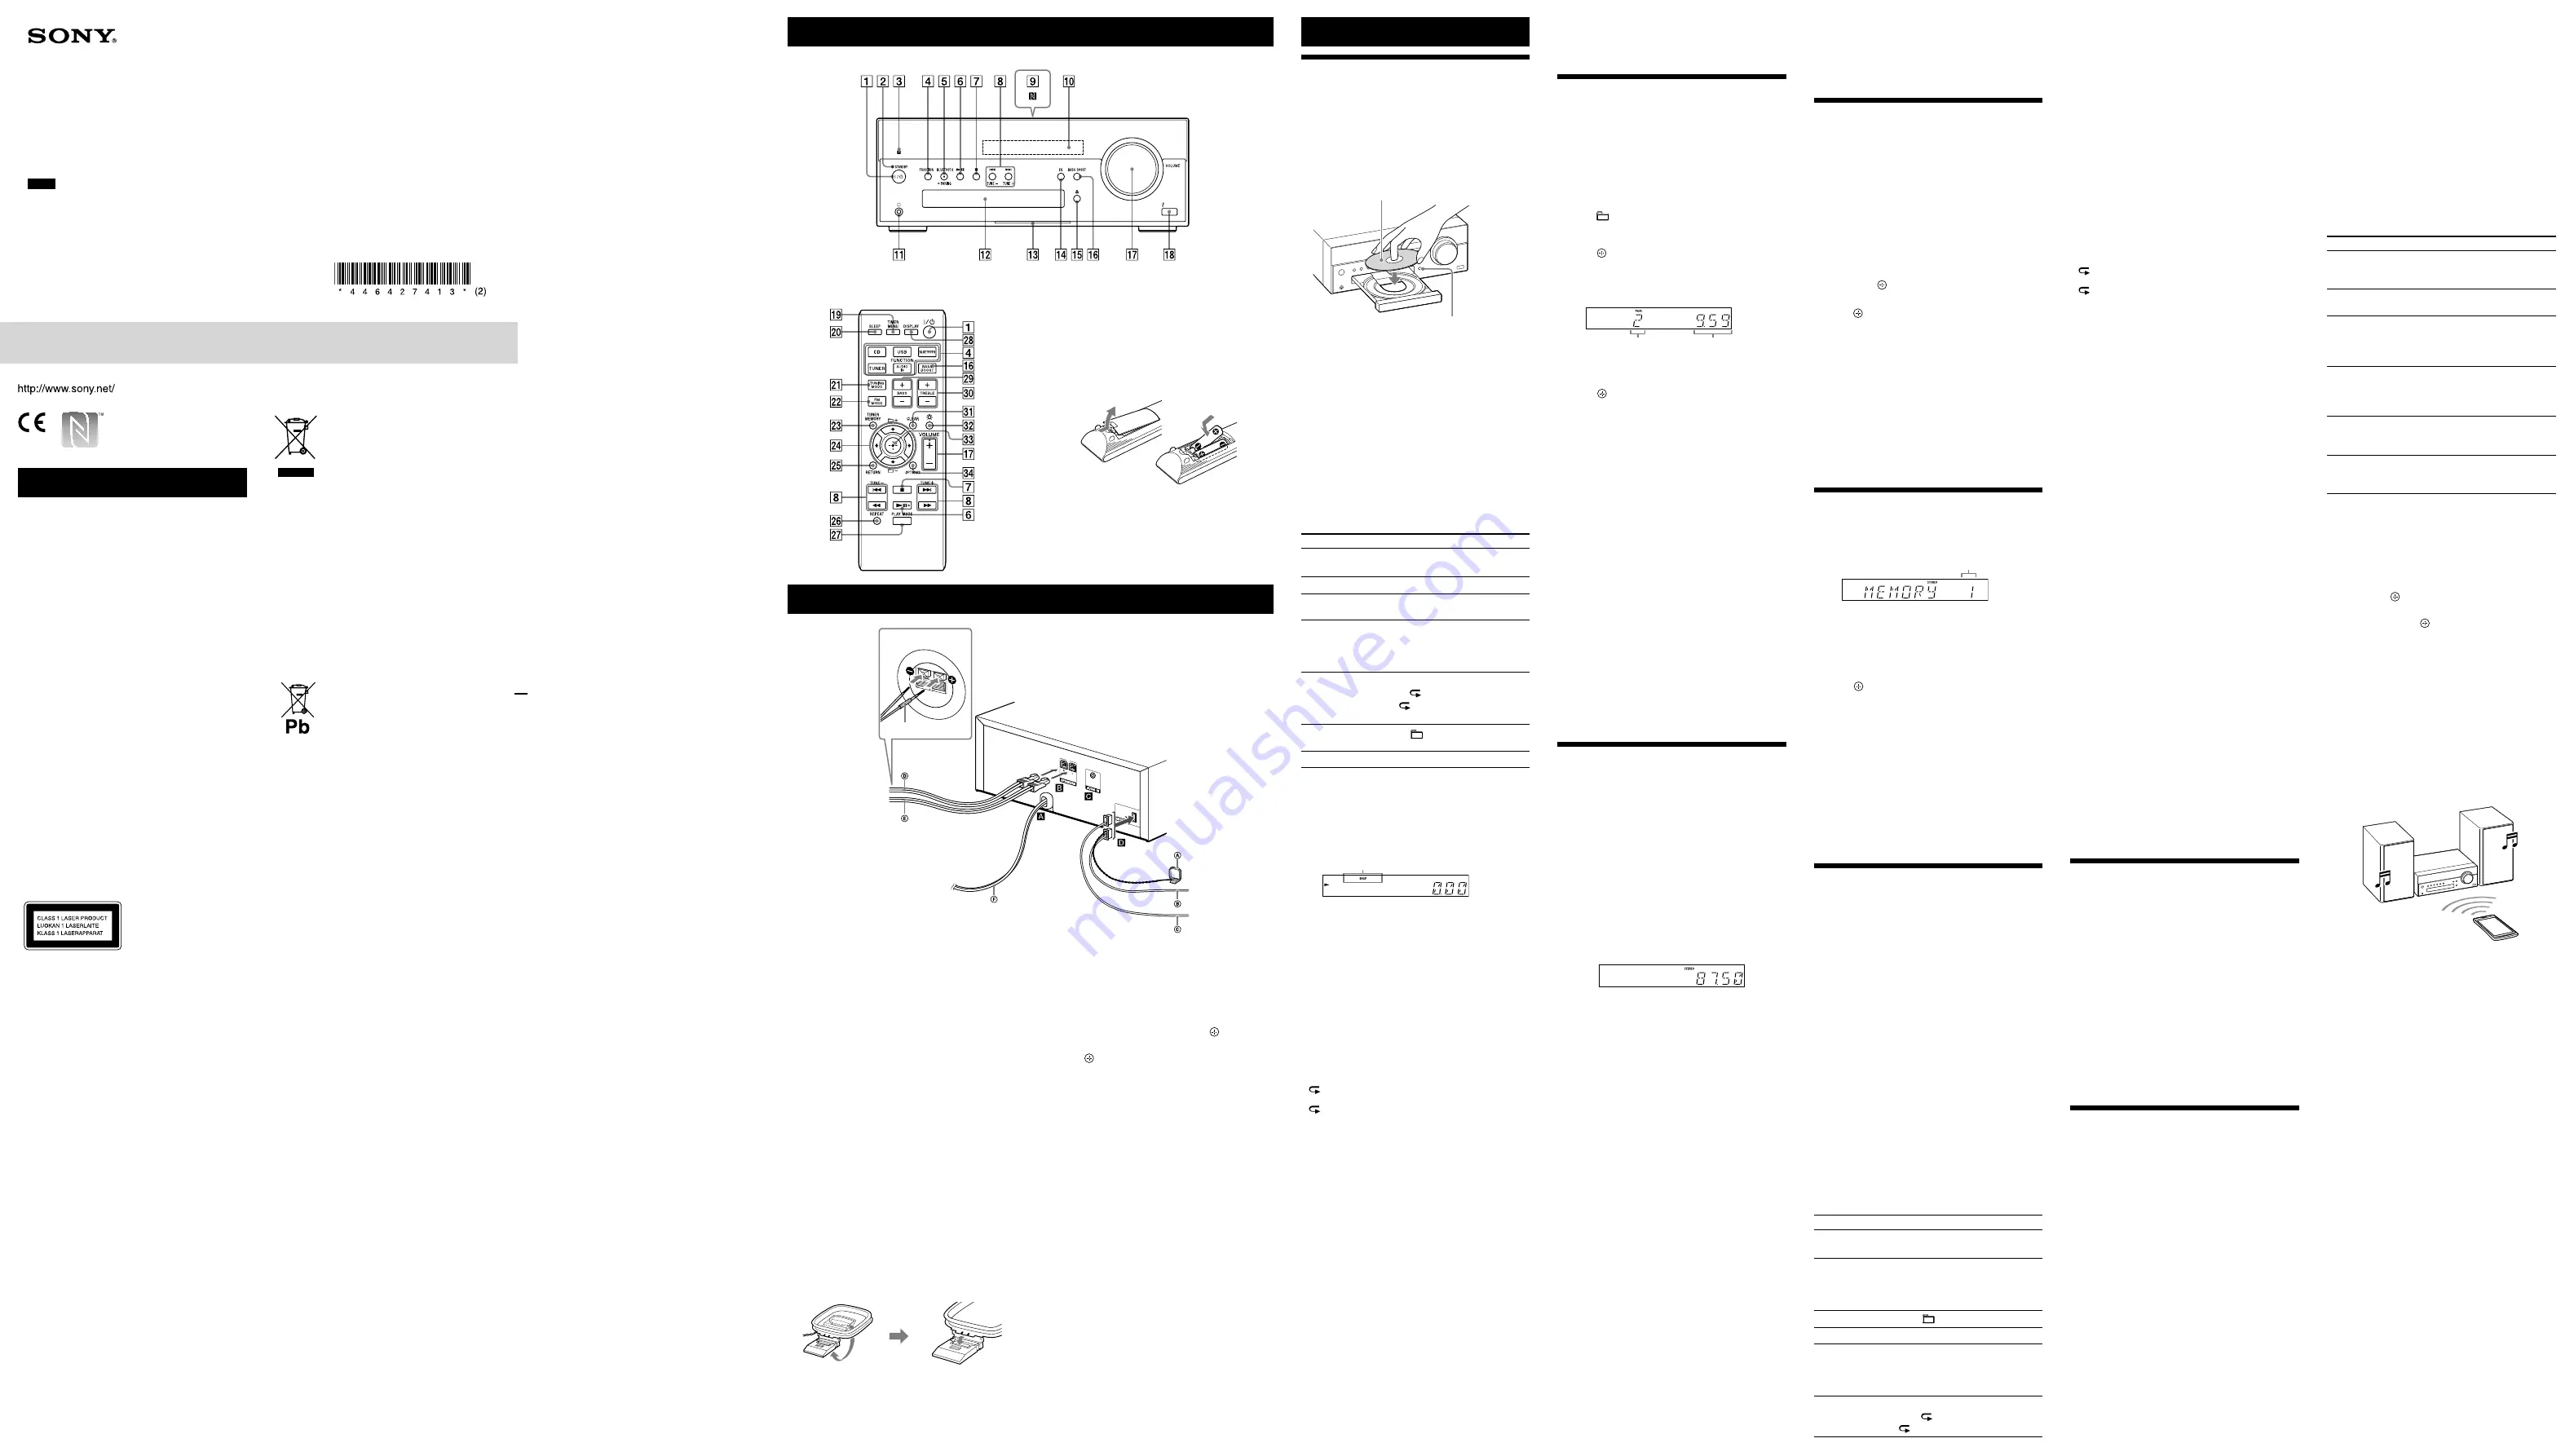
Power input (AC IN)
After all equipments are connected, connect the
power cord
to the wall outlet.
Speakers (left/right) connectors
Firmly connect the right speaker cord
to R, and
the left speaker cord
to L.
AUDIO IN (external input) jack
Connect optional external equipment with an
audio connecting cable (not supplied).
Antennas
AM loop antenna (supplied) (CMT-SBT100 only)
FM lead antenna (supplied) (CMT-SBT100 only)
DAB/FM lead antenna (supplied) (CMT-
SBT100B only)
Find a location and an orientation that provide
good reception, and then fix the antennas to a
stable surface (window, wall, etc.).
Keep the antennas away from the unit, power
cord and other AV components to avoid picking
noise.
Secure the end of the FM lead antenna with
adhesive tape.
To prepare the AM loop antenna
Rewind an
antenna cord
wound around the
antenna and raise
the antenna stand.
Stand the
antenna and
secure it to the
slit until it clicks.
This manual mainly explains operations using
the remote, but the same operations can also be
performed using the buttons on the unit having
the same or similar names.
To use the remote
Slide and remove the battery compartment lid,
and insert the two supplied R6 (size AA) batteries,
side first, matching the polarities shown below.
Notes on using the remote
ˎ
With normal use, the batteries should last for about 6
months.
ˎ
Do not mix an old battery with a new one or mix different
types of batteries.
ˎ
If you do not use the remote for a long period of time,
remove the batteries to avoid damage from battery leakage
and corrosion.
Location of Controls
Unit (Front)
Tip
When you use headphones, connect to
(headphone) jack
.
*1
When playing a VBR MP3/WMA file, the system may
resume playback from a different point.
*2
When resume play is canceled, the display returns to the
number of folders.
To change the play mode
Press PLAY MODE
repeatedly while the player
is stopped. You can select Normal Play mode (no
indication or “FLDR” appears
*1
), or Shuffle Play
mode (“SHUF” or “FLDR SHUF” appears
*2
).
*1
When no indication is selected, the system plays all files on
the USB device. When “FLDR” is selected, the system plays
all files in the selected folder on the USB device.
*2
When “SHUF” is selected, the system shuffle-plays all audio
files on the USB device. When “FLDR SHUF” is selected, the
system shuffle-plays all audio files in the selected folder.
Note on the play mode
If the power cord is disconnected when the
system is on, the play mode returns to Normal
Play.
Notes on Repeat Play
ˎ
“
” indicates that all files will be repeated until you stop
playback.
ˎ
“
1” indicates that a single file will be repeated until you
stop playback.
ˎ
If the power cord is disconnected when the system is on,
Repeat Play is cancelled.
Note on Shuffle Play mode
When you turn off the system, the selected Shuffle Play
mode (“SHUF” or “FLDR SHUF”) is cleared and the play mode
returns to Normal Play mode (no indication or “FLDR”).
Notes
ˎ
The playback order for the system may differ from the
playback order of the connected digital music player.
ˎ
Be sure to turn off the system before removing the USB
device. Removing the USB device while the system is turned
on may corrupt the data on the USB device.
ˎ
When USB cable connection is necessary, connect the USB
cable supplied with the USB device to be connected. For
details on connection, refer to the operation manual of the
USB device.
ˎ
It may take time before “READING” appears after
connecting, depending on the type of USB device
connected.
ˎ
Do not connect the USB device through a USB hub.
ˎ
When the USB device is connected, the system reads all the
files on the USB device. If there are many folders or files on
the USB device, it may take a long time to finish reading the
USB device.
ˎ
With some connected USB devices, it may take a long time
to transmit signals from the system or to finish reading the
USB device.
ˎ
Compatibility with all encoding/writing software cannot be
guaranteed. If audio files on the USB device were originally
encoded with incompatible software, those files may
produce noise or ,may malfunction.
ˎ
The maximum number of folders and files on the USB
device compatible with this system is:
1,000* folders (including the root folder)
3,000 files
250 files in a single folder
8 folder levels (in the tree structure of files)
* This includes folders that have no playable audio file and
empty folders. The number of folders that the system
can recognize may be less than actual number of folders,
depending on the folder structure.
ˎ
The system does not necessarily support all the functions
provided in a connected USB device.
ˎ
Folders that have no audio files are not recognized.
ˎ
The audio formats that you can listen to with this system are
as follows:
MP3: file extension “.mp3”
WMA: file extension “.wma”
AAC: file extension “.m4a,” “mp4” or “.3gp”
Note that even when file name has the correct file
extension, if the actual file differs, the system may produce
noise or may malfunction.
Charging a USB device or iPod/
iPhone/iPad
If you connect a USB device or iPod/iPhone/iPad
to the USB port
when the system is turned on,
charging begins automatically.
To stop charging the USB device
Press
/
to turn off the system, and then
disconnect the USB cable.
Notes
ˎ
You cannot charge the USB device or iPod/iPhone/iPad
when the system is off. Some USB devices and iPod/iPhone
may not be charged owing to their characteristics.
ˎ
If the system enters Standby mode during charging of a
USB device or iPod/iPhone/iPad, the charging stops in
progress. Before charging, turn off the Automatic Standby
function. For details, see “Setting the Automatic Standby
function.”
Using the BLUETOOTH function
You can listen to music from your iPod/iPhone/
iPad or BLUETOOTH device over a wireless
connection.
Before using the BLUETOOTH function, perform
pairing to register your BLUETOOTH device.
The system supports registration and connection
of the BLUETOOTH device and NFC, which enables
data communication by just touching a specified
location. For details on NFC, see “Connecting by
one-touch action (NFC).”
What is pairing?
The BLUETOOTH devices to be connected must be
registered with each other beforehand. Pairing is
an operation of registering two devices.
Once a pairing operation is performed, it does
not have to be performed again. In the following
cases, however, a pairing operation must be
performed again:
ˎ
Pairing information was erased when the
BLUETOOTH device was repaired.
3
Press and hold FUNCTION
and press
/
on the unit.
“STEP 9K” or “STEP 10K” appears in the display
. When you change the interval, all the AM
preset stations are erased.
Running the DAB Automatic Scan
manually (CMT-SBT100B only)
Before you can tune in DAB/DAB+ stations, you
must perform a DAB Initial Scan.
When you have moved to another area, also
perform the DAB Initial Scan manually to update
the DAB/DAB+ service information.
1
Press TUNER FUNCTION
on the remote or
press FUNCTION
on the unit repeatedly
until “DAB” appears in the display
.
2
Press OPTIONS
to display the setting menu.
3
Press
/
repeatedly to select “INITIAL,”
then press
.
4
Press
/
repeatedly to select “OK,” then
press
.
Scanning begins. The scanning progress is
indicated by asterisks (*******). Depending on
the DAB/DAB+ services available in your area,
scanning may take a few minutes.
When scanning is complete, a list of available
services is created.
Notes
ˎ
If your country or region does not support DAB/DAB+
broadcast,“NO SERV” appears.
ˎ
This procedure clears all previously stored presets.
ˎ
Before unplugging the DAB/FM lead antenna, make sure
the system is turned off to preserve your own DAB/DAB+
settings.
Presetting radio stations
1
Tune in the desired station.
2
Press TUNER MEMORY
.
Preset number
3
Press TUNE +/
repeatedly to select a
preset number.
If another station is already assigned to the
selected preset number, the station is replaced
by the new station.
4
Press
to register the station.
“COMPLETE” appears in the display
.
5
Repeat steps 1 through 4 to register other
stations.
You can preset up to 20 FM and 10 AM stations
(CMT-SBT100 only), or 20 DAB/DAB+ and 20 FM
stations (CMT-SBT100B only).
To tune in to a preset radio station
Press TUNING MODE
repeatedly until “PRESET”
appears in the display
, and then press TUNE
+/
to select the preset number to which the
desired station is registered.
Playing a file on a USB device
You can play audio files stored on a USB device by
connecting a USB memory or USB device to the
system. The playable audio format is MP3/WMA*/
AAC*.
Check the websites below for the information
about compatible USB devices.
For customers in Europe and Russia:
http://support.sony-europe.com/
For customers in Latin America:
http://www.sony-latin.com/index.crp
For customers in other countries/regions:
http://www.sony-asia.com/support
* Files with DRM (Digital Rights Management) copyright
protection or files downloaded from an online music store
cannot be played on this system. If you try to play one of
these files, the system plays the next unprotected audio
file.
1
Press USB FUNCTION
on the remote or
press FUNCTION
on the unit repeatedly
until “USB” appears in the display
.
2
Connect the USB device directly or via the USB
cable supplied with the USB device to the USB
port
on the unit.
3
Press
to start playback.
Other operations
To
Do the following:
Pause playback Press
. To resume play,
press the button again.
Stop playback
Press
. To resume play,
press
*1
. To cancel
resume play, press
again
*2
.
Select a folder
Press
+/
repeatedly.
Select a file
Press
/
.
Find a point in
a file
Hold down
/
(
/
on the unit)
during playback, and release
the button at the desired point.
Select Repeat
Play
Press REPEAT
repeatedly
until “ ” (all audio files) or
“ 1” (single audio file) appears.
Note on DualDiscs
A DualDisc is a two sided disc product which
mates DVD recorded material on one side with
digital audio material on the other side. However,
since the audio material side does not conform to
the Compact Disc (CD) standard, playback on this
product is not guaranteed.
Music discs encoded with copyright
protection technologies
This product is designed to playback discs that
conform to the Compact Disc (CD) standard.
Recently, various music discs encoded with
copyright protection technologies are marketed
by some record companies. Please be aware
that among those discs, there are some that do
not conform to the CD standard and may not be
playable by this product.
License and Trademark Notice
ˎ
Windows Media is either a registered trademark
or trademark of Microsoft Corporation in the
United States and/or other countries.
ˎ
MPEG Layer-3 audio coding technology and
patents licensed from Fraunhofer IIS and
Thomson.
ˎ
The BLUETOOTH® word mark and logos are
registered trademarks owned by BLUETOOTH
SIG, Inc. and any use of such marks by Sony
Corporation is under license. Other trademarks
and trade names are those of their respective
owners.
ˎ
The N Mark is a trademark or registered
trademark of NFC Forum, Inc. in the United States
and in other countries.
ˎ
Android is a trademark of Google Inc.
ˎ
This product is protected by certain intellectual
property rights of Microsoft Corporation. Use or
distribution of such technology outside of this
product is prohibited without a license from
Microsoft or an authorized Microsoft subsidiary.
ˎ
The system names and product names indicated
in this manual are generally the trademarks or
registered trademarks of the manufacturer. ™
and ® marks are omitted in this manual.
ˎ
You attempt to pair the system with more than
10 BLUETOOTH devices.
This system can pair with up to 9 BLUETOOTH
devices. If you pair another BLUETOOTH device
after pairing with 9 devices was performed,
pairing information of the device that was
connected with the system first is overwritten
with that of the new device.
ˎ
Pairing registration information of this system is
erased from the connected device.
ˎ
If you initialize the system or erase the
pairing history with the system, all the pairing
information will be erased.
About the BLUETOOTH indicator
The BLUETOOTH indicator in the center of the
BLUETOOTH button
allows checking of the
BLUETOOTH status.
System status
Indicator status
The system is in
BLUETOOTH Standby
(when the system is on).
Flashes slowly in blue.
During BLUETOOTH
pairing
Flashes quickly in blue.
The system is
attempting to connect
with a BLUETOOTH
device.
Flashes in blue.
The system has
established in
connection with a
BLUETOOTH device.
Lit in blue.
When “BT STBY” is
set to “ON” (when the
system is off)
Flashes slowly in blue.
When “BT STBY” is set
to “OFF” (when the
system is off)
Goes off.
Enabling reception of AAC codec
You can receive data in AAC codec format from a
BLUETOOTH device. To enable reception, set up
using the option menu.
1
Press OPTIONS
to display the setting menu.
2
Press
/
repeatedly to select “BT AAC,”
then press
.
3
Press
/
repeatedly to select “ON” or
“OFF,” then press
.
ON:
to receive in AAC codec format
OFF:
to receive in SBC codec format
Notes
ˎ
If you initiate setup during BLUETOOTH connection, the
connection is cut.
ˎ
When using an Apple product, update it to the latest
software version. For details on updating, refer to the
operation manual supplied with your Apple product.
ˎ
If sound is interrupted during reception in AAC codec
format, set the BT AAC menu to “OFF.”
Pairing the system with a BLUETOOTH
device
Connection example
BLUETOOTH device
such as a “WALKMAN”
1
Place the BLUETOOTH device to be connected
within 1 meter from the system.
2
Press BLUETOOTH FUNCTION
or press
FUNCTION
on the unit repeatedly until
“BLUETOOTH” appears in the display
.
ˎ
The BLUETOOTH indicator
flashes slowly
in blue.
ˎ
If the system has been automatically
connected with the BLUETOOTH device in
the past, press BLUETOOTH
on the unit to
cancel the connection so that “BLUETOOTH”
appears in the display
.
3
Press and hold BLUETOOTH
on the unit for
2 seconds or longer.
The BLUETOOTH indicator
flashes quickly in
blue and “PAIRING” flashes in the display
.
The system is in Pairing mode.
4
Perform the pairing operation on the
BLUETOOTH device and search for this system
with the BLUETOOTH device.
When searching has finished, a list of the
devices found may appear on the BLUETOOTH
device display.
ˎ
This system appears as “SONY:CMT-SBT100”
or “SONY:CMT-SBT100B.” If it does not appear,
perform the procedure from step 1 again.
ˎ
When establishing connection with this
system, select the audio profile (A2DP, AVRCP)
on the BLUETOOTH device.
ˎ
If the BLUETOOTH device does not support
AVRCP (Audio Video Remote Control Profile),
you cannot perform playback or stop
playback with the system.
ˎ
For details on operations of the BLUETOOTH
device to be connected, refer to the operation
manual supplied with your BLUETOOTH
device.
Setting the clock
1
Press
to turn on the system.
2
Press TIMER MENU
to select the clock set
mode.
If “PLAY SET” flashes, press
/
repeatedly
to select “CLOCK,” and then press (enter)
.
3
Press
/
repeatedly to set the hour, then
press (enter)
.
4
Use the same procedure to set the minutes.
Note
The clock settings are reset when you disconnect the power
cord or if a power failure occurs.
To display the clock when the system is off
Press DISPLAY
repeatedly to display the clock.
The clock is displayed for about 8 seconds.
If the system is in BLUETOOTH Standby mode, the
clock does not appear by pressing DISPLAY
.
Reception of DAB/DAB+ radio station
(CMT-SBT100B only)
When you turn on the system for the first time
after you purchase the system, DAB Automatic
Scan starts automatically and creates a list of
available services. During the DAB Automatic
Scan, “
” appears. Do not press any
button on the unit or the remote during DAB
Automatic Scan. Scanning is interrupted and
service list may not be created properly. To run
the DAB Automatic Scan manually, perform the
procedure of “Running the DAB Automatic Scan
manually (CMT-SBT100B only).” If you have moved
to another area, perform the DAB Automatic
Scan manually and re-register the contents of
broadcasts.
Attaching speaker pads
Attach the supplied speaker pads to the bottom
of the speakers to prevent slipping.
Rear of the speaker
4-464-274-
13
(2)
Home Audio System
GB
Operating Instructions
©2013 Sony Corporation Printed in China
CMT-SBT100/SBT100B


