background image

11

Uso de un equipo opcional

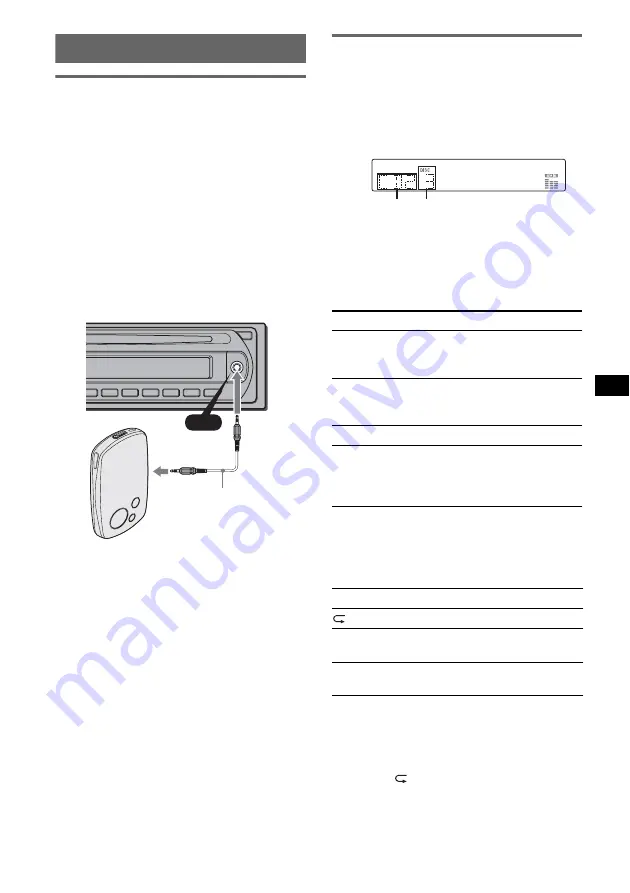
Equipo de audio auxiliar

Si conecta un dispositivo de audio portátil 
opcional a la toma de entrada AUX (minitoma 
estéreo) de la unidad y simplemente selecciona la 
fuente, podrá escuchar por las bocinas del 
automóvil. Puede ajustar cualquier diferencia en 
el nivel de volumen entre la unidad y el 
dispositivo de audio portátil. Siga este 
procedimiento: 

Conexión del dispositivo de audio 
portátil

1

Apague el dispositivo de audio portátil.

2

Baje el volumen de la unidad. 

3

Conecte a la unidad.

*

Asegúrese de utilizar una clavija recta.

Ajuste del nivel de volumen

Asegúrese de ajustar el volumen de cada equipo 
de audio conectado antes de la reproducción.

1

Baje el volumen de la unidad.

2

Presione 

(SOURCE)

 varias veces hasta que 

aparezca “AUX”.
Aparezca “AUX FRONT IN”.

3

Inicie la reproducción en el dispositivo de 
audio portátil con un volumen moderado.

4

Seleccione el volumen acostumbrado en la 
unidad.

5

Presione el botón de selección varias veces 
hasta que aparezca “AUX” y gire el selector de 
control de volumen para ajustar el nivel de 
entrada (de –8 dB a +18 dB).

Cambiador de CD/MD

Selección del cambiador

1

Presione 

(SOURCE)

 varias veces hasta que 

aparezca “CD” o “MD”.

2

Presione 

(MODE)

 varias veces hasta que 

aparezca el cambiador deseado.

Se inicia la reproducción.

Omisión de álbumes y discos

1

Durante la reproducción, presione 

(1)

/

(2)


(ALBM –/+).

Reproducción repetida y aleatoria

1

Durante la reproducción, presione 

(3)

 (REP) 

(4)

 (SHUF) varias veces hasta que aparezca 

el ajuste deseado.

*1

Si se conectaron uno o más cambiadores de CD/
MD.

*2

Si se conectaron uno o más cambiadores de CD, o 
dos o más cambiadores de MD.

Para regresar al modo de reproducción normal, 
seleccione “

 OFF” o “SHUF OFF”.

Sugerencia

“SHUF ALL” no reproduce las pistas en orden 
aleatorio entre unidades de CD y cambiadores de MD.

AUX

AUX

Cable de conexión

(no suministrado)

Para omitir

Presione 

(1)

/

(2)

 (ALBM –/+)

un álbum

y suéltelo (manténgalo 
presionado durante un 
momento).

un álbum 
continuamente

antes de que transcurran 2 
segundos de haberlo soltado 
por primera vez.

discos

varias veces.

discos 
continuamente

a continuación, vuelva a 
presionarlo antes de que 
transcurran 2 segundos y 
manténgalo presionado.

Seleccione

Para reproducir

 DISC

*

1

un disco varias veces.

SHUF 
CHANGER

*

1

las pistas del cambiador en 
orden aleatorio.

SHUF ALL

*

2

las pistas de todas las unidades 
en orden aleatorio.

Número del disco

Número de 
unidad

Summary of Contents for CDX-GT360

Page 1: ...e instrucciones 2 698 302 31 1 GB ES CS CDX GT360S CDX GT360 To cancel the demonstration DEMO display see page 10 Para cancelar la pantalla de demostración DEMO consulte la página 10 2006 Sony Corporation FM MW SW Compact Disc Player ...

Page 2: ...y drain If you do not set the Auto Off function press and hold OFF until the display disappears each time you turn the ignition off For installation and connections see the supplied installation connections manual This label is located on the bottom of the chassis Microsoft Windows Media and the Windows logo are trademarks or registered trademarks of Microsoft Corporation in the United States and ...

Page 3: ...eiving stations 8 Storing automatically BTM 8 Storing manually 8 Receiving the stored stations 8 Tuning automatically 9 Other functions Changing the sound settings 9 Adjusting the sound characteristics BAL FAD SUB 9 Customizing the equalizer curve EQ3 9 Adjusting setup items SET 10 Using optional equipment 10 Auxiliary audio equipment 10 CD MD changer 11 Additional Information Precautions 12 Notes...

Page 4: ... changers Auxiliary equipment connection An AUX input jack on the front of the unit allows connection of a portable audio device A CD TEXT disc is a CD DA that includes information such as disc artist and track name Getting Started Resetting the unit Before operating the unit for the first time or after replacing the car battery or changing the connections you must reset the unit Detach the front ...

Page 5: ...ont panel You can detach the front panel of this unit to prevent theft Caution alarm If you turn the ignition switch to the OFF position without detaching the front panel the caution alarm will sound for a few seconds The alarm will only sound if the built in amplifier is used 1 Press OFF The unit is turned off 2 Press then pull it off towards you Notes Do not drop or put excessive pressure on the...

Page 6: ...o adjust volume rotate select setup items press and rotate D SOURCE button To power on change the source Radio CD MD 1 AUX E Disc slot Insert the disc label side up playback starts F Display window G AUX input jack 10 To connect a portable audio device H Z eject button To eject the disc I BTM button 8 To start the BTM function press and hold J front panel release button 5 OFF BTM DSPL MODE SCRL PU...

Page 7: ...ld R SCRL scroll button 8 To scroll the display item The following buttons on the card remote commander have also different buttons functions from the unit Remove the insulation film before use page 4 ql buttons To control CD radio the same as SEEK on the unit w VOL volume button To adjust volume wa ATT attenuate button To attenuate the sound To cancel press again ws SEL select button The same as ...

Page 8: ...ile driving use Best Tuning Memory BTM to prevent an accident Storing automatically BTM 1 Press SOURCE repeatedly until TUNER appears To change the band press MODE repeatedly You can select from FM1 FM2 FM3 MW SW1 or SW2 2 Press and hold BTM until BTM flashes The unit stores stations in order of frequency on the number buttons A beep sounds when the setting is stored Storing by the setup menu 1 Af...

Page 9: ...o SUB page 10 ATT is displayed at the lowest setting and can be adjusted up to 20 steps 3 When AUX source is activated page 10 2 Rotate the volume control dial to adjust the selected item After 3 seconds the setting is complete and the display returns to normal play reception mode With the card remote commander In step 2 to adjust the selected item press M or m Customizing the equalizer curve EQ3 ...

Page 10: ...ay AUX A ON z or AUX A OFF page 10 A OFF Auto Off To shut off automatically after a desired time when the unit is turned off A OFF NO z A OFF 30S Seconds A OFF 30M Minutes or A OFF 60M Minutes SUB REAR 1 To switch the audio output SUB OUT z to output to a subwoofer REAR OUT to output to a power amplifier B OUT Black Out To turn off the illumination automatically for any source for example during C...

Page 11: ...ears Playback starts Skipping albums and discs 1 During playback press 1 2 ALBM Repeat and shuffle play 1 During playback press 3 REP or 4 SHUF repeatedly until the desired setting appears 1 When one or more CD MD changers are connected 2 When one or more CD changers or two or more MD changers are connected To return to normal play mode select OFF or SHUF OFF Tip SHUF ALL will not shuffle tracks b...

Page 12: ...ner commercially available cleaners or antistatic spray intended for analog discs Notes on CD R CD RW discs Some CD Rs CD RWs depending on the equipment used for its recording or the condition of the disc may not play on this unit You cannot play a CD R a CD RW that is not finalized Music discs encoded with copyright protection technologies This product is designed to play back discs that conform ...

Page 13: ...intenance Replacing the lithium battery of the card remote commander Under normal conditions the battery will last approximately 1 year The service life may be shorter depending on the conditions of use When the battery becomes weak the range of the card remote commander becomes shorter Replace the battery with a new CR2025 lithium battery Use of any other battery may present a risk of fire or exp...

Page 14: ...Pull the release keys to unseat the unit 3Slide the unit out of the mounting Specifications CD Player section Signal to noise ratio 120 dB Frequency response 10 20 000 Hz Wow and flutter Below measurable limit Tuner section FM Tuning range 87 5 108 0 MHz at 50 kHz step 87 5 107 9 MHz at 200 kHz step FM tuning interval 50 kHz 200 kHz switchable Antenna aerial terminal External antenna aerial connec...

Page 15: ...ensed from Fraunhofer IIS and Thomson Halogenated flame retardants are not used in the certain printed wiring boards Halogenated flame retardants are not used in cabinets Paper is used for the packaging cushions General No power is being supplied to the unit Check the connection If everything is in order check the fuse If the unit is turned off and the display disappears it cannot be operated with...

Page 16: ...ial The auto antenna aerial will not go up tCheck the connection of the power antenna aerial control lead Check the frequency Preset tuning is not possible Store the correct frequency in the memory The broadcast signal is too weak Automatic tuning is not possible Setting of the local seek mode is not correct tTuning stops too frequently Set LOCAL ON page 10 tTuning does not stop at a station Set M...

Page 17: ...arest Sony dealer READ The unit is reading all track and album information on the disc tWait until reading is complete and playback starts automatically Depending on the disc structure it may take more than a minute RESET The CD unit and CD MD changer cannot be operated due to a problem tPress the RESET button page 4 or During reverse or fast forward you have reached the beginning or the end of th...

Page 18: ...e agote la batería Si no ajusta la función de desconexión automática mantenga presionado OFF hasta que se apague la pantalla cada vez que apague el motor Para obtener información sobre la instalación y las conexiones consulte el manual de instalación conexiones suministrado Esta etiqueta está situada en la parte inferior del chasis Microsoft Windows Media y el logotipo de Windows son marcas comerc...

Page 19: ...lmacenamiento automático BTM 8 Almacenamiento manual 8 Recepción de las emisoras almacenadas 9 Sintonización automática 9 Otras funciones Cambio de los ajustes de sonido 9 Ajuste de las características del sonido BAL FAD SUB 9 Personalización de la curva de ecualizador EQ3 9 Definición de los elementos de configuración SET 10 Uso de un equipo opcional 11 Equipo de audio auxiliar 11 Cambiador de CD...

Page 20: ...ionales Conexión de un equipo auxiliar Es posible conectar un dispositivo de audio portátil mediante la toma de entrada AUX situada en la parte frontal de la unidad Un disco CD TEXT es un CD DA que incluye información como el nombre del disco del artista y de la pista Procedimientos iniciales Restauración de la unidad Antes de utilizar la unidad por primera vez o después de reemplazar la batería d...

Page 21: ... panel frontal de la unidad para evitar que la roben Alarma de precaución Si gira el interruptor de la llave de encendido hasta la posición OFF sin haber extraído el panel frontal la alarma de precaución sonará durante unos segundos La alarma sonará solamente si se utiliza el amplificador integrado 1 Presione OFF La unidad se apaga 2 Presione y a continuación tire de él hacia usted para extraerlo ...

Page 22: ...ección 9 Para ajustar el volumen girar para seleccionar elementos de configuración presionar y girar D Botón SOURCE Para encender o cambiar la fuente Radio CD MD 1 AUX E Ranura del disco Inserte el disco con la etiqueta mirando hacia arriba y se iniciará la reproducción F Visualizador G Toma de entrada AUX 11 Para conectar un dispositivo de audio portátil H Botón Z expulsar Para expulsar el disco ...

Page 23: ...esionado R Botón SCRL desplazamiento 8 Para desplazar el elemento de la pantalla Los botones siguientes del control remoto de tarjeta también presentan botones y funciones distintos de los de la unidad Extraiga la película de aislamiento antes de utilizar el control remoto de tarjeta página 4 ql Botones Permiten controlar el CD o la radio de la misma manera que con SEEK en la unidad w Botón VOL vo...

Page 24: ... OFF o SHUF OFF Radio Almacenamiento y recepción de emisoras Precaución Para sintonizar emisoras mientras maneja utilice la función Memoria de la mejor sintonía BTM para evitar accidentes Almacenamiento automático BTM 1 Presione SOURCE varias veces hasta que aparezca TUNER Para cambiar de banda presione MODE varias veces Puede seleccionar entre FM1 FM2 FM3 MW SW1 o SW2 2 Mantenga presionado BTM ha...

Page 25: ... BAL izquierdo derecho t FAD frontal posterior t SUB volumen del altavoz potenciador de graves 2 t AUX 3 1 Si está activado EQ3 página 9 2 Cuando la salida de audio se ajusta en SUB página 10 ATT aparece con el ajuste más bajo y puede ajustarse hasta con 20 intervalos 3 Si está activada la fuente AUX página 11 2 Gire el selector de control de volumen para ajustar el elemento seleccionado Después d...

Page 26: ...s o A OFF 60M Minutos SUB REAR 1 Para cambiar la salida de audio SUB OUT z para que la salida se realice a través de un altavoz potenciador de graves REAR OUT para que la salida se realice a través de un amplificador de potencia B OUT Desactivar pantalla Para apagar automáticamente la iluminación de cualquier fuente por ejemplo durante la reproducción de CD recepción de radio etc B OUT ON 2 para q...

Page 27: ...mbiador de CD MD Selección del cambiador 1 Presione SOURCE varias veces hasta que aparezca CD o MD 2 Presione MODE varias veces hasta que aparezca el cambiador deseado Se inicia la reproducción Omisión de álbumes y discos 1 Durante la reproducción presione 1 2 ALBM Reproducción repetida y aleatoria 1 Durante la reproducción presione 3 REP o 4 SHUF varias veces hasta que aparezca el ajuste deseado ...

Page 28: ...e discos No es posible reproducir discos compactos de 8 cm Antes de reproducir los discos límpielos con un paño de limpieza disponible en el mercado Hágalo desde el centro hacia los bordes No utilice disolventes como bencina diluyentes productos de limpieza comerciales ni aerosoles antiestáticos para discos analógicos Notas sobre los discos CD R CD RW Según el estado del disco o el equipo utilizad...

Page 29: ...ivos de formato de compresión sin pérdida no pueden reproducirse Los archivos protegidos por derechos de autor no pueden reproducirse Si desea realizar alguna consulta o solucionar algún problema relativo a la unidad que no se trate en este manual póngase en contacto con el distribuidor Sony más cercano Mantenimiento Sustitución de la pila de litio del control remoto de tarjeta En condiciones norm...

Page 30: ...unidad para extraerla del marco Especificaciones Sección del reproductor de CD Relación señal ruido 120 dB Respuesta de frecuencia de 10 a 20 000 Hz Fluctuación y trémolo inferior al límite medible Sección del sintonizador FM Rango de sintonización de 87 5 a 108 0 MHz a intervalos de 50 kHz de 87 5 a 107 9 MHz a intervalos de 200 kHz Intervalo de sintonización de FM 50 kHz 200 kHz intercambiable T...

Page 31: ... lista de comprobación le ayudará a solucionar los problemas que puedan producirse con la unidad Antes de consultarla revise los procedimientos de conexión y de funcionamiento Tecnología de codificación de audio MPEG Layer 3 y pantentes bajo licencia de Fraunhofer IIS y Thomson Generales La unidad no recibe alimentación Revise la conexión Si todo está en orden compruebe el fusible Si la unidad est...

Page 32: ...idad en un ángulo inferior a 45 en una parte firme del automóvil El disco es defectuoso o está sucio Los botones de operación no funcionan El disco no se expulsa Presione el botón RESET página 4 Recepción de radio No es posible recibir las emisoras Hay ruidos que obstaculizan el sonido Conecte un cable de control de antena motorizada azul o un cable de fuente de alimentación auxiliar rojo al cable...

Page 33: ...y a continuación selecciónelo en la lista NOTREADY La tapa del cambiador de MD está abierta o los MD no están insertados correctamente tCierre la tapa o inserte los MD correctamente OFFSET Es posible que se haya producido una falla interna tRevise la conexión Si el indicador de error permanece en pantalla póngase en contacto con el distribuidor Sony más cercano READ La unidad está leyendo toda la ...

Page 34: ...2 您的汽车引擎没有 ACC 位置时的警告 必须设定自动断电功能 第 9 页 本机在关机后会在设定的时间内完全并自 动切断电源 以防止电池消耗 如果您未设定自动断电功能 则在每次关 闭引擎时按住 OFF 直至显示画面消 失 ...

Page 35: ... 主机 6 卡片式遥控器 RM X151 6 CD 显示项目 8 重复和随机播放 8 无线电 储存并接收电台 8 自动储存 BTM 8 手动储存 8 收听已储存的电台 8 自动调谐 8 其他功能 更改声音设定 9 调整声音特性 BAL FAD SUB 9 自定义均衡曲线 EQ3 9 调整设定项目 SET 9 使用选购设备 10 辅助音频设备 10 CD MD 换碟机 10 附加信息 使用前注意事项 11 光盘注意事项 11 关于 MP3 WMA 文件 11 保养 12 取出本机 13 规格 13 故障排除 14 出错显示 信息 15 ...

Page 36: ...SW2 最多可以存储 6 个电台 BTM 最佳调谐记忆 本机选择信号强 的电台并储存 声音调整 EQ3 stage2 您可以选择 7 个预设均衡曲 线中任何一个 选购装置操作 您也可以控制选购的 CD MD 换碟机 辅助设备之连接 装置前面的 AUX 输入插孔可连接便携式音频 设备 CD TEXT 光盘是含有光盘 艺术家或曲目名称等信息 的 CD DA 入门指南 重设本机 在第一次使用本机前 或更换汽车电瓶或改 变连接后 必须重设本机 拆卸前面板 并用带尖头的物体 如圆珠笔 等 按 RESET 按钮 注意 按 RESET 按钮 将消除时钟设定和某些已储存的内容 准备卡片式遥控器 第一次使用卡片式遥控器之前 请先抽出绝 缘薄膜 光盘类型 光盘上的标签 CD DA MP3 WMA RESET 按钮 ...

Page 37: ...定完成 时钟开始走时 若要显示时钟 则按 DSPL 再按 DSPL 返回前一个显示 用卡片式遥控器操作 要设定小时和分钟 在步骤 4 中按 M 或 m 拆卸前面板 您可以拆卸本机的前面板以防止本机被盗 警报 若您未拆卸前面板即把点火开关旋转至 OFF 档 警报器将发出数秒钟的警报声 只有使用内置放大器时警报器才会发出警报 声 1 按 OFF 本机关闭 2 按 然后将前面板朝您身体方向拉出 注意 切勿摔落或猛按前面板及显示窗 切勿使前面板受热 高温或受潮 避免将前面板遗留 在停放的车中或仪表盘 后托架上 安装前面板 如图所示 将前面板的 A 部分与本机的 B 部 分接合 然后将左侧推入到位直至听到喀嗒 声 注意 切勿在前面板内表面放任何东西 B A ...

Page 38: ...定项目 按并 转动 D SOURCE 按钮 打开电源 改变音源 无线电 CD MD 1 AUX E 光盘槽 插入光盘 标签面朝上 开始播放 F 显示窗 G AUX 输入插孔 10 连接便携式音频设备 H Z 退出 按钮 退出光盘 I BTM 按钮 8 启动 BTM 功能 按住 J 前面板释放 按钮 5 OFF BTM DSPL MODE SCRL PUSH SELECT SEEK SEEK PAUSE ALBM DIM REP SHUF EQ3 AUX SOURCE 1 2 3 4 5 6 12 qk qj 4 5 8 6 7 3 CDX GT360S CDX GT360 qa qd q 9 qs qfqg qh OFF DSPL SCRL SEL SOURCE MODE 1 3 2 4 6 5 ATT VOL 4 ws qd 1 qk ql qf wa w wf wd ...

Page 39: ...跳过专辑 按 住 3 REP 8 4 SHUF 8 6 PAUSE 5 暂停播放 若要取消 则再按一次 无线电 接收已储存的电台 按 储存电台 按 住 R SCRL 滚动 按钮 8 滚动显示项目 卡片式遥控器上的以下按钮与本机上的按钮 功能不同 使用前抽出绝缘薄膜 第 4 页 ql 按钮 控制 CD 无线电 与本机的 SEEK 相同 w VOL 音量 按钮 调整音量 wa ATT 降低 按钮 降低声音 若要取消 则再按一次 ws SEL 选择 按钮 与本机的选择按钮相同 wd M m 按钮 控制 CD 与本机上的 1 2 ALBM 相同 wf 数字按钮 接收已储存的电台 按 储存电台 按 住 1 连接了 MD 换碟机时 2 连接了 CD MD 换碟机时 3 播放 MP3 WMA 时 4 如果连接了换碟机 操作则不同 请参阅第 10 页 5 在本机上播放时 注意 如果关闭本机且显示消失 除非...

Page 40: ...意 当在驾车过程中要调谐电台时 须使用最佳 调谐记忆 BTM 以免发生事故 自动储存 BTM 1 反复按 SOURCE 直至出现 TUNER 若要改变波段 则反复按 MODE 您可 以从 FM1 FM2 FM3 MW SW1 或 SW2 中 选择 2 按住 BTM 直至 BTM 闪烁 本机将各电台按其频率顺序储存在数字按 钮上 当设定存储完毕时 本机发出一声提示 音 通过设定菜单储存 1 进行上面的步骤 1 以后 按住选择按钮 出现设定显示画面 2 反复按选择按钮 直至出现 BTM 3 按 SEEK 手动储存 1 接收您要储存的电台时 按住一个数字按 钮 1 至 6 不放 直至出现 MEM 数字按钮指示会在显示屏上出现 注意 若您试图在同一个数字按钮上储存另一个电台 则以 前存入的电台将被替换 收听已储存的电台 1 选择波段 然后按一个数字按钮 1 至 6 自动调谐 1 选择波段 然后按 ...

Page 41: ...式 提示 其他均衡器类型也可调整 用卡片式遥控器操作 要调整选择的项目 在步骤 3 中按 M 或 m 调整设定项目 SET 1 按住选择按钮 出现设定显示画面 2 反复按选择按钮 直至出现需要的项目 3 转动音量控制拨盘 选择设定 例如 ON 或 OFF 4 按住选择按钮 设定完成 显示返回正常播放 接收模式 注意 显示的项目视音源和设定而异 用卡片式遥控器操作 要选择设定 在步骤 3 中按 或 可以设定以下项目 详细说明请参阅参考 页 z 表示默认设定 CLOCK ADJ 时钟调整 第 5 页 BEEP 设定 BEEP ON z 或 BEEP OFF AUX A 1 AUX 音频 将 AUX 音源显示转换为 AUX A ON z 或 AUX A OFF 第 10 页 A OFF 自动断电 本机关闭时在所需的时间过后启动切断电 源 A OFF NO z A OFF 30S 秒 A OFF ...

Page 42: ...和随机播放 1 播放过程中 反复按 3 REP 或 4 SHUF 直至出现所需设定 1 连接了一台或多台 CD MD 换碟机时 2 连接了一台或多台 CD 换碟机 或者连接了两台或多 台 MD 换碟机时 若要返回正常播放模式 则选择 OFF 或 SHUF OFF 提示 SHUF ALL 不会随机播放 CD 装置与 MD 换碟机之间的 曲目 LOCAL 本地搜索模式 LOCAL ON 只调入信号较强的电台 LOCAL OFF z 调入正常接收 MONO 3 单声道模式 若要改善信号弱的 FM 接收 则选择单声道接 收模式 MONO ON 以单声道收听立体声广播 MONO OFF z 以立体声收听立体声广 播 LPF 4 低通滤波器 选择超低音扬声器截止频率 LPF OFF z LPF125Hz 或 LPF 78Hz BTM 第 8 页 1 本机关闭时 2 当启动关闭照明功能时 本机无法用卡片...

Page 43: ...油 稀释 剂 市场销售的清洁剂 以及 用于留声机唱片的抗静电喷 雾剂等溶剂 CD R CD RW 光盘的注意事项 某些 CD R CD RW 视用于录制的设备或光盘情 况而定 可能无法在装置上播放 您无法播放未最终化的 CD R CD RW 采用版权保护技术编码的音乐光盘 本产品是专为播放符合 Compact Disc CD 标 准光盘而设计 近来 许多唱片公司都推出各种采用版权保护 技术编码的音乐光盘 请注意 这些光盘中可 能会有不符合 CD 标准的光盘 并且可能无法使 用本产品播放 关于 MP3 WMA 文件 MP3 表示 MPEG 1 Audio Layer 3 是一项音乐文 件压缩格式标准 此格式将音频 CD 数据压缩到 原大小的 1 10 左右 WMA 表示 Windows Media Audio 为另一项音乐 文件压缩格式标准 此格式将音频 CD 数据压缩 到原大小的 1 22...

Page 44: ...WMA 的注意事项 无损压缩做成的文件不可播放 有版权保护的文件不可播放 如果您对本机有疑问或问题 而本说明书中未 提及 请向附近的 Sony 经销商咨询 保养 更换卡片式遥控器的锂电池 一般情况下 电池能维持大约 1 年时间 使 用寿命可能会变短 这取决于电池的使用状 况 当电池的电力变弱时 卡片式遥控器的操控 范围将变小 请更换一枚新的CR2025锂电池 使用其他电池可能会引起火灾或爆炸的危 险 锂电池的注意事项 锂电池应放在儿童不易触及的地方 万一误吞了电 池 请立即就医 用干布擦拭电池 以保持接触良好 安装电池时 必须保证极性正确 切勿用金属镊子夹电池 否则可能会引起短路 更换保险丝 更换保险丝时 必须确保所 使用的保险丝与原保险丝的 额定安培数相同 如果保险 丝烧断 请检查电源连接并 更换保险丝 如果保险丝更 换后又被烧断 则可能是内 部故障 此时 请向附近的 Sony 经销商咨...

Page 45: ...谐波失真 0 5 立体声 0 3 单声道 分离度 1 kHz 时 35 dB 频率响应 30 15000 Hz MW 调谐范围 531 1602 kHz 以 9 kHz 为一级 530 1710 kHz 以 10 kHz 为一级 MW 调谐间隔 9 kHz 10 kHz 可切换 天线端子 外接天线连接器 中频 10 7 MHz 450 kHz 灵敏度 30 µV SW 调谐范围 SW1 2940 7735 kHz SW2 9500 18135 kHz 10140 11575 kHz 除外 天线端子 外接天线连接器 中频 10 7 MHz 450 kHz 灵敏度 30 µV 功率放大器部分 输出 扬声器输出 可靠的绝缘连接器 扬声器阻抗 4 8 Ω 最大功率输出 52 W 4 4 Ω 时 常规 输出 音频输出端子 副 后可切换 电动天线继电器控制端子 功率放大器控制端子 输入 BUS 控制输...

Page 46: ...存的电台及正确时间被消除 保险丝已熔断 切换引擎位置时产生噪音 导线与汽车附件电源连接器未正确匹配 显示从显示窗口消失 不出现在显示窗口中 调光器设定为 DIM ON 第 9 页 如果按住 OFF 则显示消失 t按住本机上的 OFF 直至出现显示 连接器脏了 第 12 页 自动断电功能无法操作 本机开启 关闭本机后自动断电功能启动 t关闭本机 本机正在工作时显示消失 关闭照明功能设定为开启状态 第 9 页 无法操作卡片式遥控器 如果开启了关闭照明功能 无照明 则卡片式 遥控器操作将无效 第 9 页 确保绝缘薄膜已经抽出 第 4 页 CD MD 播放 无法装入光盘 已装入另外的光盘 强行将光盘反向插入或者插入方向不正确 光盘不播放 光盘有损坏或脏了 CD R CD RW 不作音频使用 第 11 页 无法播放 MP3 WMA 文件 光盘与 MP3 WMA 格式以及版本不兼容 第 11 页 MP...

Page 47: ... FAILURE 扬声器 放大器连接不正确 t参阅此型号的安装指导说明书进行连接检查 LOAD 换碟机正在装入光盘 t请等待至装载完成 L SEEK 在自动调谐时 本地搜索模式为开启状态 NO DISC CD MD 换碟机内未插入光盘 t将光盘插入换碟机 NO INFO MP3 WMA 文件中未写入文本信息 NO MAG 光盘匣未插入 CD 换碟机 t将光盘匣插入换碟机 NO MUSIC 此光盘不是音乐文件 t将音乐 CD 插入本机或可播放 MP3 的换碟机中 NO NAME 曲目中未写入光盘 专辑 曲目名称 NOT READ 本机未读取光盘信息 t装入光盘 然后在列表中选择此光盘 NOTREADY MD 换碟机的盖子被打开或没有正确插入 MD t关上盖子或正确插入 MD OFFSET 可能发生内部故障 t检查连接 如果此出错指示仍然显示在显示屏 中 请向您附近的 Sony 经销商咨询 R...

Page 48: ...Sony Corporation Printed in China http www sony net ...

Reviews: