background image

9

GB

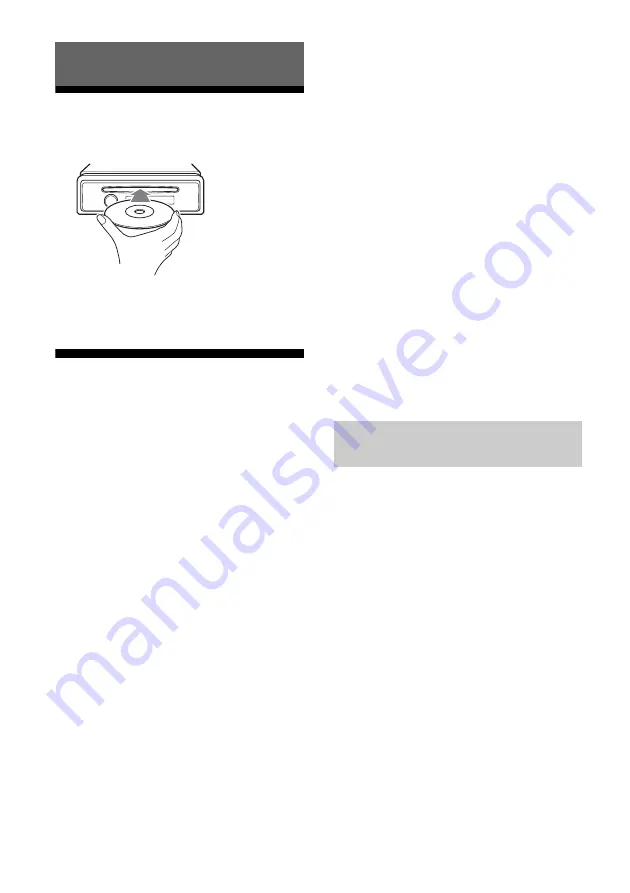
Playing a Disc

1

Insert the disc (label side up).

Playback starts automatically.

Playing an iPod/USB Device

In these Operating Instructions, “iPod” is 
used as a general reference for the iPod 
functions on an iPod and iPhone, unless 
otherwise specified by the text or 
illustrations.

For details on the compatibility of your iPod, 
see “About iPod” (page 15) or visit the 
support site on the back cover.

MSC (Mass Storage Class)-type USB devices 
(such as a USB flash drive, digital media 
player, Android™ phone) compliant with the 
USB standard can be used.
Depending on the digital media player or 
Android phone, setting the USB connection 
mode to MSC is required.

Notes

For details on the compatibility of your USB 
device, visit the support site on the back cover.

Playback of the following MP3/WMA files is not 
supported.

lossless compression files

copyright-protected files

DRM (Digital Rights Management) files

Multi-channel audio files

1

Connect an iPod/USB device to the 
USB port (page 6).

Playback starts.
If a device is already connected, to start 
playback, press SRC to select [USB] ([IPD] 
appears in the display when the iPod is 
recognized).

2

Adjust the volume on this unit.

To stop playback

Press and hold OFF for 1 second.

To remove the device

Stop playback, then remove the device.

Caution for iPhone

When you connect an iPhone via USB, phone 
call volume is controlled by the iPhone, not 
the unit. Do not inadvertently increase the 
volume on the unit during a call, as sudden 
loud sound may result when the call ends.

Press and hold MODE during playback to 
display [MODE IPOD] to enable operation by 
the iPod directly.
Note that the volume can be adjusted only 
by the unit.

To exit passenger control

Press and hold MODE to display [MODE 
AUDIO].

Playback

Operating an iPod directly 
(Passenger control)

Summary of Contents for CDX-G2050UP

Page 1: ...CDX G2050UP 4 467 643 81 1 FM AM Compact Disc Player Operating Instructions GB To switch the FM AM tuning step see page 6 To cancel the demonstration DEMO display see page 12 ...

Page 2: ...nlight fire or the like Be sure to install this unit in the dashboard of the car for safety For installation and connections see the supplied installation connections manual Warning if your car s ignition has no ACC position Be sure to set the AUTO OFF function page 12 The unit will shut off completely and automatically in the set time after the unit is turned off which prevents battery drain If y...

Page 3: ...the Radio 7 Using Radio Data System RDS 8 Playback Playing a Disc 9 Playing an iPod USB Device 9 Searching and Playing Tracks 10 Listening to Pandora Preparing for Pandora 11 Streaming Pandora 11 Available Operations in Pandora 11 Settings Canceling the DEMO Mode 12 Basic Setting Operation 12 GENERAL Setup 12 SOUND Setup 13 EQ3 PRESET 13 EQ3 SETTING 13 DISPLAY Setup 13 Additional Information Preca...

Page 4: ...t reverse fast forward Control dial Rotate to adjust the volume ENTER Enter the selected item MENU Open the setup menu Receptor for the remote commander Disc slot Display window disc eject browse page 10 11 Enter the browse mode during playback back Return to the previous display MODE page 7 9 11 PTY program type Select PTY in RDS Number buttons 1 to 6 Receive stored radio stations Press and hold ...

Page 5: ...ed by VOL volume Detaching the Front Panel You can detach the front panel of this unit to prevent theft 1 Press and hold OFF The unit is turned off 2 Press the front panel release button then remove the panel by pulling it towards you Caution alarm If you turn the ignition switch to the OFF position without detaching the front panel the caution alarm will sound for a few seconds The alarm will onl...

Page 6: ... MENU rotate the control dial to select GENERAL then press it 2 Rotate the control dial to select CLOCK ADJ then press it The hour indication flashes 3 Rotate the control dial to set the hour and minute To move the digital indication press SEEK 4 After setting the minute press MENU The setup is complete and the clock starts To display the clock press DSPL Connecting an iPod USB Device 1 Turn down ...

Page 7: ...n to the radio press SRC to select TUNER 1 Press MODE to change the band FM1 FM2 FM3 AM1 or AM2 2 Press MENU rotate the control dial to select GENERAL then press it 3 Rotate the control dial to select BTM then press it The unit stores stations in order of frequency on the number buttons 1 Press MODE to change the band FM1 FM2 FM3 AM1 or AM2 2 Perform tuning To tune manually Press and hold SEEK to ...

Page 8: ...tup page 12 Receiving the stored stations Selecting program types PTY NEWS News AFFAIRS Current Affairs INFO Information SPORT Sports EDUCATE Education DRAMA Drama CULTURE Culture SCIENCE Science VARIED Varied POP M Pop Music ROCK M Rock Music EASY M M O R Music LIGHT M Light classical CLASSICS Serious classical OTHER M Other Music WEATHER Weather FINANCE Finance CHILDREN Children s program SOCIAL...

Page 9: ...les is not supported lossless compression files copyright protected files DRM Digital Rights Management files Multi channel audio files 1 Connect an iPod USB device to the USB port page 6 Playback starts If a device is already connected to start playback press SRC to select USB IPD appears in the display when the iPod is recognized 2 Adjust the volume on this unit To stop playback Press and hold O...

Page 10: ... for more than 2 seconds to directly return to the beginning of the category list 2 Rotate the control dial to select the desired search category then press it to confirm 3 Repeat step 2 to search the desired track Playback starts To exit the Quick BrowZer mode Press browse 1 Press browse 2 Press SEEK 3 Rotate the control dial to select the item The list is jumped in steps of 10 of the total numbe...

Page 11: ...vailable Operations in Pandora Thumbs Up or Thumbs Down feedback allows you to personalize stations Thumbs Up During playback press Thumbs Down During playback press The station list allows you to easily select a desired station 1 During playback press browse 2 Press SEEK to select the sorting order BY DATE or A TO Z 3 Rotate the control dial to select the desired station then press it Playback st...

Page 12: ...the setup category then press it Setup categories are follows GENERAL setup page 12 SOUND setup page 13 DISPLAY setup page 13 3 Rotate the control dial to select the options then press it To return to the previous display Press back GENERAL Setup Settings CLOCK ADJ Clock Adjust page 6 TUNER STP Tuner Step page 6 Available only when the unit is turned off CAUT ALM Caution Alarm Activates the cautio...

Page 13: ...ble for clear sound at low volume levels ON OFF SW LEVEL Subwoofer Level Adjusts the subwoofer volume level 2 dB 0 dB 2 dB AUX VOL AUX Volume Level Adjusts the volume level for each connected auxiliary device 18 dB 0 dB 8 dB This setting negates the need to adjust the volume level between sources DEMO Demonstration Activates the demonstration ON OFF BLK OUT Black Out Turns off the illumination aut...

Page 14: ...ogies do not conform to the Compact Disc CD standard therefore these discs may not be playable by this unit Discs that this unit CANNOT play Discs with labels stickers or sticky tape or paper attached Doing so may cause a malfunction or may ruin the disc Discs with non standard shapes e g heart square star Attempting to do so may damage the unit 8 cm 3 1 4 in discs Notes on CD R CD RW discs The ma...

Page 15: ...f you have any questions or problems concerning your unit that are not covered in this manual consult your nearest Sony dealer Maintenance Replacing the lithium battery of the remote commander When the battery becomes weak the range of the remote commander becomes shorter Replace the battery with a new CR2025 lithium battery Use of any other battery may present a risk of fire or explosion Notes on...

Page 16: ... ratio 95 dB Frequency response 10 20 000 Hz Wow and flutter Below measurable limit Corresponding codec MP3 mp3 and WMA wma USB Player section Interface USB Full speed Maximum current 1 A The maximum number of recognizable data folders albums 128 files tracks per folder 512 Corresponding codec MP3 mp3 and WMA wma Power amplifier section Output Speaker outputs Speaker impedance 4 8 ohms Maximum pow...

Page 17: ...the connection and operating procedures For details on using the fuse and removing the unit from the dashboard refer to the installation connections manual supplied with this unit If the problem is not solved visit the support site on the back cover General No power is being supplied to the unit If the unit is turned off and the display disappears the unit cannot be operated with the remote comman...

Page 18: ...he station does not specify the program type CD playback The disc does not play back Defective or dirty disc The CD R CD RW is not for audio use page 14 MP3 WMA files cannot be played back The disc is incompatible with the MP3 WMA format and version For details on playable discs and formats visit the support site MP3 WMA files take longer to play back than others The following discs take a longer ...

Page 19: ... the disc and you cannot go any further The character cannot be displayed For Pandora operation CANNOT SKIP Skipping tracks on Pandora is not allowed Wait until the commercial ends Pandora limits the number of skips allowed on their service Wait until the next track begins or select another station on the list CHK DEV check device Pandora does not launch Launch the Pandora application and log into...

Page 20: ...http www sony net 2013 Sony Corporation Printed in Thailand http www sony asia com section support http www sony asia com caraudio ...

Reviews: