background image

4

CDX-F5710

2-515-319-11 (1)

H:\CDX-F5710\2515319111\2515319111\251531911CDXF5710U\01US02CD-U.fm

masterpage:Left

Getting Started

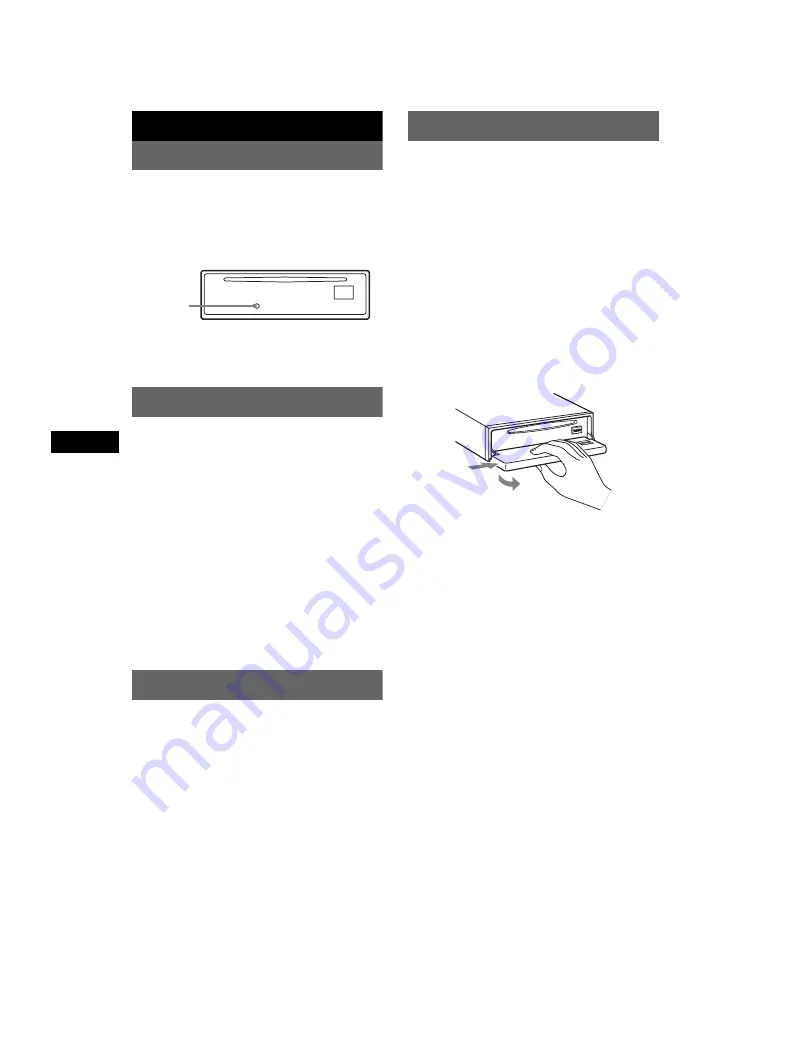
Resetting the unit

Before operating the unit for the first time, or 
after replacing the car battery or changing the 
connections, you must reset the unit.
Detach the front panel and press the RESET 
button with a pointed object, such as a ball-point 
pen.

Note
Pressing the RESET button will erase the clock setting 
and some stored contents.

Setting the clock

The clock uses a 12-hour digital indication.

1

Press 

(MENU)

.

2

Press 

(GP/PRESET)

 +/– repeatedly until 

“CLOCK-ADJ” appears.

3

Press 

(ENTER)

.

The hour indication flashes.

4

Press 

(GP/PRESET)

 +/– to set the hour 

and minute.

To move the digital indication, press 

(SEEK)


–/+.

5

Press 

(ENTER)

.

The clock starts.

To display the clock during playback/reception, 
set “CLOCK-ON” (page 11).

DEMO mode

When the unit is turned off, the clock is 
displayed first, then demonstration (DEMO) 
mode starts the demonstration display.

To cancel the DEMO mode, set “DEMO-OFF” 
in menu (page 11) while the unit is turned off.

Detaching the front panel

You can detach the front panel of this unit to 
prevent theft.

Caution alarm

If you turn the ignition switch to the OFF 
position without detaching the front panel, the 
caution alarm will sound for a few seconds.
The alarm will only sound if the built-in 
amplifier is used.

1

Press 

(OFF)

.

The unit is turned off.

2

Press 

(OPEN)

.

The front panel is flipped down.

3

Slide the front panel to the right, then 
gently pull out the left end of the front 
panel.

Notes
• Do not drop or put excessive pressure on the front 

panel and display window.

• Do not subject the front panel to heat/high 

temperature or moisture. Avoid leaving it in a parked 
car or on a dashboard/rear tray.

Tip
When carrying the front panel, use the supplied front 
panel case.

RESET 
button

1

2

Summary of Contents for CDX-F5710 - Fm/am Compact Disc Player

Page 1: ...r you call upon your Sony dealer regarding this product Model No CDX F5710 Serial No CDX F5710 For installation and connections see the supplied installation connections manual En ce qui concerne l installation et les connexions consulter le manuel d installation raccordement fourni 2005 Sony Corporation CDX F5710 2 515 319 11 1 H CDX F5710 2515319111 2515319111 251531911CDXF5710U 00US 00COV U fm ...

Page 2: ...s equipment has been tested and found to comply with the limits for a Class B digital device pursuant to Part 15 of the FCC Rules These limits are designed to provide reasonable protection against harmful interference in a residential installation This equipment generates uses and can radiate radio frequency energy and if not installed and used in accordance with the instructions may cause harmful...

Page 3: ...djusting menu items MENU 10 Using optional equipment 11 CD MD changer 11 Rotary commander RM X4S 12 Auxiliary audio equipment 13 Additional Information Precautions 13 Notes on discs 13 About MP3 files 14 About ATRAC CD 14 Maintenance 14 Removing the unit 15 Specifications 16 Troubleshooting 16 Error displays Messages 18 SonicStage and its logo are trademarks of Sony Corporation ATRAC ATRAC3 ATRAC3...

Page 4: ...n set CLOCK ON page 11 DEMO mode When the unit is turned off the clock is displayed first then demonstration DEMO mode starts the demonstration display To cancel the DEMO mode set DEMO OFF in menu page 11 while the unit is turned off Detaching the front panel You can detach the front panel of this unit to prevent theft Caution alarm If you turn the ignition switch to the OFF position without detac...

Page 5: ...e A of the front panel onto the spindle B on the unit then lightly push the left side in Press SOURCE on the unit or insert a disc to operate the unit Note Do not put anything on the inner surface of the front panel Inserting the disc in the unit 1 Press OPEN 2 Insert the disc label side up 3 Close the front panel Playback starts automatically Ejecting the disc 1 Press OPEN 2 Press Z The disc is e...

Page 6: ...CE button To power on change the source Radio CD MD 1 AUX 2 C Volume control dial SOUND button 9 To adjust volume rotate select sound items press D GP 3 PRESET M m buttons To select preset stations skip groups press skip groups continuously press and hold E Receptor for the card remote commander F LIST CAT 4 button 9 12 To list up OPEN 6 5 4 3 BBE SHUF REP 2 1 DSPL MODE EQ7 CDX F5710 DSO OFF BBE M...

Page 7: ... 5 BBE MP 6 3 To activate the BBE MP function set BBEMP ON during playback on this unit To cancel set BBEMP OFF Q OFF button To power off stop the source R RESET button 4 S Z eject button 5 To eject the disc T Disc slot 5 To insert the disc The following buttons on the card remote commander have also different buttons functions from the unit wa VOL volume button To adjust volume ws ATT attenuate b...

Page 8: ...g Memory BTM to prevent an accident Storing automatically BTM 1 Press SOURCE repeatedly until TUNER appears To change the band press MODE repeatedly You can select from FM1 FM2 FM3 AM1 or AM2 2 Press MENU then press GP PRESET repeatedly until BTM appears 3 Press ENTER The unit stores stations in order of frequency on the number buttons A beep sounds when the setting is stored Storing manually 1 Wh...

Page 9: ...t FAD front rear t SUB subwoofer volume ATT is displayed at the lowest setting and can be adjusted up to 20 steps 2 Rotate the volume control dial repeatedly to adjust the selected item After 3 seconds the setting is complete and the display returns to normal play reception mode Note Adjust within 3 seconds of selecting the item With the card remote commander In step 2 to adjust the selected item ...

Page 10: ...r The Disc Memo always takes priority over any prerecorded title You can label a disc on the unit if a changer with the CUSTOM FILE function is connected REP TRACK and all shuffle play are suspended until the labeling is complete Deleting the custom name 1 Select the radio or the unit that has stored the custom name you want to delete then press MENU 2 Press GP PRESET repeatedly until NAME DEL app...

Page 11: ...z or OFF page 4 CONTRAST To adjust the contrast of the display The contrast level is adjustable in 5 steps M DSPL 2 Motion Display To select the Motion Display mode SA z to show moving patterns and spectrum analyzer ON to show moving patterns OFF to deactivate the Motion Display A SCRL Auto Scroll To scroll long displayed item automatically when the disc group track is changed ON to scroll OFF z t...

Page 12: ...bel depending on how you mount the rotary commander Location of controls The corresponding buttons on the rotary commander control the same functions as those on this unit The following controls on the rotary commander require a different operation from the unit PRESET DISC control To control radio CD the same as GP PRESET on the unit push in and rotate VOL volume control The same as the volume co...

Page 13: ...it is operating Moisture condensation On a rainy day or in a very damp area moisture condensation may occur inside the lenses and display of the unit Should this occur the unit will not operate properly In such a case remove the disc and wait for about an hour until the moisture has evaporated To maintain high sound quality Be careful not to splash juice or other soft drinks onto the unit or discs...

Page 14: ... expansion mp3 to the file name If you play a high bit rate MP3 such as 320 kbps sound may be intermittent During playback of a VBR variable bit rate MP3 file or fast forward reverse elapsed playing time may not display accurately When the disc is recorded in Multi Session only the first track of the first session format is recognized and played any other format is skipped The priority of the form...

Page 15: ...fter replacement there may be an internal malfunction In such a case consult your nearest Sony dealer Cleaning the connectors The unit may not function properly if the connectors between the unit and the front panel are not clean In order to prevent this detach the front panel page 4 and clean the connectors with a cotton swab dipped in alcohol Do not apply too much force Otherwise the connectors ...

Page 16: ...ccessories Card remote commander RM X153 Parts for installation and connections 1 set Front panel case 1 Optional accessories equipment Rotary commander RM X4S BUS cable supplied with an RCA pin cord RC 61 1 m RC 62 2 m CD changer 10 discs CDX 757MX CD changer 6 discs CDX T69 MD changer 6 discs MDX 66XLP XM Satellite Radio Receiver XT XM1 Source selector XA C30 AUX IN selector XA 300 Note This uni...

Page 17: ...thers The following discs take a longer time to start playback a disc recorded with a complicated tree structure a disc recorded in Multi Session a disc to which data can be added The ATRAC CD cannot play The disc is not created by authorized software such as SonicStage or SonicStage Simple Burner Tracks that are not included in the group cannot be played The display items do not scroll For discs ...

Page 18: ...ocal seek mode is on during automatic tuning NO DATA All custom names have been deleted or none are stored NO DISC The disc is not inserted in the CD MD changer tInsert discs in the changer NO ID3 ID3 tag information is not written in the MP3 file NO INFO Text information is not written in the ATRAC3 ATRAC3plus file NO MAG The disc magazine is not inserted in the CD changer tInsert the magazine in...

Page 19: ...CDX F5710 2 515 319 11 1 masterpage None H CDX F5710 2515319111 2515319111 251531911CDXF5710U 01US02CD U fm ...

Page 20: ...à l explication suivante Pilotage d appareils en option En plus de la fonction de lecture cet appareil vous permet également de piloter des changeurs CD MD en option ou des appareils portables Sony en option Un disque CD TEXT est un CD DA contenant des informations telles que le nom du disque le nom de l artiste et le nom des plages SonicStage et son logo sont des marques de commerce de Sony Corpo...

Page 21: ...lle 8 Réception des stations mémorisées 8 Recherche automatique des fréquences 8 Réception d une station à partir d une liste Affichage automatique des titres 9 Autres fonctions Changement des réglages du son 9 Réglage des caractéristiques du son BAS TRE BAL FAD SUB 9 Ajustement de la courbe de l égaliseur EQ7 TUNE 9 Identification d une station de radio d un disque 10 Réglage des paramètres du me...

Page 22: ...N page 11 Mode DEMO Lorsque l appareil est hors tension l horloge est affichée en premier puis l écran du mode de démonstration DEMO apparaît Pour annuler le mode DEMO réglez DEMO OFF dans le menu page 11 lors de la mise hors tension de l appareil Retrait de la façade Vous pouvez retirer la façade de cet appareil pour le protéger du vol Alarme d avertissement Si vous mettez la clé de contact en po...

Page 23: ... appareil puis poussez doucement sur le côté gauche pour l installer en position Appuyez sur SOURCE sur l appareil ou insérez un disque pour le faire fonctionner Remarque Ne posez rien sur la face interne de la façade Insertion du disque dans le lecteur 1 Appuyez sur OPEN 2 Insérez le disque côté imprimé vers le haut 3 Fermez la façade La lecture commence automatiquement Éjection du disque 1 Appuy...

Page 24: ...ension changement de la source radio CD MD 1 AUX 2 C Molette de réglage du volume touche SOUND 9 Réglage du niveau du volume tournez sélection des paramètres du son appuyez D Touches GP 3 PRESET M m Sélection de stations présélectionnées saut de plusieurs groupes appuyez saut de plusieurs groupes de suite appuyez sur la touche et maintenez la enfoncée E Récepteur de la mini télécommande OPEN 6 5 4...

Page 25: ...ver la fonction BBE MP réglez BBEMP ON en cours de lecture sur cet appareil Pour la désactiver réglez BBEMP OFF Q Touche OFF Mise hors tension de l appareil arrêt de la source R Touche RESET 4 S Touche Z éjection 5 Éjection du disque T Fente d insertion des disques 5 Insertion du disque Les touches suivantes de la mini télécommande correspondent également à des touches fonctions différentes de cel...

Page 26: ...normal sélectionnez REP OFF ou SHUF OFF Radio Mémorisation et réception des stations Attention Pour régler des stations pendant que vous conduisez utilisez la fonction de mémorisation des meilleurs accords BTM afin d éviter tout accident Mémorisation automatique BTM 1 Appuyez plusieurs fois sur SOURCE jusqu à ce que l indication TUNER apparaisse Appuyez plusieurs fois sur MODE pour changer de band...

Page 27: ...ages du son Réglage des caractéristiques du son BAS TRE BAL FAD SUB Vous pouvez régler les graves les aiguës la balance gauche droite l équilibre avant arrière ainsi que le volume du caisson de graves 1 Appuyez plusieurs fois sur SOUND pour sélectionner la rubrique souhaitée La rubrique change comme suit BAS graves t TRE aiguës t BAL gauche droite t FAD avant arrière t SUB volume du caisson de gra...

Page 28: ...Le caractère change comme suit A y B y C y 0 y 1 y 2 y y y y espace y A Pour déplacer l indication numérique appuyez sur SEEK Répétez cette opération jusqu à ce que vous ayez saisi le nom entier 4 Appuyez sur ENTER L attribution du nom est terminée et l écran d affichage revient en mode de lecture réception normal Pour afficher le nom appuyez sur DSPL en cours de réception lecture Conseils Pour co...

Page 29: ...de la fenêtre d affichage AT z réduit la luminosité automatiquement lorsque vous allumez les phares ON réduit la luminosité de la fenêtre d affichage OFF désactive le régulateur de luminosité DEMO 1 Démonstration Pour régler cette fonction à ON z ou à OFF page 4 CONTRAST Pour ajuster le contraste de l affichage Le niveau de contraste peut être réglé par incréments de 5 M DSPL 2 Affichage animé Pou...

Page 30: ...cordez un changeur CD doté de la fonction CUSTOM FILE ou un changeur MD Si vous attribuez un nom à un disque le nom apparaît dans la liste Pour plus de détails à propos de l identification des disques reportez vous à la page 10 1 En cours de lecture appuyez sur LIST Le numéro du disque ou le nom du disque apparaît 2 Appuyez plusieurs fois sur GP PRESET jusqu à ce que le disque de votre choix appar...

Page 31: ...erser le sens de fonctionnement 1 Tout en appuyant sur la commande VOL appuyez sur la touche SOUND et maintenez la enfoncée Conseil Vous pouvez également changer le sens de fonctionnement de ces commandes dans le menu page 11 Raccordement d appareils audio auxiliaires Vous pouvez raccorder un appareil portable Sony en option à la borne BUS AUDIO IN AUX IN de I appareil Si aucun changeur ou aucun a...

Page 32: ...orme de cœur de carré ou d étoile ne peuvent pas être lus avec cet appareil Vous risquez d endommager votre appareil si vous essayez de le faire N utilisez pas de tels disques Vous ne pouvez pas écouter des CD de 8 cm 3 1 4 po Avant la lecture nettoyez les disques avec un chiffon de nettoyage disponible dans le commerce Essuyez chaque disque en partant du centre vers l extérieur N utilisez pas de ...

Page 33: ...egistre de données de CD audio compressés au format ATRAC3 ou ATRAC3plus à l aide de logiciels autorisés comme SonicStage version 2 0 ou ultérieure ou SonicStage Simple Burner Nombre maximal de dossiers groupes 255 fichiers plages 999 Les caractères du nom de dossier fichier et les informations textuelles de SonicStage sont affichés Pour plus de détails Sur le format CD ATRAC reportez vous au manu...

Page 34: ...la clé du contact Ne touchez jamais les connecteurs directement avec les doigts ou avec un objet métallique Démontage de l appareil 1 Retirez le cadre de sûreté 1Retirez la façade page 4 2Insérez les clés de déblocage simultanément dans le cadre de sûreté 3Tirez sur les clés de déblocage pour retirer le cadre de sûreté 2 Retirez l appareil 1Insérez simultanément les deux clés de déblocage jusqu au...

Page 35: ... le système Sony BUS La conception et les caractéristiques techniques sont sujettes à modification sans préavis Dépannage La liste de contrôles suivante vous aidera à remédier aux problèmes que vous pourriez rencontrer avec cet appareil Avant de passer en revue la liste de contrôles ci dessous vérifiez les procédures de raccordement et d utilisation Brevets américains et internationaux sous licenc...

Page 36: ...as Pour certains disques contenant un grand nombre de caractères la fonction de défilement peut être inopérante La fonction A SCRL est désactivée tRéglez A SCRL ON page 11 ou appuyez sur SCRL sur la mini télécommande Le son saute L appareil est mal installé tInstallez l appareil suivant un angle de moins de 45 dans un endroit stable du véhicule Le disque est défectueux ou sale Les touches de comma...

Page 37: ... mode de recherche locale est activé en cours de recherche automatique des fréquences NO DATA Tous les noms personnalisés ont été supprimés ou aucun nom n est enregistré NO DISC Le disque n a pas été inséré dans le changeur CD MD tInsérez un disque dans le changeur NO ID3 Aucune information des étiquettes ID3 n est écrite dans le fichier MP3 NO INFO Aucune information textuelle n est écrite dans l...

Page 38: ...CDX F5710 2 515 319 11 1 masterpage None H CDX F5710 2515319111 2515319111 251531911CDXF5710U 02FR02CD U fm ...

Page 39: ...CDX F5710 2 515 319 11 1 masterpage None H CDX F5710 2515319111 2515319111 251531911CDXF5710U 02FR02CD U fm ...

Page 40: ...02US 03BCO U fm masterpage Right CDX F5710 2 515 319 11 1 Sony Corporation Printed in Korea ...

Reviews: