background image

23

Recording – Basics

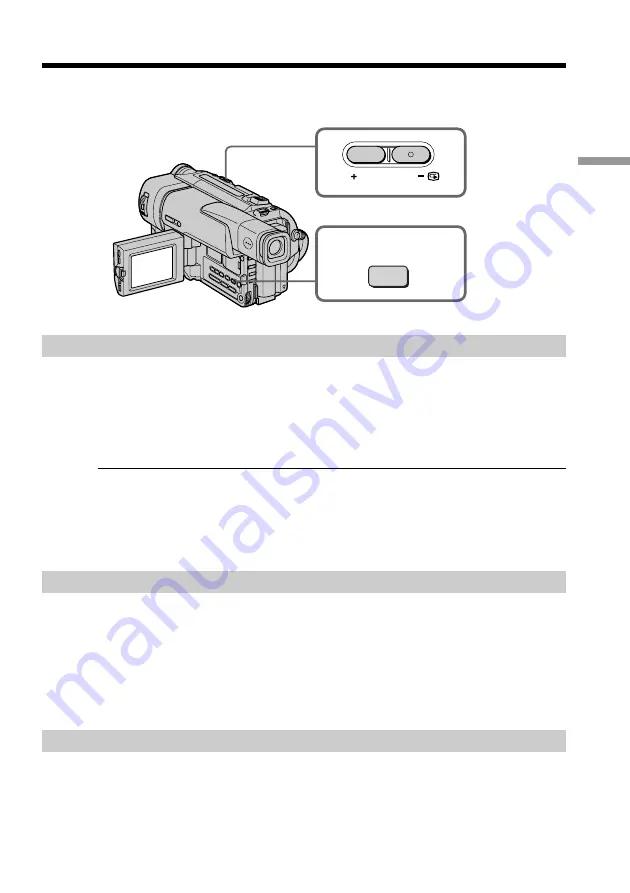
Checking the recording

– END SEARCH / EDITSEARCH / Rec Review

You can use these buttons to check the recorded picture or shoot so that the transition
between the last recorded scene and the next scene you record is smooth.

END SEARCH

You can go to the end of the recorded section after you record.

Press END SEARCH in the standby mode.
The last 5 seconds of the recorded section are played back and playback stops. You can
monitor the sound from the speaker, headphones (CCD-TRV87 only) or an earphone
(CCD-TRV17/TRV37/TRV57/TRV67 only).

Note

If you start recording after using the end search function, occasionally, the transition
between the last scene you recorded and the next scene may not be smooth.

Once you eject the cassette after you have recorded on the tape

The end search function does not work.

EDITSEARCH

You can search for the next recording start point.

Hold down the +/– (

7

) side of EDITSEARCH in the standby mode. The recorded

section is played back.

+ : to go forward
– : to go backward

Release EDITSEARCH to stop playback. If you press START/STOP, re-recording begins
from the point you released EDITSEARCH. You cannot monitor the sound.

Rec Review

You can check the last recorded section.

Press the – (

7

) side of EDITSEARCH momentarily in the standby mode.

The last few seconds of the recorded section are played back. You can monitor the
sound from the speaker, headphones (CCD-TRV87 only) or an earphone (CCD-TRV17/
TRV37/TRV57/TRV67 only).

END

SEARCH

EDITSEARCH

Summary of Contents for CCD TRV37 - Hi8 Camcorder

Page 1: ...efore operating the unit please read this manual thoroughly and retain it for future reference Owner s Record The model and serial numbers are located on the bottom Record the serial number in the space provided below Refer to these numbers whenever you call upon your Sony dealer regarding this product CCD TRV67 CCD TRV17 TRV37 TRV57 CCD TRV87 ...

Page 2: ...d to provide reasonable protection against harmful interference in a residential installation This equipment generates uses and can radiate radio frequency energy and if not installed and used in accordance with the instructions may cause harmful interference to radio communications However there is no guarantee that interference will not occur in a particular installation If this equipment does c...

Page 3: ...he fader function 34 Using special effects Picture effect 37 Using special effects Digital effect CCD TRV87 only 38 Using the PROGRAM AE function 41 Adjusting the exposure manually 43 Focusing manually 44 Superimposing a title 45 Making your own titles 47 Using the built in light 49 Advanced Playback Operations Playing back a tape with digital effects CCD TRV87 only 51 Editing Dubbing a tape 52 Re...

Page 4: ...rting a cassette p 15 Connecting the power cord p 14 Use the battery pack when using your camcorder outdoors p 9 3Close the cassette compartment by pressing the mark on the cassette compartment The cassette compartment automatically goes down 1Slide EJECT in the direction of the arrow while pressing the small blue button 2Insert a cassette into the cassette compartment with its window facing out E...

Page 5: ...iewfinder the LCD panel or the battery pack 1Set the POWER switch to VTR CCD TRV87 or PLAYER CCD TRV17 TRV37 TRV57 TRV67 while pressing the small green button 2Press m to rewind the tape 3Press N to start playback 1Set the POWER switch to CAMERA while pressing the small green button 2Open the LCD panel while pressing OPEN 3Turn STANDBY to STANDBY The picture appears on the LCD screen 4Press the re...

Page 6: ... buttons and settings on your camcorder are shown in capital letters e g Set the POWER switch to CAMERA When you carry out an operation you can hear a beep sound to indicate that the operation is being carried out Types of differences CCD TRV17 TRV37 TRV57 TRV67 TRV87 System VIDEO AUDIO IN z S VIDEO z z Digital zoom 80 200 360 360 360 Super NightShot z SteadyShot z z z Remote sensor z z z SUPER LA...

Page 7: ...reen or white that constantly appear on the LCD screen and in the viewfinder These points occur normally in the manufacturing process and do not affect the recorded picture in any way Effective ratio of pixels and or screen are 99 99 or more Do not let your camcorder get wet Keep your camcorder away from rain and sea water Letting your camcorder get wet may cause your camcorder to malfunction Some...

Page 8: ... 3 NP F330 battery pack 1 p 9 10 4 CR2025 lithium battery 1 p 65 The lithium battery is already installed in your camcorder Contents of the recording cannot be compensated if recording or playback is not made due to a malfunction of the camcorder video tape etc 5 Size AA R6 battery for Remote Commander 2 p 84 CCD TRV57 TRV67 TRV87 only 6 A V connecting cable 1 p 27 for stereo model 7 Shoulder stra...

Page 9: ... remove the battery pack Slide the battery pack out in the direction of the arrow while pressing BATT RELEASE down After installing the battery pack Do not carry your camcorder by holding the battery pack If you do so the battery pack may slide off your camcorder unintentionally damaging your camcorder Step 1 Preparing the power supply BATT RELEASE ...

Page 10: ...ower cord to the AC power adaptor 3 Connect the power cord to a wall outlet 4 Set the POWER switch to OFF CHARGE Charging begins The remaining battery time is indicated in minutes on the display window When the remaining battery indicator changes to u normal charge is completed To fully charge the battery full charge leave the battery pack attached for about 1 hour after normal charge is completed...

Page 11: ...e battery pack in a cool place Remaining battery time indicator The remaining battery time indicator in the display window roughly indicates the recording time with the viewfinder Battery pack The battery pack is charged a little before it leaves the factory Until your camcorder calculates the actual remaining battery time min appears in the display window While charging the battery pack no indica...

Page 12: ...CD TRV87 Recording with Recording with Battery pack the viewfinder the LCD screen Continuous Typical Continuous Typical NP F330 supplied 135 120 75 65 115 100 65 55 NP F530 235 210 130 115 195 170 110 95 NP F550 270 240 150 130 230 200 125 110 NP F730 475 425 260 235 395 355 215 195 NP F730H F750 550 500 300 275 470 425 260 235 NP F930 745 670 410 370 625 560 345 310 NP F950 850 760 465 420 725 65...

Page 13: ...dicate the time using a normally charged battery The battery life will be shorter if you use your camcorder in a cold environment After charging the battery pack Disconnect the AC power adaptor from the DC IN jack on your camcorder Note on the remaining battery time indicator during recording The indicator may not be correct depending on the conditions in which you are recording When you close the...

Page 14: ...let PRECAUTION The set is not disconnected from the AC power source house current as long as it is connected to the wall outlet even if the set itself has been turned off Notes The AC power adaptor can supply power even if the battery pack is attached to your camcorder The DC IN jack has source priority This means that the battery pack cannot supply any power if the power cord is connected to the ...

Page 15: ...h its window facing out and the tab on the cassette up 4 Close the cassette compartment by pressing the mark on the cassette compartment The cassette compartment automatically goes down To eject a cassette Slide EJECT in the direction of the arrow while pressing the small blue button Note Do not press the cassette compartment down Doing so may cause malfunction To prevent accidental erasure Slide ...

Page 16: ...our camcorder lights up To stop recording press START STOP again The recording lamp lights up in the viewfinder when you record with the viewfinder Note Fasten the grip strap firmly Do not touch the built in microphone during recording To enable smooth transition You can make the transition between the last scene you recorded and the next scene smooth as long as you do not eject the cassette When ...

Page 17: ...it faces the other way the indicator appears in the viewfinder and on the LCD screen Mirror mode When closing the LCD panel set it vertically until it clicks and swing it into the camcorder body Note When using the LCD screen except in the mirror mode the viewfinder automatically turns off When you use the LCD screen outdoors in direct sunlight The LCD screen may be difficult to see If this happen...

Page 18: ...s processed digitally When you shoot close to a subject If you cannot get a sharp focus move the power zoom lever to the W side until the focus is sharp You can shoot a subject that is at least about 2 feet 5 8 inch about 80 cm away from the lens surface in the telephoto position or about 1 2 inch about 1 cm away in the wide angle position Notes on digital zoom Digital zoom starts to function when...

Page 19: ...usting the viewfinder If you record pictures with the LCD panel closed check the picture with the viewfinder Adjust the viewfinder lens to your eyesight so that the indicators in the viewfinder come into sharp focus Lift up the viewfinder and move the viewfinder lens adjustment lever ...

Page 20: ...appears in the viewfinder or on the LCD screen To cancel press BACK LIGHT again If you press EXPOSURE when shooting backlit subjects The backlight function will be canceled Recording a picture SP H 0 00 01 40min REC Hi8 format indicator CCD TRV67 TRV87 only This appears while playing back or recording in Hi8 format Recording mode indicator STBY REC indicator Tape counter Remaining tape indicator T...

Page 21: ...r To cancel the Super NightShot mode press SUPER NIGHTSHOT again Using the NightShot Light The picture will be clearer with the NightShot Light on To enable NightShot Light set N S LIGHT to ON in the menu settings p 55 Notes Do not use the NightShot function in bright places ex outdoors in the daytime This may cause your camcorder to malfunction When you keep NIGHTSHOT set to ON in normal recordin...

Page 22: ...n the viewfinder or on the LCD screen superimposed on the picture Carry out the following operations in the standby or recording mode Press DATE to record the date Press TIME to record the time Press DATE or TIME then press TIME or DATE to record the date and time Press DATE and or TIME again The date and or time indicator disappears The default clock setting is set to East Coast Standard Time You...

Page 23: ...ansition between the last scene you recorded and the next scene may not be smooth Once you eject the cassette after you have recorded on the tape The end search function does not work EDITSEARCH You can search for the next recording start point Hold down the 7 side of EDITSEARCH in the standby mode The recorded section is played back to go forward to go backward Release EDITSEARCH to stop playback...

Page 24: ...CCD TRV87 orPLAYER CCD TRV17 TRV37 TRV57 TRV67 whilepressingthesmallgreenbutton 3 OpentheLCDpanelwhilepressingOPEN 4 Press mtorewindthetape 5 Press Ntostartplayback 6 Toadjustthevolume presseitherofthetwobuttonsonVOLUME The speakeronyourcamcorderissilentwhentheLCDpanelisclosed To stop playback Press x When monitoring on the LCD screen You can turn the LCD panel over and move it back to the camcord...

Page 25: ...screen indicators Press DISPLAY on your camcorder or the Remote Commander CCD TRV57 TRV67 TRV87 only supplied with your camcorder The indicators appear on the LCD screen To make the indicators disappear press DISPLAY again DISPLAY Playing back a tape ...

Page 26: ...e button To view the picture at slow speed slow playback CCD TRV57 TRV67 TRV87 only Press y on the Remote Commander during playback To resume normal playback press N To search the last scene recorded END SEARCH Press END SEARCH in the stop mode The last 5 seconds of the recorded section plays back and stops In the various playback modes Sound is muted When the playback pause mode lasts for 5 minut...

Page 27: ... from a wall outlet using the AC power adaptor p 14 Refer to the operating instructions of your TV or VCR Open the jack cover Connect your camcorder to the TV using the A V connecting cable Then set the TV VCR selector on the TV to VCR CCD TRV17 TRV37 TRV57 TRV67 CCD TRV67 only CCD TRV87 If your TV is already connected to a VCR Connect your camcorder to the LINE IN input on the VCR by using the A ...

Page 28: ... not supplied to the S video jacks on both your camcorder and the TV or the VCR Monitoring the picture from a TV or VCR CCD TRV87 only You can monitor the picture on the LCD screen Connect your camcorder to the outputs on the TV or VCR Using the AV cordless IR receiver CCD TRV87 only Once you connect the AV cordless IR receiver not supplied to your TV or VCR you can easily view the picture on your...

Page 29: ...te sensor and press S LASER LINK Turn on super laser link and press N You can switch the video input of the TV automatically to the one which the AV cordless IR receiver is connected To do so set AUTO TV ON to ON and TV INPUT to the same video input 1 2 3 in the menu settings With some models however the picture and sound may be disconnected momentarily when the video input is switched The above f...

Page 30: ...picture appears The CAPTURE indicator appears Recording does not start yet To change the still picture release PHOTO select a still picture again and then press and hold PHOTO lightly 3 Press PHOTO deeper The still picture in the viewfinder or on the LCD screen is recorded for about seven seconds The sound during those seven seconds is also recorded The still image is displayed in the viewfinder o...

Page 31: ...ed for about seven seconds and your camcorder returns to the standby mode You cannot select another still picture Printing the still picture You can print a still picture by using the video printer not supplied Connect the video printer using the A V connecting cable supplied with your camcorder Connect the yellow plug of the cable to the video jack on both your camcorder and the video printer Ref...

Page 32: ... normal TV b or a wide screen TV c If you set the screen mode of the wide screen TV to the zoom mode a picture without black bands appears d 16 9FULL The picture during recording in the 16 9FULL mode e or playing back on a normal TV f or a wide screen TV g is horizontally compressed If you set the screen mode of the wide screen TV to the full mode you can watch pictures of normal images h Using th...

Page 33: ...n the menu settings when the SteadyShot function is working flashes and the SteadyShot function does not function In the wide mode You cannot select the old movie function with DIGITAL EFFECT CCD TRV87 only and the bounce function with FADER Date or time indicator When you record in the 16 9FULL mode the date or time indicator will be widened on wide screen TVs During recording You cannot change o...

Page 34: ...hanges from black and white to color When fading out the picture gradually changes from color to black and white 1 You can use this function only when D ZOOM is set to OFF 2 CCD TRV87 only 3 CCD TRV87 only The sound does not wipe away FADER M FADER mosaic STRIPE BOUNCE 1 Fade in only OVERLAP 2 Fade in only WIPE 3 Fade in only a REC STBY REC STBY b ...

Page 35: ...follows FADER t M FADER t STRIPE t BOUNCE t MONOTONE t OVERLAP CCD TRV87 only t WIPE CCD TRV87 only t no indicator The last selected fader mode is indicated first of all 2 Press START STOP The fader indicator stops flashing To cancel the fader function After the fade in out is carried out Your camcorder automatically returns to the normal mode Before the fade in out is carried out Before pressing ...

Page 36: ... before operating the wipe or overlap function CCD TRV87 only Your camcorder stores the image on the tape As the image is being stored the WIPE or OVERLAP indicator flashes quickly and the picture you are shooting disappears from the viewfinder Depending on the tape condition the picture may not be recorded clearly While using the bounce function you cannot use the following functions Focus Zoom P...

Page 37: ...xpandsvertically STRETCH f Thepictureexpandshorizontally 1 Press PICTURE EFFECT in the standby or recording mode The picture effect indicator appears 2 Turn the SEL PUSH EXEC dial to select the desired picture effect mode The indicator changes as follows PASTEL y NEG ART y SEPIA y B W y SOLARIZE y MOSAIC y SLIM y STRETCH To turn the picture effect function off Press PICTURE EFFECT While using the ...

Page 38: ... LUMINANCEKEY You can swap a brighter area in a still picture with a moving picture TRAIL You can record the picture so that an incidental image like a trail is left SLOW SHTR SLOW SHUTTER You can slow down the shutter speed The slow shutter mode is good for recording dark pictures more brightly OLD MOVIE You can add an old movie type atmosphere to pictures Your camcorder automatically sets the wi...

Page 39: ...fect as follows STILL The rate of the still picture you want to superimpose on the moving picture FLASH The interval of flash motion LUMI The color scheme of the area in the still picture which is to be swapped with a moving picture TRAIL The vanishing time of the incidental image SLOW SHTR Shutter speed The larger the shutter speed number the slower the shutter speed OLD MOVIE No adjustment neces...

Page 40: ...tter mode Exposure PROGRAM AE The following functions do not work in the old movie mode Exposure Wide mode Picture effect PROGRAM AE When you turn the power off The digital effect will be automatically canceled When recording in the slow shutter mode Auto focus may not be effective Focus manually using a tripod Shutter speed Shutter speed number Shutter speed SLOW SHTR 1 1 30 SLOW SHTR 2 1 15 SLOW...

Page 41: ...es shake on fast moving subjects such as in tennis or golf Beach ski mode This mode prevents people s faces from appearing dark in strong light or reflected light such as at a beach in midsummer or on a ski slope Sunset moon mode This mode allows you to maintain atmosphere when you are recording sunsets general night views fireworks displays and neon signs Landscape mode This mode is for when you ...

Page 42: ... focus only on distant subjects The following functions do not work in the PROGRAM AE mode Slow shutter CCD TRV87 only Old movie CCD TRV87 only Bounce The following functions do not work in the low lux mode CCD TRV87 only Digital effect Overlap Wipe Exposure If you press PROGRAM AE when using the NightShot function the PROGRAM AE indicator flashes and the PROGRAM AE function does not work If you a...

Page 43: ...ing mode The exposure indicator appears 2 Turn the SEL PUSH EXEC dial to adjust the brightness To return to the automatic exposure mode Press EXPOSURE again Note When you adjust the exposure manually the following function and modes do not work Backlight Slow shutter CCD TRV87 only Old movie CCD TRV87 only Your camcorder automatically returns to the automatic exposure mode if you change the PROGRA...

Page 44: ...us To return to the autofocus mode Set FOCUS to AUTO To record distant subjects When you press FOCUS down to INFINITY the lens focuses on infinity and indicator appears When you release FOCUS your camcorder returns to the manual focus mode Use this mode when your camcorder focuses on near objects even though you are trying to shoot a distant object To focus precisely Adjust the zoom by first focus...

Page 45: ... to start recording 7 When you want to stop recording the title press TITLE To superimpose the title while you are recording Press TITLE while you are recording and carry out steps 2 to 5 When you press the SEL PUSH EXEC dial at step 5 the title is superimposed To select the language of a preset title If you want to change the language select before step 2 Then select the desired language and retu...

Page 46: ...HITE y YELLOW y VIOLET y RED y CYAN y GREEN y BLUE The title size changes as follows SMALL y LARGE You cannot input more than 13 characters in LARGE size The title position changes as follows 1y 2y 3y 4y 5y 6y 7y 8y 9 The larger the position number the lower the title is positioned When you select the title size LARGE you cannot choose position 9 When you select the title size LARGE in the CINEMA ...

Page 47: ...en press the dial 5 Turn the SEL PUSH EXEC dial to select the desired character then press the dial 6 Repeat steps 4 and 5 until you have selected all characters and completed the title 7 To finish making your own titles turn the SEL PUSH EXEC dial to select SET then press the dial The title is stored in memory 8 Press TITLE to make the title menu disappear 1 2 TITLE 3 4 6 1 2 3 4 TITLE SET CUSTOM...

Page 48: ... in your camcorder The power automatically goes off The characters you have entered remain stored in memory Turn STANDBY down once and then up again then proceed from step 1 We recommend setting the POWER switch to VTR CCD TRV87 or PLAYER CCD TRV17 TRV37 TRV57 TRV67 or removing the cassette so that your camcorder does not automatically turn off while you are entering title characters If you select...

Page 49: ...ding surfaces are hot while the light is on It remains hot for a while after the light is turned off DANGER Not to be handled by children Emits intense heat and light Use with caution to reduce the risk of fire or injury to persons Do not direct light at persons or materials from less than 4 feet 1 22 m during use and until cool Slide LIGHT to OFF when not in use Notes The battery pack is quickly ...

Page 50: ...unit 3 Replace the bulb using a dry cloth 4 Attach the bulb housing turning it clockwise then replace the built in light unit CAUTION When replacing the bulb use only the Sony XB 3D halogen lamp not supplied to reduce the risk of fire To prevent possible burn hazard disconnect the power source before replacing and do not touch the bulb until the bulb becomes cool enough to handle for about 30 minu...

Page 51: ...justtheeffect Fordetailsofeachdigitaleffectfunction seepage38 To cancel the digital effect function PressDIGITALEFFECT Notes Youcannotprocessexternallyinputscenesusingthedigitaleffectfunction Torecordpicturesthatyouhaveprocessedusingthedigitaleffectfunction recordthe pictures on the VCR STILL and LUMI modes Youcansearchapicturetoimage processbypressing Mor mintheplayback mode However noise appears...

Page 52: ...for more information 3 Set the POWER switch to VTR CCD TRV87 or PLAYER CCD TRV17 TRV37 TRV57 TRV67 4 Play back the recorded tape on your camcorder 5 Start recording on the VCR Refer to the operating instructions of your VCR for more information CCD TRV17 TRV37 TRV57 TRV67 CCD TRV67 only CCD TRV87 When you have finished dubbing a tape Press xon both your camcorder and the VCR To prevent deteriorati...

Page 53: ...is a monaural type CCD TRV87 only Connect the yellow plug for video and the white plug for audio on both your camcorder and the VCR You do not connect the red plug With this connection the sound will be monaural Connect using an S video cable not supplied to obtain high quality pictures CCD TRV67 TRV87 only With this connection you do not need to connect the yellow video plug of the A V connecting...

Page 54: ... you are recording a tape from VCR Select a TV program if you are recording from TV 6 Press Xon your camcorder at the scene where you want to start recording from Note You cannot record dual sound broadcasts If your VCR is a monaural type Connect the yellow plug for video and the white plug for audio on both your camcorder and the VCR you do not connect the red plug With this connection the sound ...

Page 55: ...ial to set 5 If you want to change other items select RETURN and press the dial then repeat steps from 2 to 4 For details see Selecting the mode setting of each item p 56 1 CAMERA 2 3 MENU 4 CAMERA SET D ZOOM 16 9WIDE STEADYSHOT N S LIGHT WIND PHOTO MENU END CAMERA SET D ZOOM 16 9WIDE OTHERS WORLD TIME BEEP COMMANDER DISPLAY REC LAMP INDICATOR OTHERS WORLD TIME BEEP OTHERS WORLD TIME BEEP COMMANDE...

Page 56: ...o 20 is carried out If you set to 40 80 digital zoom is activated and more than 20 to 40 80 is performed digitally p 18 CCD TRV17 only If you set to OFF digital zoom is deactivated and up to 20 is carried out If you set to 40 200 digital zoom is activated and more than 20 to 40 200 is performed digitally p 18 CCD TRV37 only If you set to OFF digital zoom is deactivated and up to 20 is carried out ...

Page 57: ...creen POWER switch VTR VTR PLAYER VTR PLAYER VTR PLAYER VTR PLAYER CAMERA Notes on the SteadyShot function CCD TRV57 TRV67 TRV87 only The SteadyShot function will not correct excessive camera shake Attachment of a conversion lens not supplied may influence the SteadyShot function SteadyShot does not operate in the 16 9FULL mode If you set STEADYSHOT to ON in the menu settings the indicator flashes...

Page 58: ...or PLAYER CCD TRV17 TRV37 TRV57 TRV67 mode To always display the remaining tape bar POWER switch CAMERA VTR PLAYER CAMERA VTR CAMERA Notes on the LP mode When you record a tape in the LP mode on your camcorder we recommend playing the tape on your camcorder When you play back the tape on other camcorders or VCRs noise may occur in pictures or sound Noise may occur also when you play on your camcor...

Page 59: ...ction p 29 To display selected menu items in normal size To display selected menu items at twice the normal size To make the demonstration appear To cancel the demonstration mode POWER switch CAMERA CAMERA VTR CAMERA CAMERA Notes on DEMO MODE You cannot select DEMO MODE when a cassette is inserted in your camcorder DEMO MODE is set to STBY Standby at the factory and the demonstration starts about ...

Page 60: ...y other VCR s remote control To show the display on the LCD screen and viewfinder To show the display on the TV screen LCD screen and viewfinder To light up the camera recording lamp at the front of your camcorder To turn the camera recording lamp off so that the subject is not aware of the recording To turn off the backlight on display window To turn on the backlight POWER switch CAMERA VTR PLAYE...

Page 61: ...re held in memory by the lithium battery If you replace the lithium battery with the battery pack or other power source connected you need not reset the date and time You must reset the date and time when the lithium battery becomes dead with no power source installed First set the year then the month the day the hour and then the minute 1 While your camcorder is in the standby mode press MENU to ...

Page 62: ... for 10 seconds after you start recording Auto date function This function works only once a day Note on the time indicator The internal clock of your camcorder operates on a 12 hour cycle 12 00 AM stands for midnight 12 00 PM stands for noon Note on the auto date function You can change the AUTO DATE setting by selecting ON or OFF in the menu settings The auto date function automatically displays...

Page 63: ...functionallowsyoutorecordandplaybackpictureswith clearerdetails Videotapesrecordedonacamcorderhavingthe XR functionshowexcellentpicture qualitywhentheyareplayedbackonan XR camcorder Theplaybackqualitywillbethenormalqualityofthestandard8mm Hi8camcorder whenvideotapesrecordedonan XR camcorderareplayedbackbyaconventional standard8mm Hi8camcorderorwhenvideotapesrecordedonaconventional standard8mm Hi8c...

Page 64: ...ordcopyrightcontrolsignalsonthetapewhenitrecords When you play back a dual sound track tape CCD TRV87 only WhenyouplaybackadualsoundtracktaperecordedinanAFMHiFistereosystem set HiFiSOUND tothedesiredmodeinthemenusettings p 55 Sound from speaker HiFi Sound Playing back Playing back a dual Mode a stereo tape sound track tape STEREO Stereo Mainsoundandsubsound 1 Monaural Mainsound 2 Unnaturalsound Su...

Page 65: ...n this case replace the battery with a Sony CR2025 or Duracell DL 2025 lithium battery Use of any other battery may present a risk of fireorexplosion Discardusedbatteriesaccordingtothemanufacturer sinstructions WARNING Thebatterymayexplodeifmistreated Donotrecharge disassemble nordisposeofit infire Lithium battery Keepthelithiumbatteryoutofthereachofchildren Shouldthebatterybeswallowed immediately...

Page 66: ...ofthelithiumbatterycompartment 2 Pushthelithiumbatterydownonceandpullitoutfromtheholder 3 InstallaSonyCR2025orDuracellDL 2025lithiumbatterywiththepositive sidefacingout 4 Closethelid Changing the lithium battery in your camcorder C R 2 0 2 5 C R 2 0 2 5 1 1 2 3 4 ...

Page 67: ...inder lens is not adjusted c Adjust the viewfinder lens p 19 STEADYSHOT is set to OFF in the menu settings c Set it to ON p 55 The SteadyShot function does not work when the wide mode is set to 16 9FULL FOCUS is set to MANUAL c Set it to AUTO p 44 Shooting conditions are not suitable for autofocus c Set FOCUS to MANUAL to focus manually p 44 The digital effect function is working c Cancel it p 38 ...

Page 68: ...back with HiFi SOUND set to 2 in the menu settings CCD TRV87 only c Set it to STEREO p 55 The volume is turned to minimum c Turn up the volume p 24 c Pull out A V connecting cable from AUDIO VIDEO jack then connect it again In the recording and playback modes Symptom Cause and or Corrective Actions The battery pack is not installed or is dead or nearly dead c Install a charged battery pack p 9 10 ...

Page 69: ...atteries with the correct polarity p 84 The batteries are dead c Insert new ones p 84 Reset the date and time p 61 DISPLAY is set to V OUT LCD in the menu settings c Set it to LCD p 55 Moisture condensation has occurred c Remove the cassette and leave your camcorder for at least 1 hour to acclimatize p 73 Some troubles has occurred in your camcorder c Remove the cassette and insert it again then o...

Page 70: ...ion that you cannot service has occurred c Contact your Sony dealer or local authorized Sony service facility and inform them of the 5 digit code example E 61 10 Ifyouareunabletorectifytheproblemevenifyoutrycorrectiveactionsafewtimes contactyourSonydealerorlocalauthorizedSonyservicefacility Yourcamcorderhasaself diagnosisdisplay function Thisfunctiondisplaysthecurrentconditionof yourcamcorderasa5 ...

Page 71: ...leaningcassette notsupplied p 74 Self diagnosis display p 70 Moisture condensation has occurred Fastflashing Ejectthecassette turnoffyour camcorder andleaveitfor about1hourwiththecassette compartmentopen p 73 You need to eject the cassette Slowflashing Thewrite protecttabonthe cassetteisout red p 15 Fastflashing Moisturecondensationhas occurred p 73 Thetapehasrunout p 15 24 Theself diagnosisdispla...

Page 72: ...CentralAmerica Chile Colombia Ecuador Jamaica Japan Korea Mexico Peru Surinam Taiwan thePhilippines theU S A Venezuela etc PAL system Australia Austria Belgium China CzechRepublic Denmark Finland Germany Great Britain Holland HongKong Italy Kuwait Malaysia NewZealand Norway Portugal Singapore SlovakRepublic Spain Sweden Switzerland Thailand etc PAL M system Brazil PAL N system Argentina Paraguay U...

Page 73: ...thecassette turnoffyour camcorder andleaveitforabout1hourwiththecassettecompartmentopen Your camcordercanbeusedagainifthe indicatordoesnotappearwhenthepoweris turnedonagain Note on moisture condensation Moisturemaycondensewhenyoubringyourcamcorderfromacoldplaceintoawarm place orviceversa orwhenyouuseyourcamcorderinahotplaceasfollows Youbringyourcamcorderfromaskislopeintoaplacewarmedupbyaheating de...

Page 74: ...ithacleaningcassette thevideoheadsmayhaveworndownduetolonguse If thisisthecase theymustbereplacedwithnewheads ContactyourSonydealeror localauthorizedSonyservicefacility Cleaning the LCD screen IffingerprintsordustmaketheLCDscreendirty werecommendusingaLCD CleaningKit notsupplied tocleantheLCDscreen Removing dust from inside the viewfinder 1 1 Remove the screw with a screwdriver not supplied 2 Then...

Page 75: ... light Donotknockorjoltthebuilt inlightwhileitisturnedonasitmaydamagethebulb orshortenthelifeofthebulb Donotleavethebuilt inlightonwhileitisrestingonoragainstsomething itmay causeafireordamagethebuilt inlight On handling tapes Donotinsertanythingintothesmallholesontherearofthecassette Theseholesare usedtosensethetypeandthicknessofthetapeandiftherecordingtabisinorout Camcorder care Removethetape an...

Page 76: ...uipmentwiththechargingfunction Topreventaccidentfromashortcircuit donotallowmetalobjectstocomeinto contactwiththebatteryterminals Keepthebatterypackawayfromfire Neverexposethebatterypacktotemperaturesabove140 F 60 C suchasinacar parkedinthesunorunderdirectsunlight Keepthebatterypackdry Donotexposethebatterypacktoanymechanicalshock Donotdisassemblenormodifythebatterypack Attachthebatterypacktothevi...

Page 77: ... or standard 8 Recording playback time using 120 min cassette SP mode 2 hours LP mode 4 hours Fastforward rewind time using 120 min cassette Approx 5 min Viewfinder Electric viewfinder monochrome Image device CCD TRV17 TRV37 1 6 inch CCD Charge Coupled Device CCD TRV57 TRV67 TRV87 1 4 inch CCD Charge Coupled Device CCD TRV17 TRV37 Approx 270 000 pixels Effective Approx 250 000 pixels CCD TRV57 TRV...

Page 78: ...emperature 4 F to 140 F 20 C to 60 C Dimensions approx 5 1 9 16 2 1 2 in 125 39 62 mm w h d excluding projecting parts Mass approx 9 8 oz 280 g excluding power cord Battery pack Output voltage DC 7 2 V Capacity 5 0 Wh Dimensions approx 1 9 16 13 16 2 7 8 in 38 21 71 mm w h d Mass approx 3 4 oz 95 g Type Lithium ion Design and specifications are subject to change without notice Specifications ...

Page 79: ... 8 Eyecup RELEASE knob p 74 9 Viewfinder lens adjustment lever p 19 0 Power zoom lever p 18 qa PHOTO button CCD TRV87 only p 30 qs BATT RELEASE lever p 9 qd STANDBY switch p 16 qf START STOP button p 16 qg Hooks for shoulder strap p 81 qh DC IN jack p 4 10 ThismarkindicatesthatthisproductisagenuineaccessoryforSony videoproducts WhenpurchasingSonyvideoproducts Sonyrecommendsthatyou purchaseaccessor...

Page 80: ...ne wf SUPER NIGHTSHOT button CCD TRV87 only p 21 wg NIGHTSHOT switch p 21 wh Display window p 85 wj Remote sensor CCD TRV57 TRV67 TRV87 only p 84 wk Tripod receptacle base Make sure that the length of the tripod screw is less than 9 32 inch 6 5 mm Otherwise you cannot attach the tripod securely and the screw may damage your camcorder Identifying the parts and controls What is SUPER LASER LINK CCD ...

Page 81: ...ksfortheshoulder strap wl Lithium battery compartment p 65 e Speaker ea LCD screen p 17 es DIGITAL EFFECT button CCD TRV87 only p 39 ed FADER button p 35 ef BACK LIGHT button p 20 eg PROGRAM AE button p 42 eh EXPOSURE button p 43 ej SEL PUSH EXEC dial p 55 ek MENU button p 55 el PICTURE EFFECT button p 37 wl e eh ej eg el ef ed ek es ea ...

Page 82: ...82 Identifying the parts and controls r COUNTER RESET button p 17 ra TIME button p 22 rs DATE button p 22 rd DISPLAY button p 25 rf END SEARCH button p 23 rg TITLE button p 45 rd rf rg rs ra r ...

Page 83: ...ip strap ta S VIDEO jack CCD TRV67 TRV87 only p 27 ts Built in light p 49 td LIGHT switch p 49 tf RFU DC OUT RFU adaptor DC output jack p 28 tg MIC jack PLUG IN POWER Connect an external microphone not supplied This jack also accepts a plug in power microphone If you connect a 2 pin microphone supply power from DC OUT jack In this case WIND in the menu settings does not function CCD TRV87 only th ...

Page 84: ...ingthe and polaritiesonthebatteriesto the marksinsidethebatterycompartment Notes on the Remote Commander Pointtheremotesensorawayfromstronglightsourcessuchasdirectsunlightor overheadlighting Otherwise theRemoteCommandermaynotfunctionproperly YourcamcorderworksinthecommandermodeVTR2 Commandermodes 1 2and3areusedtodistinguishyourcamcorderfromotherSonyVCRstoavoid remotecontrolmisoperation Ifyouuseano...

Page 85: ...RV87 only p 57 qd Manual focusing indicator p 44 qf STBY REC indicator p 20 Video control mode indicator p 26 qg Tape counter indicator p 20 Self diagnosis display indicator p 70 Photo mode indicator CCD TRV87 only p 30 qh Remaining tape indicator p 20 qj END SEARCH indicator p 23 qk NIGHTSHOT indicator p 21 ql AUTO DATE indicator p 62 Date indicator p 22 62 w Time indicator p 22 62 wa Warning ind...

Page 86: ...ingasoftbackgroundforsubjects Softportraitmode p 41 Superimposingatitle TITLE p 45 Functions to give a natural appearance to your recordings in the recording mode Preventingdeteriorationofpicturequality DZOOM MENU p 55 indigitalzoom Focusingmanually Manualfocus p 44 Reducingwindnoise WIND MENU CCD TRV87 only p 55 Shootingdistantsubjects Landscapemode p 41 Recordingfast movingsubjects Sportslessonm...

Page 87: ... fader 34 NIGHTSHOT 21 Normal charge 10 NTSC system 72 O P Q OLD MOVIE 38 Operation indicators 85 ORC 58 OVERLAP 34 Picture effect 37 Picture search 26 Playback pause 26 Power sources house current 14 car battery 14 battery pack 9 Power zoom 18 PROGRAM AE 41 R Rec Review 23 Recording and playback systems 63 Recording mode 58 Recording time 11 Remaining tape indicator 20 Remaining battery time indi...

Page 88: ...Sony Corporation Printed in Japan ...

Reviews: