background image

77

GB

Ta
ble
 of
 

co
nt

e

n

ts

Sa
mp
le

 ph
oto


se
ar

c

h

M

e

n

u

 s

ear

ch

In

dex

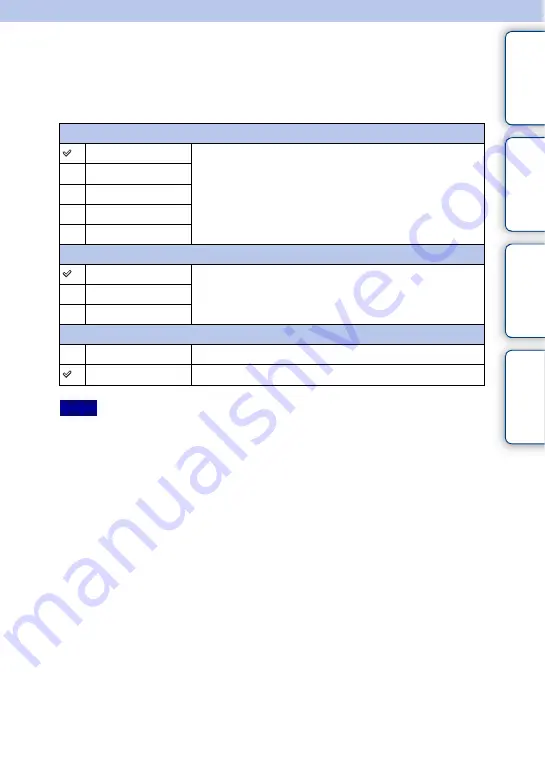
Slide Show

Plays back images automatically.

1

[Menu] 

t

 [Playback] 

t

 [Slide Show] 

t

 desired mode 

t

 [OK].

• You cannot pause the slide show. To stop the slide show, press the center of the control wheel.
• You cannot play back still images and movies together. Select either type of image with [Still/Movie 

Select].

• A panoramic image is displayed in full image. To scroll a panoramic image, first stop the slide show by 

pressing the center of the control wheel when the image is displayed, and then press the center again.

Interval

1 Sec

Sets the display interval of images.
Appears only when playing back still images.

3 Sec

5 Sec

10 Sec

30 Sec

Movie Type

All

Selects the movie type to play back.
Appears only when playing back movies.

AVCHD

MP4

Repeat

On

Plays back images in a continuous loop.

Off

After all the images have been played back, the slide show ends.

Notes

Summary of Contents for Alpha NEX-3

Page 1: ...eable Lens Digital Camera 4 183 856 12 1 Preparing the camera Mastering the basic operation Using the recording functions Using the playback functions 9hecking the functions fvailable orting images to the puter E mount ...

Page 2: ... does not fit the power outlet use an attachment plug adaptor of the proper configuration for the power outlet i Battery pack If the battery pack is mishandled the battery pack can burst cause a fire or even chemical burns Observe the following cautions Do not disassemble Do not crush and do not expose the battery pack to any shock or force such as hammering dropping or stepping on it Do not short...

Page 3: ...ower cord mains lead is supplied the power cord mains lead can be used with this unit only and should not be used with any other unit i RECYCLING LITHIUM ION BATTERIES Lithium Ion batteries are recyclable You can help preserve our environment by returning your used rechargeable batteries to the collection and recycling location nearest you For more information regarding recycling of rechargeable b...

Page 4: ...two conditions l This device may not cause harmful interference and 2 this device must accept any interference received including interference that may cause undesired operation Declaration of Conformity Trade Name SONY Model No NEX 5 Responsible Party Sony Electronics Inc Address 16530 Via Esprillo San Diego CA 92127 U S A Telephone No 858 942 2230 This device complies with Part15 of the FCC Rule...

Page 5: ...t from that to which the receiver is connected Consult the dealer or an experienced radiorrV technician for help The supplied interface cable must be used with the equipment in order to comply with the limits for a digital device pursuant to Subpart B of Part 15 of FCC Rules I Notice for the customers in the countries applying EU Directives The manufacturer of this product is Sony Corporation 1 7 ...

Page 6: ...d of correctly you will help prevent potentially negative consequences for the environment and human health which could otherwise be caused by inappropriate waste handling of the battery The recycling of the materials will help to conserve natural resources In case of products that for safety performance or data integrity reasons require a permanent connection with an incorporated battery this bat...

Page 7: ...he control wheel and soft keys 32 Using the guide function of the camera 34 Using the recording functions Defocusing the background easily Background Defocus Control 35 Selecting the flash mode 36 Adjusting the brightness of still images Exposure compensation 37 Using the self timer 37 Shooting still images continuously 38 Changing the screen display DISP 38 Shooting with various drive mode 39 Sel...

Page 8: ...mera a Handbook 68 Troubleshooting 69 Precautions 73 Specifications 76 Index 81 This instruction manual is for models NEX 3 3C and NEX S SC The NEX S SC is used for illustrations in this manual unless otherwise specified The differences between each model are as follows NEX S SC NEX 3 3C AVCHD MPEG 4 MPEG 4 Available Not available GB 8 NEX SC 3C are not compatible with Eye Fi To check whether the ...

Page 9: ...s several models supplied with different lenses The model name varies depending on the supplied lens NEX 5A 5CA 3A 3CA NEX 5D 5CD 3D 3CD NEX 5H15CH NEX 5K 5CK 3K 3CK E16mm E18 55 mm and E16 mm E18 200 mm E18 55 mm GB 9 ...

Page 10: ...eable battery pack NP FW50 1 USB cable 1 Shoulder strap 1 Flash 1 Flash case 1 CD ROM 1 Application Software for a camera a Handbook Instruction Manual This manual 1 NEX 5A 5CA 3A 3CA E 16 mm single focus lenslLens cap 1 attached to the camera I NEX 5D 5CD 3D 3CD E16 mm single focus lenslLens caplLens rear cap 1 E18 55 mm zoom lens Lens cap l attached to the camera Lens hood 1 t NEX 5H 5CH E 18 20...

Page 11: ...I NEX 5K 5CK 3K 3CK E18 55 mm zoom lenslLens cap 1 attached to the camera lLens hood 1 J CD Q 3 CD Q GB 11 ...

Page 12: ...switch 25 Shutter button 28 Remote sensor AF illuminator Self timer lamp Smile Shutter lamp ID Speaker IlJ Microphone ID Smart Accessory Terminal 23 Lens 19 Q Lens release button 20 j Mount 1121 Image sensor Lens contact Do not cover this part during movie recording Do not touch this part directly When the lens is removed NEX 5 5C 3 3C GB 12 ...

Page 13: ...r strap is recommended not to drop the camera rn J HDMI terminal 49 II Light sensor ID LCD monitor The tilting LCD monitor of the camera allows flexible shooting positions MOVIE button 28 l Control wheel 32 rn J Soft keys 33 ID e Image sensor position mark J CD l U 3 CD l U GB 13 ...

Page 14: ...ripod with a screw length of less than 5 5 mm 7 32 inch You will be unable to firmly secure the camera to tripods having screws longer than 5 5 mm 7 32 inch and may damage the camera e Image sensor position mark Connection plate cover For using the AC PW20 AC Adaptor sold separately Access lamp 22 IDMemory card insertion slot 21 l Battery compartment 17 GB 14 ...

Page 15: ...2 8 supplied with NEX 5A15CAl3A13CA I Lens On the E18 200 mm lens refer to the instruction manual of the E18 200 mm lens supplied E18 55 mm F3 5 5 6 ass supplied with NEX 5DI 5CD 5K15CKl3D 3CD 3K1 3CK Hood index 2J Focusing ring Zooming ring Focal length scale Focal length index Lens contacts Z Mounting index Do not touch this part directly GB 15 ...

Page 16: ...o be used when it has not been fully charged For the U S A and Canada PluQ 2 Connect the battery charger to the wall outlet wall socket The CHARGE lamp turns off when charging is finished Time required to charge a fully depleted battery pack at a temperature of 25 DC 77 OF is about 250 minutes 1 Insert the battery pack onto the battery charger Push the battery pack until it clicks CHARGE lamp For ...

Page 17: ...be able to efficiently charge the battery pack outside of this temperature range Connect the battery charger to the nearest wall outlet wall socket Do not try to charge the battery pack again right after it has been charged or when it has not been used after being charged Doing so will affect the performance of the battery pack I Inserting the charged battery pack 1 While sliding the cover open le...

Page 18: ...ck lever 3 Close the cover Checking the remaining battery level Check the level with the following indicators and percent figures displayed on the LCD monitor IZZZII rz l 4_711 I g Battery exhausted Battery level You cannot High Low shoot any more Image GB The displayed level may not be correct under certain circumstances 18 ...

Page 19: ... J CD C Q 3 CD Q Attaching removing the lens The camera will come with the lens attached except for the NEX 5H 5CH Refer to the steps below when attaching other lenses 1 If the body cap or the packaging lid is attached remove it from the camera or the lens Quickly change the lens somewhere away from dusty locations so as to keep dust or debris from getting inside the camera GB 19 ...

Page 20: ...ntil it clicks into the locked position Be sure to put the lens on straight When attaching a lens do not press the lens release button Do not use force when attaching a lens The Mount Adaptor sold separately is required to use an A mount lens sold separately For details refer to the operating manual supplied with the Mount Adaptor Removing the lens 1 Press the lens release button all the way in an...

Page 21: ...htly when it is turned off due to the anti dust function to prevent dust from adhering to the image sensor However attach or remove the lens quickly somewhere away from dusty locations Do not leave the camera with the lens removed Inserting a memory card sold separately 1 Open the cover 2 Insert a memory card Insert the memory card until it clicks as illustrated NEX 5 5C Check on the direction of ...

Page 22: ...UO Mark2 Memory Stick PRO Duo media Mark2 MEMORY5TI K PRO HG Duo Memory Stick PRO HG Duo media SD memory card SDHC memory card SDXC memory card Class 4 or more Images recorded on an SDXC memory card cannot be imported to or played on computers or AV devices that are not compatible with exFAT Make sure that the device is compatible with exFAT before connecting it to the camera If you connect your c...

Page 23: ... during shooting attach the flash device supplied The flash is enabled when it is raised and disabled when lowered 1 Attach the flash to the Smart Accessory Terminal of the camera When using the E18 200 mm lens you must attach the extender page 24 2 Fasten the screw to secure the flash 3 To fire the flash raise the flash first Lower the flash when you do not intend to use it GB 23 ...

Page 24: ...amera and fasten the screw securely Make sure that the flash is attached to the camera securely I Attaching the extender when using the E18 200 mm lens If you attach the flash directly to the camera images will be partly shadowed by the lens To avoid this situation attach the extender CD Attach the extender to the camera securely Attach the flash to the extender and fasten the screw GB Attach only...

Page 25: ...camera set the power switch to OFF 3 Select your area by pressing the right or left of the control wheel and press the center 4 Press the left or right of the control wheel to select each item and press the top or bottom or turn it to select the numeric value Daylight Svg Turns on or off the daytime saving time setting Date Format Selects the format to display date Midnight is indicated as 12 00 A...

Page 26: ...th date Refer to PMB Help for more details page 60 Resetting the date and time Checking the current clock setting Press Menu then select Setup Date Time Setup page 32 54 Maintaining the date and time setting This camera has an internal rechargeable battery for maintaining the date and time and other settings regardless of whether the power is on or off or the battery is installed or not For detail...

Page 27: ...Night Portrait Backlight Ii Backlight Scene Recognition icon and guide Portrait laJ Portrait Ai Landscape or Macro 3 When using a zoom lens turn the zoom ring then decide on your shot 1 Set the power switch to ON to turn on the camera Shooting still images In the iO Intelligent Auto mode the camera analyzes the subject and allows you to shoot with appropriate settings GB 27 ...

Page 28: ...hoot 1 Set the power switch to ON to turn on the camera Point the camera to the subject Focus indicator 2 3 Press the MOVIE button to start recording Focus and brightness are adjusted automatically If you press the shutter button halfway down during recording you will be able to focus more quickly MOVIE button 4 Press the MOVIE button again to stop recording GB 28 ...

Page 29: ...s the MOVIE button the camera shows the actual range to be recorded by displaying an empty frame on the screen Playing back images 1 Press the E playback button The last recorded image is displayed on the LCD monitor A still image is displayed in the default setting L8 playback button I Selecting the image Tum the control wheel I Playing back movies CD 0 Pl en o 0 CD tu 0 J 1 Press Image Index on ...

Page 30: ... right during pause Press the center Press the right or tum it right Press the left or tum it left Press the bottom top bottom 3 Turn the control wheel to select the desired movie and press the center To pause resume To fast forward To fast rewind To adjust sound volume Deleting images You can delete the image that is currently displayed 1 Display the desired image and press Delete Delete GB 30 ...

Page 31: ...2 Press the center of the control wheel to confirm OK Press Cancel to quit the operation Cancel OK T CD cr l U C 0 o 0 CD l U o J GB 31 ...

Page 32: ...ons are assigned to the control wheel When you tum or press the right left top bottom parts of the control wheel following the on screen display you can select setting items Your selection is determined when you press the center of the control wheel The arrow means you can turn the control wheel When options are displayed on the screen you can browse through them by turning or pressing the top bot...

Page 33: ...ft key A To use the function shown at the lower right comer of the screen press soft key B To use the function shown at the center press the center of the control wheel soft key C In this handbook the soft keys are indicated by the icon or the function shown on the screen A C B In this case soft key A works as the Menu button and soft key B as the Shoot Tips button Soft key C works as the Shoot Mo...

Page 34: ...ting tips in accordance with the shooting mode selected CD When Shoot Tips is displayed at the right bottom corner of the screen press the button at the right bottom page 33 A shooting tip in accordance with the current subject appears automatically I Help Guides The camera displays the Help Guide to explain the selected function when you change the setting etc You can hide the Help Guides by sele...

Page 35: ...uto Menu 2 Press the center of the control wheel The Background Defocus screen appears 3 Defocus the background by turning the control wheel Turn up to focus Turn down to defocus Press Back to restore the original status iO Bkground Defocus Backe e r DefTUS Shoot Ti se c CJ J C CD o a J C C J Cr J CJ The defocusing effect may not be noticeable depending on the distance from the subject or the lens...

Page 36: ... every time you trigger the shutter Slow sync shooting allows you to shoot a clear image of both the subject and the background Rear Sync Fires right before the exposure is completed every time you trigger the shutter A trailing image of the movement of the subject is captured to make more natural image The flash range The range of the supplied flash depends on the ISO sensitivity and aperture val...

Page 37: ... Q Drive Mode on the control wheel J CD CD o a J 0 C J o J CJ 2 Turn the control wheel to select Self timer Press Option then turn the control wheel to select the desired mode and press the center o Self timer 10 Sec Sets the 10 second delay self timer Use this when you want to include yourself in the picture To cancel the timer press Q J again When you press the shutter button the self timer lamp...

Page 38: ...ile you press and hold down the shutter button max 2 3 images per second 1 Press Drive Mode on the control wheel 2 Turn the control wheel to select Continuous Adv and press the center Changing the screen display DISP GB 38 1 Press DISP Display Contents on the control wheel DISP ...

Page 39: ... Menu 2 Use the control wheel to select Shoot Mode desired mode and press the center iO Intelligent Auto The camera evaluates the subject and makes the proper settings SeN Scene Selection Shoots with preset settings according to the subject or condition I Anti Motion Blur Reduces the camera shake when shooting a slightly dark indoor scene or a telephoto t I Sweep Panorama Shoots with panoramic siz...

Page 40: ...sly while the shutter button is pressed Sunset Shoots the red of the sunset beautifully I 2l Night Portrait Shoots portraits in night scenes Attach and fire the flash II Night View Shoots night scenes without losing the dark atmosphere Hand held Twilight Shoots night scenes with less noise and blur without using a tripod A burst of shots are taken and image processing is applied to reduce subject ...

Page 41: ...ce bar This part will not be taken c CJ J co r T CD CD o Q J co 2 Point the camera at the edge of the subject then press the shutter button fully down 3 Pan the camera to the end following the guidance on the LCD monitor The camera continues shooting during Sweep Panorama recording and the shutter keeps clicking until the end of the shooting c J r o J CJ GB 41 ...

Page 42: ...ct in various way by adjusting the shutter speed for example at the instant of the movement with high speed shutter or as a trailing image with low speed shutter 1 Select S Shutter Priority page 39 2 Turn the control wheel to select the desired value and press the center ...

Page 43: ... Priority page 39 II Aperture Priority You can adjust the range in focus or defocuses the background C J n o J J c J J co J CD CD n o a J co Turn the control wheel to select the desired value and press the center 2 GB 43 ...

Page 44: ...e larger the image size the higher the image quality 1 Press Menu GB 44 Menu 2 Use the control wheel to select Image Size Image Size and press the center 3 Turn the control wheel to select the desired mode and press the center Still CL L 14M 4592 x 3056 pixels For prints up to A3 size CM M 7AM 3344 x 2224 pixels For prints up to A4 size cs 8 305M 2288 x 1520 pixels For prints LI2L size l L 12M 459...

Page 45: ...1440 x 1080 12 Mbps Records with high image quality for r CO viewing on a high definition TV CD VGA 640 x 480 3 Mbps Records in the suitable size for WEB 0 uploads CL J Q NEX 3 3C c J o J CJ 1280 x 720 9 Mbps Records with high image quality for Fine viewing on a high definition TV 1280 x 720 6 Mbps Standard VGA 640 x 480 3 Mbps Records in the suitable size for WEB uploads When you print still imag...

Page 46: ...enu 2 Use the control wheel to select Camera Face Detection and press the center 3 Turn the control wheel to select the desired mode and press the center Off Does not use Face Detection function Jro Auto Selects the face the camera is to automatically focus on Child Priority Detects and shoots with priority on child s face Adult Priority Detects and shoots with priority on adult s face ...

Page 47: ...tton Control wheel 3 Turn the control wheel to adjust the scaling c CJ J Q Press the top bottom rightlleft of the control wheel to select the portion you want to enlarge To cancel the operation press Exit 2 Display the image you want to enlarge then press Enlarge the center of the control wheel 4 C J o J CJ GB 47 ...

Page 48: ... to enter the playback mode E Playback button 2 Press Image Index on the control wheel Six images are displayed at a time GB 48 3 Turn the control wheel to select an image To return to the single image screen select the desired image and press the center ...

Page 49: ... and an HD TV equipped with an HDMI connector are required 1 Connect the camera to the TV with an HDMI cable sold separately To the HDMI connector l HOMI cable Use an HDMI mini connector on one end for the camera and a plug suitable for connecting your TV on the other end C en J co c J o J en GB 49 ...

Page 50: ...s the proper settings Scene Selection Shoots with preset settings according to the subject or condition PortraitlLandscape Macro Sports Action Sunset Night Portrait Night View Hand held Twilight Anti Motion Blur Reduces the camera shake when shooting a slightly dark indoor scene or a telephoto Sweep Panorama Shoots with panoramic size Manual Exposure Adjusts the aperture and shutter speed Shutter ...

Page 51: ...e shot AF Continuous AF Precision Dig Zoom Sets the digital zoom when a single focus lens is used Face Detection Detects people s faces automatically and adjusts focus and exposure to suit the faces Off Auto Child Priority Adult Priority Smile Shutter Each time the camera detects a smile the camera releases the shutter automatically Off On Smile Detection Sets the sensitivity of the Smile Shutter ...

Page 52: ...ess settings such as metering mode and color settings such as white balance Exposure Compo Compensates for the brightness of the entire image 2 0EV to 2 0EV ISO Sets the ISO sensitivity ISO AUTO 200 12800 White Balance Adjusts the color tones according to the ambient light conditions Auto WB Daylight Shade Cloudy Incandescent FluorescentIFlash C Temp lFilter Custom Custom Setup Metering Mode Selec...

Page 53: ...vies to play back Rotate Rotates images Protect Protects images or cancels the protection Multiple Img Cancel All Images Cancel All Movies Enlarge Image Enlarges the image Volume Settings Sets the sound volume of movies Specify Printing Selects the images to print or makes printing settings Multiple Img Cancel All Display Contents Switches the information to be displayed on the playback screen Dis...

Page 54: ...release the shutter when there is no lens Enable Disable Sets the noise reduction processing for long exposure shootings On Off Sets the noise reduction processing for high ISO sensitivity shootings AutolWeak Sets the sound for movie recording On Off Beep e Language Daterrime Setup Area Setting Help Guide Display Power Save Selects the sound produced when you operate the camera AF Sound High Low O...

Page 55: ... the camera and the lens Sets whether or not to display the demonstration with mOVIes On Off Resets the camera to the factory settings Formats the memory card Selects the method used for assigning file numbers to Images Series Reset Selects the folder name format Standard FormlDate Form Selects the recording folder Creates a new folder Repairs the image database file of movies when inconsistencies...

Page 56: ...ected shooting mode In the table below V indicates the function available indicates the function not available The functions you cannot use are displayed in gray on the screen Intelligent Auto V V V V Sweep Panorama V Anti Motion Blur V V Scene V V V Selection V V V V G V V V ji V V V V V V V V V V V V V Program Auto V V V V V Aperture Priority V V V V V Shutter Priority V V V V V Manual Exposure ...

Page 57: ...sh modes may be limited also by conditions other than the shooting mode Even if you select a workable flash mode the flash does not fire unless it is raised Autoflash can be selected when Shoot Mode is set to Intelligent Auto or certain Scene Selection modes only Intelligent Auto v Sweep Panorama v Anti Motion Blur v Scene v Selection v v ji v v rn v v Program Auto Aperture Priority Shutter Priori...

Page 58: ...e High Definition movies Intel Core Duo 1 66 GHz or faster Intel Core 2 Duo I 66 GHz or faster NEX 3 3C For playing editing the movies Intel Core Duo 1 66 GHz or faster Intel Core 2 Duo 1 20 GHz or faster Memory 512 MB or more For playing editing the High Definition movies I GB or more Hard Disk Disk space required for installation approximately 500 MB Display Screen resolution I024 x 768 dots or ...

Page 59: ...ve the CD ROM after the installation is complete The software is installed and shortcut icons appear on the desktop If PMB has already been installed on the computer and the version number of the previously installed PMB is lower than that of the PMB on the CD ROM supplied install PMB also from the CD ROM supplied I Macintosh The following computer environment is recommended when using the supplie...

Page 60: ...r by shooting date to view them Print or save still images with the date Create a data disc using a CD burner drive or DVD burner drive For details on PMB refer to PMB Help To start Help click II PMB Help displayed on the desktop after installation Or from the start menu click Start All Programs PMB PMB Help The support information for the PMB English only http www sony co jp pmb se PMB is not com...

Page 61: ...ces Sony Blu ray disc player PlayStation 3 etc Ordinary DVD playback devices DVD player DVD playable computer etc Create a BIu ray disc of movies and photos imported to a computer using PMB Create an AVCHD format disc of movies and photos imported to a computer using PMB Creating an AVCHD format disc with a DVD writer recorder other than DVDirect Express Create a standard definition image quality ...

Page 62: ...GB 62 ...

Page 63: ...ow it means no memory card has been inserted Insert a memory card I Number of still images and time of movies that can be recorded on a memory card StiII images The table shows the approximate number of still images that can be recorded on a memory card formatted with this camera The values are defined using Sony standard memory cards for testing The values may vary depending on the shooting condi...

Page 64: ...ecorded is 330 images when you use the camera with the battery pack supplied at full capacity Note that the actual numbers may be less depending on the conditions of use The number is calculated with a battery pack at full capacity and in the following situation At an ambient temperature of 25 C 77 F Quality is set to Fine Autofocus Mode is set to Single shot AF Shooting once every 30 seconds The ...

Page 65: ...DE I iiISrD K J jJ ji it ci t I Shooting mode PASM Shoot Tips Ci FINE lEJ il1oo Menu D 10 LL I I Shoot Mode P 0100 ISO AUTO OfF IIIltO o D ggJ 1m 1 21 AWB ffij Shooting standby 1 o L J 101 0012 Ci FlHE 0 DPOf1 il100 Menu Enlarge RAW RAW J Image quality of still FINE STD Images 100 Number of recordable still Images 0 Image size of movies ID IImIm r CD I m J ImJIFINE ImJISTO CJ6 Memory cardlUpload D...

Page 66: ...era shake warning REC 0 12 Recording time of the rEI Overheating warning movie m s 2010 1 1 Recorded date time 9 30AM of the image Database file full FULL ERROR Database file error 12 12 Image number Histogram Number of images recorded in the date or selected folder CiON SteadyShot 101 0012 Playback folder CloFF File number gO Appears when HDR 0 Protect did not work on the DPOF 1 Print order and I...

Page 67: ... Metering Mode m Focus area mode 1n e e J Face Detection OFF _TO e OFF Smile Shutter ISO ISO AUTO AWB I 6 White Balance 0 11 tB 1 b L 1 7500K 69 Lwht Creative Style UWRt Port t U and t lsunsett IsJwt I IlJ l llIiI DRO Auto HDR OFF AUTO AUTO Smile detection sensitivity indicator o r J CD en GB 67 ...

Page 68: ...r Windows users 1 Turn on your computer and insert the CD ROM supplied into the CD ROM drive 2 Click Handbook 3 Click Install 4 Start a Handbook from the shortcut on the desktop For Macintosh users 1 Turn on your computer and insert the CD ROM supplied into the CD ROM drive 2 Select the Handbook folder and copy Handbook pdf stored in the GB folder to your computer 3 After copying is complete doubl...

Page 69: ...nly Make sure that the battery is NP FW50 The remaining battery indicator is incorrect or sufficient remaining battery indicator is displayed but the power runs out too quickly This phenomenon occurs when you use the camera in an extremely hot or cold location The battery pack is discharged Install a charged battery pack page 16 The battery pack is dead Replace it with a new one Cannot turn on the...

Page 70: ...be lit when the ambient temperature returns to within the suitable temperature Charge the battery pack under the suitable temperatures between 10 C and 30 C 50 OF and 86 OF Shooting images Nothing is displayed on the LCD monitor when the power is turned on If you do not operate the camera for given period of time the camera turns to power saving mode To cancel the power save operate the camera suc...

Page 71: ...harge The flash has been fired in succession in a short period When the flash has been fired in succession the recharging process may take longer than usual to avoid overheating of the flash The image taken with the flash is too dark If the subject is beyond the flash range the distance that the flash can reach the pictures will be dark because the flash light does not reach the subject If the ISO...

Page 72: ...e subject within the flash range page 36 using the flash Dots appear and remain on the LCD monitor This is not a malfunction These dots are not recorded page 73 The image is blurred The picture was taken in a dark location without the flash resulting in camera shake The use of a tripod or the flash is recommended page 23 Hand held Twilight in Scene Selection page 40 and Anti Motion Blur page 40 ar...

Page 73: ... objects that are affected by magnetic fields such as a floppy disk or a credit card between the LCD monitor and the camera body Magnet Images may trail across on the LCD monitor in a cold location This is not a malfunction When turning on the camera in a cold location the LCD monitor may become temporarily dark Do not press against the LCD monitor The monitor may be discolored and that may cause ...

Page 74: ...s of whether the power is on or off or the battery is installed or not This rechargeable battery is continually charged as long as you are using the camera However if you use the camera for only short periods it discharges gradually and if you do not use the camera at all for about three months it becomes completely discharged In this case be sure to charge this rechargeable battery before using t...

Page 75: ... The camera may not be able to record or play back properly Using the camera in sandy or dusty locations may cause malfunctions If moisture condensation occurs remove it before using the camera page 74 Do not shake or strike the camera In addition to malfunctions and an inability to record images this may render the memory card unusable or cause image data breakdown damage or loss Clean the flash ...

Page 76: ...l at an ordinary ambient temperature of 25 C 77 F and using a battery pack that is charged for an hour after the CHARGE lamp goes out Specifications Camera System Camera type Interchangeable lens digital camera Lens E mount lens Image sensor Image sensor 23 4 x 15 6 mm APS C format CMOS image sensor Total pixel number of image sensor Approx 14 600 000 pixels Effective pixel number of camera Approx...

Page 77: ... including battery and Memory Stick PRO Duo media Approx 239 g 8 4 oz camera only Operating temperature DoC to 40 C 32 F to 104 F File format Still image lPEG DCF Ver 2 0 Exif Ver 2 3 MPF Baseline compliant DPOF compatible NEX 5 5C Movie AVCHD format AVCHD Ver 1 0 compliant Video MPEG 4 AVC H 264 Audio Dolby Digital 2ch equipped with Dolby Digital Stereo Creator Manufactured under license from Dol...

Page 78: ...sions max diameter x height mm in Mass g oz Compensation effect 3 f 22 fl22 f 32 49 49 62 0 x 22 5 62 0 x 60 0 2 1 2 x 29 32 2 1 2 x 2 3 8 67 2 3 8 194 67 8 4 Approx 4 steps GB 78 1 The values for equivalent 35 mm format focal length and angle of view are based on digital cameras equipped with an APS C sized image sensor 2 Minimum focus is the shortest distance from the image sensor to the subject...

Page 79: ...ing a 50 mm lens you can get the approximate equivalent of a 75 mm lens of a 35 mm format film camera On image data compatibility This camera conforms with DCF Design rule for Camera Fi e system universal standard established by JEITA Japan Electronics and Information Technology Industries Association Playback of images recorded with your camera on other equipment and playback of images recorded o...

Page 80: ...3C LLC Eye Fi is a trademark of Eye Fi Inc MultiMediaCard is a trademark of MultiMediaCard Association PlayStation is a registered trademark of Sony Computer Entertainment Inc Adobe is a registered trademark or a trademark of Adobe Systems Incorporated in the United States and or other countries In addition system and product names used in this manual are in general trademarks or registered tradem...

Page 81: ...Setup 54 Delete 30 Demo Mode 55 D ISC creatIon 61 Display Card Space 55 Display Color 55 Display Contents 38 51 Drive Mode 51 DRO Auto HDR 52 E Enlarge 47 Enlarge Image 47 Exposure compensation 37 Extender for Flash 24 Eye Fi Setup 55 F Face Detection 46 File Format 52 File Number 55 Fill flash 36 Flash 23 Flash Compensation 52 Flash Mode 36 Folder Name 55 Format 55 G Grid Line 54 H Handbook 68 Ha...

Page 82: ...ed Eye Reduction 53 Release w oLens 54 Reset Default 55 GB Rotate 53 82 S Scene Selection 40 Scroll playback 42 Select Date 53 Select Folder 53 Select Shoot Folder 55 Self timer 37 Setting the clock 25 Setup 53 Shoot Mode 39 Shooting still images 27 Shooting Tip List 51 Shooting tips 34 Shutter Priority 42 Slide Show 53 Smile Detection 51 Smile Shutter 46 Soft keys 33 Software 58 Specifications 76...

Page 83: ...nd answers to frequently asked questions can be found at our Customer Support Website http www sony net Printed using VOC Volatile Organic Compound free vegetable oil based ink 2010 Sony Corporation Printed in Thailand 11111111111 4183856120 ...

Page 84: ...4 183 855 12 1 GB 2010 Sony Corporation NEX 3 NEX 3C NEX 5 NEX 5C Interchangeable Lens Digital Camera α Handbook Table of contents Sample photo search Menu search Index ...

Page 85: ...the page numbers mentioned in the book Search for information by function Search for information by sample photos Search for information in a listing of menu items Search for information by keyword Marks and notations used in this handbook In this handbook the sequence of operations is shown by arrows t Operate the camera in the order indicated The default setting is indicated by Indicates caution...

Page 86: ... the screen 15 Basic operations Using the control wheel and soft keys 17 Menu search 19 Shooting images 23 Playing back images 26 Deleting images 28 Using functions with the control wheel DISP Display Contents 29 Flash Mode 31 Exposure Comp 32 Drive Mode 33 Image Index 40 Using functions in the menu Shoot Mode 19 Camera 20 Image Size 20 Brightness Color 20 Playback 21 Setup 21 Continued r ...

Page 87: ...ng the software 127 Connecting the camera to the computer 130 Creating a movie disc NEX 5 5C 132 Printing still images 136 Troubleshooting Troubleshooting 137 Warning messages 143 Others Using the camera abroad 146 Memory card 147 InfoLITHIUM battery pack 149 Battery charger 151 Mount Adaptor 152 AVCHD format NEX 5 5C 153 Cleaning 154 Index Index 155 ...

Page 88: ...k the desired sample photo Shooting people page 6 Shooting macro photos page 7 Shooting landscapes page 8 Shooting sunset night views page 9 Shooting fast moving subjects page 10 If you click on a photo the screen will jump to the page describing the function recommended for shooting that kind of photo Refer to those descriptions in addition to the shooting tips displayed on the screen of the came...

Page 89: ...y the main subject is in focus by defocusing the background 24 The same scene with different brightness 38 A happy smile 59 In candle light 45 A person in front of night view 72 A moving person 68 A group photo 36 37 A person lit from behind 31 24 38 59 45 72 68 36 31 Continued r ...

Page 90: ...hotos Defocusing the background 24 Adjusting the color to indoor light 69 Flowers 43 Lowering the amount of flash light 72 Focusing manually 53 In better brightness 32 Preventing camera shake for indoor shots 68 Making food look appealing 32 24 69 43 72 53 32 68 32 Continued r ...

Page 91: ...e sky in vivid colors 32 Running water 50 Vivid green colors 75 Colored leaves 75 Panoramic photos 46 Scenery with a wide range of brightness 73 Light outdoors shot from a dark interior 73 Defocusing the background 24 Keeping your shot level 90 32 50 75 75 46 73 73 24 90 Continued r ...

Page 92: ...ooting sunset night views Holding the camera by hand 43 Trail of light 31 Fireworks 49 Defocusing the background 24 The same scene in different brightness 38 Preventing camera shake 36 Shooting the red of the sunset beautifully 43 43 31 49 24 38 36 43 Continued r ...

Page 93: ...ntents Sample photo search Menu search Index Shooting fast moving subjects Following a moving subject 56 Expressing vigorous action 50 With the subject approaching the camera 53 Capturing the best moment 35 56 50 53 35 ...

Page 94: ...peration A Playback button 26 B ON OFF Power switch C Shutter button 23 D Remote sensor 39 E AF illuminator Self timer lamp Smile Shutter lamp F Speaker G Microphone H Smart Accessory Terminal I Lens J Lens release button K Mount L Image sensor M Lens contacts Do not touch this part directly When the lens is removed NEX 5 5C 3 3C Continued r ...

Page 95: ...to search Menu search Index NEX 5 5C NEX 3 3C A USB terminal 130 B Hook for shoulder strap C HDMI terminal 123 D Light sensor E LCD monitor F MOVIE button 23 G Control wheel 17 H Soft keys 18 I Image sensor position mark 53 Continued r ...

Page 96: ... and may damage the camera C Image sensor position mark 53 D Connection plate cover Use this when using an AC PW20 AC Adaptor sold separately Insert the connection plate into the battery compartment then pass the cord through the connection plate cover as shown below Make sure that the cord is not pinched when you close the cover E Access lamp F Memory card insertion slot G Battery compartment A S...

Page 97: ...supplied with NEX 5D 5CD 5K 5CK 3D 3CD 3K 3CK A Hood index B Focusing ring C Zoom ring D Focal length scale E Focal length index F Lens contacts G Mounting index Do not touch this part directly E16 mm F2 8 supplied with NEX 5A 5CA 3A 3CA A Converter index B Focusing ring C Lens contacts D Mounting index A converter is sold separately Do not touch this part directly Lens ...

Page 98: ... Graphic display Movie recording Playback A Display Indication P A S M Shoot Mode Scene Selection Image size Aspect ratio of still images RAW RAW J FINE STD Image quality of still images 100 Number of recordable still images Image size of movies Memory card Upload 123min Recordable time of movies 100 Remaining battery Scene Recognition icons Flash charge in progress AF illuminator Does not record ...

Page 99: ... manual 0 0 Exposure compensation Shutter speed indicator Aperture indicator REC 0 12 Recording time of the movie m s 2010 1 1 9 30AM Recorded date time of the image 12 12 Image number Number of images recorded in the date or selected folder SteadyShot Appears when HDR did not work on the image Display Indication Display Indication Flash Mode Red Eye Reduction Drive Mode Focus mode 0 0 Flash compe...

Page 100: ...press the right left top bottom parts of the control wheel following the on screen display you can select setting items Your selection is determined when you press the center of the control wheel The control wheel and soft keys allow you to use various functions of the camera Control wheel Soft keys Control wheel The arrow means you can turn the control wheel When options are displayed on the scre...

Page 101: ...of the screen press soft key A To use the function shown at the lower right corner of the screen press soft key B To use the function shown at the center press the center of the control wheel soft key C In this handbook the soft keys are indicated by the icon or the function shown on the screen Soft keys In this case soft key A works as the Menu button and soft key B as the Shoot Tips button Soft ...

Page 102: ...ce Shoot Mode Intelligent Auto The camera evaluates the subject and makes the proper settings You can enjoy automatic shooting with the appropriate settings Scene Selection Shoots with preset settings according to the subject or condition Anti Motion Blur Reduces the camera shake when shooting a slightly dark indoor scene or a telephoto Sweep Panorama Shoots with panoramic size Manual Exposure Adj...

Page 103: ...faces automatically and adjusts focus and exposure to suit the faces Smile Shutter Each time the camera detects a smile the camera releases the shutter automatically Smile Detection Sets the sensitivity of the Smile Shutter function for detecting smiles Panorama Direction Selects the direction to pan the camera when shooting panoramic images Shooting Tip List Allows you to access all shooting tips...

Page 104: ...to play back Rotate Rotates images Protect Protects images or cancels the protection Enlarge Image Enlarges the image Volume Settings Sets the sound volume of movies Specify Printing Selects the images to print or makes printing settings During playback Switches the information to be displayed on the playback screen Setup Shooting Settings AF Illuminator Sets the AF illuminator to assist auto focu...

Page 105: ... monitor Wide Image Selects a method to display wide images Playback Display Selects the method used to play back portrait images CTRL FOR HDMI Sets whether or not to operate the camera with a BRAVIA Sync compatible TV s Remote Control USB Connection Selects the method used for a USB connection Cleaning Mode Allows you to clean the image sensor Version Displays the version of the camera and the le...

Page 106: ... Line t On 1 Adjust the LCD monitor angle and hold the camera The Scene Recognition function begins to work 2 To take still images press the shutter button To record movies press the MOVIE button to start recording Press the MOVIE button again to stop recording Note z On Scene Recognition The camera recognizes Night View Tripod Night View Night Portrait Backlight Backlight Portrait Portrait Landsc...

Page 107: ...s on Focusing may be difficult in the following situations It is dark and the subject is distant The contrast between the subject and the background is poor The subject is seen through glass The subject is moving quickly The subject reflects light such as mirror or has shiny surfaces The subject is flashing The subject is backlit Focus indicator Status z lit Focus locked Ready to shoot lit Focus i...

Page 108: ... Recognized Scene The defocusing range available depends on the lens used The defocusing effect may not be noticeable depending on the distance from the subject or the lens used The Background Defocus Control function does not operate when an A mount lens is attached Notes z For a better result of Background Defocus Move closer to the subject Lengthen the distance between the subject and the backg...

Page 109: ...he image you want to enlarge then press the center of the control wheel to confirm Enlarge 2 Adjust the scaling by turning the control wheel 3 Select the portion you want to enlarge by pressing the top bottom right left of the control wheel 4 To cancel the enlarged playback press Exit During movie playback Control wheel operation To pause resume Press the center To fast forward Press the right or ...

Page 110: ... You cannot use the enlarged playback function with movies To enlarge panoramic images pause the playback first and then press Option Notes z Scaling range The scaling range is as follows Image size Scaling range L Approx 1 1 13 M Approx 1 1 10 S Approx 1 1 6 7 ...

Page 111: ...You cannot delete protected images 1 Display the image you want to delete and press Delete 2 Press the center of the control wheel to confirm OK Press Cancel to quit the operation Delete Note Cancel OK z To delete several images Select Menu t Playback t Delete to select and delete specific images at the same time ...

Page 112: ... 1 During shooting Menu t Camera t Display Contents During playback Menu t Playback t Display Contents 2 Select the desired mode by turning the control wheel During shooting Disp Basic Info Shows basic shooting information Graphically shows the shutter speed and aperture value except for when Shoot Mode is set to Intelligent Auto or Sweep Panorama Display Info Shows recording information No Disp I...

Page 113: ...g information No Disp Info Does not show recording information Note z What is histogram The histogram displays the luminance distribution that shows how many pixels of a particular brightness exist in the picture Brighter image will make the entire histogram shift to the right side and darker image to the left side If the image has a high key or low key portion that portion flashes on the histogra...

Page 114: ...ed Autoflash Fires if it is dark or against light Fill flash Fires every time you trigger the shutter Slow Sync Fires every time you trigger the shutter Slow sync shooting allows you to shoot a clear image of both the subject and the background by slowing the shutter speed Rear Sync Fires right before the exposure is completed every time you trigger the shutter Rear sync shooting allows you to sho...

Page 115: ...ight or dark conditions or when you use the flash you may not be able to get a satisfactory effect Notes z Adjusting the exposure for better looking images To shoot subjects in brighter tones set a side exposure compensation To make photos of food look more appealing shoot the food a little brighter than usual and try to use a white background When shooting a blue sky setting a side exposure compe...

Page 116: ...al shooting mode Continuous Adv Shoots images continuously while you press and hold down the shutter button page 34 Speed Priority Cont Shoots images continuously at high speed while you press and hold down the shutter button page 35 Focus and brightness settings of the first shot are used for the following shots Self timer Shoots an image after ten or two seconds page 36 Self timer Cont Shoots im...

Page 117: ... continuously while you press and hold down the shutter button 1 Drive Mode on the control wheel t Continuous Adv Or Menu t Camera t Drive Mode t Continuous Adv You cannot use Continuous Adv with the following functions Scene Selection excluding Sports Action Anti Motion Blur Sweep Panorama Smile Shutter Auto HDR Note ...

Page 118: ...an that of Continuous Adv 1 Drive Mode on the control wheel t Speed Priority Cont Or Menu t Camera t Drive Mode t Speed Priority Cont You cannot use Speed Priority Cont with the following functions Scene Selection excluding Sports Action Anti Motion Blur Sweep Panorama Smile Shutter Auto HDR Focus and brightness settings of the first shot are used for the following shots Notes ...

Page 119: ...nd held Twilight in Scene Selection Anti Motion Blur Sweep Panorama Smile Shutter Auto HDR Self timer 10 Sec Sets the 10 second delay self timer When you press the shutter button the self timer lamp flashes and the audio signal sounds until the shutter operates To cancel the timer press Self timer on the control wheel Self timer 2 Sec Sets the 2 second delay self timer This reduces the camera shak...

Page 120: ...f timer Cont 2 Option t desired mode You cannot use Self timer Cont with the following functions Hand held Twilight in Scene Selection Anti Motion Blur Sweep Panorama Smile Shutter Auto HDR Self timer Cont 10 Sec 3 lmg Shoots three or five still images continuously after ten seconds When you press the shutter button the self timer lamp flashes and the audio signal sounds until the shutter operates...

Page 121: ...Bracket Cont Or Menu t Camera t Drive Mode t Bracket Cont 2 Option t desired mode You cannot use Bracket Cont with the following functions Hand held Twilight in Scene Selection Anti Motion Blur Sweep Panorama Smile Shutter Auto HDR The last shot is shown on the auto review In Manual Exposure the exposure is shifted by adjusting the shutter speed When you adjust the exposure the exposure is shifted...

Page 122: ...ntrol wheel t Remote Cdr Or Menu t Camera t Drive Mode t Remote Cdr 2 Focus on the subject point the transmitter of the Wireless Remote Commander to the remote sensor and shoot the image You cannot use Remote Cdr with the following functions Hand held Twilight in Scene Selection Anti Motion Blur Sweep Panorama Auto HDR A lens or hood may cover the remote sensor and prevent the sensor from receivin...

Page 123: ... can switch to 12 image index Menu t Playback t Image Index 3 To return to the single image playback select the desired image and press the center of the control wheel z Switching between the still image and movie On the image index screen you can switch the image type by selecting still image or movie on the left of the screen followed by pressing the center of the control wheel Still images and ...

Page 124: ...nt the camera to the subject When the camera recognizes the scene the Scene Recognition icon and guide appear on the screen The camera recognizes Night View Tripod Night View Night Portrait Backlight Backlight Portrait Portrait Landscape or Macro Scene Recognition icon and guide Notes z Defocusing the background easily During Intelligent Auto recording you can defocus the background Press the cent...

Page 125: ...is seen through glass The subject is moving quickly The subject reflects light such as mirror or has shiny surfaces The subject is flashing The subject is backlit Focus indicator Status z lit Focus locked Ready to shoot lit Focus is confirmed Focal point moves following a moving subject Ready to shoot lit Still focusing z flashing Cannot focus When the camera cannot focus on the subject automatica...

Page 126: ...ange of scenery in sharp focus with vivid colors Macro Shoots close subjects such as flowers insects food or small items Sports Action Shoots a moving subject at a fast shutter speed so that the subject looks as if it is standing still The camera shoots images continuously while the shutter button is pressed Sunset Shoots the red of the sunset beautifully Night Portrait Shoots portraits in night s...

Page 127: ...en shooting Subjects with erratic movement Subjects are too close to the camera Subjects with a repeating pattern such as tiles and subjects with little contrast such as sky sandy beach or lawn Subjects with constant change such as waves or water falls In the case of Hand held Twilight block noise may occur when using a light source that flickers such as fluorescent lighting The shortest focal dis...

Page 128: ...nting noise If you select Anti Motion Blur with RAW or RAW JPEG the image quality becomes Fine temporarily The shutter clicks six times and an image is recorded Reducing blur is less effective when shooting Subjects with erratic movement Subjects are too close to the camera Subjects with a repeating pattern such as tiles and subjects with little contrast such as sky sandy beach or lawn Subjects wi...

Page 129: ...he angle in which you fixed the focus and exposure with AE AF lock are extremely different in brightness color and focus the shooting will not be successful If this happens change the lock angle and shoot again Sweep Panorama is not suitable when shooting Subjects are moving Subjects are too close to the camera Subjects with a repeating pattern such as tiles and subjects with little contrast such ...

Page 130: ...edge the image composition may fail In such case adjust the frame composition so that the section is in the center of the image then shoot again You can select the direction by Menu t Camera t Panorama Direction and the image size by Menu t Image Size t Image Size Vertical direction Horizontal direction Radius as short as possible z Playing back scrolling panoramic images You can scroll panoramic ...

Page 131: ...s necessary The brightness of the image on the LCD monitor may differ from the actual image being shot 1 Menu t Shoot Mode t Manual Exposure 2 Press the bottom of the control wheel repeatedly to select shutter speed or aperture Shutter speed and aperture adjustment screens appear alternately Shutter speed Aperture F value 3 Turn the control wheel to select the desired value Check the exposure valu...

Page 132: ...hutter or Auto HDR function is used with the shutter speed set to BULB the shutter speed is temporarily set to 30 seconds BULB 1 Menu t Shoot Mode t Manual Exposure 2 Press the bottom of the control wheel to select shutter speed 3 Turn the control wheel to the left until BULB is indicated BULB 4 Press the shutter button halfway down to adjust the focus 5 Press and hold the shutter button for the d...

Page 133: ...oting during the reduction If proper exposure cannot be obtained after the setup when you press the shutter button halfway down the aperture value blinks Although you can shoot as it is resetting is recommended The brightness of the image on the LCD monitor may differ from the actual image being shot 1 Menu t Shoot Mode t Shutter Priority t desired value 2 Adjust the focus and shoot the subject Th...

Page 134: ...ority t desired value Smaller F value The subject is in focus but things in front of and beyond the subject is blurred Larger F value The subject and its foreground and background are all in focus 2 Adjust the focus and shoot the subject The shutter speed is automatically adjusted to obtain proper exposure Aperture F number Notes z Aperture Smaller F value opening the aperture narrows the range th...

Page 135: ... the camera automatically you can set shooting functions such as ISO sensitivity Creative Style D Range optimizer 1 Menu t Shoot Mode t Program Auto 2 Set the shooting functions to your desired settings 3 Adjust the focus and shoot the subject You cannot select Flash Off and Autoflash in Flash Mode Note ...

Page 136: ...earer Note z Using manual focusing effectively Focus fixing is convenient when you can predict the distance to the subject With Focus fixing you can fix the focus in advance to the distance at which the subject is to pass z To measure the exact distance to the subject The mark shows the location of the image sensor When you measure the exact distance between the camera and the subject refer to the...

Page 137: ...nu t Camera t AF MF Select t DMF 2 Press the shutter button halfway down to focus automatically 3 Keep the shutter button halfway down rotate the focusing ring of the lens to achieve a sharp focus Autofocus Mode is fixed to Single shot AF DMF Direct Manual Focus Note ...

Page 138: ...on Anti Motion Blur Sweep Panorama Smile Shutter Multi The camera determines which of the 25 AF areas is used for focusing When you press the shutter button halfway down in still image shooting mode a green frame is displayed around the area that is in focus When the Face Detection function is active AF operates with priority on faces AF range finder frame Center The camera uses the AF area locate...

Page 139: ...Action Anti Motion Blur Sweep Panorama Smile Shutter Continuous AF is selected when the exposure mode is set to Sports Action in Scene Selection In Continuous AF mode the audio signals will not sound when the subject is in focus Single shot AF The camera focuses and the focus is locked when you press the shutter button halfway down Use this when the subject is motionless Continuous AF The camera c...

Page 140: ...p zooming press Exit You can use this item only when a single focus lens is attached You cannot set this item when using the following functions Hand held Twilight in Scene Selection Anti Motion Blur Sweep Panorama Smile Shutter RAW or RAW JPEG in Quality If you press the MOVIE button when Precision Dig Zoom is working zooming is canceled the image on the screen returns to the normal size and movi...

Page 141: ...cted Adults and children may not be recognized correctly depending on the conditions During Smile Shutter shooting Face Detection is automatically set to Auto even if it is set to Off Off Does not use the Face Detection function Auto Selects the face which the camera is to automatically focus on Child Priority Detects and shoots with priority on child s face Adult Priority Detects and shoots with ...

Page 142: ...Cdr automatically 1 Menu t Camera t Smile Shutter t On 2 Wait for a smile to be detected When the smile level exceeds the b point on the indicator the camera records images automatically If you press the shutter button during Smile Shutter shooting the camera shoots the image then returns to Smile Shutter mode 3 To exit Smile Shutter mode Menu t Camera t Smile Shutter t Off Notes Face Detection fr...

Page 143: ...ra t Smile Detection t desired mode You cannot change Smile Detection when using the following functions Hand held Twilight in Scene Selection Anti Motion Blur Sweep Panorama Manualfocus Smiles may not be detected correctly depending on the conditions Big Smile Detects a big smile Normal Smile Detects a normal smile Slight Smile Detects even a slight smile Notes ...

Page 144: ...hoto search Menu search Index Panorama Direction Sets the direction to pan the camera when you shoot Sweep Panorama images 1 Menu t Camera t Panorama Direction t desired mode Right Pan the camera in the direction you set Left Up Down ...

Page 145: ...earch through all shooting tips in the camera Use this item when you want to look at shooting tips you have seen before 1 Menu t Camera t Shooting Tip List 2 Press the left or right of the control wheel and search for the desired shooting tip Turn the control wheel to scroll the text up and down ...

Page 146: ...y the image size corresponds to L The image size varies depending on the Panorama Direction setting When you print panoramic images both edges may be cut off Still Image size when Aspect Ratio is 3 2 Usage guidelines L 14M 4592 3056 pixels For prints up to A3 size M 7 4M 3344 2224 pixels For prints up to A4 size S 3 5M 2288 1520 pixels For prints L 2L size Image size when Aspect Ratio is 16 9 Usag...

Page 147: ...ds with the highest image quality for viewing on a high definition TV Image size in MP4 mode Average bit rate Usage guidelines 1440 1080 12 Mbps Records with high image quality for viewing on a high definition TV VGA 640 480 3 Mbps Records in the suitable size for WEB uploads Image size Average bit rate Usage guidelines 1280 720 Fine 9 Mbps Records with high image quality for viewing on a high def...

Page 148: ... Index Aspect Ratio Sets the aspect ratio of still images 1 Menu t Image Size t Aspect Ratio t desired mode You cannot select Aspect Ratio when using Sweep Panorama 3 2 Standard aspect ratio Suitable for prints 16 9 For viewing on a high definition TV Note ...

Page 149: ...table when you need two image files a JPEG for viewing and a RAW for editing The image quality is fixed to Fine and the image size is fixed to L FINE Fine File format JPEG The image is compressed in the JPEG format when recorded Since the compression rate of Standard is higher than that of Fine the file size of Standard is smaller than that of Fine This will allow more files to be recorded on one ...

Page 150: ... or approximately 25 frames sec 1080 50i compatible devices in progressive mode with AAC audio mp4 format z Checking 60i or 50i To check if your camera is a 1080 60i compatible device or 1080 50i compatible device check for the following marks on the bottom of the camera 1080 60i compatible device 60i 1080 50i compatible device 50i z Playing movies on other devices This camera uses MPEG 4 AVC H 26...

Page 151: ...s the ISO sensitivity automatically 200 400 800 1600 3200 6400 12800 You can set a faster shutter speed and reduce image blur in dark locations or of moving subjects by increasing ISO sensitivity select a larger number Notes z Adjusting ISO Sensitivity Recommended Exposure Index ISO setting speed is the sensitivity to light of recording media that incorporates an image sensor that receives light E...

Page 152: ...light If you select an option to suit a specific light source the color tones are adjusted for the light source preset white balance Shade Cloudy Incandescent Fluorescent Flash C Temp Filter Adjusts the white balance depending on the light source color temperature Achieves the effect of CC Color Compensation filters for photography Custom Allows to use the white balance setting retained by Custom ...

Page 153: ...he calibrated values color temperature and color filter are displayed 3 To call the custom white balance setting Menu t Brightness Color t White Balance t Custom If the flash is used when the shutter button is pressed a custom white balance is registered with the flash light taken into account Take pictures with the flash in later shootings Preset white balance C Temp Filter Color Temp The higher ...

Page 154: ...ntelligent Auto Scene Selection Precision Dig Zoom Smile Shutter Multi Measures light on each area after dividing the total area into multiple areas and determines the proper exposure of the entire screen Multi pattern metering Center Measures the average brightness of the entire screen while emphasizing the central area of the screen Center weighted metering Spot Measures only the central area Sp...

Page 155: ... darker You cannot use Flash Compensation with the following functions Intelligent Auto Scene Selection Anti Motion Blur Sweep Panorama when no flash is attached The higher flash effect may not be visible due to the limited amount of flash light available if the subject is outside the maximum range of the flash If the subject is very close the lower flash effect may not be visible Notes z Tips to ...

Page 156: ...e noisy Select the proper level by checking the recorded image especially when you enhance the effect Off Does not use DRO Auto HDR D Range Opt By dividing the image into small areas the camera analyzes the contrast of light and shadow between the subject and the background producing the image with the optimal brightness and gradation Auto HDR Shoots three images with different exposures and then ...

Page 157: ...er is released three times for one shot be careful about the following Use this function when the subject is motionless or does not blink Do not recompose You may not obtain a desired effect depending on the luminance difference of a subject and the shooting conditions When the flash is used this function has little effect When the contrast of the scene is low or when significant camera shake or s...

Page 158: ...on and contrast are heightened for shooting striking images of colorful scenes and subjects such as flowers spring greenery blue sky or ocean views Portrait For shooting the skin color in a soft tone ideally suited for shooting portraits Landscape The saturation contrast and sharpness are heightened for shooting vivid and crisp scenery Distant landscapes also stand out more Sunset For shooting the...

Page 159: ... images Multiple Img Deletes the selected images Press the center to confirm Select and OK All in Folder Deletes all still images in the folder This appears during still image playback only All in Date Rng Deletes all movies of the date This appears during movie playback only Note z To delete an image It is easier to delete an image displayed on the screen by selecting Delete page 28 ...

Page 160: ...elect A panoramic image is displayed in full image To scroll a panoramic image first stop the slide show by pressing the center of the control wheel when the image is displayed and then press the center again Interval 1 Sec Sets the display interval of images Appears only when playing back still images 3 Sec 5 Sec 10 Sec 30 Sec Movie Type All Selects the movie type to play back Appears only when p...

Page 161: ... Playback t Still Movie Select t desired mode You cannot display still images and movies on the same index screen Still Displays the still image Movie Displays the movie Note z Switching between the still image and the movie You can switch the image type on the image index easily Select still image or movie on the left of the screen ...

Page 162: ... 1 Menu t Playback t Image Index t desired mode 6 Images Displays six images 12 Images Displays 12 images z Switching between the still image and the movie You can switch the image type on the image index easily Select still image or movie on the left of the screen You cannot display still image and movie on the same index screen ...

Page 163: ...When multiple folders are created in a memory card this selects the folder containing the still image you want to play back You cannot select this item during movie playback 1 Menu t Playback t Still Movie Select t Still 2 Menu t Playback t Select Folder t desired folder Note ...

Page 164: ...ch Index Select Date Movies are stored by date You can select the date of movies to be played back You cannot select this item during still image playback 1 Menu t Playback t Still Movie Select t Movie 2 Menu t Playback t Select Date t desired date Note ...

Page 165: ...e is played back in the rotated position even if you turn off the power 1 Menu t Playback t Rotate t press the center The image rotates counter clockwise The image rotates as you press the center You cannot rotate movies or protected images You may not be able to rotate images shot with other cameras When viewing images on a computer the image rotation information may not be reflected depending on...

Page 166: ...d for registered images 1 Menu t Playback t Protect t desired mode You can protect up to 100 images at a time Multiple Img Applies or cancels the protection of the selected images Press the center to confirm Select and OK Cancel All Images Cancels the protection of all still images Cancel All Movies Cancels the protection of all movies Note ...

Page 167: ...rning the control wheel 3 Select the portion you want to enlarge by pressing the top bottom right left of the control wheel 4 To cancel the operation press Exit You cannot enlarge the movies During playing back panoramic images pause first and then enlarge the image Notes z Scaling range The scaling range depends on the image size Image size Scaling range L Approx 1 1 13 M Approx 1 1 10 S Approx 1...

Page 168: ...eight steps This item appears during movie playback only 1 Menu t Playback t Volume Settings t desired value z Adjusting the volume during playback The Volume Settings screen appears when you press the bottom of the control wheel while playing back movies You can adjust the volume while listening to the actual sound ...

Page 169: ...nu t Playback t Specify Printing t desired setting You cannot add the DPOF mark to movies You can add the DPOF mark to up to 998 images DPOF registration is not cleared after printing It is recommended that you clear it after you print the still images Multiple Img Selects images to order printing 1Press the center to select the number of sheets To cancel DPOF repeat pressing the center to set 0 2...

Page 170: ...desired setting You cannot use the AF illuminator when Autofocus Mode is set to Continuous AF Landscape Night View Hand held Twilight or Sports Action in Scene Selection is selected Sweep Panorama is selected Recording movies using an A mount lens When you use the AF illuminator the normal AF range finder frame is disabled and a new AF range finder frame is displayed by a dotted line AF operates w...

Page 171: ...tion with Smile Shutter Red Eye Reduction may not produce the desired effects It depends on individual differences and conditions such as distance to the subject or if the subject looked away from the pre strobe On The flash always strobes to reduce the red eye phenomenon Off Does not use Red Eye Reduction Notes z What causes the red eye phenomenon Pupils become dilated in dark environments Flash ...

Page 172: ...he displayed time 1 Menu t Setup t Auto Review t desired setting In auto review the image will not be displayed in the vertical position even if Playback Display is set to Auto Rotate Even if Grid Line is set to On when recording Sweep Panorama images the grid line does not appear in auto review 10 Sec Displays for the set time 5 Sec 2 Sec Off Does not display Notes ...

Page 173: ...images 1 Menu t Setup t Grid Line t desired setting On Displays the grid line Off Does not display the grid line z Checking the frame for movie recording Frame for movie The frame that appears when Grid Line is set to On will show to what extent your subject is included in the frame This enables you to adjust the composition by moving closer or further away from your subject ...

Page 174: ...etup t Histogram t desired setting You cannot display the histogram when using Sweep Panorama On Displays the histogram Off Does not display the histogram Note z What is histogram The histogram displays the luminance distribution that shows how many pixels of a particular brightness exist in the picture Brighter image will make the entire histogram shift to the right side and darker image to the l...

Page 175: ...u t Setup t MF Assist t On 2 Turn the focusing ring to adjust the focus The image is enlarged by seven times You can enlarge the image also by 14 times You cannot use MF Assist with the following functions Movie recording Precision Dig Zoom When an A mount lens sold separately is attached pressing MF Assist soft key will enlarge the image On Enlarges the image Off Does not enlarge the image Notes ...

Page 176: ...lications or printers that do not support them may result in or print images that do not faithfully reproduce the color When displaying images that were recorded with Adobe RGB on the camera or non Adobe RGB compliant devices the images are displayed with low saturation sRGB This is the standard color space of the digital camera Use sRGB in normal shooting such as when you intend to print out the ...

Page 177: ...enu t Setup t SteadyShot t desired setting On is selected when using the following functions Hand held Twilight in Scene Selection Anti Motion Blur You cannot set SteadyShot when an E16 mm F2 8 or A mount lens sold separately is attached On Uses SteadyShot Off Does not use SteadyShot This setting is recommended when you use a tripod Notes ...

Page 178: ...r not the shutter can be released when no lens is attached 1 Menu t Setup t Release w oLens t desired setting Enable Releases the shutter when no lens is attached Select this when you attach the camera on an astronomical telescope etc Disable Releases the shutter only when a lens is attached ...

Page 179: ...owing functions even when it is set to On Continuous Adv Speed Priority Cont Bracket Cont Hand held Twilight in Scene Selection Anti Motion Blur Sweep Panorama You cannot change Long Exposure NR when using the following functions Intelligent Auto Scene Selection Anti Motion Blur Sweep Panorama On Activates noise reduction for the same duration that the shutter is open When noise reduction is in pr...

Page 180: ...O the camera reduces the noise that becomes more noticeable when the camera sensitivity is high 1 Menu t Setup t High ISO NR t desired setting You cannot set High ISO NR when using Sweep Panorama Auto Activates high ISO noise reduction automatically Weak Activates high ISO noise reduction moderately Note ...

Page 181: ...udio Rec Sets whether or not you record the sound during movie recording 1 Menu t Setup t Movie Audio Rec t desired setting The sound of the lens and the camera in operation will also be recorded when On is selected On Records sound stereo Off Does not record sound Note ...

Page 182: ...te the camera 1 Menu t Setup t Beep t desired setting AF Sound The audio signals will sound only when the subject is in focus and during self timer countdown High Turns on audio signals when you press the control wheel or soft keys If you want to lower the volume select Low Low Off Turns off the audio signal ...

Page 183: ...100GB Table of contents Sample photo search Menu search Index Language Selects the language to be used in the menu items warnings and messages 1 Menu t Setup t Language t desired language ...

Page 184: ...e again The camera does not have a feature for superimposing dates on images By using PMB in the CD ROM supplied you can print or save images with the date 1 Menu t Setup t Date Time Setup 2 Set the date time etc Daylight Svg Selects ON or OFF Date Format Selects the date and time display format Note ...

Page 185: ...earch Index Area Setting Sets the area where you are using the camera This allows you to set the local area when you use the camera abroad 1 Menu t Setup t Area Setting t desired setting 2 Press the right or left of the control wheel to select an area ...

Page 186: ...play You can select whether or not the help guide is displayed when you operate the camera 1 Menu t Setup t Help Guide Display t desired setting On Displays the help guide Off Does not display the help guide This is convenient when you want to perform the next operation quickly ...

Page 187: ...n returns the camera to the shooting mode 1 Menu t Setup t Power Save t desired setting Regardless of the setting here the camera turns to power save mode after 30 minutes when the camera is connected to a TV or the drive mode is set to Remote Cdr Turn off the camera when you do not use it for a long time 1 Min Switches to power save mode after the set time 5 Min 10 Min 30 Min Notes ...

Page 188: ...p t LCD Brightness t desired setting When this is set to Auto do not cover the light sensor with your hand and so on When using the camera with the AC PW20 AC Adaptor sold separately the brightness of the LCD monitor is always set as bright as 2 even if you select Auto Auto Adjust the brightness automatically Manual Allows you to adjust the brightness within the range of 2 to 2 Sunny Weather Autom...

Page 189: ... Table of contents Sample photo search Menu search Index Display Color Selects the color of the LCD monitor 1 Menu t Setup t Display Color t desired setting Black Turns to the selected color White Blue Pink ...

Page 190: ...ch Index Wide Image Selects the method used for displaying the wide images 1 Menu t Setup t Wide Image t desired setting Full Screen Displays the wide images on the entire screen Normal Displays the wide images and the operation information on the screen ...

Page 191: ...mages recorded in the portrait position 1 Menu t Setup t Playback Display t desired setting When you play back the image on a TV or a computer the image will be displayed in the portrait position even if Manual Rotate is selected Auto Rotate Displays in the portrait position Manual Rotate Displays in the landscape position Note ...

Page 192: ...ages on your camera by the TV s remote control aiming at the TV See page 124 on BRAVIA Sync 1 Menu t Setup t CTRL FOR HDMI t desired setting You can perform the operation of the camera with the remote control of your TV by connecting your camera to a BRAVIA Sync compatible TV On Operates the camera with the TV remote control Off Does not operate the camera with the TV remote control Note ...

Page 193: ...ing You cannot import movies and RAW images with PTP Mass Storage Establishes a Mass Storage connection between the camera a computer and other USB devices Standard mode PTP When you connect the camera to a computer the AutoPlay Wizard appears and the still images in the recording folder on the camera are imported to the computer with Windows 7 Vista XP Mac OS X Note ...

Page 194: ...Do not put the tip of a blower into the cavity beyond the mount so that the tip of the blower does not touch the image sensor Hold the camera s face downward to prevent the dust from resettling in the camera Do not apply a mechanical shock to the camera during cleaning 1 Menu t Setup t Cleaning Mode t OK The message After cleaning turn camera off Continue appears 2 Confirm OK The anti dust is acti...

Page 195: ...of your camera and lens Confirm the version when a firmware update is released 1 Menu t Setup t Version An update can be performed only when the battery level is three remaining battery icons or more We recommend that you use a sufficient battery or the AC PW20 AC Adaptor sold separately Note ...

Page 196: ...er or not to display the demonstration with movies Select Off when you do not want to see the demonstration 1 Menu t Setup t Demo Mode t desired setting On The demonstration begins automatically when the camera is not operated for about one minute Off Does not show the demonstration ...

Page 197: ...Default Initializes the setting to the default setting Even if you activate Reset Default the images are retained 1 Menu t Setup t Reset Default t OK Be sure not to turn off the camera while resetting The settings of Date Time Setup and Area Setting are not reset Notes ...

Page 198: ...hat formatting permanently erases all data on the memory card and is unrecoverable Save precious data on a computer etc 1 Menu t Setup t Format t OK Formatting permanently erases all data including even protected images During the format the access lamp lights up Do not eject the memory card while the lamp is lit Format the memory card using the camera If you format it on a computer the memory car...

Page 199: ...nd assigns numbers to files in sequence until the number reaches 9999 Reset The camera resets numbers in the following cases and assigns numbers to files from 0001 When the recording folder contains a file a number incremented one higher than the largest number is assigned When the folder format is changed When all the images in the folder are deleted When the memory card is replaced When the memo...

Page 200: ... folder name form 1 Menu t Setup t Folder Name t desired setting The MP4 movie folder form is fixed as folder number ANV01 NEX 5 5C or folder number MNV01 NEX 3 3C You cannot change this name Standard Form The folder name form is as follows folder number MSDCF Example 100MSDCF Date Form The folder name form is as follows folder number Y the last digit MM DD Example 10000405 Folder name 100 date 04...

Page 201: ...rd form folder is selected and there are two or more folders you can select the recording folder to be used to record still images 1 Menu t Setup t Select Shoot Folder t desired folder You cannot select the folder when you select the Date Form setting You cannot select the folder for movies Notes ...

Page 202: ...umber incremented one higher than the largest number currently used A folder for still images and a folder for movies that have the same number are created at the same time When you insert a memory card that was used with other equipment into the camera and shoot images a new folder may be automatically created Up to 4 000 images in total can be stored in the folders for still images or movies res...

Page 203: ...n computers etc movies on the memory card will not be played back in this form If this happens the camera repairs the file 1 Menu t Setup t Recover Image DB t OK The Recover Image DB screen is displayed and the camera repairs the file Wait as it is until repairing is completed Use a sufficiently charged battery Low battery power during repairing can cause damage to data Note ...

Page 204: ...ents Sample photo search Menu search Index Display Card Space Displays the remaining recording time of movies on the memory card Number of recordable still images is also displayed 1 Menu t Setup t Display Card Space t OK ...

Page 205: ...shoot still images Images are transferred to your computer etc automatically via the Wi Fi network When you use a brand new Eye Fi card for the first time copy the install file of Eye Fi manager recorded on the card to your computer before formatting the card Use an Eye Fi card after updating the firmware to the latest version For details refer to the manual that comes with the Eye Fi card The pow...

Page 206: ...s Do not connect the output connector of the device with the HDMI terminal on the camera This may cause a malfunction 1 Turn off both your camera and the TV 2 Connect the camera to the TV with an HDMI cable sold separately 3 Turn on the TV and switch the input 4 Turn on the camera Images shot with the camera appear on the TV screen Select the desired image with the control wheel Notes 1 To the HDM...

Page 207: ... support BRAVIA Sync can provide LINK Menu operations The LINK Menu operations differ depending on the TV connected For details refer to the operating instructions supplied with the TV If the camera performs unnecessary operations in response to the TV Remote Control when the camera is connected to another manufacturer s TV using an HDMI connection operate Menu t Setup t CTRL FOR HDMI t Off Using ...

Page 208: ...the function for creating discs 2 Starter Edition is not supported Note Recommended computer environment Windows OS pre installed Microsoft Windows XP 1 SP3 Windows Vista 2 SP2 Windows 7 PMB CPU Intel Pentium III 800 MHz or faster NEX 5 5C For playing editing the High Definition movies Intel Core Duo 1 66 GHz or faster Intel Core 2 Duo 1 66 GHz or faster NEX 3 3C For playing editing the movies Int...

Page 209: ...hat is compatible with Hi Speed USB USB 2 0 compliant allows advanced transfer high speed transfer as the camera is compatible with Hi Speed USB USB 2 0 compliant When your computer resumes activity from suspend or sleep mode communication between the camera and your computer may not recover at the same time Recommended computer environment Macintosh OS pre installed USB Connection Mac OS X v10 3 ...

Page 210: ...llowing the instructions on the screen DirectX may be installed depending on the system environment of your computer 3 Remove the CD ROM after the installation is complete The following software is installed and shortcut icons appear on the desktop Image Data Converter SR Image Data Lightbox SR PMB PMB Launcher PMB Help If PMB has already been installed on the computer and the version number of th...

Page 211: ...er SR you can do the following etc To edit images recorded in RAW format with various corrections such as tone curve and sharpness To adjust images with white balance exposure and creative style etc To save the images displayed and edited on a computer You can either save the image as RAW format or save it in the general file format Installing the software Macintosh Using Image Data Converter SR z...

Page 212: ...rner drive To create Blu ray discs AVCHD format discs or DVD discs from AVCHD format movies imported to a computer An internet connection environment is required when a Blu ray disc DVD disc is created for the first time NEX 5 5C only PMB is not compatible with Macintosh computers The confirmation message of the Information tool appears on the screen when starting PMB for the first time Select Sta...

Page 213: ...rom such operations via the computer NEX 5 5C only 1 Connect the camera to your Macintosh computer first Double click the newly recognized icon on the desktop t the folder where the images you want to import are stored 2 Drag and drop the image files to the hard disk icon The image files are copied to the hard disk 3 Double click the hard disk icon t the desired image file in the folder containing...

Page 214: ...ag and drop the icon of the memory card or the drive icon to the Trash icon beforehand when you use a Macintosh computer and the camera is disconnected from the computer Deleting the USB connection 1 Double click the disconnect icon on the tasktray 2 Click USB Mass Storage Device t Stop 3 Confirm the device on the confirmation window then click OK Disconnect icon Note Windows Vista Windows XP ...

Page 215: ...sion of DVD writer s firmware is the latest For details refer to the following URL http sony storagesupport com Selecting the method for creating a disc Player Method Disc type Blu ray disc playback devices Blu ray disc player PlayStation 3 etc Create a Blu ray disc of movies and photos imported to a computer using PMB AVCHD format playback devices Sony Blu ray disc player PlayStation 3 etc Create...

Page 216: ... Sony Blu ray disc player and a PlayStation 3 You cannot play the disc on ordinary DVD players Standard definition image quality STD movie converted from high definition image quality HD movie can be recorded on DVD media such as DVD R discs and a standard image quality STD disc is created z Discs you can use with PMB You can use 12 cm discs of following type with PMB For Blu ray disc see page 134...

Page 217: ...usly imported to a computer Your computer must support the creation of Blu ray discs BD R non rewritable and BD RE rewritable media can be used to create Blu ray discs You cannot add contents to either type of disc once it has been created Click BD Add on Software on the installation screen of PMB and install this plug in according to the on screen instructions Connect your computer to the Interne...

Page 218: ...t the movies you want to write 4 Click Disc Creation to select Create DVD Video Format Discs STD 5 Follow the instructions on the screen to create the disc Install PMB beforehand MP4 movie files cannot be recorded on a disc It will take a longer time to create a disc because AVCHD format movies are converted to standard definition image quality STD movies An Internet connection environment is requ...

Page 219: ...g as the shop supports photo printing services conforming to DPOF you can make a Print order mark on images in advance in the playback mode so that you do not have to reselect them when you print them out at the shop You cannot print RAW images When you print images shot in 16 9 mode both edges may be cut off You cannot print panoramic images depending on the printer When you print at a shop note ...

Page 220: ...he camera or battery pack is too warm the camera displays a warning message and turns off automatically to protect the camera If you do not operate the camera for given period of time the camera turns to power saving mode To cancel the power save operate the camera such as pressing the shutter button halfway down page 104 The CHARGE lamp flashes when charging the battery pack You can use an NP FW5...

Page 221: ...long time The noise reduction function is turned on pages 96 97 This is not a malfunction You are shooting in RAW mode page 66 Since the RAW data file is large the RAW mode shooting may take time The Auto HDR is processing an image page 74 The image is out of focus The subject is too close Check the minimum focal distance of the lens You are shooting in manual focus mode Set AF MF Select to Autofo...

Page 222: ... the filter and improper attachment of the hood the filter or the hood may partially appear in the image The optical properties of some lenses may cause the periphery of the image to appear too dark insufficient light The eyes of the subject come out red Activate the Red Eye Reduction function page 88 Get close to the subject and shoot the subject within the flash range using the flash Dots appear...

Page 223: ...ther than the camera the keyboard and the mouse from the USB terminals of your computer Connect the camera directly to your computer without passing through a USB hub or other device Cannot copy images Make the USB connection by properly connecting the camera with your computer page 130 Follow the designated copy procedure for your OS When you shoot images with a memory card formatted by a compute...

Page 224: ...pecially when you print an image shot with the aspect ratio set to 16 9 the lateral end of the image may be cut off When printing images using your own printer cancel the trimming or borderless settings Consult the printer manufacturer as to whether the printer provides these functions or not When having images printed at a photo printing service shop ask the shop whether they can print the images...

Page 225: ...ot a JPEG image The setting is reset without the resetting operation The battery pack was removed when the power switch was set to ON When removing the battery pack make sure the camera is turned off and the access lamp is not illuminated The camera does not work properly Turn off the camera Remove the battery pack and insert it again If the camera is hot remove the battery pack and allow it to co...

Page 226: ...compatible memory card is inserted or the format has failed Reinsert memory card The inserted memory card cannot be used in your camera The memory card is damaged The terminal section of the memory card is dirty This memory card may not be capable of recording and playing normally The inserted memory card cannot be used in the camera Processing Long exposure noise reduction will be done for the sa...

Page 227: ...not disappear consult your Sony dealer or local authorized Sony service facility The number of images exceeds that for which date management in a database file by the camera is possible Unable to register to the database file Import all the images to a computer using PMB and recover the memory card Camera Error System Error Turn the power off remove the battery pack then re insert it If the messag...

Page 228: ...er cameras may not be enlarged or rotated No images selected You attempted to print without specifying images No images changed You attempted to execute DPOF without specifying images Cannot create more folders The folder with a name beginning with 999 exists on the memory card You cannot create any folders if this is the case ...

Page 229: ... the color system to match that of the connected video device NTSC system 1080 60i Bahama Islands Bolivia Canada Central America Chile Colombia Ecuador Jamaica Japan Korea Mexico Peru Surinam Taiwan the Philippines the U S A Venezuela etc PAL system 1080 50i Australia Austria Belgium China Croatia Czech Republic Denmark Finland Germany Holland Hong Kong Hungary Indonesia Italy Kuwait Malaysia New ...

Page 230: ...t just after it has been used for a long time Be careful when you handle it Do not use or store the memory card under the following conditions High temperature locations such as the hot interior of a car parked in direct sunlight Locations exposed to direct sunlight Humid locations or locations with corrosive substances present Images recorded on an SDXC memory card cannot be imported to or played...

Page 231: ...mpatible with Memory Stick Micro media M2 M2 is an abbreviation for Memory Stick Micro media To use a Memory Stick Micro media with the camera be sure to insert the Memory Stick Micro media into an M2 Adaptor as large as of Duo size If you insert a Memory Stick Micro media into the camera without an M2 Adaptor as large as of Duo size you might not be able to remove it from the camera Do not leave ...

Page 232: ...ll run out quickly if you use the flash or record movies frequently We recommend having spare battery packs handy and making trial shots before taking the actual shots Do not expose the battery pack to water The battery pack is not water resistant Do not leave the battery pack in extremely hot places such as in a car or under direct sunlight On the remaining battery time indicator When the power g...

Page 233: ...d Battery capacity decreases over time and through repeated use If decreased usage time between charges becomes significant it is probably time to replace it with a new one The battery life varies according to how it is stored and the operating conditions and environment in which each battery pack is used ...

Page 234: ...in When the CHARGE lamp flashes fast again this may indicate a battery error or that a battery pack other than the specified type has been inserted Check that the battery pack is the specified type If the battery pack is the specified type remove the battery pack replace it with a new one or another one and check if the battery charger operates correctly If the battery charger operates correctly a...

Page 235: ...tach an A mount lens to your camera For details refer to the operating instructions supplied with the Mount Adaptor You may not be able to use the Mount Adaptor with certain lenses Consult your Sony dealer or local authorized Sony service facility on compatible lenses The continuous shooting speed of still images will be slower Notes ...

Page 236: ...igh definition video signal shot on a digital video camera recorder to be recorded on 8 cm DVD discs hard disk drive flash memory memory card etc Recording and playback on your camera Based on the AVCHD format your camera records with the high definition image quality HD mentioned below Video signal 3 1080 60i compatible device MPEG 4 AVC H 264 1920 1080 60i 1080 50i compatible device MPEG 4 AVC H...

Page 237: ... Chemical products such as thinner benzine alcohol disposable cloths insect repellent sunscreen or insecticide etc Do not touch the camera with the above on your hand Do not leave the camera in contact with rubber or vinyl for a long time Do not use a cleaning solution containing organic solvents such as thinner or benzine When cleaning the lens surface remove dust using a commercially available b...

Page 238: ...123 Continuous Adv 34 Contrast 75 Control wheel 17 CTRL FOR HDMI 109 Custom white balance 70 D Date Format 101 Date Time Setup 101 Daylight Svg 101 Defocusing the background 24 Delete 28 76 Demo Mode 113 Direct Manual Focus 53 Disc creation 132 DISP 29 Display Card Space 121 Display Color 106 Display Contents 29 DMF 53 DPOF 86 D Range Opt 73 Drive Mode 33 DRO Auto HDR 73 E Enlarge Image 84 Enlarge...

Page 239: ...Movie Audio Rec 98 MP4 67 Multi 55 71 N New Folder 119 Night Portrait 43 Night View 43 P Panorama 46 Panorama Direction 61 Playback 26 Playback Display 108 Playback on TV 123 Playback zoom 26 PMB 129 PMB Launcher 127 Portrait 43 Power Save 104 Precision Dig Zoom 57 Preset white balance 70 Print 136 Program Auto 52 Protect 83 Q Quality 66 R RAW 66 Rear Sync 31 Recover Image DB 120 Red Eye Reduction...

Page 240: ...le Detection 60 Smile Shutter 59 Soft keys 18 Specify Printing 86 Speed Priority Cont 35 Sports Action 43 Spot 71 sRGB 93 SteadyShot 94 Still Movie Select 78 Sunset 43 Sweep Panorama 46 T Troubleshooting 137 U Upload Settings 122 USB Connection 110 V Version 112 Volume Settings 85 W Warning messages 143 White Balance 69 Wide Image 107 Windows 127 ...

Page 241: ...ii DECODE AVC VIDEO THAT WAS ENCODED BY A CONSUMER ENGAGED IN A PERSONAL AND NON COMMERCIAL ACTIVITY AND OR WAS OBTAINED FROM A VIDEO PROVIDER LICENSED TO PROVIDE AVC VIDEO NO LICENSE IS GRANTED OR SHALL BE IMPLIED FOR ANY OTHER USE ADDITIONAL INFORMATION MAY BE OBTAINED FROM MPEG LA L L C SEE HTTP WWW MPEGLA COM NEX 3 3C IS LICENSED UNDER THE MPEG 4 VISUAL PATENT PORTFOLIO LICENSE FOR THE PERSONA...

Page 242: ...to modify and redistribute source code for these software programs under the conditions of the supplied GPL LGPL Source code is provided on the web Use the following URL to download it http www sony net Products Linux We would prefer you do not contact us about the contents of source code Read license2 pdf in the License folder on the CD ROM You will find licenses in English of GPL and LGPL softwa...

Page 243: ...ex Lens Accessories Objectifs et accessoires Objetivos y accesorios Objectiva e Acess6rios ...

Page 244: ......

Page 245: ...ul en mi bolsillo Sempre que eu quiser esta mesmo no meu boIso IntCl cllangcabl _ ns Objectif Interchangeable Objetivos lntercambiables Objectlvas lnlercamblaveis Etuis et coulToies Fundas y correas EstoJos e COlTeias Vidoo and 0 h8 Accessortes J Accessoires video et autres Video y olros accesorios Video e Outros Acess6rios 02 ...

Page 246: ......

Page 247: ...I lo a O S ft 2 1 ocn MIn A IerUI f22 llIrr _d lllll tJ 2 1 2 9m in 1620 22 Snlmj Welgftl AwrOIl21 8 Ql 67g n E1S f2 I f MlI 2 m IIJQI C cn 0uwr1unI f22 Do rddDd 011 tJ 2 2 29132 po 62 C 2l 5 mm PbIls 21 8 OIl 167 g o ...

Page 248: ......

Page 249: ...Ma l MagrofiUliOII 03 Min fn F32 Io _ l l 2112 2 31 1 in 162 60mml Weog lt Awo e 1 8 01 HUgl SUll55 E _ fU S oss F aIlI_ O I2I1ID 25111 9 l III TIM nIal 11 3 OuYer1Io t tTWI F2H32 Otme IsoonlIllIII U 2 1 2 2 lIa po 162 Illl mml POIdI _ 6 7 8 1901 g ...

Page 250: ......

Page 251: ... 1Pl 1 6 1i ll 3m O loa O 35 IlMrUnmon F1 2 FoI I 00 _ lllL U 3 po 7S 5 9 l ovn POOs 181f2onI52 gl E11 2QI nm FJ 5 U OSS Min locus 1 1 1 ll SIl1I Malo Magi 0 35 Min tcI rUr F22 fol l o li liSiooll Oia tJ 3 75 5 99mrn WeIgIW Aj Iprao 18 1 2 0l152 gj ...

Page 252: ......

Page 253: ... 0 _ VCl CFl lAl9 _ ll62 u C IQ ClJl cahaN 1IIh Ow 1 075 Oo_rOII Lj d _ 2 T1 llCI 06 iMll FOIII on m l25gll_lO ...

Page 254: ......

Page 255: ...daptateur pour objectif c r P IapIat POOl cqectJf prtl ql I VOUll penner de fox n el lquel de nos ot toct ls a mof ure A _0 Adaptador de montura ESln l adaplador d rr II1h Ie p ormitB InStal a de loS objetivOS de montura 0 A e G I _ _ Adaptador de Fixac ao Este _Ie adaplaOOr de IIUI Ilo permle 1 l I nne quelquer las suas ob acl de lag om A ecw 00 _ _ _ _ Mount Adaptor n conv enl mount aMp or allow...

Page 256: ... _ no 1 5 _ _ _ _ L L L _ _ 01 _ _ tI _ _ ...

Page 257: ... m I ts ltFn EMlll lolitA LCS EML1A pnlll oIIjobIoO c o_ Q clrd LCS EMW pnllloo tlJl l c o_ Q clrd STP XHI IIcUIlo StrOll _ CoR dt ...

Page 258: ...if28 VlIu QllIQIt IJlIU SEll6F281 VIIIlI 6paw _ IIlIlOIIilSU16F2Il ViIar Elecbilooco I ploco pn I sa 6F2Sl l Cll lSl M lCO SIlMI fUll 11I JIlU LCD dII 1II11 11 D III PI Of lCD UI1 DII lCO te lIaI _tm r III la lI Lal OIlCll _ _ P ...

Page 259: ...J _ n Col _ _ _ _ W _ MIIll WfoII __ 1lIC VF PAM II1 Cl AlI _ n 1IF I I 1IIl MI RMT DSUl1 IlImolt ComrNnllIr Ib 10 5 ro 5C1 dI PlIU IO NO 5C1 MinlIIlI _ 10 5 1O 5C1 r__ lI IlrIO EBtl e t _J til _llooa o i O ...

Page 260: ...M 28 75mm f2 ll SAM DTl8 2OOmm fJ 5 6 J SAM or55 2OOlml 1 5 5 Dll6mmF2 8SAM OT S5 2OOmm 1 405 8 SAM 75 3llllrnm 1 1 5 5 8 16mm 1 2 8 FisIIeye or lH8tIIm fU 5 8 2OmmF2 8 OT1 1 mf3 S U 2 nmfU DT 18 55 ml1 3 5 5 6 SAM DT30IMI f2 8Ml1cfo SAM DT 1l1 7 lfMl1 3 5 56 I SlmmfU DT 18 2OQmm ns a3 j OT5lmnf1 8SAM OllB 25Omm f1s a3 5lImm Fz a Maao ...

Page 261: ... l enscompatibllily QIo 1 __ M Ifo uo _ _ T l _fUU SSM In S I rU l F1S Ul l r2e _fUlASSIII 2XT l1o 35nVnFUG JOOmm F2 8 G ra _ L__ w __ _ 6 se lens SEll F2l1 SEll855 SELI6f2a SELl855 lCS EM81o Lens Jllcket _flOIecbls _ _ _ _ _ pOInI_ Ii_ 0bj0ctJ 1_ AIillnM _ 0lIl0cId _ Goo pIII K IlIlIItIIl e ...

Page 262: ...www sony net ...

Page 263: ......

Page 264: ......

Page 265: ...ipt is required For specific instructions on how to obtain warranty service for your product Visit Sony s Web Site www sony com support Or call the Sony Customer Information Service Center 1 800 222 S0NY 7669 For an accessory or part not available from your authorized dealer call 1 800 488 S0NY 7669 Repair I Replacement Warranty This Limited Warranty shall apply to any repair replacement part or r...

Reviews: