background image

Inserting a memory card (sold separately)

GB

52

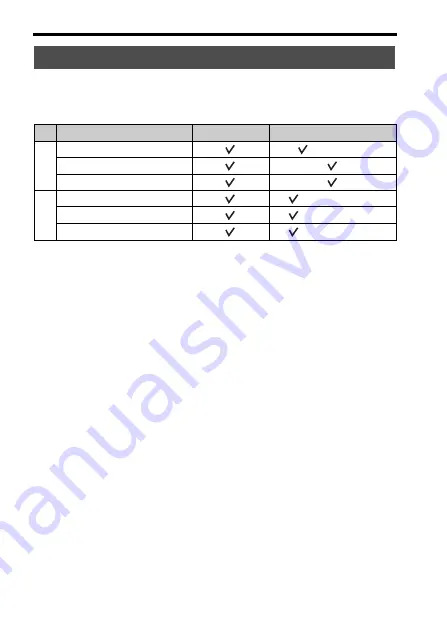
You can use the following types of memory cards with this camera. 
However, proper operation cannot be guaranteed for all types of memory 
cards.

• In this manual, the products in the table are collectively referred to as follows:

A

: “Memory Stick PRO Duo” media

B

: SD card

Notes

• Images recorded on a “Memory Stick XC-HG Duo” media or an SDXC memory 

card cannot be imported to or played on computers or AV devices that are not 
compatible with exFAT*. Make sure that the device is compatible with exFAT 
before connecting it to the camera. If you connect your camera to an incompatible 
device, you may be prompted to format the card.
Never format the card in response to this prompt, as doing so will erase all data on 
the card. 

* exFAT is the file system used on “Memory Stick XC-HG Duo” media and SDXC 

memory cards.

Memory cards that can be used

Memory card

For still images

For movies

A

Memory Stick PRO Duo

 (Mark2 only)

Memory Stick PRO-HG Duo

Memory Stick XC-HG Duo

B

SD memory card

 (Class 4 or faster)

SDHC memory card

 (Class 4 or faster)

SDXC memory card

 (Class 4 or faster)

Summary of Contents for Alpha 7

Page 1: ...4 478 729 11 2 ILCE 7 ILCE 7R Interchangeable Lens Digital Camera Instruction Manual E mount ...

Page 2: ...e the battery pack to any shock or force such as hammering dropping or stepping on it Do not short circuit and do not allow metal objects to come into contact with the battery terminals Do not expose to high temperature above 60 C 140 F such as in direct sunlight or in a car parked in the sun Do not incinerate or dispose of in fire Do not handle damaged or leaking lithium ion batteries Be sure to ...

Page 3: ...FCC radio frequency RF Exposure Guidelines in Supplement C to OET65 and RSS 102 of the IC radio frequency RF Exposure rules This equipment has very low levels of RF energy that are deemed to comply without testing of specific absorption radio SAR UL is an internationally recognized safety organization The UL Mark on the product means it has been UL Listed If you have any questions about this produ...

Page 4: ...of the following measures Reorient or relocate the receiving antenna Increase the separation between the equipment and receiver Connect the equipment into an outlet on a circuit different from that to which the receiver is connected Consult the dealer or an experienced radio TV technician for help The supplied interface cable must be used with the equipment in order to comply with the limits for a...

Page 5: ...ean countries with separate collection systems This symbol on the product or on its packaging indicates that this product shall not be treated as household waste Instead it shall be handed over to the applicable collection point for the recycling of electrical and electronic equipment By ensuring this product is disposed of correctly you will help prevent potential negative consequences for the en...

Page 6: ...ycling of electrical and electronic equipment For all other batteries please view the section on how to remove the battery from the product safely Hand the battery over to the applicable collection point for the recycling of waste batteries For more detailed information about recycling of this product or battery please contact your local Civic Office your household waste disposal service or the sh...

Page 7: ...th ILCE 7K 22 List of icons on the screen 23 Functions list Functions that can be operated using the buttons dials 27 How to use the Quick Navi screen 28 Operating the camera 30 How to use the control wheel 30 How to use the front dial rear dial 31 Selecting a function using the Fn Function button 32 Functions that can be registered using the Fn Function button 33 Functions that can be selected us...

Page 8: ... a clear movie without camera shake 58 Camera shake warning indicator 58 Using the SteadyShot function 58 Holding the camera properly 59 Removing the Eyepiece cup 60 Shooting and viewing images Shooting still images 61 Recording movies 63 Playing back images 64 Switching between still images and movies 65 Deleting images 66 Selecting a shooting mode Selecting a shooting mode 67 Functions available...

Page 9: ...onverter 78 Installing Image Data Converter 79 Using PlayMemories Home 79 Installing PlayMemories Home 80 Using Remote Camera Control 80 Installing Remote Camera Control 81 Others Learning more about the camera Help Guide 82 Checking the number of images and recordable time of movies 83 Specifications 88 Index 94 For details on Wi Fi functions see the flyer Wi Fi Connection One touch NFC Guide Thi...

Page 10: ...umbers than the maximum ISO sensitivity White Balance 36 You can adjust the color tones You can select an option to suit a light source or perform fine adjustments using color temperature and color filters Drive Mode 35 You can select an appropriate drive mode to suit your purposes such as single shooting continuous shooting or bracket shooting DRO Auto HDR 71 D Range Opt By dividing the image int...

Page 11: ...d and when you move your face away from the viewfinder the viewing mode reverts to LCD screen mode default settings You can change the screen display mode by pressing DISP on the control wheel Quick Navi 28 In For viewfinder screen you can quickly switch from the LCD screen to the Quick Navi screen by pressing the Fn button You can set the items with an intuitive operation Customization 40 The cam...

Page 12: ...hooting with an E mount lens compatible APS C size This camera is equipped with a 35 mm full frame CMOS sensor However the image size is automatically set to that of the APS C size setting and the image size is smaller when an E mount lens compatible APS C size is used default settings No compensation for damaged content or recording failure Sony cannot compensate for failure to record or loss or ...

Page 13: ...n importing AVCHD movies to a computer download and use the software PlayMemories Home from the following website http www sony net pm Notes when playing movies on other devices This camera uses MPEG 4 AVC H 264 High Profile for AVCHD format recording Movies recorded in AVCHD format with this camera cannot be played with the following devices Other devices compatible with AVCHD format that do not ...

Page 14: ... camera is designed to provide an easily viewable viewfinder by appropriately balancing various elements The image may be slightly distorted near the corners of the viewfinder This is not a malfunction When you want to check every detail of the entire composition you can also use the LCD screen How to turn off wireless network functions Wi Fi and NFC etc temporarily When you board an airplane etc ...

Page 15: ...ied with your camera Use the appropriate one that matches your country region Rechargeable battery pack NP FW50 1 Micro USB cable 1 Shoulder strap 1 For how to attach the shoulder strap to the camera refer to page 20 Body cap 1 Attached on the camera Shoe cap 1 Attached on the camera Eyepiece Cup 1 Attached on the camera Instruction Manual 1 this manual ILCE 7K Zoom lens FE 28 70 mm F3 5 5 6 OSS 1...

Page 16: ...removed A AF illuminator 36 Self timer lamp B Front dial C Remote sensor D Lens release button E Built in microphone 1 F Mount index G Image sensor 2 H Mount I Contacts 2 1 Do not cover this part during movie recording Doing so may cause noise or lower the volume 2 Do not directly touch these parts Front side ...

Page 17: ...can adjust the LCD screen to an easily viewable angle and shoot from any position F Diopter adjustment dial Adjust the diopter adjustment dial to your eyesight until the display appears clearly in the viewfinder G For shooting C2 Custom2 button 27 For viewing Enlarge button H AF MF AEL switch lever I Rear dial Rear side ...

Page 18: ...nual focus button AEL button 27 For viewing Image index button 72 K MOVIE button 63 L For shooting Fn button 32 For viewing Send to Smartphone button M Control wheel N For shooting C3 Custom3 button For viewing Delete button 66 O Access lamp P Playback button ...

Page 19: ...he microphone is supplied by the camera D i Headphones jack E Charge lamp F Multi terminal Supports Micro USB compatible device G HDMI micro jack H Multi interface shoe Some of the accessories may not be inserted fully and protrude backward from the Multi interface shoe However when the accessory reaches the front end of the shoe the connection is completed I Mode dial 67 J Power switch Shutter bu...

Page 20: ...refer to the operating instructions of the Smartphone NFC Near Field Communication is an international standard of short range wireless communication technology O Memory card cover P Memory card slot For details on compatible accessories of the Multi interface shoe visit the Sony web site in your area or consult your Sony dealer or local authorized Sony service facility Accessories for the Accesso...

Page 21: ...therwise you cannot firmly secure the camera and damage to the camera may occur Connection plate cover Use this when using an AC PW20 AC Adaptor sold separately Insert the connection plate into the battery compartment and then pass the cord through the connection plate cover as shown below Make sure that the cord is not pinched when you close the cover Bottom view ...

Page 22: ...ntifying parts GB 22 A Focusing ring B Zoom ring C Focal length scale D Focal length index E Lens contacts F Mount index Do not touch this part directly Lens FE 28 70 mm F3 5 5 6 OSS Supplied with ILCE 7K ...

Page 23: ...u change DISP Button setting and then if you press DISP on the control wheel the screen status will change to For viewfinder mode You can also display the histogram by pressing DISP For the LCD screen mode For playback Basic information display For the viewfinder mode In Auto Mode or Scene Selection mode P A S M Sweep Panorama mode ...

Page 24: ...3M 7 6M 3 2M ILCE 7R Image size of still images 83 Image quality of still images 35 Frame rate of movies Image size of movies 35 Remaining battery 50 Remaining battery warning Flash charge in progress APS C Size Capture 40 Setting Effect OFF 38 AF Illuminator 36 NFC is activated Airplane Mode No audio recording of movies 37 Wind Noise Reduction 38 SteadyShot Camera shake warning 37 58 Overheating ...

Page 25: ...n Smile Shutter 37 Metering mode 36 AWB 7500K A5 G5 White balance Auto Preset Custom Color temperature Color filter 36 Display Indication D Range Optimizer Auto HDR 36 3 3 3 Creative Style 36 70 Contrast Saturation Sharpness Lock on AF 37 Picture Effect 36 Smile detection sensitivity indicator Display Indication z Lock on AF Lock on AF guide EV scale Exposure compensation 36 Metered Manual REC 0 1...

Page 26: ...00 ISO AUTO ISO sensitivity 36 AE lock Shutter speed indicator Aperture indicator Histogram Auto HDR image warning Picture Effect error 2013 1 1 10 37PM Date of recording 3 7 File number Number of images in the view mode Display Indication ...

Page 27: ...entire screen Displays multiple images on the screen simultaneously button Scales an image up when viewing images Fn button button Displays the setup screen for functions set using the Fn button In For viewfinder screen switches to the Quick Navi screen In playback mode pressing button switches to Send to Smartphone screen Exposure compensation dial Sets the range for exposure adjustment button Pl...

Page 28: ...or viewfinder Quick Navi 1 MENU button t Custom Settings 2 t DISP Button t Monitor t For viewfinder t Enter 2 Press the DISP on the control wheel to set the screen mode to For viewfinder 3 Press the Fn button to switch to the Quick Navi screen In Auto Mode or Scene Selection mode In P A S M Sweep Panorama mode 4 Select the desired item with v V b B on the control wheel ...

Page 29: ...ty SteadyShot Auto Mode Scene Selection Notes Gray items on the Quick Navi screen are not available When using Creative Style page 70 some of the setup tasks can be accomplished only on a designated screen 5 Set the item with the front dial Some setting values can be finely adjusted by turning the rear dial Pressing the center of the control wheel turns on the designated screen used to set up the ...

Page 30: ...he following functions are assigned to v b B on the control wheel You can also change the ISO sensitivity immediately by turning the control wheel You can assign a desired function to the V b B z buttons and to the control wheel turning position in shooting mode When you turn the control wheel or press b B on the control wheel in playback mode you can display the previous or next image How to use ...

Page 31: ...Operating the camera Functions list GB 31 You can turn the front dial or rear dial to change the settings required for each shooting mode with immediate effect How to use the front dial rear dial ...

Page 32: ... Fn button 3 Select the desired item using v V b B on the control wheel The setting screen appears 4 Select the desired setting by turning the front dial then press z on the control wheel Some setting values can be finely adjusted by turning the rear dial To set the individual settings in the dedicated screen In step 3 select a setting item and press z on the control wheel to switch to the dedicat...

Page 33: ...t can be selected using the Fn button are as follows Drive Mode Flash Mode Flash Comp Focus Mode Focus Area Exposure Comp ISO Metering Mode White Balance DRO Auto HDR Creative Style Shoot Mode Picture Effect Lock on AF Smile Face Detect Soft Skin Effect Auto Obj Framing Image Size Aspect Ratio Quality SteadyShot Audio Rec Level Zebra Grid Line Audio Level Display Peaking Level Peaking Color Not se...

Page 34: ...play the first screen of the menu when you press the MENU button MENU t Setup 2 t Tile Menu t On 1 Press MENU button to display the menu screen 2 Select the desired setting item using v V b B on the control wheel or by turning the control wheel and then press z on the center of the control wheel Select an icon at the top of the screen and press the b B on the control wheel to move to another MENU ...

Page 35: ...Sets the shooting direction for panoramic images Right Left Up Down File Format Selects the movie file format AVCHD MP4 Record Setting Selects the quality and size of the recorded movie frame 60i 24M FX 50i 24M FX 60i 17M FH 50i 17M FH 60p 28M PS 50p 28M PS 24p 24M FX 25p 24M FX 24p 17M FH 25p 17M FH 1440 1080 12M VGA 3M Drive Mode Sets the drive mode such as for continuous shooting Single Shootin...

Page 36: ...rm White Fluor Cool White Fluor Day White Fluor Daylight Flash Underwater Auto C Temp Filter Custom 1 3 Custom Setup DRO Auto HDR Compensates automatically for brightness and contrast Off D Range Opt Auto HDR Creative Style Selects the desired image processing You can also adjust contrast saturation and sharpness Standard Vivid Neutral Clear Deep Light Portrait Landscape Sunset Night Scene Autumn ...

Page 37: ... selecting either Intelligent Auto or Superior Auto Intelligent Auto Superior Auto Scene Selection Selects pre set settings to match various scene conditions Portrait Sports Action Macro Landscape Sunset Night Scene Hand held Twilight Night Portrait Anti Motion Blur Movie Selects the exposure mode to suit your subject or effect Program Auto Aperture Priority Shutter Priority Manual Exposure Steady...

Page 38: ...ff Auto Review Sets auto review to display the captured image after shooting 10 Sec 5 Sec 2 Sec Off DISP Button Sets the type of information to be displayed on the LCD screen or in the viewfinder by pressing DISP on the control wheel Graphic Display Display All Info No Disp Info Level Histogram For viewfinder Peaking Level Enhances the outline of in focus ranges with a specific color when focusing...

Page 39: ...when the shutter button is half pressed This is useful when you want to adjust the focus and exposure separately On Off AEL w shutter Sets whether to adjust the exposure by pressing the shutter button halfway down This is convenient when you want to adjust the focus and exposure separately Auto On Off e Front Curtain Shut ILCE 7 only Sets whether to use the electronic front curtain shutter functio...

Page 40: ...ite Balance DRO Auto HDR Creative Style Shoot Mode Picture Effect Lock on AF Smile Face Detect Soft Skin Effect Auto Obj Framing Image Size Aspect Ratio Quality SteadyShot Audio Rec Level Zebra Grid Line Audio Level Display Peaking Level Peaking Color Not set Custom Key Settings Assigning functions to the various keys allows you to speed up operations by pressing the keys Control Wheel AEL Button ...

Page 41: ... on TV You can view images on a network enabled TV One touch NFC Assigns one application to One touch NFC You can call up the application when shooting by touching an NFC enabled Smartphone to the camera Airplane Mode You can set this device to not perform wireless communications On Off WPS Push You can register the access point to the camera easily by pushing the WPS button Access Point Set You c...

Page 42: ...e Specify Printing Adds a print order mark to a still image Multiple Img Cancel All Print Setting Monitor Brightness Sets the screen brightness Manual Sunny Weather Viewfinder Bright When using an electronic viewfinder sets the brightness of the electronic viewfinder Auto Manual Finder Color Temp Sets the color temperature of the viewfinder Volume Settings Sets the volume for movie playback Audio ...

Page 43: ...n Off Remote Ctrl Sets whether to use the infrared remote control On Off HDMI Resolution Sets the resolution when the camera is connected to an HDMI TV Auto 1080p 1080i CTRL FOR HDMI Operates the camera from a TV that supports BRAVIA Sync On Off HDMI Info Display Selects whether or not to display information to the TV while connected to a HDMI compatible TV On Off USB Connection Sets the USB conne...

Page 44: ...he folder format for still images Standard Form Date Form Recover Image DB Recovers the image database file and enables recording and playback Display Media Info Displays the remaining recording time of movies and the recordable number of still images on the memory card Version Displays the camera software version Certification Logo The certification can be displayed on the camera Setting Reset Re...

Page 45: ... explanations for the currently selected menu function or setting 1 Select MENU button t Custom Settings 6 t Custom Key Settings t desired functions assigned to the button t In Camera Guide Press the MENU button and use the control wheel to select a MENU item whose explanation you want to read and then press the button to which In Camera Guide is assigned ...

Page 46: ...fully depleted It can also be used when it has not been fully charged The charged battery pack is discharged little by little even when you do not use it To avoid missing an opportunity to shoot charge the battery pack again before you shooting 1 Set the ON OFF Power switch to OFF 2 Slide the lever to open the cover 3 Insert the battery pack completely using the tip of the battery to press the loc...

Page 47: ...over 5 Connect the camera to the AC Adaptor supplied using the micro USB cable supplied and connect the AC Adaptor to the wall outlet wall socket For customers in the USA and Canada For customers in countries regions other than the USA and Canada Power cord Mains lead ...

Page 48: ...that has not been used for a long time the charge lamp may flash quickly when the battery is charged for the first time If that happens remove the battery pack from the camera and then re insert it to recharge Do not continuously or repeatedly charge the battery without using it if it is already fully charged or close to fully charged Doing so may cause a deterioration in battery performance When ...

Page 49: ... computer If the camera is connected to a laptop computer that is not connected to a power source the laptop battery level decreases Do not charge for an extended period of time Do not turn on off or restart the computer or wake the computer to resume from sleep mode when a USB connection has been established between the computer and the camera The camera may cause a malfunction Before turning on ...

Page 50: ...harge indicator may not be correct under certain circumstances Checking the remaining battery charge To remove the battery pack High Low Turn off the camera Slide the lock lever after confirming that the access lamp page 17 is off and remove the battery pack Be sure not to drop the battery pack Lock lever ...

Page 51: ...hat the access lamp page 17 is not lit then push the memory card in once 1 Slide the lever to open the cover 2 Insert the memory card sold separately With the notched corner facing as illustrated insert the memory card until it clicks into place Ensure the notched corner faces correctly 3 Close the cover ...

Page 52: ... that are not compatible with exFAT Make sure that the device is compatible with exFAT before connecting it to the camera If you connect your camera to an incompatible device you may be prompted to format the card Never format the card in response to this prompt as doing so will erase all data on the card exFAT is the file system used on Memory Stick XC HG Duo media and SDXC memory cards Memory ca...

Page 53: ... or debris from getting inside the camera When shooting remove the front lens cap from the front of the lens 2 Mount the lens by aligning the white index marks mounting indexes on the lens and camera Hold the camera with the lens facing down to prevent dust from entering into the camera 3 While pushing the lens lightly toward the camera turn the lens clockwise until it clicks into the locked posit...

Page 54: ...nt to shoot full frame images use a lens designed for a full frame camera When carrying the camera with a lens attached hold both the camera and the lens firmly Do not hold the part of the lens that is extended for the zoom or focus adjustment To remove the lens 1 Press the lens release button all the way in and turn the lens counterclockwise until it stops 2 Attach the caps to the front and rear ...

Page 55: ... of the image sensor the part that converts the light to an electric signal it may appear as dark spots on the image depending on the shooting environment The camera is equipped with an anti dust function to prevent dust from landing on the image sensor However always make sure to quickly change the lens away from dusty locations when attaching removing a lens ...

Page 56: ...to set the date and time appears To turn the camera off set the power switch to OFF 2 Check that Enter is selected on the screen then press z on the control wheel 3 Select a desired geographic location then press z 4 Press v V on the control wheel or select a setting item by turning the control wheel then press z 5 Press v V b B or select a desired setting by turning the control wheel then press z...

Page 57: ...ttery has been discharged To reset the date and time use the menu Maintaining the date and time setting This camera has an internal rechargeable battery for maintaining the date and time and other settings regardless of whether the power is on or off or the battery is installed or not Setting the date time and area again MENU button t Setup 4 t Date Time Setup or Area Setting page 43 MENU button ...

Page 58: ...d with the camera shake compensation function is used the SteadyShot function is available for this camera to reduce camera shake MENU button t Camera Settings 6 t SteadyShot t Select the desired setting Notes The SteadyShot function may not work optimally when the power has just been turned on right after you point the camera towards a subject or when the shutter button has been pressed all the w...

Page 59: ... body and take a position that keeps the camera from moving Point 1 One hand holds the grip of the camera and the other hand supports the lens Point 2 Take a secure stance with your feet shoulder width apart Point 3 Lightly tuck your elbows against your body When shooting in a kneeling position steady your upper body by placing your elbow on your knee Holding the camera properly In viewfinder mode...

Page 60: ...amera remove the Eyepiece cup Notes When an FDA A1AM Angle Finder sold separately is attached to the camera switch the display between the viewfinder and the LCD screen by setting FINDER MONITOR in Custom Settings 3 Remove the Eyepiece cup Put your fingers under the Eyepiece cup and slide it upward ...

Page 61: ...he camera 4 Determine the size of a subject When using a lens with a zoom lever Move the zoom lever When using a lens with a zoom ring Turn the zoom ring The optical zoom is not available when a fixed focal length lens is mounted If the zoom range of the optical zoom is exceeded when a Power zoom lens is mounted the camera automatically switches over to the camera side zoom 5 Press the shutter but...

Page 62: ...an image If Auto Obj Framing is set to Auto when shooting faces close up macro subjects or subjects tracked by Lock on AF the camera analyzes the scene and automatically trims the captured image into a suitable composition Both the original and the trimmed images will be saved ...

Page 63: ...movie depends on the ambient temperature or the condition of the camera See Notes on continuous movie recording page 87 When the icon appears the temperature of the camera is too high Turn the camera off and wait until the temperature of the camera decreases When you are recording continuously for a long time you may feel that the camera is warm This is normal Also Internal temp high Allow it to c...

Page 64: ... on this camera 1 Press the button 2 Select an image by pressing the b B on the control wheel To play back movies press z on the control wheel Control panel Action during movie playback N Playback X Pause M Fast forward m Fast rewind T Forward slow playback t Rewind slow playback Next movie Previous movie C Frame advance c Frame rewind Volume settings Closes the control panel button ...

Page 65: ...o Folder View Still and to play back movies set View Mode to Folder View MP4 or AVCHD View When you select Date View both still images and movies will be displayed on the screen sorted by date MENU button t Playback 1 t View Mode t Select the desired mode Switching between still images and movies ...

Page 66: ...to delete the image before proceeding Notes Protected images cannot be deleted 1 While displaying the image you want to delete press the Delete button 2 Select Delete with v V on the control wheel then press z To delete several images at a time select MENU button t Playback 1 t Delete Delete button ...

Page 67: ...riority Shoots by adjusting the aperture and changing the focus range or by defocus the background Shutter Priority Adjusts the shutter speed to show the movement of the subject Manual Exposure Allows you to shoot after manually adjusting the exposure the shutter speed and the aperture value using the front or rear dial 1 2 Memory recall Calls up settings pre registered in Memory in the Camera Set...

Page 68: ...ates the function is available and a indicates the function is not available The functions you cannot use are displayed in gray on the screen When the shooting mode is set to M the exposure can be adjusted only when ISO is set to ISO AUTO Shoot Mode 67 Exposure Comp Self timer Cont Shooting Face Detection Smile Shutter Auto Obj Framing ...

Page 69: ... to HD quality movie settings the following items can be set Audio Rec Level Audio Level Display and Audio Out Timing 1 Set the mode dial to Movie 2 i Headphones jack When headphones are used you can set the echo compensation using Audio Out Timing 3 MENU button t Camera Settings 7 t Audio Rec Level You can adjust the audio recording level by monitoring the level meter 4 MENU button t Custom Setti...

Page 70: ...ct the desired kind of image processing from among 13 styles and you can also adjust the contrast saturation and sharpness for each Creative Style item Creative Style 1 MENU button t Camera Settings 4 t Creative Style 2 Select the desired style using v V on the control wheel Creative Style item Style Box You can fine tune the setting and save the adjusted setting ...

Page 71: ...w between the subject and the background and produces an image with the optimal brightness and gradation Auto HDR Shoots 3 images with different exposures and then overlays the correctly exposed image the bright areas of an under exposed image and the dark areas of an over exposed image to create an image with rich gradation DRO Auto HDR 1 MENU button t Camera Settings 4 t DRO Auto HDR 2 Select th...

Page 72: ...uces images Turn the rear dial to magnify or reduce an image Turn the front dial to switch to the next previous image B Image index screen You can select the number of images to be displayed MENU t Playback 1 t Image Index C Deletes unnecessary images D Changes to the playback screen Playback functions ...

Page 73: ...on One touch NFC Guide or to the Help Guide page 82 Connect the camera to your wireless access point Before starting the procedure make sure you have the SSID name of the access point and password of your wireless access point with you Saving images to a computer Transferring images from the camera to a smartphone Using the smartphone as a remote control for the camera Viewing still images on a TV...

Page 74: ...to a computer install the following dedicated software on your computer When using Windows PlayMemories Home www sony net pm When using Mac Wireless Auto Import http www sony co jp imsoft Mac 2 Use v V on the control wheel to select the access point you want to connect to Press z in the center of the control wheel and enter the password if a key icon is displayed with a wireless access point then ...

Page 75: ...y not be available in some countries and regions For details refer to the application downloading website above Downloading applications 1 Access the application downloading website http www sony net pmca 2 Follow the instructions on the screen and acquire a service account If you have an account sign in to the application download site 3 Select the desired application and download the application...

Page 76: ...o be connected t change IP Address Setting to Auto if it is set to Manual Launching the application 1 Select MENU t Application t Application List t desired application to launch You can use the One touch NFC menu to install NFC one touch functions and call up the applications by simply touching the smartphone to the mark on the camera Before using the NFC One touch functions set the applications ...

Page 77: ...ows 7 SP1 Windows 8 PlayMemories Home CPU Intel Pentium III 800 MHz or faster For playing editing the High Definition movies Intel Core Duo 1 66 GHz or faster Intel Core 2 Duo 1 66 GHz or faster Intel Core 2 Duo 2 26 GHz or faster AVC HD FX FH Intel Core 2 Duo 2 40 GHz or faster AVC HD PS Memory 1 GB or more Hard Disk Disk space required for installation approximately 600 MB Display Screen resolut...

Page 78: ... Image Data Converter you can do the following You can play back and edit images recorded in RAW format with various corrections such as tone curve and sharpness You can adjust images with white balance exposure and Creative Style etc You can save the images displayed and edited on a computer You can either save the image as RAW format or save it in a general file format You can display and compar...

Page 79: ...computer Installing Image Data Converter 1 Download the software from the following URL and install it on your computer Windows http www sony co jp imsoft Win Mac http www sony co jp imsoft Mac Using PlayMemories Home Importing images from your camera Sharing images on PlayMemories Online Uploading images to network services Creating movie discs Viewingimages on Calendar For Windows the following ...

Page 80: ...28M PS 60i 24M FX 50i 24M FX or 24p 24M FX 25p 24M FX setting in Record Setting are converted by PlayMemories Home to create an AVCHD recording disc This conversion can take a long time Also you cannot create a disc with the original image quality If you want to keep the original image quality store your movies on a Blu ray Disc Connect the camera to your computer With Remote Camera Control you ca...

Page 81: ... to install Remote Camera Control Installing Remote Camera Control 1 Using the Internet browser on your computer go to the following URL Windows http www sony co jp imsoft Win Mac http www sony co jp imsoft Mac 2 Follow the instructions on the screen to download and install Remote Camera Control ...

Page 82: ...Refer to it for in depth instructions on the many functions of the camera 1 Access the Sony support page http www sony net SonyInfo Support 2 Select your country or region 3 Search for the model name of your camera within the support page Check the model name on the bottom of your camera ...

Page 83: ...ed Insert a memory card The table below shows the approximate number of images that can be recorded on a memory card formatted with this camera The values are defined using Sony standard memory cards for testing The values may vary depending on the shooting conditions and the type of memory card used When you insert a memory card into the camera and set the power switch to ON the number of images ...

Page 84: ...re images than the numbers shown in the table above except when RAW is selected Capacity Size 2 GB 4 GB 8 GB 16 GB 32 GB 64 GB Standard 280 560 1100 2250 4600 9200 Fine 195 395 800 1600 3200 6400 Extra fine 105 215 435 870 1700 3450 RAW JPEG 54 105 215 435 870 1750 RAW 74 145 295 600 1200 2400 Capacity Size 2 GB 4 GB 8 GB 16 GB 32 GB 64 GB Standard 215 440 890 1750 3550 7000 Fine 145 295 600 1200 ...

Page 85: ...nual 0 Display Quality is set to Standard ILCE 7 High ILCE 7R The number for Shooting still images is based on the CIPA standard and is for shooting under the following conditions CIPA Camera Imaging Products Association Focus Mode is set to Single shot AF Shooting once every 30 seconds The power turns on and off once every ten times The number of images that can be recorded using a battery pack B...

Page 86: ...cording times using a memory card formatted with this camera Memory card formatted with this camera h hour m minute Continuous shooting is possible for approximately 29 minutes a product specification limit The maximum continuous recording time of an MP4 12M format movie is about 20 minutes limited by the 2 GB file size restriction Available recording time for a movie Capacity Record Setting 2 GB ...

Page 87: ...rature inside the camera will rise especially that of the image sensor In such cases the camera turns off automatically since higher temperatures affect the quality of the images or affect the internal mechanism of the camera The duration of time available for movie recording varies with the temperature or condition of the camera before you start recording If you frequently recompose or shoot imag...

Page 88: ...detection system Sensitivity Range 0 EV to 20 EV at ISO 100 equivalent with F2 8 lens Electronic viewfinder Type Electronic viewfinder Total number of dots 2 359 296 dots Frame coverage 100 Magnification 0 71 with 50 mm lens at infinity 1 m 1 diopter Eye Point Approximately 27 mm from the eyepiece 22 mm from the eyepiece frame at 1 m 1 Diopter Adjustment 4 0 m 1 to 3 0 m 1 diopter LCD screen LCD p...

Page 89: ...nd in Auto slow shutter mode 1080 50i compatible device up to 1 50 second in AUTO mode up to 1 25 second in Auto slow shutter mode Flash sync speed ILCE 7 1 250 second ILCE 7R 1 160 second Recording format File format JPEG DCF Ver 2 0 Exif Ver 2 3 MPF Baseline compliant RAW Sony ARW 2 3 format Movie AVCHD format AVCHD format Ver 2 0 compatible Video MPEG 4 AVC H 264 Audio Dolby Digital 2ch equippe...

Page 90: ...iewfinder Approx 3 5 W When using the LCD screen Approx 2 7 W ILCE 7R When using the viewfinder Approx 3 5 W When using the LCD screen Approx 2 7 W Supplied with ILCE 7K Others Exif Print Compatible PRINT Image Matching III Compatible DPOF Compatible Dimensions Approx 126 9 mm 94 4 mm 48 2 mm Approx 5 inches 3 7 10 inches 1 9 10 inches W H D excluding protrusions Mass ILCE 7 Approx 474 g 1 lb 0 7 ...

Page 91: ...ion battery Maximum voltage DC 8 4 V Nominal voltage DC 7 2 V Maximum charge voltage DC 8 4 V Maximum charge current 1 02 A Capacity Typical 7 7 Wh 1 080 mAh Minimum 7 3 Wh 1 020 mAh Maximum dimensions Approx 31 8 mm 18 5 mm 45 mm 1 5 16 inches 3 4 inches 1 13 16 inches W H D Lens FE 28 70 mm F3 5 5 6 OSS Supplied with ILCE 7K Focal length 28 mm 70 mm Lens groups elements 8 9 Angle of view 75 34 M...

Page 92: ...BRAVIA InfoLITHIUM PlayMemories Camera Apps PlayMemories Home PlayMemories Online PlayMemories Mobile AVCHD Progressive and AVCHD Progressive logotype are trademarks of Panasonic Corporation and Sony Corporation Dolby and the double D symbol are trademarks of Dolby Laboratories Microsoft Windows and Windows Vista are registered trademarks of Microsoft Corporation in the United States and or other ...

Page 93: ...yStation are registered trademarks of Sony Computer Entertainment Inc Facebook and the f logo are trademarks or registered trademarks of Facebook Inc YouTube and the YouTube logo are trademarks or registered trademarks of Google Inc Eye Fi is a trademark of Eye Fi Inc In addition system and product names used in this manual are in general trademarks or registered trademarks of their respective dev...

Page 94: ...DISP 38 Drive Mode 35 DRO Auto HDR 71 E Exposure compensation dial 27 Eyepiece sensor 17 F File Format 35 Fn 32 33 Function button 32 33 H Help Guide 82 I Image Data Converter 78 79 In Camera Guide 45 L Language 12 LCD screen 23 M Memory card 51 52 MENU 34 Microphone jack 19 MOVIE 63 MOVIE Button 63 Multi interface shoe 19 N NFC 73 Number of recordable images 83 P PlayMemories Camera Apps 75 PlayM...

Page 95: ...educing camera shake 58 Remote Camera Control 80 S Scene Selection 37 Set the clock 56 Shooting 61 Shooting mode 67 Shooting still images 61 Shoulder strap 20 Software 77 Specifications 88 SteadyShot 58 Still Movie Select 65 V Viewfinder 17 Viewing image 64 W White Balance 36 Wi Fi 9 73 ...

Page 96: ... 2013 Sony Corporation Printed in Thailand Additional information on this product and answers to frequently asked questions can be found at our Customer Support Website ...

Reviews: