background image

14

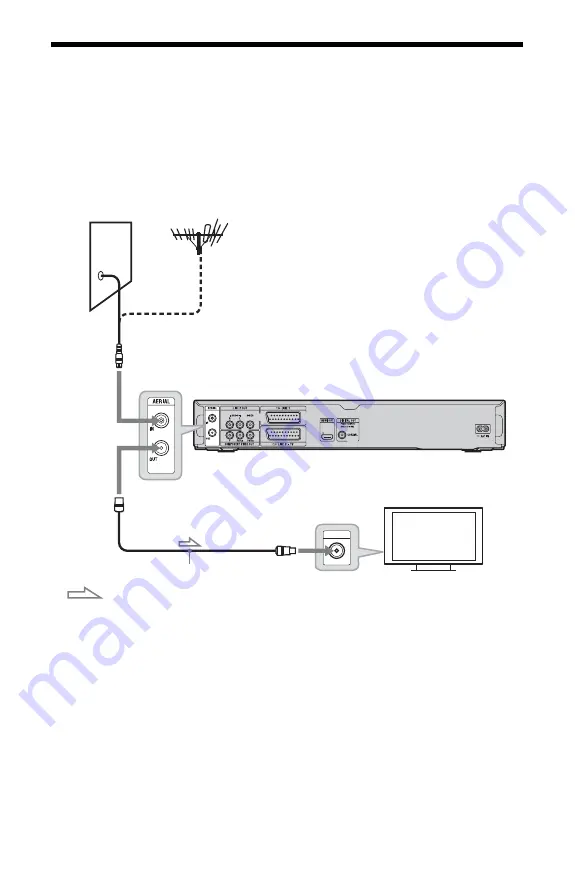
Step 1: Connecting the Aerial Cable

Connect the aerial cable by following the steps below.
“Standby Mode” is set to “Mode 1” (default) in the “System 1” setup and the picture does not 
appear on the TV when the recorder is in standby mode.
To watch TV in standby mode, set “Standby Mode” to “Mode 2” in “Step 5: Easy Setup” 
(page 21) 
or use a splitter to divide aerial input signals between the TV and the recorder.

z

You can also set “Standby Mode” to “Mode 2” in the “System 1” setup (page 72).

1

Disconnect the aerial cable from your TV, and connect it to AERIAL IN on the rear 
panel of the recorder.

2

Connect AERIAL OUT of the recorder to the aerial input of your TV using the supplied 
aerial cable.

DVD recorder

TV

to aerial input

to AERIAL OUT

to AERIAL IN

Aerial cable (supplied)

: Signal flow

Wall

Summary of Contents for 4-151-079-11(1)

Page 1: ...4 151 079 11 1 2010 Sony Corporation RDR HDC100 HDC300 HDC500 DVD Recorder Operating Instructions ...

Page 2: ...countries with separate collection systems Precautions This equipment has been tested and found to comply with the limits set out in the EMC Directive using a connection cable shorter than 3 metres On safety Should any solid object or liquid fall into the cabinet unplug the recorder and have it checked by qualified personnel before operating it any further About the hard disk drive The hard disk h...

Page 3: ...in a horizontal position only Keep the recorder and discs away from equipment with strong magnets such as microwave ovens or large loudspeakers Do not place heavy objects on the recorder On recording Make trial recordings before making the actual recording On compensation for lost recordings Sony is not liable and will not compensate for any lost recordings or relevant losses including when record...

Page 4: ...he same or similar names as those on the remote The on screen display illustrations used in this manual may not match the graphics displayed on your TV screen NEED to know information to prevent incorrect operation is listed under the b icon NICE to know information tips and other useful information is listed under the z icon The explanations regarding DVDs in this manual refer to DVDs created on ...

Page 5: ... Similar Device 23 Connecting to the LINE 1 jack 23 Connecting to the LINE 2 IN jacks on the front panel 25 Using the System Menu 26 Recording a TV Programme to the HDD 27 Using the Quick Timer function 28 Playing the Recorded Programme Title List 28 Watching TV programmes 30 Displaying the programme playback information 31 Using the Favourites List for digital broadcasting only 31 Recording to th...

Page 6: ...and Editing Before Editing 53 Erasing and Editing a Title 53 Erasing a title Erase 53 Erasing a section of a title A B Erase 54 Dividing a title Divide 54 Labelling a title Rename 55 Dubbing HDD y DVD Before Dubbing 56 Dubbing from the HDD to a DVD HDD t DVD 56 Dubbing from a Finalised DVD to the HDD DVD t HDD 58 Playing the Disc on Other DVD Equipment Finalise 59 HDD DV Camcorder Dubbing Dubbing ...

Page 7: ...nguage Settings Language 74 Video Settings Video In Out 75 Audio Input Settings Audio In 77 Audio Output Settings Audio Out 78 Limitation Settings Parental Lock 79 Easy Setup Resetting the Recorder 80 Additional Information Troubleshooting 81 Resetting the Recorder 87 Discs That Can Be Dubbed on 88 Discs That Can Be Played 90 About Recording Mode 91 Language Code List 93 Notes About This Recorder ...

Page 8: ...lects an input source G CLEAR 44 H ZOOM 50 Zooms an image in full view I text 31 This button function is not available in some areas J AUDIO 41 The AUDIO button has a tactile dot SUBTITLE 41 Selects a subtitle language MENU 40 Displays the disc s menu TIMER 36 38 K Red 33 L Green 33 M Yellow 33 N Blue 33 O SYSTEM MENU 26 66 TITLE LIST 28 40 53 TOP MENU 40 GUIDE 33 Displays EPG screen P MARKER 28 4...

Page 9: ...aying status W z REC 27 x REC STOP 27 cz SYNCHRO REC This button function is not available REC MODE 27 Selects the recording mode X TV RADIO 30 Switches between TV and radio channels Y TV 1 on standby 20 TV t input select 20 TV 2 volume 20 TV PROG programme 20 The button has a tactile dot Z TV DVD This button function is not available when connecting your TV using the EURO AV adapter page 15 Use t...

Page 10: ...ects an input source J x REC STOP 27 K z REC 27 L RESET When the recorder does not operate properly press the RESET button M LINE 2 IN S VIDEO VIDEO L MONO AUDIO R jacks 25 Connect a VCR or similar recording device to these jacks N ONE TOUCH DUB 61 64 Starts dubbing from a connected digital video camera O DV IN jack 63 Connect a DV camcorder to this jack P USB jack 45 60 Connect a USB device to th...

Page 11: ... the DVD is selected C Timer indicator 36 Lights up when the timer for recording is set D NTSC indicator 76 Lights up when playing an NTSC disc E Disc type RW lights up when a DVD RW DVD RW disc is loaded R lights up when a DVD R DVD R disc is loaded F Command Mode indicator 73 Displays the current command mode number for the recorder G Recording status H Dubbing direction indicator I Playing stat...

Page 12: ... jacks 16 C LINE 1 jack 23 To connect the EURO AV adapter see page 17 D HDMI OUT jack 15 E DIGITAL OUT COAXIAL jack 16 F AC IN terminal 19 G LINE 3 TV jack 15 To connect the EURO AV adapter see page 17 H COMPONENT VIDEO OUT Y PB CB PR CR jacks 16 Rear panel ...

Page 13: ...tep 3 Connecting the AC power cord Mains Lead on page 19 b See Specifications page 96 for a list of supplied accessories Plug in cables securely to prevent unwanted noise Refer to the instructions supplied with the components to be connected You cannot connect this recorder to a TV that does not have a video input jack Be sure to disconnect the AC power cord mains lead of each component before con...

Page 14: ...2 in Step 5 Easy Setup page 21 or use a splitter to divide aerial input signals between the TV and the recorder z You can also set Standby Mode to Mode 2 in the System 1 setup page 72 1 Disconnect the aerial cable from your TV and connect it to AERIAL IN on the rear panel of the recorder 2 Connect AERIAL OUT of the recorder to the aerial input of your TV using the supplied aerial cable DVD recorde...

Page 15: ...ll enable you to view pictures and listen to sound Use a certified HDMI cable to enjoy high quality digital picture and sound through the HDMI OUT jack When connecting a Sony TV audio component that is compatible with the Control for HDMI function see page 18 When using the HDMI connection no signal is output from the LINE 2 OUT or COMPONENT VIDEO OUT jacks To connect a TV Connecting an audio vide...

Page 16: ...to Progressive in the Video In Out setup to send progressive video signals For details see Component Video Out on page 75 B Video output jack You will enjoy standard quality images To connect to audio jacks Connecting to audio jacks will enable you to listen to sound C Digital audio output jack COAXIAL If your audio component has a Dolby 1 Digital DTS 2 or MPEG audio decoder and a digital input ja...

Page 17: ... the connector is not upside down or tilted 2 Insert the HDMI connector straight into the HDMI jack Do not bend or apply pressure to the HDMI connector b Be sure to disconnect the HDMI cable when moving the recorder Do not press the recorder against the cabinet wall when you place the recorder in a cabinet with the HDMI cable connected It may damage the HDMI jack or the HDMI cable Do not twist the...

Page 18: ...orates High Definition Multimedia Interface HDMI technology HDMI the HDMI logo and High Definition Multimedia Interface are trademarks or registered trademarks of HDMI Licensing LLC By connecting Sony components that are compatible with the Control for HDMI function with an HDMI cable not supplied operation is simplified as below One Touch Play page 41 System Power Off When you turn the TV off usi...

Page 19: ...int it at the remote sensor on the recorder b If the supplied remote interferes with your other Sony DVD recorder or player change the command mode number for this recorder page 73 Use the batteries correctly to avoid possible leakage and corrosion Should leakage occur do not touch the liquid with bare hands Observe the following Do not use a new battery with an old battery or batteries of differe...

Page 20: ...lease the TV 1 button Code numbers of controllable TVs If more than one code number is listed try entering them one at a time until you find the one that works with your TV The remote performs the following Controlling TVs with the remote TV 2 Number buttons TV t TV PROG TV 1 Manufacturer Code number Sony 01 default Grundig 11 Hitachi 24 ITT 15 16 JVC 33 LG Goldstar 76 Loewe 45 Nokia 15 16 69 73 P...

Page 21: ...switch the input selector on your TV so that the signal from the recorder appears on your TV screen 2 Follow the on screen instructions to make each setting and press or to proceed Area Select your area using M m Auto Channel Setting page 69 1 Select a channel type to scan using and press m All Scans both digital and analogue channels Digital Scans only digital channels Analog Scans only analogue ...

Page 22: ...de page 72 Select the mode for when the recorder is turned off Yes Mode 2 Input signals are output when the recorder is in standby mode No Mode 1 No input signals are output when the recorder is in standby mode Manual Clock Setting The recorder sets the clock automatically When the signal cannot be found set the clock manually Set the day month year hour and minutes using M m and press to start th...

Page 23: ... 72 If not the picture will not appear Use the DV IN jack on the front panel if the equipment has a DV output jack i LINK jack page 63 For details refer to the instruction manual supplied with the connected equipment To record on this recorder see Recording from Connected Equipment on page 39 Connect a VCR or similar recording device to the LINE 1 jack of this recorder To connect the EURO AV adapt...

Page 24: ...r and to your TV in the order shown below To watch video tapes watch the tapes through a second line input on your TV If you disconnect the recorder s AC power cord mains lead you will not be able to view the signals from the connected VCR Connect the equipment that outputs only monaural sound to the L MONO and VIDEO input jacks on the front of the recorder LINE 2 IN jack VCR DVD recorder TV Line ...

Page 25: ...onnect the R input jack b Do not connect the yellow LINE IN VIDEO jack when using an S video cable Do not connect the output jack of this recorder to another equipment s input jack with the other equipment s output jack connected to the input jack of this recorder This may cause noise feedback Do not connect more than one type of video cable between the recorder and your TV at the same time Connec...

Page 26: ...t Music List Photo List on the connected USB device page 51 Timer Recording Displays a menu for timer recording Programme Guide Allows you to set a programme to be recorded based on the information provided by the EPG Electronic Programme Guide page 34 Timer List Allows you to set the date time and programme position of the programme manually page 36 HDD Cam DV Displays the Dubbing List HDD Cam Du...

Page 27: ...ress x REC STOP To pause recording Press X pause To resume recording press z REC To change the recording mode for analogue broadcasting only Press REC MODE repeatedly to select the recording mode before recording starts Each time you press the button the display on the TV screen changes as follows For more details about the recording mode see page 91 To watch another TV programme while recording S...

Page 28: ...op recording press x REC STOP Playing the Recorded Programme Title List To play a recorded title select the title from the Title List b The recorder records TV programmes only to the HDD To keep and enjoy programmes as a single DVD record the programmes to the HDD then dub them to a DVD page 56 1 Press HDD or DVD If you select DVD insert a DVD see Playing Discs and Recorded Programmes on page 40 P...

Page 29: ...y Total capacity approx G Icons Title name Recording Date Indicates a protected title NEW Indicates that the title is newly recorded not played back Indicates that the title is recorded using the Update function Genre icons Indicates the title s genre only when the title has genre information You can check each genre icon name See To search for programmes by genre Genre on page 36 Select a title a...

Page 30: ...r DVD recorders It may take a few seconds for the thumbnail pictures to be displayed Depending on the DVD some functions are not available Watching TV programmes 1 Turn on the recorder and your TV Then switch the input selector on your TV so that the signal from the recorder appears on your TV screen 2 Press PROG to select the programme position or input source you want to watch To select a progra...

Page 31: ...title on the HDD A Programme Name Title name B Status information Displays media type status bar elapsed time C Various information depends on the situation D The currently selected function or audio setting appears only temporarily Example Dolby Digital 5 1ch E Channel number The Favourite application gives you the option to Store your favourite channels in one of four TV or four Radio lists Add ...

Page 32: ...move from the Favourites List using M m and press the red button Remove again To scroll the list display by page press To go back to the Favourites List press O RETURN To watch or listen to a favourite channel 1 While watching TV press repeatedly to select a Favourites List To switch the Favourites List to show TV or radio list press TV RADIO 2 Select a channel using M m and press To scroll the Fa...

Page 33: ... period Example of EPG Display A Current Genre Favourites List TV Radio mode B Indicates the currently selected channel number and station name C Indicates the currently selected programme and allows you to move around the list Press the green button Watch to watch the selected programme D Station name E Colour buttons Press the same colour button on the remote REC Watch and Genre F Indicates if a...

Page 34: ...ammes up to 8 days in advance Before you start recording Check that the HDD has enough available space for the recording page 67 You can open up disc space by erasing titles page 53 b The recording destination is HDD only 1 Press GUIDE 2 Select a programme using M m Displays the Favourites List INFO Displays the detailed information of the selected programme Indicates that the programme has parent...

Page 35: ...timer recording even if the start end time of the programme has changed Recording TV Programme Using the EPG After selecting the programme you want to record in the EPG display you can check the detailed settings for the timer You can set the timer for a total of 32 programmes up to 8 days in advance Before you start recording Check that the HDD has enough available space for the recording page 67...

Page 36: ... for EPG timer recording even if the start end time of the programme has changed Setting the Timer Manually Manual You can set the timer for a total of 32 programmes up to 30 days in advance Set the date time and programme position of the programme manually 1 Press INPUT to switch between digital or analogue broadcasting 2 Press TIMER The Timer List display appears 3 Select Add New Timer and press...

Page 37: ...the timer recording cannot be made Even if the timer is set for the same daily or weekly programme the timer recording cannot be made if it overlaps with a programme that has priority will appear next to the overlapped setting in the Timer List Check the priority order of the settings page 38 Even if the timer is set timer recordings cannot be made while recording a programme that has priority The...

Page 38: ...ings 2 Select the timer setting you want to cancel and press the green button Erase 3 Select OK and press To turn off the Timer List Press SYSTEM MENU When the timer settings overlap The programme that starts first has priority and the entire programme is recorded After finishing the previous recording the other recording starts with several tens of second s delay when the end time of one recordin...

Page 39: ...layback pause 5 Press z REC This recorder starts recording 6 Press the pause or play button on the connected equipment to cancel the playback pause status The connected equipment starts playback and the playback image is recorded by this recorder To stop recording press x REC STOP on this recorder If you connect a DV camcorder with a DV IN jack See Dubbing from DV Camcorder on page 63 If you conne...

Page 40: ...e disc tray to prevent it being opened by mistake When the recorder is turned off hold down x stop on the recorder until LOCKED appears in the front panel display The disc tray is locked To unlock the disc tray hold down x stop on the recorder until UNLOCKED appears in the front panel display b When the Child Lock cannot be set check that Front Panel Display is set to On default in the System 2 se...

Page 41: ...DMI to On default in the System 1 setup page 72 Various video playback options Buttons Operations AUDIO Selects one of the audio tracks recorded on the disc when pressed repeatedly For DVD VIDEOs or digital TV programmes recorded on the HDD selects the language For DVD RWs DVD Rs VR mode or analogue TV programmes recorded on the HDD selects the main or sub sound SUBTITLE Selects a subtitle languag...

Page 42: ...rt while to start playback z You can record the programme for up to 3 hours b Paused titles are not saved to the HDD This function is cancelled when x stop is pressed PROG is pressed DVD is pressed SYSTEM MENU is pressed TITLE LIST is pressed INPUT is pressed the recorder is turned off a timer recording is started Z open close is pressed Chase Play allows you to view the recorded part of a program...

Page 43: ... or For example Time Search To find a scene at 2 hours 10 minutes and 20 seconds enter 21020 If you make a mistake select another number 4 Press Playback starts from the selected number To close the Play Mode menu Press INFO O RETURN or SYSTEM MENU To make a favourite scene HDD only You can have the recorder store specific portions of the title in memory and play immediately whenever you want Up t...

Page 44: ...peatedly cancel the PBC functions by pressing TITLE LIST before step 1 b Set the start and stop points for Repeat A B within the same title Sections shorter than 7 seconds cannot be set for Repeat A B To change the angles 1 Press INFO during playback to select Angle 2 Change the angles using and press b You can change the angles only when multi angles are recorded on the DVD To play a DVD Playlist...

Page 45: ... press MARKER A check mark appears by the selected item To clear the check mark press MARKER again To select unselect all items press the yellow button Selection repeatedly To change the item order press the green button Sort to select Name Size or Date for photo files only and press 9 Repeat step 8 to select all the folders or files tracks you want to copy When you do not select a destination fol...

Page 46: ...m Menu appears 3 Select Media and press 4 Select Video DivX and press The DivX List appears Options applicable only to the selected media are displayed Example HDD A Media type HDD DVD CD or USB B Current folder file name and file size C Colour buttons Press the same colour button on the remote Red button Edit Allows you to erase copy folders files etc Green button Sort Sorts folders files by name...

Page 47: ...rrent file 4 Press Repeat play starts To cancel repeat play select Off in step 3 or press CLEAR Buttons Operations AUDIO Selects one of the audio tracks recorded on the disc when pressed repeatedly SUBTITLE Selects a subtitle language when pressed repeatedly When a DivX file contains subtitles you cannot select subtitles in other files instant replay instant advance Replays the scene briefly fast ...

Page 48: ...ge 49 etc Green button Sort Sorts files by name or size Yellow button Play Mode Allows you to set play mode Repeat Play or Shuffle Play Blue button Media Switches the list to the Title List DivX List or Photo List D Scroll bar Appears when all of the folders tracks files do not fit on the list To view the hidden folders tracks files press M m E Track file number Total number of tracks files F Fold...

Page 49: ...to select all of the files you want to add to the Playlist 4 Press the red button Save The Playlist is saved and the display switches to the Playlist To go back to the Music List press the blue button Music List Notes on playing discs with a DTS sound track DTS audio signals are output only through the DIGITAL OUT COAXIAL jack or HDMI OUT jack When you play a disc with DTS sound tracks set DTS to ...

Page 50: ... the current image press N To go back to the Photo List press O RETURN z When you select photo files using the MARKER button only the selected photo files are played in full view or slideshow b Thumbnail images of some photo files may not be displayed For DVD camcorder video files containing JPEG image files and movies the recorder can play only the movie sections To scroll the list display by pag...

Page 51: ...ll also be applied next time you play a slideshow To play a slideshow without the sound set BGM to Off To display the photo information 1 Press DISPLAY in full view or slideshow Photo file name and number are displayed The colour buttons are also displayed 2 Press the corresponding colour button to rotate the photo adjust the speed of the slideshow etc 3 Press DISPLAY again to turn off the informa...

Page 52: ...he red button Start Copy The items are copied to the disc To play the disc on other DVD equipment finalise the disc For details see steps 2 to 7 of Playing the Disc on Other DVD Equipment Finalise on page 59 z To format DVD RWs DVD Rs see page 66 b You cannot copy files on the HDD to USB devices You cannot copy files to a recordable DVD that has been recorded using other recorders devices DATA DVD...

Page 53: ...on Edit The sub menu appears 3 Select an option and press You can make the following edits to the title Erase Erases the selected titles page 53 Dubbing Displays the Dubbing List page 56 Rename Allows you to change the title name page 55 Protection Protects the selected titles appears next to the protected titles A B Erase Erases a section of the title page 54 Divide Divides a title into two title...

Page 54: ... to exit To cancel A B Erase Press O RETURN The Title List appears b Images or sound may be momentarily interrupted at the point where you erase a section of a title Sections shorter than about 3 seconds may not be erased If you want to dub a long title to a disc but do not want to reduce the picture quality divide the title into two shorter titles Note that dividing a title cannot be undone 1 Pre...

Page 55: ...rs at the input row To insert a space select the empty key and press To switch between alphabets and symbols press the green button ABCabc Symbols To erase a character move the cursor to the right of the character at the input row and press the red button Back Space To insert a character move the cursor to the right of the point where you want to insert the character Then select the character and ...

Page 56: ...ee Dubbing restriction on page 92 No other operations are available during dubbing Timer recordings do not start while dubbing Before you start dubbing check the Timer List for any timer recordings that are due to start during a dubbing Depending on the DVD the aspect ratio may change when the title is dubbed Dubbing from the HDD to a DVD HDD t DVD You can select the titles you want to dub at 1 sp...

Page 57: ... exceed the maximum dubbing speed of this recorder even when using discs that support higher dubbing speeds In addition depending on the disc condition the recorder may be unable to dub at the maximum dubbing speed To display dubbing information While dubbing at 1 speed the dubbing information is displayed all the time While dubbing at high speed or when dubbing information is not displayed press ...

Page 58: ...ss the yellow button Selection to select Select All or Unselect All and press 8 Repeat step 7 to select all of the titles you want to dub 9 Press the red button Start Dub The dubbing mode list appears 10Select a dubbing mode using M m and press Dubbing starts z When you dub a Playlist title it is recorded as an Original title When you select Original in step 10 titles are dubbed in the same mode a...

Page 59: ... damage the dubbed contents Finalising is unnecessary Finalising is unnecessary when playing a disc on VR format compatible equipment After finalising you cannot edit or dub on the disc However a disc finalised on this recorder can be edited again if you unfinalise page 67 or reformat page 66 the disc Note that if you reformat the disc all dubbed contents will be erased Even if your other DVD equi...

Page 60: ...recorder does not support the AVCHD format HD high definition image quality You can dub MPEG 2 format images SD standard definition images only When the HDD camcorder contains still images and moving images only moving images can be dubbed to the recorder Playlist made with the HDD camcorder cannot be dubbed to the recorder When dubbing from the HDD camcorder the recorder recognises and uses the s...

Page 61: ...ng from the HDD camcorder for the first time all of the contents are dubbed to the recorder The next time only newly shot sessions that have not been dubbed yet are dubbed to the recorder Follow steps 1 to 3 of Preparing for HDD camcorder dubbing on page 61 and press ONE TOUCH DUB on the recorder The recorder starts dubbing the contents on the HDD camcorder to the HDD Title List of the recorder To...

Page 62: ...der you want to dub to the recorder using M m and press MARKER A check mark appears next to the selected item To clear the check mark press MARKER again To select unselect all items press the yellow button Selection to select Select All or Unselect All and press To preview a scene without sound press To exit the preview press x stop 7 Repeat step 6 to select all of the scenes folders you want to d...

Page 63: ...s straightforward because the recorder will fast forward and rewind the tape for you you do not need to operate your DV camcorder Refer as well to the instruction manual supplied with the DV camcorder before connecting b You cannot make a recording while DV camcorder dubbing The DV IN jack is for input only It will not output signals You cannot use the DV IN jack when signal input to the DV IN jac...

Page 64: ...em Set Input Colour System in the Video In Out setup to the same colour system as the DV tape contents system page 76 When dubbing bilingual titles on the DV Digital8 format tape set Bilingual Recording to either A L default or B R in the Audio In setup page 77 Do not connect or disconnect any cables while dubbing You can dub the entire contents of a DV Digital8 format tape to the HDD with a singl...

Page 65: ...e recorder pauses dubbing 8 Press N and repeat steps 5 to 7 to dub more scenes 9 Select REC Stop and press The selected scenes are dubbed as a single title To exit DV Dubbing Press SYSTEM MENU b You cannot set a scene to be shorter than one second The recorder will pause recording when there is a blank space or an image containing copy protection signals or signals in a different colour system fro...

Page 66: ...he following functions Example When a DVD RW VR mode is inserted 1 Disc Name 2 Used Space Remain approximate Displays used remaining time of the disc in current recording mode example SP mode 3 Disc Protection Displays whether protection is set 4 Disc Type 5 Format Type Displays the recording format 6 Disc setting buttons Available settings differ depending on the disc type Finalise page 59 Unfina...

Page 67: ...ecorder 1 Select Unfinalise and press 2 Select Yes and press The recorder starts unfinalising the disc Unfinalising may take several minutes 3 Press SYSTEM MENU to exit FormattingtheHDD HDD Formatting You can check used remaining space of the HDD and use the following functions A Used Space Remain approximate Displays used remaining time in current recording mode example DR mode and used remaining...

Page 68: ...lt settings are underlined Clock Setting The recorder will automatically set the clock when any digital channels have been scanned and stored Turns on the Auto Clock Set function when a programme position in your local area broadcasts a time signal Select On and press If the recorder does not receive a time signal from any station select Off and set the clock manually Set the day month year hour a...

Page 69: ...rdingly When you want to set Frequency and Band width manually select the item using M m and change the settings using or number buttons 2 Select Start using M m and press The recorder starts scanning the digital channels 3 Select Yes and press To cancel scanning Press O RETURN When a result display appears select Yes to save the result Allows you to disable enable or arrange the digital channels ...

Page 70: ...ct the channel and press the green button Erase To change the channel order see Digital Channel List on page 69 CH System Select the region to get the best broadcast reception Channel Press repeatedly until the channel you want is displayed To select a cable or satellite channel press until the channel you want is displayed Receivable channels Tuner channels Analog Manual Setting AU Select this FR...

Page 71: ...lt Allows you to select whether or not to update the channel list automatically to the latest 41 AS41 42 AS42 43 AS43 44 AS44 45 AS45 46 AS46 47 AS47 48 AS48 49 AS49 50 AS50 51 AS51 52 AS52 53 AS53 54 AS54 55 AS55 56 AS56 57 AS57 58 AS58 59 AS59 60 AS60 61 AS61 62 AS62 63 AS63 64 AS64 65 AS65 66 AS66 67 AS67 68 AS68 69 AS69 Channel Set number Channel On Turns on the Auto Fine Tuning function Norma...

Page 72: ...recorder page 14 Mode 2 When the recorder is turned off input signals from the LINE 1 jack are output from the LINE 3 TV jack and aerial input signals are output to the connected TV The standby power consumption is higher than that of Mode 1 Auto Power off On The recorder automatically turns off when you do not press any buttons for 6 hours in stop mode The display asks for confirmation about one ...

Page 73: ...er Settings System 2 You can check the current software version of the built in digital tuner and keep it up to date with the latest software b Do not turn off the recorder during updating the software Resets the date and time for One Touch Dubbing from HDD camcorder The recorder will dub all of the contents on the HDD camcorder next time you press the ONE TOUCH DUB button The display asks for con...

Page 74: ...you selected for the sound track z If you select Others in DVD Menu DVD Audio or DVD Subtitle press and enter a language code from Language Code List on page 93 b If you select a language that is not recorded on the DVD VIDEO one of the recorded languages will be automatically selected Front Panel Display On Bright lighting Off Turns off the lighting and saves power consumption when the power is o...

Page 75: ...ssive format hold down x stop on the recorder and press Z open close on the recorder Selects a method of outputting video signals for the LINE 3 TV jack and a method of inputting video signals for the LINE 1 jack Select Video Video RGB default when using the EURO AV adapter page 17 The picture will not be clear if this setting does not match the type of video input signal TV Type 16 9 Select this ...

Page 76: ... HDMI Resolution is set to 576p Selects the method of outputting video signals for the HDMI jack b Some settings may not be available depending on the connected device Input Colour System Auto Recorder automatically detects signals of colour systems and selects the appropriate colour system PAL Selects the PAL colour system SECAM Selects the SECAM colour system HDMI Resolution Auto 1080p Normally ...

Page 77: ... from the DV input jack the recorder automatically selects Stereo or Bilingual regardless of the External Audio setting NICAM Select NICAM Normally select this position Standard Select this if the sound from NICAM broadcasts is not clear Bilingual Rec Mode HDD On When recording bilingual programmes both main and sub sounds can be recorded Off When recording bilingual programmes only one sound trac...

Page 78: ...I OUT jack is connected to equipment not compatible with MPEG audio signals the PCM signals will be automatically output even when you select MPEG Dolby Digital HDD DVDs only Dolby Digital Select this when the recorder is connected to an audio component with a built in Dolby Digital decoder PCM Select this when the recorder is connected to an audio component without a built in Dolby Digital decode...

Page 79: ... that exceeds the set level your password is required 1 Select a block level and press All All block t G General t PG Parental Guidance Recommended t M Mature Audience 15 t MA Mature Adult Audience 15 t AV Adult Audience Strong violence 15 t R Restricted 18 t Off 2 Enter your four digit password using the number buttons To cancel the setting select Off default in step 1 Playback of some DVD VIDEOs...

Page 80: ... Enter your four digit password using the number buttons then enter a new password b If you forgot your password reset the recorder page 87 Easy Setup Resetting the Recorder Select this to run the Easy Setup programme Follow the instructions for Easy Setup page 21 Change Password ...

Page 81: ... Switch the input selector on your TV such as to VCR and AV 1 so that the signal from the recorder appears on the TV screen Check that the Video In Out setup is set to the appropriate item that conforms to your system page 75 If you connect the recorder to your TV via only the COMPONENT VIDEO OUT jacks set Component Video Out in the Video In Out setup to Progressive page 75 Set Standby Mode to Mod...

Page 82: ...rength using the blue button Signal in Digital Channel List in the Channel setup page 69 Check aerial installation TV programme pictures are distorted Reorient the TV aerial Adjust the picture refer to the TV s instruction manual Place the recorder and TV farther apart Place the TV and any bunched aerial cables farther apart The aerial cable is connected to the AERIAL OUT jack on the recorder Conn...

Page 83: ...lowing 1Turn the recorder off and on again 2Turn the connected equipment off and on again 3Disconnect and then connect the HDMI cable again The HDMI OUT jack is connected to a DVI device DVI jacks do not accept audio signals The equipment connected to the HDMI OUT jack does not conform to the audio signal format In this case set HDMI Audio to PCM in the Audio Out setup page 79 Sound is noisy Audio...

Page 84: ...er setting overlapped the timer setting page 38 There is not enough disc space for the recording The recorder was in the process of dubbing Recording does not stop immediately after you press x REC STOP It will take a few seconds for the recorder to input disc data before recording can stop Recording does not stop after you press x Press x REC STOP Timer recording is not complete or did not start ...

Page 85: ...nging the language using the DVD VIDEO s menu After you have changed the language for the DVD menu remove and insert the DVD again to apply the change The angles cannot be changed Multi angles are not recorded on the DVD being played The DVD prohibits changing angles Try changing the angle using the DVD s menu The angles cannot be changed for the titles recorded on this recorder The DivX video fil...

Page 86: ...the recorder and remote Set the same command mode page 73 The default command mode setting for this recorder and the supplied remote is 3 You can check the current command mode in the front panel display page 11 The batteries are weak The remote is too far from the recorder The remote s manufacturer code returned to the default setting when you replaced the batteries Reset the code page 20 The rem...

Page 87: ...is activated E01 appears in the front panel display There is a problem in the HDD Contact your nearest Sony dealer Note that contents on the HDD may be erased when servicing this unit E02 appears in the front panel display The HDD information is incorrect You cannot make a new recording to the HDD Format the HDD following the instructions of Format in HDD Formatting page 67 Note that all of the re...

Page 88: ...on VR mode compatible players finalisation unnecessary Video mode Format in Video mode page 66 Playable on most DVD players finalisation necessary page 59 DVD R Format in VR mode DVD R VIDEO Playable on most DVD players finalisation necessary page 59 DVD R DL DVD R VR mode Format in VR mode Playable only on DVD R in VR mode compatible players finalisation necessary page 59 DVD R DL Video mode Form...

Page 89: ...annot record TV programmes or contents on connected equipment directly to a disc You cannot mix VR mode and Video mode on the same DVD RW To change the disc s format reformat the disc page 66 Note that the disc s contents will be erased after reformatting It is recommended that you use discs with For Video printed on their packaging In some cases you may not be able to dub titles on discs that con...

Page 90: ...t region code page 91 DVDs that were recorded on a different recorder and not correctly finalised Note on playback operations of DVD VIDEOs VIDEO CDs Some playback operations of DVD VIDEOs VIDEO CDs may be intentionally set by software producers Since this recorder plays DVD VIDEOs VIDEO CDs according to the disc contents the software producers designed some playback features may not be available ...

Page 91: ...f it has not been correctly finalised For more information refer to the operating instructions for the recording device Do not insert any discs that cannot be played on this recorder This may cause the recorder to malfunction About Recording Mode Like the standard 3 recording modes of video tapes you can select the desired recording mode using the REC MODE button Recording modes with higher qualit...

Page 92: ...py protection signal cannot be recorded Titles containing Copy Once copy protection signals can be moved only from the HDD to a DVD RW DVD R VR mode after the title is moved the original title in the HDD is erased The Move function is performed using Dubbing List Discs that can be used for protected signals CPRM compatible DVD RWs DVD Rs VR mode only The dubbed disc can be played only on CPRM comp...

Page 93: ...93 Additional Information Language Code List For details see page 74 The language spellings conform to the ISO 639 1988 E F standard Code Language Code Language Code Language Code Language not specified ...

Page 94: ... powder or solvent such as alcohol or benzine On cleaning discs disc lens cleaners Do not use cleaning discs or disc lens cleaners including wet or spray types These may cause the recorder to malfunction Notes about the discs To keep the disc clean handle the disc by its edge Do not touch the surface Dust fingerprints or scratches on the disc may cause it to malfunction Do not expose the disc to d...

Page 95: ...e JPEG image files that conform to the Exif 2 2 image files format and Y CB CR is 4 4 4 4 2 2 or 4 2 0 DivX video files with the extension avi or divx Exchangeable Image File Format The file format used by digital still cameras b The recorder will play any data with the extension mp3 jpeg jpg avi or divx even if they are not in MP3 JPEG or DivX format Playing these data may generate a loud noise w...

Page 96: ... to this recorder by the i LINK cable DV connecting cable When connecting this recorder to i LINK compatible equipment having two or more i LINK jacks DV jacks refer to the instruction manual of the equipment to be connected i LINK and are trademarks Specifications System Laser Semiconductor laser Transmission standards Digital broadcasting DVB T Channel coverage Digital broadcasting VHF UHF Chann...

Page 97: ...For connecting digital still camera Memory card reader USB memory HDD camcorder and Hard disk drive General Power requirements 220 240 V AC 50 60 Hz Power consumption 44 W Dimensions approx 430 71 5 258 mm width height depth incl projecting parts Hard disk drive capacity RDR HDC100 160 GB RDR HDC300 320 GB RDR HDC500 500 GB Maximum recordable number of titles 999 Mass approx 4 1 kg Operating tempe...

Page 98: ... 74 DATA CD 90 DATA DVD 90 Decoder 71 Digital Channel List 69 Digital Manual Setting 69 Digital Services EPG 33 Disc 44 Disc Information 66 Format 66 Rename 55 Disc settings 59 Disc Setup 59 66 Disc types 88 90 Divide 54 DivX video files 46 DivX Registration 73 Dolby Digital 16 78 DRC 79 DTS 16 78 Dubbing 53 Dubbing dubbing format 88 from a finalised DVD to the HDD 58 from the HDD to a DVD 56 Move...

Page 99: ...slow motionplay 42 47 zoom 50 Playlist 44 Progressive 22 Protection 53 Protection title 53 Q Quick Timer 28 R Rear panel 12 Recording recording mode 91 recording time 91 while watching another programme 27 Recording mode 91 Recording time 91 Region code 91 Remote 8 19 Rename 53 55 Repeat 43 Repeat Folder 47 Title 47 Resetting the recorder 80 87 Resume Off 42 Resume Play 42 S Scan Audio 41 Searchin...

Page 100: ...on Printed in Malaysia U Unfinalise 67 Unselect All 53 Usable discs 88 90 USB 61 V Version 73 Video cable 15 VIDEO CD 90 Video In Out 75 Video mode 88 Video output 16 Visual Search 30 VR mode 88 Z Zoom 50 ZWEITON 37 ...

Reviews: