background image

17

Ho
oku

p

s a

nd 
Set
tings

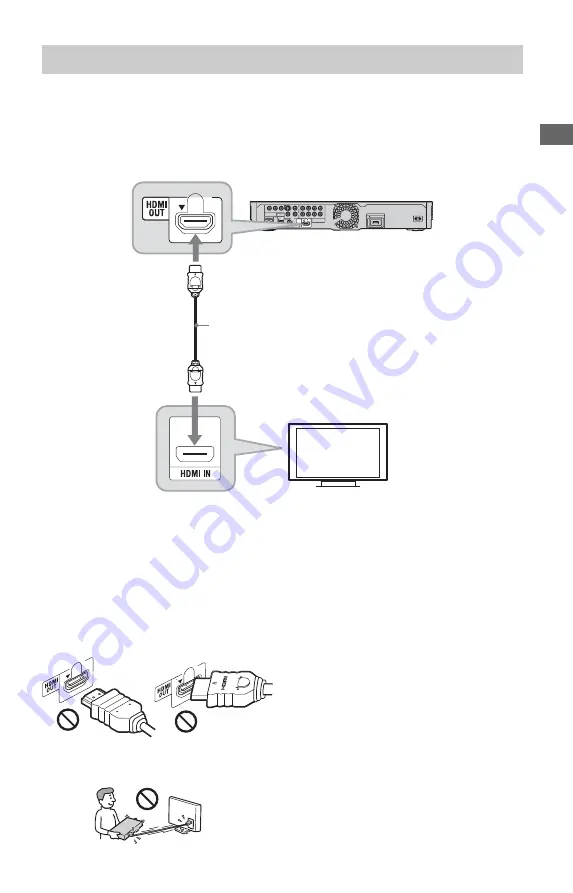
Connect the player and your TV using an HDMI cable to enjoy high quality digital pictures and 
sound through the HDMI OUT jack.
If you connect a Sony TV that is compatible with the “Control for HDMI” function (page 18), 
refer to the instruction manual supplied with the TV.
If you connect a 1080/24p- or 1080p-compatible TV, use a High Speed HDMI cable.

Notes on connecting to the HDMI OUT jack

Observe the following as improper handling 
may damage the HDMI OUT jack and the 
connector.
• Carefully align the HDMI OUT jack on the 

rear of the player and the HDMI connector 
by checking their shapes. Make sure the 
connector is not upside down or tilted.

• Be sure to disconnect the HDMI cable when 

moving the player.

• Do not press the player against the cabinet 

wall when you place the player in a cabinet 
with the HDMI cable connected. It may 
damage the HDMI OUT jack or the HDMI 
cable.

• When connecting or disconnecting, do not 

screw in or rotate the HDMI connector.

About indicators for HDMI connection

When the connected HDMI-compatible 
component is recognised, the HDMI 
indicator lights up in the front panel display.

Connecting to an HDMI jack

Blu-ray Disc/DVD player

HDMI cable (not supplied)

TV

,

continued

Summary of Contents for 4-145-650-11(1)

Page 1: ...ful hints tips and information about Sony products and services please visit www sony europe com myproduct The software of this player may be updated in the future To find out details on any available updates please visit For customers in European countries http support sony europe com For customers in Australia http www sony asia com support ...

Page 2: ...consequences for the environment and human health which could otherwise be caused by inappropriate waste handling of this product The recycling of materials will help to conserve natural resources For more detailed information about recycling of this product please contact your local Civic Office your household waste disposal service or the shop where you purchased the product For customers in Aus...

Page 3: ...ens cleaning disc A disc that has a non standard shape e g card heart A disc with a label or sticker on it A disc that has cellophane tape or sticker adhesive on it Do not resurface the playing side of a disc to remove surface scratches Precautions This equipment has been tested and found to comply with the limits set out in the EMC Directive using a connection cable shorter than 3 metres On safet...

Page 4: ...pull on the AC power cord mains lead itself On adjusting volume Do not turn up the volume while listening to a section with very low level inputs or no audio signals If you do your ears and the speakers may be damaged when a peak level section is played On cleaning Clean the cabinet panel and controls with a soft cloth Do not use any type of abrasive pad scouring powder or solvent such as alcohol ...

Page 5: ...this document If you have any questions or problems concerning your player please consult your nearest Sony dealer Notice for the customers in Europe This product is intended to be used in the following countries AD AL AT BA BE BG CH CY CZ DE DK EE ES FI FR GB GR HR HU IE IS IT LI LT LU LV MC MD ME MK MT NL NO PL PT RO RS SE SI SK SM TR VA IMPORTANT NOTICE Caution This player is capable of holding...

Page 6: ...y use of the WLAN feature of this BDP S760 outside of the buildings is prohibited on the French territory Please make sure that the WLAN feature of this BDP S760 is disabled before any use outside of the buildings ART Decision 2002 1009 as amended by ART Decision 03 908 relating to radio frequencies use restrictions ...

Page 7: ...egistration Order of 2006 P I 6A 2006 is the General Authorization for the use of Radiofrequencies by Radio Local area Networks and by Wireless Access Systems including Radio Local Area Networks WAS RLAN Notice for the customers in Norway Use of this radio equipment is not allowed in the geographical area within a radius of 20 km from the centre of Ny Ålesund Svalbard About this manual In this man...

Page 8: ...al Memory 26 Step 4 Connecting to the Network 27 Step 5 Connecting the Mains Lead 29 Step 6 Preparing the Remote 29 Controlling TVs with the remote 30 Step 7 Easy Setup 31 Step 8 Setting Wireless LAN 33 Setting wireless LAN Automatic registration WPS 33 Setting wireless LAN Access point scan 34 Playback Playing BDs DVDs 36 Using the BD s or DVD s menu 38 Enjoying BONUSVIEW BD LIVE 38 Searching for...

Page 9: ...nformation Troubleshooting 69 Self Diagnosis Function 73 Playable Discs 74 Video Output Resolution 76 Audio Output Signals and Player Settings 77 About Wireless LAN Security 78 Specifications 79 Language Code List 80 Parental Control Area Code 80 Terms and Conditions of Use and End User License Agreement 81 Glossary 83 Index 86 Before operating the player please read Terms and Conditions of Use an...

Page 10: ...ns only when connected to a Sony Theatre Mode compatible AV amplifier receiver or Sony Theatre Mode compatible TV TV 1 on standby page 30 Turns on the TV or sets to standby mode 1 on standby page 31 Turns on the player or sets to standby mode B Number buttons page 40 65 Enters the title chapter numbers etc CLEAR Clears the entry field C TIME page 13 Displays the elapsed remaining playback time in ...

Page 11: ...rses fast forwards the disc when pressed during playback Each time you press the button search speed changes as follows Playback direction M1 10 t M2 30 t M3 120 Reverse direction n 1 t m1 10 t m2 30 t m3 120 When you press and hold the button fast forward fast reverse continues at the selected speed until you release the button Search speed does not change when playing CDs and MP3 audio tracks Sp...

Page 12: ... player is turned on Lights up in blue when playing BDs D Front panel display page 13 E WLAN indicator Lights up when Wireless is selected as a connection method in Internet Settings under the Network Settings setup page 63 F Remote sensor page 29 G N play x stop page 36 Starts or stops playback H Z open close page 36 Opens or closes the disc tray I USB jack page 46 Connect a USB device to this ja...

Page 13: ...D VIDEO Elapsed time of the current title r Remaining time of the current title When playing a CD Elapsed time of the current track r Remaining time of the current track r Elapsed time of the current disc r Remaining time of the current disc Except MP3 audio tracks z T Title or Track C Chapter or D Disc may be displayed depending on the disc F Network connection indicator Lights up when accessing ...

Page 14: ...OUTPUT FRONT L R SURROUND L R SUR BACK L R CENTER SUBWOOFER jacks page 24 E Ventilation holes The ventilation fan is inside the player F EXT slot page 26 G AC IN terminal page 29 H HDMI OUT jack page 17 22 I LINE OUT VIDEO jack page 20 J DIGITAL OUT COAXIAL jack page 23 K DIGITAL OUT OPTICAL jack page 23 L LAN 100 terminal page 27 Rear panel ...

Page 15: ...llowing items Audio video cable phono plug 3 1 for Australian model only Mains lead 1 Remote commander remote 1 R6 size AA batteries 2 Follow steps 1 through 8 to hook up and adjust the settings of the player Do not connect the mains lead until you reach Step 5 Connecting the Mains Lead page 29 ...

Page 16: ...To connect to a TV with DVI input Use an HDMI DVI converter cable not supplied The DVI jack will not accept any audio signals so you have to use another audio connection in addition to this connection page 21 Furthermore you cannot connect the HDMI OUT jack to DVI jacks that are not HDCP compliant e g DVI jacks on PC displays Jack type Video resolution Hookup High quality Standard quality Digital ...

Page 17: ...efully align the HDMI OUT jack on the rear of the player and the HDMI connector by checking their shapes Make sure the connector is not upside down or tilted Be sure to disconnect the HDMI cable when moving the player Do not press the player against the cabinet wall when you place the player in a cabinet with the HDMI cable connected It may damage the HDMI OUT jack or the HDMI cable When connectin...

Page 18: ... the optimum video mode for watching movies When connected with a Sony AV amplifier receiver using the HDMI cable the speaker output also switches automatically When connected with a Theatre Mode compatible TV using the HDMI cable the TV s video mode switches to Theatre Mode Press the button again to return to the original setting Language Follow When you change the language for the on screen disp...

Page 19: ...p the Player on page 15 b When you connect the player and TV using a component video cable disconnect the video plug yellow of the audio video cable Connecting to component video jacks Y PB CB PR CR Audio video cable Component video cable not supplied green red blue Signal flow Match the colour of the plug to that of the jack Blu ray Disc DVD player TV Match the colour of the plug to that of the j...

Page 20: ...ing Up the Player on page 15 b When you connect the player and TV using an S video cable disconnect the video plug yellow of the audio video cable Connecting to audio video or S VIDEO jacks Audio video cable Signal flow Match the colour of the plug to that of the jack Blu ray Disc DVD player TV red white yellow yellow red white S video cable not supplied or ...

Page 21: ...ording to the input jacks on your AV amplifier receiver z For correct speaker location refer to the instruction manual supplied with the connected components Jack type Hookup Digital See Connecting to an HDMI jack on page 22 See Connecting to digital jacks OPTICAL COAXIAL on page 23 Analogue See Connecting to 7 1 channel jacks on page 24 See Connecting to audio L R jacks on page 25 continued ...

Page 22: ...mpatible with the Control for HDMI function page 18 refer to the instruction manual supplied with the AV amplifier receiver 1 Connect the HDMI OUT jack of the player and your AV amplifier receiver 2 Set BD Audio Setting to Direct in the Audio Settings setup page 57 To enjoy the secondary audio commentary set BD Audio Setting to Mix Connecting to an HDMI jack AV amplifier receiver Blu ray Disc DVD ...

Page 23: ...r DTS 2 decoder and a digital input jack you can enjoy Dolby Digital 5 1ch Dolby Pro Logic 4 0ch or DTS 5 1ch surround effects 1 Connect the digital jack of the player and your AV amplifier receiver 2 Set Audio Output Priority to Coaxial Optical in the Audio Settings setup page 54 3 Make the appropriate settings in Dolby Digital and DTS under the Audio Settings setup page 57 Otherwise no sound or ...

Page 24: ...hannel surround sound 1 2 Connecting to 7 1 channel jacks AV amplifier receiver Blu ray Disc DVD player Stereo audio cable not supplied Monaural audio cable not supplied Signal flow Stereo audio cable not supplied Stereo audio cable not supplied Monaural audio cable not supplied ...

Page 25: ...54 3 Make the appropriate settings in Speaker Settings under the Audio Settings setup page 54 If your AV amplifier receiver only has L and R audio input jacks use this connection See Hooking Up the Player on page 15 Connecting to audio L R jacks AV amplifier receiver Audio video cable Signal flow Blu ray Disc DVD player white red white red Match the colour of the plug to that of the jack ...

Page 26: ...ntally swallowing the external memory Do not apply too much pressure to the external memory in the slot as it may cause a malfunction We recommend use of the Sony USM2GL available as of April 2009 Other USB flash devices may support this function However we cannot guarantee compatibility with all USB flash memories When inserting a USB flash memory check the insertion direction before inserting it...

Page 27: ...wireless LAN router access point Wi Fi Protected Setup compatible wireless LAN routers access points may have the logo 3 For details see No Security on page 78 Wireless LAN router access point Settings Security Setting Type Security is set Check the security setting of your connected network on your PC screen Example Windows XP 1 A message with the lock icon indicates that security is enabled Wi F...

Page 28: ... z Using a shielded interface cable LAN cable straight or crossing is recommended To update the player s software using the network See Network Update page 49 and Software Update Notification page 62 b Do not connect a phone line to the LAN 100 terminal as it may cause a malfunction To enjoy the BD LIVE function See Enjoying BONUSVIEW BD LIVE on page 38 b To enjoy the BD LIVE function we recommend...

Page 29: ...ensor on the player page 12 b Use the batteries correctly to avoid possible leakage and corrosion Should leakage occur do not touch the liquid with bare hands Observe the following Do not use a new battery with an old battery or batteries of different manufacturers Do not attempt to recharge the batteries If you do not intend to use the remote for an extended period of time remove the batteries If...

Page 30: ... number previously entered will be erased 1 While holding down TV 1 enter the TV s manufacturer code using the number buttons For instance to enter 09 press 0 then 9 Code numbers of controllable TVs If more than one code number is listed try entering them one at a time until you find the one that works with your TV 2 Release TV 1 Controlling TVs with the remote Buttons Operations TV 1 Turns your T...

Page 31: ...splay for OSD language selection appears If the display for OSD language selection does not appear Press HOME and select Easy Setup in the Setup setup page 67 Then select Start and press ENTER 4 Select a language for the on screen displays using M m and press ENTER The initial settings message appears 5 Select Start and press ENTER 6 Select the cable type used to connect the player and your TV and...

Page 32: ...bout 30 seconds For the test screen see When you select HDMI in step 6 above b If no picture appears press RETURN to return to the previous screen and change the resolution setting 2Select Finish and press ENTER The display asks for confirmation 3Select OK or Cancel and press ENTER When you select Video or S Video in step 6 Select an aspect ratio that matches your TV and press ENTER Select 16 9 wh...

Page 33: ...djusting the settings of the wireless LAN router access point In this case you may need to change the wireless settings of your PC accordingly For details refer to the instruction manual supplied with the wireless LAN router access point 1 Follow steps 1 and 2 of Step 4 Connecting to the Network on page 27 2 Press HOME 3 Select Setup using 4 Select Internet Settings in Network Settings and press E...

Page 34: ...13Select Finish and press ENTER 14Check the settings and select Finish then press ENTER The message Settings are complete appears If an error message appears in the network diagnostic results check the message Then set the network settings again or perform the network diagnostic again Use the following procedure when you connect the player to a wireless LAN router access point that is Wi Fi Protec...

Page 35: ...ess in step 12 you cannot check the characters on the screen 12Press b The WEP or WPA key is displayed as 8 asterisks no matter how many characters you enter 13Select Auto Acquisition and press ENTER If you use a static IP address select Manual For details see Network Settings on page 63 14Select Auto and press ENTER If you specify a DNS server select Manual For details see Network Settings on pag...

Page 36: ...layer appears on your TV screen 2 Press Z and place a disc on the disc tray 3 Press Z to close the disc tray When you insert a commercially available BD ROM or DVD VIDEO playback automatically starts depending on the disc DVD BD x OPTIONS N M m ENTER HOME Number buttons X Z Playing side facing down ...

Page 37: ...n the player or you remove the external memory for BD ROMs The player may not resume playback depending on the disc or stop point To play restricted BDs or DVDs Parental Control When you play a restricted BD change the BD Parental Control setting in the BD DVD Viewing Settings setup page 59 When you play a restricted DVD the display for entering your password appears on the screen Enter your four ...

Page 38: ... external memory not supplied into the EXT slot on the rear of the player The external memory is used as the local storage Make sure that the external memory is properly inserted into the player page 26 4 Connect the player to a network page 27 5 Turn the player on 6 Set BD Internet Connection to Allow in the BD DVD Viewing Settings setup page 60 Items Details Headphones Type Selects the headphone...

Page 39: ...disc if you delete the Shared Cache Data Depending on the BD ROM the disc name may not be displayed You can move quickly between scenes within the title currently being played back 1 Press SCENE SEARCH during playback or in pause mode Playback pauses and a bar with a scene indicator appears at the bottom of the screen 2 Move the scene indicator to the scene you are searching for using or m M The s...

Page 40: ...R After a while the player starts playback from the selected number You can check the title information including the video transmission rate etc Press DISPLAY The displayed information differs depending on the disc type and player status Example when playing a BD ROM A The current selected angle B Title number or name C The currently selected audio setting D Available functions angle audio subtit...

Page 41: ...er HDMI in step 3 above and press ENTER 2 Select an item and press ENTER Adjusting pictures and sound for videos Items Details PictureQuality Mode Standard Brighter Room Theatre Room Memory Selects the picture settings for different lighting environments Video Equaliser This setting is selectable when Picture Quality Mode is set to Memory see Video Equaliser elements on page 41 HD Reality Enhancer...

Page 42: ...EVEL during playback to adjust the headphone volume The headphone volume bar appears on the screen when pressing PHONE LEVEL b When Audio Output Priority is set to other than Headphones in the Audio Settings setup Surround 2ch will appear on the screen when SURROUND is pressed To enjoy higher quality surround sound set Audio Output Priority to Headphones in the Audio Settings setup page 54 When yo...

Page 43: ...N Available OPTIONS 1 Press OPTIONS The options menu appears 2 Select an item using M m and press ENTER The available items differ depending on the situation Various music playback operations DATADVD DATABD 2 DATA CD 3 1 CD Items Details Headphones Type Selects the headphones type page 42 Play Plays the selected track Play from start Plays the current track from the beginning music CDs only Stop S...

Page 44: ...racks recorded in monaural MP3 albums tracks recorded on BD Rs in any format other than UDF Universal Disk Format 2 6 MP3 albums tracks recorded on BD REs in any format other than UDF Universal Disk Format 2 5 The elapsed time of some MP3 audio tracks may not be displayed correctly Playing Photo Files 1 BD REs BD Rs containing JPEG image files 2 DVD ROMs and DVD RWs DVD Rs DVD RWs DVD Rs containin...

Page 45: ...ormat other than UDF Universal Disk Format 2 5 The following photo files or folders cannot be displayed in the file list or folder list photo files that have an extension other than jpeg or jpg photo files that have an extremely long name photo folders in the 5th tree and photo files folders in the 6th tree or lower 501th or more folders when the total number of folders and files in a single tree ...

Page 46: ... Some USB devices may not work with this player The player can recognise Mass Storage Class MSC devices that are FAT compatible and non partitioned and Still Image Capture Device SICD class devices If the MSC devices are partitioned the player may not recognise the devices 2 Press HOME 3 Select Photo using 4 Select USB Device using m and press ENTER The file list or folder list appears 5 Select a ...

Page 47: ...er list appears 5 Select a file or folder using M m and press ENTER When you select a folder select a file in the folder using M m and press ENTER The selected photo file is displayed To play a slideshow press N b The following photo files or folders cannot be displayed in the file or folder list Photo folders in the 10th tree and photo files folders in the 11th tree or lower Folder numbers 1 000 ...

Page 48: ... menu when you need to change the settings of the player 1 Press HOME 2 Select Setup using 3 Select the setup category icon to change using M m and press ENTER For details on setting options and setup category icons see Setting list page 49 Example Video Settings 4 Set the options ...

Page 49: ...stem Settings setup page 62 The Setup settings remain after updating The player informs you of newer software version information when Software Update Notification is set to On default page 62 b Do not disconnect the mains lead or LAN cable while downloading or updating software Any operations including opening the disc tray are not available while updating Downloading times may differ depending o...

Page 50: ...or information about other software update methods visit the following website or consult your nearest Sony dealer or local authorised Sony Service facility For customers in European countries http support sony europe com For customers in Australia http www sony asia com support b Do not disconnect the mains lead while updating Any operations including opening the disc tray are not available while...

Page 51: ...jack or COMPONENT VIDEO OUT jacks using M m and press ENTER When you change the video output resolution the test screen appears for about 30 seconds b If no picture appears press RETURN to return to the previous screen and change the resolution setting 2Select Finish and press ENTER The display asks for confirmation DVD Aspect Ratio Letter Box Displays a wide picture with black bands on the top an...

Page 52: ... BD ROM 1080 24p Output is set to On In this case press HOME to display the home menu and change the BD ROM 1080 24p Output setting Sets the colour setting for video signals output from the HDMI OUT jack Select the setting that matches the connected TV type Auto HDMI only Normally select this The player outputs signals starting from the highest resolution acceptable to the TV 1080p 1080i 720p 480p...

Page 53: ...ible video with a TV that supports x v Colour display makes it possible to more accurately reproduce object colours present in the natural world Sets the picture mode for DVD playback pause status For BD ROMs or discs containing AVCHD files Pause Mode automatically switches to Auto HDMI Deep Colour Output Auto Normally select this 12bit Outputs 12bit video signals 10bit Outputs 10bit video signals...

Page 54: ...TER Size Selects the size of the speakers Front Centre Surround Audio Output Priority HDMI Outputs audio signals from the HDMI OUT jack Coaxial Optical Outputs audio signals from the DIGITAL OUT OPTICAL COAXIAL jack Multi Channel Analogue Select this when connecting an AV amplifier receiver via the MULTI CHANNEL OUTPUT jacks Stereo Analogue Outputs audio signals from the LINE OUT R AUDIO L jacks H...

Page 55: ...re speaker surround speakers surround back speakers and subwoofer Change the Distance setting each time you move the speakers Start from the front speakers Large Normally select this position Small Select this when the speakers cannot reproduce adequate low frequencies None Select this if you do not connect surround back speakers Yes Select this if you connect a subwoofer to output the LFE low fre...

Page 56: ...or example if Front is set to 5 0 metres Surround Back can be set between 0 metre and 5 6 metres Subwoofer 3 0 m Set this within 1 6 metres and 0 6 metre of the Front setting 0 to 15 6 metres 0 2 metre increments For example if Front is set to 1 6 metres Subwoofer can be set between 0 metre and 2 2 metres Front Left Front Right 0 0 dB Adjust the level of the front speakers 12 0 dB to 0 0 dB 0 5 dB...

Page 57: ... from the DIGITAL OUT OPTICAL COAXIAL jack Audio HDMI Auto Normally select this Outputs audio signals according to the status of the connected HDMI device 2ch PCM Downmixes to 2 channel Linear PCM signals before outputting from the HDMI OUT jack BD Audio Setting Mix Outputs the audio obtained by mixing the interactive audio and secondary audio to the primary audio Direct Outputs the primary audio ...

Page 58: ...D when Audio Output Priority is set to HDMI Multi Channel Analogue Stereo Analogue or Headphones Sets the downmix method of multi channel to two channel sound b Downmix has no effect on the bitstream audio output from the DIGITAL OUT OPTICAL COAXIAL HDMI OUT jack Audio DRC Auto Performs playback at the dynamic range specified by the disc BD ROM only Other discs are played back at the Standard leve...

Page 59: ...Select OK and press ENTER 4 Select the age restriction and press ENTER The lower the value the stricter the limitation If you select Select Age Restriction you can enter the age from 0 to 255 using M m or the number buttons To cancel the Parental Control setting select No Restrictions z You can change the password see Password on page 60 b If you forget the password reset the player page 68 and se...

Page 60: ... new password see Password on page 60 When you play discs which do not have the Parental Control function playback cannot be limited on this player Depending on the disc you may be asked to change the Parental Control level while playing the disc In this case enter your password then change the level Sets or changes the password for the Parental Control function A password allows you to set a rest...

Page 61: ...tart Mode is set to Off and the ventilation fan may turn on depending on the surrounding temperature Slideshow Speed Fast Photos change rapidly Normal Photos change at normal speed Slow Photos change slowly OSD Dimmer Bright Bright lighting Dark Low lighting Off Turns off the lighting during playback Lowlightingother than during playback Control for HDMI On Allows you to use the Control for HDMI f...

Page 62: ... software version information Network connections and settings are required when using this function page 63 Displays the player s software version information and the MAC address Auto Power Off On Turns on the Auto Power Off function Off Turns off the function Auto Display On Automatically displays information on the screen when changing the viewing titles picture modes audio signals etc Off Disp...

Page 63: ... a WEP or WPA key according to the selected security type When you select Access point scan in step 4 go to step 9 of Setting wireless LAN Access point scan on page 34 z WEP or WPA key may be displayed as passphrase or network key depending on the wireless LAN router access point The SSID of your wireless LAN router access point is displayed in the wireless network list on your PC Check your conne...

Page 64: ...ubnet Mask Default Gateway The display for the DNS server setting appears after you set the items Enter the DNS server address manually and go to step 12 11Select the DNS server setting method and press ENTER When you select Manual enter the address in the Primary DNS row 12Select Do not use and press ENTER If your Internet service provider has a specific proxy server setting select Use and fill t...

Page 65: ... 2 Press and enter the next character If you make a mistake follow the next steps 1Move the highlight to the entry field using M m The colour of the cursor changes to yellow 2Move the cursor to the left side of the character you want to delete using Example when you want to delete H SSID Entry display 3Select Clear and press ENTER b Make sure the security key is correctly entered before you procee...

Page 66: ...r Settings in Network Settings and press ENTER The connected server list appears If no server appears in the server list press OPTIONS to select Update Server List and press ENTER 5 Press OPTIONS to select Network Diagnostic and press ENTER 6 Select Start and press ENTER The network diagnostic starts Results are displayed after the player finishes running the network diagnostic To display detailed...

Page 67: ... press OPTIONS to select Hidden then press ENTER To delete a server from the connected server list 1 While the connected server list is displayed select a server using M m and press OPTIONS 2 Select Erase and press ENTER To delete all the servers select Erase All The display asks for confirmation 3 Select OK and press ENTER The selected server is erased Easy Setup Re runs the Easy Setup to make th...

Page 68: ...tings you want to reset to default and press ENTER The display asks for confirmation You can reset the following settings Video Settings Audio Settings BD DVD Viewing Settings Photo Settings System Settings Network Settings All Settings 4 Select Start using and press ENTER b When All Settings is selected in step 3 all settings within Setup are reset Video Settings and Audio Settings that can be ad...

Page 69: ...ears on the screen when turning the player on See Network Update page 49 to update the player to a newer software version The disc does not play The disc is dirty The disc is upside down Insert the disc with the playback side facing down The disc is skewed You are attempting to play a disc with a format that cannot be played back by this player page 75 The region code on the BD or DVD does not mat...

Page 70: ...gs setup page 51 No BD ROM picture appears Check the BD ROM 1080 24p Output setting in the Video Settings setup page 52 See also Connecting to an HDMI jack page 22 when connecting equipment using the HDMI cable There is no sound Check that all the connecting cables are securely connected Check whether the connecting cables are damaged Check the connection to your AV amplifier receiver page 21 and ...

Page 71: ...nge the setting on your TV etc The Control for HDMI function does not work BRAVIA Sync Check that the mains lead of the connected component is securely connected If the HDMI indicator does not appear in the front panel display check the HDMI connection page 17 22 Check that Control for HDMI is set to On page 61 Make sure that the connected component is compatible with the Control for HDMI function...

Page 72: ... Check if the USB device is on The USB device is connected via a USB hub Connect the USB device directly to the player The file name is not correctly displayed The player can only display ISO 8859 1 compliant character formats Other character formats may be displayed differently Depending on the writing software used the input characters may be displayed differently The disc does not start playing...

Page 73: ...router access point is on Depending on the surrounding environment such as the wall material radio wave receiving condition or obstacles between the player and the wireless LAN router access point the communication distance may be shortened Move the player and the wireless LAN router access point closer to each other Devices that use a 2 4 GHz frequency band such as a microwave Bluetooth or digita...

Page 74: ...nd selected audio settings For details see page 77 Type Disc Logo Icon used in this manual Characteristics Blu ray Disc BD ROMs and BD REs BD Rs in BDMV and BDAV mode including 8 cm discs single layer and DL discs BD REs BD Rs containing MP3 audio tracks or JPEG image files DVD VIDEO Discs such as movies that can be purchased or rented DVD DVD RWs DVD Rs in VR mode or DVD RWs DVD Rs in video and V...

Page 75: ...software The BD Rs recorded on a PC cannot be played if postscripts are recordable A CD or DVD disc will not play if it has not been correctly finalised For more information refer to the instruction manual supplied with the recording device Note that some playback functions may not work with some DVD RWs DVD Rs even if they have been correctly finalised In this case view the disc using normal play...

Page 76: ...720 effective scanning lines and the progressive system b Some AVCHD format discs may not play depending on the recording condition The AVCHD format disc will not play if it has not been correctly finalised Video Output Resolution Output resolution differs depending on the Output Video Format setting in the Video Settings setup page 51 Protected contents on DVDs are output at 480p 576p resolution ...

Page 77: ...2 channel LPCM signals To enjoy Connections and settings Disc source Audio output signal AV amplifier receiver support audio format Player audio jack 1 Audio Settings setup pattern BD HD Audio 2 HD Audio 3 HD Audio 2 HDMI OUT A Up to 7 1ch LPCM 3 Multi channel LPCM Dolby Digital DTS Dolby Digital DTS Dolby Digital DTS 4 Dolby Digital DTS DIGITAL OUT C 7 1ch MULTI CHANNEL OUTPUT D Dolby Digital DTS...

Page 78: ...with your network environment No Security Although you can easily make settings anyone can intercept wireless communication or intrude into your wireless network even without any sophisticated tools Keep in mind that there is a risk of unauthorized access or interception of data WEP WEP applies security to communications to prevent outsiders from intercepting communications or intruding into your ...

Page 79: ...lot For connecting the external memory DC output 5 V 500 mA Max USB USB jack Type A For connecting digital still camera and USB memory Wireless Wireless LAN standard IEEE802 11a b g IEEE802 11n draft 2 0 Frequency range European models 2 4 GHz band Channels 1 13 5 GHz band Channels 36 64 100 140 Australian New Zealand models Australia only 2 4 GHz band Channels 1 13 5 GHz band Channels 36 64 100 1...

Page 80: ...cl 2092 China cn 2093 Colombia co 2115 Denmark dk 2165 Finland fi 2174 France fr 2109 Germany de 2200 Greece gr 2219 Hong Kong hk 2248 India in 2238 Indonesia id 2239 Ireland ie 2254 Italy it 2276 Japan jp 2304 Korea kr 2333 Luxembourg lu 2363 Malaysia my 2362 Mexico mx 2376 Netherlands nl 2390 New Zealand nz 2379 Norway no 2427 Pakistan pk 2424 Philippines ph 2428 Poland pl 2436 Portugal pt 2489 ...

Page 81: ...assumed that you agree that the security functionality improvements error corrections other functional updates or any other changes offered by Sony through such updates would not be made to the Software and that your current and further use of the Software may be affected thereby When the automatic update functionality described in the previous paragraph is activated it is assumed that you agree a...

Page 82: ...leged breach by you of this Agreement in any manner ii any information you submit to Sony hereunder iii any breach or alleged breach by you of a third party s rights or iv any damage caused by or alleged to have been caused by you to the Service You will cooperate as fully as reasonably required in Indemnified Party s defense of any claim Sony and or Indemnified Parties reserve the right at its ow...

Page 83: ...g high definition content AVCHD page 76 The AVCHD format is a high definition digital video camera format used to record SD standard definition or HD high definition signals of either the 1080i specification 1 or the 720p specification 2 on DVDs using efficient data compression coding technology The MPEG 4 AVC H 264 format is adopted to compress video data and the Dolby Digital or Linear PCM is us...

Page 84: ...at formulates DLNA Interoperability Guidelines for sharing digital content via a network For details visit the following website http www dlna org Dolby Digital Plus page 77 Developed as an extension to Dolby Digital the audio coding technology supports 7 1 multi channel surround sound Dolby TrueHD page 77 Dolby TrueHD is a lossless coding technology that supports up to 8 channels of multi channel...

Page 85: ... characteristics Wi Fi Protected Setup page 27 33 The Wi Fi Protected Setup specification easily sets the security of wireless home networks There are 2 ways to use the Wi Fi Protected Setup function The Push Button Configuration method using the WPS button on the wireless LAN router access point The PIN method using a PIN code x v Colour page 53 x v Colour is a familiar term for the xvYCC standar...

Page 86: ...2 F Freeze frame 11 Front panel display 13 H HD Audio 77 HD Reality Enhancer HDMI 41 45 84 HDMI 17 22 31 51 52 53 54 57 71 84 Headphones Type 42 HOME 11 36 48 Home menu 48 L Language Follow 18 Local storage 26 38 72 LTH 84 M MAC address 62 MP3 audio tracks 43 74 MULTI CHANNEL OUTPUT 24 54 Music 43 N Network Settings 63 Network Update 28 49 O One Touch Play 18 37 OPTIONS 11 38 43 45 OSD 61 P Parent...

Page 87: ... 46 V Video 36 Video output resolution 76 Video Settings 41 50 W WEP 34 63 78 WEP key 34 63 Wi Fi Protected Setup 27 33 63 85 WPA key 34 63 WPA2 PSK AES 78 WPA PSK AES 78 WPA PSK TKIP 78 WPS button 27 33 X x v Colour 53 85 ...

Reviews: