background image

16

Imaging

To enter a symbol

1

When you enter text, select 

Options

 > 

Add symbol

.

2

Scroll to a symbol and select 

Insert

.

To enter text using T9™ Text Input 

1

From standby select, for example, 

Menu

 > 

Messaging

 > 

Write new

 > 

Text 

message

.

2

If 

 is not displayed, press and hold 

down 

 to change to T9 Text Input. 

3

Press each key only once, even if the 
letter you want is not the first letter on 
the key. For example, to write the word 
“Jane”, 

press , , , . 

Write the whole word before looking 
at the suggestions.

4

Use 

 or 

 to view suggestions.

5

Press 

 to accept a suggestion.

To enter text using multitap 

1

From standby select, for example, 

Menu

 > 

Messaging

 > 

Write new

 > 

Text message

.

2

If 

 is displayed, press and hold down 

 to change to multitap text input.

3

Press 

 – 

 repeatedly until the 

desired letter appears.

4

When a word is written, press 


to add a space.

Imaging

Camera and video recorder 

You can take pictures and record video 
clips to view, save or send. You find 
your saved pictures and video clips 
in 

Media

 > 

Photo

 > 

Camera album

 and 

Organizer

 > 

File manager

.

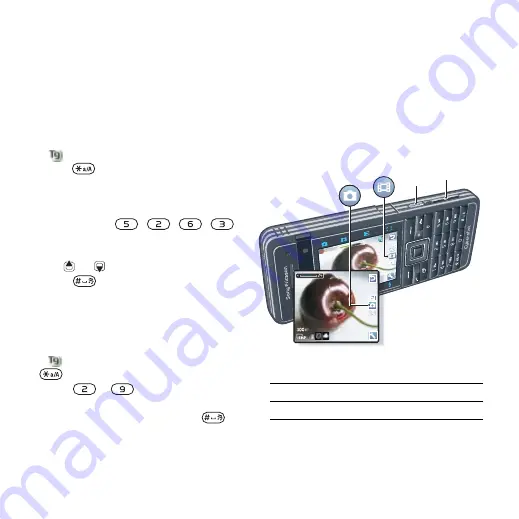
Viewfinder and camera keys

1

Take pictures/Record video

2

Zoom in or out

1

2

This is the Internet version of the User's guide. © Print only for private use.

Summary of Contents for C902RED

Page 1: ...go to www sonyericsson com fun Register now to get a suite of tools free online storage special offers news and competitions at www sonyericsson com myphone For product support go to www sonyericsson com support This is the Internet version of the User s guide Print only for private use ...

Page 2: ... with extra Style up cover in lime green choose colour to match your mood GPS Enabler HGE 100 Get more from your phone add GPS technology Know where you are where you re going and how to get there Design Collection IDC 23 Black leather with a vibrant purple lining this phone case has a separate credit card compartment matching hand strap and detachable jewellery This is the Internet version of the...

Page 3: ...g and receiving calls 24 Contacts 25 Call list 29 Speed dial 29 Voicemail 29 Voice control 29 More than one call 31 Restricted dialling 32 Call time and cost 33 Showing or hiding your phone number 33 Messaging 33 Text messages 33 Picture messages 34 Message options 35 Voice messages 36 Email 36 My friends 37 Area and cell information 39 Media player and music 39 Transferring content to and from a ...

Page 4: ...te service 55 More features 56 Flight mode 56 Location services 56 File manager 56 Alarms 57 Calendar 58 Notes 59 Tasks 60 Profiles 60 Time and date 60 Theme 61 Main menu layout 61 Locks 61 Troubleshooting 63 Common questions 63 Error messages 65 Important information 66 Guidelines for Safe and Efficient Use 68 Memory card 71 End User Licence Agreement 71 Limited Warranty 72 FCC Statement 74 Decla...

Page 5: ...properly licensed or is otherwise authorized Sony Ericsson does not guarantee the accuracy integrity or quality of any additional content or any other third party content Under no circumstances will Sony Ericsson be liable in any way for your improper use of additional content or other third party content Smart Fit Rendering is a trademark or a registered trademark of ACCESS Co Ltd Bluetooth is a ...

Page 6: ...n Cuba Iraq Iran North Korea Sudan Syria as such listing may be revised from time to time or any country to which the U S has embargoed goods or ii to any person or entity on the U S Treasury Department s list of Specially Designated Nationals or iii any person or entity on any other export prohibition list that may be maintained from time to time by the United States Government including but not ...

Page 7: ...mputer Software Clauses in DFARS 252 227 7013 c 1 ii and FAR 52 227 19 c 2 as applicable Other product and company names mentioned herein may be the trademarks of their respective owners Any rights not expressly granted herein are reserved All illustrations are for illustration only and may not accurately depict the actual phone Instruction symbols These symbols may appear in the User guide Note T...

Page 8: ... Slide the battery cover off 3 Slide the SIM card into its holder with the gold coloured contacts facing down To insert the battery 1 Insert the battery with the label side up and the connectors facing each other 2 Align the silvery edge of the battery cover properly 3 Gently press battery cover into place This is the Internet version of the User s guide Print only for private use ...

Page 9: ...appears as unless it starts with emergency number digits for example 112 or 911 You can see and call an emergency number without entering a PIN Startup screen The startup screen appears when you turn your phone on See Using pictures on page 23 Standby After you have turned your phone on and entered your PIN the name of the network operator appears This view is called standby If you want to correct...

Page 10: ...ions To view the phone demonstration From standby select Menu Entertainment Demo tour To view status information From standby press the volume key up Charging the battery The phone battery is partly charged when you buy it To charge the battery 1 Connect the charger to the phone It takes approximately 2 5 hours to fully charge the battery Press a key to view the screen 2 Remove the charger by tilt...

Page 11: ...aker 2 Screen 3 Selection keys 4 Call key 5 Activity menu key 6 Connector for charger handsfree and USB cable 7 Video call camera 8 End on off key 9 C key Clear 10 Navigation key 11 Silent key This is the Internet version of the User s guide Print only for private use ...

Page 12: ...started 14 15 17 16 13 12 12 Flash Light 13 Camera lens 14 Camera key 15 Volume digital zoom keys 16 Self portrait mirror 17 Strap holder This is the Internet version of the User s guide Print only for private use ...

Page 13: ...ontrol Record sound Demo tour Cyber shot Messaging Media Write new Inbox Email Drafts Outbox Sent messages Saved messages My friends Call voicemail Templates Manage messages Settings Photo Music Video Games TV Web feeds Settings Alarms Contacts Radio Myself New contact This is the Internet version of the User s guide Print only for private use ...

Page 14: ...allpaper Main menu layout Theme Startup screen Screen saver Clock size Brightness Edit line names Calls Speed dial Smart search Divert calls Switch to line 2 Manage calls Time cost Show hide my no Handsfree Connectivity Bluetooth USB Phone name Network sharing Synchronization Device management Mobile networks Data communication Internet settings Streaming settings Message settings SIP settings Acc...

Page 15: ...on Press To navigate your media 1 From standby select Menu Media 2 Scroll to a menu item and press the navigation key right 3 To go back press the navigation key left To delete items Press to delete items such as numbers letters pictures and sounds To send items 1 Scroll to an item such as a contact a picture or a sound 2 Select Options Send 3 Select a transfer method Shortcuts You can use keypad ...

Page 16: ...w messages Running apps applications that are running in the background My shortcuts add your favourite functions to access them quickly Internet quick access to the Internet Memory card Your phone supports Memory Stick Micro M2 memory card adding more storage space to your phone It can also be used as a portable memory card with other compatible devices You can use the file manager to move files ...

Page 17: ...uage 2 Select an option Entering text You can use multitap text input or T9 Text Input to enter text The T9 Text Input method uses a built in dictionary To change text input method When you enter text press and hold down To shift between capitals and lower case letters When you enter text press To enter numbers When you enter text press and hold down To enter full stops and commas When you enter t...

Page 18: ...Use or to view suggestions 5 Press to accept a suggestion To enter text using multitap 1 From standby select for example Menu Messaging Write new Text message 2 If is displayed press and hold down to change to multitap text input 3 Press repeatedly until the desired letter appears 4 When a word is written press to add a space Imaging Camera and video recorder You can take pictures and record video...

Page 19: ...rd if a memory card is inserted If not the picture is saved in the phone memory Face detection You can use face detection to bring an off centre face into focus The camera automatically detects up to three faces indicated by white frames A green frame shows which face has been selected when auto focus is used As a rule focus is set to the face closest to the camera To set face detection From stand...

Page 20: ...o stop recording Press To use zoom Press the volume keys up or down To adjust brightness Press or Camera touch keys Above and below the camera viewfinder there are eight touch keys acting as shortcuts to commonly used camera features Touch key Feature Camera Video View mode Focus Video Not available Shoot mode Video Video length Scenes Video Night mode Self timer Flash Video Light This is the Inte...

Page 21: ...ettings for common picture situations including landscape portrait and sport Picture size Focus Face detection Metering mode White balance To adjust colour tones to the lighting conditions Video length For picture messages the length is limited Microphone Night mode Video recording Zoom Auto focus Focus frame Camera remaining pictures Location data is turned on Camera Video View mode Focus Shoot m...

Page 22: ...ng review select Options Photo fix To use Photo mate From standby select Menu Organizer Applications Photo mate To view pictures and video clips 1 Activate the camera and press or to scroll to 2 Scroll to the item 3 To view a video clip press the centre navigation key Transferring pictures Transfer to and from your computer You can use Bluetooth wireless technology and the USB cable to transfer pi...

Page 23: ...ect a Web address 3 Select Go to Camera printing You can print camera pictures using the USB cable connected to a compatible printer To print camera pictures using the USB cable 1 From standby select Menu Media and scroll to Photo Camera album 2 Scroll to a month and a picture 3 Select Options Print 4 Select an option 5 Connect the USB cable to the phone 6 Connect the USB cable to the printer Web ...

Page 24: ...urn off location data for pictures From standby select Menu Cyber shot Settings Add position Off Photo tags You can tag pictures to categorize them They are saved in Photo tags To tag pictures 1 From standby select Menu Media and scroll to Photo Camera album 2 Scroll to a month and a picture Select View 3 Press and scroll to a tag 4 Press the centre navigation key 5 For each picture you want to ta...

Page 25: ...to a month and a picture Select View 3 Select Options Edit in PhotoDJ 4 Edit the picture 5 Select Options Save picture To edit and save a video clip 1 From standby select Menu Organizer File manager Videos 2 Scroll to a video clip and select Options Edit in VideoDJ 3 Edit the video clip 4 Select Options Save To trim a video clip 1 From standby select Menu Organizer File manager Videos 2 Scroll to ...

Page 26: ... To change the ear speaker volume during a call Press the volume key up or down To mute the microphone during a call 1 Press and hold down 2 Press and hold down again to resume To turn the loudspeaker on during a call Select SpkrOn To view missed calls from standby Press to open the call list You can call numbers from your contacts and call list See Contacts on page 25 and Call list on page 29 You...

Page 27: ...2 Scroll to New contact and select Options Special numbers Emergency nos Video call See a person on the screen during calls Both parties need a subscription that supports the 3G UMTS service and you need to be within range of a 3G UMTS network 3G UMTS service is available when appears To make a video call 1 From standby enter a phone number with international country code and area code if applicab...

Page 28: ... select OK 6 Select a number type 7 Scroll between tabs and select the fields to add information 8 Select Save Calling contacts To call a phone contact 1 From standby select Menu Contacts 2 Scroll to a contact and press To go directly to the contacts list From standby press and hold down To call with Smart search 1 From standby press to enter a contact name or a phone number All entries which matc...

Page 29: ... They are saved on the SIM card To add a SIM contact 1 From standby select Menu Contacts 2 Scroll to New contact and select Add 3 Enter the name and select OK 4 Enter the number and select OK 5 Select a number type and add more information if available 6 Select Save To call a SIM contact 1 From standby select Menu Contacts 2 Scroll to a contact and press Deleting contacts To delete all contacts 1 ...

Page 30: ... add your own business card 1 From standby select Menu Contacts 2 Scroll to Myself and select Open 3 Scroll to My contact info and select Add Create new 4 Scroll between tabs and select the fields to add information 5 Enter the information and select Save Groups You can create a group of phone numbers and email addresses from Phone contacts to send messages to See Messaging on page 33 You can also...

Page 31: ...rs 1 From standby select Menu Contacts 2 Scroll to New contact and select Options Speed dial 3 Scroll to a position number and select Add 4 Select a contact To speed dial From standby enter the position number and press Voicemail If your subscription includes an answering service callers can leave a voicemail message when you cannot answer a call To enter your voicemail number 1 From standby selec...

Page 32: ...e name is played back to you and the call is connected Voice answering When you use a handsfree you can answer or reject incoming calls with your voice To activate voice answering and record voice answer commands 1 From standby select Menu Settings the General tab Voice control Voice answer Activate 2 Follow the instructions that appear and select Cont Wait for the tone and say Answer or another w...

Page 33: ...tandby select Menu Settings the Calls tab Manage calls Call waiting Activate To make a second call 1 During the call select Options Hold call This puts the ongoing call on hold 2 Select Options Add call 3 Enter the number to call and press To answer a second call During the call press This puts the ongoing call on hold To reject a second call During the call press and continue with the ongoing cal...

Page 34: ...all select Options Talk to and select the participant to talk to 2 To resume the conference call select Options Join calls My numbers You can view add and edit your own phone numbers To check your phone numbers 1 From standby select Menu Contacts 2 Scroll to New contact and select Options Special numbers My numbers 3 Select an option Restricted dialling You can restrict outgoing and incoming calls...

Page 35: ...b Show hide my no 2 Select Hide number Messaging Receiving and saving messages You are notified when you receive a message Messages are automatically saved in the phone memory When the phone memory is full you can delete messages or save them on a memory card or on the SIM card To save a message on a memory card From standby select Menu Messaging Settings General Save to Memory card To save a mess...

Page 36: ...look up 3 Select a recipient and select Send To copy and paste text in a text message 1 When you write the message select Options Copy paste 2 Select Copy all or Mark copy Scroll to and mark text in the message 3 Select Options Copy paste Paste To add an item to a text message 1 When you write the message select Options Add item 2 Select an option and then an item To call a number in a text messag...

Page 37: ... Enter text To add items to the message press scroll and select an item 3 Select Continue Contacts look up 4 Select a recipient and select Send Receiving picture messages You can select how to download your picture messages Standard options when you download picture messages are Always automatic download Ask in roaming ask to download when not in home network Not in roaming do not download when no...

Page 38: ...ail account or you can enter them manually You can also receive settings at www sonyericsson com support To create an email account 1 From standby select Menu Messaging Email Accounts 2 Scroll to New account and select Add To write and send an email message 1 From standby select Menu Messaging Email Write new 2 Select Add Enter email address Enter the email address and select OK 3 To add more reci...

Page 39: ... View To save an attachment in an email message When you view the message select Options Attachments Use Save Synchronizing email Email can be synchronized with a Microsoft Exchange Server Microsoft Outlook For more information see Synchronizing on page 52 Active email account If you have several email accounts you can change which one is active To change the active email account 1 From standby se...

Page 40: ...acts tab 2 Scroll to a contact and select Chat 3 Write the message and select Send Status You can show your status for example Happy or Busy to your contacts only You can also show your status to all users on the My friends server To show my status 1 From standby select Menu Messaging My friends Options Settings Show my status 2 Select an option To update your own status 1 From standby select Menu...

Page 41: ...and podcasts Use Sony Ericsson Media Manager to transfer content to your phone Transferring content to and from a computer Required operating systems You need one of these operating systems to use the software included on the CD Microsoft Windows Vista 32 bit or 64 bit versions of Ultimate Enterprise Business Home Premium Home Basic Microsoft Windows XP Pro or Home Service Pack 2 or higher To inst...

Page 42: ...le handsfree Music stops when you receive a call and resumes when the call has ended Music player To play music 1 From standby select Menu Media Music 2 Scroll to a title and select Play To stop playing music Press the centre navigation key To fast forward and rewind Press and hold down or Do not remove the USB cable from your phone or computer during transfer as this may corrupt the memory card o...

Page 43: ...the track and select Mark 5 Select Add to add the tracks to the playlist To add files to a playlist 1 From standby select Menu Media and scroll to Music Playlists 2 Select a playlist 3 Scroll to Add music and select Add 4 For each track you want to add scroll to the track and select Mark 5 Select Add to add the tracks to the playlist To remove tracks from a playlist 1 From standby select Menu Medi...

Page 44: ...information When you hear a song through a loudspeaker from standby select Menu Entertainment TrackID Start When the radio is playing select Options TrackID Online music and video clips You can view video clips and listen to music by streaming them to your phone from the Internet If settings are not already in your phone see Settings on page 49 For more information contact your network operator or...

Page 45: ... Menu Media and scroll to Video 2 Scroll to a title and select Play To stop playing videos Press the centre navigation key Radio To listen to the radio 1 Connect the handsfree to the phone 2 From standby select Menu Radio To change the volume When the radio is playing press the volume keys up or down To automatically search for channels When the radio is playing select Search To manually search fo...

Page 46: ...the ringtone off From standby press and hold down To set the vibrating alert 1 From standby select Menu Settings the Sounds alerts tab Vibrating alert 2 Select an option MusicDJ You can compose and edit your own melodies to use as ringtones A melody consists of four types of tracks Drums Basses Chords and Accents A track contains a number of music blocks The blocks consist of pre arranged sounds w...

Page 47: ... Press Applications You can download and run Java applications You can also view information or set different permissions Before you use Java applications If Internet settings are not already entered in your phone see Settings on page 49 To select a Java application 1 From standby select Menu Organizer Applications 2 Select an application To view information about a Java application 1 From standby...

Page 48: ...t browsing 1 From standby select Menu Internet 2 Select Options Go to 3 Select an option To exit the browser When you browse the Internet select Options Exit browser Bookmarks You can create and edit bookmarks as quick links to your favourite Web pages To create a bookmark 1 When you browse the Internet select Options Tools Add bookmark 2 Enter a title and an address Select Save To select a bookma...

Page 49: ...text on a Web page 1 When you browse the Internet select Options Tools Find on page 2 Enter text and press Find To send a link 1 When you browse the Internet select Options Tools Send link 2 Select a transfer method Internet security and certificates Your phone supports secure browsing Certain Internet services such as banking require certificates in your phone Your phone may already contain certi...

Page 50: ...to download an audio podcast to download a video podcast or to download a photo Updating Web feeds You can manually update your feeds or schedule updates When there are updates appears on the screen To schedule Web feed updates 1 From standby select Menu Media Web feeds 2 Scroll to a feed and select Options Schedule update 3 Select an option To update Web feeds manually 1 From standby select Menu ...

Page 51: ...oto feeds From standby select Menu Media Photo Photo feeds Connectivity Settings Before you synchronize with an Internet service use the Internet PlayNow My friends Java picture messaging email and picture blog you need to have settings in your phone If settings are not already entered you can download settings using the setup wizard or by going to www sonyericsson com support To download settings...

Page 52: ...tings the Connectivity tab Bluetooth Turn on To receive an item 1 From standby select Menu Settings the Connectivity tab Bluetooth Turn on 2 When you receive an item follow the instructions that appear To pair the phone with a device 1 From standby select Menu Settings the Connectivity tab Bluetooth My devices 2 Scroll to New device and select Add to search for available devices 3 Select a device ...

Page 53: ... device at the same time To turn powersave on From standby select Menu Settings the Connectivity tab Bluetooth Powersave On Transferring sound to and from a Bluetooth handsfree You can transfer the sound to and from a Bluetooth handsfree using a phone key or the handsfree key To transfer sound 1 From standby select Menu Settings the Connectivity tab Bluetooth Handsfree Incoming call 2 Select an op...

Page 54: ...The phone will remain activated during file transfer 3 Computer Wait until an external device icon appears in My Computer and then double click to open Phone memory and memory card appear as external disks in Windows Explorer 4 Drag and drop selected files between the phone and the computer Synchronizing You can synchronize in two different ways You can use the USB cable or Bluetooth wireless tech...

Page 55: ... Computer When you are notified that the Sony Ericsson PC Suite has found your phone you can start synchronizing Synchronizing using an Internet service You can synchronize online using SyncML or Microsoft Exchange ActiveSync If Internet settings are not in your phone see Settings on page 49 SyncML You can synchronize remote data and personal information using SyncML Before you synchronize using S...

Page 56: ...e information such as email contacts and calendar entries using Microsoft Exchange Server with Microsoft Exchange ActiveSync Before you synchronize using Microsoft Exchange ActiveSync You must enter settings for Microsoft Exchange ActiveSync to access a Microsoft Exchange Server Settings that are required are Server address server URL Domain server domain Username account username Password account...

Page 57: ... in the phone 1 From standby select Menu Settings the General tab Update service 2 Select Software version To use Update service using the phone 1 From standby select Menu Settings the General tab Update service 2 Select Search for update and follow the instructions that appear To use Update service using a USB cable 1 Go to www sonyericsson com support or click the Sony Ericsson Update service in...

Page 58: ...ar you you may be able to view your approximate location on a map To use Google Maps for mobile From standby select Menu Entertainment Location services Google Maps To view help about Google Maps When you use Google Maps select Options Help To view your approximate location When you use Google Maps press To view a saved location 1 From standby select Menu Entertainment Location services My favouri...

Page 59: ...en a folder 5 Select Paste To select more than one file in a folder 1 From standby select Menu Organizer File manager 2 Scroll to a folder and select Open 3 Select Options Mark Mark several 4 For each file you want to mark scroll to the file and select Mark Alarms You can set a sound or the radio as an alarm signal The alarm sounds even if the phone is turned off When the alarm sounds you can sile...

Page 60: ...y select Menu Alarms 2 Scroll to an alarm and select Edit 3 Scroll to the tab 4 Scroll to Silent mode and select Edit 5 Select an option Calendar The calendar can be synchronized with a computer calendar with a calendar on the Web or with a Microsoft Exchange Server Microsoft Outlook For more information see Synchronizing on page 52 Default view You can choose whether month week or day view will a...

Page 61: ...et when reminders should sound 1 From standby select Menu Organizer Calendar 2 Select a date 3 Select Options Advanced Reminders 4 Select an option Notes You can make notes and save them You can also show a note in standby To add a note 1 From standby select Menu Organizer Notes 2 Scroll to New note and select Add 3 Write a note and select Save To show a note in standby 1 From standby select Menu ...

Page 62: ...ettings To select a profile 1 From standby select Menu Settings the General tab Profiles 2 Select a profile To view and edit a profile 1 From standby select Menu Settings the General tab Profiles 2 Scroll to a profile and select Options View and edit Time and date To set the time 1 From standby select Menu Settings the General tab Time date Time 2 Enter the time and select Save To set the date 1 F...

Page 63: ...ter your PUK Personal Unblocking Key Your PIN and PUK are supplied by your network operator To unblock the SIM card 1 When PIN blocked appears enter your PUK and select OK 2 Enter a new four to eight digit PIN and select OK 3 Re enter the new PIN and select OK To edit the PIN 1 From standby select Menu Settings the General tab Security Locks SIM protection Change PIN 2 Enter your PIN and select OK...

Page 64: ...pad lock You can set this lock to avoid accidental dialling Incoming calls can be answered without unlocking the keypad To use the automatic keylock 1 From standby select Menu Settings the General tab Security Automatic keylock 2 Select an option To lock the keypad manually From standby press and select Lock To unlock the keypad manually From standby press and select Unlock IMEI number Keep a copy...

Page 65: ...hat appear I cannot charge the phone or battery capacity is low The charger is not properly connected or the battery connection is poor Remove the battery and clean the connectors The battery is worn out and needs to be replaced See Charging the battery on page 8 No battery icon appears when I start charging the phone It may take a few minutes before the battery icon appears on the screen Some men...

Page 66: ...t be detected by other devices using Bluetooth wireless technology You have not turned the Bluetooth function on Make sure that the visibility is set to show phone See To turn the Bluetooth function on on page 50 I cannot synchronize or transfer data between my phone and my computer when using the USB cable The cable or software that came with your phone has not been properly installed Go to www s...

Page 67: ... PIN2 You have entered your PIN or PIN2 incorrectly Enter the correct PIN or PIN2 and select Yes See PIN on page 7 PIN blocked PIN2 blocked You have entered your PIN or PIN2 code incorrectly three times in a row To unblock see SIM card lock on page 61 Codes do not match Codes that you have entered do not match When you want to change a security code for example your PIN you have to confirm the new...

Page 68: ...work of Call Centers An extensive network of Sony Ericsson service partners A warranty period Learn more about the warranty conditions in this User guide On www sonyericsson com you will find the latest support tools and information For operator specific services and features please contact your network operator You can also contact our Call Centers If your country region is not represented in the...

Page 69: ...port sonyericsson com México 01 800 000 4722 questions MX support sonyericsson com Nederland 0900 899 8318 questions NL support sonyericsson com New Zealand 0800 100150 questions NZ support sonyericsson com Norge 815 00 840 questions NO support sonyericsson com Österreich 0810 200245 questions AT support sonyericsson com Pakistan 111 22 55 73 92 21 111 22 55 73 questions PK support sonyericsson co...

Page 70: ...ce where required or requested to do so Do not use where a potentially explosive atmosphere exists Do not place your product or install wireless equipment in the area above an air bag in your car Caution Cracked or broken displays may create sharp edges or splinters that could be harmful upon contact Do not use your Bluetooth Headset in positions where it is uncomfortable or will be subject to pre...

Page 71: ...llation Check with your vehicle manufacturer s representative to be sure that your mobile phone or Bluetooth handsfree will not affect the electronic systems in your vehicle Full attention should be given to driving at all times and local laws and regulations restricting the use of wireless devices while driving must be observed GPS Location based functions Some products provide GPS Location based...

Page 72: ...s Sony Ericsson does not warrant or represent that your device will be impervious to introduction of malware You can however reduce the risk of malware attacks by using care when downloading content or accepting applications refraining from opening or responding to messages from unknown sources using trustworthy services to access the Internet and only downloading content to your mobile phone from...

Page 73: ... copy of important data We are not responsible for any loss or damage to content you store on the memory card Recorded data may be damaged or lost when you remove the memory card or memory card adapter or turn off the power while formatting reading or writing data or when you use the memory card in locations subject to static electricity or high electrical field emissions Protection of personal in...

Page 74: ...ree kit which may be delivered with your mobile phone What we will do If during the warranty period this Product fails to operate under normal use and service due to defects in design materials or workmanship Sony Ericsson authorized distributors or service partners in the country region where you purchased the Product will at their option either repair or replace the Product in accordance with th...

Page 75: ...t failures caused by installations modifications or repair or opening of the Product performed by a non Sony Ericsson authorised person 6 The warranty does not cover Product failures which have been caused by use of accessories or other peripheral devices which are not Sony Ericsson branded original accessories intended for use with the Product Sony Ericsson disclaims any and all warranties whethe...

Page 76: ...tement This device complies with Part 15 of the FCC rules Operation is subject to the following two conditions 1 This device may not cause harmful interference and 2 This device must accept any interference received including interference that may cause undesired operation Any change or modification not expressly approved by Sony Ericsson may void the user s authority to operate the equipment This...

Page 77: ...cations AB of Nya Vattentornet SE 221 88 Lund Sweden declare under our sole responsibility that our product Sony Ericsson type AAD 3052101 BV and in combination with our accessories to which this declaration relates is in conformity with the appropriate standards EN 301 511 V9 0 2 EN 301 908 1 V2 2 1 EN 301 908 2 V2 2 1 EN 300 328 V1 7 1 EN 301 489 7 V1 3 1 EN301 489 17 V1 2 1 EN 301 489 24 V1 3 1...

Page 78: ...htness 18 business cards 28 C calendar 58 59 call divert 31 call list 29 call numbers in message 34 call time 33 caller specific ringtones 26 calls answering and rejecting 24 emergency 25 handling two calls 31 international 24 making and receiving 24 putting on hold 31 recording 45 video 25 camera settings 19 code memo 64 conference calls 32 contacts adding phone contacts 26 default contacts 26 gr...

Page 79: ...Bluetooth technology 51 help 8 hiding number 33 history Web pages 47 I IMEI number 62 Internet bookmarks 46 security and certificates 47 settings 49 J Java 45 K keypad lock 62 automatic 62 manual 62 keys 9 L language 15 location data 22 location services 56 lock keypad 62 phone 62 M master reset 63 Media Manager 39 media transfer 40 52 memory card 14 memory status 28 This is the Internet version o...

Page 80: ...synchronizing 53 phone mode 53 phone name 49 photo feeds 49 Photo fix 20 Photo mate 20 photo tags 22 PhotoDJ 23 photos improving 20 Photo fix 20 picture messages 34 pictures 22 editing 23 improving 20 Photo fix 20 PIN code changing 61 unblocking 7 playlists 41 PlayNow 42 podcasts 41 49 printing pictures 21 profiles 60 PUK 7 61 push email 37 R ringtones 44 RSS feeds See Web feeds 48 S safety guidel...

Page 81: ...eme 61 time 60 time zone 60 touch keys 18 transfer method Bluetooth technology 50 USB 51 transferring camera pictures 20 files 51 music 40 sound 51 turning on off Bluetooth function 50 keypad lock 62 phone lock 62 SIM lock protection 61 U update Web feeds 48 Update service 55 V video blog 21 editing 23 video player 43 video recorder 16 VideoDJ 23 visibility 50 voice answering 30 voice commands 29 ...

Page 82: ...r speaker 24 ringtone 44 W warranty 72 Web search 47 Web feeds 48 showing in standby 49 update 48 Web pages history 47 pan and zoom 47 Z zoom 18 This is the Internet version of the User s guide Print only for private use ...

Reviews: