Getting Started
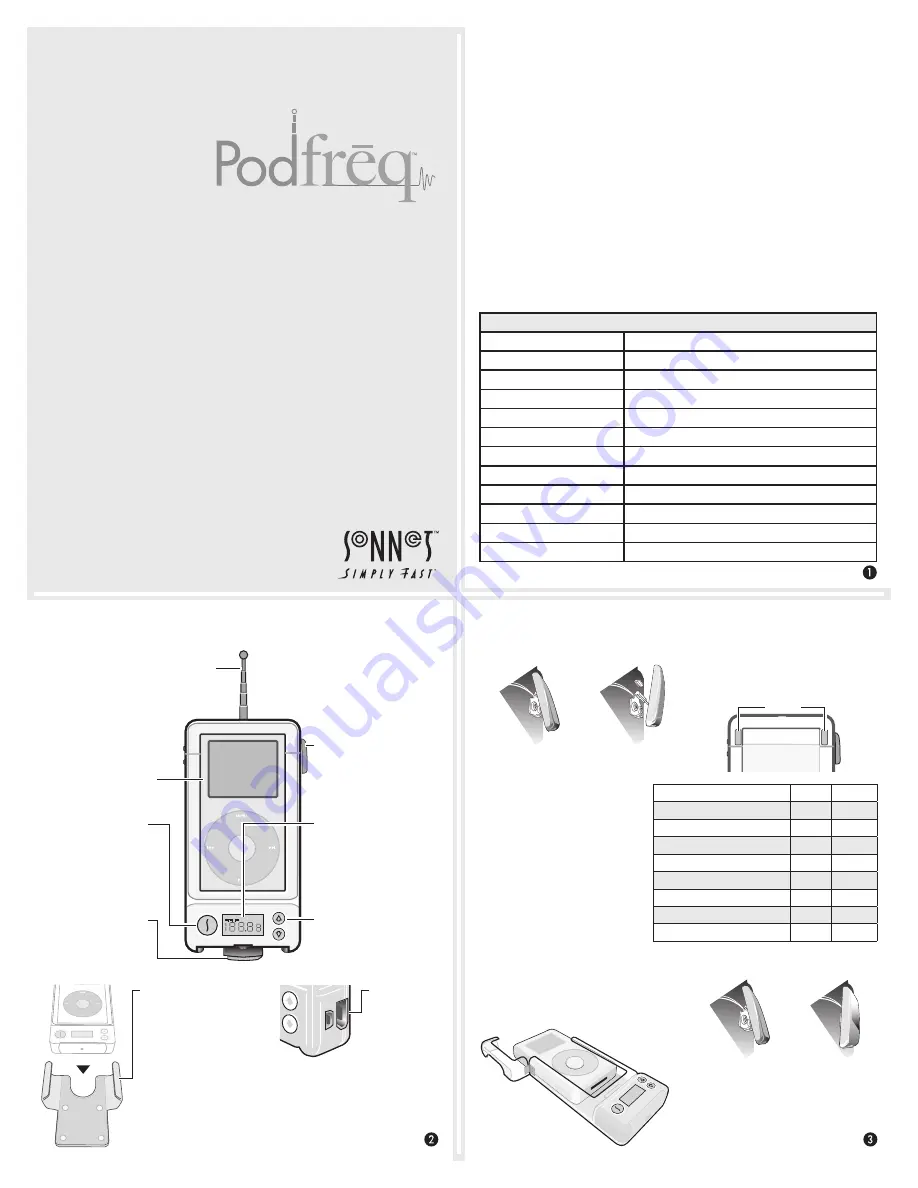
This section describes the physical aspects of PodFreq.
Introduction
This user’s guide explains how to use PodFreq, the premium FM
transmitter for your iPod. PodFreq broadcasts to any analog or digital
FM tuner, and enables you to transmit your iPod’s music on any fre-
quency from 88.3 to 107.7 MHz to a FM radio or tuner tuned to the
same frequency. PodFreq incorporates mini-USB 2.0 and standard 6-
Pin FireWire
®
ports in its design so that you may plug in a cable (sold
separately) to transfer files between your computer and iPod, sync
your files with iTunes
®
, and even charge your iPod without removing
it from PodFreq.
Requirements
PodFreq’s requirements are simple:
• Any compatible iPod w/dock connector (excluding iPod mini and
iPod nano)
• FM tuner (analog or digital, connected to an antenna)
Technical Specifications
Antenna
Telescoping, 8.6" (21.8 cm) when fully extended
Power Requirement
No batteries or power cables; powered by the iPod
Frequency Modulation
88.3 to 107.7 MHz
Tuning Type
Digital tuning, tunes in 0.1 MHz steps, last station recall
Stereo Separation
Greater than 40dB
Auto Level Control
Built-in to prevent sound distortion
Signal-to-Noise Ratio
Greater than 45dB (Stereo) 15 kHz LPF
Modulation Distortion
Less than 0.5%
Transmitter Range
10–35 feet (3–10.7 m), depending on FM receiver/antenna
Frequency Response
50 Hz to 15 kHz
Ports
Mini-USB 2.0 and 6-Pin FireWire
Dimensions (WxHxD)
2.87" x 5.46" x 1.35" (7.3 x 13.9 x 3.4 cm)
User’s Guide
Latch
- The latch secures
PodFreq’s case around your
iPod.
Stand
- The stand swivels
out to allow you to place
PodFreq in an upright
position.
Power Button
- Press and
release to turn the power on
or off; press and hold until
Auto Off appears on the
display to activate the auto-
matic off timer (1, 2, 3, 4, or
8 hours).
Display
- Shows the selected
broadcast frequency, as well
as the automatic off timer
indicator.
Antenna
- Extend the antenna completely
to achieve better transmitting performance.
Up/Down Tuning Buttons
-
Press to select a broadcast
frequency.
FireWire and
mini-USB 2.0
Ports
- Connect
PodFreq to
your computer
with a standard
FireWire cable,
or a USB cable
with a mini
connector on
one end (sold
separately).
•
Pr
em
iu
m
F
M
Tr
an
sm
itt
er
fo
r iP
o
d
®
www.podfreq.com
Your iPod
- Sold separately,
of course.
Car Cradle
- When attached
to a car mount (sold
separately) with the included
hardware, this will hold
your PodFreq securely in
your car. The cradle uses a
standard AMPS/NEC hole
pattern, commonly used for
cell phone mounts, making
it compatible with a wide
variety of car mount solu-
tions. Visit www.podfreq.
com/accessories.html for
information on car mount
solutions.
A—Insert Your iPod into PodFreq
1
. Pull the bottom of
the latch away from
PodFreq.
2
. Lift the latch up and
away from PodFreq.
6
. Hook the PodFreq’s
latch.
7
. Snap the latch
closed on PodFreq.
3
. If you are using a 20 or 40GB 4G iPod
(grayscale display, with click wheel), or a
30 or 60GB iPod (video) model, attach the
included adhesive spacers (see table next to
step 4 for specific information). If you are
using any other iPod, go to the next step.
4
. Open PodFreq’s top. If you are using
a 30 or 40GB 3G iPod (with 4 but-
tons) or a 40 or 60GB iPod with color
display, skip to step 5. Otherwise,
slide the required spacer pad or pads
(see table at right) inside PodFreq
behind the dock connector.
iPod Model
Pad
Spacers
10, 15, or 20GB 3G (4 button)
Thick
—
30 or 40GB 3G (4 button)
—
—
20GB 4G (Click Wheel)
Thick
Thin
40GB (Click Wheel)
—
Thin
20 or 30GB iPod w/color disp.
Thick
—
40 or 60GB iPod w/color disp.
—
—
30GB iPod (video)
Both
Thick
60GB iPod (video)
Thin
Thick
5
. Gently slide your iPod into PodFreq, making
sure that it connects completely with the dock
connector.
Please note, you may have to press
on your iPod to make it mate properly with the
dock connector; the dock connector will learn the
new position
. If your iPod is turned off when
you connect it to PodFreq, the iPod makes a
noise; this is normal
operation. Close
PodFreq’s
top.
Spacers


