


Fusion F2 Setup
Figure 3
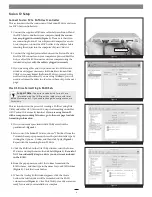
Connect Fusion F2 to SATA Host Controller
This section describes the connection of the Fusion F2 drive enclosure
to a SATA host controller card.
1.
Connect the supplied eSATA data cables between Fusion F2 and
the SATA host controller in your computer;
verify the connec-
tors are plugged in securely
(Figure 3)
. Please note that if you
are connecting Fusion F2 to an ExpressCard adapter for a note-
book computer, connect the eSATA cables to the adapter before
inserting the adapter into the computer’s ExpressCard slot.
2.
Connect the supplied power cable between the Fusion F2 and a
FireWire 400 connector on your computer or powered FireWire
hub, or a FireWire 800 connector on your computer using the
included adapter;
verify the cable is plugged in securely
.
3.
If you are using a Mac and it is powered on, two
Disk Insertion
windows will appear onscreen; click Initialize to launch Disk
Utility so you may format the Fusion F2 drives; proceed to the
next section for directions. If you are using Windows, you will
need to reformat the drives in order to use them; skip to the next
page.
Mac OS Drive Formatting & RAID Sets
This section describes the process of creating a RAID set using Disk
Utility under Mac OS X Version 10.5; steps for formatting under Mac
OS X Version 10.4 are nearly identical.
If you are using Fusion F2
with a computer running Windows, go to the next page for drive
formatting information.
1.
If it is not already open, launch Disk Utility and click the
partition tab
(Figure 4)
.
2.
Select one of the Fusion F2’s drives, choose “1 Partition” from the
Volume Scheme pop-up menu, choose the partition table type by
clicking the Options… button, and then click Apply
(Figure 4)
.
Repeat with the remaining Fusion F2 drive.
3.
Click the RAID tab in the
Disk Utility
window, select the Fusion
F2 drives and drag them into the disk field
(Figure 5)
.
Be careful
NOT to accidentally drag in a drive you don’t want included
in the RAID
.
4.
From the pop-up menus, select the volume format and the
RAID scheme, and then type in the name for your RAID volume
(Figure 5)
. Click the Create button.
5.
When the
Creating RAID
window appears, click the Create
button; the selected drives will be formatted and the RAID
volume created
(Figure 6)
. Close Disk Utility; your drives are now
ready for use and your installation is complete.
Figure 4
Figure 5
eSATA data cable
Figure 6
Support Note:
The drives included with Fusion F2 are
formatted using the GUID partition table for use with Intel-
based Mac computers. If you need to change the configuration, use
Disk Utility.