To change the lower limit
Send the shade to it’s current
lower limit.
To change the upper limit
Send the shade to it’s current
upper limit.
Adjusting the limits in User Mode
Press until the shade jogs
Press both and at the same
time until the shade jogs. Adjust to
a new lower limit position.
Press both and at the same
time until the shade jogs. Adjust to
a new upper limit position.
Press until the shade jogs
Note
If shade is actively moving (in-motion) Should be pressed twice.
To Delete
: Activate shade to intermediate position, then press and
hold (stop) for 5 seconds. Shade will jog to confirm deletion.
Setting
Press the or to operate shade. At the desired intermediate
(preferred) position press (Stop) to stop the shade.
Once the desired Intermediate position is reached, Press and
hold (stop) until the shade jogs. The Intermediate position
is now added to memory
Using
Send the shade to the intermediate position by pressing (stop)
from ANY shade position.
Note:
Shade should be stationary prior to activating intermediate
position function.
Setting an Intermediate Position (Preferred Position)
Adding or deleting a Transmitter or a Channel
Programmed Transmitter
STEP 1:
STEP 2:
Transmitter to add or delete
STEP 3:
STEP 4:
Using already programmed transmitters select the transmitter (single channel) or the channel, (1-5)
of a multi-channel transmitter.
Press and hold the programming button of that transmitter until the shade
jogs.
Select the transmitter (single channel) or the channel, (1-5) of a multi-channel transmitter, to be
added or deleted.
Press and hold the programming button of that transmitter until the shade
jogs.
P
ro
g
a
m
m
m
ed
Tr
a
n
sm
it
te
r
Tr
a
n
sm
it
te
r
To
A
d
d
O
r
D
el
et
e
To change the lower limit
Send the shade to it’s current
lower limit.
To change the lower limit
Send the shade to it’s current
lower limit.
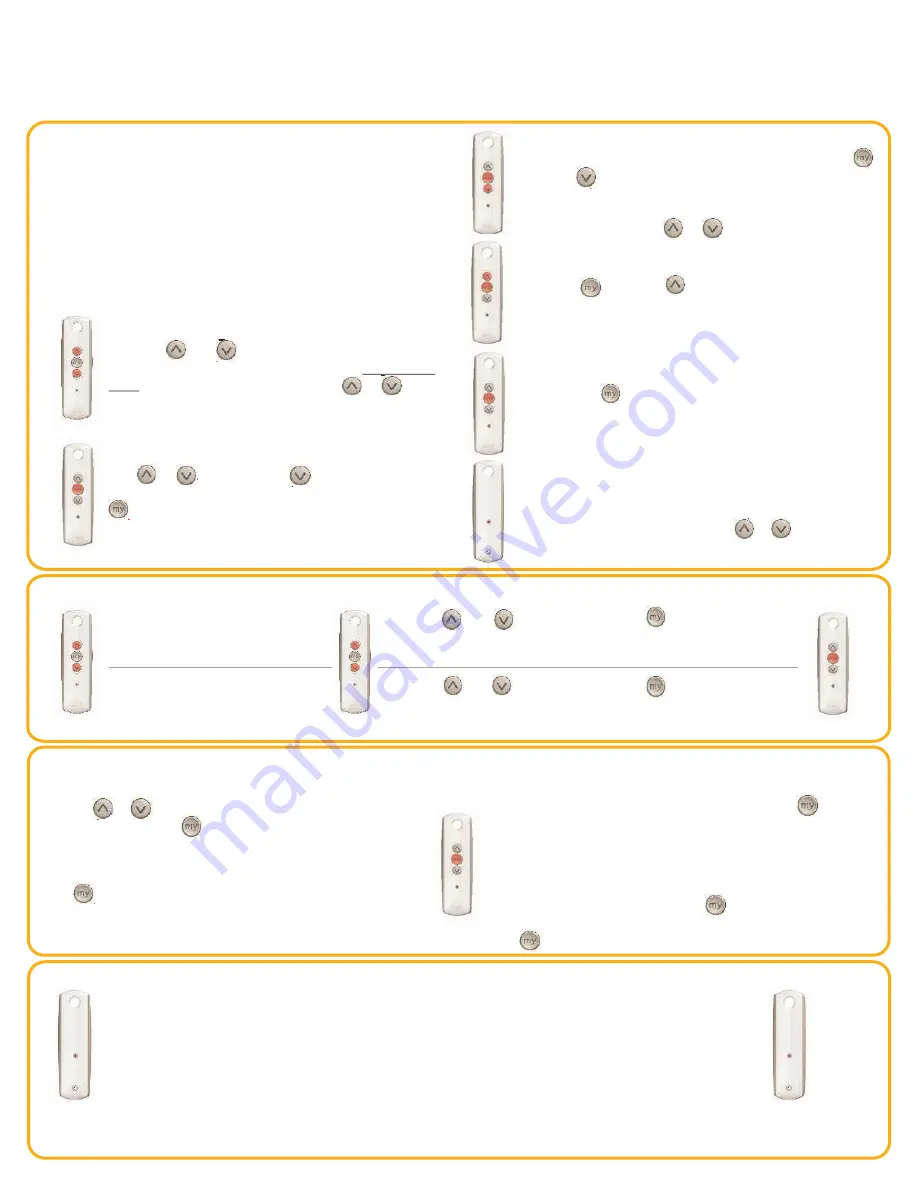
Programming Mode
STEP 1: Connect power
With the motor installed in shade, connect power to
the motor (120V, or 12 V or 24V transformer or 12 V
battery wand)
STEP 2: I
Press both and
at the same time
until the shade
jogs.
In Programming
Mode, the shade will move only when the or is held
nitiate programming
A jog is a brief up and down motion.
STEP 3:
Press or . When pressing product should
go down or out. To change direction press and hold
(Stop) until the shade jogs.
Check directions
A jog is a brief up
and down motion.
STEP 4: Set the limits
Bring the shade to desired
upper
limit stop point. Press both
(Stop) and until the motor moves, then release. (If the shade
stops when the buttons are released take it back to the upper limit
and repeat) Stop the motor when reaching the desired
lower
limit.
You can adjust by pressing or
STEP 5: Set the limits
Press both (Stop) and
at the same time
until the
shade moves, then release. The shade will stop at the original
upper limit.
STEP 6: Confirm
Press and hold (stop) until the shade jogs to confirm
the limit settings.
limit settings
A jog is a brief up and down motion.
STEP 7: Set user mode
Press and hold the programming button on the
back of the transmitter until the shade jogs. The
shade is now in User Mode. In User Mode, the
shade will operate with a brief press on or
Double check limit settings as a precaution.
QUICK PROGRAMMING GUIDE FOR ALL RTS MOTORS
Altus RTS 120 V / Sonesse 30
Please refer to individual instructions for more details
TM
TM
24V / Wirefree Roll Up LT-30RT Round Head & CORD Lift CT-32 Motors.
Before you begin
Motors are shipped without limit settings and transmitter ID’s. Steps 1 to 7 must
be completed to ensure proper shade programming and functionality. Power should
ONLY be connected to current shade being programmed. All other shades should be
disconnected from their respective power while programming


