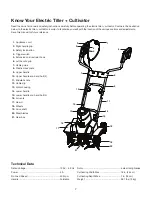
SNOWJOE sunjoe TJ601E-RM Operator'S Manual Download Page 13

13

•  Do not use cleaning fluids or solvents or spray the 

machine down with water (especially water under 

pressure) when cleaning the machine. 

NOTE: After each use, follow these steps to properly clean the 

unit:

1.  Remove soil, dirt, and foliage stuck in the blades, drive 

shaft, tool surface, and vents with a brush or dry cloth.

2.  Spray or rub biodegradable oil onto the blades.
3.  Clean soiled grips with a damp cloth.

Always inspect the machine for damaged and worn parts after 

each use. Check that safety features (i.e. labels, guards, etc.) 

are in place. Check that nuts, bolts, and screws are tight.
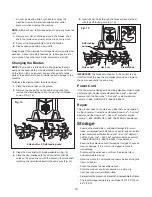
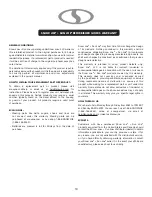
Changing the Blades

NOTE: 

The machine is fitted with six tilling blades that can 

easily be changed. Both of the steel blade pairs can be fitted 

on the left or right, as required. Always change both blade 

pairs at the same time to avoid imbalance and damage to the 

machine.
To replace the blades, follow the steps below:

1.  Place the electric tiller on the ground. 
2.  Remove the hex bolts and the self-locking nuts, then 

remove the steel blades, noting the way the old blades 

come off (Fig. 14).

3.  Clean the drive shaft with biodegradable 

oil (Fig. 15).

4.  Place the new blades onto the drive shaft so that the 

holes on the axles line up with the holes on the drive shaft, 

replacing the new blades exactly the same way (Fig. 15).

5.  Insert the hex bolts through the holes and secure them 

with the self-locking nuts (Fig. 15).

IMPORTANT:


The blades must be set in the correct turning 

direction. Note the way the old blades came off and replace 

the new ones exactly the same way.

Power Cord

If the power cord is damaged, it must be replaced in order to avoid 

a safety hazard. Contact your authorized Snow Joe

®

 + Sun Joe

®


dealer or call the Snow Joe

®

 + Sun Joe

®

 customer service 

center at 1-866- SNOWJOE (1-866-766-9563).

Repair

This product does not contain any parts that can be repaired 

by the consumer. Contact an authorized Snow Joe

®

 + Sun Joe

®


dealer or call the Snow Joe

®

 + Sun Joe

®

 customer service 

center at 1-866-SNOWJOE (1-866-766-9563) for assistance.

Storage

• 

Examine the electric  cultivator thoroughly for worn, 

loose, or damaged parts. Should you need to repair or replace 

a part, contact an authorized Snow Joe

®

 + Sun Joe

®

 dealer or 

call the Snow Joe

®

 + Sun Joe

®

 customer service center at 

1-866-SNOWJOE (1-866-766-9563) for assistance.

• 

Examine the extension cord thoroughly for signs of excess 

wear or damage. If it is worn or damaged, replace it 

immediately.

• 

Disconnect the extension cord from the electric  

cultivator before storing.

• 

Allow the motor to completely cool down before storing the 

cultivator.

• 

Clean the product as described above.

• 

Store the product and its accessories in a dark, dry,  

frost-free, and well-ventilated place.

• 

Always store the product in a place that is inaccessible to children. 

• 

The ideal storage temperature is between 

50ºF (10°C

) and 

86ºF (30°C

).

Fig. 14

2 Hex bolts + 2 Self-locking nuts

Fig. 15

Drive shaft

Hex bolt

Steel blades

Self-locking 

nuts

Summary of Contents for sunjoe TJ601E-RM

Page 1: ...To make sure you get the most out of your product be sure to register online at to enjoy full product support PASTE UPC LABEL HERE A Division of Snow Joe LLC Model TJ601E RM Form No SJ TJ601E RM 880E...

Page 2: ...nplugging the unit mCAUTION Moving parts will continue to run for several seconds after turning off the machine 9 Do not abuse the cord Never carry the garden tiller cultivator by the cord or yank the...

Page 3: ...rt stop function properly before cultivating Hold onto the tiller cultivator with both hands during operation Ensure the grips are dry Contact with rotating parts can amputate hands and feet Keep hand...

Page 4: ...lt in GFCI protection and may be used for this measure of safety 2 To prevent electric shock use only with an extension cord suitable for outdoor use such as SW A SOW A STW A STOW A SJW A SJOW A SJTW...

Page 5: ...or make a knot with the two cords as shown in Table 1 5 Do not abuse the cord Never pull the tiller cultivator by the cord or yank the cord to disconnect it from the receptacle Keep the cord away fro...

Page 6: ...ce WARNING Keep electrical extension cord away from blades Wear eye protection breathing protection and ear protection i e safety goggles dust masks and ear defenders SWITCH OFF Remove plug from the o...

Page 7: ...button 4 Trigger switch 5 Extension cord restraint hook 6 Left handle grip 7 Cable guide 8 Plastic cross plate 9 Upper handle 10 Upper handle knob and bolt 2 11 Middle handle 12 Cable clip 13 Motor ho...

Page 8: ...unplugged from the power supply Failure to heed this warning could result in serious personal injury mWARNING To prevent serious personal injury make sure the switch is in the OFF O position the unit...

Page 9: ...wer handle using the four knobs and bolts Tighten the two knobs on each side to ensure a secure fit Fig 6 5 Secure the power cable to the unit body by using the cable clip Fig 7 mWARNING Make sure all...

Page 10: ...tivating depth To change from transport position to the tilling position 1 Pull out the cotter pin and slide out the bolt then remove the wheel assembly completely as indicated by the arrow Fig 8 2 Fl...

Page 11: ...rea Always let the product come to a complete stop before averting your attention Do not overwork yourself Take regular breaks to ensure you can concentrate on the task at hand and have full control o...

Page 12: ...x 3 bar NOTE Do not use chemical alkaline abrasive or other aggressive detergents or disinfectants to clean this product as such substances might damage the tool s surfaces Check for worn or damaged p...

Page 13: ...elf locking nuts Fig 15 IMPORTANT The blades must be set in the correct turning direction Note the way the old blades came off and replace the new ones exactly the same way Power Cord If the power cor...

Page 14: ...e not intended for use with this electric tiller cultivator Contact Snow Joe Sun Joe if you are unsure whether it is safe to use a particular replacement part or accessory with your electric tiller cu...

Page 15: ...15 NOTES...

Page 16: ...16 NOTES...

Page 17: ...17 NOTES...

Page 18: ...18 NOTES...

Page 19: ...anty shall be construed as obligating Snow Joe Sun Joe to incorporate such design changes into previously manufactured products nor shall such changes be construed as an admission that previous design...

Page 20: ...snowjoe com...

Reviews: